In this video Tim discusses the importance of the contract.
In a perfect world, and it happened only once during Tim's building career, you should be able to hand a contractor a set of plans, specifications and a CONTRACT and not have to talk to him ever again.
In other words, everything the contractor needs to know to complete the job is included in all three of those documents.
If you have great plans and specifications, the contract can be very very simple.
This video was shot before the advent of the online contractor-homeowner matching services, but it's relevant because you'll use this system to DOUBLE CHECK to make sure you're about to hire the pro.
I remember the first load bearing wall I modified. I was in my early twenties and had never done it before. It was in a massive old home in Clifton, an inner-city suburb in Cincinnati, Ohio.
I was working as a sub-contractor for a remodeling company and knew just enough to be extremely dangerous. Fast forward . . . The house didn't collapse and in fact the enlarged opening I created has not sagged to this day. But I must tell you I had lots of luck that day. All sorts of things could have gone wrong.
Creating archways or openings in bearing walls can almost always be accomplished. It simply becomes a matter of where the loads are going to be concentrated. A typical bearing wall tends to transmit a fairly equal amount of load down to the floor below via the wall studs.
If you decide to create a large opening in the wall, then the loads above the opening must be shifted to the sides of the opening using a properly sized beam. Will a double 2 x 6 be enough? How about a single 2 x 12?
IMPORTANT TIP: The truth is, only experienced carpenters who have successfully installed beams, or structural engineers who are trained to size and specify beams, should make the call. Do not try to conjure up your mystic powers and guess.
They can only do this by visiting your home. During this visit the expert will perform an inspection to look for hidden CONCENTRATED loads above the wall.
Do NOT trust advice from other home improvement websites that have little, or no, information at their About Page as to who's giving the advice.
The cost to hire a registered residential structural engineer is well worth it. Often this person will even draw a small plan showing you how to build the temporary supporting wall.
If you want to install a beam in an existing bearing wall, there are all sorts of tricks and methods. If it is an interior wall, there is a cool way to install a beam without building any temporary support walls.
You need to have access to both sides of the wall into which the beam is going to be placed. All that you do is simply install half of the beam at a time. You make 1.5 inch deep notches at the top of one side of the wall and slide the beam into this recess. Add the king studs at each end of the beam that run from top plate to bottom plate. You then add the jack studs next to the king studs.
These framing members actually support the load from the beam. If the rough opening of the new beam is 72 inches or less, you generally only need one jack stud at each end. Once all of this is in place and the jack studs are solidly supported from beneath, you can take out the remaining old notched wall studs as the weight of the wall will be carried by the one half of the beam that is secure and in place.
Be sure to have the second half of the beam already cut and ready to slide in place!
Hiding a Beam
Let's say you want to remove a wall in between two rooms but you want the ceiling to be smooth just like in the two rooms. You don't want a beam hanging down a foot where the wall used to be.
You can install the beam up in the same space as the floor joists and just use joist hangers to connect the floor joists to the new beam.
This will only work if the beam height is sufficient to support the weight that's being transferred to it.
Often you can't do the cool trick I described. Perhaps you are working on an outside wall and want to salvage the wall finish on the exterior side of the new beam. You need to build a temporary wall 3 feet back from the existing bearing wall.
But stop! Before you start to build the wall, you must build the beam and lay it on the floor next to the existing wall. Why? Many a rookie carpenter has built the temporary wall, created the hole in the existing wall only to find out they can't get the beam threaded into the narrow space between the old and temporary walls!
The temporary support wall needs to have a top and bottom plate, and the studs of this wall need to fall as closely as possible under and above the floor and ceiling joists. The studs are cut tight so they have to be tapped in place. I simply add a few toe nails that just penetrate partially into the top and bottom plates. Be careful about ruining finished floors and ceilings!
Masonry Walls
Don't even think about creating an opening in a masonry wall without help from a professional. Masonry walls are very heavy. The weight from steel roof members and floor loads can be enormous.
Often you need to install needles in a masonry block wall to carry the load while you work to install the beam. A structural engineer may also design a temporary beam that bolts to the course(s) of masonry that are just above where the new beam will be installed. You install this temporary beam first, support it well making sure the supports are on solid bearing, then you create your opening.
Remember, always make sure the new beam is in place, it's the correct size and you can easily lift and thread it into place BEFORE you create the opening in the wall. You want to be able to place the new beam with no, or minimal, delay.
Lori Ohaco, who lives in stormy Lincoln, Nebraska, has a challenge.
A light bulb broke in an outdoor fixture and she needs to, well how about she tell you:
"I have an outdoor yard light with 40-watt bulb in it. It has started blowing bulbs every two days.
Some of the glass got broken in a storm. How do I clean out the light socket without killing myself?
I don't know which fuse shuts off the power to this light."
Turn Off The Switch
For starters, you want to turn off the switch that operates this outdoor light. If this light is operated by a 3 or 4-way switch that's problematic because the orientation of the switch - up or down - tells you nothing.
Turn Off All Power
Lori, the safest way to do this is to turn off all the power to your home. There should be a huge master breaker at the top of your electrical panel.
Some homes have the main disconnect in another part of the house or garage. My main disconnect is in my garage on the other side of the wall from the outdoor electrical meter, while my electrical panels are in my basement.
You then have to use a needle-nose pliers to remove the aluminum bulb socket from the lamp base. Watch the following video to see what the aluminum threaded base looks like on a bulb. You'll see me point to it at 1:07 in this video:
You may have to break some glass with the pliers and then bend the aluminum bulb base a little bit to get a good purchase on the base with the plier tips.
Needle-Nose Pliers
Here are the pliers I'd use for this job:
These are fantastic needle nose pliers. I own this exact one. They're also amazing wire strippers too. Well worth the price. CLICK HERE TO HAVE THESE PLIERS DELIVERED TO YOUR HOME IN DAYS.
Pull Up Brass Tab
Once you have the bulb base out of the socket, you need to pull up the brass tab at the base of the socket. (Shown in the photo at the beginning of this column.)
If the brass tab gets depressed by screwing in the bulb too tightly, it can lead to arcing that eats a hole in the bottom of the bulb. This could be why you're burning through so many bulbs.
Once you have all this work done and a new bulb in the socket, turn back on the electricity, locate the fuse or circuit breaker to this outdoor lamp and LABEL it.
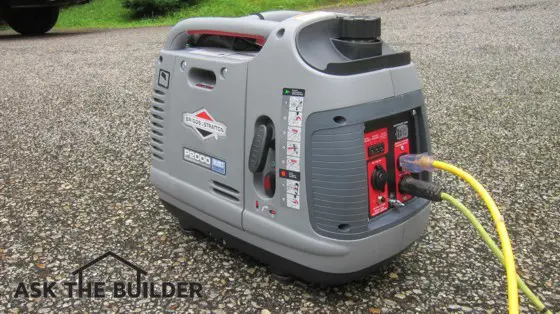
This easy-to-carry electric generator can get you out of a bind in a power outage or make a camping trip or picnic more enjoyable. CLICK THIS PHOTO TO HAVE THIS GREAT GENERATOR DELIVERED TO YOUR HOME NOW. Copyright 2017 - Tim Carter
Portable Electric Generator TIPS
Small generators can do many things but not all at once
DEAR TIM:I've had it with power outages here at my home and I've decided to get an electric generator. I've got several complicating issues.
For starters, my budget is tight. Second, I want this generator to be multi-purpose and take it on family picnics and camping trips.
The generator needs to be quiet. What are my options? Can I satisfy all of my wishes and have clean power that won't hurt my sensitive electronic devices?
What can you tell me about these small generators? Kathleen K., Boulder, CO
DEAR KATHLEEN: I've got great news for you.
Small Generators = Big Benefits
You can get a new portable generator that will satisfy all your requirements! What's more, if you lug in multiple bags of groceries on a routine basis, I believe you'll be able to carry one of the generators a short distance with moderate effort on your part.
As with many things, advancements in technology and micro computers have allowed electric generator manufacturers to produce small generators that produce stable and clean alternating current using an inverter inside the machine. Most new portable generators have an onboard computer that converts the direct current from the generator to a very stable alternating current that will not harm your sensitive electronics and appliances.
My Own Testing
I know this for a fact because in the past two weeks I tested two different portable generators using a sophisticated oscilloscope to measure the quality of the electricity being produced by the generators. Guess what?
Both machines created a more perfect sine wave on the scope than the electricity coming into my home from my local utility!
Size Matters
Here's the scoop on the portable generators. Size does matter.
The bigger the generator, and all it's combined parts, the more power it can produce. If you want portability, meaning a generator you can carry like a five-gallon pail of drywall compound, then you sacrifice total power output.
Hand-Carry = 2,000 Watts
The generators I tested weigh about the same as a pail of drywall compound and produce 2000 watts of power. That may seem like a lot of power, but it's not when you think about the giant standby generator I have next to my garage.
This automatic standby generator comes on automatically if the power fails at my house and will produce 17,000 watts. You can purchase generators that produce far more power than that if you desire. My standby generator weighs hundreds and hundreds of pounds. It's the size of an outside air-conditioning unit.
Large Standby Generator Video
Watch a video about my standby generator.
Tight Budget Means Small Power
Since your budget is tight, you'll probably be able to get one of the 2,000-watt machines. Even though it's power output is not the highest, you can still power many things with it. For example, here's the running wattage of some common tools or appliances:
What I love about the new portable generators is how they automatically adjust the gasoline motor speed in relationship to the power being requested by the devices you have connected. If the generator senses little need for power, then the gasoline motor runs at a lower speed using less fuel and making less noise.
Quite Quiet
The new generators are also very quiet, even when running at full speed. When you take them on a camping trip or a picnic, you'll not have to scream to be heard in a conversation.
Start-Up Power Draw
The issue with small generators is what's called startup power. Certain appliances and tools have a very high starting wattage.
You may have seen this in your home on occasion when a refrigerator, washing machine or air conditioner turns on. The lights in your house may momentarily dim when the electric motors in these things draw lots of power to start spinning.
A portable generator putting out only 2,000 watts can't handle the start-up demand of many things, so you'll have to check into that to see what you can and can't power when your house power goes off.
Frequent Monitoring & Feeding
You'll discover you can use a portable generator at your home in a power outage, but you'll be busy. You'll only be able to power a few things at a time, so you'll be switching out extension cords as you produce your own rolling brown outs within your home.
The portable generators, by default, have smaller fuel tanks so if you have an extended power outage, you'll be refueling on a more frequent basis.
Follow all safety guidelines when refueling a generator and NEVER EVER operate a portable generator indoors, in a garage, near an open window, etc. The carbon monoxide produced by the gasoline engines can and will kill you. Be CAREFUL and read all safety instructions.
Malcom O'Dell, who lives in the land of rainbows and unicorns in Washington, DC, came to my website, saw a column I wrote about portable electric generators - and possibly one about standby generators - and proceeded to take me to the woodshed to bust my chops. Read for yourself:
"Why do you recommend environmentally unfriendly electric generators when for no more money homeowners can buy battery back-up systems that--like the ubiquitous computer UPS backup--instantly restores power with no delay, and can keep basic systems going for hours, even days?
Our family has used these systems in our homes and even large offices for years in developing countries where power goes down routinely. They are simple, cost-effective, and cost no more than a generator.. and they eliminate all the noise and toxic fume pollution of generators.
The batteries charge with a simple trickle charger when power is available from the lines and can be supplemented, for even more environmentally performance, by solar panels. And, with a sizable array of solar panels, the homeowner or office can become substantially or even completely off the grid, never dependent on failing public power utilities.
Time for Tim, Ask the Builder, to look at modern environmentally friendly technology.. and address climate change at the same time.
Can do?"
Home Runs At The Pit
Malcom's soapbox statement reminded me of when I used to play softball with my buddies back in the late 1960's. We played at "The Pit" - the playground behind Clifton School in Cincinnati, OH. I routinely hit pitches over the fence out onto McAlpin Avenue.
Malcom, you just served up a juicy ball that's I'm going to turn into a frozen rope.
The first thing I want to say is I'm in complete agreement with Malcom about the promise of solar. I think the future is extracting clean energy using photovoltaic (PV) panels.
There's going to be some yet-to-be-discovered technology advancement that will cause PV panels to become mainstream. Right now, the average person simply can't make the numbers work to get a payback in a short amount of time.
PV Degradation
The other issue with PV panels is the active photons in sunlight destroy the current panels at a slow rate. Hopefully some future affordable technology will address this issue.
As the panels degrade, they put out less electricity.
Residential Generators
Malcom, the portable generators I wrote about cost less than $1,000 in 2014. The standby generators average about $10,000 installed.
Standby Generator Video
Here's a video showing you the fantastic and reliable Kohler standby generator at my own home.
Massive Batteries For Normal Power
Where in the world can you get a battery backup system that will deliver electricity to a home for " ... hours, even days." as you said for $10,000 or LESS? I'm not talking about a few hundred watts of electricity for hours or days. I'm talking about 2,000 or even 5,000 watts of clean power per hour for hours and hours and hours.
Malcom, are you aware how the power that comes through the lines and enters the batteries' trickle charger is made?
Most commercial power in the USA is made with FOSSIL FUELS. I believe that's your complaint with regular generators - that they use "Unfriendly" environmental liquids.
My guess is you use them - as many of us do - each day when you drive to work, the grocery store, etc.
Possibly More Efficient
Now granted, the massive power plants are probably more efficient at producing a kilowatt of electricity per Btu of fossil fuel than the portable or standby generators, but then there's that pesky voltage loss over the power lines that extend from the power plants to your home and office.
Toxic Mining Tailings
Oh, don't forget the mine tailings from all the mines in the third-world countries where the elements are clawed from the Earth to make the magical batteries you so love. My guess is all the rivers in the area of the mines are poisoned with heavy metals that leach from the mine tailings.
Air Pollution From Smelting!
I almost forgot the air pollution from the smelting process! Once the rocks have been mined for the batteries, they have to be smelted - melted - to extract the lithium, nickel, cadmium, etc.
I doubt those smelters in those third-world countries have all the scrubbers on them that are mandated by our EPA. I guess Mother Nature removes all the pollution out of the air via rain before they'd ever float over us here in the USA.
Time To Help Others
I'm sure I've forgotten something or other major points, but I need to scoot to answer other questions from other AsktheBuilder.com visitors.
If you want to continue the discussion, feel free to do it in the comments below.
Simple light fixtures that you find in basements and garages usually have different colored screws where you attach the wires.
You want to put the HOT black wire on the brass screw and the neutral white wire on the silver screw.
If you do it backwards, you'll energize the threads inside the socket and if you touch the threads on the bulb as you screw it in, you could get ZAPPED!
Silver Screw = White Neutral Wire
Put the white neutral wire on the silver screw.
Ground Wire = Green Screw
Put the bare ground wire on the green screw. If no green screw, attach it to the box if it's metal. If it's a plastic box, just tuck it back into the box away from the fixture screws to prevent a short.
Robert and Sharon need some light on their front porch in Florence, KS.
"We bought a older ranch house that doesn't have a front porch light or switch.
How can we add one? And where would we get the power source from?"
Well, this is an open-ended question to be sure!
Type Of Construction
There are so many variables. It is a solid masonry house? Is it a simple frame home with an open basement where it's easy to fish a cable up into the wall next to the front door?
Location of Light
Is it acceptable to have the light on the wall right next to the door, or do you want it in the ceiling of the porch away from the house's exterior wall?
Here's a typical remodeling box you'll probably use for the light switch.
This is a box made to install in an existing wall. See the flip-up tabs that lock behind the drywall? CLICK THE PHOTO NOW TO HAVE THIS BOX DELIVERED TO YOUR HOME.
Simple But Hard Steps
You add one by extending a new electric cable from an outlet or the electric panel to the new switch location. This cable can originate from a wall outlet near the door.
Wall outlets have continuous hot wires and a neutral and that's all you need to get a porch light to work.
A typical porch light will only have a 60-watt bulb in it so there's little chance the new light will overload a common room circuit.
How To Steps
Determine the box you'll get the power from
Extend a proper-sized two-wire cable with ground from this box. Use a 14-gauge wire.
Put cable in new switch box near door.
Extend another two-wire cable from new switch box to new porch light fixture box.
Watch following video to see how to wire it all up
Watch this video to see how to connect the wires to a simple switch that will turn the porch light on and off.
Fishing New Cables
Depending on how your house is built, extending these cables and installing the boxes can range from easy to very difficult.
I'd simply get quotes from three different electricians and have them describe exactly how they intend to solve the problem and have the finished product meet your goals.
DEAR TIM:I’m about to buy a digital multimeter to troubleshoot all sorts of electrical issues around my home. I’ll be blunt.
Do you own one, and if so, which one? What do you like about the one you have?
There seems to be a huge difference in these handy devices and I’m very confused as to what to purchase.
I know you can’t tell me everything about these, but can you go over what I can use one for around the house and why there is such a huge disparity in pricing of these tools? Randy P., Akron, OH
DEAR RANDY: I sure can understand your confusion when looking at these products.
Many Different Multimeter Models
If you visit an online retailer that shows all of them next to one another, they pretty much look alike, but the difference in price from the lowest to the highest can vary by 25X or more! It’s natural for you to wonder if there can be such a huge difference inside the tool.
Guess what? the answer is yes. When it comes to digital multimeters you get what you pay for.
I've Got Several
Over the years, I’ve accumulated quite a few digital multimeters. I started off with a beginner's model from Radio Shack.
It’s smaller than a deck of playing cards and has somewhat limited capabilities. I could go on and on about the detailed electrical specifications of multimeters, but it would probably make your head explode.
What you need to know is that you should get one that’s durable, one that can handle any electrical appliance at your home and one that has a pedigree. The more expensive multimeters can do more.
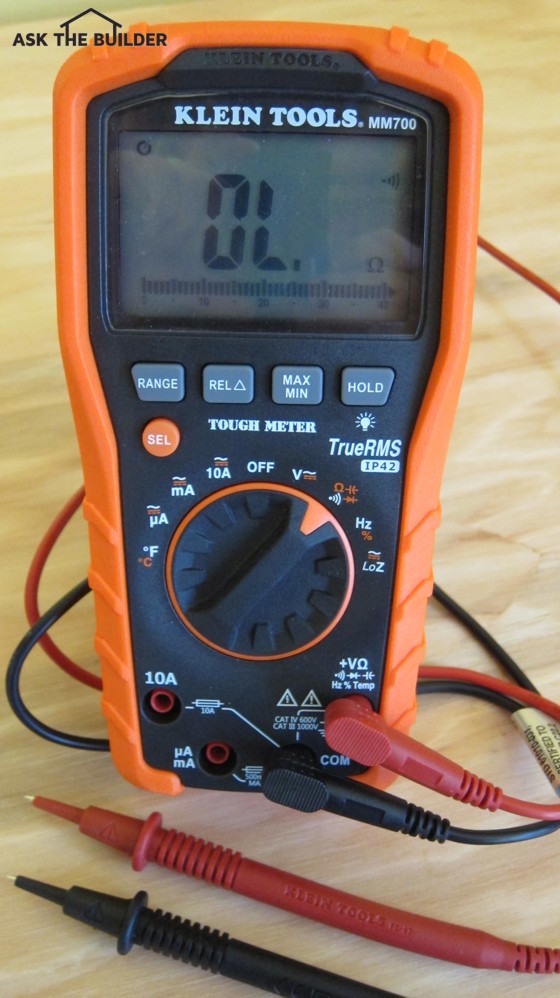
This is one of my multimeters. This one is PERFECT for homeowners. A professional electrician might want a more robust one, but this one will do almost all an electrician could ever want. CLICK THE PHOTO NOW TO HAVE THIS MULTIMETER DELIVERED TO YOUR HOME.
Klein MM700
The digital multimeter I’m now using is a sleek Klein Tools MM700. As you might expect it’s robust and has a full feature set that would impress professional electricians,
HVAC technicians and anyone who tinkers with electronic devices.
Auto Ranging Feature
What I really like about this one is it’s an auto-ranging multimeter. This means it will automatically detect what you want to measure without you guessing the approximate value. I strongly recommend an auto-ranging multimeter for homeowners like you.
Continuity Checkers
Perhaps the most useful thing you’ll do with your new digital multimeter is to check what we call continuity. This refers to checking to see if a wire or circuit is continuous or unbroken.
Here’s a simple example of this. When I take a quarter or a piece of metal, turn on the multimeter, insert the two probes into the proper holes on the tool and touch the quarter with the probes, I hear a nice tone and I see a measurement on the screen. This tells me electricity is flowing through the quarter or metal between the two probes.
Klein MM700 Video Review
Watch this simple video to show a few features of the Klein MM700 Multimeter.
OL = Open Loop
If I had performed the same test but substituted a piece of wire that had a break in it, I would have not heard a thing and my meter would have displayed “OL”. The audible tone in many multimeters is very handy because you can concentrate on what the probes are touching and get the information you need with your ears in some cases.
Jobs For Multimeters
Here’s a few things an auto-ranging multimeter can do around your home that could save you the cost of a service call from an electrician. First things first, when you get your multimeter stop and read the instructions, especially the safety warnings.
Let’s say you have an old-fashioned low-voltage doorbell and it’s not working. You can use the multimeter to see if you’re getting power up to the doorbell switch. If you don’t register power coming to the switch, then you can use the multimeter to check for a break in the wire from the transformer or up to the doorbell.
3-Way Switch Issues
Often people mess up the wires that connect to a 3-way switch. They go nuts trying to figure out what wire connects to what screws on the odd switch. Once again, the multimeter will save you an expensive service call.
You can use it to discover the continuous hot wire that feeds the first switch. Once you know this, it’s pretty easy to get both switches wired the right way.
Bulbs Still Good?
Here’s a simple task many overlook. You can use a multimeter to check to see if light bulbs are burned out.
Realize the small glob of solder at the base of a bulb is connected to one end of the filament. The other end of the filament is connected to the aluminum threads at the base of the bulb.
Turn on the multimeter, touch one probe to the solder glob and one to the threads and check for continuity. If the bulb is still good, you’ll hear a tone if you have my multimeter!
Check Voltage
The most common use you may put the multimeter to is to check for live voltage at a switch or an outlet. Follow the instructions that come with the multimeter and avoid working with live circuits.
You can turn off the circuit breaker that provides power to an outlet and then check to see if it is energized. I can do this easily with my MM700 as it has removable shields so the probes can get into the slots of a standard wall outlet. If you’re unsure how to do this, consult with a pro.
Broken Switches
Let’s say you think a wall switch or dimmer switch is broken. The multimeter can tell you in a jiffy it still works. Disconnect the switch from the power source and use the continuity tester function.
If the switch is in the on position and you don’t hear an audible signal or readout for continuity, then the switch is probably defective.
Check Car Alternator
If you like working on your cars, a multimeter is invaluable. The alternator on my son’s car went bad and in minutes I used my multimeter to confirm the alternator was not producing the needed power to keep the battery topped off.
Check Surface Temperature!
One thing I love about my Klein Tools MM700 is it also can test the surface temperature of something. It has a really wide range from 0 - 1,500 F! There are countless things around your home you may want to know the temperature of, and most would fall within that range.
Tough & Rugged
I also love how durable my MM700 is. It can handle drops from just over 6 feet and sustain no damage. Remember, read the instruction manual that comes with your new digital multimeter!