Flagpole Tips

The American Flag

Be patriotic. Display an American Flag at your home. CLICK THE PHOTO OF THE FLAG NOW AND HAVE ONE DELIVERED TO YOUR HOME IN DAYS.

Flagpole Tips

I wrote the column about flagpoles as a result of the tragic September 11, 2001, terrorist attacks on our country. Within days of the events, I was flooded with emails from people just like you who were flush with renewed patriotism.

I think it is wonderful and am so happy that so many people have decided to install a flag pole to fly Old Glory.

"Both Buildings Are Going to Collapse"

Firefighting happens to be a hobby of mine. The morning of the attack my wife frantically called down to my office and told me to come upstairs and look at the live TV coverage.

I knew that firefighters were rushing to the scene and I knew they were going into both buildings to rescue people and try to extinguish the fires. But I also knew something else.

I knew both Trade Center Buildings were going to collapse. I said that within a minute of seeing the rerun of the video of the second plane striking the second World Trade Center building.

The structural steel that supports the buildings was severely damaged. Load bearing columns were ripped out by the planes. Other columns had the fireproofing material scraped off. It was just a matter of time before the steel would soften and collapse under the weight of the floors above.

But yet, I knew that firefighters and police officers were climbing the stairs knowing the same thing. They were in a race trying to cool the steel before the collapse would happen. As we know, they lost both races. And we lost hundreds of heroes.

Free & Fast Bids

CLICK HERE to get FREE & FAST BIDS from local handymen who can install a flagpole for you in one day.

Some Flagpole Facts

The wind exerts a very strong force on flags. Simply hold up a flag on a windy day and you will see what I mean.

This means that poles need to be sized for the wind speed and for the size of the flag(s) to be flown on the pole. Tall poles need to be large diameter to offset the pull of the wind.

Be sure to match your flag to the size of the pole you buy or make. Most good flag pole manufacturers have sizing charts to help you do this.

telescoping flag pole

Here's a telescoping flag pole. It's perfect for most homes. CLICK THE PHOTO NOW TO HAVE THIS DELIVERED TO YOUR HOME IN DAYS.

In-Ground Pole Drainage

If you decide to do a ground-set pole be aware that the sleeve needs to be able to freely drain collected rain and ground water. If it can't do this, then the pole may rust away over time.

The danger is that the pole can weaken over time and blow over and hurt you or someone else. You can minimize corrosion by making sure the pole is not surrounded by water.

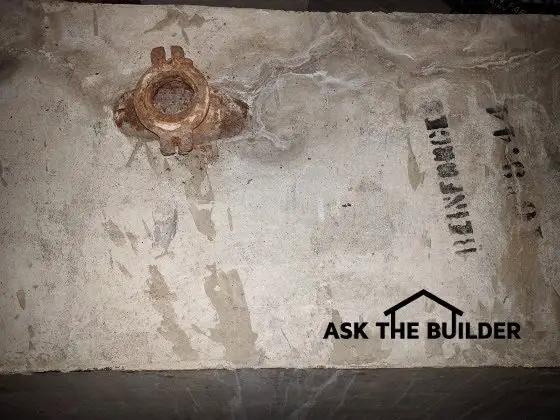
Cut slots in the bottom of any pole sleeve. Set the sleeve on a metal plate and have it welded if possible.

This sleeve sits on a poured concrete footer. Before you pour the concrete that holds the sleeve in place, pour three inches of washed gravel on top of the footer. This is done after the sleeve is in place.

Any water that goes down around the pole drains into the sleeve, exits the sleeve through the slots and then passes through the gravel to the soil. The concrete is simply poured on top of the gravel and it will not clog the gravel passageways. This drainage is very important. Don't overlook it as you build the foundation for your pole.

CLICK HERE to get FREE & FAST BIDS from local handymen who can install a flagpole for you in one day.

Homemade Flagpole Parts

If you are on a tight budget there is no reason why you can't make a pretty nice flagpole on your own. The most challenging parts to get are the truck (flagstaff cap) that sits on top of the pole and the sleeve that is placed in the ground. In reality, only the sleeve may present a problem for you.

Different Truck Designs

The truck I saw that works perfectly for a homemade flagpole was sold at a local flag shop in Cincinnati, OH called Flaggs U.S.A.

At this store, I held in my hand a cast aluminum truck that would fit perfectly over the end of a 2 inch diameter galvanized iron pipe.

The cost was about $20.00. If you decide to look at other truck assemblies, you must determine if they fit inside a tube or over the end of the tube.

It makes a big difference! The ones that fit inside a pipe or tube must fit very snugly or you will have all sorts of problems. The one that I saw has mounting bolts that you tighten around the outside of the flagpole pipe. Once tight, the truck will not move on top of the pole. The manufacturers listed below also sell truck parts.

The Sleeve

In the column about flagpoles, I tell you to make a sleeve with a steel plate base. This makes it easy to install the sleeve but the plate is not necessary.

You simply need a pipe sleeve that has an inner diameter slightly larger than the outer diameter of the flagpole pipe. This pipe can rest on the concrete footer at the bottom of the hole.

The challenge is to keep it plumb as you pour the concrete. One method is to tap a slightly oversize square peg into the end of the sleeve. This peg can stick up about a foot or so.

Then extend two pieces of wood over the hole in the shape of the letter X that are nailed to the square peg. Drive stakes into the ground and nail the X pieces to the stakes once the sleeve is plumb.

CLICK HERE to get FREE & FAST BIDS from local handymen who can install a flagpole for you in one day.

Column B381

May 23, 2017 AsktheBuilder Newsletter

Last Thursday my youngest daughter Kelly helped me finish installing the dock here at the lake. It lifts up and down like a castle drawbridge that crosses a moat.

You have to lift the dock out of the water in the fall so the lake ice doesn't destroy it. Cedar wood panels that create the walking surface need to be lifted out, carried up some steps and set on a patio for the winter. You reverse this process in the spring.

It was a HOT day, with the temperature pushing 92 F. Just five days earlier, on Mothers Day, it was 36 F and raining.

You gotta love New Hampshire WX! Today and tomorrow are going to be perfect diamond days with temperatures at 72 F and sunny skies.

My oldest daughter Meghan, just to the right - see her photo?, coined the phrase diamond day. When the sunlight reflects off the small waves in the lake, they look like thousands of twinkling diamonds.

My Trex Transcend Deck

Last summer was consumed with me rebuilding two massive decks and constructing a new giant deck that's slightly lower than my upper deck. Here's a photo I shot in the fall.


Today after sending out this newsletter to you, I'll be starting to finish the project. Cold WX set in and I couldn't finish the deck.

I have to build a very cool set of platforms and built-in bench between the two decks you see in the photo above.

I'll be shooting lots of photos of this aspect of the project as it might create some inspiration for you. I'm a huge fan of multi-level decks for a number of reasons.

In my case, I wanted the new deck to be lower so when you sit on the upper deck in the chairs with the yellow cushions you get an unobstructed view of the lake.

CLICK HERE to see how to best clean a wood or composite deck. You know I'm always trying to look out for you!

High-Quality LED Flashlight - LOW Price!

I published a review yesterday of a new Coast LED flashlight I had the chance to try out.

This is a very cool one because it's got a rechargeable lithium-ion battery as well as a conventional alkaline battery pack.


Do you need a laugh? Most people need more humor in their lives.

I BEG you to CLICK HERE and read the expanded captions under each photo in the review. By the time you get to the last photo, I'll bet I've put a grin on your face.

If not, I want you to email me and let me know.

Prevent a FIRE at Your House

There are over 100 electrical fires per week in the USA. Many of these fires can be prevented by you. People DIE in these fires.

To prevent many of these sinister fires, all you have to do is install a few special AFFORDABLE circuit breakers in your electrical panel.

Here's what one of them looks like:

These special circuit breakers can SENSE a SHORT CIRCUIT and arcing in a switch or outlet BEFORE it turns into a fire.

My friend Steve should have had these breakers in his home. If he had, he would have prevented the fire he had but CAUGHT IN TIME before it did lots of damage.

He and his wife might have died had this fire broke out when they were asleep. Thank God they were in the house and near the switch that melted.

CLICK HERE to see what happened to Steve's dimmer switch.

CLICK HERE to read more about circuit breakers and this special arc-fault breaker that will protect you and your family!!!

How would you like to get FREE & FAST BIDS from local electricians who can come over and install these breakers in your home in just MINUTES?

Yes, it takes about two minutes to remove an existing circuit breaker and install this new arc-fault breaker.

I'm serious. You can get FREE BIDS - no obligation at all.

CLICK HERE to get the Free Bids that could save your life.

Roofing Ripoff Book Update

Today I'm supposed to get my proof of the PRINTED paperback Roofing Ripoff book.

If the printing process recreated in atoms what I saw in the digital PROOF, and I feel it will happen, then I click a button at Amazon Create Space and the book is instantly available for purchase by you.

You're in for a treat because my book designer, Ms. Sheridan Stancliff, took a suggestion I offered up and made it so much better.

It's at the bottom of just about each page of the book. I've never seen this done before, and I have to tell you in color it's stunning.

I'll send out a SPECIAL announcement to let you know if you can finally purchase a paperback version of the book.

You can get a PDF or Kindle version NOW if you want.

CLICK HERE to get a digital copy RIGHT NOW.

BIG ANNOUNCEMENT - Pay Attention!!!

Here's the big announcement about the book you need to know about.

If the statistics I uncovered while researching the book are accurate, you may be one of the eight out of TEN subscribers to this newsletter that have an asphalt shingle roof.

Or maybe one is on the light commercial building you work in or own.

Are you one of the 8 in 10?

If so, you don't necessarily have to read the book but you DO NEED something up on top of your roof I'm now selling.

I'll share what you need when I tell you the paperback is available.

Watch for that imminent announcement.

Suffice it to say that each day you wait to install what I'm selling you're one day CLOSER to WASTING THOUSANDS of dollars.

Yes, your inaction is going to cost you THOUSANDS of dollars.

CLICK HERE if you want to get an idea of what Roofing Ripoff is all about and to download the first three chapter for FREE.

That's enough for today. I need to get outdoors on the deck.

Tim Carter
Founder - www.AsktheBuilder.com

Do It Right, Not Over!

Coast HP8R LED Flashlight Review

Coast HP8R LED Flashlight

Here it is. She's a beauty. If you misplace it, I guarantee you'll never get it back. CLICK THE PHOTO NOW TO HAVE ONE DELIVERED TO YOUR HOME NEXT WEEK.

Coast HP8R LED Flashlight

I've had more flashlights than I care to remember.

Thirty years ago, I remember the craze swirling around the aluminum Mag flashlights.

They were the belle of the ball in the early 1980s as it was introduced in 1979.

I owned several and I have to admit, they were a vast improvement over the unreliable flashlights of old.

Fast Forward

It's hard for products to stay at the top. Such is competition.

In my opinion, Coast has far surpassed Maglight. Yes, there are lots of LED flashlights out there, but when you hold a Coast flashlight in your hand, you'll admire every part of it.

They're very well made. I LOVE the ones I own.

Specifications

I don't waste my time copying and pasting all the specs for products. I concentrate on the subjective aspects of the tool and judge it against all that have come into my hands before it.

If you want the specs on the Coast HP8R flashlight, CLICK HERE.

Coast HP8R LED Flashlight

The barrel of the flashlight is the perfect diameter for me. It's got a handsome knurled finish grip. Great on wet nights when you're in the graveyard. CLICK THE IMAGE NOW TO MAKE ALL YOUR FRIENDS JEALOUS. YOU'LL HAVE THE BEST FLASHLIGHT AROUND.

Coast HP8R LED Flashlight

I didn't want to fully grasp it or I'd cover up the great logo. Believe me, it's going to fit in your hand, especially if you're a woman that wants lots of light but not a monster flashlight. Note it's got a slide focus for wide light or a tight beam. You can lock that function so it doesn't move. CLICK THE PHOTO NOW AND HAVE THIS FLASHLIGHT AT YOUR DOORSTEP IN JUST DAYS. LIGHT UP THE NIGHT AND CREEPY BASEMENTS SCARING AWAY ALL GOBLINS.

Coast HP8R LED Flashlight

This is a rechargeable flashlight!!! It comes with a wonderful lithium-ion battery pack as well as one that holds four AAA batteries as a backup in case you deplete the lithium-ion pack. Very handy! CLICK THIS PHOTO RIGHT NOW. ORDER IT AND WIPE THE GRIN OFF YOUR FACE.

Coast HP8R LED Flashlight

It's BRIGHT. Blinding bright. CLICK THE PHOTO NOW AND BE THE BRIGHTEST BOY OR BELLE ON YOUR BLOCK! IT WILL BE DELIVERED BY A SPECIAL COURIER.

Coast HP8R LED Flashlight

It's hard to take photos at night showing what it can light up. Your local airport might want to have you on a list of people to contact if they need you to replace the visual approach glidescope lights to help planes land in a power outage. CLICK THE PHOTO NOW. JUST BUY THE DARN FLASHLIGHT. RESISTANCE IS FUTILE.

Coast HP8R LED Flashlight

You get the charger that has a mini USB plug on it. This is the same plug that usually is for most Android cell phones and many other electronic items. CLICK THE PHOTO NOW. GET OUT YOUR CREDIT CARD.

Coast HP8R LED Flashlight

You use this case on your belt to transport the HP8R to its assigned duty. It's best to put the flashlight in the case with the lens facing the sky. Just do it that way and worry about other things. ARE YOU SERIOUS? IT TOOK YOU THIS LONG TO DECIDE TO BUY IT? CLICK NOW. QUANTITIES ARE LIMITED SERIOUSLY!!!!

CLICK HERE TO ORDER THIS MAGNIFICENT LED FLASHLIGHT.

Belt Sanding Tips Video

Belt Sanding Tips

Hi, I'm Tim Carter and I want to show you how to use a belt sander to take the finish off a piece of furniture or a piece of wood.

The problem I have right now is it is about 47 degrees outside. I wanted to use a chemical stripper, but the instructions say the working temperature should be between 60 and 80 degrees. Well, I have to get the job done, so I am going to treat this the same way you would refinish a hard wood floor.

All a contract does that sands hardwood floors is he just uses his sander with different grits of sandpaper. Let's get started.

Free & Fast Bids

CLICK HERE to get FREE & FAST BIDS from local painters that can do the sanding for you. You've got more important things to do!

Right now I have 60-grit sandpaper on the belt sander. It's pretty rough and it is going to really good job to make the initial cut through the finish.

Wait!! Before we get started, there is an important tip. If you don't know this, you will probably ruin the piece of furniture. You don't just put the sanding machine down on the surface and hold it in position.

Not only do I have to run the sander back and forth slowly, but I also have to move it in a circular motion. Doing this ensures that you don't cut a line or a pattern in the surface.

Let me show you. Well you can see that it does a great cutting into the finish. In just a matter of seconds, the finish has been removed and it is down to bare wood.

Common Belt Sander Uses:

  • sand peach fuzz from recently cleaned wood decks
  • sand small patches of hardwood flooring
  • sand flat slab doors and large baseboard
  • sand any larger flat surface

So now to finish the job, is to do the entire top with that first pass with the 60-grit sand paper. Then go back and do it over with different grit sandpapers - 80 grit, 120 grit, etc. - getting finer each time until the table top is as smooth as a piece of glass.

And that's how you can take a finish off a piece of furniture.

CLICK HERE to get FREE & FAST BIDS from local painters that can do the sanding for you. You've got more important things to do!

Referenced in the November 20, 2012 AsktheBuilder Newsletter.

How to Stain Wood

How to Stain Wood

Stain wood sample here. This piece of wood had a wood conditioner applied to the left side. An equal amount of stain was applied over the entire piece of wood and wiped off immediately. The conditioner saved the day and allowed the gorgeous grain to show through! Copyright 2018 Tim Carter

"I continued to ruin gorgeous pine trim because I did not understand that softwoods must be treated with the utmost care when they are stained."

How to Stain Soft Wood Checklist

DEAR TIM: I have to stain some white pine woodwork in my home. In the past, I have had nothing but problems when I stain wood.

The color is not even, the grain disappears and colors are much darker than in the sample brochures. I must be doing something wrong. How can I get professional results from start to finish when staining woodwork? Sandra B., Westland, MI

DEAR SANDRA: I see you have the softwood blues.

I Blotched Up Staining Pine Years Ago

I used to get into this same funk many years ago when I first started in the construction business. Imagine my customers' reaction when I transformed beautiful white pine woodwork into a blotchy mess.

My initial diagnosis was the wood had not been sanded well enough. But I still had problems when the wood was as smooth as glass.

I continued to ruin gorgeous pine trim because I did not understand that softwoods must be treated with the utmost care when they are stained. Staining pine is not easy to do, that is if you want it to look perfect.

Free & Fast Bids

CLICK HERE to get FREE & FAST BIDS from local painters who can apply a wood conditioner to your softwood.

What Kind of Cell Structure do Softwoods Have?

White pine, alder, spruce, and fir are softwoods that have a very open cell structure. They readily absorb massive amounts of stain, much more than you and I want them too.

Hardwoods such as oak, poplar, cherry, and walnut are much different. Their dense cellular structure makes them harder and because of this, there are simply fewer voids for the liquid stain to penetrate.

A suitable comparison might be comparing two different pieces of paper. A paper towel readily absorbs water drops while a drop of water may sit for minutes on the surface of glossy paper used in many decorative coffee tables books.

How Do Professionals Pre-Treat Softwoods Before Staining?

Professional painters and woodworkers use a clear wood conditioner to partially block many of the wood pores. These conditioners are easy to apply and dry rapidly.

Pre-Stain Wood Conditioner

Here's a very good clear wood conditioner. Always do a TEST on a scrap piece of wood to ensure you like the results. CLICK THE IMAGE TO ORDER SOME NOW.

Often you can brush them on the piece of wood and stain it within fifteen minutes. The liquid conditioners contain clear resins and solids that clog the pores of the softwoods.

By doing this, many of the stain pigment particles that create the actual color are not allowed to soak deeply into the wood. The conditioners also help to enhance the grain of the wood.

How Long Should the Conditioner Dry?

Read the label on the can of the wood conditioner. It will list the dry time. If it's humid, extend the drying time at least an hour, maybe two.

The wood conditioner needs to be completely dry for maximum performance.

Wood Conditioner Video

Watch this video to see how easy it is to apply a wood conditioner.


CLICK HERE to get FREE & FAST BIDS from local painters who can apply a wood conditioner to your softwood.

How Important is the Sanding Process?

Sanding is extremely important when staining wood. Roughly sanded wood exposes more surface area that allows too much stain to soak into the wood.

When you take the time to use progressively finer and finer grit sandpaper that eventually produces a glass-like surface, you minimize the surface area of the lumber. You may start out with 100-grit paper, then switch to 150-grit and finish with 220-grit. Aluminum oxide sandpaper self-sharpens as you work.

Be sure you have a scrap piece of the wood you intend to stain. Sand it just as you would your finish pieces of wood. You're going to condition and stain your test piece first.


Sandpaper

Here's an assorted pack of aluminum oxide sandpaper that will do a great job on softwood. CLICK THE IMAGE TO ORDER IT NOW.

Taking the time to fine sand until the wood surface is super smooth also is the foundation for achieving a silky surface after the final coats of finish are applied.

When Do You Apply the Wood Conditioner?

After you have sanded the wood and removed all dust, apply the clear conditioner. Pay attention to the instructions as they often instruct that any wood treated with the conditioner should be stained within two hours.

The conditioner usually has the consistency of water and it's very easy to apply. You'll see it soak into the soft wood.

Is It Best to Do a Stain Wood Practice Run?

Grab your test piece of wood and get ready to stain it. Do NOT be impatient and stain the finished pieces. If you make a mistake, it's hard to correct it.

Apply the stain and work it in well with a rag or brush. Wait perhaps 30 seconds and wipe off the excess stain. All too often people make a mistake by either rubbing too hard or they use a rag that is saturated with stain.

IMPORTANT TIP: The depth of color you see the moment the stain is wiped off is generally what the woodwork will look like after the clear finish is applied.

The key to successful wood staining lies in practice. Make sure the carpenter saves all wood scraps. Use these scraps for test samples. Not only will they allow you to select the correct stain color, but you can also use the scraps to see what happens if you leave the stain on for 10 seconds, 30 and even two minutes.

Always keep a wet edge when staining. Never stop staining a piece of wood halfway down its length. Work yourself into a corner if you must stop for lunch, a break or the end of the day.

Wood Stain Video

Watch this video to discover a little-known staining trick.

Be sure the stain dries before you proceed. Depending on the temperature and humidity, this could take 24 hours.

The stain is dry when you take a dry finger and rub it with medium pressure across the wood. If the wood is smooth, not tacky, and there's no color transfer to your finger, the stain is dry.

If you try to rush the job, the clear finish can lift stain from the wood and the result is a blotchy mess.

What's a Great Clear Finish?

Your choices for clear finish coats are many. Lately, I have become a huge fan of water-based clear urethanes.

They're easy to apply and dry rapidly. When I use these, it is not uncommon to apply two or even three coats of finish in the same day. That can be a huge time saver.

I prefer to use water-based urethane. I like it because it doesn't yellow over time when exposed to light.

polyurethane

I've had excellent results with this clear water-based urethane. It dries FAST. CLICK THE IMAGE TO ORDER SOME NOW.

When working with any clear finish, be sure to check the work as you apply the finish. If you apply too much clear finish, it may sag or run in spots.

After you apply the finish to a vertical surface you have a window of opportunity of perhaps five minutes when you can correct these errors with your brush instead of waiting for the finish to dry and then sand out the defects.

You'll get the best results doing a light sanding in between coats of the clear finish. Sand with 220-grit paper. You don't have to press hard.

CLICK HERE to get FREE & FAST BIDS from local painters who can apply a wood conditioner to your softwood.

Column 497


DIY Acrylic Shower Walls

acrylic shower walls

Installing do-it-yourself acrylic shower walls can be easy so long as you select the right acrylic shower set! (C) Copyright 2017 Tim Carter

DIY Acrylic Shower Walls TIPS

    • Many different models and types to choose from
    • Some acrylic showers have thin walls that need lots of work to install
    • Wall studs must be plumb and not bowed
    • Shower base must be level and installed in wet setting compound
    • CLICK HERE to Get Tim's FREE & FUNNY Newsletter!

    DEAR TIM: I’ve had it with ceramic tile in my shower. It’s hard to clean and I love the sleek look of some of the modern acrylic shower units.

    I want to do this job myself so the install needs to be DIY friendly. What’s been your experience with these easy-care shower units?

    Would you be kind enough to share some installation tips so I don’t goof this up? Alice W., Xenia, OH

    DEAR ALICE: I can hear you loud and clear about ceramic tile care.

    Stain Solver Cleans Tile

    Oxygen Bleach

    Stain Solver is MADE in the USA with USA ingredients that are food-grade quality. CLICK THE IMAGE to order some NOW.

    When I was younger I seemed to have plenty of energy to wrestle with cleaning tile and grout.

    I did discover years ago that using Stain Solver certified organic powdered oxygen bleach made the job easier and less smelly.

    You mix the Stain Solver with warm or hot water, stir until the powder is dissolved and put the solution into a spray bottle.

    I'd just spritz the dry tile and grout every 15 minutes and at the end of an hour I'd scrub. The Stain Solver has no odor like nasty toxic chlorine bleach.

    But I no longer have to deal with cleaning tile because I just switched out all the showers in my home to acrylic with the last install just days ago.

    I've Installed Many

    As you might expect, I’ve installed countless acrylic tub and shower units over the years as I’ve been a master plumber since before I was 30 years old. I’ve discovered much to say the least.

    The best news in my opinion is the overall quality and design of some units have come a very long way.

    Free & Fast Bids

    CLICK HERE to get FREE & FAST BIDS from local bathroom remodeling contractors who specialize in new shower surrounds.

    Old Hum Drum Acrylic Showers

    Years ago many of the units were tough to install and those made for remodeling were humdrum. Just last year I installed a stunning acrylic alcove shower in my basement bathroom that was 60 inches wide and had simulated ceramic tile patterning formed into the side panels. I loved the built-in molded shelves for soap, shampoo and razors. This unit was very easy to install.

    shower unit

    This is the shower unit I installed in my basement bathroom. It was very easy to do. Very DIY friendly!

    Many of the available acrylic units come with their own sleek shower doors that are built to fit perfectly if you follow all the instructions. Just last week I installed a frameless clear tempered glass shower door on a corner shower unit in my own master bathroom. You’d think it would be hard to work with glass panels, but it wasn’t at all.

    Read Install Instructions Before Buying

    There’s a big big difference between the actual acrylic shower systems in the marketplace. While they may all look the same or similar in the showroom, you need to compare the plastic materials and look behind the panels to tell the difference.

    The unit I installed last year in my basement bathroom featured a proprietary solid composite material made with resins, fiberglass and filler. It’s extremely durable and is much stiffer than the acrylic material I installed in the past two weeks in my master bathroom.

    Some Need More Studs

    My basement bath alcove shower unit didn’t require any extra wall studs because on the back of the composite fiberglass walls there were reinforcing fins that acted like miniature I-beams. Believe me, the walls are very rigid and don’t flex at all.

    On the other hand, the three-piece corner acrylic shower I just installed for my wife in our master bathroom was made with a thinner acrylic that had no fins and required quite a few strategically placed wall studs to support the walls. This unit also required you to use a special tub-surround adhesive to help hold the wall panels to the studs so they don’t flex back and forth like the bottom of an old oilcan.

    tub surround adhesive

    Here's the tub surround adhesive I had to use in my master bathroom. CLICK THE PHOTO NOW TO HAVE THIS DELIVERED TO YOUR HOME. NO TRAFFIC HASSLES!

    Avoid These Mistakes

    Here’s a list of the top things I feel you need to consider when working with acrylic shower units. You can’t afford to make a mistake at any stage. Some mistakes can cost you lots of extra money if you have to purchase new panels.

    Before you buy a shower unit, download and carefully read the written installation instructions. Judge for yourself if you possess the skills and tools to install that particular unit. Pay close attention to the requirements for wall framing and think about how you’ll ensure all the wall studs are where they need to be for the side nailing fins and faucet location.

    CLICK HERE to get FREE & FAST BIDS from local bathroom remodeling contractors who specialize in new shower surrounds.

    Shower Base Support

    Most DIYrs make a grave mistake installing the shower base. Pay extremely close attention to this part in the written instructions. Almost all units require that the base be set in some sort of wet plaster or mortar. What’s more, it’s absolutely mission critical the shower base be perfectly level in all directions if you’re installing the factory-provided shower door kits.

    The reason the bases must be set in a wet plaster is so the bottom of the shower doesn’t move when you stand in it. If the acrylic flexes at all it will eventually crack and you’ll get leaks. I’ve discovered over the years that I get the best results using a dry-setting joint compound that sets up in 90 minutes. I mix it so it’s the consistency of warm cake icing.

    dry setting joint compound

    This is the dry setting joint compound I prefer. It mixes easily with water. Use COLD water to slow set time. Mix until it's like warm cake icing. CLICK THE PHOTO NOW TO HAVE THIS DELIVERED TO YOUR HOME. NO NEED TO FIGHT TRAFFIC AND RUDE SHOPPERS.

    The wall studs on the edges where the shower doors are to be installed must be perfectly plumb. Don’t overlook this step because you’ll pay the price when you go to install the shower door at the end of the job. You can’t grind, trim or change the size of a piece of tempered glass!

    Rookies often ruin acrylic wall panels when cutting the hole for the shower faucet. The error may be based in poor measuring skills. Just remember that you can enlarge a hole but you can’t make one smaller.

    I’ve found that it’s best to cut the hole with a high-speed spiral saw. This is an affordable tool that drywall installers have used for decades to cut holes in drywall for electrical boxes.

    RotoZip tool

    This is an amazing tool invented decades ago. It cuts holes in drywall accurately and FAST. CLICK THE IMAGE NOW TO ORDER ONE. Get EXTRA spiral bits.

    The bits that come with these tools have cutting edges on the sides of the bit. You drill a small 1/4-inch hole in the acrylic panel, insert the bit, turn on the saw and slowly cut in a counterclockwise movement.

    Rain Head Shower Head

    I think another tip you should consider is using a rain head shower head. I installed one in each of my new showers and LOVE them. My wife loves it too. That's the best part.

    rainhead shower head

    This is just one type of rain head shower head. There are many models and diameters. You may have to pipe with 3/4-inch pipe if you get one 10 inches or more in diameter. CLICK THE PHOTO NOW TO HAVE ONE OF THESE BAD BOYS DELIVERED TO YOUR HOME BY NEXT WEEK. NO TRAFFIC HASSLE OR DEALING WITH RUDE AND SMELLY CUSTOMERS.

    In my basement shower, I actually hung it from the ceiling! So if your ceiling height in your shower is about 7-feet tall, consider having it come straight down instead of using the special shepherd's crook shower arm that comes out of the wall.

    CLICK HERE to get FREE & FAST BIDS from local bathroom remodeling contractors who specialize in new shower surrounds.

    Column 1197

Circuit Breakers Types

Circuit Breakers

This switch looks somewhat normal, except for the soot around the edges. Too much electricity flowed through it, the switch MELTED and started to burn. CLICK THE PHOTO to read the story of what happened and HOW TO PREVENT IT. Wait until you see the back of the switch! (C) Copyright 2016 Tim Carter via anonymous friend contribution

Circuit Breakers Types TIPS

DEAR TIM: I'm getting ready to add some electrical wiring in my house. I know that I need to install some extra circuit breakers. What are the different types of circuit breakers?

How do circuit breakers work and just what do they protect? Second, will circuit breakers protect extension cords? Katie D., Traverse City, MI

DEAR K.D.: If you haven't worked with household electric that got 240 volts of power before, I want you to be careful.

It Will Bite You - Can Be Deadly

Standard residential electricity (120/240 volt) is dangerous. You must treat it with the utmost respect. People are killed on a daily basis by electrocution and fires which result from improperly installed wiring and electrical devices.

Also, as you progress with your work, be sure it is inspected by your local inspection authority.

Circuit Breaker Fire Prevention Video

The huge house fire in this video could have been prevented with a simple special circuit breaker. Don't let your house BURN!

What Are Circuit Breakers?

The conventional circuit breakers you're getting ready to install are wonderful devices. They're basically automatic switches that disrupt the flow of electrical current in the event of an overload.

Free & Fast Bids

CLICK HERE to get FREE & FAST BIDS from local electricians who will stick their hands in the panel to install breakers!

Meant To Protect Wires

The sole function of basic circuit breakers, believe it or not, is to protect the wiring that runs from the circuit breaker panel to the various switches, outlets and fixtures. Conventional circuit breakers will not protect you from electrocution, nor will they protect equipment from voltage surges.

More Current = More HEAT

The electrical wiring in your house can be easily damaged by having too much electricity flow through it too fast. As electricity flows through a wire it generates friction.

This friction, in turn, generates heat. It's possible to generate enough heat to melt the insulation on the wires.

Wires without insulation, when crossed, have a tendency to generate sparks. Sparks seem to have a tendency to cause fires.

Bi-Metal Strip For Heat

Virtually all residential circuit breakers have two independent methods which allow them to automatically switch off or trip. The heat, we just spoke of before, can trip a breaker.

When too much heat is generated, a small piece of bimetal inside the breaker begins to bend. This bending force causes the breaker to switch off.

This property works well to protect the wiring when electrical demand slowly builds.

Electric Short Circuits

However, wiring some times short circuits. These short circuits occur when two wires touch each other and generate sparks.

Short circuits like this allow massive amounts of electricity to flow through wiring very quickly.

Small electromagnets within the breakers sense this flow and instantaneously switch the breaker off before the insulation covering the wires begins to melt.

CLICK HERE to get FREE & FAST BIDS from local electricians who will stick their hands in the panel to install breakers!

Types Of Circuit Breakers

Here are samples and photos of the types of circuit breakers you'd find in a typical residential home like yours:

15-amp-circuit-breaker

This is a standard single pole circuit breaker. It's 15 amps and they come in various amperage ratings. It's for a single 120-volt circuit in your home like controlling some wall outlets and maybe a few ceiling lights or a bath fan. CLICK THE PHOTO NOW TO SEE MORE BREAKERS AND TO HAVE THEM DELIVERED TO YOUR HOME NEXT WEEK.

double pole breaker

This is a double pole 30-amp breaker. Note it's double the width of the single pole breaker. It takes up two spaces in the electric panel. It's for a 240-volt circuit in your home. You'd find a breaker like this controlling the power to your electric clothes dryer. CLICK THE PHOTO NOW TO SEE MORE DOUBLE POLE BREAKERS AND TO HAVE THEM DELIVERED TO YOUR HOME.

20-amp-tandem-circuit-breaker

This is an unusual breaker. It's a tandem breaker that controls two different circuits but only takes up the space of a normal single breaker. You can use this breaker if you start to run out of space in your panel. CLICK THE PHOTO NOW TO SEE MORE TANDEM BREAKERS AND TO HAVE THEM DELIVERED TO YOUR HOUSE FASTER THAN YOU CAN SAY "SPARKS! RUN AWAY!"

GFCI-and-CAFCI-circuit-breaker

This is perhaps the MOST IMPORTANT circuit breaker you could have in your home. It's a combination GFCI and a CAFCI breaker. This is the type that CAN SAVE your life and PREVENT FIRES!! CLICK THE PHOTO NOW TO ORDER THESE LIFE-SAVING BREAKERS SO YOU DON'T BECOME A STATISTIC.


Extension Cord Issues

Electrical wiring, extension cords, and breakers are manufactured to withstand certain amounts of electrical current without damage. The standard by which they are measured is amperes or amps.

You probably have a few dangerous extension cords in your home that are made with 16-gauge wire. These can handle just 10 amps. Electrical currents passing through this wire in excess of 10 amps can cause catastrophic failure to the wire.

IMPORTANT TIP: What happens if you have this cord plugged into a 15-amp circuit?

If you are powering something that's calling for MORE THAN 10 amps, the cord insulation can MELT and catch FIRE. You need to use extension cords that have their own built-in breakers!

Extension Cord With Built-In Breakers

extension-cord-with-breaker

Here's an extension cord that's got a built-in breaker. If you try to overload it so it would OVERHEAT and catch on FIRE, the built-in breaker SAVES you. CLICK THE PHOTO NOW TO HAVE THIS SAFE CORD DELIVERED TO YOUR HOME.


CLICK HERE to get FREE & FAST BIDS from local electricians who will stick their hands in the panel to install breakers!

Related Terms: outdoor lighting, electricity literature, circuit breakers

Concrete Laundry Tub

Concrete Laundry Tub

This is a great photo of the underside of a concrete laundry tub. This drain assembly just needs to be cleaned of the rust and painted with a rust-inhibitive paint. Copyright 2017 Tim Carter

"I believe the reason they're so strong is that the manufacturers decided to make the concrete mix quite rich adding a small amount of extra Portland cement."

Concrete Laundry Tub Checklist

  • Concrete laundry tub is fantastic. Do not get rid of yours! Valuable!!
  • Contain high amounts of Portland cement and wire mesh reinforcing
  • WATCH concrete epoxy video below
  • Use Stain Solver oxygen bleach to deep clean concrete
  • CLICK HERE to Get Tim's FREE & FUNNY Newsletter!

DEAR TIM: I have a 1938 Cape Cod stone house with a behemoth laundry sink in the basement. It appears to be made of concrete, soap stone or something similar and has two giant tubs.

It's supported by a steel stand that's in pretty good shape with some minor rust. Can you identify it?

How long have these sinks been around? How can I clean and restore it?

Also, the faucet holes aren't standard size or distance can I fill and drill new ones? Chris R., Lexington, KY

DEAR CHRIS: You bet I can identify it.

Among other things, I'm a master plumber and I've owned and moved several of these monster sinks. Believe it or not, you're the proud owner of a collector's item. You've got a marvelous precast concrete laundry tub that's nearly indestructible.

When Were Concrete Laundry Tubs Invented?

Concrete laundry tubs were invented and displayed for the world to see at the 1867 Paris Exposition.

Who Invented Concrete Laundry Tubs?

A man by the name of Joseph Monier invented concrete laundry tubs. He was a gardener who started making steel-reinforced concrete tubs and pots because he was dissatisfied with clay and wood pots that would fall apart.

concrete laundry tub

This is a magnificent concrete laundry tub that’s stood the test of time and can serve many future generations once cleaned up. Copyright 2017 Tim Carter

Free & Fast Bids

CLICK HERE to get FREE & FAST BIDS from local handymen who can restore your sink if you can't handle it.

Is Concrete Strong?

Concrete is strong when you try to compress it, but if you try to stretch or bend it, it's weak. Steel is exceptionally strong if you try to stretch it.

You can make beams, columns, suspended slabs, bridges, boats, and even laundry tubs when you combine the concrete and steel in the right configuration!

Have you Used These Sinks?

The house I lived in from age 2 until 22 had a double-basin concrete sink. This concrete laundry tub was just on the other side of the wall from where I slept.

I was lucky enough to have concrete laundry tubs in the first two houses I owned. As you might imagine, they came in different models with one, two or three sink basins. The sinks weigh hundreds and hundreds of pounds.

Why Are the Concrete Sinks So Durable?

I believe the reason they're so durable is that the manufacturers decided to make the concrete mix quite rich adding a small amount of extra Portland cement.

They added enough Portland cement so the concrete probably tested out at 6,000 pounds per square inch or higher compressive strength.

Years ago when the sinks were made this extra cement, probably only cost the manufacturers a nickel since there's not that much cement volume in each sink. What a wise decision it was!

concrete laundry tub

Here's a closeup shot of the underside of the tub's drain. Remove the rust, paint it, install a PVC tailpiece with a flange and a disposal washer and you're good to go! Copyright 2017 Tim Carter

What Is the Top Lip Material?

It's important to realize the top lip of these sinks is made from steel so the edge won't chip. The workmanship that went into creating each of these sinks is of the highest quality. I've seen hundreds of these sinks in my career and all of them are impressive.

How Do You Repair Cracks and Crumbles?

I feel it's best to repair cracks and crumbled areas with modern concrete epoxy.

A point often overlooked is the best method to restore the sink surfaces.  Use the best concrete-repair epoxy I've ever used, if you want to repair a crack in one of these grand sinks, or fill in a crumbling area.

What is the Best Epoxy to Use?

I've had the best success with the PC-Products Epoxy in a tube. See it just below in the photo? CLICK HERE to have it delivered to your home in days.

pc-concrete-tube

This is a wonderful DIY foundation repair epoxy. I've used it with great results. CLICK THE IMAGE TO ORDER IT NOW.

CLICK HERE to get FREE & FAST BIDS from local handymen who can restore your sink if you can't handle it.

Concrete Epoxy Repair Video

Watch this video to see how to repair cracks in concrete.

How Do You Restore The Steel Stand?

I'd start the steel stand restoration process by removing any rust. If you need a new stand, see below where I talk about hiring a local welder.

CLICK HERE if you want to get FREE BIDS from local welders who'll make a new stand for you.

Use a high-quality paint made to paint steel after the stand is sanded and ready for primer and paint.

spray paint

This is a fantastic spray paint for steel. You can also get it in small cans if you want to brush it on. CLICK THE PHOTO NOW AND HAVE THIS PAINT DELIVERED TO YOUR HOME.

The stand probably was painted black when the sink was new. It could have been a dark gray as well.

How Do You Strip Paint From Concrete?

Use regular paint stripper to strip paint from the concrete surfaces.

Start to remove any paint from the inside of the sink basin walls after you have the steel stand repainted. Remove paint with common paste paint strippers. Follow the directions on the label and be sure the space is well ventilated if you're using a stripper that contains methylene chloride.

What's the Best Cleaner?

I feel the best cleaner for the sink is a low-grade abrasive cleaner.

I would then try to scrub the sides of the sink with Soft Scrub abrasive cleaner. While it's available at most grocery stores, you can CLICK HERE and have it delivered to your home.

soft scrub

This is the infamous Soft Scrub. I've used it for years. It contains very fine silica sand or volcanic pumice as the abrasive. CLICK THE PHOTO NOW TO HAVE THIS DELIVERED TO YOUR DOORSTEP.

Just test it on a small area at first using a scrub brush with stiff nylon bristles. Do not use a wire brush of any type, especially one on a spinning power tool. That will damage the concrete surface in no time.

How Can You Remove Oil Stains?

Oxygen Bleach

Stain Solver is MADE in the USA with USA ingredients that are food-grade quality. CLICK THE IMAGE to order some NOW.

You'll have fantastic results removing oil stains and any organic stains using a powerful oxygen bleach solution. I prefer Stain Solver, a pure white powder you mix with warm or hot water.

It's certified organic, it's Made in the USA with USA ingredients, and it's got the highest percentage of active ingredient that I know of. Stain Solver is non-toxic and has no odor.

Just spritz the sides of the sink with the solution keeping the concrete wet for an hour or more. Don't let the solution dry.

Every fifteen minutes, scrub with the brush and see if you're making progress. If so, keep at it until you get the sink clean.

IMPORTANT TIP: Realize if you use muriatic acid to try to clean the sink, you'll damage the steel lip and you'll erode some of the cement paste that makes the inside of the sink basins so smooth. I'd not recommend using acid at all.

Can You Drill New Holes in a Concrete Sink?

You can drill new holes in a concrete sink that will work for a modern faucet. It's best to create the holes with a diamond hole-cutting saw. Realize you'll have to make certain the blade can cut through tiny steel wire that you're sure to encounter in the concrete matrix.

Diamond hole saws

Diamond hole saws are affordable and there are many to choose from. Always read the reviews and invest wisely. CLICK THE PHOTO NOW TO HAVE THE HOLE SAWS DELIVERED TO YOUR HOME.

Where Can I Locate a Faucet That Uses Existing Holes?

Before you do this radical modification to the sink, please consider taking the time to visit plumbing supply houses where plumbers purchase most of their products. These unique businesses can be found in just about every large or medium city. They rarely advertise, but believe me they exist.

There's a great chance these supply houses will have a faucet that will work using the existing holes in the sink.

Can A Local Welder Help?

If that doesn't work, I'd be inclined to work with a local welder who works in stainless steel. See if he can't fabricate a mount that has holes for modern faucets.

This mount would have small bolts that would allow you to use the existing holes to pull the mount tight to the sink and leave enough space for the water supply lines to feed the faucet.

If your sink needs a new steel base, this same welder can fabricate one in less than an hour using small 1/8-inch x 1-inch angle iron. Be sure there's plenty of cross bracing so the stand will not collapse.

CLICK HERE if you want to get FREE BIDS from local welders who'll make a new stand for you.

Column 1111

Extension Cord Size

This is a beefy 12-gauge extension cord. You can see the 12/3 number on the label. 12-gauge wire is normally rated for 20 amps and 2400 watts, but this one may be underrated because it's stranded wire in the cable. No matter, this cord can deliver lots of juice! CLICK THE PHOTO NOW TO HAVE THIS CORD DELIVERED TO YOUR HOME.

Extension Cord Size TIPS

  • Voltage drops when electric travels long distances
  • Use heavy 12-gauge cords to prevent damage and fires
  • Get cords with GFCI breakers built in
  • Some cords have circuit breakers to prevent FIRES
  • CLICK HERE to Get Tim's FREE & FUNNY Newsletter!

DEAR TIM: My electric hedge trimmer, chain saw and other tools seem to struggle when I use them outside. The size of my yard requires me to use a 100-foot extension cord.

The motor on one tool has already failed after just two years. What's causing this?

Are there new improvements in extension cords that can prevent electric tool failures and other electrical accidents? Susan, Clemson, SC

DEAR SUSAN: The electric motor sensor in your tool was probably caused by overheating.

Low Voltage Ruins Electric Motors

The excessive heat within the motor was very likely caused by low voltage. My best guess is that you are using an undersized extension cord.

Thousands of electric tools die each year prematurely because they are starved for voltage by thin, undersized extension cords. Your other electric tools suffer every time you plug them into that cord.

Free & Fast Bids

CLICK HERE to get FREE & FAST BIDS from local electricians who can help you select the SAFEST extension cord.

Different Wire Gauges

Not all extension cords are created equal. Within the outer insulation of an extension cord you'll find wires that contain different amounts of copper.

Wires that contain more copper can supply your tools with more power. Wire size is measured by the gauge or thickness of the wire.

Smaller Number = More Power / Confusing!

You will often see numbers like 16, 14 or 12 gauge on extension cord wrappers. Believe it or not, as the number gets smaller, the thickness of the copper wire gets bigger!

Thus, a 12 gauge wire can carry significantly more power than a 16-gauge wire. My guess is that your extension cord is a 16 gauge or possibly an inferior 18-gauge cord.

Long Wires = Voltage Drop

Long extension cords can cause excessive resistance and voltage drop. Voltage drop will damage tools.

You can minimize this damage by selecting the proper length cord for the job.

Use Shortest Cord Possible

The best advice is to always use the shortest extension cord possible when powering a tool or device. You may have to purchase cords of varying lengths to power tools. I happen to own cords that range in length from 25 feet up to 100 feet.

CLICK HERE to get FREE & FAST BIDS from local electricians who can help you select the SAFEST extension cord.

GFCI Breakers Built In

You can protect your tools and yourself with many of the new and exciting improvements in extension cords. One of my favorites are the new, short extension cords that contain ground fault circuit breakers.

This 12-gauge cord has a GFCI circuit breaker built into the end where you plug it into a wall outlet. This will protect you in WET situations. CLICK THE PHOTO NOW TO HAVE THIS CORD DELIVERED TO YOUR HOME.

These nifty cords allow you to work safely in damp grass or other locations where you are operating outdoor electrical equipment near water. The ultra-sensitive ground fault breakers, housed within the cord, can sense short circuits before you get shocked. These devices are a must if you work in wet locations.

Here's an extension cord that's got a built-in breaker. If you try to overload it so it would OVERHEAT and catch on FIRE, the built-in breaker SAVES you. CLICK THE PHOTO NOW TO HAVE THIS SAFE CORD DELIVERED TO YOUR HOME.

You can also purchase short extension cords that contain miniature circuit breakers. These cords sense voltage drops in long cords and will cut off the power to the tool before the motor can be damaged.

Soft & Supple In Cold WX

If you're frustrated by stiff extension cords that become unruly in cold temperatures, look for cords that contain rubber in the outer insulation covering. The rubber compounds allow the cords to stay flexible and supple even at temperatures well below 0 degrees F.

This cord has special insulation that allows it to be soft and supple in COLD weather. It also sports an LED in the female end telling you it's plugged in and ready to go! CLICK THE PHOTO NOW TO HAVE THIS WONDERFUL CORD IN YOUR HOME NEXT WEEK.

Have you ever plugged in a tool and had no power? Finding the source of the problem is now easy if you use a cord with a lighted end. A small night-light type bulb is permanently fused in the end of a clear plug end. The cord just above has this feature.

If there is power at the end of the cord, the light glows. You can purchase simple adapters that tell you the same thing if you wish to have this convenience for your existing extension cords.

CLICK HERE to get FREE & FAST BIDS from local electricians who can help you select the SAFEST extension cord.

Column 174

How To Paint Ceramic Tile

Paint Ceramic Tile

Want to know how to paint ceramic tile? As crazy as it sounds you can paint a ceramic tile floor like this. The key is using the right paint and covering the paint with clear urethane. © 2018 Tim Carter

"Apply floor tile paint after cleaning the tile with Stain Solver oxygen bleach. Use a urethane-based paint for best adhesion. Clear coat the paint to protect it."

Revised May 2018

Painting Ceramic Tile TIPS

DEAR TIM: Can you instruct me how to paint ceramic tile? Money is very tight now, and applying ceramic tile paint is the only thing I can afford. Can you paint tile, so it will not peel?

Is there a special ceramic-tile paint? What is an easy way to paint ceramic floor tile, and should I paint the grout? Leslie S., Belleville, IL

DEAR LESLIE: I'll gladly help you discover how to paint ceramic tile. If you've painted walls and even flooring before, you can do this job. The best part is you can really transform the look and feel of a room when you paint ceramic tile.

Can You Paint Tile?

Any ceramic tile can be painted no matter if it is old or new. The most important thing is to make sure the tile is perfectly clean.

Many people ignore the instructions on paint cans. If you take a few moments to read these instructions, you'll discover that they tell you to apply the paint to clean, dry surfaces that are free of grease, wax, dirt, and dust.

CLICK HERE to get FREE & FAST Bids from local painters to paint your ceramic tile.

How to Paint Ceramic Tile

Follow these easy steps to get the best results from ceramic tile paint:

  • deep clean the tile and grout
  • purchase urethane-resin water-based paint
  • add a small amount of flow-control additive to the paint
  • use a low-nap roller and high-quality brushes

What is the Best Tile Cleaner?

Oxygen Bleach

Stain Solver is MADE in the USA with USA ingredients that are food-grade quality. CLICK THE IMAGE to order some NOW.

You can clean ceramic tile with just about any soap, but the more powerful ones often give you a better job. The tile and grout need to be free of all dirt, oil, grease, etc. for the paint to have a chance to bond.

The best tile and grout cleaner I have ever used is Stain Solver certified organic oxygen bleach. It's Made in the USA with USA ingredients.

This is a powder that you mix with hot tap water. You apply a generous amount of the solution and let it soak into the grout.

Millions of oxygen bubbles attack the dirt.

The longer you allow the Stain Solver solution to work on its own, the less you have to scrub.

After a 10 to 15-minute wait, scrub the grout with the excess oxygen-bleach solution. You'll be stunned how much gunk comes out of the grout. After it dries, it should look like new. If you plan to also paint the grout, you must let the grout dry for at least 48 hours.

WATCH this video to see how easy it is to do.

What Floor Tile Paint Is The Best?

The best ceramic tile paint is one that has a urethane resin. The resin in the paint is what allows it to stick to things. Urethane is extremely sticky.

To ensure that the new paint will not peel, you need to use the right paint. In the past, I have had great success with oil-based paint. Pollution laws that address volatile organic compounds (VOCs) in paint make it harder and harder to find oil paints. It's important to realize urethane paint is the next best choice.

Many people also do not like the clean-up process that comes with oil-based paints. You need to use mineral spirits or paint thinner to clean the brushes, rollers and other tools.

Water-based paints that contain a urethane resin make a great ceramic tile paint.

Urethane-fortified paint

Here's a great urethane-fortified paint. That's why on the label it says it's for porches and floors! It's tough enough to walk on so you know it will perform really well on your vinyl siding where no one can walk except squirrels. CLICK THE IMAGE NOW TO have this paint delivered to your home.

Urethane is a very sticky glue, and after all, that is what paint really is - a liquid glue that contains color. You really need a sticky paint to adhere to the glossy surface of most ceramic tile.

Can I Paint Tub and Shower Tile?

Do not paint tub and shower tile. The constant exposure to water and the aggressive cleaning of these surfaces can cause damage to the paint.

There are places where I'd not apply paint to ceramic tile or other glazed surfaces. Don't apply it to ceramic tile that gets wet on a regular basis.

Examples of this are tile surfaces inside a tub or shower area. I'd also not paint the inside glazed surface of a toilet bowl.

You can successfully paint a ceramic-tile backsplash that gets occasional water on it. The ceramic-tile floor in a bathroom can also be painted so long as the water sports in the bathroom don't get totally out of control.

CLICK HERE to get FREE & FAST Bids from painters to paint your ceramic tile.

Should I Clear Coat the Paint?

Yes, it's best to apply a clear water-based urethane to the paint just as you'd apply urethane to a hardwood floor.

To keep the paint on the tile looking like new, you need to protect it. This is especially true if you decide to paint ceramic floor tile. Painted floors of any type work well, and proof of that is any basketball court. Painted basketball courts are created by painting the patterns on the floor, let the paint cure for two days and then coat the entire floor with several coats of clear floor finish.

I've found that the water-based urethanes stay clear for a long time, never yellowing. Price is almost always the best barometer of quality.

Look for a water-based urethane that costs the most money. I've had great success over the years with Varathane Diamond Coat urethane.

Polyurethane Paint

Use this heavy-duty polyurethane to protect the paint. The urethane works just like putting it on hardwood floors! CLICK IMAGE TO ORDER IT NOW.

Can You Paint Grout?

Yes, you can paint grout. The paint will stick very well to the rough grout texture.

As for painting the grout, that's a personal decision. There's no doubt it will make the job easier if you paint the grout the same color as the tile.

If you do want a contrast in color, then you'll be painstakingly taping off the grout lines with the special acrylic masking tape that will not stick to fresh paint.

If you want natural grout and need to regrout, do so before you paint. The regrouting process will damage the freshly-painted tile. Keeping paint out of grout requires great skill and patience.

What is the Best Paint Roller for Ceramic Tile?

I suggest a roller with a low nap to keep bubbles and texture to a minimum.

You can also add products to the paint that allow them to flow well and attain a finish as if they had been sprayed.

Paint Additive

This is a great paint additive you use to eliminate brush strokes. It reduces the surface tension in the paint. CLICK THE PHOTO NOW TO HAVE THIS DELIVERED TO YOUR HOME.

If you have a sprayer, you absolutely can spray the tile. Be sure to protect adjacent surfaces from overspray.

Make sure the urethane you use to protect the paint is applied to a clean dust-free surface. Read the paint-can label to see how soon you can apply the urethane. It is best to let the paint cure as long as possible so it gets nice and hard. This will make it more durable.

CLICK HERE to get FREE & FAST Bids from painters to paint your ceramic tile.

Author's Note: We've received other questions with similar problems or questions. Here's one from E.J. Vincent of California regarding her ceramic tile painting project.

"I want to paint my own design onto ceramic tile, like the ones you would buy at Home Depot. Is there a special ceramic tile paint and sealer I need to use? The ceramic tiles will be incorporated in with the same unpainted tiles on the kitchen cabinet top and backsplash."

Message from Tim: Years ago while researching a column about cleaning decks, I discovered the wonders of Stain Solver Oxygen Bleach. It is perhaps the 'greenest' cleaner I know of as it uses oxygen ions to break apart stains, dirt and odor molecules. There are no harsh chemicals, and it works on just about anything that is water washable.

I decided to create my own special blend using ingredients made in the USA. In fact, the raw materials in the active ingredient are food-grade quality registered with the FDA. I call my product Stain Solver. I urge you to use it to help with cleaning your tile grout. You will be amazed at the results!

Column 723