Gabriele, who lives in Crofton, Maryland, was worried about putting in the wrong bulb in a recessed light fixture.
She wanted to make sure the bulb wattage was safe. Here's what she asked:
"My recessed light housing reads 60-watt bulb maximum. The GE bulb I have says the 75w "uses only 53w."
Since I just can't grasp electricity and watts and watt hours, will you kindly tell me if it is safe to use the mentioned bulb in the mentioned light fixture?
My sincere apologies if this is covered in one of your older Q&A posts. I searched back about six or seven "pages" and didn't find this. However I found other interesting items, though!"
It was very wise of you to stop and think about this Gabriele. Many people don't ask and some become a number in the National Fire Protection Association statistics that deal with fire deaths. Overheating in recessed lights causes many fires and people die.
Here's what you need to know about light bulbs. When a bulb converts electricity to light, it produces heat as a byproduct.
The brighter the bulb, the greater the amount of heat.
Recessed Fixtures TRAP Heat
This is not so much an issue for normal bulbs that are out in the open and can dissipate the heat. The issue with recessed lights is that they're often in confined spaces and some get covered by insulation that traps the heat.
Regular ceiling-mounted fixtures can also be problematic which is why you'll often see insulation between the bulb and the wiring.
Wall Sconces Or Ceiling Lights Can Melt Wire Insulation
If you install a bulb that has a higher wattage than the fixture recommends, the heat can build up and get so great it can melt the insulation on the wires. If this happens, the bare wires can and do arc starting electrical fires.
The good news is that your new bulb should be safe because it's using less than the 60 watts an older-style incandescent bulb would use.
The only other thing I'd check, and this may require a professional, is to be sure you don't have insulation packed around the recessed light fixture.
I get quite a few questions each week about what size extension cord to use.
You may be one that's very worried about safety and electrical fires when using extension cords.
Talk with any seasoned firefighter and they'll tell you that extension cords are quite often the source of an electrical fire. There's a number of reasons why they're dangerous, but paramount is how it's easy for a cord to get overloaded with too much current.
Flowing Current Equals Friction
When a rough rope passes through your hand fast you'll almost always get a rope burn. It's caused by the friction of the rope fibers rubbing against your skin.
When electricity flows through a wire, it creates friction. The more current that goes through a wire, the hotter it gets.
If you want an extension cord to safely handle the load you've attached to it, then it better be big enough.
You have to stop and do a simple calculation as to the number of watts that will flow through the extension cord.
Most bulbs, tools, space heaters, and appliances have the wattage clearly marked on the label.
Can you see how this helps you understand why you trip circuit breakers? If you have a toaster, a hair dryer and some lights on the same circuit and turn them all on at the same time, too much current is trying to flow through the breaker.
Circuit breakers are designed to protect the wiring in your home. When they sense too much current is flowing they SHUT OFF.
It TRIPS on purpose to prevent the wires in the wall from OVERHEATING which in turn causes a fire.
Wire or Cable Size
Above I talked about how larger sized wire can handle more current or heat.
Wire size is stated in gauge to get you even more confused.
A 14-gauge wire is rated for 15 amps or 1800 watts.
A 12-gauge wire is rated for 20 amps or 2400 watts.
A 16-gauge wire or extension cords is usually only rated for 10 amps or 1200 watts.
When you look at the label of a heater, saw or any other electrical tool, you often see how many WATTS it draws. Use the above values to help you size the correct extension cord.
CAUTION: Don't think you can plug in a powerful table saw rated at 2400 watts or 20 amps into a 12-gauge extension cord and all go well.
Why? You may be plugging in the extension cord into a wall outlet that's only rated for 15 amps!!!!!
Wire New Homes With 12-Gauge Wire
This is why I hate to use 14-gauge wire when I wire homes. I always used 12-gauge wire when possible and the customer was willing to pay for the extra cost. It's so nice to know that you have plenty of wattage available on every circuit.
DEAR TIM: Four of the six bulbs in the recessed lighting in our kitchen ceiling keep burning out. I just replaced one and it burned out in an hour. I am using 65-watt bulbs. Our house is only three-years old. Are the bulbs the wrong size? Is there a problem with the wiring? Cory Dixson, El Dorado Hills, CA
DEAR CORY: The problem with the premature failure of the light bulbs has nothing to do with the wattage or the wiring. My first guess is that it can be traced to the person who has installed the light bulbs or previous owners of your home. I think they are twisting them into the socket too tightly.
The flickering of light bulbs in lamps and fixtures can also be caused by bulbs that have been installed too tightly into light fixtures.
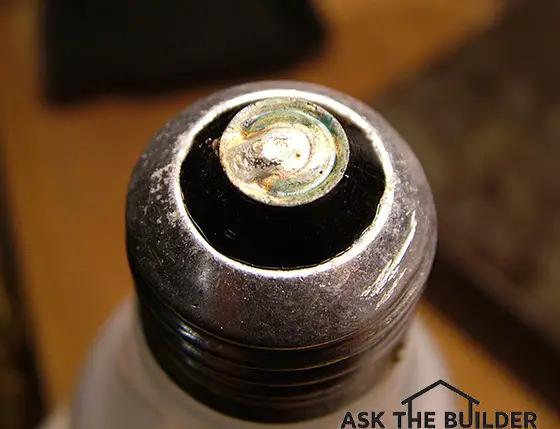
At the base of light fixture sockets you will find a brass tab. This tab is bent at an angle when the fixtures are new and will spring back and forth if depressed slightly. Do not ever stick your finger in the socket to test this, as you can get shocked if the power is on to the fixture.
Take several new light bulbs and inspect the base of each one. You will quickly notice that the bottom of most light bulbs has a small droplet of solder in the center of the base. More importantly the size of this drop of solder is not consistent from light bulb to light bulb. It is close in size, but not always the same size or height.
If the brass tab at the base of the socket does not make firm contact with the bottom of the light bulb, a small electrical arc, or spark, can happen that starts to melt the solder. Over a period of time, the solder can deform and the gap between the solder and the brass tab gets larger.
In some cases, this arcing can create a hole in the base of the bulb causing air to enter the bulb. When this happens, the filament burns out rapidly.
When this happens, the electrical contact between the brass tab and the solder is broken and the light bulb acts as if it has been turned off when in fact the switch is on and the bulb is still in working condition.
Pull Up The Tab
To prevent this arcing you must be sure the brass tab is always at about a 30-degree angle inside the bottom of the socket. People who twist bulbs in tightly will depress and flatten the tab so it does not spring back when a bulb is replaced.
Turn OFF Breaker
If you discover the tab is flattened, then you must turn off the power to the lights, and as an additional safety safety measure, turn off the circuit breaker to the lights.
Use a needle-nose pliers and carefully grasp the sides of the brass tab near the tip of the tab, not where it bends down into the underside of the socket. Slowly pull it up so the end of the tab is about one quarter inch off the base of the socket.
These needle-nose pliers will work great to pull back up the brass tab. CLICK THE IMAGE TO BUY THESE GREAT PLIERS.
When you install a bulb always do so with the power on and the light switch on. As soon as the bulb comes on, only continue to turn the bulb one-eighth of a turn. If you screw the bulb in too tightly, you will once again flatten the brass tab.
You need an excellent pair of needle-nose pliers for this repair. This is a great one. CLICK HERE to BUY it now.
DEAR TIM: I’ve got several pieces of outdoor furniture that need to be sanded and repainted. I’m getting conflicting recommendations from the handyman I know, each supposed expert I talk to at the local national chain hardware stores and the apron-wearing giant big box warehouse sales associates.
All of the different advice creates a cacophony that’s clanging in my head! The last time I did the bench using the advice from one of the big box stores it lasted but two years. I live in the high desert of Arizona and realize that it’s a harsh environment, but shouldn’t I get more than two years out of a finish?
Help me Tim, you’re my only hope. Shirley R., Tuscon, AZ
DEAR SHIRLEY: I hear you loud and clear about the free advice you get from all those experts at your local businesses.
Poor Advice Rampant Across USA
If you had access to my email you’d quickly discover that many others all across the USA are very frustrated with the quality of the advice they receive from the sales associates.
Ask The Right Question!
Here’s the mistake most consumers make when they talk with a sales person at a local hardware store, paint store or giant big-box retailer. They forget that the power is always in the question.
At some point in the conversation with the sales associate you always must ask this very simple and valid question:
“Before you came to work at this fine business, can you tell me what you did professionally to accumulate your knowledge about this product and how’s it’s used?”
It’s a valid question because you’re about to part with your hard-earned money and very valuable time. Why waste both hoping you get the best advice?
If the sales associate says, “Oh, I retired from working my entire life as a paper salesman in Scranton, PA and thought it would be fun to work here.”, then you know what to do.
The same is true if the sales associate is a part-time college student or some other young person. How much life experience could that person possibly have with using products professionally?
Enough about all that. Let’s talk about paints and outdoor wood furniture. I’ve got some very good news for you.
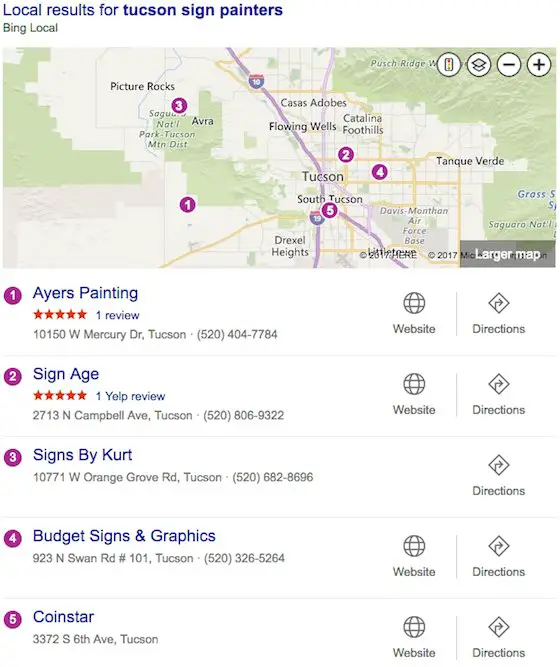
I just went online and searched for Tuscon sign painters. You’ve got quite a few out there.
Here's a common search result for Tuscon AZ sign painters. Don't be afraid. Go talk to them! Copyright 2017 Bing.com & Microsoft Corp.
Pros Don't Gamble
If you want to know the best products for a situation, you go talk with the professionals who’s livelihood depends on the products they have to use in their daily jobs.
How many sign painters do you think would still be in business if their painted signs peeled in less than two years? I’ll answer for you: Not many.
Wood Is Not Easy
First and foremost wood is hygroscopic. This means it swells and shrinks in response to the moisture content in the wood. For you this is not too big of a deal as you have a very arid climate. Your annual rainfall is nowhere near what I have here in New Hampshire.
Paint Is Just Colored Glue
Now let’s discuss paint. Paint is just a film. The chemistry of paints is complex.
One of my best friends in college, John Pendery, got his PhD in chemistry and went on to be a chemist for the largest paint company in the USA. I’ll never forget the day he handed me two very similar chemical formulas. He asked me if I knew what they were.
I said, “No”. His response was, “This one is the formula for common yellow carpenter’s glue. This one is a very common wall paint many paint companies sell.”
Many Paints Have Cheap Resin - Glue
Paint is just glue. It sticks to things. But some paints stick far better than others.
Your local sign painters will attest to that. They’ll also tell you that wood is the hardest thing for paint to stick to because it wants to move.
But it’s not impossible to get lasting results with wood as I’ll wager there are hundreds, if not thousands, of painted wood signs in Tuscon that don’t peel like your wood bench has.
I’ve had remarkable success with modern house paints that are made with a urethane resin. The resin is the glue component in paint. If you have anything indoors that’s got a coat of urethane on it, you know how tenaciously urethane bonds to anything.
Here's a great urethane-fortified paint. That's why on the label it says it's for porches and floors! It's tough enough to walk on! CLICK THE IMAGE NOW TO ORDER IT.
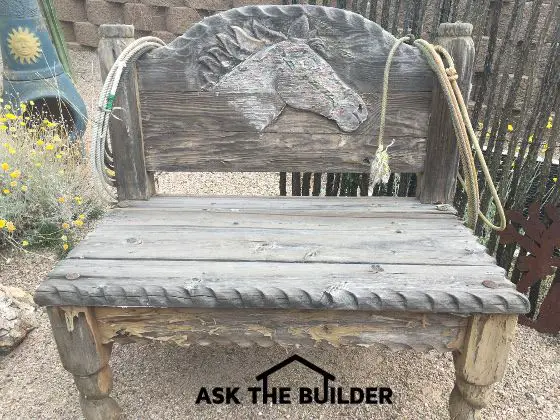
Here’s an outdoor bench that desperately needs to be restored. It sits outdoors in the harsh conditions in Tuscon, AZ. (C) Copyright 2017 Tim Carter
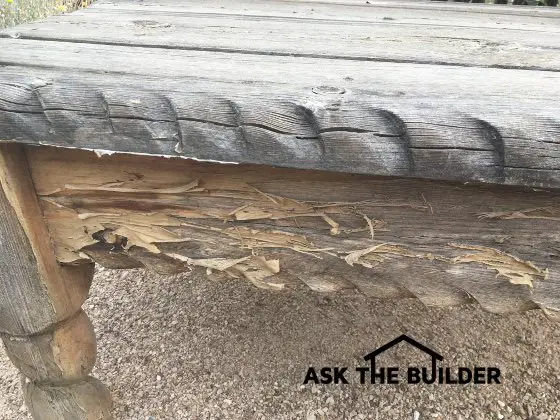
Here's a great example of end grain on wood. This bench leg is made from a log or limb of a tree. The top and bottom of this leg are all end grain. That's what you see when you look at the end of a piece of lumber. You must seal end grain very well with wood that's exposed to the rain. Copyright 2017 Tim Carter
Prep Work Important
Based on the photos you sent, you’re prep work is not going to be that hard since most of the paint has peeled off. Any professional painter will tell you that the success of a new paint job is based on the preparation of the surface.
Remove Sun-Damaged Lignin With Stain Solver
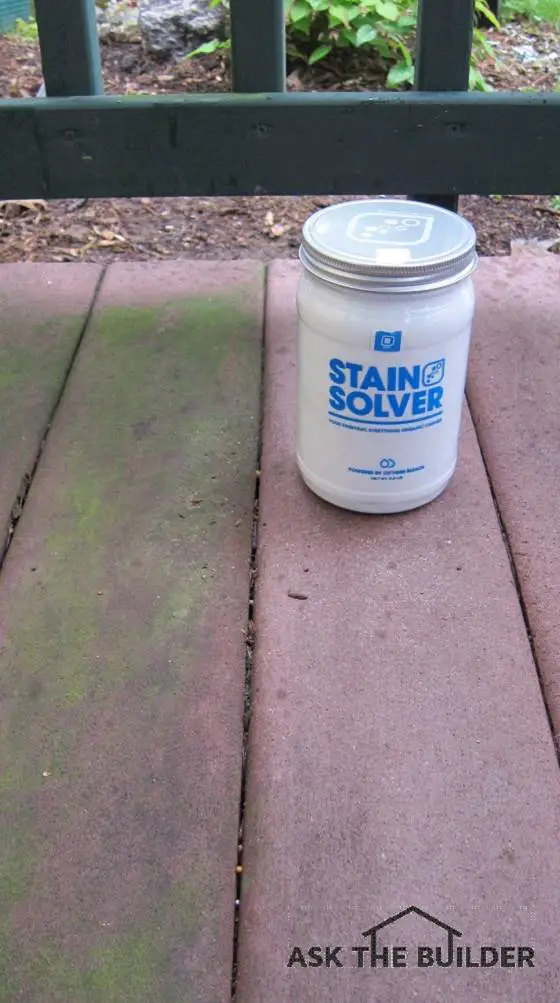
Stain Solver is MADE in the USA with USA ingredients that are food-grade quality. CLICK THE IMAGE to order some NOW.
The first thing I’d do is scrape off all the old paint and get the bench to bare wood. I’d then clean off all the old sun-damaged gray wood lignin using Stain Solver.
It's a certified organic oxygen bleach. Stain Solver is a powder you mix with water. You apply the solution working in the shade if at all possible.
Allow it soak into the wood. Keep the wood very wet with the solution for 15 minutes, lightly scrub with a stiff brush and rinse. The natural wood color will return and the bench will look marvelous.
Sand Off Wood Fuzz
You’ll probably have to sand the wood to remove wood fuzz. Brush off all the dust and then apply any recommended primer that the finish coat paint manufacturer says to use on bare wood.
Be sure to work in the shade. Before priming, fill all cracks with exterior spackling compound and caulk all cracks where water could enter the wood.
IMPORTANT PAINTING TIP: Pay close attention to the recoat time on the primer label. You want to apply the finish coats of paint as soon as possible after the primer allows.
Doing this creates both a mechanical and chemical bond between the primer and finish coat of paint. If you prime the bench and then wait days or a week to finish paint it, you don’t get as good a bond between the coats of paint.
Coat End Grain For Sure
Paint all the surfaces of the bench, especially the underside and the bottom of the legs. You want to completely seal out all water. The end grain of the lumber is where water loves to get in, so those may require threeor more coats of paint.
Please let me know what brand of paint the local sign painters say to use. Be sure to talk to no less than three sign painters!
Years ago, I injured my right heel coaching my daughter's soccer team. It was slow to heal and if I walked on it too much it ached. A hot bath temporarily provided some relief.
I needed to soak in the tub and went to my kids' bathroom as my wife and I only had a walk-in shower in our bathroom.
I filled the tub and relaxed. When finished, I moved the drain lever and absolutely nothing happened - I mean not even the slightest movement of water.
Let me add here I'm a master plumber. I've been one for decades. I know all about blocked drains and why they happen.
Why my kids didn't tell me the tub wouldn't drain is beyond mental comprehension.
I tried to plunge the line and nothing, but black gunk came backwards through the piping into the bathtub. An attempt to snake the line yielded no results.
I had horrible visions of cutting into the living room ceiling to cut apart the piping. I decided to try an off-the-shelf drain cleaner just to see if it would work. My past experiences with these products was not good.
New Thick Product
I went to the store and saw a new product - one that was thick - it claimed it would penetrate right to the clog through the standing water. I thought I would give it a try.
Realize that there are plumbers who specialize in cleaning out drains. It's their entire business. I had no intention of EVER being that type of plumber.
I enjoy installing new piping, or replacing old piping with new. Cleaning out drains? No way.
Secret Weapon - Wet / Dry Vac
Once home, I decided to improve my chances. It made sense to me to concentrate the power of the product by removing the standing water. I bailed the tub as much as possible.
I then fired up my wet-dry vacuum and sucked all the water from the tub and trap. To get the water from the trap, I made sure I inserted a wet rag into the tub overflow. Without this rag, I would have just sucked air through the overflow past the trap water while it remained in the drain.
With the piping clear of all water, I poured in the drain cleaning product and allowed it to sit for 30 minutes as directed.
I then covered the drain opening with my hand and filled the tub with water. I knew that the weight of the water would have a great impact on moving the clog - if the drain cleaner worked.
Once the tub filled, I moved my hand. BINGO! - the drained opened and water rushed out of the tub. I was astonished. I had never seen a drain cleaner work so well so fast.
This experience inspired me to write this article. Here's the product that worked for me:
Yes, I'm a master plumber and used Drano! On some clogs, it does a great job. But so do Oxygen Bleach! Look down below about that! CLICK THE IMAGE ABOVE NOW TO ORDER DRANO GEL.
Gel Drain Cleaners
The thick drain cleaners work better than old drain products because they are stickier. They stay at the clog site longer and thus have more time to dissolve and soften the clog.
The primary ingredient in most of the liquid drain cleaners is regular household chlorine bleach. Bleach can be used by anyone who has their house connected to a city sewage system.
Don't use concentrated chlorine bleach if you have a septic system! The chlorine kills the beneficial bacteria within the septic tank.
Stain Solver is MADE in the USA with USA ingredients that are food-grade quality. CLICK THE IMAGE to order some NOW.
There's another bleach you might not know about. It's oxygen bleach. I happen to love Stain Solver.
Stain Solver is a certified organic oxygen bleach Made in the USA with USA ingredients. It's an oxidizer just like smelly, toxic chlorine bleach.
Stain Solver is also a great drain cleaner. Just pour the powder down into a clogged drain and magic can happen in a few hours.
It works well to dissolve grease, black nasty biogoop, toothpaste and any other organic matter that's clogging the pipe.
The best way to use it is do exactly what I did to clear the clog in my bathtub. Once you've sucked the water out of the drain with a wet-dry vac, then pour 1/4 cup of the Stain Solver powder into the drain followed by one cup of boiling hot water.
Allow it to work for about two hours and see what happens.
Biofilm
Biofilm is gunk that builds up inside pipes. It is basically a glue-type substance that holds clogs together. The liquid drain cleaners do a great job of dissolving this bioflim. Once this happens, solid particles trapped in the biofilm can be flushed through the pipes.
This black goop on the side walls of drain pipes can also create an odor. You know you have biofilm buildup if you run water in a sink, tub or shower and the first seconds after the water goes into the drain a foul odor fills your nostrils.
Foaming Cleaners
Biofilm can buildup on the entire area of the drain pipe. When a pipe is not clogged, drain cleaners used to do preventive maintenance only attack the bioflim the liquid can touch. Here's a great one to use to clean your piping system:
This is a foaming cleaner. You want to really read the instructions on how to use it. I'd pour it in and then not put any water down the drains for hours. Probably before going to bed. CLICK THE IMAGE NOW TO ORDER SOME.
This is why the new foaming drain cleaner is exciting. The foam fills up the entire pipe - when used according to directions - and attacks all of the biofilm buildup. At this time, only one manufacturer - Drano - offers this foaming drain clog product. I intend to try it tonight on my tub drain to clean any clog that might have been missed in my first successful attempt.
Enzyme Cleaners
Enzyme drain cleaners eat the biofilm. If your drain is completely clogged, these cleaners are not the thing to use. You will need a powerful drain cleaner or a mechanical snake. The enzyme cleaners are perfect for septic systems and for preventative drain cleaning work. Use them on a regular basis in all systems before you get a solid drain stopping clog.
The enzymes work best in lukewarm water - perfect growth conditions for bacteria. They also need time to work. Use them when you don't plan to drain things down the pipes. If you pour the enzyme into your system and then brush your teeth, do laundry, dishes or use the toilet, you simply flush the cleaner down the system. Follow directions!
The Old-Fashioned Snake
Not too long ago I had a clog develop in my own home. It was a buildup of toilet paper caused by a malfunctioning low-flow toilet that was only discharging 1.5 QUARTS of water with each flush. I'm a master plumber and I HATE the low-flow toilets and feel the government should not force them on people like me that do NOT NEED THEM.
I live in a rural area on a well. Each time I flush my toilet and that water is sucked from my well, the exact same amount is put back into Mother Earth. No water is being wasted.
Rant is over. Sorry.
I cleared my clog in my main drain pipe under my concrete basement slab in about 45 SECONDS using an inexpensive traditional snake.
You can buy them in different lengths and here's the exact one I got. They are CHEAP!!!!
Buy one now and have it ready to go when you need it.
Here's the exact simple drain cleaning snake I used to clear my clog. CLICK THE IMAGE NOW TO HAVE THIS DELIVERED TO YOUR HOME.
Clog Prevention
Once the clog is gone and the drain is working well you can prevent clogs by just forcing lots of water into the drain at one time.
For toilets, have two people in the bathroom with filled 5-gallon buckets. Flush the toilet and as most of the water is just about to leave the bowl BOTH people need to empty the buckets AS FAST AS POSSIBLE at the same time.
Pour as much as possible so the bowl doesn't overflow. This huge surge of water fills the 3-inch drain pipe to the max.
This giant slug of water has tremendous energy and it blasts out of the way any small buildup of crud, toilet paper, etc. keeping the drain wide open.
Fill sinks and tubs full with water and pull the plug to get the same effect on small-diameter drain pipes.
What Doesn't Work?
Forget about using the liquid drain cleaners for clogs in laundry drains. Why? Most laundry drain clogs are lint buildup caused by clothing fibers.
These fibers are not dissolved by the liquid drain cleaners. Capture washing machine lint with an old panty hose. Prevention is the best medicine for laundry drain clogs!
This past week I've been struggling working on a remodel job here at my own home because I've been lame.
Not lazy lame, physically lame.
I'm installing a new three-piece American Standard corner shower and a new vanity and sink in our master bathroom.
Last Sunday, I was on my knees all day - yes, I was using knee pads - tearing out the concrete mud tile base and the old shower threshold.
When on your knees, you may have a tendency to bend your toes like I do. The next day I had no soreness or issues at all.
I woke up on Tuesday morning and my right foot was hurting. It was pain near the base of my big toe. It got worse as the day went on and by dinner, I was in severe pain and could barely walk.
I'm pretty much convinced, based on the symptoms, it was gout. What's odd is I don't fit the profile of the primary causes of this condition.
I don't drink alcohol. I don't smoke. I don't eat the crazy meats like liver, kidney, etc. that are high in the chemical compound that trigger gout. Finally, we rarely have red meat here at the Carter Casa. Eating lots of red meat can trigger gout so the experts say.
I iced my foot, I did all sorts of stuff and made no progress as the days wore on. It was so tender that the weight of a thin top sheet felt like my foot was being stabbed by fifty knives.
Finally, I decided yesterday to try to treat the symptoms with pineapple juice. My good friend Jim Cluett said to soak my foot in Epsom salts.
I did both yesterday and woke up this morning in great shape! I have minor discomfort but the swelling is gone and I can walk normally!
Here's to pineapple juice and Epsom salt!
My mom was one of the first women pharmacists in the state of Ohio back in the early 1950s. She swore that Epsom salt is the universal healing soaking solution. She also swore swabbing sore throats with some red lava solution was a smart thing to do, but that's a story for another day.
I remember her making me soak my feet in a warm solution of Epsom salts for all sorts of problems. I hadn't done it in years.
DEAR TIM:Well, now I've done it. My newlywed wife has lost all confidence in my home improvement skills.
She wanted me to install a dimmer switch in our dining room and now the chandelier only works half the time. There are two switches in the room that control the light.
They worked fined before I started the job. But now, you can only get the lights to come on at one switch. Can you use your super powers and help me out of this mess so she lets me touch a putty knife in the future?
What did I do wrong and how in the world do these crazy 3-way switches work? Brad G., Hamilton, OH
DEAR BRAD: I'll never forget the day I almost lost all my home improvement privileges from my new wife.
Sparks A Flyin' - Many From My Wife!
We'd been married about three years and I was replacing an ivory wall receptacle in our kitchen with a white one. Kathy said, "Shouldn't you turn off the circuit breaker before you do this?" I responded, "No, that's only if you don't know what you're doing."
Seconds later, there was a flash and small droplets of molten copper and steel made burn marks in our new gleaming white laminate tops. Kathy was furious and has never let me live that mistake down.
I was too lazy - and cocky - to go down to turn off the breaker. Believe me, you make that mistake just once. I was very lucky to avoid electrocution and serious burns.
If it's any consolation, you're not the first person to goof up the wiring a set of 3-way switches. It's easy to do if they're not marked and most electricians never mark the wires. What a shame, because it would only take a few moments to do this.
What's more, I routinely get emails from rookie electricians who tell me they don't understand 3-way switches. They LOVE my 3-way switch video as it explains exactly how to wire them flawlessly.
3-Way Switch Video
Watch this video to see how easy it is to wire up two 3-way switches.
Railroad Track Switches
I had an interesting thing happen this past summer to me that really helps me explain how 3-way switches work. I became a certified train conductor working part time on a scenic train in New Hampshire.
Part of my training included being a fireman on the train. When you're a fireman, you have to throw the switches to allow the train to go on different tracks.
When the train approaches a switch, it's going to go down one track or the other depending which way the switch is oriented. The same is true inside a 3-way switch.
Send Current Down One Wire
If you look at the first 3-way switch that's connected to the wire that leads back to your electric panel, you can see why the light goes on or off. If you flip the switch one direction, you stop the electricity from entering the rest of the switch circuit.
If you flip that first switch so the light comes on and then walk over to the second 3-way switch and flip it, the light goes off because you have oriented the switch so the electricity can't travel down the wire that's connected to the chandelier. It's caveman simple when you think about it.
Here's what you need to know to get back in your wife's favor and to get the chandelier working perfectly. First, turn off the circuit breaker that powers this circuit. Don't be bold like I was all those years ago.
Four Wires
Inside each box you should discover four wires that connect to each 3-way switch. One wire at one of the switches is the continuous hot wire that is getting electricity from your circuit breaker panel. At the other switch box there's a wire that goes to the chandelier.
At each switch box you now have three remaining wires. One wire might be bare copper or have green insulation on it. This one is the ground wire and connects to the green screw on the 3-way switch. The remaining two wires are called travelers and simply extend to the other 3-way switch.
Compare Dimmer To Old Switch
Look at your new dimmer switch or a new 3-way switch. You should notice four screws, two on each side.
One is green, that's the ground screw. One screw is black and the other two are brass colored.
Magic Black Screw
The black screw is the important one. You connect the continuous power wire to this screw in the one box and in the other box you connect the wire that goes to the chandelier to the other black screw of the second 3-way switch.
The Travelers
The leftover wires in the box connect to the two brass screws. These are called travelers by electricians.
It doesn't matter which of the wires connects to each of the brass screws. Do this and your chandelier will work perfectly again.
Find The Hot Wire
The issue you'll have is determining which of the wires at each box is the one to connect to the black screw. If you use a simple multimeter that can tell you voltage and continuity, this will be child's play. You also need a voltage pen. This is a cool device you point at a hot wire and it tells you it's HOT! Save sparks!!!
I own this multimeter. It's PERFECT for a homeowner. It will do all you ever need. This kit comes with a voltage pen too!! WOOT! CLICK THE PHOTO NOW TO HAVE THIS DELIVERED TO YOUR HOME NEXT WEEK! MAGIC!
Using the multimeter at the one box will allow you to discover which of the wires is the continuous hot wire that has power when the circuit breaker is on. Mark this wire once you determine this.
Continuity Testing
You can then use the multimeter's continuity tester along with a scrap piece of wire that stretches between the two switch boxes to determine the two traveler wires. By connecting the scrap piece of wire to one of the wires at the other switch the tester will tell you if you have continuity. Once again, mark the wires with a T1 or T2 telling you they're the travelers. Do this in each box. The remaining wire in the second box is the one that leads to the chandelier. It's easy!
Oxygen bleach was used to remove the algae from the decking boards on the right. Photo Credit: Tim Carter
"The good news is that it's easy to remove algae. The better news is that once you have your patio, deck or roof free of algae, you can do something to STOP algae from coming back."
DEAR TIM:My house must be a magnet for algae. I have green algae on the shaded parts of my deck, it's on my patio and on my vinyl siding. Furthermore, I believe there's black mildew on my siding.
Then there's the roof. I have black streaks of algae up there. How can I safely remove the algae from all these surfaces without harming me, my pets and my plants? I've heard I should use bleach, but something tells me that this is not the right approach. What would you do? Caroline B., Jackson, MS
How to Remove Algae at My Own Home
DEAR CAROLINE: I have some algae issues at my own home.
I have two decks, one on top of another. The lower deck has lots of shade which is a perfect place for algae to grow.
I also have algae coating stone steps on my property. I work at keeping them clean because when wet, the algae-covered steps are like walking on wet ice. They are so slippery! You, I, and millions of others suffer from algae around our homes.
The good news is I developed a non-toxic certified organic cleaner that's SAFE to use on all exteriors surfaces. It gets rid of algae in no time and will NOT HARM any vegetation, fish in ponds, or our earthworm allies in the soil!
This algae cleaner is called Stain Solver. I've got much more about it below.
The good news is that it's easy to remove algae. The better news is that once you have your patio, deck or roof free of algae, you can do something to STOP algae from coming back.
More on that far below. Keep reading, because you have to clean the algae first.
What is the Best Algae Cleaner?
Certified organic oxygen bleach is the best algae cleaner if you care about the environment and your plants and trees.
Do NOT use chlorine bleach or any product that says on the label it contains sodium hypochlorite. That's the fancy name for chlorine bleach. Chlorine bleach will KILL all the vegetation around your home.
The first thing you might find interesting is there's more than one type of bleach. For many years growing up, I thought bleach was bleach.
My mom used to buy those white plastic bottles of smelly chlorine bleach for years to use in our laundry. She would save the bottles, rinse them out and then fill them with water in case the water main broke outside our house. It was a big joke around our home, but my mom always was prepared!
Much to my surprise I discovered, about seventeen years ago, there's at least one other bleach - oxygen bleach. It does many of the same things chlorine bleach does, but it's not toxic.
Where Can I Get Oxygen Bleach?
Oxygen bleach is the preferred bleach to use on the exterior, and interior, of your home because it will not harm you, your pets or your plants. My favorite oxygen bleach is Stain Solver. It's made in the USA with USA ingredients.
IMPORTANT TIP: Stain Solver is certified organic. Most of the other oxygen bleach products out there are NOT certified organic.
Chlorine bleach, on the other hand, is highly toxic to plants, humans and animals. It's so powerful that it will remove the color from wood decking and it can discolor painted exterior surfaces much like it takes out the color from fabrics.
Is Stain Solver Safe for Plants, Wood & Color-Safe?
Stain Solver is MADE in the USA with USA ingredients that are food-grade quality. CLICK THE IMAGE to order some NOW.
Stain Solver will not take the color out of your wood decking, your vinyl siding, your painted surfaces, or your roof. Stain Solver is a powder you mix with water.
Once mixed with warm or hot tap water, all you get is more water, oxygen ions that do the cleaning and some harmless organic soda ash. Not all oxygen bleaches are the same. Many contain fragrances, dyes, color crystals, and excessive fillers.
The popular oxygen bleach that you see on TV commercials is made with offshore ingredients that are of dubious quality. It also contains far more filler than active ingredient.
Do You Dissolve It in Warm Water?
This past weekend, I mixed up some Stain Solver to clean algae from my lower deck and from the deck railing. I simply dissolved the powder in warm water, poured it into a simple garden hand-pump sprayer and squirted it on the algae-coated surfaces.
I allowed it to soak for about ten minutes, then used a scrub brush to remove the green algae. After rinsing with a garden hose, the surfaces looked brand new! You can see the results in the photo above.
That's my own Trex decking. You can see the board on the left still has the algae coating.
You can clean roofs with oxygen bleach, but it can be challenging. The biggest problem is that it's dangerous working up on a roof. The algae-covered roof, once wet with the oxygen bleach solution, can be very slippery. You need to make sure you do not fall from the roof.
Watch this video to see how to clean algae from a roof using Stain Solver.
It's imperative the roof surface, or any surface you're cleaning, does not dry out before you get to scrub it. You must keep the surface wet with the solution at all times. This is hard to do on a roof on a sunny day. It's best to clean roofs on overcast days when air and roof temperatures are cool.
Do You Need to Scrub the Surface?
You need to scrub the surface after the oxygen bleach solution soaks. Don't ever think that you can just spray on any magical cleaner and get perfectly clean surfaces.
When you take a shower, you don't just stand under the water stream. You rub your skin. The rubbing with soap is what gets you clean. Rubbing is mechanical agitation.
The same is true for clothes. If you spray your clothes with a cleaner and let them dry, they won't be clean. You must let them AGITATE with soap in the washing machine.
You need to agitate the Stain Solver on the roof. Period.
IMPORTANT SCAM TIP: Some companies try to ply a product that you just spray on and then walk away. They say you have to do no more.
Marketers that make that claim are yanking on your lazy heartstrings that want the easy way out. Don't believe the spray-and-rinse claims for a second.
As I pointed out above, you already know that you have to mechanically agitate ANYTHING to get it clean.
Once you have the surfaces clean, you can inhibit the growth of algae if you coat the surfaces with a biocide.
Copper is a natural biocide as is zinc to a lesser degree. If you have an exposed copper or zinc strip about 6 inches wide along the top of your roof, each time it rains tiny metal atoms are deposited on the roof. Copper stops algae from growing. PERIOD.
Watch this video for PROOF!
Do I Use Copper Sulfate to Prevent Algae for Patios and Decks?
It's hard to get copper to coat siding, decking or patios. But if you periodically spray your patio and decks with a copper sulfate solution, it will inhibit algae growth.
Please CLICK the following image of copper sulfate crystals to buy some. You mix 1.25 pounds per gallon of HOT tap water. Stir until dissolved. Apply to DRY patio, deck, siding, etc. using a garden hand-pump sprayer.
IMPORTANT REMINDER TIP:You need to CLEAN the algae off first before using the copper sulfate. Copper sulfate is NOT A CLEANER. CLEAN the algae with Stain Solver oxygen bleach for BEST RESULTS.
This is copper sulfate. It dissolves easily in water. Spray it on with a hand-pump sprayer. CLICK THE IMAGE TO ORDER THE COPPER SULFATE NOW.
You can see why you'll just have to suck it up and do periodic cleaning to keep your home looking great.
4-way switch - It has four screws plus the green grounding screw. You can discover other tips about 3 and 4-way switches here. PHOTO CREDIT: Tim Carter
"The first thing you need to know is that the 4-way switch is indeed a very special switch. It's got a total of FIVE screws on it!"
4-Way Switch TIPS
Complex switch requiring great skill to install
Has five total screws on it vs. a standard single-pole switch with just three
DEAR TIM:I'm pulling my hair out wiring a 4-way switch. What's the secret to 4-way switch wiring?
Do you need a special 4-way electrical switch or a 4-way light switch? At this point, my new wife thinks she married a dunce.
If you can teach me how to wire a 4-way switch, I'll be eternally grateful. If you can't help, I will be forced to admit defeat and will call an electrician. Robert M., Ft. Collins, CO
DEAR ROBERT: Listen, don't beat yourself up too badly.
Is a Four-Way Switch Hard?
There are many people who are flummoxed by the mysterious 4-way, or four-way, switch. I liken the 4-way switch, and its first cousin the 3-way switch, to the famous movie Wizard of Oz.
It's easy to get confused how to wire a 4-way or 3-way switch. This is why I created videos to show how it's done.
The first thing you need to know is that the 4-way switch is indeed a very special switch. It's got a total of FIVE screws on it! (See photo above.)
A normal simple single-pole switch that you have to turn on a bedroom, closet or front-porch light only has three screws on it.
The two screws are for the incoming (line) and outgoing (load) power wire and the third screw is for the ground or earth wire.
Watch the following video to see a simple single-pole switch.
You need to really understand how current flows and is interrupted by a simple single-pole switch before you start to tackle a 4-way switch!
Single Pole Switch Video
This is what most of the switches in your home look like. You need to understand this before you graduate to a 3-way switch, much less a 4-way switch!
How is a 4-Way Switch Different from a 3-Way Switch?
A 3-way switch has three screws plus the green grounding screw. A 4-way switch has four screws plus the green grounding screw.
Multiple On & Off Locations
You use 4-way switches in situations where you want to control a light or other fixture from more than two locations. For example, the second-floor hallway lights in my own home are controlled at four different locations. To accomplish this, you must have two 3-way switches and two 4-way switches.
Where Does the 4-Way Switch Go?
A 4-way switch must always be in between two 3-way switches. I know this sounds confusing, but let's see how it is done in the real world if you were to remove the drywall or plaster from your walls and ceilings.
The easiest way to understand how to wire a 4-way switch is to watch this video:
The traveler wires from the two 3-way switches attach to the screws on the four-way switch.
Connect the two travelers from one 3-way switch to the bottom two screws on the 4-way switch. It doesn't matter which traveler wire goes on which bottom screw.
Then connect the two travelers from the other 3-way switch to the top screws on the 4-way switch. Another key point is it doesn't matter which traveler wire you attach to which screw.
What Happens to the White Neutral Wires?
In all three boxes, you connect the white wires to each other with a wire nut. The white neutral wire that enters the first 3-way switch needs to travel through all the switch boxes until it eventually gets to the light fixture.
The white neutral wires NEVER get attached to any of the screws on the 3-way or 4-way switches.
You do the same with the bare copper wires and create a tailpiece of bare copper that connects to the green grounding screw on each switch. In each box, you are left with black and red wires. These connect to the terminal screws on the switches.
How Many 4-Way Switches Can You Use?
You can have many 4-way switches in a circuit as you want. As crazy as this sounds, you could have 10 switches control one light. This circuit would have the mandatory two 3-way switches and eight 4-way switches.
It's important to realize that all the 4-way switches fall in between the two 3 way switches. This is the only way the circuit will work.
How Do You Wire a 3-Way Switch?
To make any of these circuits work correctly, you must connect the wires to the right screws on the 3-way switches. WATCH my 3-way switch video now.
Look closely at the 3-way switches. They'll have a black screw and two brass ones.
Connect the black continuous-hot wire in box number 1 and the black wire that goes up to the light fixture in box number 3 to the special black screw on each 3-way switch.
The remaining two wires at each box connect to the brass screws on the 3-way switch.
Home or construction plans are the heart and sole of any project I have ever done. This is especially true of large scale room addition work or new home construction.
Without detailed plans, a project is doomed to failure. Mistakes will happen.
Cost overruns will almost always occur. Change orders will be a weekly event.
All of these things take the fun out of construction for both the homeowner and the contractor.
Change Orders - Death On A Stick
Take change orders for instance. I hated change orders! I never made any money on change orders.
They disrupted the flow of the job. It seems that you can never recapture the cost of the time spent discussing the change, calculating the change and administering the change. They were nightmares as far as I was concerned.
Watch this video to see a great set of plans for a room addition. Wait until you see the interior elevations that show light switch locations!
Lumber Yards Know Best
Here's another trick for you. Most lumber yards have salesmen that call on builders.
Some of these same companies may be large enough to have an in-house estimator. I used to deal with a lumber company like this.
I'd take plans that I was bidding to this individual. He'd do a complete computerized lumber takeoff. It was wonderful!
Well, as you might imagine, this estimator or salesperson would see plan after plan. He knows who draws a complete set of plans and who doesn't.
So, why not talk with this individual? Ask him/her which architect seems to consistently draw the clearest, most complete set of drawings.
Hopefully you will walk away with the names of 2 - 3 architects whom you can interview. Not many people know of this approach.
Selecting an Architect
Remember, you are looking for an architect who specializes in residential construction. You want one who can show you various completed projects.
Discuss how mistakes will be handled. Everyone makes mistakes. If the architect goofs somehow, ask how this mistake will be paid for.
As a general rule of thumb, most mistakes come to the surface after all of the rough framing is completed. Suggest that a portion of the fee is withheld until the rough framing is complete. Simply develop a plan to deal with this circumstance.
Ask about written specifications. Generally, most architects who have computerized have these written project guidelines already sitting in their word processors.
Written specifications are an important part of a project. They're similar to assembly instructions you might receive with a bicycle.
They tell the builder what things to use where and how to put certain things together. These specifications can prevent substitutions of products.
In other words, if the plan calls for baseboard in a room, just what type does that mean? You might think a nice tall baseboard. Your builder might think it means a piece of #3 pine! Specifications can clear up problems like this.
I've sold a set of decent new home specifications that cover lots of items you'd probably forget to think about. Just ONE thing in my set could save you thousands of dollars.
Look for schedules on plans. Schedules are simple spreadsheets of information. For example, good plans come with Door and Window Schedules.
This is usually a table which lists each opening, what type of window or door goes there, the make, model, options, rough opening size, size of structural header, type of interior and exterior finish, etc.
These schedules are loaded with valuable information that is useful to everyone involved in the project. They leave nothing to speculation.
Types Of Schedule Spreadsheets
Your plans MUST HAVE a schedule for:
appliances
plumbing fixtures
lighting fixtures
room finish
cabinets
Elevations
Great plans also have lots of exterior and interior elevations. This is a two-dimensional drawing of what a finished wall will look like.
These are invaluable in kitchens and bathrooms as they show the exact location of electrical outlets, fixtures, toilet-paper holders, towel bars, etc. There's no guessing where something goes!