Understanding House Settling Cracks

house settling cracks

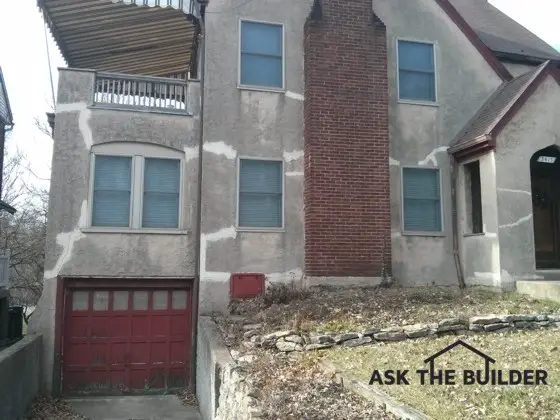
House settling cracks were patched here. See all the white lines? The person who repaired the cracks made several critical mistakes. The stucco should have been washed first. The patching material should have been tested on the side or rear of the home for a perfect match. Copyright 2018 Tim Carter

House settling cracks come in all types and sizes. Settling cracks can often just be lumber shrinkage cracks in new homes. True settlement cracks tend to get larger over time.

Revised February 2018

House Settling Cracks TIPS

Shrinkage Cracks Most Likely Instead Of House Settling Cracks

Cracks happen for all sorts of reasons. But all too often people name every crack in their house as a settlement crack.

New homes are plagued with shrinkage cracks because the wood framing is shrinking as it looses water. If you feel you have a true settlement crack, the best person to call to get an opinion is a structural engineer.

CLICK HERE to get FREE & FAST BIDS from local structural engineers.

Related Links - VERY IMPORTANT!

Settlement or Shrinkage? Most Likely Shrinkage

How to Match Stucco Patches Perfectly

How To Match Mortar / Grout Colors In Minutes

Concrete Shrinks!

Shrinkage cracks can happen in concrete. For every ten feet of concrete that are poured, be it a wall or a slab, it will shrink 1/16th of an inch in about a year's time.

But people see a crack in a concrete wall and immediately think it's a settlement crack.

Different construction materials have different expansion and contraction coefficients.

House Settling Cracks Video

Watch this short video to see some common house settling cracks.

Some materials change shape and size as they absorb water and water vapor while materials immediately adjacent to them do not budge. An example of this is hardwood flooring. Wood is hygroscopic. That means it changes shape and size as it soaks up water and then releases it.

Mother Earth is a dynamic too, meaning soils can move. But this is somewhat rare unless you live on a steep hillside.

There are all sorts of soil-movement problems in parts of Greater Cincinnati, Ohio because of an unstable soil. It's found wherever you have the Kope or Lower Fairview formation.

You can use geologic maps like the one below to identify bad soils.

cincinnati geologic map

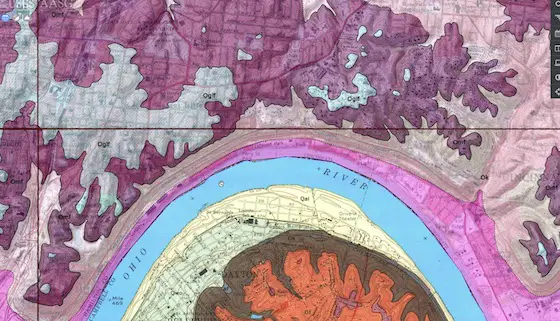
This is a copy of a United States Geologic Survey (USGS) geologic topographic map of the East End of Cincinnati, OH. The downtown area would be just to the left of what you see. The Kope and Lower Fairview formations are the light pink rock just above the magenta alluvium that's north of the Ohio River. (C) Copyright 2017 USGS and every US taxpayer that owns the maps. CLICK THE IMAGE TO BUY GEOLOGIC MAPS FOR YOUR AREA.

Understanding House Settling Cracks

If you have an understanding as to why cracks happen, then you can often work to make permanent repairs. There are some cracks that can't be easily repaired.

What's more, it is hard to totally disguise some cracks.

CLICK HERE to get FREE & FAST BIDS from local structural engineers.

Houses Have Hips And Knees

Large houses have joints within them.

These are places where the house relieves movement, just like the joints in our fingers, arms and legs. I often see cracks in modern homes where columns support beams. You can see cracks right where the contact point between these two structural members meet.

Hardwood floors often develop cracks. There are all sorts of reasons for that to happen, and almost always they can be traced to a humidity or moisture problem.

Soil Problems Cause House Settling Cracks

I routinely act as an expert witness in court cases involving poor quality construction. Recently, I finished a case that involved a house built on poor soil.

The builder built a house that was constructed over the top of a ravine that was filled in. Believe it or not, the excavation contractors bulldozed trees, limbs, and other vegetation into a small valley.

Then they placed soil on top of this. They rolled over the soil making it look like a great place to build.

Two years after the house was built, problems started to happen.

The foundation actually dropped several inches in numerous places and caused all sorts of havoc within the home and in its outside walls.

There were huge vertical cracks in the brickwork, the basement floor looked like an earthquake had struck and interior steel I-beams were twisted and compressed so much that they were crushing 2x4 plates. I was amazed at what can really happen when houses are built on poor soil.

Foundation Settlement Repair Video

Watch this short video to see one method to repair foundation settlement cracks.


Insurance Claims

The insurance company needs to be sent a copy of the letter to put them on notice of a possible claim. These letters need to be sent to both companies via certified mail with a return receipt being sent to you. Keep these very valuable receipts.

CLICK HERE to get FREE & FAST BIDS from local structural engineers.

Column B288

Rough-In Plumbing Diagram

riser diagram

Rough-In Plumbing Diagram | You'll need a master plumber to draw a riser diagram like this. CLICK or TAP HERE and I'll draw your rough-in plumbing diagram in just a day or two.

Rough-In Plumbing Diagram TIPS

Rough-In Plumbing Diagram - I Can Draw One For You - CLICK or TAP HERE!

Please watch this short video:

DEAR TIM: My city allows homeowners to install their own plumbing. But to get the permit I need to supply them with a rough-in plumbing diagram.

What is a plumbing diagram? Can I just do a bathroom plumbing diagram since all I am doing is adding a new bathroom to my home? Is it a good idea to include a bathroom plumbing vent diagram when I submit my paperwork to get my permit? Dave B., Cincinnati, OH

DEAR DAVE: You should count your blessings that you live in a community that allows you to do your own work. Some areas of the nation do not allow owners of single-family homes to do their own work. Plumbing permit help is my specialty because I've been installing plumbing for decades.

I became a master plumber before the age of 30 and used to do all the plumbing work on all my jobs. I loved running drain and vent pipe and especially heavy black iron for natural gas lines. I've tapped my fair share of sewers and lived to tell about it!

It's my opinion that certain homeowners can do better work than some of the plumbers I've seen in my years in the field. If you can install the piping correctly and it meets or exceeds the plumbing code, why shouldn't you be allowed to do the work?

CLICK HERE  to get FREE & FAST BIDS from local plumbers who will draw a rough-in drawing for you.

2D Drawing Shows All

A rough-in plumbing diagram is a simple isometric drawing that illustrates what your drainage and vent lines would look like if they were installed, but all of the other building materials in your house were magically removed. You would see the pipes in three dimensions, and be able to see all of the connections, the pipe sizes, fittings and vent piping.

Isometric Rough-In Plumbing Diagram

I'm a master plumber and I drew this in about ten minutes. It shows the fixtures in a bathroom that's being added to an existing home. The solid lines carry water and waste. The dashed lines only carry air and some condensation water. - © 2017 Tim Carter - Master Plumber  CLICK the DRAWING if you want to hire Tim to draw your rough-in plumbing diagram.

By drawing the lines that represent each pipe at certain angles, you can make a three-dimensional drawing on a flat piece of paper. Any artist can tell you this is simply a matter of perspective. Imagine looking at your house's plumbing system as you hover in the air and at an angle instead of just looking at your house from the front door. This is what a rough-in plumbing diagram looks like.

CLICK HERE  to get FREE & FAST BIDS from local plumbers who will draw a rough-in drawing for you.

Magic Triangle

You create the interesting 3D perspective in the 2D drawing by using a simple 30 - 60 - 90 triangle. These are very inexpensive and do a great job of showing the sloping and intersecting wye fittings as if you were able to see a real plumbing system without all the wood or steel framing in the way.

30-60-90 triangle

This is the infamous 30-60-90 triangle. Eventually they'll be collector's items with everyone switching to computer graphics! CLICK THE IMAGE NOW TO BUY ONE. VERY CHEAP

Solve Problems Early

A plumbing diagram is a really useful tool that can save you lots of money and headaches. The drawing communicates to the plumbing inspector that your system will meet the minimum standards of the code. When you apply for your permit, an inspector studies your rough-in plumbing diagram making sure the pipe sizes are correct and that you're using the correct fittings at the places where pipes connect to one another.

For example, let's imagine you think it's okay to install a fitting connecting two drain pipes together at a 90-degree angle, and this pipe is in the ground under a concrete slab. In almost every jurisdiction I know of, this is an illegal connection. You draw this and the plumbing inspector corrects this mistake before you install the pipe and have to rip it out to make the correct connection using two 45-degree bends to make the 90-degree turn.

You should just have to do a bathroom plumbing diagram for your job since you're remodeling. It would be unreasonable for you to have to make a drawing of your entire plumbing system, especially since it's hidden behind the walls.

You'll be expected to show how and where your new drains will connect to your existing plumbing system. This is very important as the new branch line you install must connect to an existing plumbing drain in the right location.

Vents are Dashed Lines

The diagram will absolutely have to include a bathroom plumbing vent diagram. Vent pipes on plumbing diagrams are drawn as dashed lines while pipes that carry water are drawn as solid lines.

Some pipes that are waste lines can be vent lines at the same time. It can get confusing. In the drawing I made above there's an example.

Isometric Rough-In Plumbing Diagram

This is a portion of the big diagram above. I made the lines red here to illustrate these two pipes are both drain and vent lines. Read the column copy for explanation. - © 2017 Tim Carter

Look at the slightly enlarged image I cut out of the overall diagram at the top of the page. I've made two lines red.

This section of piping is 3-inch in size and starts at the one end of the wye fitting where the toilet drain pipe also connects. The toilet drain pipe extends from the wye and terminates with the "T"-shaped symbol. The "T" represents the actual toilet flange.

Wet Venting

The red section of piping takes the water waste from the vanity that sits next to the toilet. Since the drain pipe is 3-inches in diameter, there's plenty of space for both water and air to exist if you were to fill the vanity sink with water and pull the drain plug while flushing the toilet at the exact same time. The rushing toilet water would not rob the vanity p-trap of air because it can get plenty of air in the 3-inch pipe.

Some plumbers and inspectors call this wet venting. In other words the toilet has a wet vent because water from the vanity flows through that small section of vent pipe. There are some inspectors that will not allow wet vents. I've never had a problem with one so long as you maintain the size of the vent pipe for the fixture being vented. In this case, the toiled drain is 3 inches so its wet vent needs to be 3 inches.

Once the wet vent terminates at the 3 x 1 1/2 tee fitting where the vanity drain connects, the vent for both the toilet and vanity can be 1 1/2 inches.

You'll need to show how and where your new vent pipe connects to an existing vent pipe or exits the roof as a new separate vent. If you're going to go through the roof with this new vent pipe, be sure it's sized correctly to prevent getting choked with ice. This can happen in your climate in periods of severe cold weather if the pipe exiting the roof is too small a diameter.

Plumbing Vent Video

Watch this video to see some plumbing drain lines, but more importantly, lots of plumbing vent lines.

Call Out Pipe Sizes

Be sure you call out the size of each pipe shown on your rough-in plumbing diagram. Show all changes of direction correctly. If you intend to use a fitting that turns a hard 90-degree angle, show that on your drawing. If you intend to use fittings that turn just 45 degrees, draw that acute angle on the paper. It's not that hard to make a plumbing diagram so long as you can visualize the pipes in your head before you install them.

Study Other Drawings

If you struggle to make your rough-in plumbing diagram, the first thing to do is ask your local plumbing inspector or the plumbing department if they have any sample plumbing diagrams you can study. Once you see how they're drawn, it will make complete sense to you. If they don't offer a free sample, consider purchasing a copy of your local plumbing code. Often the code books have great examples of the isometric rough-in plumbing diagrams.

Use Correct Symbols

When you see a sample rough-in diagram, you'll notice that certain simple symbols are used to indicate the fixtures you will eventually connect to the pipes. Be sure to use these symbols properly so the inspector reviewing your drawing doesn't think you will be connecting your toilet to your bathroom vanity pipe!

To make the drawing, you'll discover that a drafting 30-60-90 plastic triangle will be invaluable. The 30-degree angle side of the triangle is perfect to illustrate pipes that run horizontally with the code-required slope. CLICK HERE NOW to buy one of these dandy plastic triangles. Some computer software also allows you to draw lines at specific angles.

CLICK HERE  to get FREE & FAST BIDS from local plumbers who will draw a rough-in drawing for you.

Column 722

How To Connect Deck Railing Post to Deck

Deck Railing Connection TIPS

Deck Post Danger

Deck railing posts are the foundation of a deck railing system. They must be strong.

It's easy to connect deck railing posts to the floor joists of the deck.

No Lag Bolts!

Don't lag bolt a deck railing post to the outer band board that's nailed to the ends of the floor joists. The nails that pass through the band board into the ends of the floor joists have minimal holding power.

The reason why nails driven into the end of a stud or joist don't hold well is because the nail is parallel to the micro grow tubes that make up the tree. If you could look at the end of a deck joist with a high-powered microscope it would resemble what the end of a bundle of unwrapped drinking straws would look like.

CLICK HERE to get FREE & FAST BIDS from local deck builders in your city or town.

Use this Simpson Strong-Tie Connector

I completely rebuilt a deck on my own home recently. I didn't build the deck originally. 

To connect the new posts to the floor joists I used two Simpson Strong-Tie DTT2Z ZMAX galvanized 14-gauge 2x deck tension tie connectors at each post base where it passed next to the floor joists.

deck railing post connector

Here's the connector I used on my own deck posts. You need two per deck railing post. WATCH the VIDEO above to see how it goes in. CLICK THE IMAGE HERE NOW TO BUY THESE CONNECTORS.


CLICK HERE to get FREE & FAST BIDS from local deck builders in your city or town.

This important video warning was shared in Tim's May 16, 2014 AsktheBuilder Weekend Warrior Tip.

Undermount Kitchen Sinks

Undermount Kitchen Sink

Undermount Sink Installation | This is my own undermount kitchen sink at my own home. My wife loved this countertop and sink. We sold the house and moved to New Hampshire. It's harder to install the above sink than it is to install a wall-hung sink bracket. © 2021 Tim Carter

"I think it's reasonable for a person to wonder how in the world the sink will stay permanently attached to the countertop with this kind of weight regularly trying to pull the sink down into the base cabinet."

Undermount Kitchen Sink Checklist

DEAR TIM: Are undermount kitchen sinks a good idea? I have never had one, and am worried about leakage where the undermount sink contacts the underside of the countertop.

I want a granite undermount kitchen sink, but am worried the sink will pull away from the granite countertop. This would be a nightmare, especially if the sink was filled with water.

What undermount sink installation tips can you share that will allow me to buy one with complete confidence? Christy F., Flemington, NJ

DEAR CHRISTY: The first thing I can tell you is an undermount kitchen sink will give you a lifetime of leak-free performance if it is installed correctly. I have several undermount sinks in my own home, and they simply do not leak where the sink touches up against my granite countertops.

Related Links

Repair an Undermount Kitchen Sink With Ease

Stainless Steel Sinks Are Superb

It's important to note I felt the same way you did about undermount kitchen sinks. It was the plumber in me that made me a Doubting Thomas. After all, a standard double-bowl sink that has a disposer on one side and is completely filled with water weighs well over 100 pounds.

I think it's reasonable for a person to wonder how in the world the sink will stay permanently attached to the countertop with this kind of weight regularly trying to pull the sink down into the base cabinet.

CLICK HERE to Get FREE & FAST BIDS from local countertop installers.

How is the Undermount Kitchen Sink Attached?

High-strength epoxies, anchors and clips, and silicone caulk are used to attach the sink to the underside of the stone tops.

The undermount sinks are held in place with metal anchors that are glued to the underside of the stone with a two-part epoxy that cures rapidly and has incredible tensile strength once cured.

Furthermore, a bead of silicone caulk helps bond the sink to the stone to prevent water leaks between the sink and the underside of the countertop.

What is a Great Epoxy to Use?

PC-7 is a great epoxy that will not sag or drip when installing the anchors to the underside of a stone countertop. Remember, blow out all the dust from the holes before applying the epoxy.

PC Products Epoxy

I've used epoxies made by this company for both inside and outside projects. PC Products makes a superb epoxy right here in the USA! CLICK THE IMAGE TO ORDER SOME NOW.

Does the Stone Need to be Dust-Free?

Another key point is to make sure the underside of the stone countertop is dust-free. Dust will cause the epoxy bond to fail.

Any installer worth his salt will take a brush to remove stone dust from underneath the countertop. Dust in this location is a strong possibility because of the cut made to create the hole for your sink.

How is the Sink Cutout Created?

It must be remembered the granite countertop fabricator had to cut a special-shaped hole in the stone top to create the hole for your undermount sink. The undermount sinks come with a cutout template that's traced onto the stone.

Once the cut is made, the fabricator has to polish the rough stone edge.

What Generates the Thick Dust Under the Top?

Cutting out the hole for the sink and polishing the edge generates thick dust under the top.

The water that is used during the polishing process gets very small pieces of stone in it, and this slurry can roll to the underside of the countertop. Once the water component of the slurry evaporates, the stone grit or dust is left behind.

There's no real standard as to how much overhang the stone should be beyond the actual sidewalls of the sink. I always tried to have no less than 1/8 inch for an overhang and certainly no more than 1/4 inch.

CLICK HERE to Get FREE & FAST BIDS from local countertop installers.

Will Caulk Hold a Sink In Place?

No, caulk is not to be used as the adhesive to hold the sink to the stone. Caulk is just used to create a waterproof seal between the sink and the stone top.

Most undermount sinks come with very clear written installation instructions. Every set of instruction I have seen calls for a bead of clear silicone caulk to be placed around the flat lip of the undermount sink. This continuous bead of caulk acts as the waterproof seal between the sink and the countertop once the undermount sink is pressed permanently against the stone countertop.

Every month or so I get an email from a homeowner who's undermount sink has crashed down into their cabinet. Each autopsy report shows the idiot installer cut corners and just used caulk to hold the sink. They never bothered to use anchors and epoxy.

How Long Does it Take To Install the Sink?

Most professional installers can install an undermount kitchen sink in 30 minutes or less. The tools required are a 2x4 longer than the sink cutout is wide, one or two bar clamps, the special two-part epoxy and the caulk and caulk gun.

Once the installer knows the underside of the stone top is dust-free, he applies the silicone caulk to the sink lip. The sink is then pushed up against the underside of the stone top and centered under the polished cutout.

The 2x4 is then placed on top of the countertop spanning across the sink. One end of the bar clamp goes through the large drain hole in the sink and the other end goes on top of the 2x4. A double-bowled sink needs two clamps, one for each drain hole.

The clamps are partially tightened and the reveal of the sink is checked to make sure it is even around the entire cutout of the granite. The clamps are then fully tightened.

It's now time to mix the two-part epoxy and apply it to the small bolt posts that are glued next to the lip of the undermount sink. The installers are on their backs in the sink base looking up when they do this.

What are Different Undermount Kitchen Sink Anchors?

There are several types of anchors that can be used to mount an undermount sink. One type you have to drill holes for.

Another anchor has a wide round base at the bottom of the threaded stud. This base has holes in it that allow the epoxy to ooze through. These are very good if you make sure the underside of the stone / granite is dust-free. Here's a good example of this anchor. CLICK HERE to see all the different types of anchors.

Undermount Sink Anchor - Clip

This is a common undermount sink anchor and clip. You can see the round base of the threaded stud. Use this type with the PC Products epoxy above. CLICK THE IMAGE TO SEE MANY ANCHORS.

The epoxy sets rapidly, usually in ten minutes or so. After this wait period, the rest of the hardware that clamps the sink to the bolt posts is installed. It is good to wait at least one day before the plumber arrives to connect any drain piping or a heavy disposer to the undermount sink.

Before the drain piping is attached to the sink, it is wise to tighten the nuts that hold the clamps in place. Do not over tighten. Simply make sure they are snug. The adhesive properties of the silicone caulk in conjunction with the epoxy hold the sink permanently in place.

How Long Should the Epoxy Cure?

The epoxy should cure at least 24 hours before you apply tension forces to it.

The biggest mistake you or an installer can make is trying to rush the job. All too often an aggressive plumber, remodeler or homeowner will try to finish the entire job the same day.

They will wait six or seven hours thinking the epoxy is plenty hard, only to discover that the weight of a heavy disposer pulls the sink away from the countertop.

The bolt posts and nuts are not common items found at hardware stores or online. CLICK HERE to see a wide assortment of great undermount sink anchors.

Is There a No-Epoxy Method to Install a Sink?

There's another way to support an undermount sink and it doesn't involve using epoxy. The undermount sink is supported by a wire harness that's snugged up against the bottom of the sink using an ingenious drawbar.

It's called the Hercules Universal Sink Harness Kit. CLICK HERE to ORDER IT NOW.

Sink Harness Kit

Here are all the parts for the Hercules Universal Sink Harness Kit. You just need a simple screwdriver and a wrench to install it. EASY! CLICK THE IMAGE TO ORDER ONE NOW.

Hercules Universal Sink Harness Install VIDEO:

CLICK HERE to Get FREE & FAST BIDS from local countertop installers.

Column 662

Ice And Water Shield

Ice and Water Shield on Roof

This entire roof has been covered with an ice and water shield. It’s going to be leak-free for many years. © 2018 Tim Carter

"Ice and water shield is a far superior product compared to basic roofing felt paper."

Ice and Water Shield Checklist

DEAR TIM: Lately I’ve seen roofers install a strange product that looks like traditional felt paper, but it’s not. It has a peel-away backing paper, and this material sticks to the wood sheathing.

What is it? Why would you use this on a roof? Is it something that can be added to an existing roof in case I’m adding another layer of shingles? Connie G. Columbus, OH

Related Links

Ice Dams and Water Shield - DO NOT SHARE - Secret Info

Grace Ice and Water Shield® Benefits


DEAR CONNIE: Without being there, I’m willing to wager that you saw ice and water shield being installed. It’s an amazing roofing product that was introduced in the 1980’s and has quickly become the gold standard for creating leak-free roofs in all climates.

Free & Fast Bids

CLICK HERE to get FREE & FAST BIDS from local roofers who can install the BEST ice and water shield.

What Makes Ice and Water Shield Different?

Ice and water shield is different from felt paper because it's a rubberized membrane that sticks to itself and the wood roof sheathing. It creates a waterproof barrier to standing water if installed correctly.

Felt paper does not stick to anything.

Roofing ice and water shield may look like traditional felt paper, but it’s vastly different in performance. Ice and water shield is a far superior product compared to basic roofing felt paper.

What Does Felt Paper Do?

Traditional felt paper does a decent job at stopping most leaks where water gets under shingles, tiles, metal or slate. It does this by using gravity.

Gravity allows the water to flow over the tar paper down to the edge of the roof. As long as the water doesn't travel horizontally or along the shaft of a roofing nail, the water will not come in contact with the wood beneath the actual roofing material.

How is Felt Paper Installed?

Felt paper is installed so each higher row overlaps the row below. In a perfect world water can't get to the wood roof sheathing.

How Does Felt Paper Allow Leaks?

The overlapping seams of the felt paper can't protect against water that flows BACKWARDS up the roof.

But felt paper has problems where it overlaps the sheet below and where the nails penetrate the felt. If water backs up under the roof as happens with ice damming, water can flow up and under the lap joints of felt paper.

Are the Nail Holes in Felt Sealed?

No. The nail holes through felt paper are not sealed.

Where the nails used to attach the roofing materials penetrate felt paper, the actual hole created by the nail is not sealed where it passes through the felt paper.

Water can get under the head of the nail and seep down the shaft of the nail where it passes through the felt paper. When this happens, you get leaks into your home.

Ice and Water Shield

The roofer still needs to install a small strip of the ice and water shield at the lower edge of the roof. He'll do that after removing the 2x4 cleat that prevented him from falling to the ground. © 2017 Tim Carter

What Ingredients are In Ice and Water Shield?

Ice and water shield contains asphalt cement, a special stretchable membrane, and a fancy co-polymer called styrene butadene styrene (SBS).

The SBS component makes the product very sticky.

The ice and water shield roofing material is made with a rubberized asphalt mixture that solves these problems. Because the product has a very sticky backing, it not only adheres well to the wood roofing sheathing, but it also sticks well to the layer below when you overlap the pieces.

Does the Air Temperature Cause Problems During Installation?

Yes, the air temperature, as well as direct sunlight, causes problems when installing ice and water shield.

When the air temperature is above 60 F and the sun is shining on the ice and water shield product, it's extremely sticky. It acts just like contact cement and whatever the sticky side touches, it will not pull off.

You'll have an impossible time pulling it off of anything it touches.

Do Nails Seal with Ice and Water Shield?

Yes, the nail holes through certain brands of ice and water shield do seal. Be sure you get that guarantee in writing before you purchase a product.

When nails penetrate the ice and water shield on the roof, the rubberized nature of the material creates a gasket effect on the shaft of the nail. Leaks simply don’t happen. But not all ice and water shield products offer this!!

What Brand Offers the Nail Hole Guarantee?

The one I used on my own home has this feature and it really works. It's Grace Ice and Water Shield®.

Ice and Water Shield

I covered the ENTIRE roof of my New Hampshire house with Grace Ice and Water Shield. I never have to worry about a roof leak - EVER. CLICK THIS IMAGE NOW TO ORDER SOME AND HAVE IT DELIVERED TO YOUR HOME.

Do Other Roofing Products Go Over the Ice and Water Shield?

Ice and water shield products are hidden by the finished roofing materials. Not only does ice and water shield installation stop leaks caused by ice dams, but it also stops leaks created by fierce wind-driven rain.

Does Ice and Water Shield Protect Against Hurricanes?

Yes, ice and water shield will protect your home from leaks caused by hurricanes.

If you live in an area that’s frequented by hurricanes or severe thunderstorms that can drive rain sideways, then you need this material. These storms can easily push water under many finished roofing materials.

CLICK HERE to get FREE & FAST BIDS from local roofers who can install the BEST ice and water shield.

Can I Cover the Entire Roof?

You can cover the entire roof with the ice and water shield, but in many instances, it’s applied where leaks frequently happen. The problem is a leak can occur just about anyplace on a roof for any number of reasons.

How Far Up a Roof Should it Be Installed to Prevent Ice Dam Leaks?

To prevent leaks from ice dams, you may want the product to extend up from the edge of the roof at least 3 feet, but 6 feet is better. I put it over my entire roof because ice dams can form far up a roof.

If the roof has a low slope, you absolutely want to extend the barrier product up the roof quite a distance. I would also apply it in any valleys you may have where two roof planes intersect.

Do You Use It Around Skylights & Flashings?

Ice and water shield is perfect to use around skylights, chimneys, plumbing vents, ventilation caps, or anything that penetrates up through a roof. The roofer laps the material up onto the object and cuts it at corners or curves in a special way to create a leak-proof barrier. Traditional roof flashings then cover this sub-flashing made from the shield product.

Can I Apply It Over Existing Shingles?

No, you can’t apply it on top of the old shingles. You must apply this product as indicated by the manufacturer. Typically you’ll discover that you must apply the material directly to the wood roof sheathing that’s under the shingles and any old felt paper.

Is it Hard to Work With in Hot Weather?

Working with ice and water shield can be challenging, especially in warm or hot weather. In these conditions, the back of the material is very sticky. If you start to unroll it and you’re not aligned correctly, you can install it crooked. If you try to straighten it out, you’ll almost always get a wrinkle.

Be prepared for a slight learning curve when using the material for the first time. If you’re not astute at how it should be installed, by all means read all the tips from the manufacturer and watch any videos they may have about how to best handle the material.

If you’re working on a steep roof, you need to be very careful. Wear all required fall-protection equipment and watch out when stepping on the material if it’s damp, frosty or cold. It can be very slippery. Falling from a roof can really ruin your day. I know, as it’s happened to me on more than one occasion.

Ice and Water Shield VIDEOS:

CLICK HERE to get FREE & FAST BIDS from local roofers who can install the BEST ice and water shield.

Column 861

Credit Card Skimmer Video

Credit Card Skimmer - They are out there!


This is a video I put up to PROTECT my AsktheBuilder.com newsletter subscribers from credit card fraud.

Always check. This is not complete protection as the electronic skimmer can be placed inside the gas pump in less than 40 seconds.

January 13, 2017 AsktheBuilder Newsletter

It's Friday! If you're retired, that's inconsequential.

The rest of us know what it means!

I just looked at the extended weather (WX) forecast for central New Hampshire where I live. Holy Tomato! You'd think it was early March!

If the WX stays like this, the lake by my house will not freeze solid. Here's a photo I took earlier in the week.

The red line is the boundary between open water, above the line, and ice. In the past few days, some of the ice is melted. I'd say we have about 50 percent open water at this time.

In past years, the lake would freeze over completely by about now. Freezing depends not only on temperature, but wind.

I live on Lake Winnisquam, the third largest lake in NH, and it's got a significant amount of fetch. What's more, the lake is oriented north / south which means the wind really gets the water moving.

When the water is choppy, it's not going to freeze unless the temperature really gets below zero and stays there. The forecast temperatures are daytime highs of 40+ F with brilliant sun starting in a few days. Need I say more?

New Products to Share

If you're a new subscriber, you're in for a real treat. The same goes for you if you're in the group my buddy Dick Daniels is in.

Dick Daniels is a US Navy Captain, former fighter pilot from the Vietnam War. He's been a subscriber since 1997, maybe before. I've had the good fortune to meet Dick and his wife Sue on a few occasions over the years.

What a blessing it is to have subscribers like Dick and Sue and I hope to meet you one day. Always open each newsletter because when I travel, I try to set aside time for meet ups. For example, my son and I are thinking of doing a BBQ road trip this spring in the south, and each time we go to a restaurant we're going to have a meet up.

Here's the treat. One week ago today, I embarked on a massive project. I'm revising each and every column on AsktheBuilder.com.

You have no idea how many months this is going to take, but it's really worth it.

Here's what's in in for YOU:

  • Fresh content
  • New Product links
  • Bullet-point list at top of column for FAST TIPS
  • Links to Contractors in your city/town
  • New large-format photos when possible

I decided a few days ago to share a link with you to each revised column so you don't miss ANYTHING.

Remember, just about all the columns now have great LINKS to products I LOVE and USE at my own home. Don't guess if about a product, always see what I use.

A list of columns revised in the past 48 hours is just below and let me tell you, a few of the columns have amazing information you should scan.

Go ahead, click ALL of the links below.

LAST CALL - Asphalt Shingle WARRANTY Survey

If you've not yet taken my Asphalt Shingle Warranty Survey, this is your LAST CHANCE to be part of my Roofing Ripoff expose' book.

You'll be able to say you were one of the people that's in one of the colorful pieces of the pie charts!!!

If you take the survey, you're going to get a 20% discount on the .pdf version of the book. My sophisticated newsletter software has the ability to track who takes the survey. That's how I'll get you the secret promo code.

CLICK HERE to take the survey.

Revised Columns - CLICK THEM ALL!

Here's the most up-to-date list of the columns I've revised:

How to ID a Load Bearing Wall - GREAT VIDEO

How to Drill Into Stucco

How to Build a GREAT Gravel Driveway

Secret TIPS for Drilling Through Hard Steel - GREAT VIDEO

Plumbing Vent Pipe Tips - GREAT GREAT VIDEO!!

Bathroom Fan LEAKS Cold Air - TWO GREAT VIDEOS

Caulk Removal Secrets

Residential Steel Beams - GREAT PHOTO of GIANT BEAMS at my Cincy home

Acrylic, Fiberglass Tub Care and Maintenance

Cast Iron Tub Repair TIPS

That's enough for today. I'll have more for you on Sunday.

Tarlaíonn sonas nuair a dhiúltú duit diúltachas!

Tim Carter
Founder - www.AsktheBuilder.com

Do It Right, Not Over!

Cast Iron Tub Repair

Cast Iron Tub Repair TIPS

Repairing a chipped or scratched cast-iron tub is easy. The trick is to use the right products.

Most chips are small, ranging in size from the head of a pin to the size of a dime. If you have multiple chips, repair the smallest one first. 

I've had fantastic success using inexpensive clear rapid-set epoxy that I just paint the next day.

CLICK HERE to get FREE & FAST BIDS from local handymen that can repair your cast iron tub chip.

Clean the Tub

Oxygen Bleach

Stain Solver is MADE in the USA with USA ingredients that are food-grade quality. CLICK THE IMAGE to order some NOW.

If you want the repair to last for years, you need to apply the epoxy to a clean, dry surface. I've found that Stain Solver is the best cleaner. It's non-toxic and does a great job of removing soap scum, body oils, mildew, and other grime.

If the chips are on the bottom of the tub, just fill the tub with enough water to cover the chips and sprinkle in one cup of Stain Solver per two gallons of water that are in the tub.

Allow it to soak for three hours. At the end of the three hours, scrub the tub with a stiff brush, rinse and let dry.

CLICK HERE to get FREE & FAST BIDS from local handymen that can repair your cast iron tub chip.

Cast Iron Cleaning Tips

Cast iron fixtures are probably the easiest fixtures to care for, as they have the hardest finish of all plumbing fixtures. The porcelain glaze that is bonded to the iron achieves a hardness very near that of actual glass. We all know that glass, because of its hardness and smoothness is really quite easy to clean. Porcelain, when cleaned on a regular basis, will shine like new glass forever. However, many people simply wait too long to clean things as mentioned above.

For example, The Kohler Company publishes the following instructions for caring and cleaning of their cast iron products:

  • Do use only non-abrasive cleaners and a soft nylon brush to clean the slip resistant surface of tubs.
  • Do use cleaners with a Ph of between 3 and 8. (Ph is a measurement of how acidic or alkaline a cleaner is.) The following cleaners are recommended: Earth Rite All Purpose, Earth Rite Tub & Tile, Glass Plus, Green Windex, Pinesol Broad Spectrum, Sparkle, Top Job, and Enviro Care Neutral Disinfectant.
  • Do NOT use steel wool, wire brushes, metal scrapers, or abrasive sponge pads!!
  • Do NOT use buffing machines on the slip resistant surfaces on tubs.
  • Do NOT use high alkaline or strong acidic cleaners!
  • Do NOT use abrasive cleaners.

Repair Products

Here are a few products you can use to repair your cast-iron tub. If you go the route of the clear epoxy and paint, you'll need high-gloss paint mixed to match the color of your cast-iron tub. That's somewhat easy to do.

The trick when using the clear epoxy is to mix it up well and only put in enough so the epoxy is flush with the surrounding porcelain. The epoxy does NOT shrink as it dries. Work with great light and don't overfill the chip. Paint it the next day.

Loctite Quick Set Epoxy package

This is the clear rapid-set epoxy that I've used for years to repair many things, including cast iron. I LOVE this product. CLICK THE IMAGE ABOVE TO ORDER IT NOW.


CLICK HERE to get FREE & FAST BIDS from local handymen that can repair your cast iron tub chip.

porcelain touch-up glaze

This may be a great product if you need a one-step process. You have to find the right one that matches the color of your tub. CLICK HERE TO ORDER THIS NOW.

How to Install a Deck Post

install deck post

You install a deck post using the correct hardware and supported by a pier that distributes the concentrated load. Note the approved metal connectors at both ends of the post. © 2018 Tim Carter

"You install a deck post using special metal connectors and fasteners that have a thick coating of zinc. Cheap connectors can corrode and the deck will collapse."

Revised November 2018

Install a Deck Post TIPS

DEAR TIM: This is the year of the deck at my home. I’ve scheduled the time off and I’m ready to build, however, I need your help on several things.

How do I connect the deck posts to the deck? How do the posts connect to the concrete pier, or do they just rest on the concrete? Should the posts be buried in the soil?

How do you calculate where to place the concrete piers so the posts are centered on them? Can you just come over hand help me do all this? Catherine R., Uncasville, CT

Related Links

How To Connect a Deck Railing Post to a Deck - Great Video Here

Diagonal Bracing For Ultimate Deck Strength and Safety

DEAR CATHERINE: I’d love to help you, but you know what happens next, right? “Tim, you helped Catherine with her deck, so surely you can help me install my water heater.” I’m going to do my best to answer your questions and I urge you to visit my AsktheBuilder.com website where I have an entire category titled Deck Construction.

I’m hoping your deck is a small one and not too high off the ground. That’s a good beginner’s project, especially if the deck is just one level and a rectangle or a square. As decks become more complex, you need quite a bit of carpentry experience to ensure everything comes out as it should.

Free & Fast Bids

CLICK HERE to Get FREE & FAST BIDS from local deck builders in your city or town.

When Did the Deck Building Boom Begin?

The deck building boom started in earnest in the early 1970s with the widespread availability of CCA treated lumber.

When I first got into the building business decks were just starting to explode in popularity. It makes sense as many love to be outdoors and a deck can be an excellent outdoor room if designed properly and outfitted with shade structures and sometimes screening.

One of the coolest decks I ever built was the platform for a gorgeous screened porch for an older woman. The vaulted ceiling along with the wood floor made for an ideal spot to spend all day and night.

As the deck industry exploded, one or two manufacturers responded by developing engineered metal connectors that allowed carpenters and homeowners to safely and securely connect the parts of decks so they don’t fall down.

What About Deck Collapse Issues?

Deck collapses are real, they happen annually and people get killed or severely injured when decks suddenly fall to the ground. For this reason, you MUST be sure your deck is code-compliant and you get the necessary permits from your local building department. Not all towns require building permits for decks but check to make sure.

How Do I Install a Deck Post?

Deck posts must rest on something solid. The deck post must be connected to a concrete pier if possible using metal connectors and fasteners.

How Much Do Decks Weigh?

The average deck can weigh several tons or over 4,000 pounds.

The amount of weight being transferred to two or three deck posts that are just 4x4s or even 6x6s is enormous.

The average deck is rated for 60 pounds per square foot. Let's say you have a deck that's 12 x 20 or 240 square feet. It's possible the total weight of the deck with people, furniture, etc. on it could be 14, 400 pounds.

Half of that weight could be transferred to the two 4 x 4 posts. That means each post is supporting about 3,600 pounds.

If the post were just resting on the soil, it would transfer about 293 pounds per square inch to the soil. The post could easily sink into the soft soil.

Concrete deck piers have large footprints often being 24 inches in diameter or 24 inches square. That means the load from the post resting on a pier like this would exert only 6.25 pounds per square inch on the soil. Isn't that crazy the difference?

Cold Climates and Frost Heaving Deck Posts

The soil in cold climates can and does lift up as it freezes. At my own home here in central New Hampshire, the soil can lift as much as four, or more inches!

install a deck post

The dashed lines represent the frost line in different parts of the USA. It can be a few inches or a few feet! Copyright 2018 Tim Carter

You don't want a deck moving up and down as it can cause all sorts of issues. You solve this by placing the bottom of a concrete deck pier BELOW the frost line for your area.

The frost depth in central New Hampshire is about 54 inches. It can be six feet, or more, in northern Minnesota! Check with your local building department for the frost depth at your home.

CLICK HERE to Get FREE & FAST BIDS from local deck builders in your city or town.

Should I Install a Deck Post with Galvanized Structural Deck Post Connectors?

You’re going to use approved galvanized metal connectors sized to your deck lumber to connect the vertical posts to the outer beam that supports your deck joists. The most common connector is a plate that has two tabs of metal that point up and two that point down creating the letter U.

Special corrosion-proof fasteners are used to connect this metal bracket to the post and beam. These brackets come in various sizes for the different sized posts and beams. You’ll find these connectors online, at home centers and at lumberyards that sell lumber for deck construction.

My favorite brand, and I've used it for decades, is Simpson Strong-Tie. I have many of their connectors on my own giant decks here in New Hampshire. The photo just below is a common connector you'd use to connect a wood post to a concrete pier.

deck post base

This is a very common post base made by Simpson Strong-Tie. These can be used to connect a deck post to concrete or a wood deck under-carriage. The small rectangle on the right fits inside the larger metal square. You turn over the smaller square and set the post on top of it. The giant square washer connects the entire assembly to the anchor bolt in the concrete. CLICK THE IMAGE TO ORDER ONE NOW.

The deck posts connect to the concrete piers using similar metal connection post bases. There are several types of metal post bases, but they all connect to the concrete pier and to the wood post. Once again, you’ll size the metal post base to the wood post that you’re using.

Can Wind Lift Up a Deck?

It's possible for wind to lift up a deck.

You don’t want the deck posts to just rest on the concrete pier. Wind uplift, shifting soil, garden tractor accidents, etc. could cause the post to shift off the pier contributing to the deck collapsing. Connecting the post to the concrete pier anchors the deck to the earth.

Should Deck Posts Be Buried in the Ground?

In my opinion, it’s not a great idea to bury the deck posts in the soil even if they’re resting on concrete piers. I’ve seen lumber that’s treated for ground contact succumb to rot and insect infestation.

install a deck post

Lookie lookie, Can you see the extensive termite damage on the right side of the post? Imagine my reaction when I pulled this post out of the ground. ©2017 Tim Carter

Keeping the treated lumber above grade allows it to dry rapidly thus extending its useful lifespan.

post cap connector Simpson

Here's a post cap connector. Simpson makes them in all different sizes to connect different posts to different width beams. CLICK THE IMAGE TO SEE ALL THE SIMPSON PRODUCTS YOU'LL NEED FOR YOUR PERGOLA.

What is the Correct Concrete Pier Spacing?

Some lumber yards have great computer software that can calculate the size of your deck beams and the number of posts you need. This will tell you what the spacing between the posts will be.

Generally speaking, you probably won't exceed 10 feet between posts/piers. You can exceed that if you incorporate steel beams into your deck design.

How Do I Get Piers in the Right Spot?

The placement of the concrete piers that support your deck posts is very critical. I discovered long ago from a fellow carpenter a fairly easy way to get them perfect each time. Once again, if your deck is low to the ground, this will be very easy to do.

I’ve found it best to create the actual outline of the deck using the deck lumber. This means you’ll connect the ledger board to your home using all the approved flashings and internal metal connectors ensuring this board will not pull away from your home.

You then attach the two end joists that extend out from the house and cap those with the band board joist that runs parallel with the ledger board along the house. You now have a square or rectangular box. Suspend this box in the air with temporary posts made from 2x4s or 2x6s. Make sure the box is level and square.

To square up this box, lay flat 2x4s on the top of the box that extends from the center of the end joists to the ledger board and to the outer band board. These should be oriented roughly at a 45-degree angle across the top box. When the diagonal measurements from one corner to the opposite corner across the box are equal, the box is square. Making sure the measurements are the same, put two nails at each end of the flat 2x4s.

You can now suspend an old-fashioned and reliable plumb bob from each corner of the box to the ground. These two points on the ground can be used to help you calculate the exact position of your concrete piers based on the deck plan you’re using. Let me know how it works out!

CLICK HERE to Get FREE & FAST BIDS from local deck builders in your city or town.

Column 1037

Bathroom Exhaust Fan Leaks Cold Air

bathroom exhaust fan attic

Bathroom Fan Leaks Cold Air | The off-white, overweight flying saucer is really a quiet bathroom exhaust fan. You can see the flexible insulated exhaust pipe that prevents condensation. The humid bath air goes out the roof. © 2021 Tim Carter

Bathroom Fan Leaks Cold Air TIPS

I can call you on the phone to solve your bathroom fan leaking cold air problem. The call is FREE if you're not satisfied with my solution. CLICK HERE to set up the call.


DEAR TIM: My husband and I purchased a small ranch home built in the 1950s. A year ago we installed new exhaust fans in the bathrooms, kitchen, and basement. Last winter I noticed cold air would fall out of the fan covers when the fan was not operating. The small bathroom is now the coldest room in the house. Did we make a mistake? Why is cold air coming into the house? What's the best way to exhaust the air from the bathrooms? Because heating costs are rising, we must stop or minimize the cold air infiltration. Jill L-H., Maumee, OH

DEAR JILL: My gut reaction is that you did nothing wrong. My experience tells me that you probably didn't do some extra things that would have made a big difference.

Unfortunately, these extra added touches don't come as part of the written instructions with many exhaust fans. I have never seen these tips on a sheet of paper. When you install as many fans as I have, you start to learn what works best.

CLICK HERE to get FREE & FAST BIDS from a local bath-fan installer.

bathroom exhaust fan

This exhaust fan has a built-in damper, but most fit poorly allowing cold air to drift back into a home. © 2017 Tim Carter

Why Do Bath Fans Leak Cold Air?

Let's briefly discuss the dynamics of what is happening with the exhaust fans. I assume you used the suggested smooth-metal piping to connect the fan to the exterior of your home. My guess is the bathroom fan exhaust pipe is located in a cold attic space.

If so, the pipe gets very cold when the fan is not in use. This cold pipe can cause the air inside the pipe to go from warm to cold.

Cold air is denser and heavier than warm air and wants to go down, not up. This is why you feel it fall down out of the exhaust fan cover.

Should Pipe Joints be Sealed?

Metal pipe joints should be sealed with special metal duct tape used by professional HVAC contractors.

Cold air from the attic can also be entering the joints in the metal piping if they are unsealed. It is an excellent idea to use aluminum duct tape that heating and cooling contractors use to seal ducts.

This is an inexpensive special tape you often can only find where furnaces, air conditioners and ductwork are sold. Do not confuse this professional tape with the common duct tape sold at home centers and hardware stores.

aluminum duct tape adhesive

This is very cool duct tape. Pros never use the crap tape you see at home centers. This tape is thin aluminum with a strong adhesive. CLICK THE IMAGE NOW TO ORDER SOME.

Should a Bath Fan Vent Outdoors?

All bath fans should vent or exhaust to the outdoors. Never allow a bath fan to dump moist air into an attic.

Should Bath Fans Have an Internal Damper?

Bath fans should have an internal flapper damper that blocks cold air. These dampers usually fit poorly inside the fan housing and the cold air can seep by them. If you want to stop cold air, you need to have a great damper, or double damper at the exhaust hood where the air leaves your home.

Should Vent Hoods Have a Sealed Door?

Some vent hoods made by the fan manufacturers have swinging doors that have a felt seal. These are not bad. I've had decent success with these.

But the best vent hood I've ever used to stop cold air is one that exits the sidewall of your home and has a double damper. These are ingenious and inexpensive bathroom exhaust vent hoods that are very easy to install. Here's the one I have at my own home:

clothes dryer vent double door

Look at the double doors. This keeps pests out and prevents cold air from backdrafting into your home. CLICK THE IMAGE to order it now.

Where Should a Bath Fan Exhaust Outdoors?

A bath fan can exhaust through the roof or you can go out a sidewall of your home.

Exhausting bath exhaust out a roof is the safest and best method. This ensures all humid air from showers and baths will never rot any wood. If you exhaust bath air under, or near, a roof overhang, the humid air can get sucked into the attic through soffit vents. This moisture can condense on the trusses, roof rafters and roof sheathing and cause wood rot and mold growth.

What Vent Flashing is Used on the Roof?

I prefer to install a roof vent that is made to compliment the high-quality exhaust fans I install. Most high-quality exhaust fans, and I've installed Fantech in my own home with great results, come with a special hood that's made to be used with shingles, shakes, or metal roofs. The Fantech exhaust fans are very quiet because you install the motor up in an attic or at some other location away from the bathroom. These fans vacuum the air out of the bathroom and you simply don't hear much noise at all.

bathroom exhaust fan

Here's a typical Fantech bath exhaust fan setup. The odd cone-shaped metal thing is the fan. The two boxes that have the round white covers are place up in the ceiling joists of the bathrooms. All you see are the sleek round white covers. They come with and without lights! I LOVED these in my last house. CLICK THE IMAGE TO BUY the SET NOW.

These self-flashing exit caps have a great flapper damper with a felt seal that really closes tightly when the fan is not in use. Virtually no air works its way back down my exhaust pipes so long as the flapper is checked annually for dirt and debris buildup.

CLICK HERE to get FREE & FAST BIDS from a bath-fan installer in your city or town.

What About Insulating Metal Exhaust Pipe?

It is also a great idea to insulate the metal pipe in any unconditioned space where it passes. If the metal pipe is not insulated, the moist humid air in the pipe will condense on the side walls. Often this water finds its way back to the fan and drips into the bathroom. Many a homeowner thinks they have a roof leak, when in fact the issue is condensation inside the pipe.

I prefer to spray the metal exhaust pipes with foam insulation. This insulation is available in aerosol cans and is quite easy to work with. Be sure to clean the exterior of the metal pipe with soap and water as the metal pipe often is coated with a fine film of oil from the manufacturing mill. Wear very old clothes when working with the spray foam. Many foams have a urethane component and if the urethane foam gets on the clothes and dries, you can't get it off.

Be sure the entire length of the exhaust pipe is insulated all the way from the fan to the underside of the roof where it exits the house. This insulation will provide a secondary benefit by preventing or minimizing condensation inside the exhaust pipe. Many people think they have a roof leak during winter months as the exhaust fans operate. In most cases the water is simply condensation that forms against the cold sidewalls of the exhaust pipe and then runs downhill back to the fan.

WATCH these Bath Fan VIDEOS:


Not all exhaust fans are created equal. Some have low-powered fans that can barely push open the first flapper damper much less the second flapper at the roof. As with many consumer products, the things that work better and are more reliable often cost more. When you shop for fans you will be shocked to discover it only costs a little more money to get a very high-quality fan.

Can I Install a Remote Fan in an Attic?

You can install a remote fan in an attic. The advantage is the fan noise is not above your head in the bathroom. The remote fan can be 10, 20, or 30 feet away from the bathroom.

If you want the best bathroom exhaust fan, I recommend you get the Fantech fan that I had in the last home I built. I loved them so much, I had two of them, one for the master bathroom and another one exhausted the air from two back-to-back bathrooms in my home.

Do I Need a Makeup of Fresh Air Intake?

Your house should also be equipped with a makeup or fresh-air intake vent. When exhaust fans, clothes dryers, central vacuum cleaners, fuel-burning furnaces and water heaters and fireplaces operate, they consume vast amounts of air. It is entirely possible that back drafting is happening in the bathroom fan exhaust pipe as it becomes the point of entry for air needed by another appliance that is sucking air from the house.

fresh air intake vent

This fresh-air intake vent will do a great job. You may need several to get enough air indoors to satisfy all fuel-burning appliances. Pipe them with solid 4-inch metal pipe. CLICK THE IMAGE TO ORDER THIS VENT NOW.

Makeup air intake ports can be as simple as a clothes dryer exhaust cap that has holes drilled in the flapper. I have also seen small hoods where the flapper is removed and small galvanized hardware cloth is inserted in its place. These makeup air intake points should be located in the utility room where furnaces and water heaters are located.

CLICK HERE to get FREE & FAST BIDS from a bath-fan installer in your city or town.

Column 594