DEAR TIM: I’m going to build a new home and want to make sure I seal all air leaks in my new house. The new home is close to where I live and I have the time and inclination to do some work on it myself. My current home leaks air around doors, windows, at electrical outlets and numerous other places. What would you do if you were building a new home? Are there ways to retrofit my existing home to seal existing air leaks? What’s the issue and why do houses leak air so bad? Nick M., Lexington, MA
DEAR NICK: Congrats on your new home! How lucky you are to be close to the project and be able to get some of that fresh sawdust aroma into your lungs! Any and all work you do on the job will add to your overall satisfaction that you’ll feel once the home is done and you’re moving in.
Let’s talk about your existing home first and why it’s leaking air. Once you understand this, I believe you’ll know exactly what to do with your new home. The sad thing is it’s very simple to stop a vast majority of air leaks in the average home during the construction process. I feel it doesn’t happen because most workers don’t know how to do it or the builder just doesn’t care to do what’s needed.
Air leaks start right on top of the foundation. While most foundations and concrete slabs look perfectly flat, they’re not. When the carpenters install joists and wood-framed walls on top of the cast concrete, concrete block or slab foundations tiny gaps that you can slide one or two pieces of paper under add up to a vortex of air flowing into a home.
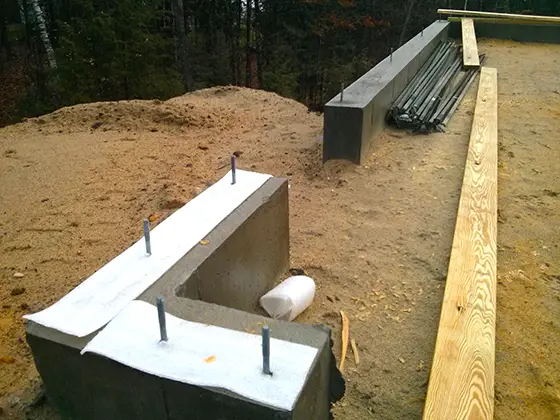
If you’re building a new home, don’t forget to use a foam sill sealer that sits on top of the foundation and under the treated wood sill plate. © 2016 Tim Carter
These leaks can be stopped with a simple piece of foam that fits under any wood that contacts the foundation. If your existing home is lacking this vital piece of sealant, you’ll have to do your best to caulk any gaps you can see in a crawlspace or basement. For slab homes, you can often caulk or use expanding foam along the bottom of baseboard trim.
Wood joist systems that sit on top of the wood sill plate can leak air because the wood framing is not perfectly straight. These gaps need to be caulked.
Leaks around doors and windows, depending upon the age of your existing home, can be traced to any number of gaps. On very old frame homes that have sliding windows that go up and down there are giant cavities where the iron window weights go up and down. These leak air through the window rope pulleys and other gaps in the frame.
Caulking all gaps between the window and door frames, window and door trim and siding usually minimizes these leaks. You’ll stop air leaks around windows and doors on your new home by using newer membrane tapes that are applied over the nailing fin that’s an integral part of almost every new door and window frame.
Be sure the gaps between all door and window frames are sealed with special expanding foam meant for windows and doors. You do this after the doors and windows are installed and working properly. Using the wrong foam can cause doors and window frames to bulge!
Years ago the joints between individual pieces of wall sheathing were never sealed. That gap can also allow air into the wall cavities. Today you’ll be able to use the special flashing and air-sealant tapes to cover all the horizontal and vertical seams in your exterior wall sheathing. It’s impossible to fix these errors on old homes unless a major remodeling job calls for removing all existing siding thus exposing the old sheathing.
Once you have all the exterior sheathing seams taped and have all the nailing fins on the windows and doors sealed to the sheathing, you’ve pretty much made the exterior of the house immune from air leaks with respect to the walls. Now it’s time to pay attention to the attic.
Electricians and plumbers almost always drill holes through the top plates of walls to put cables and pipes up into an attic. These holes must be sealed. You can caulk around cables and pipes or use foam.
Be sure you check with your building inspector as some codes call for a special sealing material that’s fireproof. Hot gases from fires love to find these holes in basements and walls and use them as chimneys to transfer the fire to attics by drafting.
Sealing these gaps around the cables and pipes will stop just about all the air from leaking through electrical outlets and switches. But to stop all of it you need to caulk any and all holes where cables enter electrical boxes. It’s also a great idea to caulk around the gap between the drywall and the electrical box after the drywall is installed.
Existing house wall outlet leaks can be minimized by using foam gaskets under outlet and switch cover plates. I’d also caulk the gap between the drywall and the electrical box in an existing home. Be sure to vacuum any dust around this gap before applying the caulk.
The issue with air leaks through all these places is that no one specific location leaks lots of air. It’s the cumulative total amount of air passing inside that’s the issue.
Be sure you install a fresh-air intake vent to satisfy the air needs for your fuel-burning appliances, exhaust fans and a central vacuum cleaner that exhausts to the outdoors. You don’t want any backdrafting issues that might bring carbon monoxide into your super-tight home!
Column 1173