Plumbing Fixture Schedule

tim carter master plumber seal

Tim Carter has been a master plumber since 1989. He knows all about plumbing fixture schedules.

Plumbing Fixture Schedule - Seems Easy But It's Not

Some government entities require you to supply a plumbing fixture schedule to obtain a plumbing permit. These tables identify all the plumbing fixtures in a job. That's the easy part.

You also need to list the drain fixture units and the water-supply fixture units. That's the hard part.

Often you'll also be required to supply a three-dimensional plumbing isometric drawing showing all drain lines, vent lines, the building drain, and all pipe sizes. If you're not a plumber, you'll have a very hard time getting this isometric drawing or riser diagram produced correctly the first time.

plumbing fixture schedule

This is the header of a typical plumbing fixture schedule. You need to be an expert to fill in all the blanks correctly. Good luck if you try it yourself or CLICK HERE to have it done by a professional.

Master Plumber Tim Carter

Tim Carter has been a master plumber since 1989 and creates plumbing fixture schedules for architects, engineers, and homeowners like you. His schedules are never rejected by the building or plumbing departments.

It's important to realize that you need to understand the total capacity of the outgoing building drain pipe as well as the incoming water supply line.

Water supply calculations are harder because you need to take into consideration the length of the pipe as well as the pressure. The pressure within the pipe can vary depending how high or low the house is with respect to the water main at street level.

It's best to probably hire an expert like Tim Carter to create your plumbing fixture schedule. He can do it in just a few days. Go here to place your order for your fixture schedule or plumbing isometric drawing.

Plumbing Riser Diagrams and How Pipes Work

washing machine drain pipe riser diagram

Plumbing Riser Diagrams - This is what the drain pipe for your washing machine might look like if you had x-ray vision and could see into your walls. The u-shaped pipe near the floor is a trap that holds water. It prevents sewer gas and vermin from entering your home. Copyright 2023 Tim Carter

Plumbing Riser Diagrams and How Pipes Work

Author's Note: I've been a master plumber since 1989. CALL ME NOW to talk about your riser diagram. 603-470-0508

I'd love to draw your plumbing riser diagram or isometric drawing. GO HERE to order one.

tim carter master plumber

Yes, it's me, Tim Carter! I'm taking a break from installing a garage floor drain in my daughter's home on Mt. Desert Island in Downeast Maine. CALL ME NOW if you need a residential riser diagram for your project: 603-470-0508

Destined to be a Builder

You may wonder how I got my start as a builder and how I became interested in a plumbing riser diagram. The hook was set in Boy Scouts when I obtained my home repairs merit badge. I then helped pay my way through college working on the weekends and during the summer for a man who restored old homes that he bought out of foreclosure. After graduating from college with my geology degree, I decided to start my own construction business.

Within a year I had purchased an FHA-repossessed home in an auction for $8,500. The house needed lots of work including installing new drain pipes for the only bathroom in the house. I tackled this project myself and was instantly attracted to plumbing work. I found it fascinating how all the different-sized drain pipes connected to one another and more importantly how each fixture had a mysterious pipe that extended up from the drain pipe to the ceiling.

tim carter master plumber seal

Tim Carter has been a master plumber since 1981 and can draw your residential riser diagram.

The Extra Pipe is a Vent

This extra pipe was a vent pipe. I didn’t understand how that vent pipe worked at the time but after a few trips to the local library, I discovered why the pipe was a vital part of the system and I was on my way to becoming a master plumber. I’d like to share some of what I discovered all those years ago so you don’t get sick from sewer gas. I also feel that once you understand how all the plumbing pipes in your house work together, you’ll have fewer clogs and you’ll save hundreds and thousands of dollars on plumbing repairs.

GO HERE to discover more about plumbing vent pipes.

Pipes Get Bigger like Rivers

It’s important to realize the plumbing drain and vent pipes in your home mimic what Mother Nature does with her drain water. Water that falls on mountains travels through ever larger streams and rivers until it eventually gets to the ocean. The rivers get bigger and deeper to handle all the water from thousands of square miles of surface area.

The same is true in your home. A vanity sink on the upper floor of your home only needs a small diameter pipe such as a 1 and 1/4 inch or a 1 and 1/2 inch. Toilets, because of the size of the solid waste they accept, require a 3-inch pipe. By the time all the fixtures in your home are connected, a 4-inch pipe transports all of the water and waste on its way to your septic tank or the city sewer. The pipe buried in your yard that connects to a city sewer is almost always 6 inches in diameter.

Waterfalls Inside Your Walls

Have you ever seen a waterfall? You have them in your home at many fixtures. When the water leaves the p-trap under a sink, shower, tub, or washing machine drain, it almost always travels horizontally through a pipe just as a river flows across the land. When the horizontal pipe connects to a vertical one, you get a small waterfall within the pipes. Plumbers call these vertical pipes stacks. Typically the stack ends in a basement or under a slab connecting to a new horizontal pipe that leaves your home. The same is true with waterfalls as the water starts to flow horizontally at the base of the falls.

By now you’re probably wondering all about the vexing vent pipes. These pipes allow air from outside your home into the plumbing system. You may think that the pipe up on your roof acts like your fireplace chimney that sends smoke outdoors. It’s the exact opposite with plumbing pipes.

Pipes are Filled With Air

Before you turn the water on at a fixture or flush a toilet, the drain pipes beyond the water seal in your p-traps are filled with air. As soon as you flush your toilet and 1.6 gallons of water rushes into the pipes, it pushes the air in front of it. You’ve experienced this rush of air if you’ve ever stood next to a tall elevator in a high-rise building. As the elevator comes racing down the shaft, it rams the air in front of it and some of it blasts out of the closed doors you’re facing.

Roof Vent Pipe is Not a Chimney

The vent pipe in your roof allows the air to enter the system to replace the air being pushed through the pipes by the drain water. Atmospheric pressure which is around 14 pounds per square inch, helps get the air into the vent pipes. The code calls out the minimum size for vent pipes, but they can work if smaller. You know this to be true because a tiny pin prick in a plastic water jug is all you need to get water to flow out of the spigot below. The enormous pressure of the atmosphere pushes plenty of air into the tiny pinprick hole.

One day I wanted to test this on a real plumbing system. I created a small bathroom with normal fixtures but instead of using the code-required vent pipe sizes, I vented the entire bathroom with just a 1/2-inch-diameter pipe. I filled all the fixtures with water to the brim, pulled the drain plugs and flushed the toilet at the same time. Everything worked perfectly because plenty of air could get through the small tubing. After satisfying my curiosity, I installed the correct-sized vent pipes!

Plumbing departments want to make sure all the drain pipes and vent pipes in your home are sized properly. This is why they require you to supply a riser diagram or isometric plumbing drawing to obtain a permit. I’ve always loved drawing these 3-dimensional drawings. I draw these each week for plumbers, architects, and plumbers who are too busy or who can’t figure out how to do the drawings to satisfy the inspectors.

riser diagram gray water

Here's a riser isometric drawing showing the separation of gray water from black water in a home. CLICK or TAP HERE to have me draw your riser diagram.

You want the pipes to be sized correctly so that you minimize or eliminate the possibility of clogs in your system. Pipes that are sized too small can get clogged. You can also create clogs by using the wrong fittings in your system. You want the water flowing through the drain pipes to make gentle turns when the water is flowing horizontally.

Secrets to Square Anything

tape measure squaring board off a deck

You can often square things up by yourself. In this case, I was able to get the flat 2x6 square with the front edge of the deck using a marker and a tape measure. It’s so easy to do! Copyright 2022 Tim Carter

Secrets to Square Anything - It's So Simple

Are you trying to save money in these harsh financial times? Have you given up trying to find a contractor and are starting to do more projects on your own? If so, you’re in fine company as my email inbox has exploded over the past months with requests for help.

Lately, I’ve had quite a few people ask for help who are going to build decks and patios outdoors. Some are building their own sheds and are using the plans I offer for a deluxe two-story shed. In each of these situations, the homeowner asks me how to get the object square. Or, they need to know how to make sure the edge of the patio or the deck is square with the side of the house.

Let’s talk first about the concept of square. You probably remember from your high school geometry class that a square is an object with four sides of equal length and each side is oriented at 90 degrees to the other. In the world of building, the concept of square means that a line extending out from some other straight surface is square when it extends out at a 90-degree angle.

You may also remember from your high school geometry class the math equation that Pythagoras discovered thousands of years ago that tells you when something is square. I’m talking about the equation that makes your brain hurt like your back does after carrying sacks of cement around all day. Yes, it was A squared times B squared equals C squared. Fortunately, there’s a much easier way.

The numbers 3, 4, and 5, or any multiples of them, are all you need to create a square line extending out from the side of your house or some other line. Here’s how to do it. Those three numbers represent the measurements of each of the three sides of a right triangle. Remember, a right triangle is one where two of the lines are at a 90-degree angle or square.

To create a short square line extending out from some other straight line here’s all you need to do. Take a scrap piece of wood and lay it on the ground. Put some weight on each end of the board so it’s hard to move it. Snap a straight chalk line down the center of the board. You always need to start with a straight line.

Drive an 8-penny sinker nail into the wood at one end of the line. Drive another one exactly 4 feet away down the chalk line. Using two tape measures, hook the ends on the heads of the nails. Tape measures that have a small slit in the hook make it easy to hold onto the nail head. The chalk line and two tape measures are about to create a triangle once you pull out the tapes.

The one tape measure is going to create the square line extending out from the chalk line. Pull it out about 39 inches. Pull the other tape measure out from the other nail. It represents the hypotenuse of the right triangle.

When you cross this second tape measure over the first one and the 60-inch mark on the second tape is crossing over the first tape at the 36-inch mark, the first tape measure is now square with the chalked line. Make sure you are aligning the tape lines taking the readings on the inside edges of each tape measure.

This method is close enough for patios and decks. If you want to be extremely accurate, you need to have the corner of the hook of each tape measure on the points of the 4-foot marks on the chalk line. Measuring from the center of the tape measure hook introduces a very very tiny margin of error.

One of the common questions I get is, “Tim, how in the world can a square up a 2x4 wall I’m building before I nail the OSB sheathing to it? Is it possible to do this without using a sophisticated calculator?” The answer is absolutely yes no matter how long the wall is or how tall it is.

When you build a wall of any length you should have the top and bottom plates the exact same length. You’ll then install all the wall studs in between the two plates. The king studs in this wall should also be the same length. You now have created the four sides of a rectangle with each opposing side the same length. Now we have to get it square since at this point it’s probably a parallelogram, not a right rectangle!

Chalk a line on the wood subfloor or concrete slab. Position the edge of the bottom plate on this chalk line along its entire edge. Tack the bottom plate down so it can’t move.

Take your tape measure and measure the diagonal distances from each corner of the bottom plate to the opposing corner of the top plate. If they are the exact same distance then by the luck of the stars the wall is already square. Go buy a lottery ticket! In almost all cases, the measurements will be different.

Let’s say one measurement is 170 inches and the other one is 172 inches. All you have to do to square up the wall is take a sledgehammer and tap the end of the top plate at the corner where it measures 172 inches. Tap it until it measures 171 inches. When you then measure the other diagonal that was previously 170 inches, it will now measure 171 inches. It’s sledgehammer magic I tell you! The wall is now square.

Keep in mind this method works no matter what the two diagonal measurements are. All you have to do is tap the top plate corner until such time as the two diagonal measurements are equal. There’s no need for one of those fancy calculators.

Column 1484

How to Prevent Contractor Mistakes

toilet flange buried under new tile floor

How to Prevent Contractor Mistakes - Would you know that this new floor installed over an existing floor would cause extreme illness resulting in thousands of dollars of unnecessary medical bills? Copyright 2023 Tim Carter

How to Prevent Contractor Mistakes - Phone Call Help and Due Diligence

I feel it’s my job to save you as much money and time as possible on every project you plan to do at your home. While it’s a noble quest, I’m thwarted each day by two or three things. First and foremost, if my incoming email from homeowners like you is a statistically relevant cross-section of the population, there are thousands of contractors who produce less than acceptable workmanship.

The next problem is you. It’s tough-love time. Each autopsy I do for homeowners that are victims of poor workmanship contains a toxic mix of trust and hope. It’s natural for you to trust that the person you hire will do a good job. But hope is an emotion that should only be reserved for things you can’t control like the weather and winning lottery numbers. Don’t ever hope the job goes well. Do your due diligence to ensure a happy ending.

Allow me to share with you two true stories. The first one happened just last week. Several days ago a young woman my wife and I know from church reached out to me. She's our cantor and was desperate for plumbing help. All of a sudden a leak occurred in a lower-level ceiling of her condo.

Knowing how to prioritize leaks, I asked, "Is water dripping constantly?” She replied, “No. It's just a water spot that appeared that wasn't there a few days ago.” I knew it was not an emergency as a pinhole leak in a water supply pipe would cause a stream of water or a constant drip. I texted her, "I'll be there tomorrow at 11:29 AM."

Once I arrived at the woman's condo and looked at the stain, it was time for questions. I asked, "What happened here in the past few days that was unusual? Have you had strangers in the house or contractors?” She responded, "Oh yes, just a few days ago a flooring contractor finished installing a new laminate floor upstairs."

We climbed the flight of steps and I walked over to the spot just above the water-stained ceiling below. I was standing inside a half bathroom. The young woman added, "The flooring contractor took off the toilet and put it back down after he installed the flooring. He said everything would be fine."

While the flooring contractor’s intentions may have been good, he broke the all-important toilet gasket seal and buried the toilet flange with the new laminate flooring. Now, each time the toilet is flushed, water splashes around under the toilet, and some leaks out around the toilet flange. It then passes through the hole cut in the sub-flooring for the drain pipe. Gravity then deposits the water on the drywall fastened, for the time being, to the bottom of the floor joists.

This young woman only reached out to me because she couldn’t get local plumbers to return her calls. How many hundreds of dollars of extra expense were caused by the flooring contractor’s lack of understanding of how to properly re-seat a toilet? So you know, I’m going to fix the flooring contractor’s mistake for free.

Two years ago a different homeowner hired me to diagnose why his wife was seriously ill. Three different doctors couldn’t figure out the cause of her sickness. After talking with the husband on the phone for just 15 minutes, I told him I was positive she was being poisoned by methane gas.

I simply asked questions that the doctors might not have posed. As the phone call ended, I told the homeowner to open the windows in the house and keep them open until the repairs could be made. His wife started to feel better within hours.

A different flooring contractor made the same mistake. He installed a new marble floor on top of a ceramic tile floor inside a half bathroom. Once again, this contractor broke the all-important seal between the toilet and the flange. The homeowner paid me to specify how the repair was to be done and to be present when a plumber came out to reseat two toilets in the house. It ended up being an eight-hour consult as his home was 80 miles away.

A remodeling contractor based in Texas subscribes to my weekly newsletter. In my most recent newsletter, I shared the story about the young woman. He reached out to me recounting several similar horror stories about water leaks caused by flooring contractors. He finished by saying, “I caution my customers not to let the flooring guys mess with the plumbing. Really smart tile/flooring guys know better and state up front they do not remove/reinstall plumbing fixtures.”

You can prevent bad workmanship, to a large degree, by investing the time to discover how jobs should be done. Yes, it takes work to do this. It’s not easy. By doing it, you remove hope from the equation. Don’t forget that I offer phone coaching to let you know all the things that can go wrong on one of your upcoming jobs. The husband of the sick wife wrote me a heartfelt note thanking me for putting an end to his wife’s misery. Save a stamp and let’s talk before you start your job!

Column 1495

Painting Rusty Metal and Steel

rusty metal gas pipe rust paint

The rust on this large natural gas line could eventually eat through the pipe and cause a catastrophic gas leak and explosion. Copyright 2022 Tim Carter

Painting Rusty Metal and Steel - Prevent Explosions!

Did you see in the recent news the catastrophic gas explosion that killed nine people on the island of Jersey in the English Channel? It’s early in the investigation and the experts may not ever be able to pinpoint the cause, but I have my own idea based on something that happened to me two years ago.

I was hired by a small condominium association to do a thorough inspection of some outdoor covered decks that had leak issues and wood rot problems. This building was located just a mile or so from the Atlantic Ocean in New Hampshire. The flats on Jersey island were subject to the same marine environment.

My inspection started at the uppermost deck and I worked my way down to the ground-floor deck. When I was underneath the deck in a passageway that led to a basement door, I saw black iron gas lines that extended from the outdoor meters into the basement. These are connected to the water heaters and furnaces.

The iron pipes weren’t black. They were a crusty brown as they were completely coated in rust. I immediately informed the president of the condo association that these pipes must be painted with a special rust primer and then two coats of finish paint. I instructed her to make sure she read the instructions on the label of the special metal rust primer to prepare the pipes so the primer adhered well.

I was reminded of a quote from the captain of the Norwegian Dawn cruise ship. I had attended a talk of his five years ago while on a short cruise and he said, “The sea EATS iron and men.” If you remember some of your high school chemistry you know this to be true. Saltwater is extremely corrosive to unprotected steel and iron.

Author's Note: Ed Nemec sent me this after I mentioned this column in my Ask the Builder newsletter: "I had a gas meter stubbed into a cabin but never used for decades. When I went to use it, the thin thread snapped off with no pressure as it was only stubbed - no stress at all. The meter was still turned off but it amazed me at the time. So I experienced what you're talking about in Illinois with no salt conditions."

You may or may not know this but I’ve been a master plumber since 1981. I’ve installed miles of black iron gas lines in my lifetime. I’ve hand-threaded each and every pipe with cutting dies. You may have never thought about the threaded pipe, but where the grooves are the pipe wall thickness has been cut away and reduced to create the threads.

This means that the strength of the pipe is much less in these grooves. If rust has been working on the pipe eating away at the iron, then if something bumps the pipe or it becomes stressed or bent by accident, the metal at the base of the grooves can crack just like you bending a thin pop-top tab on a soft drink can. Gas now starts flowing from the pipe like air from a blown-up balloon.

You don’t need to live near the ocean for this to happen. Normal rain or humidity in the air will cause rust to form and grow on unprotected iron or steel. Your house has all sorts of structural steel elements that are rusting. Many ignore this rust at their peril.

x o rust paint can

This is FANTASTIC paint to use on black iron pipe or any steel. Be sure to use their primer and coat the primer with finish paint within hours of the primer drying. CLICK HERE to have it delivered to your home.

What about your deck joist hangers? I know they were galvanized when they were installed, but has that zinc coating worn off and do you see rust?

What about the nails that attach the deck joist hangers and other structural connectors to the wood? Is the copper in the treated lumber leaching out with each rain event causing rust and corrosion?

What about those cheap electroplated roofing nails the roofer used to install your shingles? I’ve seen new roofing nails transform to rusty fasteners in as little as five to seven years. The best roofing nails are ones that are double-dipped hot galvanized. Period.

What about any steel support posts in your basement or crawlspace? Do you see rust on these? What happens if the rust eats through the post and someone bumps into it?

What about rust on any horizontal steel I-beams in your basement or crawlspace? Are you ignoring it? If so, you’re making a sad mistake.

The good news for you is that painting rusty black iron pipe or all the things I listed above is absolutely a simple DIY job. Most of the high-quality rust primers and special rust finish paints are available in spray cans should you not like to use a brush.

I recorded a video about five years ago showing the difference between two top rust-paint brands. The test panels in the ASTM scratch test were like night and day. I urge you to watch this video so you purchasea paint that will last for many years, even in a marine environment.

Column 1487

How to Build A Masonry Fireplace

masonry fireplace cast iron damper smoke shelf fire brick

Odds are you’ve never seen what’s above and behind the mantle of your masonry fireplace. Behold the magic of why the fireplaces in the houses I built never smoked.  Note how high the bottom of the cast-iron damper is in relationship to the bottom of the concrete lintel that forms the top of the opening of the firebox. This separation is very critical. Copyright 2022 Tim Carter

How to Build a Masonry Fireplace - It's Very Complex

The two main reasons for smoke in his home were the lack of a combustion air intake and his chimney was not the correct height. A few of his photos also showed a very dangerous situation where his flue liners were not surrounded by solid masonry, rubble, and mortar. A hot ember could make contact with wood framing with little difficulty.

Over the years I’ve visited homes that have fireplaces built by amateurs or paid masons that have no clue how to build them. You may not think it’s that hard to build a fireplace but it’s actually very technical. The width of the fireplace opening controls all the other dimensions.

The Brick Industry Association (BIA) should be your go-to source for all the information you need if a traditional masonry fireplace is in your future. I’ve used their specifications for over 40 years to construct smoke-free fireplaces in all of the homes I’ve ever built.

I urge you to go to their website and download the free technical notes publications about masonry fireplaces. They are:

  • #19 Residential Fireplace Design
  • #19A Residential Fireplaces, Details and Construction
  • #19B Residential Chimneys - Design and Construction

These publications are written so a layperson can understand them with ease. The illustrations and tables allow you to easily visualize exactly how a masonry fireplace should be constructed. If you have a smoking fireplace, you’ll no doubt discover the cause of why you’re coughing by using the three publications. I guarantee they’ll help you do an autopsy on your fireplace.

When you dive into the documents, you’ll discover that the shape of the firebox is mission-critical. The sides have to be angled and tapered to the rear of the firebox. The rear wall needs to be vertical rising up from the floor, but then at a certain height, it needs to start to gently slope towards the front of the fireplace.

The position of the damper is extremely important. Not only does it need to be at least 8 inches above the opening of your fireplace, but it also needs to be forward and close to the room. By default, this creates the smoke shelf behind it. It’s far more complex than you probably ever realized.

One of the biggest mistakes I routinely see when homeowners send me photos is the use of regular mortar to set the actual high-temperature firebrick. That’s a huge mistake. The firebrick are supposed to be set using fire clay. Regular mortar will crumble in short order. If you see sand in the mortar joints in between your firebrick and the joints are about 3/8-inch tall, you’ve got the wrong mortar.

Fire clay is a powdered clay that’s mixed with water. It’s rich in both aluminum and silica and can withstand decades of high temperatures inside the firebox. The fire clay joints are very thin, normally less than 1/8-inch in height. A mason that knows what she/he is doing carefully dips the side of the brick that will touch another one into the soupy batter.

bag of fire clay

Fire clay comes in bags like this. CLICK HERE or the image to have it delivered to your home.

Your mason may build the firebox correctly and yet your fireplace still smokes. If that’s the case, you then need to see what went wrong with the chimney. The size of the flue is directly related to the size of the firebox. All of these specifications can be found in the BIA Technical Notes.

Don’t overlook the height of the chimney. It’s very important because of downdrafts created by nearby trees or parts of your roof. All of this is covered in the documents.

Last but no least, be sure that the mason builds the chimney crown properly. Based on my lifetime experience I’d say that less than one percent of all chimney crowns are constructed properly. To see how to do it, pay close attention to the diagrams in the #19B document. Don’t forget the all-important drip kerf under the crown overhang!

Column 1489

Cold Weather Myths and Your Home

water running from vanity faucet

If this water runs all night, will it cost 1/20th of what it will cost to repair a burst water line? Copyright 2023 Tim Carter

Cold Weather Myths and Your Home - Easy Ways to Save $$$

When I woke up just before writing this column, it was a balmy -15F here at my house in central New Hampshire. A gale was blowing and the wind chill was -41F. You may be reading this column in sunny Florida or southern California where it never gets bitter cold but you may have family or friends up in the frozen north that may benefit from what I’m about to share. There are several cold-weather myths to dispel.

How Much Water Should Drip From a Faucet?

As you might suspect, when a cold blast of Arctic air washes over those of us that choose to live where the air hurts our faces, the requests for help at my Ask Tim page on my www.AsktheBuilder.com website go through the roof. Just minutes ago Autumn, who hales from Newport News, VA, asked me to debunk an old wive’s tale. She asked about how much water needs to drip from a faucet to prevent water pipes from freezing.

If you really paid attention in your high school chemistry and physics classes, you know that motion interferes with water wanting to go from the liquid to solid state. This is why a pond freezes but the stream feeding the pond still contains liquid water. That said, if the temperature drops low enough, there’s the possibility the stream might freeze.

If you could see inside the copper pipe that is feeding your kitchen or bathroom sink while you have the faucet dripping or even a tiny stream flowing from the faucet, you’d see virtually no motion in the water within the pipe. Visualize a huge crowd of people on one side of a single turnstile. While you perceive movement at the choke point, farther back in the crowd the people are pretty much standing still.

To prevent an expensive service call from a plumber, you need to have lots of water running through the water lines. As the temperature gets colder and colder, more water needs to be tumbling around in the pipe. While your local water works may not like this, if you use $10 worth of water and $3 worth of natural gas or electricity during a cold night, it’s so much cheaper than a $300-$500 repair bill.

There are numerous ways to prevent frozen water lines. First, you need to do whatever you can to keep the temperature of the pipe above 32F. I’m not a fan of heat tape because it can cause fires if installed incorrectly. I’m a huge fan of adding more insulation, relocating the pipes so they touch the actual warm wall or floor surface, and/or replacing the section of pipe with PEX tubing. Water that freezes in PEX tubing will cause the tubing to expand but it won’t burst the tubing.

How Can I Lower My Heating Bill?

One of the top questions I receive is, “How can I save money on my heating bills in bitterly cold weather?” The honest answer, and most don’t like it, is to turn down your thermostat. You want to use far less fuel. Installing a programmable thermostat is the best way to control how much natural gas, propane, or electricity you’ll use. Allow the temperature to drop to 50F while you sleep. Sleep under a puffy insulated blanket.

Forget about caulking air leaks, adding more insulation, etc. in periods of frigid weather. The caulk might freeze, you may not get a fast return on investment on added insulation. A column I shared with you just two weeks ago showed how it can take decades to recapture the cost of foam insulation.

The better thing, and you may recoil at this, is to just wear more clothes when you’re inside. My wise father-in-law grew up on a rural farm during the Depression. He recounted stories of going to bed as a child with frost coating the covers. He survived to tell the tale.

Think about this for a moment. How many nights have you been eating outdoors at a restaurant, perhaps at a football game and the air temperature was 60F? You might have had on a light jacket and been comfortable.

I routinely keep my thermostat low at my home saving lots of money. I wear long underwear, a knit hat, wool socks, and often a hoodie with the hood pulled up to keep my neck warm. Yes, I may look like a nut inside my home, but I’m as snug as a bug in a rug.

Do I Need Replacement Windows?

What about those drafty windows? Guess what? The air leakage around the windows may be so little as it wouldn’t even cause the smoke from a burning stick of incense to waver. Put away your credit card! Don’t sign a contract for new replacement windows!

I know you’re feeling air moving when you sit next to the glass but it’s not air leaking in from outside. The air in your room makes contact with the cold glass surface. The air cools and as you know cold air is heavier than warm air. The cold air starts to move toward the floor. This conveyor belt of air doesn’t stop until the glass surface warms up.

Pull the curtains closed or drop the window shade to corral the cold air next to the window. You’ll be amazed at how within minutes the draft seems to have disappeared.

Column 1494

Loan Prepayment Benefits

table showing interest savings by prepaying a loan

Loan Prepayment Benefits - You Can Save Thousands of Dollars

My youngest daughter moved out West thousands of miles away from me in 2022.  Once in her new city, she had to purchase her first car. She bought a used car from Carvana.

At the time of the purchase, she had a job prospect but was not employed. She had an excellent credit score very close to 800 and a hefty rainy-day fund. Within a month of purchasing the car, she obtained a very high-paying job as a private flight attendant for a multi-billionaire. Making her car-loan payments as well as her apartment rent was not an issue.

Her lack of a job at the time of buying the car caused her to get raked over the coals with a 10 percent rate. The term of the loan was six years.

Big Christmas Bonus

My daughter informed me that she was given a sizeable Christmas bonus from her employer. She wanted to take part of the bonus, $5,000.00, and invest it. She had gone to a local bank and discovered she could get a one-year certificate of deposit for 3.5%. She also knew she could send the money to the professional investment firm that handled her rainy-day fund.

I told her that the best thing to do would be to apply the $5,000 to pay down her car loan. I decided to poll my newsletter list because I knew that any number of my subscribers were financial experts. As you might suspect, I was flooded with a plethora of excellent advice. I decided to share it with you.

Let's get started.

"Does She Have a Rainy-Day Fund?"

A vast majority of the responses that poured in wanted to make sure she had a rainy-day fund that would cover all of her living expenses for a minimum of six months. I had NOT SHARED with my newsletter list that she had one of these funds.

This was, perhaps, the best piece of advice offered up by my newsletter subscribers. If you don't have a rainy-day fund, you should. My next-door neighbor who is a retired CPA is far more conservative. He feels you should have five years' worth of living expenses saved up. Very few people can achieve this goal, although it's a very noble goal to aim for.

The bottom line is you SHOULD HAVE a rainy-day fund.

Prepayment Penalty?

One of the things I told my daughter before polling my newsletter experts was, "Be sure you read the loan agreement. Discover if there is some hidden prepayment penalty. If there is, the penalty may negate all the benefits of paying off part of the principal early."

That same advice was offered up by quite a few of my subscribers. When you are negotiating for a loan, be SURE THERE IS NO PREPAYMENT PENALTY. Make the loan officer show you in the loan agreement the language that says you can PREPAY the loan early with NO PENALTY.

Get a NEW Loan ASAP!

You may have been one of my subscribers that suggested my daughter re-negotiate her loan ASAP. With ten months of on-time loan payments PLUS a great job, she'd be able to get a much more favorable interest rate. She can apply the $5,000 to the new loan principal right away to get lower monthly payments. Then she can do an extra trick you'll see below to pay off the new loan in HALF THE TIME.

Guaranteed 13 to 15% Interest?

Several financial experts pointed out that if you wanted to get a HIGHER return on investment rather than apply the $5,000 to prepay down the loan, you need to find some investment that GUARANTEES you an annual interest rate of better than 13%. By paying down the loan you effectively are getting a 10%, roughly, return on your investment for the $5,000. You'll see this detail shortly. Hang in there.

The reason you'd need to get at least 13% is that you have to pay Federal taxes on interest income. You may even get DOUBLE TAXED on this as your state may have a tax on interest income.

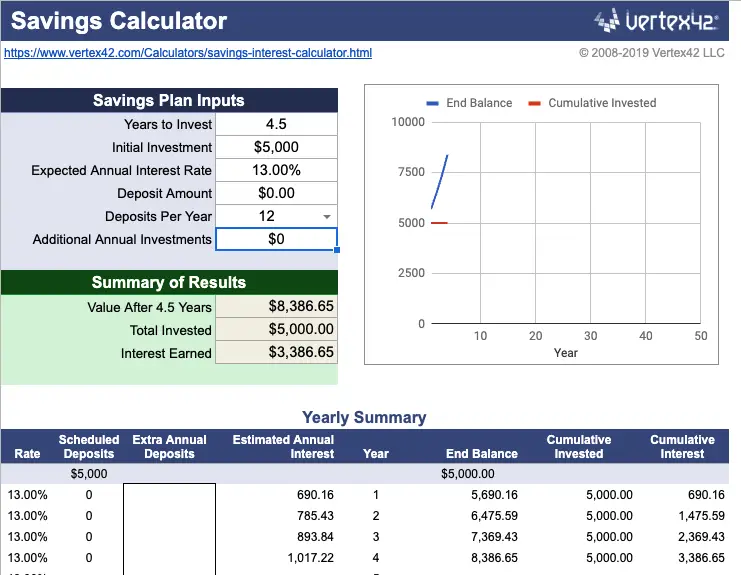
I used a fantastic savings calculator that shows what happens if you invest $5,000 for 4.5 years at 13% interest rate. You use 4.5 years because that's the amount of time left to pay down the loan should you make a one-time payment of $5,000.00 on the principal. You'd get $3,386.65 in interest at 13% for 4.5 years. But remember, you need to pay taxes on that income.

table showing interest income on savings


Calculating Interest Savings

When I reached out to my newsletter subscribers, I shared that I thought the projected savings in interest on my daughter's car loan by making a one-time $5,000 principal payment would be $6,430.83. I used an inferior online template that didn't calculate the savings the correct way.

I was WRONG. I wasn't even close. Not only that, I didn't use critical-thinking skills - SHAME ON ME - to think about what the total interest might be. You'll see that just below. I also goofed up by thinking that the $5,000.00 would be a savings when in fact it's just re-paying principal owed.

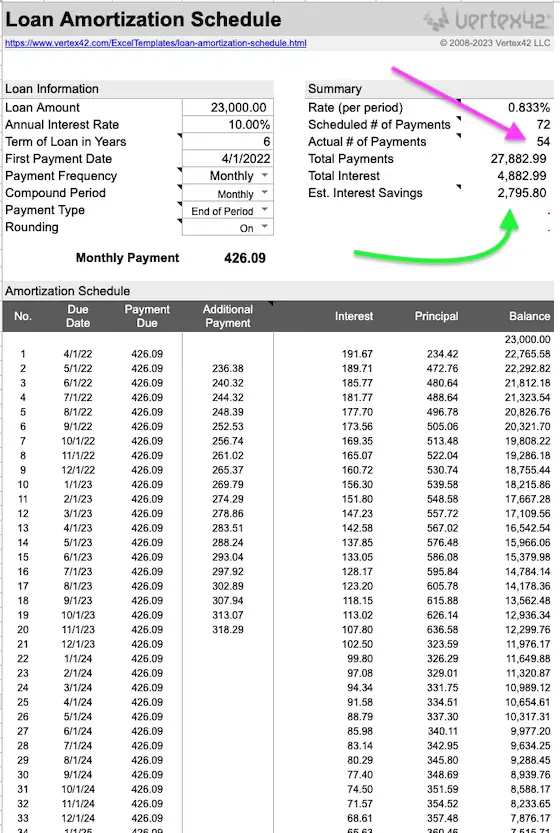
Ken, one of my subscribers, sent me this fabulous page where you can download and use all sorts of loan calculators. I used the first one at the top - Loan Amortization - to calculate the TRUE interest savings.

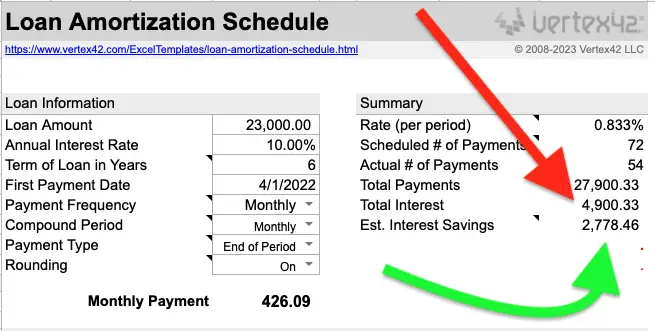
Using the template suggested by Ken and NOT making an extra principal payment you can see rapidly what the total interest would be on my daughter's car loan. Look:
table showing loan interest

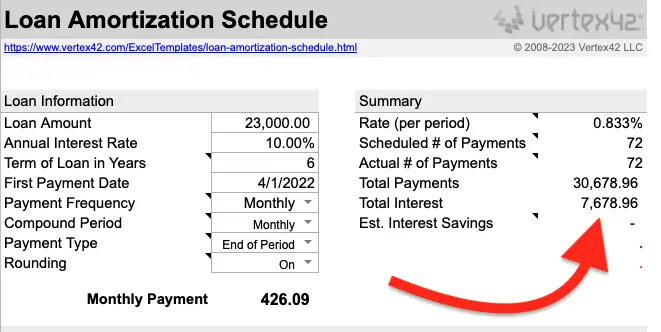
The table above shows the original car loan of $23,000 for six years at the 10% interest. If you make the 72 payments of $426.09, you'll end up paying $7,678.96 in interest over the life of the loan.

You can see that my original calculation was so far off as to be laughable.

Look what happens if you make a one-time $5,000 principal payment ten months into the life of the loan.

table showing interest savings by prepaying a loan

One simple payment of the $5,000 after just ten months into the loan saves almost $3,000.00 in interest! The actual amount is $2,778.46 in interest. What's more, the loan is paid off in 54 months, not 72 months. Look at these two giant tables to see how that one payment of $5,000 CHANGES the amount of interest and principal in the subsequent payments starting in month 11. I'm sorry but I could only grab a screenshot of 52 months on my monitor.

loan amortization table

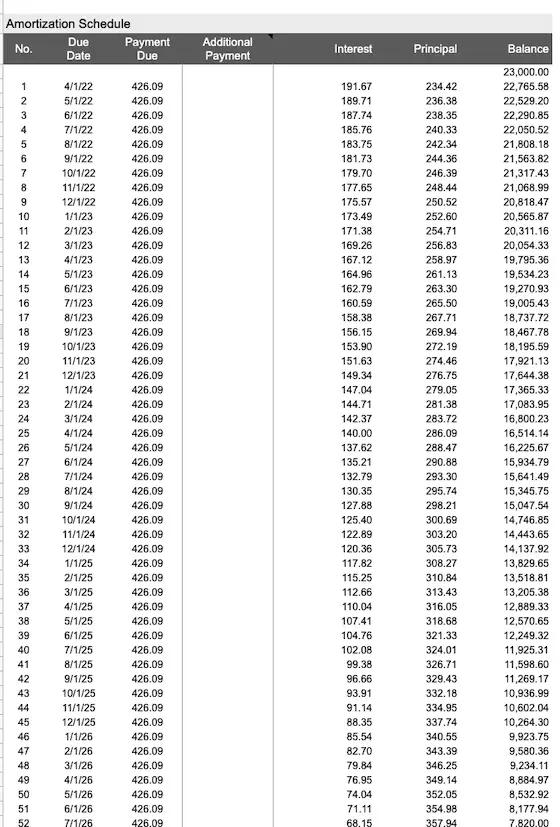
This table above shows NO extra principal payment. Look at the principal and interest payment on payment #11.

loan amortization table

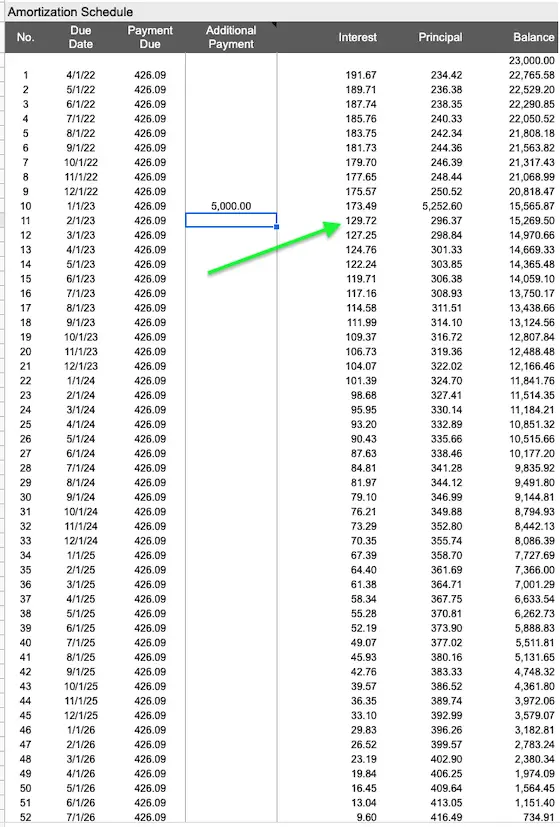
Look at how the interest payment in month 11 is DRASTICALLY LOWER than the previous month. This is because the interest is calculated EACH MONTH ON THE UNPAID PRINCIPAL. Since the principal dropped by $5,000, the interest MUST BE LOWER.

But It Gets BETTER

A few days after polling my subscribers, Rob reached out to me. He had stellar advice. It's important to realize a few others offered up similar advice, but didn't outline exactly what they had done to achieve paying off their loans early.

Rob noted up front that his suggestion deviated from my proposed one-time principal payment of $5,000.00. His method is more complex and it becomes a multi-variable calculation because you only use part of the $5,000 each month and whatever is NOT used to pay down the loan is invested. The issue is what kind of interest can you get that PROTECTS the remaining $5,000.00 so it's not at risk as might happen should you invest in stocks or some other risk-based investment?

Rob's method is simple. You create an amortization table as you see above - I'm talking about the table just above that does NOT have the green arrow in it. You can see the interest and principal you'd be paying each month with your regular payments of $426.09. This is very powerful with long-term loans such as a 15 or 30-year home mortgage. With my daughter's car loan, it's different.

Rod said, "Look at the table your loan officer will give you. When it's time to make payment #1, look at how much principal would be paid in your SECOND payment. Add that to your first payment and repeat this each month." In the case above you'd be paying the scheduled $426.09 PLUS $236.38 for a total payment of $662.47.

What you see below is Rob's method but I STOPPED when I exhausted the $5,000.00 at payment #20. But remember, over those 20 months you would be earning some interest on the money you had not paid out yet. It's very interesting to note that the amount of interest saved is nearly identical to what you'd save had you made the lump-sum $5,000 principal payment in month ten of the loan.

Doing it Rob's way the loan is paid off in 54 months if you make NO OTHER principal payments. But if you continue to add more principal with each payment you might pay off the loan in as little as 36 months.

loan amortization table

The Bottom Line

I think it's obvious that you can save vast amounts of interest if you prepay off a loan. In my daughter's case, should she make a lump-sum payment this month she'll save almost $3,000.00.

You tell me what SAFE investment opportunity offers you a GUARANTEED payment of $2,778.46 over 4.5 years if you invest $5,000.00. I know I can't think of one!

How to Use an Old Drywall Lath Hatchet

How to Use an Old Drywall Lath Hatchet - Keep it Razor Sharp

This video was probably recorded in the 1950s. The installer is putting up 3/8-inch-thick drywall lath panels. These lath panels were often 16 inches wide and normally 4 feet long. They were introduced in the early 1900s. Some call it rock lath. The use of the word rock stuck with it as gypsum board transitioned to the dryall you see today in the year 2023.

A 1/4-inch to 3/8-inch-thick scratch coat of plaster would be installed over this followed by a thin coat of silky-smooth white veneer plaster.

The reason he uses so many nails is because of the combined weight of the plaster lath and the actual plaster.

The hatchets were used originally to cut the actual wood lath strips to length. Back in the 1800s 1.5-inch-wide by 1/4-inch-thick wood strips were nailed to the wall studs. There was about a 3/8-inch-wide gap between each one. The scratch coat of plaster would ooze through the gap and hook itself onto the wood in this manner. The hatchets were used to cut the wood strips to length.

Below the video is a photograph of my own hatchets. The one with the wood handle is about 45 years old!