WalabotDIY Imaging Tool Review

WalabotDIY

Here it is. The WalabotDIY. It attaches to your smartphone temporarily while you put it to work! CLICK HERE for more information. Photo credit: WalabotDIY

If you've read comic books in the past, watched the Heroes TV series or have seen any of the newer Marvel movies about superheroes, then you're undoubtedly aware of magical super powers.

One that I wish I had over the years was X-ray vision that would allow me to see through plaster, concrete, tile, wood floors, etc. so I didn't cut into a pipe, cable or who-knows-what!

You don't have to wish any longer.

You can now have that super power in your hands if you attach the new WalabotDIY to your smart phone!

This column was SO GOOD that I shared with the 31,000 subscribers who read my November 30, 2016 AsktheBuilder Newsletter.

Capabilities

The WalabotDIY can see through up to 4 inches of concrete! You can identify the location of reinforcing steel, conduits or any other hidden material in a slab or poured wall.

It's child's play for the WalabotDIY to see through drywall or plaster. Can you imagine how this handy tool can let you know what you're up against before you demolish a wall to create a larger opening?

It's equipped with multiple sensitivity settings so you get accurate readings.

Since it's working in conjunction with your smartphone, you can snap still photos of what WalabotDIY is *seeing*. If you make pencil marks on the wall at the location of where you snap the screenshot, you can look at your stored photos later to remind you what's where behind the drywall, plaster or concrete.

Do you have pests like mice or flying squirrels living in your walls? WalabotDIY can see them and tell you exactly where the nests are!

Platforms

At this time the WalabotDIY works only with Android smartphones.

Visit the WalabotDIY website to see if your phone, and it's operating system, will support this mystical tool that will save you from calling in a plumber or electrician to fix what you damaged with that reciprocating saw blade, chipping hammer, or sledgehammer blow!

My Own Test

I had the opportunity to use the WalabotDIY at my own home. Three years ago, I created a man cave / amateur radio shack above my garage. The new wall I built was loaded with electric cables and some ran at odd angles within the wall.

To keep my cave warm, I stuffed the wall full of rock wool insulation. I felt that would be an excellent test as finding things in hollow wall cavities is the easiest of tasks for an imaging tool.

WalabotDIY

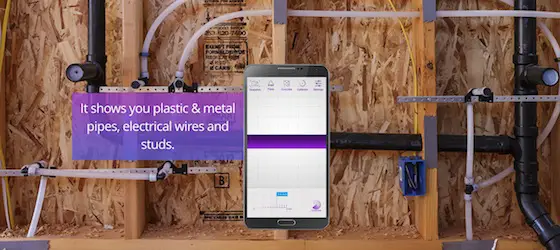
This is a very similar situation with the same insulation in my wall. You can see how the WalabotDIY can produce an image on the smartphone screen. CLICK HERE to get more information about WalabotDIY. Image credit: WalabotDIY

It took no time at all for the WalabotDIY to calibrate itself and go on the hunt for the 120-volt cables.

As I slid the sensor across the wall, the screen changed and lo and behold it showed me exactly where the electric cables were nailed to the studs and angling across one of the spaces between the studs. I was impressed.

I had decent results with the tool. It takes a little bit to get used to working it. You need to make sure you read all the instructions that come with it and on their website. It takes some practice to get a feel for what the you see on the screen translates to inside the wall. BE PATIENT when working with it and you should get respectable results.

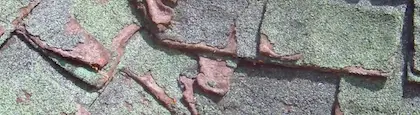
Here are more photos of what the WalabotDIY can do. This sure would have come in handy last winter when I had to cut into my basement floor slab. I have PEX heating pipes in the concrete and could not afford to hit one with the chipping hammer drill bit!


WalabotDIY

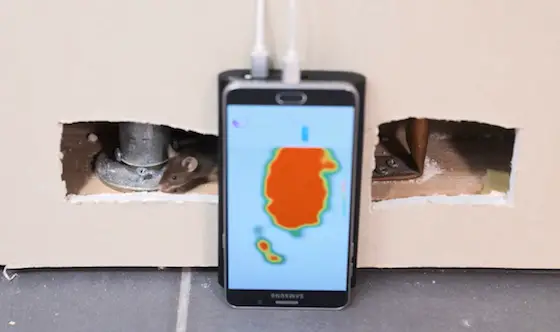
You can see how easy it is to use the WalabotDIY. The orange blob on the screen is screaming at you, "Hey, I've FOUND SOMETHING!" Photo credit: WalabotDIY


WalabotDIY

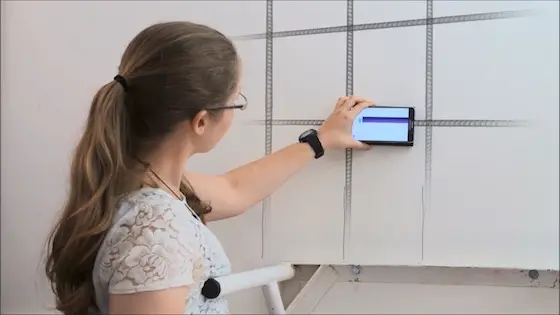
This young woman is showing how to use the WalabotDIY to locate steel reinforcing rods in a cast concrete wall. Photo credit: WalabotDIY

walabotdiy imaging tool


Watch this video to see how easy it is to use the WalabotDIY:

November 16, 2016 AsktheBuilder Newsletter

Kathy and I wish to thank you for your comforting responses last week with respect to the passing of her father. He's up in Heaven now with Kathy's mom.

My guess is he's playing solitaire, or he's busy in his garden. He could also be changing the brakes on St. Peter's Cloud Surfer Mobile or whatever he drives around after getting off work at the Pearly Gates.

Remember as you continue the journey each day to look for treasure in the right place.

"Only life is priceless, and making each day count."

Roofing Ripoff Book Update

A year ago, I decided to write an expose' book about why my asphalt shingle roof fell apart LONG BEFORE it should have.

When I bought my house in 2008, the roof was just eight years old and was in perfect shape - or so I thought.

Within a few years, granules were falling off faster than people abandoning a sinking ship.

Soon the shingles started to curl and delaminate. Look at this photo I took of my shingles eighteen months ago just before removing them:

Roof curling shingles


You may be like Greg Grigsby who lives about forty miles from me. I visited his roof last fall to survey his deteriorating shingles.

Greg emailed me last night wondering about the status of the book. You may have emailed me over the past few months too.

The good news is the book should be ready for you sometime in February, 2017.

Here's the primary reason the book has been delayed.

While writing it I made a discovery about how to arrest and SLOW DOWN the deterioration of asphalt shingles!

This is HUGE because the evidence I collected points to the fact that many of the shingle manufacturers appear to be making a product that's designed to fail much faster than it should.

Why are they doing that?

I'm going to let the book help you come to your own conclusion. It's deeply disturbing to me is all I'll tell you.

When I present the facts of how manufacturers know how to make excellent roofing products that last decades and decades, I'm afraid you'll be none too happy.

Here's a teaser photo below that you'll see in the book.

What would you say if I told you that this material was made just like shingles that are FALLING APART on your roof?

But what you see below is in perfect condition and it's been exposed to the weather since the 1930's.

That's not a typo.

This material has been exposed to New Hampshire weather since before WW II and looks BRAND NEW.

Does that have your attention? It should.

What does this have to do with why I'm delaying the publication of the book?

I have to have the product you need up on your roof ready to sell and ship BEFORE the book is published. I hope to have that in place in the next ninety days.

I Need Your Opinion

In the meantime, I'd like you to help take some ownership of my book project.

I'd like you to help me decide what's the best subtitle and back-cover content for the book.

Would you do that for me?

Many books have subtitles. It's text that helps further explain what's inside the book.

The back-cover content expands upon the subtitle. It tells you in a paragraph, or two, what the book's about and what might have been the motivation of the author to write the book.

Great subtitles and back-cover content captivate your attention. They draw you into the book like the tractor beam of the fabled Death Star in the Star Wars movie series.

CLICK HERE and follow the instructions to help me decide what's going to be on the front and back cover of the book!

THANKS for doing this.

Christmas Shopping and AsktheBuilder.com

I try to help you all year long with tips and advice about how you can save money and time.

You can return the favor by using my affiliate link at Amazon.com when you do all your shopping. With Christmas coming, you can really help me by using my link each time you go to Amazon.

CLICK HERE to get started.

Each issue of this newsletter contains my Amazon affiliate link. It's in the right column just under the photo of my daughter Meghan. See it above?

THANKS for using the link. The revenue I get from this helps me continue to produce this newsletter.

Tyrone Roberson and Bob Sumerel Tire

CLICK HERE and read about Super Hero Tyrone Roberson! He saved Kathy and me on Saturday!

Amazing YardMax Log Splitter!!!!

I had the opportunity to test and review a powerful 35-ton full-beam log splitter. It's made by Yardmax.

This splitter did an amazing job.

CLICK HERE to see all of the Yardmax log splitters.

I wrote a review and taped a video about the splitter.

CLICK HERE to watch the video and read the review.

Yardmax makes a bunch of very unique products.

One of them I'm DROOLING OVER. CLICK HERE and guess which one it is.

I'll give you a clue. It's something that you've probably NEVER SEEN BEFORE.

CLICK HERE and then click the link that shows you all their products.

That's enough for today.

PLEASE go back up and click the link to help me decide the subtitle and back-cover content for my Roofing Ripoff book.

Thanks!

Tim Carter
Founder - www.AsktheBuilder.com

Do It Right, Not Over!

Yardmax Chipper Shredder Video Review

I tested the Yardmax YW7565 Chipper Shredder in November of 2016. Over the years I've owned several different chipper shredders so I felt as if I could evaluate this machine quite well.

The bottom line is it's a great machine.

Here's the top reasons why I feel this way:

  • It's well built. I didn't observe any shortcuts.
  • It's designed well. Everything is where you think it should be.
  • It's easy to operate. The lever to engage the spinning chipping disc is intuitive.
  • It chips FAST. The machine gobbles mid-size branches quicker than you can eat a chewy brownie.
  • It's self-feeding. Once the spinning disc starts to chip the wood, it pulls the branch into the machine keeping your hands SAFE.
  • It's easy to move around. I was able to pull the machine up a moderate hill into my shed with no help at all.

This chipper shredder can handle up to branches 3 inches in diameter! The unit has a 6.5 Horsepower Briggs & Stratton engine. The shredder has easy access to the spinning disc for maintenance.

CLICK THIS LINK to buy one now:

The above is an affiliate link. I get a tiny commission if you purchase this item from Amazon.

November 11, 2016 AsktheBuilder Newsletter

This is going to be a fast newsletter.

I'm sitting in the giant atrium of the Embassy Suites Hotel in Blue Ash, Ohio. In two hours, I'll be at the church where the services will be held for my father-in-law.

We had to send him back to Heaven last week and now it's time for family and friends to gather to honor and remember him.

What a life he had! He was a child during the Great Depression and lived on a very rural farm in Kings Mills, Ohio.

If you live near Cincinnati, OH, then you might make the connection and understand why the giant amusement park along I-71 is called "Kings" Island. I'll bet you never thought of that!

He was a medical doctor and was an avid DIYr not only working on his cars, but he also fixed lots of things around his own home.

He told me very funny stories of how he and his brothers used electricity to amuse themselves.

He told me about going to sleep at night in the farmhouse with frost on his blankets.

He taught me important business negotiation principals, among them that there needs to be romance in the deal for both parties. His exact words.....

Doc also taught me many other things and he's DIRECTLY responsible for you being able to read this newsletter and absorb all the free content at my AsktheBuilder.com website.

When no bank would lend Kathy and I the money to purchase our first run-down home at age 23, he stepped forward and wrote the check. I have a very interesting story about this, but that's for another day.

We paid him back and the rest of the story is simply that the quaint 3-bedroom house at 2865 Minto Avenue in east Hyde Park in Cincinnati became the launching pad for my building career.

Thanks Doc!!! Talk to St. Peter today about putting new brakes on his St. Peter mobile!

Thanks to All Veterans!

At the same time, you and I need to THANK and HONOR each and every living Veteran who's service and SACRIFICE allows me to type these words and for you to be able to express yourself using your First Amendment rights.

The great opportunity and liberties you and I have here in the USA are only possible because Freedom is NOT FREE.

All veterans, who we honor this day, gave some of themselves so you can be free. Millions of veterans gave the ultimate sacrifice, their lives, but we honor those late in May on Memorial Day.

If you're a veteran, I thank you, as does my family, from the depths of our hearts for what you did so I can live in this magical land.

I only wish there was a way I could repay that debt of gratitude.

If you know a veteran, STOP what you're doing right now and call them, stop them in the store today, email them, etc. and THANK THEM for their service.

New Video - AMAZING GLUE

I taped a new video last week before leaving New Hampshire to come to Ohio.

It's about a new one-part glue that probably will remind you of the simple white glue you used as a child in kindergarten.

While this glue LOOKS LIKE simple white glue, it's STRONG like epoxy. This is a glue you need to buy now to have around the house for HUNDREDS of repairs.

It's easy clean up with water and it dries CLEAR! It's also WATERPROOF so it's great for outdoor repairs too! I think it should have been named MAGICAL WONDER GLUE!

CLICK HERE to view the video. I have a handy BUY NOW link on the same page for you.

New Columns For You

Here are a few links for new columns I've added to the AsktheBuilder.com website:

Electric Floor Heating

Ceramic Tile in a Shower

Poured Foundation or Block???????

Okay, that's enough for today. Next issue I'll have TWO new videos for you. If you're a tool nut, you're going to LOVE THESE TWO NEW VIDEOS.

Tim Carter
Founder - www.AsktheBuilder.com

Do It Right, Not Over!

Tyrone Roberson and Bob Sumerel Tire Company

On Saturday morning November 12, 2016, I was getting ready to pack up my car to leave Cincinnati, OH. I was at the Embassy Suites hotel in Blue Ash, OH, a northern suburb of Cincinnati.

When I walked to the car in the parking lot, I immediately saw it leaning and knew the right rear tire was flat or soon to be. I needed to react so as to minimize the delay of Kathy and I driving to Scranton, PA.

My auto insurance includes roadside assistance, so I called them and help was soon on the way. While waiting for the tow truck, I looked up the closest tire repair shop. It was Bob Sumerel Tire in downtown Blue Ash.

For the rest of the story, read the letter I sent this morning, November 13, 2016, to the CEO of AAA Allied Group, the company that owns Bob Sumerel Tire Company:

Dear CEO of AAA Allied Group:

I'm sitting in the lobby of a Springwood Suites Hotel in Scranton, PA, right now approximately 500 miles from Blue Ash, OH refreshed and rested.

One of your employees, Tyrone Roberson, made it possible.

Yesterday morning, I awoke to pack my car to leave Blue Ash to drive back to New Hampshire. I groaned as I approached my car only to see a flat rear tire.

After a phone call to my insurance company that provides roadside assistance, I looked up the closest  tire repair shop. Just a mile away was your Bob Sumerel Tire Shop in downtown Blue Ash, OH.

I called ahead to see if they were busy and how long the wait might be as I needed to get my wife back home. She was very distraught about the funeral of her father the day before and getting her home as soon as possible was my goal.

Tyrone Roberson answered the phone and I told him of my plight. He said get down there as soon as possible and he'd get me on my way.

About thirty minutes later, I walked through the door and Tyrone said, "Good morning, how's it going today?"

"Well, it's not going too bad, but I'll be even better once you get me back on my way to New Hampshire," I responded.

"Oh, I just talked to you on the phone. Let me have your key," Tyrone said.

Here I am with Tyrone Roberson after he made sure my tire repair happened faster than you can say "Two cheese coneys no mustard heavy onion."

Here I am with Tyrone Roberson after he made sure my tire repair happened faster than you can say "Two cheese coneys no mustard heavy onion."

After handing him the key, he disappeared into the shop and moments later I saw my car inside one of the bays.

Another customer heard me say 'New Hampshire' and we proceeded for about five minutes to talk about the delightful weather up there, even in winter.

The next thing I knew Tyrone said, "Sir, you're ready to go."

I thought he was talking to someone else because there's no way a flat could be fixed that fast.

But I was wrong. Tyrone was talking to me.

"How much do I owe you?"

He just smiled.

"Seriously, what do I owe you?", as I pulled my wallet from my pants.

"Nothing sir. I hope you have a safe trip back home."

I was astonished and pulled out a $20 bill and handed it to him saying, "Here you go. Treat yourself and the rest of the team to something."

If it's your company policy to offer this generous service to out-of-town travelers, it's not only smart, but it's appreciated.

I walked outside to leave, but decided to go back in and say something to the manager, Matt Liviskie.

"I wanted to thank you and let you know something if you don't already know it. I feel it's very important for you to know who might be on the other side of the counter from you.

I produce a newsletter that goes out to 51,000+ consumers two times a week, I write a syndicated newspaper column that's published by sixty newspapers and I produce videos on for my YouTube channel that has over 66,000 subscribers."

"I'm going to spread the word in my newsletter about what happened here moments ago and make Tyrone a hero in the next issue."

"Realize that you never know what a customer might do after interacting with you."

I share all this with you on a busy Monday morning only to let you know that Tyrone completely turned around a stressful start to the day and made it into one where I'll go out of my way to do business with your company.

If you have an internal newsletter or other way to honor employees who provide outstanding customer service, please consider including this story so other employees can mimic the good will of Tyrone.

Tyrone was featured in my November 16, 2016 Newsletter.

Tim Carter
Founder - www.AsktheBuilder.com

Electric Floor Heating

DEAR TIM: I’ve read about electric floor heating and wonder if it will really do the job. Growing up I lived in a home that had electric coils in the ceilings of the rooms. The house was never really comfortable so I’m skeptical of the claims of the radiant floor mat manufacturers. If they do work, is it an expensive way to heat? Can you control the temperature easily? How is it installed? Donna B., Rochester, NY

DEAR DONNA: Let’s cut to the chase. Do you like to eat toast? Have you ever burned a piece of bread in a toaster? That’s the proof you need to know that electric heating works and can work quite well.

But realize that electric heating systems made to be in a ceiling or a floor do NOT glow red or orange and cause things to catch on fire. The coils in these systems produce a heat that’s more like a warm moist towel a flight attendant gives you just before landing when you sit up near the front of the plane.

The most likely reason your childhood home was uncomfortable was that not enough heating coil was put into the house and there weren’t enough heat BTUs to offset the heat loss that was happening in cold weather. To give you an extreme example, think about how futile it would be to heat a large warehouse with a tiny campfire.

Here’s what you need to know about electric floor heating. I’m writing this column right now in my cozy warm man cave ham radio shack with it a comfortable 72 F inside the room while frost is coating everything outdoors as I look through my large picture window in front of me.

This fabric mat contains a continuous heat coil that uses frugal amounts of electricity to heat a room. © 2013 Tim Carter

This fabric mat contains a continuous heat coil that uses frugal amounts of electricity to heat a room. © 2013 Tim Carter

There’s a wonderful electric coil floor mat under my handsome rough oak laminate floor. This heating system keeps my room warm even if the temperature outdoors drops below zero.

It works it my situation because the floor heating mat was designed for my heat loss. It can easily produce more heat than is lost through the walls, floor, ceiling and window. The same would be true for your home or your room where you might use this product.

My radiant floor electric mat came with a dandy wall thermostat that contains a tiny computer. You can program the thermostat to turn on and off depending on your schedule of when you want the room to be heated. You can override the computer and just set the temperature to be constant if you desire.

The cost to heat with electricity depends on where you live. There’s a wide range of prices people pay for electricity. The key to keeping your costs low is to invest heavily in insulation so the heat you create with the electricity slowly seeps outdoors. That’s what I did in my man cave. There’s lots and lots of insulation.

Be sure any windows and other openings are sealed well against air infiltration. Air leakage is one of the biggest enemies of any heating system. Tiny vampire air leaks that may seem innocent add up and rob you of both comfort and sweet moola - money.

Each of the electric floor heating systems works the same, but the installation may be different. You need to research exactly what’s required before you start.

In my situation, the manufacturer of the fiberglass mat that contained my heat coils required that the mat be set in wet thinset that’s used to install ceramic tile. This was easy to do.

After that step, I had to cover my mat with an additional one-quarter inch of thinset. My floor looked like a cement slab after I was done. This thinset protects the coils from damage caused by the finished flooring that lays on top of them, but it also spreads out the heat under the entire floor because the mortar conducts the heat. There are no hot or cold spots in the floor if you lay on it. It’s luxurious heat to say the least.

The most critical thing to consider when installing electric radiant floor heating mats, in my opinion, is the soundness of the sub-flooring. You don’t want the floor to flex or bend as over time this could cause the electric coils to break. If you have any doubt about this, have a conversation with the manufacturer of the electric floor mat you decide to install.

I’d read all the instructions that come with the product and do not deviate from them. Don’t assume that you know better and that what’s recommended is overkill. Realize that once this mat is installed, it’s virtually impossible to replace it without great effort and expense.

It’s very wise to read all the instructions even if you intend to have another person install the mat. If you do this, you’ll be able to make sure everything is fine and that you’ll not have issues down the road. The other benefit of doing this is that you can ask pointed questions of the contractors who are bidding your job. Don’t assume for a moment that the contractor, or sub-contractor, will know exactly how to install the electric heating mat!

Column 1170

YardMax 35 Ton Log Splitter Review

I had the distinct pleasure to test the Yardmax 35-ton full-beam log splitter in November of 2016. Having used many different types of log splitters, including a sledge hammer and wedge, I felt I could give an honest opinion as to how well this massive tool works.

The bottom line is it's unbelievable. I've owned a 27-ton hydraulic splitter for about eight years and the new Yardmax splitter has much nicer features.

Here's what I love about the Yardmax splitter:

  • It's beefy - weighing in at just under 700 pounds.
  • It's built TOUGH. I didn't see any shortcuts at all.
  • It's got a Briggs & Stratton engine. I don't know if you can get a better engine.
  • It tilts 90 degrees so the splitting ram goes up and down instead of sideways. This saves your back!
  • It's got oversized hydraulic components that translate to faster cycle time. Work gets done FASTER.
  • It's got a nice 4-way splitting head so you get four pieces of wood from each ram cycle.
  • The owners manual stores in a waterproof tube on the tow bar. INGENIOUS!!!!! All large equipment should have this feature so the manual is with you at all times! BRAVO Yardmax for thinking about this!

I'd rate this splitter five hammers out of five. hammer-5-5

It's a dandy power tool and if you keep the engine filled to the brim all the time - even when in not in use - with ethanol-FREE gas (get this at small airports from the FBO) that has Briggs & Stratton fuel stabilizer in it, the engine will start all the time. If you want the engine to be trouble-free for YEARS, then change the oil each season and put in a new air filter. Do these three things and the engine will run for thousands of hours with no issues.

CLICK HERE to see all of the Yardmax splitters.

To BUY one, just click the following Amazon affiliate link.

The above is an affiliate link. I get a tiny commission if you purchase this item from Amazon.

Ceramic Tile in Shower

If you can stretch your budget you can have fancy ceramic tile in a shower. © 2016 Tim Carter Builder

DEAR TIM: I’m remodeling my bathroom and want the WOW factor when I see it each day. Regular square tile seem so boring.

What would you suggest to create a look that will put someone’s head on a swivel when they see it?

What are the best practices, in your opinion, when it comes to installing ceramic tile that will not fall off the wall and not leak?

I don’t want any issues and want this tile to look as good as the 100-plus-year-old tile in my grandmother’s distinguished old home. Sara J., Lincoln, MA

DEAR SARA: You’ve given me a tall order to fill. I can remember, as if it happened yesterday, similar questions from my customers. Some knew exactly what they wanted and others required some inspiration.

One thing’s for sure. You get but one chance with ceramic tile, so what you decide to do better be right. It’s prohibitively expensive to remove tile and start over!

I’d start the idea process by visiting several ceramic tile showrooms in, or around, your town or city. Some modern showrooms have created full wall panels and even full showers within the showroom that incorporate many of the products they sell.

In the old days, you’d look at a few sample boards that had tile pieces affixed to them. You’d have to use your imagination to try to dream up what they all might look like once installed.

CLICK HERE to get FREE & FAST BIDS from local contractors who can install ceramic tile in your bathroom!

Some specialty tile stores, and big box home centers, still sell tile this way and I’d avoid them. You need to see several different specialty tiles, as well as different types of tiles all used together in one motif.

If this requires an all-day journey to a store many miles away, then call the showrooms to ensure they have full-blown shower and bath enclosures constructed in the showroom.

I’d also spend hours online looking at photographs of ceramic tile showers and bathrooms. You can do this by visiting the websites of ceramic tile manufacturers. Another clever trick is to use image searches on websites that just curate photographs. Use keyword search phrases like: decorative shower ceramic tile, border ceramic tile, tile insets for showers, etc.

In my opinion, the WOW factor happens when you blend different materials, shapes and colors. For example, if you’ve not seen ceramic border tile that looks like the wood trim you see around doors and windows, then by all means get to a showroom. Be prepared to have your eyelids open to the full and upright position! Some of these borders are stunning.

You can achieve a dazzling shower by blending marble, granite, border tile and even some regular ceramic tile in the same shower. Subtle color tones that compliment one another can draw out the color and texture of adjacent materials.

Inset panels surrounded by the border tile within the shower can create a dramatic layered effect on what otherwise might be a flat, plain wall. Don’t forget to incorporate accessory tile for soap dishes, shampoo shelves and any other body care products you want to store within the shower area.

Stop and think for a moment about your grandmother’s bathroom tile that’s not only stood the test of time, but it looks as good as the day it was installed. This didn’t happen by accident. The builder and master tile setter who worked together to create the masterpiece did so using materials that were waterproof.

CLICK HERE to get FREE & FAST BIDS from local contractors who can install ceramic tile in your bathroom!

Behind that tile I’m quite certain you’ll discover concrete made from Portland cement and coarse sand. This concrete mix was was applied to steel mesh that had been fastened to the wood studs. The waterproof tile was bonded permanently to the concrete with a slurry of Portland cement that may have contained fine pure silica sand.

Plumb Walls

It’s also mission critical for the wall surfaces to be perfectly flat and plumb. The master tile setter achieved this goal by installing the wet concrete with straightedges that created the perfectly smooth surfaces.

Tile does not tolerate being placed on wavy surfaces. The glossy surface of most tile will telegraph, due to light reflection, the fact that the substrate is not smooth.

You can obtain the same results today as the craftsmen of old using modern materials. I’d give serious consideration to using steel studs to frame the shower area. These galvanized framing materials are straight and will not twist or bow over time.

Water will not harm them should a leak develop. Sheets of cement board, or other fully waterproof material, can be screwed to the steel studs to create the perfectly flat substrate tile desires.

A cross-laminated vapor barrier can be placed on the steel studs before the substrate boards are applied. This will capture both liquid water and water vapor. The liquid water will drop down to the shower pan and eventually travel to the sea.

Be sure to also incorporate solid blocking that may be required for shower grab bars. Take lots of photographs that show the location of the blocking. Write on the blocking the distance to the centerline from the floor and be sure you can see this in the photos.

Tile Tools

What tools do you need to complete a simple tile job? Here's a list:

  • tape measure
  • pencil
  • tile cutter
  • nippers
  • a 1/4 by 1/4 inch v-notched trowel
  • a hammer
  • some 6d finish nails
  • 8 lineal feet of straight 1/4 inch wood lattice strip
  • putty knife
  • 3-inch wide-bladed scraper
  • grout sponge
  • rubber grout float
  • several buckets
  • accurate 4 foot level

Click the image below to BUY all, or some, of the tools in the above list.

ceramic tile tools list

CLICK THIS IMAGE NOW TO ORDER ALL THE TOOLS YOU NEED TO DO CERAMIC TILE.

Use thinset mortar, it’s waterproof, to adhere your new tile to the substrate. Mix the grout so it’s the consistency of warm cake icing. Squeeze all water out of the sponges you use to strike the grout joints.

If you get the grout too wet during the finishing process, the water dilutes the Portland cement in the grout making it weak and susceptible to cracking and flaking.

CLICK HERE to get FREE & FAST BIDS from local contractors who can install ceramic tile in your bathroom!

Column 1169