September 20, 2016 AsktheBuilder Newsletter

Happy Tuesday if you're on my side of the International Date Line.

I'm sure I'm going to hear about that statement. 😉

A week from today I'll be in Norfolk, VA attending a special editors event for STIHL. I decided to attend only because they have a special announcement about five or six new SECRET tools.

STIHL is a fantastic brand that I've used for over forty years and that's part of the reason I decided to go. This could be a game changer for them.

We shall see ...

At the conclusion of the event, I fly from Norfolk on Wednesday afternoon to Cincinnati, OH.

On Friday September 30th at 3:30 pm, I'll be in room 201 of Braunstein Hall at the north end of the University of Cincinnati campus giving a speech about my pathway from being a wet-behind-the-ears geology undergraduate to the AsktheBuilder.com guy.

The university wants me to share my tale about how I used my college degree to get to this unusual destination - especially since I was a rock hound.

The speech is OPEN TO THE PUBLIC. There will be a reception following it so I'm having one of my classic meet ups just after the speech.

This means you can come and we can chat at the reception! Be there or be square!

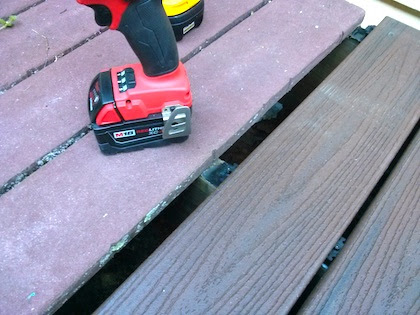
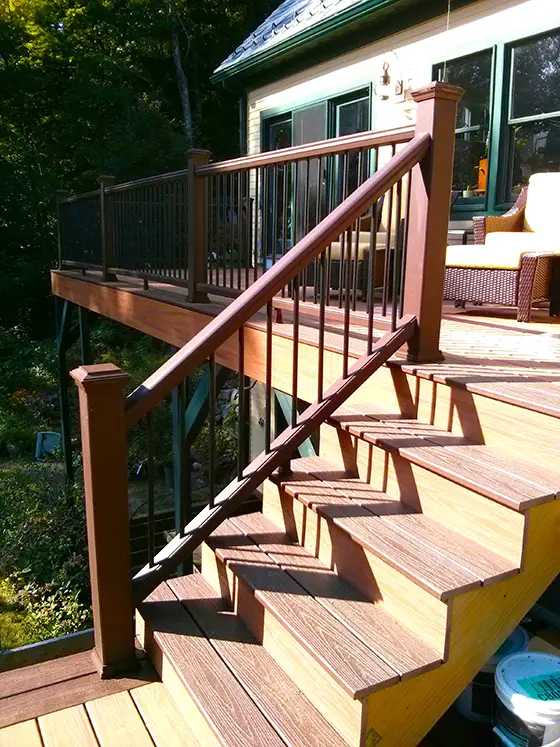
I almost finished my presentation yesterday. Here are two teasing photos for you. Let's see if you can guess how these photos relate to my talk:

That one probably really stumps you. How about this one? My guess is you'll figure the following one out. If not, come to the speech! Read more about how my speech went. Just Click Here for my AsktheBuilder.com Speech at UC.

Encapsulation FUN Quiz

Well, it's happened again.

I've stumbled onto another interesting path here at AsktheBuilder.com that you're really enjoying.

My new quizzes.

I'm STUNNED at the interest level in this, but after talking to my son yesterday about it, he took the one about the Water Pressure, he said, "Dad, these are really good. I think you're onto something that would be of great interest to millennials like me."

You're going to start seeing at least one per week now.

The purpose of the quizzes is to help show you how things work in and around your home in a FUN WAY.

The comments coming back to me are all positive, although you may be one that sometimes doesn't agree with the exact wording of a question or the answer.

No matter, I provide helpful LINKS when you View Your Score that helps explain my twisted logic.

Remember, to VIEW YOUR SCORE and see the helpful links you need to scroll back up the page after you click the SUBMIT button.

Today I want to test the depths of your ignorance about encapsulation.

What's that?

CLICK HERE to have a boatload of FUN.

(Editor's Note: Tim goofed in the quiz. Read about it in his September 20, 2016 Newsletter Correction.

There's a VERY IMPORTANT video to watch. You really need to watch the video at the very least.

WARNING: I urge you to go to the bathroom first before taking the quiz because you will be ROFLOL.

Now, if you're one who has your knickers in a knot and is all huffy about the idiotic quizzes, then you can bypass it and just CLICK HERE missing all the fun.

Keith's Cracked Cabinet Frames

About a week ago, Keith, who lives in Renton, WA, emailed me the following:

"Cabinet installer had multiple places where screws spit the framing. They have said they will come and glue and patch the cracks. Is this an acceptable practice for new cabinets?"

That's all he sent along with this photo.
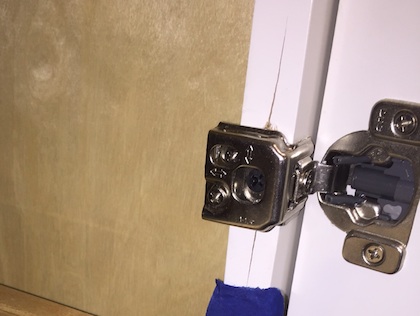
I answered him:

"No. Splits happened because no pilot hole was drilled. It's nearly impossible to inject glue deep into the crack. Insist on new cabinets."

Overnight he replied:

"Thanks for the reply. Where do I go to get assistance in making them correct this properly? They are master home builders assoc, and awarded from them, which I have tried to contact but have not called back."

HOLY TOMATO!!!!!

The image that flashed into my head is that scene from the movie Jerry Maguire when Tom Cruise was yelling, "Show me the MONEY!"

If you want a contractor to FIX poor workmanship then realize the MOST POWERFUL LEVER of all is:

$ MONEY $

I've written about it for years and years and years.

ALWAYS make sure you have enough money to FINISH the project assuming the contractor is either abducted one day by space aliens or he disappears on his own walking off the job.

Trust is a two-way street. You'll get the argument from the contractor that he needs to have your money ahead of time to pay for materials or subs.

If the contractor says that, he's underfunded in his business. That being said, it's fair to forward the deposit to the supplier or contractor for Special Order items only.

Every week I get emails from TRUSTING homeowners who have given the contractor MORE MONEY than he deserves at that point in the job and then all that's left for leverage is HOPE.

In most cases the contractor has goofed up, gone missing and REFUSES to answer repeated phone calls.

The homeowner HOPES the contractor will fix things and do the job right. Most will not based on the email I receive.

Never forget this:

Hope is the emotion of last resort.

You HOPE for things you can't control like the weather and what food might be served when you visit your inlaws.

You CAN - AND MUST - CONTROL THE FLOW OF MONEY to your contractor.

That's more than enough for today.

Are you liking the quizzes? Then let me know.

Tim Carter
Founder - www.AsktheBuilder.com

Do It Right, Not Over!

Impact Driver Uses

Milwaukee Impact Driver

Milwaukee Impact Driver

DEAR TIM: My husband has been hinting about wanting an impact driver. He claims there are many uses for it around the house. I wonder if he’s trying to pull the wool over my eyes and just get another expensive toy. What’s your feeling about this tool that just looks like a drill to me? Do you own one? Would you recommend getting one? What can you use it on? My husband already has a screw gun so is an impact driver really not needed? If you convince me, then I’ll order one. Melanie H., Apple Valley, CA

DEAR MELANIE: I can understand your skepticism. Some people do want each new shiny object that hits the marketplace. It’s across all product lines, even amateur radios, much less power tools! This disease affects both women and men equally I feel.

But the good news is this time your husband is not trying to get something that’s moderately useful. I own more than one impact driver and they’re absolutely one of the top five power tools I feel the average homeowner should own. I only wish these amazing tools were available decades ago when I was still building sixty hours a week. My productivity would have gone through the roof!

If you’ve never used or held an impact driver in your hand, the best way to describe this tool is to think about what you’ve seen an auto mechanic use to remove the lug nuts from one of your car wheels. Remember that high-pitched whizz noise and rat-a-tat-tat as the lug nut spins off or is tightened by the air-powered impact driver? This reliable technology that’s been around for years was transferred to the pro and DIY power tool marketplace not too many years ago.

These marvelous tools can be used for so many things as long as you get the right one. Even though many look the same, there’s a lot of difference between some of these tools. I prefer the cordless impact drivers because they’re so versatile. Who wants a power cord dragging around if it’s not needed?

My favorite impact driver is made by Milwaukee. It’s got a brushless motor, a 1/4-inch hex drive, and it has three different torque settings. The torque power settings range from 200 to 1,600 inch-pounds of torque. Believe me, that’s more than enough to drive giant 3/8-inch long lag screws into hard yellow pine!

CLICK HERE to purchase the exact Milwaukee Impact Drive kit I own.

There are different voltages you can get with cordless power tools. I happen to be a fan of 18-volt tools but I probably expect more out of my tool than a casual weekend warrior homeowner. There are 12-volt impact drivers that deliver plenty of punch and will drive or remove many fasteners with just one charge of the lithium-ion battery.

Here’s just a partial list of some of the jobs this tool will accomplish. I recently used mine to remove screws that held a deck railing in place. The tool also did a remarkable job of removing large lag bolts that held railing posts in place. I used the driver to install giant 5-inch-long timber screws through solid lumber.

My impact driver works well for smaller fasteners too. When you need extreme control to drive small hidden fasteners in between expensive composite decking, then come borrow my impact driver. I just finished driving hundreds and hundreds of tiny stainless-steel screws that are part of the hidden fastening system for my Trex decking. Using the number two torque setting delivered the perfect amount of torque so as not to snap off the screws.

The hex drive system allows you to use the tool with any number of fasteners. Imagine if you need to drive Phillips-head screws. How about hex-head screws? Do you have to drive torx-head screws or square-drive fasteners? All of these fasteners can be expertly driven into wood, steel or any material with precision using a high-quality impact driver and an assortment of hex-shaft bits.

Don’t try to compare an impact driver with a screw gun. The inner mechanics of each tool are radically different. Impact drivers deliver tiny bursts of power that make a much bigger difference in trying to both drive and remove fasteners.

When using an impact driver it’s really important that the bit you’re using is a perfect match for the fastener. If there’s the smallest amount of slop in the fit, either the bit or the fastener will get almost always get rounded and ruined as the tool spins rapidly but the fastener doesn’t.

If your husband has not used an impact driver, I feel it’s best to have him practice driving different fasteners in scrap pieces of lumber to really get a feel of how the tool works. You need to be careful not to overdrive certain fasteners. He’ll also discover that when driving into wood, the wood species makes a big difference. Harder woods can cause fasteners to snap with little warning.

I urge you to try the tool too. I believe once you see how amazing an impact driver is, you’ll be glad you approved the purchase. It saves so much work and takes so much stress off your wrists and hands. Keep in mind that impact drivers that cost more money usually have better parts, better engineering and can last generations if cared for properly.

CLICK the image just below to get the EXACT Milwaukee Impact Drive kit I own.

Column 1162


Milwaukee Impact Driver

Milwaukee Impact Driver

September 16, 2016 AsktheBuilder Newsletter

It's Friday morning here in the USA, and it's a magnificent autumn day.

I wish I could go out for a hike, but I'm lucky to get some help today from a friend to help finish the HUGE Trex Transcend deck project of mine.

I'll be taping a few videos today of stuff you need to see about the decking project. I hope to have those videos edited and uploaded for you next week.

On Sunday I'm going to have some VERY IMPORTANT news you need to know about encapsulation.

WATCH for that newsletter and please open and CLICK the links in it.

The Quiz Results

Two days ago, I tried an experiment with a quiz about galvanizing. It was both a success and a learning experience for me.

When I created the quiz, I didn't realize how POWERFUL the software was.

But I do now!!!

All of the things you wanted are possible - and more.

I created a NEW fun one about Water Pressure Problems in your home.

Here's what you need to do.

After taking the FUN QUIZ and clicking the SUBMIT button, be sure to CLICK the View Your Score link on the NEXT SCREEN.

When you do this, you'll see the quiz again, your score and explanations and LINKS to more valuable information.

Be SURE to comment again at the bottom of the page and let me know if you want me to continue this.

I think it's a great way to help you discover more about how things work around your home and how to fix things.

CLICK HERE to take the Water Pressure Quiz!!

I GUARANTEE you'll laugh while taking it.

Next time, I'll drink even more coffee to have more quirky answers

Have a great weekend.

Tim Carter
Founder - www.AsktheBuilder.com

Do It Right, Not Over!

Water Pressure Quiz AsktheBuilder.com

This is a fun quiz, I discussed in my September 16, 2016 Newsletter.

I think you're going to discover lots of NEW information.

After you CLICK the Submit button, be sure to click the VIEW YOUR SCORE link on the resulting screen.

When you do this, you'll see your score AND you'll see helpful tips and links.

You'll also get to see how you did with respect to others taking the fun quiz.

Be SURE to comment below if you liked this and want me to do MORE quizzes.

NOTE: To those who disagree with the answer to question #2, after you take the quiz you can shake the high school physics class cobwebs out of your head studying the material at these links. Do NOT click these before you take the fun quiz:

Link 1

Link 2

Link 3

September 14, 2016 AsktheBuilder Newsletter

My favorite season of the year is creeping into New England.

Fall.

Crisp mornings, the sky so blue it makes your eyes hurt, lake water that looks like someone dumped millions of gallons of blue dye into it, and of course the tree leaves.

I'll be out trying to get some great photos for you of all this over the next month, so be on the lookout for those.

Galvanized Nails, Screws and Connectors

Yesterday, I started to replace the old Trex decking on my front porch with the new Trex Transcend decking.

I've got a photo for you below showing it. But read the following first.

About five years ago, I had to completely rebuild my front porch because the builder - I did NOT build the house I live in here in New Hampshire - totally goofed it up.

I put the old Trex decking back down using galvanized nails made for my Paslode finish nail gun.

I was stunned by what I saw as I removed the old decking. So much so I mumbled to myself, "Maybe it's time for an experiment. Maybe a fun quiz could help save people lots of time and money."

Before dawn this morning I put together a simple five-question quiz about galvanizing.

It's an EXPERIMENT. If you like it, I need you to tell me.

In the future, I can add photos to the quiz and ask you questions about what you see. We could have lots of fun with this.

CLICK HERE to take the simple quiz about galvanizing.

Be SURE to read what Dr. Caster used to say to me and my fellow classmates each time he gave us a test. His quote is just under the headline of the quiz. CLICK HERE and scroll down to the quiz.

New Home Walkthrough Checklist

I've sold a helpful product for years that helps you spot defects in a new home as you do your walk through.

You can click here to see what it currently includes.

Most people have no clue what to look for and they pass over things that are very important.

The issue is the checklist is just a .pdf file and you have to print it out on paper.

It's time to convert it to a helpful APP that you download to your phone or tablet. How cool would it be to have this on your smart phone or tablet?

Can you see how helpful that might be?

I could use your help to make it a fantastic product.

Tell me what features you'd like to see in a app like this and I'll do my best to incorporate them.

Just REPLY to this email and send a response back.

If you can change the Subject Line to: WalkThrough Comments, that would really help me.

MEETUP in Cincinnati - Speech at UC

You may not open each issue of this newsletter. I get that. We all get swamped.

Two weeks ago, I announced that I'll be giving a speech at my Alma Mater - the University of Cincinnati - on Friday, September 30 at 3:30 pm.

There will be a reception immediately following the talk and BOTH the speech and reception are open to the public.

That means I'll be having a meet up at the reception! Woo Hoo!!

The speech will be in room 201 of Braunstein Hall. This building is immediately south of the Geology and Physics building. Both are at the extreme north end of the campus very close to Clifton Avenue. There's a parking garage very close to both buildings.

The topic of my talk is how I folded my geology degree into a successful building and internet publishing business.

The talk will not be videotaped, but I'll be taking my voice recorder and hope to capture the entire talk for you should you not be able to attend and want to hear it.

But, if you live in Cincinnati, or near it, come to the talk! Please reply to this email and let me know if you intend to come to the speech.

Next week I'll have two new videos for you and news about encapsulating crawlspaces.

I need to get back outdoors to finish the deck and front porch. Here's a photo of the stunning difference between my old composite decking and my new Trex Transcend.

Do I have to tell you that the Milwaukee impact driver is sitting on top of the OLD decking???? Look at the stunning grain and coloration of the Trex Transcend Lava Rock on the right side of the photo.

CLICK HERE to see more amazing photos of Trex Transcend decking.

That's enough for today.

Tim Carter
Founder - www.AsktheBuilder.com

Do It Right, Not Over!

Galvanized Nails Quiz

This is an experiment. I discussed it in my September 14, 2016 AsktheBuilder Newsletter under Galvanized Nails, Screws and Connectors.

I want to see if you're interested in discovering how and why things work around your home in a fun and clever way.

Please take the quiz below. It's only five questions.

All of the questions are REQUIRED. I'll be publishing graphic results of how you and others did on each question.

The CORRECT ANSWERS to the quiz are down below it, but don't cheat and look at them.

There are also LINKS to past columns of mine about galvanizing that explain all of this in MUCH GREATER detail.

I URGE YOU TO CLICK the LINKS and do a little reading to get the FACTS about galvanizing.

COMMENT BELOW after taking the quiz to let me know if you liked this. If enough respond, I'll continue to do this.


ANSWERS:

Question 1: Yes

Question 2: No

Question 3: Yes

Question 4: Yes

Question 5: Yes

LINKS:

Four Types of Galvanizing

Preventing RUST on Nails and Screws - GREAT PHOTO HERE


PC Universal Glue Video


Tim Carter shares news about a new easy-to-use glue he tried out. PC Universal Glue. It's strong like epoxy, but no messy mixing two parts together. It's as easy to use as the simple white glue you used in grade school. I LOVE the products made by the company that makes this glue.

CLICK HERE to BUY this amazing new glue. It's super strong. It dries CLEAR. Water washup!!

They paid me to make this video and when you see how well it works, you'll be glad they did.


This column was shared with the 31,000 subscribers who read my November 11, 2016 AsktheBuilder Newsletter.

How to Deck Stair Railing

DEAR TIM: I read your column each week in our paper and a few weeks ago you talked about building stairs for a deck. I can handle that but am worried about how to make all the complex cuts required for the deck stair railing. I realize you can’t provide step-by-step directions in the space you’re given, but can you point out the challenges and give me a few life-line tips so I don’t mess up my deck railing? Mandy C., Clemson, SC

DEAR MANDY: You’re correct that it’s impossible for me to offer you step-by-step directions on how to build stair railings in the limited space provided in this newspaper column. I could write a book about the process easily devoting one hundred pages or more with countless step-by-step photos.

What follows should be a decent quick-start guide you can use along with some common sense to get very good results. The first thing to realize is it doesn’t require complex math to make a great stair railing.

The angle of the stair railing is determined by the rise and run of the steps you’re working with. The bottom and top rails of the steps simply run parallel to the line created by the nose of each of the stair treads. To see this line, place a long straightedge on the steps. If you built the steps right with the same riser and tread combination and the needed one-inch overhang of the tread over the riser, then the straightedge will just touch the front tip of each tread all the way down to the bottom step.

This deck stair railing was made using great skill and modular parts designed to fit together. Photo Credit: Tim Carter

This deck stair railing was made using great skill and modular parts designed to fit together. Photo Credit: Tim Carter

The posts that support the railing need to be very secure and they need to be in the same relative position on each tread. In other words, if the face of the top post on your deck is set back 3 inches from the tip of the decking board at the edge of the deck, then all the other posts on the steps going down must also have their face 3 inches from the tip of the stair riser they’re sitting on.

It’s vital to maintain this spacing and position for the posts so that the railings connect to the posts at the same height above each tread. This creates a uniform sight line and professional look. It also creates a safe railing. The building code is very specific about the height of the railing and you have some leeway.

Remember that line that’s created by the straightedge along the tips of the stair treads? If you extend a vertical line up from this sloped line, the top railing must be not less than 34 inches and no more than 38 inches above the line connecting the tips of the stair treads.

Calculating the angle of the cut for the railings is very simple. Once you have your railing posts in position and secure, you just clamp your bottom rail to the posts with the excess railing extending past the posts. Be sure the bottom railing is at least one inch above the tips of the stair nosing and that the railing is parallel with the sloped line created by the tips of the tread nosings.

Use a pencil to carefully mark the line where the vertical posts are touching the railing. These will be your cut lines. Be sure to cut on the correct side of the line with your miter saw.

Both the bottom and top railings need to be securely fastened to the vertical posts. Use screws that will not corrode and will penetrate deep into the posts. The last thing you want is a flimsy connection between the post and the railing. Pre-drill pilot holes so you don’t split the wood.

One trick some carpenters use to ensure the railings are in the correct position is to use a giant piece of plywood that has been cut to create the parallelogram that the railings and posts create when all the pieces are connected.

In other words, if you were to take a piece of plywood and rest the long edge on the stair tread nosing tips, the top long edge would be parallel to the stair nosings, but it would be too tall. Using a 4-foot level resting at the tip of the lower stair tread, you can make a mark up on the wood at the 34-inch level that meets the code requirement. If you make an identical mark using the level sitting on the top tread and then snap a line between those two marks, you’ve now created the top of your handrail. You can also trace where the sheet of wood contacts both posts.

Use a saw to cut along the three odd lines and now you should end up with a parallelogram that fits nicely between the two posts. If you did everything right, the top line is also parallel with the bottom edge of the plywood. Your top cut line represents where you hand will touch the top of the handrail as you go up and down the steps. As you stand back and look at this odd-shaped piece of wood, it should look good and uniform.

This template will help you to ensure your angled cuts are right and provide you with guidance as to where you need to place the top and bottom handrails so they’re in the correct positions allowing you to end up with a safe and sturdy stair railing.

Column 1161

How to Match Stucco

DEAR TIM: How can I match the stucco finish on my eighty-year-old front porch? I tried using white Portland cement and buff sand, but as you can see in my photo, the results are atrocious. I added some dry cement pigment to try to get a match and it just didn’t work. I noticed the old stucco has dark sand in it. Is that important? What’s the best way to get a match, if it’s even possible? What can I do now to fix this so I don’t have to sleep on the couch? My wife is none too happy with me right now. Help me Tim, you’re my only hope! Brian McA., Whitehall, PA

DEAR BRIAN: What husband amongst us has not slept a night or two or three on the couch for a brazen misdeed around the home? It’s a right of passage, albeit an undistinguished one. Alas, I’ve got good news for you!

You’re going to soon be in your wife’s good graces because you’re going to make that front porch foundation wall stucco look stunning. But before we do that, let me tell you how difficult it is to match stucco. If you share this with your wife, you may get back into your own bedroom tonight and on a nice comfy mattress.

These patches don’t match at all. It requires some testing to get a perfect match when working with cement stucco. Photo Credit: Brian McAllister

These patches don’t match at all. It requires some testing to get a perfect match when working with cement stucco. Photo Credit: Brian McAllister

I think the best way to describe how hard it is to match stucco is to imagine trying to repair a tear in just about any fabric. Even the best tailor or seamstress will have a nearly impossible time blending in the sewing needed to repair the slit or slash.

The most important thing to realize is that the stucco you see on your front porch does not look today like it looked eighty years ago. Mother Nature has changed the appearance of the stucco just like she does with anything left in her presence.

When the stucco was new, each piece of sand had a thin coating of cement paste over it. The color of the stucco was very uniform much like the patches you have in your photo. Note how you can’t see any color at all of the individual grains of sand in your fresh patches. Once you grasp this, you’ll understand how tough it is to match stucco.

Over time weathering works to remove the cement-paste film from the sand. This is why you now notice the dark grains of sand in your stucco. Your stucco can also get stained from rain splashing dirt against it. Soot from decades of diesel exhaust and who-knows-what can also settle into the stucco finish altering its appearance. Your new stucco patches have none of this.

The first thing to do when trying to match stucco, or brick mortar which is nearly identical to stucco, is to start with the sand. Look very closely at the sand grains in the existing stucco. Note the colors, the sand grain size and the blend of the colors.

The sand for the existing stucco probably came from a gravel and sand pit within fifteen miles or less. It was not easy eighty years ago to truck sand to a job site. Visit all the nearby sand and gravel pits and start to look at their different sands. Most gravel pits have different piles of sand. You need to find a sand that matches as close as possible what you have now.

Once you have the sand, now it’s time to clean your existing stucco. I’d use a solution of oxygen bleach to do this. It’s not harmful to your plants and it’s not aggressive like a pressure washer. A pressure washer could damage the stucco, so think twice before using one.

After the existing stucco is clean and dry, you can now try to get a match on the cement used to bond the sand together. You tried using white Portland cement adding pigment to it. I’d try to just go with a traditional gray Portland cement and see what happens. I’d also try to make different batches using hydrated lime in addition to the Portland cement. The lime will modify the color depending on the ratio of cement to lime in your mix.

Apply the different test batches to the face of some small concrete brick. Allow them to dry and cure for at least a week to see how you’re doing. Realize the grains of sand in the stucco make up probably ninety percent of the color matrix so you need to acid wash the new stucco samples after 30 days to see the real color of the new stucco you’re making.

See how hard this is? Most people don’t have the patience to undertake this job because it’s just so time consuming. Most people want instant gratification.

The easiest way to solve your problem is to just re-coat the entire foundation wall with new stucco that’s all made the same way. To get the new stucco to bond permanently to the old stucco you need to use cement paint. I’m assuming you’ve cleaned the old stucco of all dirt, grease, etc. before you start.

Cement paint is just a mixture of Portland cement and water. You add water to Portland cement stirring until it’s the consistency of a thin latex paint. Slightly dampen the existing stucco with water, brush on the cement paint and immediately cover it with the fresh stucco. Do not allow the cement paint to dry. Work in the shade or on an overcast day with no wind.

Column 1160