Tim Carter demonstrates the steps to take in order to place and appropriately measure the PVC to install the shower drain.
How to Install Shower Drain Pipe Part 1 Video
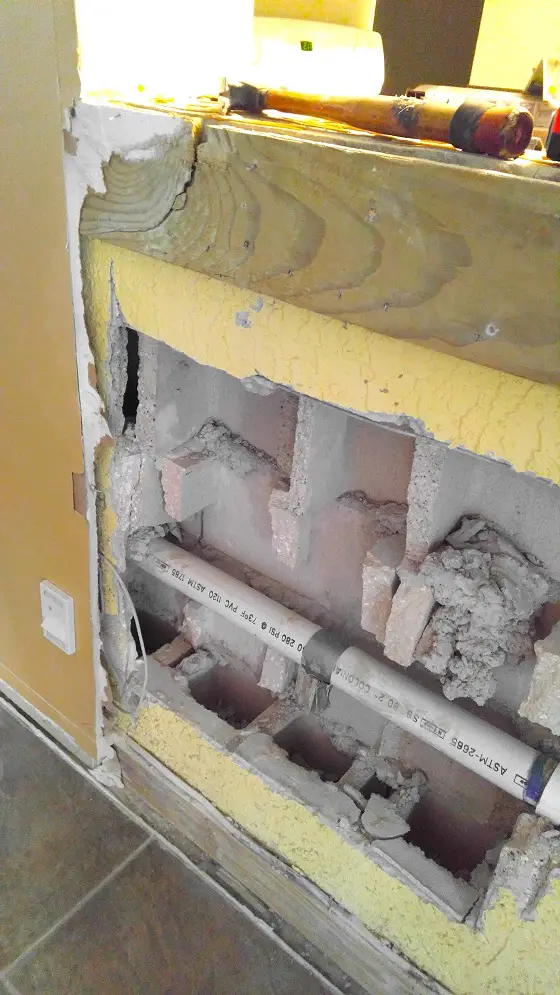
Tim Carter explains what to look out for when you install a new shower drain in an existing concrete slab.
How to Relocate Shower Drain Part 2 Video
How to Relocate Shower Drain Part 2
Tim Carter continues to explain various tricks that help when moving a basement shower drain.
NOTE FROM TIM: Please do yourself a favor and WATCH all of the following videos that cover the entire aspect of relocating this drain:
How to Relocate Shower Drain Part 1 Video
How to Relocate Shower Drain Part 1
Tim Carter demonstrates the steps to take when relocating a shower drain.
Basement Concrete Slab Removal Tips Video
Tim Carter explains several tips to help when removing concrete around a basement shower drain.
Concrete Block Door Opening
Concrete Block Door Opening | These concrete block will be removed to transform the pass through to a door opening. Photo Credit: Jeff Selvidio
DEAR TIM: I live in a very common home here in Florida. Most are built from concrete block. Twenty years ago, a room addition was added to the home and the rear exterior concrete block wall became an interior wall. A window was removed to create a pass through to the room addition. Now we want to transform the concrete block under this pass through to a real door opening. Can you help me figure out how to finish the uneven inside cores of the concrete block? I want to be able to attach drywall to the opening. I don’t know where to begin. Jeff S., Largo, FL
DEAR JEFF: I’ve had to do exactly what you plan to do on a few occasions. It’s a nasty dusty job. What’s more, it requires a certain level of skill to achieve your goal. There are any number of ways to get your desired result of a finished drywall arch.
One way is to face the concrete block opening with treated 2 x 10 material. This lumber should be within one eighth of an inch of what the width of the concrete block wall is now when you add the thickness of the concrete block and the two pieces of furring strip material that’s nailed to the concrete block.
It’s quite difficult to anchor this 2 x 10 to the cores of the concrete block wall. Many contractors might tell you that you need to embed anchor bolts in concrete that’s poured to fill the irregular cores that will be exposed after you removed the block under the pass through opening. It’s not easy to pour this concrete and set the anchor bolts.
I think the best way for a serious DIY person like you is to just create the rough wood opening using pieces of treated 3/4-inch treated plywood. I would be very tempted to make u-shaped forms out of the 3/4-inch plywood that wrap around the concrete block and extend back on the walls about one foot.
The pieces of plywood that cover the sides of the block would then be glued and nailed to the concrete block wall. You’d have to cut back any existing furring strips that are on the concrete block so the wide strips of plywood would fit tightly against the concrete block.
By using one-foot-wide strips, this give you plenty of area to nail and glue the wood so you don’t risk getting a poor attachment if you just tried to place fasteners near where you cut away the concrete block.
The piece of plywood that covers the irregular block cores that were cut away is attached to the two side pieces of plywood with some screws and construction adhesive.
I’d space the screws about 4 inches apart. Use galvanized coarse-threaded screws that are at least 1 and 5/8-inch long. I’d carefully drill pilot holes in the plywood making sure the screws entered the side pieces of plywood exactly in the center of the 3/4 width so the screws hold very well.
You may discover that it’s best to create these u-shaped forms only 2-feet high at a time and stack them on top of one another as you work your way to the top of the opening. The original block layers may not have the wall perfectly plumb or in the same plane and one giant U-shaped form may be very hard to align if it’s one piece about seven feet tall!
I’d try to use traditional cut nails to attach the one-foot pieces of plywood to the concrete block. Be sure to nail into the horizontal mortar joints that are between the layers of block. Wear safety glasses and use a 20-ounce, or heavier, hammer. You’ll discover the cut nails do an excellent job of penetrating the mortar and will bite well creating a long-lasting attachment.
Beware using masonry screws. If you over-tighten them, which is easy to do, they lose their grip. This rarely happens when you drive a cut nail into a mortar joint.
To avoid issues with the treated plywood, I’d be sure to purchase a piece that’s as flat as possible. Get it home and out of the sun as fast as possible. If you allow it to sit in the sun, the plywood may warp and twist.
Try to bring it inside where it can start to acclimate to the inside temperature and humidity in your home. You want the wood to shrink and adjust to the inside environment so it places minimal stress on the fasteners and glue as you start to assemble it. I would allow it to acclimate for about four days before I’d start cutting it into the pieces you’ll use to create your u-shaped forms.
I mentioned this column in my April 19, 2016 AsktheBuilder Newsletter.
Column 1140
DIY Shed AsktheBuilder Flat Blocking for Floor Joists Video
Tim Carter discusses what you need to think about before you install flat 2 x 4 blocking in between floor joists when using plywood that's NOT tongue and groove.
For more DIY Shed building tips and information and to purchase the actual plans for the shed in this video, click the following links:
SHED PLANNING: https://www.askthebuilder.com/how-to-plan-a-shed
SHEDS for STORAGE: https://www.askthebuilder.com/storage-sheds
GARDEN SHEDS: https://www.askthebuilder.com/garden-sheds
SHED RAMPS: https://www.askthebuilder.com/shed-ramps/
ACTUAL SHED PLANS: http://go.askthebuilder.com/plans
DIY Shed AsktheBuilder Floor Joists Complete Wide Shot Video
Tim Carter stands on top of the completed floor joists showing progress on the job.
For more DIY Shed building tips and information and to purchase the actual plans for the shed in this video, click the following links:
SHED PLANNING: https://www.askthebuilder.com/how-to-plan-a-shed
SHEDS for STORAGE: https://www.askthebuilder.com/storage-sheds
GARDEN SHEDS: https://www.askthebuilder.com/garden-sheds
SHED RAMPS: https://www.askthebuilder.com/shed-ramps/
ACTUAL SHED PLANS: http://go.askthebuilder.com/plans
DIY Shed AsktheBuilder Joist Hanger Nails and Screws Video
Tim Carter shows the special nails and screws you use to install joist hangers. NEVER use roofing nails! Roofing nails are not structural fasteners.
For more DIY Shed building tips and information and to purchase the actual plans for the shed in this video, click the following links:
SHED PLANNING: https://www.askthebuilder.com/how-to-plan-a-shed
SHEDS for STORAGE: https://www.askthebuilder.com/storage-sheds
GARDEN SHEDS: https://www.askthebuilder.com/garden-sheds
SHED RAMPS: https://www.askthebuilder.com/shed-ramps/
ACTUAL SHED PLANS: http://go.askthebuilder.com/plans
DIY Shed AsktheBuilder Joist Hanger Secret Tips Video
Tim Carter shares a few secret tips about installing joist hangers.
These tips help you get the top of the joists flush with the top of a beam, allow you to deal with cupped joists and a secret tip about cutting the correct length of the joist.
For more DIY Shed building tips and information and to purchase the actual plans for the shed in this video, click the following links:
SHED PLANNING: https://www.askthebuilder.com/how-to-plan-a-shed
SHEDS for STORAGE: https://www.askthebuilder.com/storage-sheds
GARDEN SHEDS: https://www.askthebuilder.com/garden-sheds
SHED RAMPS: https://www.askthebuilder.com/shed-ramps/
ACTUAL SHED PLANS: http://go.askthebuilder.com/plans