Granny Pod House

backyard shed

Granny Pod House Tips

DEAR TIM: I believe I need a granny pod. My mother-in-law might have to move to an assisted care facility.

The monthly costs for this are staggering. My mother-in-law is very mobile and needs just a little help. I did the math and it seems I can make her money last for many years if we just build a granny pod house on my lot.

Fortunately I’ve got the room and the zoning code permits it. What’s the best way to go about this so the pod adds, rather than detracts, value to my home and property?

What would you do to create the ultimate granny pod house that could be converted to something else in the future? John M., Austin, TX

DEAR JOHN: I’m beginning to get quite a few emails like this and it’s not surprising as mature children are faced with tough decisions concerning their parents. My sister and I had to make the same choice with my mother years ago, but we couldn’t do the granny pod option. We moved mom to a very nice assisted living facility in her community.


Granny Pod Planning Process

When planning a granny pod, there are many things to consider and lots of them are quite important. The planning process must include your mother-in-law. She needs to tell you what things are important to her.

For example, she may love indoor plants. If so, you’d want to incorporate a space where plenty of light streams into the space to keep the plants happy.

Perhaps she still loves to cook. In that case, be sure there’s no wasted space at all in the kitchen and determine how much counter space she’d really like to have.

Maybe she likes to sew or do crafts, so you need to create a convenient space to do that.


Related Links

How To Build a Shed

50 Dream Design Tips

Contractor Hiring Hacks

Tim's NH Shed

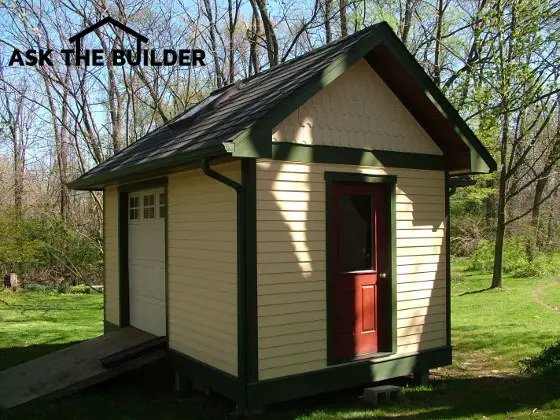
This is an outdoor shed that could be converted to a granny pod house in thirty days or less. Photo Credit: Tim Carter

Just have her make a list asking this question: “Mom, if you could wave a magic wand and create the perfect small apartment, what are the top five things it would have?” Let her ponder that for a couple of weeks if necessary. Use photos from other granny pods to stimulate ideas if necessary.

Free & Fast Bids

CLICK HERE to get FREE & FAST BIDS from local remodeling contractors that can build the dream pod behind your home.

Talk To Realtors

I would talk to top realtors in your area and see if they have any ideas as they look into their crystal balls with respect to the future. For example, do they see a future trend for more detached home offices?

Do they feel there’s a growing trend for deluxe man caves? Now’s the time to try to think about what the granny pod might be used for when the time comes your mother-in-law will no longer need it. You want to make the transition from her use to the future use to be as pain and cost-free as possible.

Make It Match

The granny pod should look as much like your existing home as possible.

If possible, the granny pod should resemble a carriage house that you might see next to a large distinguished home. I don’t think making this pod look like an oversized shed you see in the parking lots of the big box stores is a good idea.

Open Floor Plan is Best

The floor plan should be as open as possible. Doing this gives you all sorts of options with respect to the future use of the pod. What’s really important at this point is trying to guess correctly at the future use of the structure.

simple granny pod plan

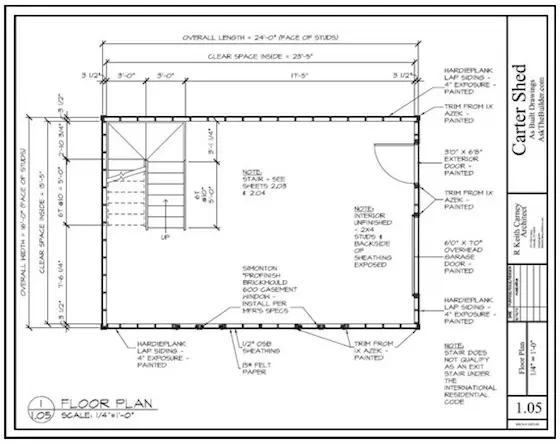
Here's an example of a blank open floor plan for a granny pod. There is a staircase to an attic space, but you can figure out where everything else can go from here. Copyright 2017 Tim Carter

Create two or three ultimate floor plans. See how they relate to one another with respect to the overall size of each use. Now’s the time to make the granny pod bigger in case your best guess of the future use requires 200 more square feet of space than what your mother-in-law requires.

CLICK HERE to get FREE & FAST BIDS from local remodeling contractors that can build the dream pod behind your home.

Concrete Slabs Restrict Change

The plumbing drain lines must be in the correct location for whatever you plan to do in the future if you must build on a concrete slab. A wood-floor system built above a crawl space allows future access to the plumbing pipes. You'll never regret having access to the plumbing drain lines.


Granny Pod Videos

These videos have some very good ideas.

Install Blank Utility Conduit Pipe

You’ll probably have to extend utilities to the pod underground. If so, now’s the time to install blank piping for future use. You’ll never regret installing an extra electrical conduit pipe as well as a 4-inch-diameter schedule 40 PVC pipe that could act as a secondary drain in case something goes dreadfully wrong in the future.

No Steps or Staircases

I’m sure your mother-in-law has no interest in steps and will want everything on the first floor. I’d design the pod so the attic has a steep roof, and a giant dormer or multiple gable ends so the attic space can become bonus room for the future use of the pod.

The building code controls ceiling heights in rooms. Be sure to study the building code and do what's necessary to meet or exceed its standards. Extra attic space will be an asset in the future.

Use Best Windows & Doors

Be sure you put in the best windows and doors you can afford. Make use of natural light and be sure to consider the compass orientation of the pod with respect to north and south. Plan for an outdoor garden space or a shaded patio or deck so your mother-in-law can enjoy being outdoors in delightful weather!

AirBnB

Your granny pod can be rented out on Airbnb.com if you have to move your mother-in-law out to a facility that can give her more care. Be sure you design the pod so that any renters will not have to rely on you for anything.

To summarize, be sure you do the following as you move forward with your granny pod:

  • include the occupant in the plans
  • create an open floor plan
  • think about what happens with the granny pod a few years from now

CLICK HERE to get FREE & FAST BIDS from local remodeling contractors that can build the dream pod behind your home.

Column 1133

How To Repair Chipped Tile

DEAR TIM: I have a gorgeous white tile floor in my home. It’s a long story, but I dropped something and chipped a tile. I tried to hide it with a throw rug, but my wife caught me. To get out of the doghouse, I need to repair the tile. Do I have to take out the old tile and replace it with a new one? I would think matching the grout would be very hard to do. Is there another way to repair the chipped tile that will work and get me back into the good graces of my better half? Andrew V., Perth, Australia

DEAR ANDREW: I’m reminded of the time forty years ago when I ruined some brand new ceramic tile in the kitchen of my second home. It was one-of-a-kind hand-painted backsplash tile near a sink that I sprayed with molten copper and steel. I need not go into the details about how that happened, but suffice it to say my better half was standing next to me just before the foolish accident and had asked me if I knew what I was doing. The sparks, smoke and molten splatter told her all she needed to know.

Here’s the good news. You’re going to be able to repair the chipped ceramic tile in less than a day. You do have options with respect to how to accomplish the task. I’d recommend you also purchase a box of fine chocolates to supplement your peace offering. Too bad you don’t live in the United States because there’s a candy shop in Cincinnati, Ohio that would go a long way to satisfy your wife’s sweet tooth.

See the small circled area where the white tile is chipped? This can be repaired in less than an hour! Photo Credit: Andrew Vous

See the small circled area where the white tile is chipped? This can be repaired in less than an hour! Photo Credit: Andrew Vous

Let’s discuss replacing the chipped tile and the challenges that presents. Sometimes you have to do that because the chip in the tile is so big that you may not have the skill set to repair it using the secondary method I’ll describe in a minute.

If you decide to remove a ceramic floor tile, the first place to start is to make sure you have an exact match of the tile. Most people don’t have any spare tile left over at their homes. I feel that builders and remodelers should always leave behind spare tile and put it in the original boxes it came in. Homeowners should always keep the tile and hand it off to future owners of the home for all the obvious reasons.

In addition to saving the spare tile, it would be great if you had some of the original sanded grout. It’s harder to preserve sanded grout because the Portland cement in the product wants to harden as it’s exposed to humid air. To preserve it, you need to place it in a tightly sealed container and freeze it. The air inside most freezers is exceptionally dry.

If you don’t have any spare grout, then you have to match it. If you don’t get a perfect match, the new grout line surrounding the replaced tile will look worse than the current chip! If you do decide to replace the tile, then you need to deep clean the tile and grout first and allow the grout to dry so you can see its true color. I recommend using certified organic oxygen bleach to clean tile grout.

The photograph you sent me is excellent (see above). The chip appears to be the size of a green pea or pencil eraser. I’ve repaired many chips like this in less than four hours. You’re going to do the same.

The first thing to do is be sure the chipped area is clean and free of all dirt, dust, oil, etc. Once it’s clean, then you’re going to mix up some rapid-set clear or white epoxy. The epoxy I use sets up in about five minutes after it’s mixed.

I’ve had great success with a product that’s the consistency of honey when it’s mixed. It’s self leveling and works great in the field area of a tile. You add just enough epoxy so it flows and is the same level as the surrounding glazed finish.

In your case you’re going to have to work a little harder because your chip is on the edge adjacent to the sanded grout. This area of the tile often has a slightly rounded profile and you don’t want the epoxy to run down onto the grout. You’ll have to add the epoxy in at least two applications and build up layers over a period of 30 minutes.

Once you get the epoxy placed and the chip is filled to the right height and profile, you paint the epoxy with a matching paint. You’ll use a fine artist brush so you don’t get any paint on the adjacent tile or grout. Put on at least two coats. Once the paint is cured, this could take several days, then you coat the paint with three coats of water-based clear urethane.

I want you to refine your repair skills first using some scrap tile you have around the house or you buy. Chip a piece and do all I say until you’re an expert at the method. Do not try to do all I say the first time on the tile in your kitchen. You only get one chance to repair it correctly and you need to have great skills and magic. You’ll attain those rapidly with a few practice sessions out in your garage.

Let me know the instant you’re out of the doghouse and how the chocolates were received. I’d also like to see an after photo taken of the tile once you repair the chip.

Column 1132

February 21, 2016 AsktheBuilder Announcement

What a difference a week makes! Last Sunday I taped the video:

Why is My House Cold With the Heat On

Go watch it.

When I woke up this morning and was grinding my coffee beans with my inexpensive, yet powerful, Krups Grinder it was 40 F outdoors!

That's a 47-degree DIFFERENCE in temperature from last week's -7F.

Often people don't put into perspective relative differences in temperature. Think about it this way.

How stark is the difference in temperature to your body between 40 F and 87F? It's the difference between chilly and HOT!

The same thing happens going the other direction. It was BITTER COLD last Sunday

That's why my boiler was running constantly and not able to get my house up to 70 F.

I've got TWO things for you this morning.

Both are VERY IMPORTANT. Let's get right to it.

I NEED YOUR HELP

Today is the day. Today is when I write the last word in my upcoming Defective Shingles Book.

Some extra information finally came available to me in the past ten days that I had been waiting on. It was well worth the wait as you'll discover when you read the book.

What's more, I received a survey response two days ago from Stephen who lives in Warwick, RI.

He talked about how his roof failed long before it should and his "new $10,000 roof" created a dreadful financial burden that he and his wife are still hurting from to this day.

Has the same thing happen to you or someone you know?

I desperately need you to tell me your story if you've suffered a financial hardship because your shingles FAILED far too early.

Did you use up lots of your savings?

Did you have to borrow money from a relative or friend?

Did you have to take out a home equity loan or worse yet, put the cost on a credit card?

Did you have to use some sort of financing from one of the big box stores?

If poor-quality shingles have caused you financial PAIN, I NEED you to fill out my Defective Shingles Survey ASAP.

CLICK HERE to fill it out. Tell me as many details as possible about how the bad shingles have caused you to suffer.

If you have plenty of money and your shingles have FAILED, I still need you to take the survey.


.
MYSTERY LINK! You have too much stuff. This Spring you'll solve the problem.

What's the BEST way to deal with it? CLICK HERE to Discover what I did!

.

NO MORE DVDs! This is SERIOUS

A few years ago, I was very lucky to connect with a professional video production company in Cincinnati, OH called the PPS Group.

There I met Bob, Jim, David, and John.

John was the producer I worked with to create four super professional DVDs.​

The first one was an authoritative guide on how to install crown molding.

The next two showed how to install a traditional shower pan liner and the poured mud base for the ceramic tile.

The final one was a simple, yet informative DVD about how to install different insulation.

The team at PPS has decided they must have the space where the DVDs are stored.

But that's not the worst part.

Based on the conversation I had with Bob, the majority owner, he's not too interested in producing more copies.

That means the DVDs we now have at the PPS headquarters might be the LAST ONES that are going to be created.

I've sold these for years for $19.95 each plus shipping but now to get rid of them, Bob wants me to drop the price 60%.

Yes, a 60% true Inventory Reduction Sale.

When these DVDs are gone, they're GONE. That's not a lie.

You can now purchase - until the supply is exhausted - each DVD for just $7.95 plus shipping.

I've also created a SPECIAL SKU if you want all four.

You can get all four of them in a bundle for just $27.95 plus shipping.

This is an incredible deal.

I'm here to tell you, you'll NEVER get these DVDs cheaper and once gone, you'll have a collector's item.

Here are the links:

BUNDLE of all Four DVDs

Crown Molding DVD

Shower Pan Liner DVD

Shower Mud Floor DVD

Insulation DVD

That's enough for today.

Remember, please go fill out the Defective Shingles Survey above if you took a financial HIT replacing your roof.

Thanks

Tim Carter
Founder - www.AsktheBuilder.com

Do It Right, Not Over!

February 19, 2016 AsktheBuilder Ooopsie By Accident

If you're a new subscriber, when I make a mistake I send out something like this. The headline is something my son used to say when he was a little tyke after he'd drop something or break something.

I was in a rush last night when I built the newsletter you received earlier this morning.

I FORGOT to ask you something!!!

Do you live in any of the following USA states or Canadian provinces or know someone who does?

  • Alaska
  • Delaware
  • Mississippi
  • Nevada
  • New Mexico
  • North Dakota
  • Oklahoma
  • Rhode Island
  • South Carolina
  • Vermont
  • West Virginia
  • Wyoming
  • British Columbia
  • Saskatchewan
  • Manitoba
  • Maritime Provinces

If you live in one of these states or provinces, and you have an asphalt shingle roof that is falling apart, the shingles are curled, the granules are falling off, etc., I NEED you to fill out my Defective Shingles survey.

CLICK HERE to fill out the survey.

Look at this photo. Tell me if your roof looks something like this:

I'm putting the finishing touches on my Defective Roof Shingles book this weekend.

After that, it's ready for the final cover art, proofreading, and formatting.

Have a great weekend!

Tim Carter
Founder - www.AsktheBuilder.com

Do It Right, Not Over!

February 19, 2016 AsktheBuilder Weekend Warrior

I had a troubling thing happen to me this week that you need to know about.

I'm about to save you thousands of dollars in the future.

A public relations (PR) person who I'll not name contacted me with the following message:

"Hi Tim,
Wondered if you might need a building expert who specializes in sustainability as a resource for an upcoming story?"

My response was simple:

Can you send me (name of *expert* hidden by me)'s CV?

I'm interested to know how deep his/her knowledge of the process is.

The PR person came back to me with a spin answer that had zero information about the *expert's* background that would qualify her/him as an expert.

I once again requested the *expert's* CV - curriculum vitae - so I could vet the person to see if he/she was really an expert.

The PR person never responded back.

This *expert* is someone you might see on a TV show.

Why should this be of importance to you? Do you think that all the hosts of TV shows you see are real professionals?

What is the definition of a professional?

Just because a person has a TV show, does that make them an expert on a topic?

Should you trust their advice?

I know I can answer the above questions, but can you?

If you're going to put thousands of your hard-earned dollars in the balance to do a job at your home, don't you think you should be getting advice from a person that has these minimal qualifications:

  • has actually done the job
  • has done the job at paying customers' homes for decades

Yeah, I thought so. Don't ever HOPE the advice you're getting is going to work.

You need to know that the person giving the advice has walked the walk.

Remember, you HOPE for things when you can't control the outcome of that thing. You can control where you get expert advice all the time.


House Design Book

More than a few months ago, Bill Hirsch Jr., AIA, sent me his book to review.

It's filled with solid advice about what you need to know if you're about to build a new home.

The last thing you need are design flaws.

The book contains stunning photos, but it's also filled with lots of practical advice.

I can tell you I've been inside many homes that have basic design flaws that cause all sorts of issues.

Even here at my own home I have a few. I didn't build the house I live in here in NH. My own home here has a very common deck design flaw.

My deck is only 10-feet wide out from the house. That's too narrow to put a small 4-foot diameter table with chairs and have enough room for people to get by when people are seated at the table.

If you want to know the minimum width for a deck then CLICK HERE.

I've got lots of the same design advice at my website, but Bill consolidated it into this book.

It's worth every penny, so I suggest you order it.

CLICK HERE to get either the Kindle or hard-copy edition.

.
MYSTERY LINK! You peer up into your attic. You see something that's NOT supposed to be there. What is it?
.


Water Behind House Wrap

Here's a column I just wrote. You're not going to believe the photo you're about to see.

CLICK HERE and be amazed.

Don't ever make the mistake this homeowner made.

Replace a Tub With a Walk-In Shower

Here's another column for you.

I'll guarantee you you'll discover something new with this one.

Wait until you see the photo in this one. WOWZA!

CLICK HERE to see it.

That's enough for today.

I'll be back soon.

Tim Carter
Founder - www.AsktheBuilder.com

Do It Right, Not Over!

February 16, 2016 AsktheBuilder Newsletter

We had record-breaking cold here in NH over the weekend.

My Davis weather station sensor up on top of my garage roof transmitted to the interior dashboard panel that it was only -12F on Sunday morning.

Yes, I know it was colder for some, but it was D * * * cold here. So cold that my boiler could not keep up.

Kathy was complaining, and rightfully so, because the house was chilly.

I decided to tape a video that explains why a house is cold when the heat is on.

"Tim, everyone knows why. Tisk tisk."

Well smartypants, I'll bet you don't know it all.

Watch the video and be honest.

As Dr. Kenneth Caster would say to me before handing me one of my Historical Geology tests, "Today we're going to test the DEPTHS of your ignorance."

Yes, he did say that. I loved him. He was one of the most influential professors of my college career. Another one being Dr. John Alexander, my physical chemistry lab teacher.

Oh and for all you who live where it's hot and often HUMID, I've got a super tip in the video for you if you think getting a BIG air conditioner will keep you comfortable.

Bwahahahahahahahahahahaha!

I pretty much guarantee you'll discover something when you WATCH IT.

CLICK HERE to watch it.

GREAT New Map of the USA

Do you like maps as much as I do? There's a new geographic map of the USA that's going to be glued to one of my walls!

Check this out. This map is unlike any you've ever seen. It's got amazing detail and you can see clearly the real physical geomorphology of the country.

It would make a GREAT GIFT for that special someone.

CLICK HERE to order one now.


New Tool Review

Can you guess what this is?


It's perhaps the most unique chalk box / reel I've ever held in my hand.

CLICK HERE to read my review.

Nail Gun Review

I've got another review for you while you're at it!

Look at this bad boy.

If you've never clicked one of my tool reviews you should.

Why?

Well, I'm starting to have a little fun writing the captions.

Go read them and tell me if you think I should drink more or less fresh coffee.

CLICK HERE NOW and behold the creative capabilities of a coffee-juiced writer.

If you don't want to click my tool reviews, then go grab yourself a juice box and a fruit roll up and we'll be back in about six hours to check up on you.

.
MYSTERY LINK! Clue: If you're from Cincinnati what do you call chili, spaghetti and cheese on a plate?
.


Install a New Window in an Old Wall Video Series

I uploaded four new videos over the past few days.

The chronicle the saga of me putting in the window up in my man cave.

Have you ever wanted to cut a new window or door into an existing frame wall? I show you how it's done.

If I had a super power, it would be to look good on video. When I edit my videos I shake my head at my messed up hair, sweat pouring off me, sawdust on my face and clothes and my unrehearsed lines.

I sure hope the four videos make sense to you!

Here are the FOUR links to the videos:

Video 1 of 4

Video 2 of 4

Video 3 of 4

Video 4 of 4

That's plenty for today.

I'll be back on Friday.

If you spill that juice box, you can get the stain out with my Certified organic Stain Solver. Go ahead, click the link and make your clothes cleaner than a cat that's licked itself for seven hours straight.

Tim Carter
Founder - www.AsktheBuilder.com

Do It Right, Not Over!

Milwaukee Fine Line Chalk Reel Review

Here it is. It's drop dead gorgeous.

Here it is. It's drop dead gorgeous.

Do you have a chalk box or chalk reel?

You know, that thing that looks like a teardrop and is coated in blue or red dust?

I'll bet you never thought the design could be improved, right?

Well, the caffeine-stoked engineers at Milwaukee Tools must have made a pot or two or three too much and SCHAZAAM!

I introduce to you the aluminum body high-tech design with torque-dispersing planetary gears Fine Line Chalk Reel.

The first moment I held this in my hand I thought, "Holy Cucumber! This thing is going to last generations!"

It's got a feel to it unlike any other. Once you hold one, you have to have one. It's that good.

This bad boy has got 100 feet of 0.9 mm high-strength braided line lurking under that bright red durable aluminum body.

See that little black button at the pivot point of the crank? You press that to allow the line to go out fast with the crank staying put. It also helps you get the crank end into the small depression at the top of the reel. Very clever.

This is one handsome chalk reel.

This is one handsome chalk reel.

The top of the reel turns a quarter turn allowing you to fill the belly of the beast with the red, blue or ??? chalk of your pleasure.

This is one chalk reel that homeowners will want to barter with you for. They may offer up one of their kids as a slave. Don't do that deal.

This is one chalk reel that homeowners will want to barter with you for. They may offer up one of their kids as a slave. Don't do that deal. This is the view featured in the February 16, 2016 AsktheBuilder Newsletter.

The mystery planetary gears power this reel making quick work of rewinding the string after you twerk a line. With a 6:1 ratio, you can chalk more lines faster than a rookie carpenter with six helpers throwing reels back and forth like juggling pins.

This is just like the 4 on the floor of my '67 Pontiac GTO ragtop. You could take 1st gear out to about 50 mph. The same is true with this reel. You can snap lines faster than fly flits from your face.

This is just like the 4 on the floor of my '67 Pontiac GTO ragtop. You could take 1st gear out to about 50 mph. The same is true with this reel. You can snap lines faster than fly flits from your face.

Installing a New Window Video 3 of 4

Tim Carter demonstrates in this third video of the series how to cut out the wall sheathing and install the much needed sill flashing.

The window install has been happening over a period of days and it's being done on a garage that has fiber cement siding for the exterior.

Tim shows the importance of cutting out the fiber cement siding so that no one gets hurt and the siding on the outside is not damaged.

The window install can be done by a serious DIY person who has the right tools and common sense.

Water Behind House Wrap

DEAR TIM: I have a house wrap installed on my house over plywood sheathing. No clapboards are in place yet. I'm getting moisture behind the house wrap that is of concern to me. The product was installed at about 55 F, last October. The moisture appears in varying temperatures and also whether or not exposed to direct sunlight. The inside of the house is unfinished, with just insulation only in between the wall studs. No drywall is installed. I don't want my sheathing to rot away after I install the clapboards, so what can I do? What should have been done before winter set in? Steven Z., Jeffersonville, VT

DEAR STEVEN: I hope you’re sitting down. I’ve got some sobering news for you. Based on the photograph you sent to me, and it’s a perfect example of a picture is worth a thousand words, you’ve got to redo lots of work on the outside of your home once the weather warms up. The water you see behind the house wrap has at least four sources from just the one photo you provided.

This house is missing two things. The exterior siding and the interior vapor barrier and drywall. Photo Credit: Steven Zajchowski

This house is missing two things. The exterior siding and the interior vapor barrier and drywall. Photo Credit: Steven Zajchowski

Let’s start with the exterior and then move indoors. I’d like to go back in time to share how carpenters and builders of old protected wood frame houses from rot. They used time-tested technology.

In the late 1800’s tar paper was invented and builders quickly saw an advantage in using it under wood siding on home. Caulks from over 100 years ago that were used to try to seal water infiltration were crude and didn’t offer the long-term flexibility of modern caulk. Water could easily leak behind wood siding clapboards where they touched up against window and door trim and frames.

Carpenters would nail asphalt-saturated felt paper onto the wood sheathing of a home before installing the siding. Long sheets were installed in rows 3 feet high. They would start at the bottom of the house making sure the felt paper overlapped the foundation. Then each successive piece of felt paper would overlap the one below it.

Vertical seams also were overlapped to ensure water that got behind the wood siding would drain down the paper never touching the wood sheathing behind the paper. You can watch a video I made showing how felt paper was installed here:
http://go.askthebuilder.com/feltpaper

Your house wrap was not installed this way. There are numerous places where the wrap is not overlapped correctly. What’s more, the vertical seams have not been taped shut. Blowing rain can easily get behind the house wrap since you don’t have your siding installed.

I also see where the nailing fins of the windows do not overlap the house wrap. This is another place water can get behind the weather barrier. Modern rubberized asphalt flashing tapes are available that allow you to seal window and door nailing fins to the house wraps. It must be done working from the bottom up just like the carpenters did 100 or more years ago.

Just think about how the clapboard siding works. Each piece overlaps the one below just like shingles on a roof. Gravity then pulls the water down to the ground. You need to do the exact same thing with house wraps, flashing tapes and metal flashings that are part of a wall system. You must maintain the overlap in the correct direction at all times.

Another possible source of the water behind the house wrap is interior humidity that has a direct path to the exterior. You indicated you moved into the home, yet it’s not finished. You live in a cold climate and the interior relative humidity is almost always higher in the inside of your home than it its outside.

The water vapor inside your home originates from cooking, showering, a possible running humidifier, indoor plants, washing dishes and clothes, breathing, etc. These things and activities all add water vapor to the inside air. This water vapor is trying to get outdoors and needs to be stopped with a cross-laminated vapor barrier that’s installed on all exterior walls over the insulated walls. It’s then covered with drywall.

If you don’t have this vapor barrier in place, the water vapor passes through the insulation, the plywood or oriented strand board and then can collect on the back side of the house wrap. Most house wraps are designed to allow water vapor to pass through them, but it’s possible for liquid water to collect on the back side if more water vapor is trying to get through than the house wrap will allow to pass at one time.

Interior humidity was not a real issue in older homes up where you live decades ago. Most older homes had no insulation and they were exceedingly drafty. Vast amounts of dry colder air would pass through the walls and lower the overall humidity in the house. There was so much air moving through the walls that even if condensation did somehow form inside a wall cavity, it rapidly evaporated. This is why older homes never rotted away like you see happening with modern homes.

I have numerous other videos here on my AsktheBuilder.com website that show you how to install house wraps and how to install the flashing tape around windows and doors. I’d invest the time and watch these so your house doesn’t rot away!

Column 1131