Bath Remodel Before Video

Bathroom Remodel Before Video Transcript

Hi, I'm Tim Carter founder of AsktheBuilder.com. I'm here in my basement bathroom at my own home and we're going to be remodeling it. And the reason why is the original architect and the homeowner they just made some really critical mistakes in my opinion and I'm gonna do my best to correct them.

So I want to take you on a little tour right now of the bathroom and to show you the before and then you'll really appreciate what it's going to look like when we're finished. Look at this. Right here behind me, this is a massive custom-built shower and it's all tile. It's tile floor, walls, even a seat, and even had a tile ceiling as well. So it's all going to come out.

Believe it or not, this entire shower is coming out and the biggest reason is because right here where I'm standing, in my opinion, they made a big mistake. Once you see this whole bathroom that's a pretty big one there's no storage anywhere. And right where I'm standing, could have been a beautiful closet to store many things. Not only things for the bathroom, but also other things for the house.

Follow me. Okay I'm outside the shower now and this is actually the sidewall of the shower and I think this is where the biggest mistake was made. Instead of going around the corner to get into the shower, they could have made the entrance to the shower here. And that's exactly what I'm going to do.

You’re going to see it nice 32-inch deep by 60-inch wide shower is going to be put in this place here. It will be very nice and it's one from Sterling, you know it's a Kohler company, you know we're putting in a beautiful prefabricated that acrylic shower here. It's gonna be awesome.

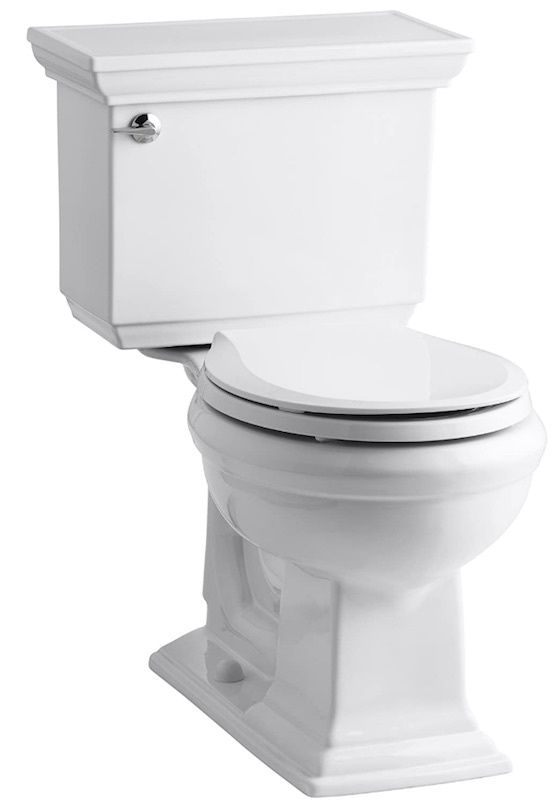
Okay so look at this. Here's the toilet the existing toilet that's coming out. We're going to put one just like it in its place in the toilet and it's not going to change the location because
we're dealing with a concrete slab over here that's got radiant heat in it so it's a nightmare to try to relocate plumbing in a situation like this.

I've already got a little problem here. I do have to chisel out some of the concrete to relocate the drain for the shower. You'll see exactly how we're going to do that.

Let's look at the sink. Here here's the original pedestal sink and I think it's a mistake, in my opinion, to put these in a bathroom. I think they're OK for a powder room, maybe where guests come in, but in a working bathroom, you need some flat counter space. You know for combs, toothpaste, toothbrushes, hair, you know just need some flat area for things.

Well, guess what? These things don't have it. This is coming out. We're putting in a 36-inch vanity, a beautiful precast China top from Kohler. It's going to be awesome. So you'll see that and that's probably one of the last things we do.

I wanted to talk a little bit about the floor. Look at it. So we're keeping the floor. It's not bad. We're going to have to clean the grout. I'm going to show you that. But this is a really big bathroom these were one foot by one-foot tiles and you can see over here let's count, that's a half a tile. Here's one, two, three, four, five, six, seven.

The bathroom is seven feet this dimension before we get to the shower wall and then it's about nine feet deep this way. It's a huge bathroom, in my opinion, they could have tightened up a little bit and had some extra space for the closet that's over there way on the other side those other walls in the shower. But I'm not going to change that.

No big deal, but just remember when you're planning on your home or bathroom, uh make the best use of space. I also want to talk just a little bit more about the fixtures. I'm going to be using all Kohler fixtures in this bathroom. I used them as a plumber for all the years that I was building and remodeling. I have in my own home.

I've never had problems with Kohler stuff. so I think that I really really enjoy watching how we install the Kohler and the Sterling products in this bathroom job.

All right I'm Tim Carter for AsktheBuilder.com. I think they're really gonna like the series we're going to tape every single step so that you can remodel your own bathroom. If you want to. If you want to discover more home improvement tips, go to AsktheBuilder.com.

Related Links

Bathroom Remodeling Sequence - What Happens When?

Bathroom Remodeling Guide - How to FIND the BEST Contractor

CLICK or TAP HERE to get FREE QUOTES from local bathroom remodeling contractors.

BUY these great Kohler fixtures for your bathroom remodel job:

kohler memoirs toilet

CLICK or TAP HERE to see ALL Kohler toilets you can have delivered to your home.

CLICK or TAP HERE for acrylic shower kits.

CLICK or TAP HERE for Kohler vanity tops.


Open Letter to Brent Bellm and Melanie Kalemba at BigCommerce

Dear Brent and Melanie:

This is a Dear John letter.

We're breaking up. But it's all your fault.

Yes, you.

After years of me being faithful to you and putting up with your BigCommerce.com shopping cart for two of my businesses - even though parts of your cart were still in Alpha mode, you decided to raise your prices.

I understand all about raising prices. Inflation and what not can cause all sorts of issues. A three or even five-percent cost increase can sometimes be expected.

Companies have to raise prices even more when the cost-of-goods-sold goes up dramatically. But all you have for raw costs are electrons, and the last time I checked they're free.

For you to raise prices 200 - 500 percent on me is simply unacceptable.

I'm currently looking to replace you and when I do, I'm going to do my best to tell the world - and the 100,000 people on my newsletter list - all about the new shopping cart I picked to replace you.

Remember, it was your fault, not mine.

Tim Carter

CEO AsktheBuilder.com and StainSolver.com


March 11, 2016 AsktheBuilder Newsletter

Spring is here in New Hampshire! WOO HOO!!!

Two days ago, it was, are you sitting down, 71 F. Holy Cucumber! Normally, it would be about 41 F and there could be two feet of snow still on the ground.

I spent the day with two friends over by the Connecticut River at the Saint Gaudens National Historic Site.

What was I doing there? CLICK HERE to discover!

While on the subject of amateur radio, I had something big happen two weeks ago. I passed perhaps the last exam I'll take in my life.

I sat for the Amateur Extra test and aced it with a 100% score. If you're not an amateur operator, you probably have a BIG yawn going right about now.

It's a pretty big deal as only 18.5% of all licensed operators have attained Amateur Extra, the highest level you can achieve in the hobby. With these license privileges, I have access to every megahertz of the amateur radio spectrum.

Blah blah blah ... I know, you probably think this is all boring as can be. Here's all I want to say. Amateur radio is a magnificent hobby and what I like to do is mix radio with outdoor hiking and camping.

Get that picture out of your head of a radio operator down in a basement surrounded by all these glowing tubes and giant boxes. Modern radios that allow you to communicate all over the world are the size of deck of cards.
Bathroom Remodel Update

I started the bathroom remodel yesterday! Four videos have been taped. I'll have them ready for you on Sunday.

I stripped the drywall off the side of the shower wall and made a SHOCKING discovery.

It appears the builder and ceramic tile installer did NOT use any waterproof membrane underneath the custom seat that was built inside the massive tile shower stall.

My guess is they thought the ceramic tile, the grout and the cement board are waterproof. Well guess what?

Only one of the above is waterproof. Can you guess which one?

You'll discover the answer on Sunday.

.
MYSTERY LINK! What is the time-tested SECRET ingredient the old-time masons used to make sure stucco would NOT FALL OFF a concrete wall?
.

Discover Price of New Home with One Click!

Are you thinking of building a new home but want to know WHAT it will cost early in the process?

Would you be interested in a magic simple spreadsheet that you enter in just ONE NUMBER and it automagically calculates the price of all the other things AND the total price?

Did you get that?

You just need to know ONE NUMBER - the price of one component of your new home - that's all!

Once you know one number, the magic behind the spreadsheet does all the other work for you!

CLICK HERE to watch a video I taped about it.

Here's how it works.

Say you've got a set of simple plans but they're accurate enough for a foundation contractor to give you a price for your footers and poured concrete foundation.

You take those two numbers, enter them into the correct cells on the spreadsheet and hit enter.

​This spreadsheet works in Microsoft Excel, Apple Numbers or Google Sheets.

BOOM! All the other numbers get filled in and you also see the grand total estimate for your new home.

How cool is that?

Here's the BEST PART. You can enter in ANY number that you have. Let's say you know the cost of all the windows you're going to use in the house.

Just enter that number in the right cell and BOOM! There's your price for the entire house.

Maybe you know the entire cost to hang and finish the drywall. BOOM! Enter just that number and the magic happens!

What's it worth to you to have an idea of the actual cost before you invest weeks or months trying to GUESS at the number?

Is it worth the price of five caramel lattes?

I thought so. Yep, just $19.95 and that's the LOW INTRODUCTORY PRICE.

I'm holding the price DOWN just for you as I know this tool is worth far more than twenty bucks.

CLICK HERE to get it right now.

White Mystery Powder

Do you know all there is to know about that pesky white deposits on your foundation wall, your garden wall, your paving brick, your chimney, etc.?

It's efflorescence.

Do NOT use water to get rid of it! Why?

I suggest you read these columns and WATCH the videos:

Efflorescence Video

What CAUSES Efflorescence?

Remove Efflorescence

Okay, that's enough for a Friday morning.

I'll be back at you on Sunday with some bathroom remodel videos!

Tim Carter
Founder - www.AsktheBuilder.com

Do It Right, Not Over!

Brick and Rock House

DEAR TIM: My husband and I are in a small skirmish about our new brick veneer home. I want it to be somewhat distinctive where you incorporate random pieces of rock in the brick. Among other claims, he says this will weaken the brick and cause leaks. Is this true? He’s also worried that it will cause our home to be worth less money when we go to resell it. Help we win the battle. Can you offer up any advice that will allow me to have the home I want and satisfy my husband at the same time? Have you seen houses like this and what would you do? Saraj C., Santa Rosa, CA

DEAR SARAJ: I really hate being put in the middle of these spouse wars, but then again I’ll always jump in to help a damsel in distress! The good news is I feel you’ll be able to have the house you want and we’ll calm down your husband at the same time. I feel what he needs is some inspirational help to get him over a few of his mental barriers.

Let’s answer the structural concern first. First and foremost, the brick on your new home is not structural in nature. It’s just an outer skin that has nothing to do with holding up the roof. The brick rest on the poured concrete foundation and they’re supposed to be connected to the wood-frame walls using heavy-duty galvanized corrugated pieces of metal that are securely fastened to the wood wall studs. This is done so the brick doesn’t tip over and fall to the ground.

Here’s a very unique and tasteful use of brick and rock on the exterior of a house. Photo Credit: Tim Carter

Here’s a very unique and tasteful use of brick and rock on the exterior of a house. Photo Credit: Tim Carter

The pieces of stone or rock will not weaken the brick. In fact, depending on the type of rock you choose to use, the actual pieces of rock may be stronger than the brick. Granite is a good example of this. Pieces of granite may have far greater compressive and tensile strength than the brick you’re using.

Incorporating the rock or stone will not cause leaks. Water seeps through the mortar joints in between each brick and runs down the back of the brick veneer. Your builder needs to know how to keep this water from contacting the wood framing and redirect this water back to the outside of the wall.

I was lucky and grew up in a distinctive older suburb of Cincinnati, Ohio called Clifton. The northern parts of this suburb had a few houses that several houses where brick and stone were blended together in a random pattern. The look was stunning. As a young boy riding his bicycle up and down the sidewalks of this area, these houses would catch my eye because they were so distinctive.

I’ll never forget my first time walking past the majestic Tribune Tower in downtown Chicago. This stately skyscraper has 149 pieces of rock, brick and stone embedded in the oolitic limestone that was used to build the structure. These pieces of stone come from all over the world, some from very historic sites such as the Great Wall of China, the Alamo, the Berlin Wall and many others.

Imagine what you could do! You live in one of the most geologically diverse states in the United States. You could have a boatload of fun going out and collecting different rocks from around the state of California and using these to mimic what was done at the Tribune Tower, albeit on a smaller scale.

Mixing different colors and rock textures could create a gorgeous look. What’s more, collecting the rocks would make for great trips and memories. Being a college-trained geologist myself, I think this could be a great way to do something that helps you discover more about all the wonders that surround you.

As for hurting the value of your home, I may have to concede a point to your husband. Not all people would like the look you’re going for. A seasoned realtor or appraiser would no doubt tell you the same.

But there’s a way around this and it’s very easy to do. All you need to do is order a few hundred extra brick that are being used to build your home. These would be easy to store in your garage or in your yard. You’ll also want to save about twenty or more five-gallon buckets of the exact sand that’s used by the bricklayers building your home.

Saving the sand could be a little more problematic, but there has to be a way you can do this. Having the brick and sand on hand will allow you to tell a future buyer they can remove the pieces of stone and install the matching brick in their place should they have the desire. To ensure the patches look perfect, you need to use the exact same sand as was used when the brick were first installed.

Be sure to save at least one of the empty bags of mortar so a future mason knows what to buy. I always coach people to save things like this down by the electrical circuit panel. Put the bag in a resealable plastic bag and mark on the outside of the bag what it is and also put in big letters: DO NOT DISCARD. Tape this bag above the electrical panel for a future homeowner.

Column 1134

March 4, 2016 AsktheBuilder Weekend Warrior

I've got some killer content for you to review and a video below you should watch for this weekend.

Some of you already have great weather and can do concrete repairs.

Others, well it's just about five weeks away when Old Man Winter will be plodding his way back to the North Pole.

Before we get to that content I want to share a very important message that was brought to you via Emanuel Oakes who lives in Wilkinsburg, PA.

This is a Do-NOT-Do-This Story.

Emanuel hired a concrete contractor to replace his driveway. He trusted the job would be done right.

Where Emanuel's driveway ends at the street, there's a common sloped concrete curb.

For some reason, the contractor made the driveway 1.5 inches higher than the top edge of the curb.

Emanuel did not like this. I don't think anyone would. Why it happened is beyond human comprehension.

The first mistake Emanuel made, and perhaps he was out of town, was that he failed to inspect the forms after they were set but before the concrete truck arrived.

He would have been able to see the flat 2x board that was laying on top of the curb to act as a dam for the concrete.

But he didn't see it and the concrete was poured. Or if he did see it, he didn't think it through as to what the finished height of the concrete would be.

Fast forward.

Emanuel went to an attorney to sue this contractor.

He contacted me today asking me if I do expert witness work.

I replied, "Yes, I've done it for about fifteen years. The most recent job I was in Antigua. It was a case involving the roof of the Brazilian Ambassador's home."

I told Emanuel that he needs to stop all he's doing and do one simple thing.

Measure back ten feet from the curb - or go to the closest control joint in the slab that's parallel to the curb - saw cut the new concrete at this line, remove the concrete between the cut and the curb and re-pour it so the concrete is flush with the top of the curb and meets the existing slab at the saw cut.

I said, not knowing all the figures, that he could do this for possibly 10 percent of what he's spending - or will spend - on attorneys, experts, etc.

But here's the most important thing I asked Emanuel:

"Emanuel, when you went to the attorney the first time did you ask him the most important question of all? Here it is:

'If I win the lawsuit, (and that's a long shot) do I get my money right there in the courtroom?' "

The answer is NO.

In fact, you may never get the money if you win a construction lawsuit.

The second most-important question in situations like this that you ask the attorney in the first ten minutes of the meeting is:

"How many lawsuits like this have you prosecuted that have actually gone to trial?"

The answer is LOW. Probably less than five percent.

This means you SETTLE with the other party and bandage your wounds to stop the financial bleeding.

The third most important question you ask in the first fifteen minutes of meeting with the attorney is:

"What's the average price a person like me spends until the matter is settled?"

If the attorney waffles or refuses to give you an answer, immediately stand up and walk out of her / his office.

I'm sharing all of this with you for a reason.

The legal pathway is one paved with gold - gold from your bank account.

Now, with all that said, if you're considering legal action against a contractor I can tell you over the phone some of the stories about cases I've worked on.

You can take away from those stories knowledge that will help you make great decisions on what to do.

I'm not allowed to give you legal advice, but I'm allowed to tell you stories.

CLICK HERE if you want me to tell you stories.

Repair Concrete Video

CLICK HERE to watch a very important video showing you how to repair cracks in concrete.

CLICK HERE to BUY the products I used in the video.

Fencing Columns

Here are a few past columns that will help you if you're thinking about fencing around your yard.

CLICK HERE to see a photo of a wood fence I built for Kathy at our last home. She LOVED this fence.

CLICK HERE to see how to set fence posts. This one has a CLOSE UP shot of the fence Kathy loved.

CLICK HERE to discover privacy fencing.

I have many many more columns on fencing.

Use the SEARCH ENGINE at the bottom of each page at my site.

Type:

fences

and behold the power of AsktheBuilder.com.

I've got a SPECIAL TREAT for you on Sunday.

Are you thinking about building a new home and do you want to have a quick and easy way to ESTIMATE what it will cost?

I've got that for you on Sunday.

Tim Carter
Founder - www.AsktheBuilder.com

Do It Right, Not Over!

March 1, 2016 AsktheBuilder Newsletter

Holy Tomato! It's March!

We're just a few weeks away from the Vernal Equinox - the official start of Spring - but here in NH, it sure looks like Spring to me.

As I look out my man cave / office / ham radio shack window, the snow is gone in the woods.

For the past few years on this day, there would be at least 24 inches of snow on the ground next to and looking beyond the black trailer of mine that's behind my truck.

Now the ground is bare. Yes, there's snow on the grass in the right of the photo, but the primary reason it's hanging around is because my snow blower throws it up there and makes it deeper than normal.

Bathroom Remodel Update

Everything has arrived for my bathroom remodel except the vanity cabinet. But that's no big deal as it's one of the last things I need.

I'll be starting on the job probably on Thursday.

You're going to get to see every step of the journey as I'm taping a massive video series showing you the Before, During and After.

The biggest challenge of the job is relocating the existing shower drain. I have to move the trap about four feet and need to chip out a trench in my concrete slab making sure I don't hit any of the PEX tubing that's in the floor. It provides the radiant heat in the basement.

I'm using all Kohler and Sterling fixtures in this project and they are stunning. Don't worry, you'll get plenty of face time with each fixture as I go to install them. You'll know the exact products I'm using and I'll explain how you connect everything together.

Bottom Line: Start setting aside time to watch well over 100 videos. I don't think I'm going to combine many into a longer video for all sorts of reasons.

On YouTube I can create a huge playlist so they play one after another.

Tom's Noisy Neighbors

Yesterday I received an email from Tom via my Ask Tim page.

He wanted me to tell him the best products to use to STOP the noise from his upstairs neighbors who tramp around their condo.

I suggested to Tom that he read a few of my past columns so he could understand all that's in play when it comes to sound control.

You should do the same. Here are the columns I shared with Tom:

Sound Control

Stopping NOISE Through Windows

Trash Chute Clatter

Hush Hush Laminate Flooring!

Milwaukee Work Gloves

I wear work gloves all the time around the house as I do stuff. Why?

I discovered long ago protecting your hands saves HUNDREDS of DOLLARS in medical fees and trips to the ER.

All you have to do is ask my good friend, Dave Evans, who has sewn up my skin countless times.

I just tried the latest Milwaukee Demolition Gloves and they're dandy. I'll be using them when I do the demolition in the bathroom for sure.

.
MYSTERY LINK! Do you know what it takes to be an honorary Tail Hooker? I'll bet you have no clue. CLICK HERE to see how I got the honor!
.


Defective Shingles Book UPDATE

My book about your defective roof shingles has cleared the most important hurdle.

A very high-powered attorney who specializes in libel has gone over the book and I've made a few minor changes so I'm in the clear.

The last thing I need is a multi-billion-dollar roofing manufacturer with unlimited funds suing me for harming their reputation.

I'm hoping to have the book in your hands no later than April 1st.

Here's the good news:

  • I tell you in the book what shingles to buy.
  • I tell you in the book HOW to protect the shingles on your roof if you just installed shingles in the past few years.
  • I tell you how to make your shingles LAST for DECADES instead of just the 12 or so years the current shingles seem to last.

If you can't wait until April 1st, then reply to me. You can pay a small fee and I'll tell you the shingles I'd buy if I had to re-roof right now.

But only do this if you can't wait. It's VERY IMPORTANT for you to read the book for a number of reasons.

I'm going to tell you all about this roof in the book. Look at the photo below. When you see another photo of this roof from a different angle, you're NOT GOING TO BELIEVE WHAT YOU SEE.

Hang in there. Wait for the book.

That's enough for today.

I'll be back soon.

Tim Carter
Founder - www.AsktheBuilder.com

Do It Right, Not Over!

Granny Pod House

backyard shed

Granny Pod House Tips

DEAR TIM: I believe I need a granny pod. My mother-in-law might have to move to an assisted care facility.

The monthly costs for this are staggering. My mother-in-law is very mobile and needs just a little help. I did the math and it seems I can make her money last for many years if we just build a granny pod house on my lot.

Fortunately I’ve got the room and the zoning code permits it. What’s the best way to go about this so the pod adds, rather than detracts, value to my home and property?

What would you do to create the ultimate granny pod house that could be converted to something else in the future? John M., Austin, TX

DEAR JOHN: I’m beginning to get quite a few emails like this and it’s not surprising as mature children are faced with tough decisions concerning their parents. My sister and I had to make the same choice with my mother years ago, but we couldn’t do the granny pod option. We moved mom to a very nice assisted living facility in her community.


Granny Pod Planning Process

When planning a granny pod, there are many things to consider and lots of them are quite important. The planning process must include your mother-in-law. She needs to tell you what things are important to her.

For example, she may love indoor plants. If so, you’d want to incorporate a space where plenty of light streams into the space to keep the plants happy.

Perhaps she still loves to cook. In that case, be sure there’s no wasted space at all in the kitchen and determine how much counter space she’d really like to have.

Maybe she likes to sew or do crafts, so you need to create a convenient space to do that.


Related Links

How To Build a Shed

50 Dream Design Tips

Contractor Hiring Hacks

Tim's NH Shed

This is an outdoor shed that could be converted to a granny pod house in thirty days or less. Photo Credit: Tim Carter

Just have her make a list asking this question: “Mom, if you could wave a magic wand and create the perfect small apartment, what are the top five things it would have?” Let her ponder that for a couple of weeks if necessary. Use photos from other granny pods to stimulate ideas if necessary.

Free & Fast Bids

CLICK HERE to get FREE & FAST BIDS from local remodeling contractors that can build the dream pod behind your home.

Talk To Realtors

I would talk to top realtors in your area and see if they have any ideas as they look into their crystal balls with respect to the future. For example, do they see a future trend for more detached home offices?

Do they feel there’s a growing trend for deluxe man caves? Now’s the time to try to think about what the granny pod might be used for when the time comes your mother-in-law will no longer need it. You want to make the transition from her use to the future use to be as pain and cost-free as possible.

Make It Match

The granny pod should look as much like your existing home as possible.

If possible, the granny pod should resemble a carriage house that you might see next to a large distinguished home. I don’t think making this pod look like an oversized shed you see in the parking lots of the big box stores is a good idea.

Open Floor Plan is Best

The floor plan should be as open as possible. Doing this gives you all sorts of options with respect to the future use of the pod. What’s really important at this point is trying to guess correctly at the future use of the structure.

simple granny pod plan

Here's an example of a blank open floor plan for a granny pod. There is a staircase to an attic space, but you can figure out where everything else can go from here. Copyright 2017 Tim Carter

Create two or three ultimate floor plans. See how they relate to one another with respect to the overall size of each use. Now’s the time to make the granny pod bigger in case your best guess of the future use requires 200 more square feet of space than what your mother-in-law requires.

CLICK HERE to get FREE & FAST BIDS from local remodeling contractors that can build the dream pod behind your home.

Concrete Slabs Restrict Change

The plumbing drain lines must be in the correct location for whatever you plan to do in the future if you must build on a concrete slab. A wood-floor system built above a crawl space allows future access to the plumbing pipes. You'll never regret having access to the plumbing drain lines.


Granny Pod Videos

These videos have some very good ideas.

Install Blank Utility Conduit Pipe

You’ll probably have to extend utilities to the pod underground. If so, now’s the time to install blank piping for future use. You’ll never regret installing an extra electrical conduit pipe as well as a 4-inch-diameter schedule 40 PVC pipe that could act as a secondary drain in case something goes dreadfully wrong in the future.

No Steps or Staircases

I’m sure your mother-in-law has no interest in steps and will want everything on the first floor. I’d design the pod so the attic has a steep roof, and a giant dormer or multiple gable ends so the attic space can become bonus room for the future use of the pod.

The building code controls ceiling heights in rooms. Be sure to study the building code and do what's necessary to meet or exceed its standards. Extra attic space will be an asset in the future.

Use Best Windows & Doors

Be sure you put in the best windows and doors you can afford. Make use of natural light and be sure to consider the compass orientation of the pod with respect to north and south. Plan for an outdoor garden space or a shaded patio or deck so your mother-in-law can enjoy being outdoors in delightful weather!

AirBnB

Your granny pod can be rented out on Airbnb.com if you have to move your mother-in-law out to a facility that can give her more care. Be sure you design the pod so that any renters will not have to rely on you for anything.

To summarize, be sure you do the following as you move forward with your granny pod:

  • include the occupant in the plans
  • create an open floor plan
  • think about what happens with the granny pod a few years from now

CLICK HERE to get FREE & FAST BIDS from local remodeling contractors that can build the dream pod behind your home.

Column 1133

How To Repair Chipped Tile

DEAR TIM: I have a gorgeous white tile floor in my home. It’s a long story, but I dropped something and chipped a tile. I tried to hide it with a throw rug, but my wife caught me. To get out of the doghouse, I need to repair the tile. Do I have to take out the old tile and replace it with a new one? I would think matching the grout would be very hard to do. Is there another way to repair the chipped tile that will work and get me back into the good graces of my better half? Andrew V., Perth, Australia

DEAR ANDREW: I’m reminded of the time forty years ago when I ruined some brand new ceramic tile in the kitchen of my second home. It was one-of-a-kind hand-painted backsplash tile near a sink that I sprayed with molten copper and steel. I need not go into the details about how that happened, but suffice it to say my better half was standing next to me just before the foolish accident and had asked me if I knew what I was doing. The sparks, smoke and molten splatter told her all she needed to know.

Here’s the good news. You’re going to be able to repair the chipped ceramic tile in less than a day. You do have options with respect to how to accomplish the task. I’d recommend you also purchase a box of fine chocolates to supplement your peace offering. Too bad you don’t live in the United States because there’s a candy shop in Cincinnati, Ohio that would go a long way to satisfy your wife’s sweet tooth.

See the small circled area where the white tile is chipped? This can be repaired in less than an hour! Photo Credit: Andrew Vous

See the small circled area where the white tile is chipped? This can be repaired in less than an hour! Photo Credit: Andrew Vous

Let’s discuss replacing the chipped tile and the challenges that presents. Sometimes you have to do that because the chip in the tile is so big that you may not have the skill set to repair it using the secondary method I’ll describe in a minute.

If you decide to remove a ceramic floor tile, the first place to start is to make sure you have an exact match of the tile. Most people don’t have any spare tile left over at their homes. I feel that builders and remodelers should always leave behind spare tile and put it in the original boxes it came in. Homeowners should always keep the tile and hand it off to future owners of the home for all the obvious reasons.

In addition to saving the spare tile, it would be great if you had some of the original sanded grout. It’s harder to preserve sanded grout because the Portland cement in the product wants to harden as it’s exposed to humid air. To preserve it, you need to place it in a tightly sealed container and freeze it. The air inside most freezers is exceptionally dry.

If you don’t have any spare grout, then you have to match it. If you don’t get a perfect match, the new grout line surrounding the replaced tile will look worse than the current chip! If you do decide to replace the tile, then you need to deep clean the tile and grout first and allow the grout to dry so you can see its true color. I recommend using certified organic oxygen bleach to clean tile grout.

The photograph you sent me is excellent (see above). The chip appears to be the size of a green pea or pencil eraser. I’ve repaired many chips like this in less than four hours. You’re going to do the same.

The first thing to do is be sure the chipped area is clean and free of all dirt, dust, oil, etc. Once it’s clean, then you’re going to mix up some rapid-set clear or white epoxy. The epoxy I use sets up in about five minutes after it’s mixed.

I’ve had great success with a product that’s the consistency of honey when it’s mixed. It’s self leveling and works great in the field area of a tile. You add just enough epoxy so it flows and is the same level as the surrounding glazed finish.

In your case you’re going to have to work a little harder because your chip is on the edge adjacent to the sanded grout. This area of the tile often has a slightly rounded profile and you don’t want the epoxy to run down onto the grout. You’ll have to add the epoxy in at least two applications and build up layers over a period of 30 minutes.

Once you get the epoxy placed and the chip is filled to the right height and profile, you paint the epoxy with a matching paint. You’ll use a fine artist brush so you don’t get any paint on the adjacent tile or grout. Put on at least two coats. Once the paint is cured, this could take several days, then you coat the paint with three coats of water-based clear urethane.

I want you to refine your repair skills first using some scrap tile you have around the house or you buy. Chip a piece and do all I say until you’re an expert at the method. Do not try to do all I say the first time on the tile in your kitchen. You only get one chance to repair it correctly and you need to have great skills and magic. You’ll attain those rapidly with a few practice sessions out in your garage.

Let me know the instant you’re out of the doghouse and how the chocolates were received. I’d also like to see an after photo taken of the tile once you repair the chip.

Column 1132

February 21, 2016 AsktheBuilder Announcement

What a difference a week makes! Last Sunday I taped the video:

Why is My House Cold With the Heat On

Go watch it.

When I woke up this morning and was grinding my coffee beans with my inexpensive, yet powerful, Krups Grinder it was 40 F outdoors!

That's a 47-degree DIFFERENCE in temperature from last week's -7F.

Often people don't put into perspective relative differences in temperature. Think about it this way.

How stark is the difference in temperature to your body between 40 F and 87F? It's the difference between chilly and HOT!

The same thing happens going the other direction. It was BITTER COLD last Sunday

That's why my boiler was running constantly and not able to get my house up to 70 F.

I've got TWO things for you this morning.

Both are VERY IMPORTANT. Let's get right to it.

I NEED YOUR HELP

Today is the day. Today is when I write the last word in my upcoming Defective Shingles Book.

Some extra information finally came available to me in the past ten days that I had been waiting on. It was well worth the wait as you'll discover when you read the book.

What's more, I received a survey response two days ago from Stephen who lives in Warwick, RI.

He talked about how his roof failed long before it should and his "new $10,000 roof" created a dreadful financial burden that he and his wife are still hurting from to this day.

Has the same thing happen to you or someone you know?

I desperately need you to tell me your story if you've suffered a financial hardship because your shingles FAILED far too early.

Did you use up lots of your savings?

Did you have to borrow money from a relative or friend?

Did you have to take out a home equity loan or worse yet, put the cost on a credit card?

Did you have to use some sort of financing from one of the big box stores?

If poor-quality shingles have caused you financial PAIN, I NEED you to fill out my Defective Shingles Survey ASAP.

CLICK HERE to fill it out. Tell me as many details as possible about how the bad shingles have caused you to suffer.

If you have plenty of money and your shingles have FAILED, I still need you to take the survey.


.
MYSTERY LINK! You have too much stuff. This Spring you'll solve the problem.

What's the BEST way to deal with it? CLICK HERE to Discover what I did!

.

NO MORE DVDs! This is SERIOUS

A few years ago, I was very lucky to connect with a professional video production company in Cincinnati, OH called the PPS Group.

There I met Bob, Jim, David, and John.

John was the producer I worked with to create four super professional DVDs.​

The first one was an authoritative guide on how to install crown molding.

The next two showed how to install a traditional shower pan liner and the poured mud base for the ceramic tile.

The final one was a simple, yet informative DVD about how to install different insulation.

The team at PPS has decided they must have the space where the DVDs are stored.

But that's not the worst part.

Based on the conversation I had with Bob, the majority owner, he's not too interested in producing more copies.

That means the DVDs we now have at the PPS headquarters might be the LAST ONES that are going to be created.

I've sold these for years for $19.95 each plus shipping but now to get rid of them, Bob wants me to drop the price 60%.

Yes, a 60% true Inventory Reduction Sale.

When these DVDs are gone, they're GONE. That's not a lie.

You can now purchase - until the supply is exhausted - each DVD for just $7.95 plus shipping.

I've also created a SPECIAL SKU if you want all four.

You can get all four of them in a bundle for just $27.95 plus shipping.

This is an incredible deal.

I'm here to tell you, you'll NEVER get these DVDs cheaper and once gone, you'll have a collector's item.

Here are the links:

BUNDLE of all Four DVDs

Crown Molding DVD

Shower Pan Liner DVD

Shower Mud Floor DVD

Insulation DVD

That's enough for today.

Remember, please go fill out the Defective Shingles Survey above if you took a financial HIT replacing your roof.

Thanks

Tim Carter
Founder - www.AsktheBuilder.com

Do It Right, Not Over!

February 19, 2016 AsktheBuilder Ooopsie By Accident

If you're a new subscriber, when I make a mistake I send out something like this. The headline is something my son used to say when he was a little tyke after he'd drop something or break something.

I was in a rush last night when I built the newsletter you received earlier this morning.

I FORGOT to ask you something!!!

Do you live in any of the following USA states or Canadian provinces or know someone who does?

  • Alaska
  • Delaware
  • Mississippi
  • Nevada
  • New Mexico
  • North Dakota
  • Oklahoma
  • Rhode Island
  • South Carolina
  • Vermont
  • West Virginia
  • Wyoming
  • British Columbia
  • Saskatchewan
  • Manitoba
  • Maritime Provinces

If you live in one of these states or provinces, and you have an asphalt shingle roof that is falling apart, the shingles are curled, the granules are falling off, etc., I NEED you to fill out my Defective Shingles survey.

CLICK HERE to fill out the survey.

Look at this photo. Tell me if your roof looks something like this:

I'm putting the finishing touches on my Defective Roof Shingles book this weekend.

After that, it's ready for the final cover art, proofreading, and formatting.

Have a great weekend!

Tim Carter
Founder - www.AsktheBuilder.com

Do It Right, Not Over!