September 13, 2015 AsktheBuilder Newsletter

A few days ago, I was blessed to receive a simple one-line email reply to one of my newsletter blasts.

I get great emails all the time and you may be one who invests the time to send me some jewel from your fingertips or voice-recognition software.

It came from Art Ralston. Here's what he sent:

"One of the things I like about you is your zest for life."

Thanks Art!

That zest comes from one thing and if you want zest in your life you can make it happen with very little effort.

It's all about this one word.

Attitude

I believe I have my mom to thank for it. When I reach back deep into my memories, I can trace my attitude to long-ago events.

I played outdoors with great intensity. I looked forward to delivering the papers on my afternoon Post & Times Star route. A great attitude about schoolwork took longer to develop. That happened in college.

Better late than never.

My mom was a go-getter. She was the bread winner in our family because my dad suffered horribly from deep depression caused by his WW II experience as a medic and being a POW.

About twenty years ago, I found on the floor of my local post office a lapel pin that sits right in front of me at my desk.

I don't know that I need the reminder, but I love the pin.

That's a photo of it above.

This same sentiment was expressed by the character Andy in the movie Shawshank Redemption when he said:

"I guess it comes down to a simple choice. Get busy living or get busy dying."

I'm busy living and you should be too.

If part of your living is going to be getting serious about home improvement projects then click the following button.

.
CLICK HERE and go on a Magical Mystery Tour that will delight your eyes. Be Inspired!
.

Milwaukee MX4 Masonry Drill Bit

I received some new Milwaukee MX4 drill bits to test.

These have four pure carbide tips oriented at 90 degrees to one another as well as a centering tip.

The four tips prevent the violent lockup a hammer drill can experience when it encounters steel rebar in concrete.

These are SDS Plus bits and they have a great design in the twisted flutes to rapidly eject the concrete dust and grit from the hole.

They come in a variety of sizes and lengths.

You'll love them!

CLICK HERE to buy one now.

.
MYSTERY LINK!!!! CLICK HERE and see if your ESP allowed you to guess it correctly.
.

New Q & As for You - You Rascal!

Mario's HOT Mobile Home in San Diego

Dion's Bahama Formica Dilemma - Shiny Finish!

Kathy's NOISY Return Air Vent

That's enough for a Sunday.

I'm off to church in an hour, then I'll be up on the roof the rest of the day if the rain holds off.

Tim Carter
Founder - www.AsktheBuilder.com

Do It Right, Not Over!

Vent Makes Noise

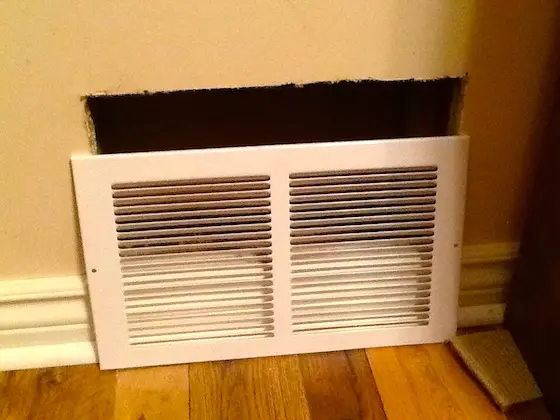
Kathy Burke now lives in a noisy house in Chatham, Ontario, Canada.

She caused the problem, but didn't mean to.

A cold-air return vent makes noise.

Here's her full report:

"We have a small 950 sq. ft home with two return vents.

We have never covered this one vent since living here as it was behind a cabinet.

I purchased a cover and when it is put over the vent, the pull of air is so strong the vent whistles loudly.

The cover just fits the hole.

Would it whistle less if I buy a larger cover?

The hole originally had large pieces of foam stuck in it which I removed. The hole is 8" x 14". Thanks so much."

Here's the noise maker. What do you think is the answer? Photo credit: Kathy Burke

Here's the noise maker. What do you think is the answer? Photo credit: Kathy Burke

Here's my solution to the problem:

Kathy, the vent is now making noise because the opening is being restricted too much by the vent cover.

You're on the right track to the solution!

You need to make the opening bigger to stop the noise.

I'm sure the return air is between two wall studs, so to make this easy you need to enlarge the hole by going up.

Your challenge is going to be locating a vent cover that is twice as tall but the same width.

Report back after you complete the job.

Formica Scratch Repair

Dion Kennard lives in the Bahamas.

The land of milk and honey sea and surf and humidity.

Here's his story:

"When we built our house we had a local contractor build our kitchen cabinets and prepare and install our counter tops.

They are 1/2" thick Formica sheets in a dark stone color.

Unfortunately he polished them to a high gloss and they are now showing every scratch and mark.

Is there some way that I can refinish them myself so that they would be more forgiving?"

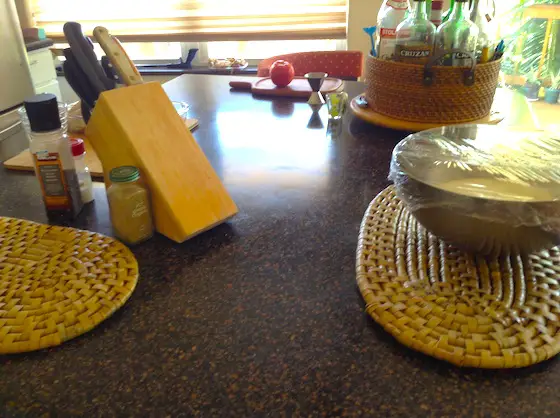
I believe there are scratches here, but they're hard to see. Photo credit: Dion Kennard

I believe there are scratches here, but they're hard to see. Photo credit: Dion Kennard

Here's my simple answer:

To disguise scratches, you need to get rid of the high gloss. Gloss, by its very nature, shows minor surface imperfections because of the way light is reflected by the imperfection.

A matte finish is more forgiving.

How you might create a pleasing and uniform matte finish is a mystery to me.

You may be better off just trying to repair the scratches as they happen as you could ruin the top trying to change it's look.

CLICK HERE for some repair kits that may work.

Hot Mobile Homes

Mario Gonzalez is suffering from a hot mobile home in San Diego, CA.

He's probably so hot he can't make the connection between his hot home and his car.

Here's what he sent:

"I've noticed that my mobile home gets hotter during summer than the outside temperature.

I feel the hot air that builds up during the day and is not exhausted.
I want to either install a whole house exhaust fan, or one small bathroom exhaust fan per room.

I'm worried that during winter, the cold air will come in the house and that I'll make things worse. Any suggestions?"

Here's my answer.

Mario, have you ever thought about why a car that sits in the sun is so hot when you get inside it?

Have you ever touched the metal roof of a car that's been in the sun and burned your finger?

The sun's infrared rays heat up the metal and the temperature of the metal can get well above 120 F or more.

The same thing happens to your mobile home or anything left in the sun.

The hot object radiates the heat much like a glowing piece of steel or a campfire.

Your body feels that radiated heat.

A whole house fan is your best bet.

I can't believe you're complaining about winter in San Diego! You want cold, come visit me here in New Hampshire the third week of February!

September 11, 2015 AsktheBuilder Newsletter

Today is the grim 14th anniversary of the day radical Islamic terrorists attacked us here on our homeland.

This war with the radical religious fanatics and the USA goes back over 210 years ago in case you wondered.

It's nothing new.

Just listen to the first sentence in the US Marines Hymn:

"From the Halls of Montezuma, to the shores of Tripoli."

Dust off your history books and go read WHY the US Marines were dispatched to the Mediterranean Sea over 200 years ago. CLICK HERE to get up to speed.

If you lost a soul mate, family member or friend on September 11, 2001, in the attack, my heart goes out to you on this day.

Would you have had the courage and bravery to ascend the steps of the twin towers as all the first responders did? They were trained pros and knew the buildings could collapse.

The same is true for the first responders who raced to help injured at the Pentagon.

God bless America!

Weekend Warrior Video is Back

Back in the spring, I started a trend where each Friday I send you a great video for a project you can tackle over the weekend.

It's back!

This week I'm featuring a GREAT VIDEO produced by a close friend of mine, Dan Gray.

Dan is a car expert, and he reviews cars like I review tools and building products.

He did a great video showing how, in an hour, you can make your dull plastic headlights CLEAR again!

CLICK HERE to watch Dan's video. You'll be amazed at how easy it is to do the job. (NOTICE: As of February 2021, this link no longer seems to work.)

The ONLY thing I would have done differently in the video is I would have used a different tool.

Dan used a Bosch drill.

I'd have used the Milwaukee Cordless Buffer. It's an AMAZING tool.

CLICK HERE to see this amazing cordless buffer.

I tested this tool at a Milwaukee event and was blown away by how easy it was to use.

It's a great gift for you or that backyard mechanic you know!

That's enough for today.

Have a great weekend!

Tim Carter
Founder - www.AsktheBuilder.com

Buff it Right, Not Over!

Galvanized Nail False Advertising

Gordon Doughman is a subscriber to my FREE newsletter.

He was kind enough to share a fascinating discovery he made.

Allow him to share the story:

"Tim,

I know in several of your recent newsletters you discussed galvanized nails and the performance difference between hot dipped versus electroplated nails. I recently rebuilt my deck (capped composite and aluminum railing; very little maintenance!) and had a need for some galvanized nails to secure some boards between joists for the connection of the railing posts. I went to a local Home Depot in Cincinnati. Take a look at the photos below to see what I found!
photo 1
photo 2
As you can see, the manufacturer claims these nails are galvanized, but the fine print (second photo) states that in fact, the nails are not galvanized, but rather has a "Proprietary polymer coating…that is equivalent to galvanization…". It then goes on to state "The use of stainless steel fasteners is recommended for all outdoor projects" even though the first sentence states "For use on exterior applications and with all treated lumber".
How can the manufacturer get away with this!?!?! In my mind this is false advertising. Of course, these nails were about half the price of true hot dipped galvanized nails (same manufacturer no less).
Thought you might like to alert your readers to this deception.
Blessings,
Gordon"
Here's my answer - as best as I can.
Gordon, it's a game of whack a mole.
Companies can put just about anything they want on a label, and there are not that many people out there that have the authority to stop it.
Be thankful that the labeling at least had a description of the truth, albeit you had to hunt for it! They could have left that off and everyone would be really deceived.

September 9, 2015 AsktheBuilder Newsletter

I've decided to change how I do the Secret Link each week. Rather than have the repetitive "Welcome if you're a new subscriber...." open, I'm just going to make the link the first button in the newsletter. You'll see it below.

Well, the USA holiday Labor Day was two days ago. That's the traditional holiday associated with the end of summer in the northern hemisphere.

If you live in a higher latitude like I do (NH), that means you could be weeks away from cool / cold weather (WX if you do Morse code like me) and you're running out of time for outdoor projects.

I try to remind you each year that it's critical to READ the label on products so you're aware of any temperature restrictions. Some products need to cure for X hours before it drops below 32 F.

.
SECRET Mystery Link! CLICK HERE for Surprise!
.

NEW Roof Flashing Video

Three days ago, I had the rare opportunity to tape a video about a special flashing I had to create from a flat piece of aluminum.

If you're a new or newer subscriber, I've been working on installing a new roof all summer on my own home.

The reason it's taking so long is I can only work on it a few days a week and then if it's raining or BLAZING HOT I lose even more time. See FAR below what other thing keeps me off the roof - it's a fascinating part-time job I have each summer.

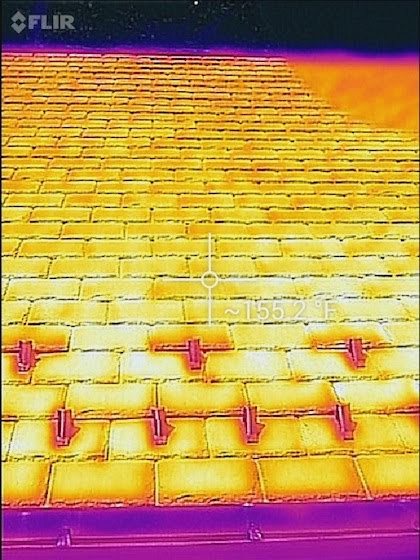
When the sun hits the DaVinci Roofscapes GORGEOUS synthetic slate product I'm using, it can get as hot as 155 F. You get burned even if you're wearing long pants and gloves.

Look at the thermal image photo I took using the FLIR ONE thermal imaging camera that works on my Android phone.

It has a feature where you turn on a cross hair, aim the center to where you want to take a temperature and it shows it on the screen. See it in WHITE just below in the photo?

But the good news is I'm almost finished with the roof!

This new video contains a little trick that many young roofers don't know about.

Remember that one line from the movie The Lord of the Rings? It was said by Galadriel at the open of the movie:

"And some things that should not have been forgotten were lost. History became legend. Legend became myth."

That's what I'm seeing in the construction industry. Certain pieces of hard-earned knowledge about fantastic ways to do things are becoming mythical.

Well, I'm trying to do my part by taping videos, writing things on the website and here in the newsletter to prevent that. Knowledge I've discovered can be shared out into the future so you don't have to hope things will be done right at your home.

You can just come and see what my take on a situation happens to be.

Think about that.

What gems of knowledge do you know and what are you doing to ensure they're not forgotten? Please consider making sure that doesn't happen.

GO WATCH the video now and pay attention to the one feature of the special flashing that's rapidly becoming mythical.

Asphalt Shingle PROBLEMS Update

If you're new to the newsletter, here's a peek at what's going on about me and my roof.

The quick story is that I bought a house in New Hampshire seven years ago. At the time, the asphalt shingle roof was only about six years old and it was in gorgeous shape. It was a 30-year shingle on a steep roof.

The steeper the roof, you usually get more life from the roofing product. Well, not in my case. The roof started to fail a little over three years ago - and this past winter it really went over the cliff.

I decided to look into it and it didn't take long to get stonewalled by the asphalt shingle manufacturers and their primary association.

Within the past two weeks, the one company that originally agreed to answer my tough questions replied with a puff piece that avoided all my questions.

At this point ALL of the major asphalt shingle manufacturers have refused to answer my questions.

What does that tell you?

I taped a SECOND video that's going to be part of a five-part series. I briefly touch on the potential issues with asphalt shingles in this video.

CLICK HERE to watch it.

This fall I'm going to produce a small eBook about what I think is going on. I'll alert you when it's finished and for sale. This is one report you don't want to miss.

New Q and A's for You!

Here's the latest content added to the website. If you want a treasure trove of tips, THIS is the section of the newsletter you ALWAYS want to look at and CLICK EACH link.

I really share some stuff here that will save you time, money and frustration!

Angel Wants to Remove Bearing Wall Kitchen

Shane's Bathroom Plumbing Piping Dilemma

Rain on Framing Lumber - New House Ruined????

That's enough for today.

I'll be up on the roof again in about ten minutes then I have a dinner train tonight.

If you're a new subscriber, I'm a part-time conductor on a real train here in New Hampshire. It's a DREAM job. People would pay to do this job.

CLICK HERE to see me in my uniform.

Tim Carter
Founder - www.AsktheBuilder.com

Do It Right, Not Over!

Remove Bearing Wall Kitchen

DEAR TIM: I would like to remove the two corner walls in my kitchen that are common with my living and dining room. This will allow me to install more cabinets and a countertop with a bar to eat at. The entire house will seem more open. Can the walls be removed? What's involved? Who does this work? Do you think the average homeowner can successfully tackle a job like this? Angel G., Dover, ID

DEAR ANGEL: In the not too distant past, I used to do remodeling work just as you envision. In the process, I made more than one homeowner's wildest kitchen remodeling dreams come true. You'll not believe how taking down one or two walls can completely transform a space. Your smallish kitchen will seem triple the size once this job is complete.

The simple answer to your question is the walls can be removed. The complex answer is the one about what's involved in doing this. You need to determine what's inside each of the two walls and whether one or both are bearing walls.

A bearing wall is a support wall that transfers load from above down through the structure to another wall, a beam, and/or a foundation. Some bearing walls seem innocuous and are well disguised. I had a bearing wall in the last home I built for my family that had a doorway in it and a large wide opening. This wall supported huge second floor, attic and roof loads from above. Looking at that wall you'd think it was just an ordinary wall.

These two walls can be removed. It may be an easy job or it may be one that requires great skills and magic. Photo Credit: Angel Garcia

These two walls can be removed. It may be an easy job or it may be one that requires great skills and magic. Photo Credit: Angel Garcia

Your two walls can have all sorts of other surprises awaiting you. Once you take off the plaster or drywall from one side, you may discover plumbing water and drain lines, electric cables, low-voltage wires for intercoms, doorbells or sound systems, cable-TV cables, HVAC supply or return-air ducts, boiler piping, and even dryer vent piping. All of these things would have to be re-routed to achieve your dream.

If you have an unfinished basement you can sometimes get a good idea of what's in the wall by going down and looking at the ceiling directly under the two walls. Things that pass up into the walls from below should be readily visible to you. Look for plumbing pipes, HVAC ducts and any other thing that's disappearing from the basement up into the walls above.

Electric cables in the walls may not always poke through into the basement as they can be fed from the top of the wall or from other side walls in your room that connect to the two you want to remove. Electric cables are the least of your problems and are often the easiest thing to relocate.

If you want to determine if the walls are load-bearing, you can often do this by poking your head up into the attic if you have a single-story house. If you have traditional roof trusses that span your entire home there's a good chance the walls are not load bearing. It's possible for some trusses to have internal load-bearing points on them, so if you have any doubt at all, take photos of the trusses and visit a truss-fabricating plant to talk with the staff engineer.

If you determine the walls are load bearing, the job grows in complexity by a factor of three or more. You'll have to get a residential structural engineer involved and this professional will produce a drawing showing what beams and columns need to be installed that will replace the walls.

In certain instances, it's possible to hide a beam up in the ceiling so you don't have it hanging below your finished ceiling. The advantage of having the beam tucked up in the ceiling is you get one nice flat ceiling through the entire kitchen, dining room and living room space.

If you do have to install beams that take the place of the bearing walls, you now have to install columns that support the beams. These can be made from wood or steel. The columns need to transfer the load to the foundation or the soil below. This is not as easy as it seems as it requires you to create a continuous load path from the bottom of the beam all the way to the ground.

I don't feel the average homeowner can do this job. Perhaps the only thing the average homeowner can accomplish is the demolition of the plaster or drywall. But even then, if done wrong, you can harm things inside the wall.

This job is best done by a full-service remodeling company. The best in the business have seasoned employees who know how to do the demolition and deal with all the things that need to be relocated. They'll work with mechanical and electrical subcontractors and keep the job moving each day.

If you proceed with this job, be prepared for some pain. It's dirty dusty work and there are usually disruptions with respect to your use of the heating, air conditioning or plumbing systems. Have your remodeling contractor produce a detailed schedule that outlines how long each phase of the job will take.

Only pay for work and materials that are done correctly and to your satisfaction. There's no need to make any advance payments because there's usually no custom materials that have to be purchased to remove walls. Remember, your contractor doesn't pay his employees or regular material suppliers in advance, so why should you have to pay him before he dose the work?

Column 1108