January 13, 2013 AsktheBuilder Newsletter & Tips

I emailed you a few days ago about the Flash Sale for Stain Solver.

It's about to end in just a little less than 14 hours. The sale ended January 13, 2013 at midnight.

You can save 10% off the 2.2-pound size or 15% off the 4.5-pound size.

Go now to the Stain Solver cart to save money.

The SALE PRICE is already computed at the Stain Solver shopping cart.

Remember, you also get FREE SHIPPING to anywhere in the lower 48 states.

In a few days I'm going to have more news about the new smaller size we're introducing! It's perfect to use as gifts for friends, family, or co-workers.

If you work at a store that wants to SELL Stain Solver, this is going to be perfect for you.

THANKS for your support!


WORKMANSHIP WARNING

Last night, I was paging through the most recent issue of Fine Homebuilding magazine. I've been a subscriber for nearly 40 years. That's a long time.

I have a DVD that contains all of the past magazine articles from the beginning of the magazine. Many, if not all, of the articles from 20 - 40 years ago were written by real craftsmen.

But times are changing. I can clearly see a frightening erosion of the quality standard that's promoted by this amazing publication.

It saddens me deeply as I try to promote Fine Homebuilding magazine as one of the finest publications in the industry.

Some of the people writing articles for Fine Homebuilding are not as talented as they could be. I was shocked as I read an article in the most recent issue about how to flash a chimney.

The author was using expensive copper flashing. Copper is, perhaps, one of the best metals to use for roof flashing because it doesn't rust. It can last, in certain climates, well over 100 years.

But the SHOCKING thing is the author, who's a roofer, was using a caulk as part of the installation.

He was NOT soldering the tiny gaps where two pieces of copper flashing meet at the corners of the flashings.

Why is this important? Why should this concern you?

Fine Homebuilding for decades has been a gold standard of displaying quality workmanship.

Many young builders and remodelers think that if it's in Fine Homebuilding, then it's the right way to do something.

Here's the bottom line: I don't care WHAT the caulk manufacturers claim.

Caulk is NOT a permanent roofing material.

I don't know of a caulk that can last for 50 years up on a roof. I don't know of a caulk that can take that intense beating from the sun's ultraviolet rays.

I don't know of a caulk that can maintain its flexibility for as long as the copper expands and contracts over the 125-year period.

Metal and solder ARE long-lasting roofing materials.

You want flashings to last as long or LONGER than the actual roofing material. Caulk WILL fail long before that.

Solder will NOT fail if done correctly, and it's caveman simple to solder copper and tin!

How do you protect yourself in the future from workmen who think they know the correct way to do something?

I would recommend starting with my Contractor Hiring Guides. In all of them, I provide a checklist that contains the time-tested methods to do work around your home.

Be Careful Out There!

I've got a fantastic CONTEST for you on Tuesday. If you like hunting expeditions, then you MUST OPEN Tuesday's newsletter.

Thanks, as always, for your trust.

Tim Carter
Founder www.AsktheBuilder.com

Do It Right, Not Over.

January 8, 2013 AsktheBuilder Newsletter & Tips

Late last week, Kathy and my son Tristan worked together to make my favorite soup. It's a beef vegetable soup Kathy has made for years.

You know in cartoons how the artist draws an aroma cloud that wafts through rooms only to find it's way under a person's nose? That happens here.

I work in the basement, and even though we don't have forced-air heating that would easily circulate aromas, that simmering soup bouquet made it into my office. I was taking a normal deep breath, and I was overcome by the delicious smell.

It brought back fond memories of me coming home on a cold winter's day after pounding nails all day. I'd walk through the garage and open the door to the house. Immediately the vegetable soup aroma would wash over me like a giant warm water wave at the beach.

No matter how bad my day was, that soup aroma soothed me like a deep shoulder rub. I wonder if you could bottle that aroma and sell it?


TIP OF THE WEEK - WINTER CHECKLIST

I'm really lucky to be able to meet many who subscribe to this newsletter. Perhaps you're one. Maggie subscribes, and she live just a few miles from my house. I had the pleasure of meeting Maggie and Jack, a visiting subscriber from Chicago, as we ate lunch along the shore of Lake Winnipesaukee on a delightful summer day several months ago.

Maggie emailed me last week asking me if I had a checklist. She pointed out that if she had possessed one of mine, she might not have been without heat last month. Sorry about that, Maggie!

Maggie's misery has spawned the official AsktheBuilder.com Winter 2013 Checklist.

It's FREE. There's NO COST. It can SAVE a life! or prevent thousands of dollars of damage to your home.

Download the checklist NOW.

Click here to get the AsktheBuilder.com Checklist.

Winter 2013 Checklist

But there's a little issue. You see, there are subscribers to this newsletter that live all over the world. You may live in Indonesia where it never gets cold. You may be one who lives in Australia, New Zealand, Patagonia or South Africa where it's currently summer!

I have a few tips for you if you do live where it's warm now, but most are for those who live in the Northern Hemisphere.

I'm going to make up a number of checklists for you in the coming months, but this one will help you over the next sixty days. If you have tips and suggestions for checklists, SEND THEM TO ME. I'll gladly give you credit.

Could you do me a favor? After downloading the checklist, can you please send it to all your friends, co-workers and relatives?


INSTALL A NEW EXTERIOR DOOR IN ONE DAY

Guess what? Earlier this morning, I clicked the button that officially launches my second Kickstarter project.

This new project is about creating an intensive series of videos that show you how to install a new factory pre-hung door in less than a day. Doing this, you could easily save over $1,000 and gain enormous confidence that will allow you to tackle other projects!

I'll be installing a gorgeous Therma-Tru Classic-Craft mahogany door with leaded glass in the door and sidelights. On the exterior, I'll trim it with Fypon PVC trim that won't warp or rot.

Kickstarter New Front Door Video Series

I plan to tape about 12 videos showing you how to do the entire job, from getting the proper measurements for the door to spackling the last hole prior to painting the trim. But guess what? I have a feeling I'll be delivering about 25 or more videos, maybe as many as 30!

That's what happened with my DIY Shed project. I promised 100 videos, but it turned out to be closer to 200. What a deal all those backers got! WOW!

I learned so much with my first Kickstarter project. The biggest thing is the videos for this project WILL be available on a DVD. You don't have to watch them online if you choose the DVD reward. In fact, I'm getting ready to create a DVD for all the shed videos, but that's another matter on another day.

I also discovered that it's really important to have a reward at Kickstarter for all those that miss the EARLY BIRD SPECIAL. This time the EARLY BIRDS get online access to ALL the videos in this new series for just $7.

That's an INSANELY low price. This new door series will NOT sell anywhere near $7 or even $15 when I load them to my shopping cart in seven weeks. The price will be MUCH higher for sure.

If you're not one of the first 100 people to get online access to ALL of the videos for just $7, then you can get access for just a little more money. But hurry NOW if you want the videos for just $7.

The coolest part of this project is the new AsktheBuilder.com Apprentice Certificate. You can back the project, get access to all of the door videos AND get an official real certificate that I sign if you select that reward.

In fact, if you start to collect the certificates, you're going to get other free stuff in the future. Read all about that at the Kickstarter page.

Remember doing that as a kid? I clearly recall saving cereal box tops and other coupons and sending them in to get a magic decoder ring or other cool prize. If you collect multiple certificates, you're going to be eligible to get some extra stuff for FREE!

How about you just go look at the project, become an official backer, and help me create this unique video series? You can even pledge just one dollar!

Would you like to get FREE access to the video series? No problem.

The first TEN people that reply to me with the correct answer to the following question get access to the door video series for FREE. Here's the question:

Watch the video at the top of the Kickstarter page. I'm wearing a hooded sweatshirt in the video. Tell me WHAT the sweatshirt represents or supports. Good luck!

IMPORTANT NOTE: I plan to do about 10-15 other Kickstarter project this year. All of them will be similar in that the projects just take one or two days - not three months like the shed project. You'll have access to the videos very quickly after I do the project.


DOOR ADJUSTMENT TIP

I can hear you now. "Tim, I don't need a new door. My door just rubs and doesn't fit right. What do I do?"

Easy. The most frequent cause of this issue are loose screws in the top or center hinges of the door.

Open your door, and check the tightness of the screws on both parts of the hinge. Tighten the screws that go into the edge of the door and those that go into the frame.

If that doesn't solve the problem, push against the top of the frame at the top hinge and see if the frame moves in ever so slightly. If it does, you need to take off just the hinge face on the frame and install two hidden LONG screws under the hinge. These screws will pass through the door frame and go into the rough wood frame. You'll probably need 3-inch-long screws. Be SURE to pre-drill the hole in the frame so you don't split it!

These long screws pull the frame tight against the rough framing lumber and get the door back into adjustment.


STAIN SOLVER SALE

What got stained at your house over Christmas? Well here's what happened to me.

We set up our live Christmas tree just two weeks before Christmas. It was a beautiful live tree we cut down at a local tree farm.

During the process of setting it up, I got pine sap stains on my khaki pants. Ugh!

Not a problem. I took them off, soaked them for three hours in some Stain Solver solution, then washed them normally. They looked like NEW!

Stain Solver Bottle

Did a guest spill red wine at your dinner table? What food got ground into your carpet? Is it time to clean the grout in your tile floors? Stain Solver can tackle all those things and more.

You can get 10% off the 2.2-pound size and 15% off the 4.5-pound size right now. But this sale ENDS on Sunday. You better hurry. CLICK NOW to get the great pricing.

We've already reduced the price at the shopping cart. You won't see it marked as a sale price. The normal prices are $24.97 and $39.97 respectively.

Remember, FREE SHIPPING included to any of the 48 contiguous United States.

Have a GREAT week! I'll be getting ready to install that Therma-Tru Classic-Craft mahogany door and that Fypon PVC trim!

Tim Carter - Founder AsktheBuilder.com

Do it Right, Not Over!

January 2, 2013 AsktheBuilder Newsletter

Happy New Year! I don't know about you, but I'm always stoked about starting something new.

In this case, it's a new year. How about you? Are you excited? What are your goals, no matter how big or small, for 2013? What can I do to help you achieve your home improvement goals? Talk to me. Email me. We're all in this together.

I spent much of the past few days creating the roadmap for what I'm doing this year. A close friend of mine, Jeff Walker, taught me it's best to do this between Christmas and New Years.

If you write down your ideas and plans on paper, there's a far better chance they'll happen. It's the first step in commitment. As I created my written list, do you know what ideas kept coming up?

2013 is the Year of More Video at AsktheBuilder.com.

Why video? I've received hundreds of emails from those who backed my DIY Shed video project. They want more step-by-step videos of me teaching you how to save money and do things yourself.

By gosh, I'm planning on doing just that. Just take a look below.

Just after Christmas, I went to see The Hobbit with Kathy and my son Tristan. It was a great movie. I read the book 40 years ago, but started to re-read it last week.

If you've not read The Hobbit and the Lord of the Rings trilogy, you're missing a great read. I loved all of them.


TIP OF THE WEEK - OIL THOSE TOOLS AND EXERCISE VALVES

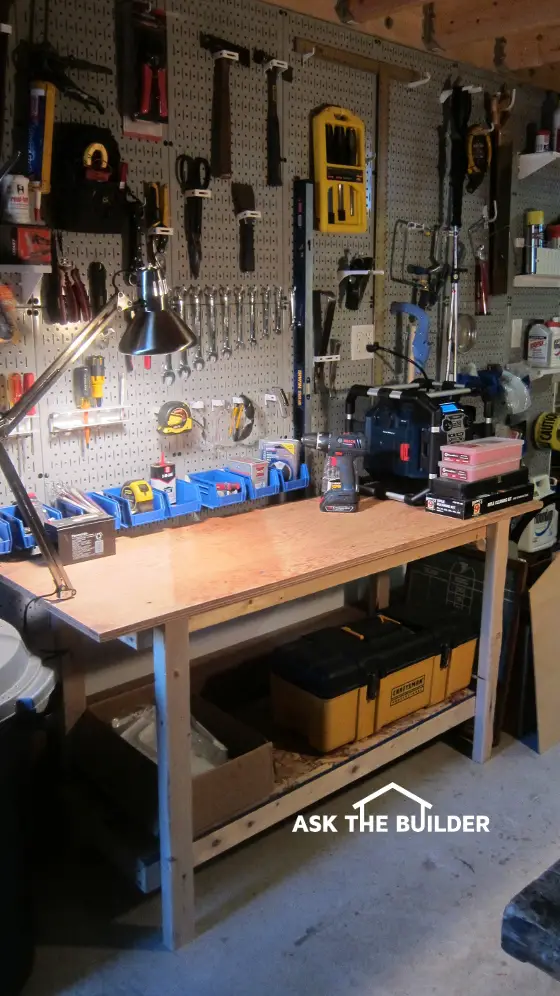
I spent a few days before Christmas cleaning up my garage. One of the things I did was apply a very thin coat of oil on any bare metal that I could see on quite a few hand tools. These tools hang on my wicked useful metal Wall Control metal pegboard awaiting their next call to duty. Here's a photo of a few of the tools in my garage.

Wallcontrol Pegboard Workshop

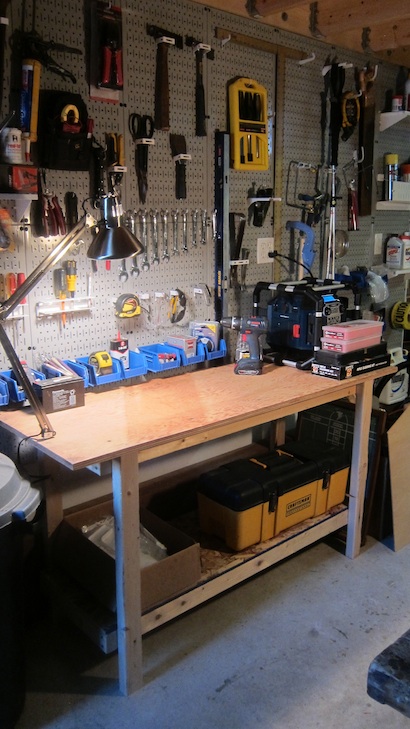
My garage is not heated, so everything in there gets cold. Every now and then, we get a jump in temperature usually accompanied with increased humidity. I've seen condensation droplets on bare metal in my garage on any number of occasions.

The oil on the bare metal prevents rust. It also helps them work so much better.

Do you need shut off valves under sinks and toilets to work in the future? Then you need to exercise them by turning them off and back on every six months or so. Be sure to tighten the packing nuts after you turn the valves back on.

Packing nuts? Oh, that's a new video I'll tape for you! The packing nut is that hexagonal nut that surrounds the valve stem. Tighten it ever so slightly when you open the valve again.


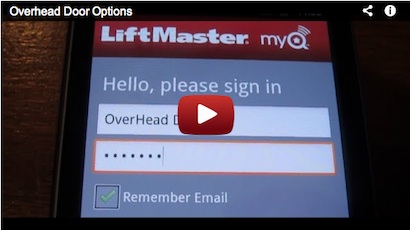
GARAGE DOOR TECHNOLOGY!

What's the latest in garage-door technology? You might be surprised. Watch this video. The payoff is at the end!

LiftMaster Garage Door Opener App


MY CHRISTMAS WISH FROM YOU

The weeks before Christmas were as hectic as ever. I'm sure your head was about to spin off.

I didn't want to bother you with a tiny request that I had until now.

Remember that scene in Star Wars Episode IV when Princess Leia made the recording on R2-D2? "... This is our most desperate hour. Help me Obi-Wan Kenobi, you're my only hope."

The Death Star is not aiming me, but it's imperative that I add subscribers to my newsletter. For all sorts of normal reasons, I'm losing more subscribers each week than gaining. That's not a good situation.

Is it possible for you to do just one thing for me? Just one small favor?

Can you do whatever it takes to get just one of your friends, co-workers or relatives to subscribe to this newsletter? If you can get more, fantastic.

All you have to do is send them to the home page of www.AsktheBuilder.com. The sign-up form is right there in the center of the page.

But you need to follow through and make sure they did sign up. If you do this, AND reply to me that you did it, I'll summon all the other local wizards up here in New Hampshire and we'll cast a protective spell on you so that all your upcoming home improvement projects will be a success!

If you can prove to me you got a friend to sign up, I'll send you a one-of-a-kind special AsktheBuilder.com gift!


LAS VEGAS AND LOS ANGELES MEET UPS!

I'll be traveling on business to the great West Coast of the USA the first week of February. I'm available Monday evening, February 4th, for a Las Vegas meet up. I'll be staying at the Rivera Hotel just north and east of the strip.

Map of Las Vegas - partial

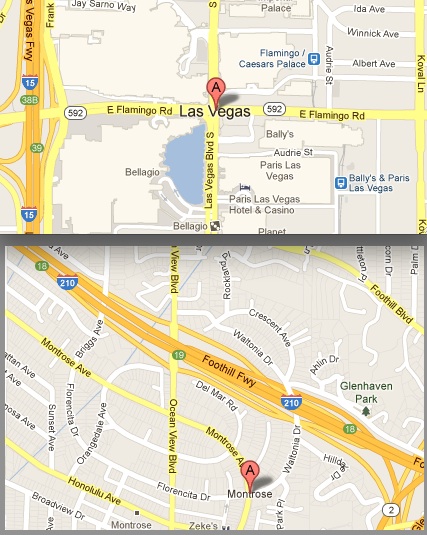
I'll then be in Los Angeles from February 6th until the 10th. I suspect that sometime on Saturday the 9th would be best for most people. I'll be in Montrose, CA just off the 210 if that helps locate you.

If you want to hang out and chat about anything, reply to this email but change the Subject Line to either: Las Vegas or Los Angeles Meet Up.


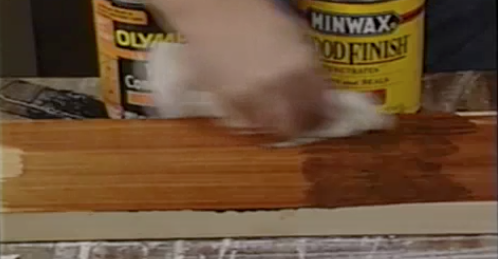
WOOD-STAINING NINJA SECRET

Do you know how to get professional results when staining wood, especially soft woods? If so great! If not, you must watch this video of mine.

Wood conditioner video thumbnail


CLOSE-OUT T-SHIRT SALE AND ASKTHEBUILDER.COM GEAR

You'll see just below that I'm about ready to start my second Kickstarter project. That means I need to clear the shelves of the remaining loot from the DIY Shed Project.

The remaining items are super high-quality shirts, and they're SOFT.

How soft you ask? Maggie is a NH subscriber that backed the shed project when I launched it on Kickstarter. She smartly opted for a reward that included the t-shirt. Here's what she wrote to me,

"I know that you'll probably not want to hear this, but I refuse to wear the DIY t-shirt out of my house. "Why" you might ask: Because it's the SOFTEST t-shirt I've ever owned and wear it for my pajama top. That limits the audience to my husband, daughter and assorted pets. Now if you had only gotten one of those rough, obviously cheap t-shirts, then the folks at the hardware store, grocery store, etc. might actually have seen it. Ah well, you live with the consequences of your actions (much to my sleeping comfort)."

Maggie

Tim in DIY Shed Project T-shirt

I have to admit it, but Maggie's right. The t-shirts are soft. I purchased the best one's I could find from a local NH business.

Here's the skinny. There are ONLY seventeen total t-shirts left:

13 Large and 4 Medium.

That's it. Once they're gone, they're gone. I'm never printing more with this design.

If you purchase one of these LAST DIY Shed t-shirts, when you open the box, there'll be a secret gift for you inside. It's like a grown-up Cracker Jacks surprise!

You'll discover the gift is highly useful and color coordinated with the t-shirt. Your friends and neighbors will be so jealous. They'll be in awe of your smart shopping!

Be SURE to read the text at each of these pages if you live in Alaska or Hawaii.

Click Here for the Large t-shirts.

Click Here for the Medium t-shirts.

This is a NO REFUNDS or EXCHANGES deal. Why? Because I'll not have any to exchange, and my goal is to get rid of them.

I guarantee you these will be gone in hours. I'm so sorry if you miss out.

QUESTIONS FOR YOU:

Should I create a standard AsktheBuilder t-shirt that's a stock item? Would you like that? How about an AsktheBuilder.com hat? Do you want me to stock those? What other gear would you like to see?

I have many skills and magic, but ESP is not amongst them. You need to reply to me letting me know what you want.

If I get a strong response, I'll commission a design.


VIDEO TUTORIALS

I mentioned above that you're going to see more videos. Well, we've been busy here at AsktheBuilder.com! Check out all the new video guides in my store. There are 23 different video series you can purchase! More are being added soon.

Are you perplexed by simple roof framing?

Do you want to know the basics about installing asphalt shingles?

What's the secret trick to getting a wall or foundation square without knowing all the complicated math?

Do you want step-by-step instructions on how to install a VELUX skylight? Wait till you watch that video series!

The answers are all waiting for you in my videos.


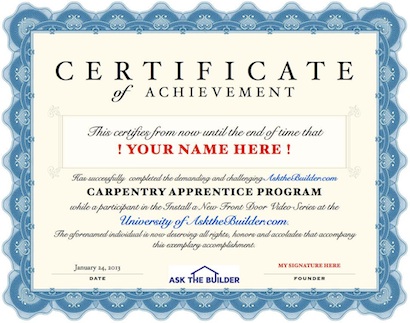
INSTALL AN EXTERIOR DOOR IN ONE DAY!

In less than a week, I'm launching my second Kickstarter project. This one will only take one day to complete, not four months like the shed!

Would you like to discover how to install an exterior door like a pro in less than a day? Well you must be part of this Kickstarter project.

On the morning of January 8th, about 9 am, I'm going to click the green Launch button on the control panel at the Kickstarter page that I get to see. There's an image just below for you.

I'm going to install a deluxe Therma-Tru Classic-Craft Mahogany Fiberglass Door with striking Acadia leaded glass in the door and sidelights. The exterior is going to be trimmed with Fypon cellular PVC boards that resist wood rot and insects.

This video series is going to have no less than 12 videos! I'm going to show you from start to finish how to install a standard pre-hung door like a pro. After watching these videos, you'll have the confidence to tackle this project!

You'll be able to save hundreds and hundreds of dollars doing this job yourself. Heck, you could easily save over $1,000.00. That's the minimum amount of labor and profit a pro will charge you to come do this pretty easy job.

You *must* open next week's newsletter immediately to get access to the project. Why? There are only 100 of the Early-Bird Specials in this project. The project will ONLY be live on Kickstarter for TEN DAYS.

This project also features the first of many official AsktheBuilder.com Apprentice Certificates. More on that next week!

Fiber Cement Siding Installation Tips

DEAR TIM: My New Years resolution is to install new lap siding on my home. I've narrowed it down to fiber cement siding because of its durability and good looks. However, I'm stumped as to how to install it. It seems like it's so brittle that it would crack if you try to nail it. What's the easiest way to cut it? How do you nail it? What other secret tips can you share about installing fiber cement siding? Amy S., Niagara Falls, ON Canada

DEAR AMY: I sure understand why you're attracted to fiber cement siding. It has so many positive qualities, I don't know where to begin. Many people are unaware that it's been around for well over one-hundred years.

In many older cities and towns around the USA and Canada, I can show you homes that were built in the early 1900's that still have the original fiber cement siding on them. The best part is that it looks like the day it was installed!

This handsome siding is not wood. It’s made primarily with Portland cement with tiny wood fibers as a binder. Photo Credit: Tim Carter

The original fiber cement siding was made a little differently than today's products. Years ago the fibers used in the siding were asbestos. When you combine asbestos with Portland cement, you create a product that's virtually indestructible. It won't burn, it's insect proof, water will not harm it, and it's basically thin sheets of rock. We all know how long-lasting rock is!

But as you point out, rock - and fiber cement siding, is somewhat brittle. The original fiber cement siding was more brittle than the products you buy today. If you purchase 12-foot lengths of fiber cement siding and hold it flat in your hands, you'll quickly discover it acts much like a piece of wet spaghetti. It bends easily. However, you can crack it if you're not careful.

The first thing you need to do before you install this magical siding is to take a few minutes and read thoroughly the written installation instructions produced by the manufacturer. By doing this and following their instructions, you ensure that you'll not void any warranty that comes with the product. That's very important.

Be sure to wear all of the safety gear, including approved dust masks, that the manufacturer recommends. The dust that's created when cutting fiber cement siding contains silica. Silica is not a good thing to get into your lungs.

I've cut thousands of feet of fiber cement siding using an older electric miter saw outfitted with a carbide blade. You can use an abrasive blade made for cutting masonry, but I find that creates even more dust.

The silica dust will significantly shorten the life of the electric motor on any tool. You might want to go online to the classified ad websites and buy a decent used saw for this job. If it still works at the end of the job, you can resell it or give it away for free.

I suggest cutting the material outdoors so the dust dissipates. Set up the saw so that you're always upwind of the saw blade. You want the dust to blow away from you at all times. I've even set up a powerful fan to create wind on calm days.

Believe it or not, using proper siding nails as called for by the siding manufacturers, you can nail along the top of the siding without cracking it. You need to be at least 1-inch away from the edge. You'll discover nails at the top corners of the siding will need a pilot hole to prevent cracks. You can buy a small 1/16th-inch-diameter masonry bit that drills a perfect pilot hole.

One of the benefits of using fiber cement siding is blind nailing. The siding is so rigid that you can nail along the top edge of the siding for certain widths and the siding won't flap in the wind or curl. The nails are covered by the next piece of overlapping siding.

This is a huge advantage as you don't have to see any nails or you don't have to countersink and putty them. I love blind nailing siding. The only nails visible are those holding the last piece of siding at the top of the wall.

When you have to butt two pieces of siding together on a long wall, you absolutely must install a piece of flashing under the two pieces of siding. I usually cut a piece of 40-pound tin about 1.5 inches wide and a little longer than the pieces of siding are wide.

The metal strip is placed behind the two pieces of siding that are going to butt together. It overlaps the piece of siding below the butt joint, but stays slightly above the bottom of the two pieces that cover the metal. You don't want to see the bottom of the metal below the siding once it's installed.

Drive one nail at the top of the metal flashing after sliding it under the end of one of the pieces of siding so it stays in place. Don't be tempted to use tar paper for flashing as the heat of the sun can cause asphalt to drip from the felt paper causing ugly stains to appear.

You can watch videos about siding tips by simply typing "siding video" into the search engine at www.AsktheBuilder.com.

Column 968

Overhead Door Options Video

Overhead Door Options Transcript

Hi, I'm Tim Carter and I want to talk about the options that are available for overhead doors. Lets take a look at the one installed in my shed. This overhead door might look ordinary, but there are a few things that are interesting.

First, it might look a little smaller. Well, it is. This garage door is only six-feet wide. While that is not big enough for a car, it will work for a garden tractor, riding lawnmower or a motorcycle.

Secondly, look at the remote control that is installed on the outside of the door. This is a keypad remote that allows you to open the door from outside. Using this type of remote opener means you don't have to install any handles on the garage door itself. This makes for a very nice, clean look.

The door has a wood look to it but it is made of metal. It was painted at the factory and the paint should last 15 years or so. There are many colors available.

The next new feature is the computerized opener program. If you have a smart phone, you can download an application that allows you to control your garage door from wherever you are. You can open or close the door from inside your house or from 10,000 miles away.

The application shows you if the garage door is open or closed. Simply touch the screen and the door will open or close.

Why would you want to control your door when you aren't around? Here are a few examples. Let's say a trusted neighbor needs to borrow a tool. Boom, he calls you on your cell phone, and using your smart phone OR any computer, you can let him just in your garage, but NOT your house. Or let's say you're expecting a large delivery, but can't meet the driver. They call you when they arrive at your home, you open the door, and the package is safe and dry inside the garage. Or if you are forgetful, like I was 3 nights ago, instead of walking to the shed, I closed the door from the couch.

There are many options when it comes to overhead garage doors. I recommend that you go to a professional store that sells garage doors. An independent dealer will be able to explain all the options that are available for your project. I used Overhead Door Options here in Meredith, NH. It is a small business that sells and installs doors.

That is my final tip, if you have never installed an overhead door before, you might want to leave it to the professionals. The springs that open the door are extremely powerful. If you won't know what you are doing and install them wrong, you could get seriously hurt. So leave the installation to the pros.

This Garage Door Technology was shared with my readers in the January 2, 2013 AsktheBuilder Newsletter.

Build a Workbench in 30 Minutes

DEAR TIM: My New Year's resolution is to start to repair things around my home. I desperately need a workbench in my garage, but have little money and skills. Can you help me build a workbench that will really serve me over the years and not break the bank? What kind of materials should I use? What tools do I need? Is it really possible for a lass like me to build a workbench just after the New Year in a couple of hours? Molly O'Sullivan, Tewksbury, MA

DEAR MOLLY: Not only is it possible to build a sturdy workbench, but you can also do it in about 30 minutes once you gather the few materials. The best part is the workbench is going to last for years and years.

This simple, yet sturdy workbench was cut and assembled in less than 30 minutes! Photo Credit: Tim Carter

I've constructed many workbenches over the years. Some I've done for customers, but I've also built several for myself. As you might expect, there's a wide variance of opinion as to the best attributes for a workbench.

Some will say the overall size is the most important. Others will say the workbench has to be super strong. At the end of the day, it all depends on what you plan to do at the workbench. Answering that question will act as your North Star as you think about how you need to build your workbench.

My guess is that you're not going to be rebuilding large diesel engines on the workbench, so it doesn't have to be able to support thousands of pounds. If you copy the design I just concocted, I think you'll be fine.

Not too long ago, I built a cozy workbench for my own garage using just one sheet of plywood and four 2x4x8s. I also needed about forty 3-inch-long drywall screws and twelve 1and 5/8-inch drywall screws.

I decided to go back in time and just use simple power tools to construct this rough bench. My guess is you have these same tools I used: a circular saw, a drill, a framing square, a phillips screw bit to insert in your drill, a 1/8-inch drill bit for wood, a measuring tape and a straightedge or chalkline.

The depth of the workbench top is very critical if you plan to butt it against a wall that will have tools hanging on pegboard. You do not want to make the workbench any deeper than 24 inches. If you exceed that depth, you'll quickly discover it's very hard to reach things on the wall. You may want to reduce this depth to 22 inches if you're small and have short arms.

The bench I made for my garage was only 5-feet long. While that seems small, it's really plenty big for most projects. If you have the space, feel free to make yours longer.

The height of the workbench is the hardest thing to calculate. You need to determine if you plan to work at the bench sitting or standing. It makes a huge difference. I prefer to stand. Since I'm only 5 feet 8 inches tall, I've determined that workbenches that are 32 inches high are perfect for me.

Don't be fooled by the height of kitchen countertops. They're usually 36-inches high. But you rarely are working on an object 5 or 6 inches high in your kitchen. You'll discover as you work on objects on your workbench that if the workbench is too high, your shoulder will raise up to an uncomfortable height, and you'll lose leverage.

To build the base for my workbench, I simply made two boxes that measured 16 inches by 48 inches by 3.5-inches tall. These boxes work to stabilize the legs and they support the workbench top and the bottom shelf. The 2x4s used were stood up on their edges to make the boxes.

I then cut four legs at 31 and 1/4-inches long. The legs go at each corner of the boxes with the top flush with the one box and the bottom of the leg 4 inches from the bottom of the lower box. The legs are screwed to the outside of the boxes on the 4-foot face. Be sure you use the framing square to ensure the legs are square with the boxes. Install three long screws where the legs contact each box.

I prefer to use 3/4-inch fir plywood for my workbench tops. It's a little more expensive, but it's very durable. You can use oriented strand board if that's all you can afford.

If you want a really durable workbench top, you can add a layer of oak flooring to the top of the workbench. This will add more cost to the project and considerable work. I feel you'll be very happy with just the fir plywood. So far it's working out great for me.

Column 967

December 19, 2012 AsktheBuilder Newsletter

Well, we're less than a week away from Christmas. The excitement is really building here at the Carter house. I hope it's ramping up for you too.

Last weekend, we had a painting party at my daughter Meghan's apartment. She got married back in September, and she and her new husband Brent moved about 35 miles south of us.

The day before last Friday, I helped Meghan and Brent build a new base for a used giant oak butcher block table they purchased on Craigslist. We had to get the apartment painted before we moved the table up into the eating area.

I coached Meghan the entire way through the table restoration process, from removing the old finish with a belt sander, to building the base and finally her staining it yesterday. I can't wait to see the end result. She sent a photo of the table after it was stained, but it's just not the same when you see it in person.


HUGE NEWS! ASKTHEBUILDER SUBSCRIBER BRYAN PETERSON WINS BOSCH CONTEST!

I've run quite a few contests here in this newsletter. The two most recent are the Bosch Take-Back-Your-Day tool chest and LE Johnson Pocket Door giveaway. It's lots of fun to do these. Go to the LE Johnson photo gallery and you can see why so many entered that contest!

I beg subscribers like you to enter these contests you see here in my newsletter.

Why? Because you're guaranteed to lose 100 percent of the contests you don't enter.

Guess what? Bryan Peterson of Coon Rapids, MN is a WINNER! Read what he sent me hours ago:

"I've been following your newsletters and receiving helpful hints from you for years now. I can't begin to tell you how helpful your tips have been. For all it's worth, I want to let you know that I think you are a real stand up guy. I appreciate you being so honest with all of us and frankly I really enjoy reading your newsletters.

Now on to the nuts and bolts of why I'm writing this. Thanks to you I entered the Bosch Take-Back-Your-Day contest and guess what? Yea, that's right, I won. Not only are they giving me the entire L Boxx system, but they also decided to throw in an 18v cordless drill. I couldn't be more excited. This will help me out tremendously when transporting tools to and from the jobsite. Thank you very much,"

Bryan Peterson

Bryan, first, congratulations and secondly, you're most welcome.

It's my job to dispense tips and tell you about contests. I'm so happy you won!

Do us all a favor if possible. When the new Bosch gear arrives, could you stack it in front of you and have someone take a photo? I'd LOVE to publish that photo here to let other subscribers know it really pays to take the time to enter these contests!


GREAT STOCKING STUFFER GIFTS

Are you puzzled what to put in those stockings? I know, you need AFFORDABLE, but really useful gifts. Here are some last-minute ones for you.

But HURRY, ORDER THEM NOW so they arrive by Christmas!!!!

I love my Energizer Solar Flashlight. It's requires NO batteries!! You let the sun charge it, or you simply turn the crank!

Energizer Solar flashlight

Don't you hate it when your cell phone dies? No power. Ugh. Get this Instant Charger for your phone if it has a micro USB connection point.

phone charger

If you have an iPhone, you need to click here.

You can't have too many drill bits. Not ever. These are premium Bosch drill bits and really affordable.

Bosch drill bits

How many times have you heard me that one of my MUST-HAVE tools is my Stanley QuickSlide razor knife? It's so comfortable in your hand. And really compact!

Stanley QuickSlide razor knife

Lastly is the Kindle Fire. I love my Kindle Fire. I love downloading books in seconds.

Kindle Fire


A GREAT QUICK READ

Yesterday, my very good friend Chuck Eglinton sent me a Christmas gift. He did it in SECONDS.

He sent me a Kindle eBook. I just had to open my Kindle Fire, click a button, enter my password and the eBook was in my reader in seconds.

It's an excellent story, written in poem form, that you can read in less than 15 minutes. You've probably heard the story before, but David Anderson does an excellent job of re-telling it in his own words.

His children did a magnificent job of illustrating the book. It comes in traditional paper form or you can read it electronically.

Remember, you do NOT have to own a Kindle Fire or regular Kindle to read Amazon Kindle books. You can download the Kindle app for your iPad, your smartphone or ANY computer.

This is a book you need to get and read to your children or grandchildren. It's a book that should be read from the pulpit of your Church next week.

Please purchase A Visit From Heaven. You can send it now as a gift to someone like Chuck did to me. It takes you just a moment to send this as a gift.

Send it to your kids so they can read it to your grandkids. Send it to friends who might need to hear the story again.

David's up there now possibly hanging out with my mom and dad and someone you know. My guess is they're getting ready for Christmas too. You know it's a big day in Heaven!

I wish you a Merry Christmas!

I'll be taking next week off. I'll be back here after the New Year!

Nail Gun for Roofing

roofing nail gun

Here's a roofing nail gun. This dandy cordless roofing nailer takes most of the work out of nailing shingles. Copyright 2018 Tim Carter

"My roofing nail gun had a small lithium-ion rechargeable battery and a tiny canister of propane gas that powered the tool. Inside the nail gun was a small internal combustion engine that produced the instant burst of power to drive each roofing nail."

Roofing Nail Gun Checklist

  • Hose or no-hose?
  • Lightweight
  • Durable
  • Works any weather

DEAR TIM: I've decided to re-roof my house because I simply can't afford to pay a roofer. I'll be stripping off all the shingles down to the bare wood.

Do you feel it's worth it to purchase a nail gun to install the roofing nails? What can you tell me about these tools? I'm seriously thinking of starting my own small roofing business so I feel I might get lots of use from the tool.

Have you ever used these guns? Do they really work well? - Sam P., Lexington, KY

Related Links

The BEST Roofing Nails - Don't be Fooled!

Framing Nail Guns - Use it to Build the Roof!

DEAR SAM: Your next job brought a smile to my face.

I clearly remember the first house I bought. I was 23 years old, and it was a vacant home that needed work. It had a hole in the roof big enough to put a basketball through. Needless to say, I was up on that roof stripping off the shingles, repairing the bad wood and then installing shingles to make the house weathertight.

CLICK HERE to get FREE & FAST BIDS from local roofers if you decide it's too much work to use your own nail gun.

When Was the First Roofing Nail Gun Invented?

The first roofing nail gun was invented, as best as I can determine, in the 1990s.

When I did that roof back in the mid-1970's, roofing nail guns were just a glimmer in the eye of modern tool company engineers. Twenty years earlier, the first powered nail gun was invented, but it drove nails meant to secure subflooring to floor joists. I had to install those shingles on my house nailing each nail by hand - thousands and thousands of nails.

When Were Roofing Staple Guns Invented?

Roofing staple guns were invented in the early 1980s.

In the 1980's, I started to use pneumatic staple guns that were made to install wide staples into roof shingles. It was an approved method at the time, but there were issues with staples that were driven too deeply that tore into the shingles.

If this happens, the holding power of the staple is not transferred completely to the body of the roofing shingle.

Were the First Roofing Nail Guns Perfect?

No, the early models were not perfect by any means, but they did drive roofing nails far faster than an average roofer could do it by hand.

The tool never tires, but humans do. Don't forget that.

How Reliable is a Modern Roofing Nail Gun?

Modern roofing nail guns are very reliable.

As you might expect, there have been vast improvements in roofing nail guns. This past summer, I had the pleasure of working with a Paslode impulse roofing nailer that drove thousands of nails into my shed roof with not one misfire. Each nail was driven perfectly so the underside of the nail head was snug against the top surface of the shingle.

roofing nail gun

Here's the exact nailer I used on my roof. It was a pleasure to use and never misfired. CLICK THE IMAGE NOW TO ORDER ONE.

CLICK HERE to get FREE & FAST BIDS from local roofers if you decide it's too much work to use your own nail gun.

Do All Roofing Nail Guns Require Air Hoses?

No, some roofing nail guns do not run on compressed air. They don't need an air hose.

The particular gun I used did not require an air hose or a noisy air compressor on the ground. My roofing nail gun had a small lithium-ion rechargeable battery and a tiny canister of propane gas that powered the tool. Inside the nail gun was a small internal combustion engine that produced the instant burst of power to drive each roofing nail.

How Fast Do the Nail Guns Shoot a Nail?

As fast as you could move the tool, safely position it, and pull the trigger, another nail shoots into the roof. The tool allowed me to install shingles far faster than I could ever imagine doing it by driving nails with a traditional hammer. What's more, I was less fatigued. That's important, as fatigue leads to accidents while up on roofs.

Does it Make Financial Sense to Buy a Nail Gun?

Depending on how much you value your time and the urgency with which you need to finish the roof so water doesn't get into your home, I would wager that it can make financial sense to invest in one of these tools for just one roofing job.

Can I Sell the Nail Gun After Using It on One Job?

If you care for the tool, you can sell it online at one of the free classified websites in just a matter of days. Contractors are always looking for great deals on tools like this, especially tools that have all the original paperwork in the tool case.

If you do decide to start your own small business, you'll have a great competitive edge with this tool. You'll be far more productive which leads to higher profits.

Should I Read the Owners Manual?

My biggest suggestion is to read the owner's manual that comes with the tool. Read it cover to cover. The safety warnings are the most important, and then you need to know how to care and clean the tool.

Do You Have to Clean the Nail Gun?

The roofing nailers require more frequent cleaning and care than a regular nail gun that just fires nails into wood, oriented strand board and plywood. The asphalt shingles, dirt, shingle granular material, etc. are all hard on the roofing nail guns. It's really important to clean the tool regularly.

Don't underestimate the danger of these tools. You can get seriously injured with any nail gun. They shoot out the fasteners at extremely fast speeds. Don't point the guns at people or yourself. Don't allow the tip of the gun to ever point at your body or come into contact with a body part.

NEVER carry the tool around with your finger on the trigger. A common accident is a worker coming down a ladder with the tool in his hand and finger on the trigger. The tool can come into contact with a person's head standing next to the ladder. As you might suspect, the gun fires the instant the tip of the gun touches the person's skull. Ouch!

You can watch a video about replacing a roof shingle. Simply click here - "replace roof shingle video".

CLICK HERE to get FREE & FAST BIDS from local roofers if you decide it's too much work to use your own nail gun.

Column 966

December 11, 2012 AsktheBuilder Newsletter

Last week I mentioned that I was going to tape a parody video using a very cool tool I was reviewing. The video was uploaded about three hours ago. It's my hope you get as much pleasure watching it as I had creating it.

Suffice it to say I'll not be moving to Hollywood anytime soon. Acting is hard work and I'm surely no actor!

To purchase the cool tool in the video, CLICK HERE.

To watch the video, just go to the Worx SD Driver Review at my website!


LIVE Q & A ROUND TABLE TONIGHT

Do you have an upcoming project where you need an answer from me? Would you like to do it during a webinar and listen to other questions and answers?

I'm doing a LIVE webinar tonight, December 11, 2012, at 7 pm Eastern Time. The primary topic is anything about building a shed, but you can ask any question.

  • Do you know how to properly size a room addition?
  • Can you square up something without using a fancy calculator? How?
  • What's the best concrete form system to use?
  • What are my options when insulating a floor?
  • Do they make plywood that will not rot?
  • What's the best way to dig pier holes?
  • Should you put wall sheathing on a wall before or after you tilt it up?
  • Is it hard to use a nail gun? Is it really dangerous?

I'll bet you have a boatload of questions. If so, come to PowHow tonight and be in the webinar. There are a LIMITED NUMBER of seats left in the webinar. Sign Up NOW.

This is the first of many, many PowHow classes I'll be conducting in the future.

PowHow Class with Tim


TIP OF THE WEEK - DISGUISING A CRACK IN CONCRETE OR BLACKTOP

If you have a small crack in concrete or blacktop, it can look like a scar across your face even if you do go to repair it. The caulks that are made to repair these cracks are monotone and they often don't match the color of the surface being repaired.

If you look closely at worn concrete or blacktop you'll quickly see that MOST of what you see is colored sand grains in concrete and small stones in blacktop.

Your job, before you attempt the repair, is to locate sand that looks like the sand in the concrete or small stones that match the aggregate in the blacktop.

The stones from the blacktop are frequently at the bottom of your driveway. The rain carries them away. Start saving them!

You can also find the stones along the edges of your blacktop.

The trick is to inject the crack with the proper repair caulk - just caulking about 2 feet - and then immediately cover what you did with the sand (if patching concrete) or stones (if patching blacktop). Press the sand or stones into the sticky caulk immediately.

This really works well. I've had great success with this over the years. If you do this, I'd LOVE to see your Before and After photos.

I hope to see you in class tonight!

Till next week.

Worx SD Driver Review Video


Worx SD Driver Review

"I know what you are thinking? Does he have the Phillips #2 Driver? Or the flat head driver in the barrel of the gun?"

"Well to be honest with you, in all the excitement, I pretty much forgot myself!"

"But with this being the Worx Semi-Automatic SD Driver, the most powerful motorized screw driver in the world, that it can snap your screw heads clean-off, you've got to ask yourself one question, do I feel lucky?"

Hi, I'm Tim Carter and in all seriousness, this is the Worx SD Driver and it is a semi-automatic. It is really a cool tool. It works like a semi-automatic gun. You slide back the barrel of the driver and it inserts a different screw bit. It is very clever.

The motorized drive features forward and reverse. It is just a nice small motorized screw driver that is shaped similar to a pistol. Thus the fun with the opening of the video.

This fun filled video was featured in my December 11, 2012 AsktheBuilder Newsletter.