How to Build a Wall

DEAR TIM: I've decided I'm going to build an outdoor shed using wood, but I've never built a wall before. It can't be that hard. Is it just a matter of banging together some studs and covering it with sheathing? What secrets can you share that will save me time and ensure that the job will get done right. The last thing I need is my wife and neighbors chortling as they see my flail around with a hammer and saw. Help me Tim, you're my only hope! Arlo E., Albany, NY

DEAR ARLO: The last thing we both need is you to be the laughing stock in your household and neighborhood. How about I transform you into a superhero? It's possible, but you need to really pay attention.

Building a wall for a shed or a house is not that hard, but then again, there are many places you can make a mistake. It's all a matter of how big your appetite is for margin of error. Some people don't care if a wall is out of square or uneven. Others, like me, expect near perfection, or as close as you can come to it working with rough lumber.

This wall was built in less than an hour by two people. But it took four to stand it up! Photo Credit: Tim Carter

Understand there are many ways to achieve your wall-building goal. You could talk with ten different master carpenters and get ten different sets of instructions. What follows are methods I've used to build walls that are square, plumb and level.

Let's talk about the basic components of a frame wall. You have a bottom plate, the actual vertical wall studs and the top plates. You may also have other larger lumber pieces used to create beams, or headers, over doors and windows.

The top and bottom plates should be lumber that's straight as possible. I prefer to build walls on the ground so I can nail through the top and bottom plates into the ends of the wall studs. If you attempt to build the wall in place, and I'll never forget watching a vocational education teacher do this at his own home, you'll be flailing and toenailing the studs into the bottom plate. Toenailing, while acceptable, is much harder to do in my opinion.

Use 16-penny sinker nails to connect the plates to the wall studs. These nails are generally 3.25-inches long and the shaft of the nail is about one-eighth inch thick.

The wall studs at each end of the wall need to be perfectly straight. Take your time and find these true studs. Using straight studs at the corners allows you to easily connect the walls together as you build your shed.

It's mission critical that the top and bottom plates be the exact same length. When I say exact, I mean it. The vertical wall studs need to be the same height. Doing this allows you to square up the wall on the ground before you begin to add sheathing to the wall.

Before you add the plywood or oriented-strand board sheathing to the wall, you must square up the wall. Failure to do this will cause you great headaches and embarrassment.

I chalk a line on the floor and then temporarily toenail the bottom plate to the floor making sure the edge of the bottom plate is just touching the chalk line. The nails must be driven through the bottom of the plate so that you can remove them after you have the wall sheathing applied to the wall.

Once the bottom plate is straight and secure, take out your tape measure and check the diagonal measurements of the wall. You do this by hooking your tape measure to the exact corner of the bottom plate at one end of the wall and stretch it to the corner of the top plate at the other end of the wall.

Undoubtedly the two diagonal measurements will be different. Gently tap the end of the top plate one way or the other until the two diagonal measurements are the same. When they are, the wall is perfectly square. Secure the top plate of the wall temporarily to the floor using a few nails. You don't want the wall to move as you apply the sheathing.

With the wall square, it now becomes easy to apply the wall sheathing. If the wall is not square, or the bottom and top plates are not straight, it becomes very problematic to apply the sheathing.

The wall sheathing is nailed to the wall studs with 8-penny nails. I prefer to use nails that are ring shanked. These have tiny ridges on the shaft of the nail which provide more surface area and create better holding power.

Once the sheathing is applied, you can remove all the temporary nails that were holding the wall to the floor. It's time to tilt the wall into position.

Be sure you have plenty of help when you tilt up the wall. It will be heavy. If it's windy, be very careful. The wind can easily blow the wall over. Brace the wall once it's raised up to prevent it being blown over by the wind!

You can watch a wall-building video that contains secret tips at www.AsktheBuilder.com. Simply type "wall building tip video" into the search engine at www.AsktheBuilder.com. There are MANY ADDITIONAL wall-building tips at www.AsktheBuilder.com.

Column 945

Concrete Deck Pier Video

Video - Concrete Deck Pier

This item was so good, I featured it in my June 19, 2016 AsktheBuilder Newsletter.

Below is the transcript for the above video.

Hello, I'm Tim Carter of AsktheBuilder.com. I want to talk a little about the piers. Specifically, about the forms to create them. Check these out.

I'm using this 12-inch diameter top and a base that flairs out to 18-inches. It is called Form-Footer and it is really an unique system. It comes as a kit and you just snap it together without the need for tools. It even comes with the reinforcing steel already cut and already bent. That is an enormous time saver if you are DIYer.

The base is 18 inches in diameter, then there is a reducer collar from 18 to 12 inches. The tower is two sections that snap together and the top is a ring that holds it all together and has two supports for the top of the rebar. In the base, the reinforcing steel is in a cross pattern, then there are two vertical bars. The vertical bars are held in place at the top and bottom for proper alignment during concrete pouring.

If you need to go taller, just add additional tower sections in case you need to set the base deeper into the ground due to your frost level.

Why is this form so much better? In the old days, you would have first pour a pad in the bottom of the hole and then use one of those cardboard tubes for your form. This needed extra time as the pad would have to dry for a day before you added the cardboard tube and arranged the rebar inside the tube. That all took time. This system is already to go right from the box.

Level the soil at the bottom of the hole, place this form into the hole, put a little dirt around the base to hold it plumb and you are ready to pour. Check into this system on your next deck or shed project. It is easy and quick, and no cutting of steel with a hack saw.

The next video will show one of these just set into the hole and a second one with the dirt around the base waiting for the pour.

Wall Building Tip Video

Hello, I'm Tim Carter of AsktheBuilder.com. I need to explain something that should have been explained in the last video.

You'll notice that not all the sheathing is on. This is the seam between the two top plates. One is 16-feet long and the other is 8-foot long. Now the top plate needs to be installed on the wall before the sheathing is installed. If you don't have this top plate on and when you go to lift the wall up, the people lifting the wall won't do it exactly at the same time and without the top plate, the seam will come apart. By putting on the top plate now, it locks the seam in place. In this case, I used a 16-foot 2x4 that goes back 8-feet from the seam in both directions.

One little tip. Notice that the top plate doesn't go all the way to the end of the wall. It ends 3-1/2 inches before the end. Just the size of a 2x4. This is done so the top plate from the adjoining wall overlaps and ties the two walls together. Be sure to allow room to tie your walls together. It makes for a stronger corner.

How To Foam Insulation Board Video

How To Foam Insulation Board

Hi, I'm Tim Carter from AsktheBuilder.com. I want to talk about little about closed cell foam insulation and how is can be used to insulate the floor system in a shed or out building that has a wood floor. There are two benefits from this product.

First, I am using the closed-cell foam insulation, 4-inches thick, in between the floor joists. Each inch has an R-valve of 5. In this application, the foam blocks are just pressed fitted into place. So to keep them from falling over the years, we installed pressure-treated blocks to support the insulation.

The other benefit of this product is it is a tremendous vapor retarder. Lots of moisture will come up out of the soil under the shed and try to get into the structure. This insulation will block that moisture.

Just be sure you cut it nice and snug between the floor joints and you will be good to go. So remember, closed-cell foam insulation is a great insulator for floor systems.

July 20, 2012 AsktheBuilder Newsletter & Tips

I made a mess of the building site where my shed is going last week. We had to dig the eight holes for the piers and oh my, what a mess! There were piles of dirt and rock all over the place.

Sometimes that happens. Because the site is so tight, there wasn't much room to put the dirt. Just about every ounce of it has to be shoveled back into the holes by hand. UGH!

My new friend Robert Moore from Baltimore, MD, arrived up here in New Hampshire to help me for about eleven days. In just two days, we got the floor frame complete and the floor joists in. If we really hustle today, we should get the treated plywood floor on. By end of day Saturday, we'll have walls up!

Speaking of messes, I made another one in last week's newsletter when I mistakenly said that Mt. Washington, in NH, is the tallest peak east of the Mississippi. Get out the fork! Time to take a big bite of humble pie! Pass the Cool Whip!

Bill Delaney, Mike Sullivan, Vivian Cancio, Donald Lee Shea, Phil Heaton, John Lund, Herb Daniel, Jeremy Wrenn, Steve Loyola, Daniel Strom, Timothy Peck, Michael Keener and Geoff Moore all politely *reminded* me that Mount Mitchell in NC is the highest peak east of the Mississippi. Thanks for catching that! Mt. Washington is the highest peak in the Northeast and home of the notorious fierce weather.

Planning App

When I do an autopsy on mistakes on jobs, as I did last month down in Antigua, in almost every case the mistakes can be traced to poor plans.

Chief Architect has come out with a free app, for now at least, that helps you plan a house or just a room. For years, this company has made fantastic planning software - I've tested it - so this app should be stellar.

If you have an iPad, go get the planning app now. It's FREE.

Repairing Potholes in Asphalt or Blacktop

If you live in a place that gets freezing weather, then you know all about potholes. Roadways can be filled with them, but so can your driveway.

You can make permanent repairs to blacktop with cold-patch blacktop that comes in a bag. Yes, it's absolutely possible.

The folks at Quikrete created a video about this, but I don't agree with one thing in their video. They say to " ... overfill the pothole by 2 to 3 inches ....." I've used these materials in my own videos, and I've never seen them compact that much.

I made my video years ago and intend to make a new one. I'll be trying out the Quikrete product for sure, to see if it actually compacts that much.

If you really want your patch to never come out, I have a secret trick for you. Both my video and the Quikrete one do NOT mention this secret.

When you're doing your preparation work, make the bottom of the hole wider than the top. Think of a dovetail joint in woodworking. When the patch material hardens, it simply can't lift out of the hole because it's locked in place. This is why amalgams and tooth fillings hold in your teeth. Dentists make sure the hole is wider at the bottom of your tooth than the top.

Last Call for Pocket Door Contest!

Do you want a chance at winning a FREE Pocket Door Hardware Kit from LE Johnson? If so, you have to tell us why. Your chances of winning improve greatly if you also submit a photo and even a video!

Go here to enter this contest.

Special Shed Shout Out!

As the shed-building project is now in high gear, I want to share each week some material tips with you. As you build things, I want you to use things that will last!

Last week I had the pleasure to use for the first time a great plastic form for the concrete piers. It's call the Form Footer. I saw this product last October in Chicago at the Remodelers Show. I knew then it would be easy to use, and I was NOT disappointed. What I really liked was the 1/2-inch rebar came with the form already CUT and BENT! You don't need any tools to get this product assembled.

Let me tell you, cutting 1/2-inch rebar is no easy task, unless you have a great recip saw and the right blade.

Two days ago, Robert and I installed lots of Simpson Strong-Tie joist hangers and corner supports. We used a combination of the special Simpson joist-hanger nails and screws. My trusty DeWALT cordless impact driver did a stellar job of driving the screws.

The day before we used Simpson's special hold-down anchors to permanently lock the treated 6x6 posts to the concrete piers. I've used Simpson Strong-Tie framing connectors for years and have always felt they are a superb product.

I rate both products 5 hammers! That's as good as it gets! Next week I'll have a super video for you to watch about Dow closed cell foam insulation. I'll also be telling you about the benefits of Southern Yellow Pine - especially for wood-floor systems.

Camper Gets Interior Make Over

"My husband and I bought a gooseneck camper in 2011. It was an old camper and had carpet on the walls and ceiling of the sleeping area. The first time we used the camper, I could not breath while in the sleeping area. I had some kind of reaction to something in the carpet. I was so stuffed up and my chest felt tight like I could not get air.

So later I had some teenage grandchildren pull the carpet out. I did not take any pictures of the carpet in the camper. I have a picture of the carpet removed and of what I did to insulate and finish the camper.

I used a foam board that had foil on the outside and has a good R value. I also glued the stuff to the ceiling and walls as the camper is fiberglass. I was afraid to use anything but glue because of the possibility of cracking or putting holes in the outside shell of the camper and making it leak.

The window frames were tricky because the stuff I was using was much thicker than the original carpet. I removed the window frames and made little risers out of half inch strips of wood that I painted and screwed to the frames.

I am pleased with my work and so is my husband. I can sleep without breathing problems in the camper now."

Joy Davis

The inside of the camper before starting

Insulation is being installed as well as the Wainscoting

The finished camper interior

If you want to submit pictures and the story behind your project, CLICK HERE to go to the Before & After Submission Page.

Working with Concrete in a Bag

Concrete Bags

Concrete bags on a pallet are ready for water and a hoe. You can transform these bags of concrete into many things around your home. You just need minor skills and practice! Photo Credit: Tim Carter

"Believe it or not, the concrete in the bags that you see at hardware stores and home centers is pretty much the same concrete you would get if you called a ready-mix plant...."

Concrete Bags Make Superb Concrete

  • perfect for small projects
  • mixes easily in a wheelbarrow or plastic sheet
  • mix until it's like firm applesauce
  • too much water weakens concrete in a bag

DEAR TIM: I need to replace a small section of sidewalk that's only 4 feet by 4 feet. I've never worked with concrete before and wonder if I can actually do this.

I see the bags of concrete at the hardware store and could easily get these to my home. What's involved with this process and how can I succeed the first time?

What tools would I need to purchase? What are some tips you can share to help me do this job? I have other concrete projects but am anxious about whether I can do them. Julie Q., Campton, NH

Mix Concrete in a Tough Plastic Bag

DEAR JULIE: I love your attitude. Many people get frozen in their fear of failure and don't even try to do a job like this. I can already tell you that you will do well, especially if you follow my tips.

Is Concrete in a Bag Strong?

Concrete in a bag is strong as long as you use the correct amount of water when mixing it. Some come with a 4,000 pounds per square inch (PSI) rating. It's important to realize you can add more Portland cement to make it even stronger.

Let's talk about the actual concrete mix in the bags. Believe it or not, the concrete in the bags that you see at hardware stores and home centers is pretty much the same concrete you would get if you called a ready-mix plant and had it delivered to your home in a giant truck equipped with a rotating drum.

Is Ready-Mix Concrete in Trucks Better?

The ready-mix concrete plant can make all sorts of different mixes for you. They offer convenience as they mix the material.

There are some disadvantages from using ready-mix concrete:

  • large trucks weighing over 70,000 pounds may crack your driveway
  • small loads can be very expensive. 
  • you often need many people to help unload

What Strength Concrete Do I Need?

You need a minimum of 4,000 PSI concrete for concrete exposed to freezing weather. Remember, that's the minimum strength. It's better to pour it 4,500 or 5,000 PSI.

Concrete is formulated at different strengths. Most of the bagged concrete mixes are rated at 4,000 pounds per square inch (psi). That strength is achieved so long as you don't add too much water to the mix. They tell you on the bag labels how much water to add to get to that strength. Pay attention to that.

Will Concrete Last in Cold Climates?

4,500 PSI strength is very good for concrete exposed to freeze-thaw cycles in cold climates. Concrete absorbs liquid water, and this water inside concrete can tear it apart if the bonds between the cement, sand, and gravel are not strong.

You weaken concrete by adding too much water to it when you mix it or if you add water to it as you finish it.

Is it Easy to Mix Concrete in a Bag?

It's pretty easy to mix concrete. I do it in a wheelbarrow.

I've seen a unique bag system where you just put the dry concrete mix in a strong plastic bag, add the water and move the bag back and forth.

Both methods work well. You can even mix concrete using heavy sheets of plastic in case you can't purchase the plastic mixing bags.

Is it Easy to Finish Concrete in a Bag?

It is easy to finish concrete. You just need to follow a few steps:

  • screed the concrete so there's no excess between the form boards
  • float the concrete to drive the rocks down from the surface
  • the top 1/4 inch of the surface of the concrete should just be the coarse sand and Portland cement
  • wait for it to stiffen up, rub with a magnesium or wood float

For you to succeed on your sidewalk, I need you to first practice finishing concrete. Mixing is easy, but finishing requires some skill. I highly recommend that you pour a small, thin test slab first to practice to see how concrete transforms from the plastic to the hard state.

Should I Do a Practice Pour?

Buy one bag of the concrete mix. Look on the label for a table that shows you how far it will go. You should be able to make a small thin slab about 2 feet by 2 feet that's only 2 inches thick. That's plenty big to practice.

Lay a sheet of 6 mil plastic on your garage floor. Build a small square form from wood that will hold the concrete. Lay this form on the plastic. Mix the bag of concrete mix with the required water and mix until it's a uniform texture. Remember, you can always add more water. Add the water in stages as you mix.

Pour the mixture into the form. Use a straight piece of wood to make the concrete flush with the top of the wood forms. Slide the piece of wood side to side rapidly as you pull or push the piece of wood from one end of the form to the other. This double action eliminates voids on top of the slab and helps drive the stones down below the surface.

When Do You Float the Fresh Concrete?

You want the top of the concrete to be the coarse sand and cement paste with the stones in the mix perhaps down about 1/8 or 1/4 inch. This sandy top layer allows you to create the desired finish.

You'll need a wood or magnesium hand float tool and an edging tool to produce the smooth edges for your slab. If your existing sidewalk finish is a broom finish with just lines, you'll just need a push broom to create the final texture.

You have to wait about 30 minutes or an hour before you can start to put a finish on fresh concrete. It depends on the temperature of the concrete, the air temperature and the relative humidity of the air.

When freshly mixed, you can easily put your finger deep into the mix. You do not want to start to finish the concrete until it has started to firm up. When the concrete is hard enough that thumb pressure indents it about one-half inch, start to rotate the hand float on the surface and see what happens. It should produce a great result!

You can watch several videos that show how to mix and place concrete at www.AsktheBuilder.com. Simply type "concrete video" into the search engine. There are MANY ADDITIONAL Concrete Finishing tips here at www.AsktheBuilder.com.

Column 944

July 10, 2012 AsktheBuilder Newsletter And Tips

This past Saturday morning I was once again on top of the highest peak east of the Mississippi River - Mt. Washington. I was on my ham radio operating at the finish line of the Newton's Revenge bicycle race up the mountain.

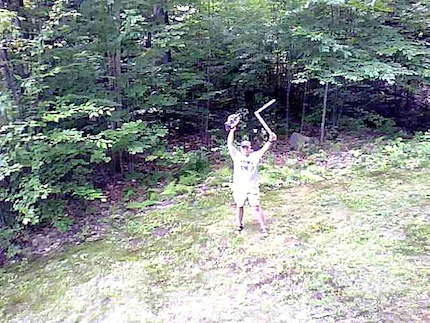
As you can see from the photo, it was a little windy and foggy up at the top. Every now and then there would be a break in the dense fog and clouds. The flags tell the tale. One of the riders wanted a photo of himself with his bike at the summit after he made the epic climb.

Wind, clouds and fog are the norm at the top of Mt. Washington. The temperature on Saturday morning was 52 F and the winds were sustained at 40-50 mph with 70 mph gusts. From time to time the wind blew me a half-step forward. It was an experience indeed.

To bring home the importance of ham radio, I read a story on USAToday.com about a big storm that hit the Smokey Mountains National Park on the evening of July 7th. Most of the damage was at Cades Cove. There's only one long road back into this part of the park, so if it's blocked, you're SOL. This paragraph in the story tells you why ham radio operators are so important:

"Rescue efforts on Thursday night were hampered by power being knocked out to a key radio repeater in the area, which led to spotty transmission from campers seeking assistance. Jordan described the communications problems as "extremely frustrating" as emergency officials tried to plot their response."

If there was a local ham radio club near there, they could have been on the air in hours, if not minutes. We bring our own power. We don't need the utility company's power.

On Saturday morning, we had our radio central command post up and running in fifteen minutes. Those of us with powerful mobile radios in our cars and trucks have 24/7/365 communications.

If you want to be able to communicate to the outside world in an emergency, get your ham radio license, join an amateur radio club in your area and get up to speed. It's not hard to do.


Tip of the Week: Staying COOL

I lived in Cincinnati, OH for nearly 55 years. On Saturday, July 7th, it was 103 F there. Here in Meredith, New Hampshire it was a comfortable 80 F. The midsection of the USA and East Coast has been brutalized by Mother Nature for about two weeks now.

Realize that added insulation in an attic doesn't necessarily keep you cooler on hot days. If your attic temperature soars to 140 - 160 F, which it can do easily in this extreme heat, the insulation itself can get HOT if there is no air movement. If the insulation is as hot as the attic, then it does you no good.

Insulation is a solid material and it can get hot. Remember, insulation just slows the transfer of heat.

If you want the inside of your home to stay as cool as possible, and you do not have central air conditioning, you must try to keep your attic as cool as possible. Traditional whole-house fans can really help in this effort.

A whole-house fan will transfer tens of thousands of cubic feet per hour of outside air into and through your attic. It pulls this air in through windows and doors in your house. This air moving past your body will offer you some comfort as it evaporates the perspiration from your body.

The in-rushing air into the attic space pushes the hot air out of your attic through plenty of exhaust vents at the gable ends of your house or through roof vents. As the sun goes down and the outside air temperature drops, the fan will continue to cool off the roof, the framing lumber and the insulation in your attic. The outside air coming in through the windows will cool things in the house so you're ready to fight Mother Nature the next morning.

If you have central air conditioning, then install powered attic ventilator fans that will pull cooler outside air in through soffit vents. The intention is to keep the attic temperature as low as possible so your central air conditioner doesn't have to work as hard.


The DIY Shed Project Has Begun!

A few days ago, I started the shed project. The official carpenter pencils are here, the custom T-shirts should be done any day, and the awesome hats are being made now. If you're a project backer that deserves these items, they'll be on the way to you soon!

Best of all, the LIVE webcam is up and running! You can watch me build the shed LIVE if you want. The cost to do this is pennies per day. Here's a photo of me this weekend goofing around in front of the camera with my Milwaukee Cordless Saw and framing square.

You can purchase access to the webcam right now, on sale, for just $10 for the entire project. That's 33% off. The sale ENDS on Sunday, July 15th, at midnight ET. The price jumps to $15 next Sunday.

This week, if all goes well, I'll have the concrete piers installed. The forms for the piers came from Form Footer. They're really a fantastic product. You don't need tools to put them together, and the forms come with the steel reinforcing bars already CUT AND BENT!!! That's a tremendous advantage.

Thanks to Quikrete as well for helping out with the concrete for the piers.

I should be on an excavator digging the pier holes as this newsletter is delivered to your Inbox. Go ahead, click and get access to the camera so you can see me dig!


Stain Solver News

I've got a huge announcement next week about Stain Solver. At that time I'm going to share a story about Jack Cherco from Chicago. He and I had lunch last week while he was here in New Hampshire for a wedding. If you own a small or medium retail business, you do not want to miss this story and announcement. It's BIG.

^ ^ ^ Re-read that paragraph - It's important. ^ ^ ^

Two days ago, Cheryl McTavish sent me two photos. The before photo of her Spanish pavers is just below. You're not going to believe the AFTER photo. I'll swear on a stack of Bibles standing on the summit of Mt. Washington with swirling storm clouds around me that I did NOT use Photoshop or any other digital enhancements on the *after* photo.

Click here and look at what Stain Solver did to Cheryl's floor. Be sure to read about what it did to two embroidered tablecloths that had red wine stains on them. The only thing Cheryl needs to do is to update the date settings on her digital camera. She's a year and a month behind!


Tripping Up Stairs

I've built countless sets of stairs in my career. I wrote a Building Simple Stairs ebook a few years ago. I'm going to create, I hope, the most authoritative step-by-step video about how to build simple steps in the next month. I have to build steps up to the attic of the shed. You'll be able to purchase this series of stair-building videos soon.

It's extremely important that you get the stair risers, that's the height between each step, CORRECT. I don't mean the right dimension, but more that each riser needs to be exactly like the other. If you don't do this, you create steps that are very dangerous with people tripping and falling.

Our brains can easily detect a one-quarter-inch difference! Look at this video sent to me by Win Harrington of the 36th Street Subway Station in Brooklyn, NY. Did you by any chance trip on this staircase before the MTA maintenance workers fixed it?

This video was taped a few weeks ago and went viral on the Interweb.


Win a Pocket Door Kit!

Last week I casually mentioned doing a contest to give away a pocket door frame. Oh my gosh! I was inundated with responses. I would have never guessed there was that much interest.

LE Johnson has kindly offered to provide the prize! Thank you!

Here's how we're going to do it. Anyone can enter. All you have to do is write a simple 150-word essay about why you need this pocket door more than any other person. That's all you have to do to enter. You do NOT have to submit a photo or video as I mention below. But it may help your chances of winning.

Just write up why you need the pocket door hardware kit. LE Johnson makes different hardware for different types of doors. If you want a surface-mount slider door, you can have that hardware. The winner gets to pick what kit they want. Before you submit your written entry, take your time, check your spelling and grammar and really tell your story.

To get an extra edge in the voting, you can submit photos and video. You have to do a little extra work to do this. You have to upload the photo or video to a website that allows that. Then you submit to me the URL of where the judges can see the photo and/or video.

The photo should be of the door or wall where you plan to use the pocket door. Better yet, tape a video with your family being actors/actresses and upload the video to your YouTube channel. You can get a FREE channel on YouTube in just minutes.

The judging is going to be done by subscribers to this newsletter. You get to vote for the winner.

We'll open the contest for two weeks to give everyone plenty of time to get their story written, photos taken and videos uploaded. That's plenty of time.

Then I'll load all of the entries to a special page at my website. I'll share that page with you in an upcoming newsletter. You'll then be given a special link to use to vote. You'll only be able to vote once, unless you try to fool the system. That's not cool.

Go here to ENTER to win a FREE LE Johnson Pocket Door Kit!


Great Hammer Skills

Russell Morris from Australia sent me a link to a German commercial taped five years ago. It's worth watching. Maybe there was some magic done in post production, as I would have loved to see a wide shot towards the end instead of a close up. I don't want to ruin it for you, so you'll have to watch.

I'm convinced the nail you'll see at the end of the video was inserted in a pre-drilled hole. It's a massive nail and goes into the wood much too easily.

But it took great skill to do it nonetheless! I say this assuming it was real.


Paying a Contractor

Last week's newsletter about my consult in Antigua struck a raw nerve with a builder or remodeler named Kevin Toomey. He emailed me asking me if I required a deposit from a homeowner for a consult fee. I replied, "Yes. They have to pay a 30 percent deposit in advance."

Kevin thought I was hypocritical because I had said in last week's newsletter that contractors should not be paid in advance. I actually clarified that last week saying that a contractor should get money for custom-ordered materials.

I tried to explain to Kevin that purchasing a round-trip plane ticket to a city I had no intention of visiting, reserving a hotel room and renting a car was the same as ordering a custom-made front door.

But Kevin still didn't connect the dots, nor did he take the time to go to my website and read the countless past columns I have there about being fair to contractors and protecting your interests as the homeowner.

The Bottom Line is this: Realize that if you give more money to a contractor than he deserves for completed and satisfactory work, you're acting like a bank. You're HOPING the contractor completes the work to your satisfaction.

All too often the contractor disappears or doesn't complete the job. Why? He's possibly used your money to pay off bills from other past jobs and he doesn't have money to pay your project costs. When this happens, the contractor takes off.

This is why you develop a fair payment schedule, no matter how small or big the project is. If the project is short and only lasts five days, you can pay the contractor some money at the end of day two or three for all the work done so far and you find satisfactory.

Later this summer, after the shed project is complete, I'm going to compile all my payment columns into a book. You'll be the first to see it. It will have a cool payment plan schedule for any size job - big or small.

This book will give you great peace of mind so that you never find yourself hoping the contractor will finish your job. You'll ALWAYS have enough money in your account to bring in another contractor should yours disappear.

Step Footing

DEAR TIM: I'm not very good at reading blueprints and on the ones for my new home, the architect has drawn a step footing. Is this an accepted way to put in a foundation? Why can't the footer that rests under the foundation all be at the same level? What are some best practices when installing a stepped footer? Patricia A, Akron, OH

DEAR PATRICIA: Don't feel bad about not being able to read or understand blueprints. Many people aren't able to make sense of all the lines, dimensions, symbols and notes on the large sheets of paper. I was fortunate as a builder to have the ability to see two-dimensional blueprints in three dimensions in my head. Believe me, that really comes in handy.

Footers are a very important structural component of a house. In most cases, the footer is the only part of the house that touches the earth. Footers are commonly called spread footers because they spread the weight of the house over a wider area than if you just poured the foundation walls allowing them to touch the ground.

Here's a foundation footing that's making a transition from one level to another. It's poured continuously for extra strength. Photo Credit: Tim Carter

The best analogy I can give is pushing a knife through a stick of butter. If you put a knife on edge, you can push it into the butter with relative ease. But turn the knife sideways so the wide blade is in contact with the stick, and you'll not be able to press it into the butter unless the butter is room-temperature soft. The wide face of the knife blade spreads out the downward force over a greater area just like the footer.

A step footer or footing is one that's poured at different levels. When you see a complex one, it appears to look like a set of steps as the footer changes elevation with the ground. That's why it's called a step footer.

This footer is required where the building is constructed on sloped ground, or when part of the building will not have a full foundation. An example of a house like this is one that has a full basement but an attached garage next to it. A shallow foundation would be used for the garage because the garage floor is poured on grade.

The house my wife grew up in had a three-level stepped footing. The main part of the house had a full basement while part of the house had a crawlspace. The attached garage was poured on grade. If you were to cut the house in half now to look at it, you would clearly see the footer under the foundation was at three distinct levels. If you were to pour the foundation and footer at the same level in all these areas you'd waste lots of time, effort and money.

Poor soil conditions can cause a footer to step down. You can also have a situation where a house has a walk-out basement because the ground falls away down a hill. The foundation wall on the walk-out wall has to be poured deeper to resist frost heave.

The levels of the steps in a footer can be critical. If the foundation walls are being constructed with concrete block, you want the steps to be some multiple of 8 inches as a typical concrete block, with a mortar joint, is 8-inches tall. As the block layer lays the walls on the lower footers the top of his block eventually is even with the higher footer.

Poured concrete foundation forms also come in fairly standardized heights, so the foundation contractor will want the steps in the footer to match the heights of his forms.

It's a very good idea to have the foundation footer be continuous and the footer actually transition to a vertical section of concrete that connects to the footer above and below. This is why a footer is called out on a plan as "continuous".

Footers for houses are normally about 8-inches thick and can be as thick as 10 inches. There should be two steel rods that are placed about 1-foot apart horizontally and be about one-third of the distance up from the ground as the footer is thick. The steel rods must overlap each other at least 15 diameters, and more is better. I used to overlap my one-half-inch thick steel rods about 18 inches when I was building.

The steel rods must also be continuous through the entire footer. This means they have to be bent to go around both horizontal and vertical corners. The steel is a vital component of the footer and should never be left out.

Concrete is weak in tension. This means if you try to bend it, it will crack easily. Concrete is very strong in compression. You compress concrete when you try to squeeze it. Steel is very strong in tension. Adding it to concrete footers and concrete foundations vastly increases it's resistance to cracking.

Be sure the soil beneath the footer is compacted and will support the structure. The building inspector will help you here. Never pour a footer on soil that contains organic material.

You can watch several videos that show how to install a concrete foundation footer at www.AsktheBuilder.com. Simply type "concrete footer video" into the search engine on this page.

Column 943

New House Construction Tips

DEAR TIM: With mortgage interest rates at all-time lows, I feel it's best to build my new home now. I've got hundreds of questions about the process, but wonder if you can just give me some quick tips that will help me keep the cost down and avoid nightmares. I know many people who have regretted building a new home and who have been cheated by unscrupulous builders. Do you have a playbook that one can use to help avoid all or many of the pitfalls? Bryan P., Lowell, MA

DEAR BRYAN: Not only are mortgages at all-time lows, but you can also get a pretty good deal on some materials and labor. Many contractors are hungry for work as are their sub-contractors. It's a great environment to build. You'll just have to be sure to order many items in advance because many supply houses don't stock items like they once did. Delays in getting materials can really cause heartache and cost overruns.

I feel I can best advise you on what to do and what not to do by sharing a story. Just last week, I found myself in the West Indies of the Caribbean. The property manager for a foreign embassy had hired me to inspect a roof on a new home. This house was built four years ago, but the builder made multiple mistakes on the roof causing black tar stains to appear inside and water leakage in numerous locations.

My inspection revealed numerous mistakes. First and foremost, the plans and specifications for the job were very poor quality. The plans lacked detailed drawings of critical aspects of the complicated roof design. Too much was left to interpretation by the carpenters and roofers. Even though the plans were not the best, the builder deviated from them. These deviations lead to the water leakage.

The builder and roofer used the wrong underlayment for the sub-tropical location. The intense sunlight and dark roofing color caused the underlayment to liquefy and drip through cracks of the finished interior ceiling. A proper underlayment that would withstand the extreme heat was available at the time the house was built. The architect didn't specify this product, and the builder failed to read the written limitations about the product he used. Or if he did read them, he ignored the instructions.

The homeowner that built the house placed too much trust in the builder. She just thought and hoped he would do the right things. That didn't happen. The builder not only cut corners, but he also abandoned the job for nearly 18 months as it was nearing completion.

Another mission-critical mistake the owner made was giving the builder more money as the job progressed than he deserved. When the defects in the roof were discovered, it cost far more money to repair the roof than the homeowner still had in her possession.

As you can imagine, this defective roof and other mistakes made by the builder are causing the homeowner great angst, frustration and money. Sadly, all the problems could have been avoided.

Days before this was a forest. The trees are gone, hole is dug and concrete will soon be poured for the new house foundation. Photo Credit: Tim Carter

The most important thing you can do when building a new home is to slow down at the beginning of the job and develop excellent plans and written specifications. Select every material and item you'll have in your new home. Avoid allowances. Allowances are frequently created by an architect because everyone's in a rush to get started. These budget items are hidden time bombs as the allowances are frequently unrealistically low.

What's more, a builder can say later that something you chose in the allowance he didn't plan for. He'll then charge you more money. By eliminating allowances you can get a guaranteed price for the home as the builder can't make excuses. During the bidding phase he'll study the plans and specifications. It's his responsibility to identify what he needs to do and how much it will cost. That's what professionals do.

Consider hiring an independent inspector to check the quality of the work as the job progresses. Don't rely on the government building inspector. Some areas don't even have building inspectors! Realize the building code is basically a set of minimum standards. Houses built to code are not necessarily well-built homes. If you hire this secondary inspector, be sure in your contract with the builder that your inspector's word is final and that he speaks on your behalf.

The contract has to have very specific terms with respect to payments. The best way to ensure that you don't get cheated by the builder is to have him submit with his bid a very detailed breakdown of all costs of the job. Both the materials and labor for each aspect are listed. The builder's overhead and profit are also listed. Years ago, I developed Contractor Hiring Guides that have all this information. They can be found at the AsktheBuilder Store.

You make each bidding contractor fill out this breakdown of costs. You can then quickly see if the costs for each item are weighted correctly. When it's time to pay the builder each month, you just pay him for items that are completed and satisfactory. This way you always have enough money to complete the job should he disappear.

You can watch a video that shows what's on a great set of blueprints at www.AsktheBuilder.com. Simply type "blueprints video" into the search engine at www.AsktheBuilder.com.

Column 942