August 1, 2012 AsktheBuilder Newsletter & Tips

Building the new shed at my house has consumed me. That's why there was no newsletter last week. Tremendous progress has been made in a short amount of time. Check out the photo!

Robert Moore & Tim in front of DIY Shed

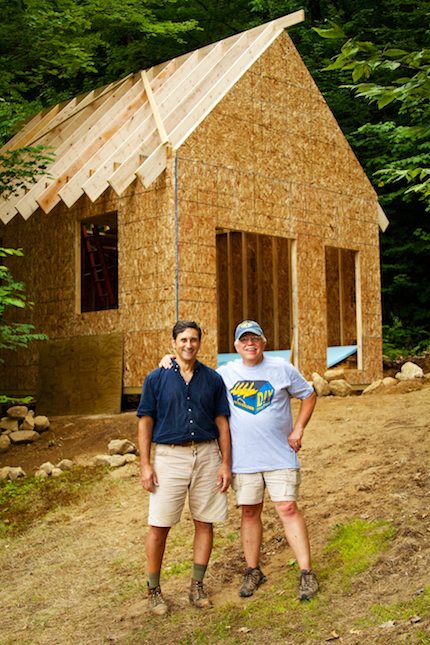
I'm standing with Robert Moore. He's an AsktheBuilder.com newsletter subscriber with extensive carpentry experience that came up from Towson, MD, to help me for nine days. The first day he was here, it was hot, humid, and all we had were eight piers staring at us along with eight very large holes in the ground that had to be filled in.

Robert's self-employed like I am. His day job is helping people with their PCs. He's a one-man geek squad! Don't let the Spartan appearance of his website fool you. He knows his stuff. Kathy and I discovered his Achilles Heel is ice cream - homemade chocolate ice cream made with hot custard.

The weather moderated and my good friends in Canada sent us some cooler weather! The cool air produced ideal working conditions with lower temperatures and less humidity. We only had one brief rain shower for 15 minutes that chased us away from the site in the first few days.

At the end of nine days, you can see what we got done. This week, if all goes well, I should have the roof complete.

Be sure to look at the bottom of this newsletter. I have a very fast Flash Sale on the entire set of videos that I'm creating. You do not want to miss out this time if you missed out when I launched the shed project on Kickstarter.


Tip of the Week - Ads and Mentions in This Newsletter

Have you ever wondered about bad or bogus products?

This is a reminder about product ads and write ups you see in this newsletter. I want you to know that I test and review just about everything I talk about. If I don't actually test it, I'll tell you.

But here's an example of what you don't see. A few weeks ago, I was approached by a company that wanted to buy ads in this newsletter. I asked about the product, and they told me it was a thing that saves money.

Look at the photo as it appears it's some sort of generator. It was some magical product that claimed to save you a huge amount of money on your electric bills. I actually think it's like the time machine in the movie Napoleon Dynamite. That was a funny scene indeed! Remember the crystals?

Here's a link to that funny movie scene.

Picture electric motor

My job is to vet stuff like this. I asked for a sample to be sent to me so I could test it. The company immediately stopped responding to me. They've not sent a unit to test, so that speaks volumes to me. Yesterday, I saw an ad for the exact product on a website I was visiting.

Simply put, I really value my integrity and will not accept advertising money unless I feel the products are of the highest quality. The products I mention here are ones I would use in my own home or on my own job site. Period.

I assume you want me to tell you about products that I would never use, right? If so, please REPLY to this newsletter and tell me.


Multi-Purpose Saw Tool

I received in the mail a Savage Folding Jab Saw / Utility Knife. It's a formidable weapon to have in your tool box.

When it's folded up, it's 7 inches long, so it's not going to fit in your pocket. This is why it comes with a soft-sided case that has a belt clip on it.

You can install, in seconds, any regular blade that you might put in a reciprocating saw. That's a big plus. The overall diameter of the tool is fairly substantial. I don't think it would fit well in a woman's hand, but I could be mistaken. The diameter is easily that of any framing hammer I've used.

All in all it's a fascinating tool as it gives you two tools in one. You've got a razor knife coupled with a jab saw that can be outfitted with blades to cut metal, wood or drywall.

This is a tool I'll use primarily for the jab saw function. It's just too big for me to use as my go-to razor knife. I LOVE my Stanley razor knife. I have several in case they ever think of discontinuing it!

Click the two links just below to see the Swanson tool and my absolute favorite razor knife.

Swanson Jab Multi Tool

My Favorite Razor Knife


DeWALT Saw Stand Video

Here's a video I taped a few days ago that you should like. If you've never seen this DeWALT miter saw stand, you'll be blown away.

Pocket Door Contest - Please HELP Pick the Winner!

We have our entries in the LE Johnson Pocket Door Contest!

Some are remarkable, and if you go look at the entries, you'll be treated to a video!

Click here to see them.

Please do me a favor and VOTE for a winner. It's easy to go through the entries. The link to the vote ballot is at the above page. Click that link just above.


Lumber Species

You may think that all framing lumber is the same. Framing lumber is that which is used to build floors, walls, and roofs. Trim lumber is the fancier lumber used for moldings, bookcases and other interior and exterior finish applications.

I believe to the average person framing lumber pretty much looks the same. However, if you look closely some of it is very different in color. Pick up two same sized pieces of lumber, but of different species, and you'll be stunned by the weight difference.

I was lucky enough to get the Southeastern Lumber Manufacturers Association to connect me with a New Hampshire lumber yard that stocked southern yellow pine (SYP). It's a fantastic lumber to use when framing.

If you compare it to other lumber, you'll quickly see how strong it is. It's also heavy. There's lots of dense summer wood in southern yellow pine. This contributes significantly to its weight.

Spend some time looking at span tables and you'll quickly see that SYP is almost as strong as Douglas Fir. I'm telling you this so that you know you have choices when building a structure. Some species of lumber are better suited for roof rafters and floor joists than others.

For more great information on wood, I urge you to visit the Real Outdoor Living website.


FLASH Video Sale

The sole purpose of my shed project was to create an authoritative step-by-step series of videos about building a shed.

I discovered after the fact it was a big mistake pitching the project that way. It's not about building a shed. It's about you saving Time and Money on any number of projects.

Maybe you just want to know how to install a door. Perhaps you want me to show you how to layout a wall. That's what all these videos are about. Hundreds and hundreds of tips. There are at least 30 different aspects or parts to the overall series. A partial list is just below. For the FULL list, just go here.

What I'm really creating is a collection of DIY videos that show you how to do any number of tasks. For example, would you like to know how to:

  • layout a simple foundation
  • excavate for a pier
  • install a concrete pier
  • frame a wood floor
  • install asphalt shingles
  • install an exterior door
  • install a skylight
  • etc.

You get the point. Watching all of these videos shows you how to build a shed. But just watch a few and you can see how to do one part of the project.

Here are two videos I taped while building the shed you can watch to see the kind of detail and teaching that's going on.

Awesome Concrete Pier Form

Cool Wall-Building Tip

When this shed project was announced here in the newsletter a few months ago, you could have purchased the entire series of videos for $30. That opportunity is now gone.

But for the next few days, you can invest just $50 for the entire series. That's an insanely low price. Why? When all the videos are done, each *part* of the series will probably sell for $7-9 each.

Since there are 30 distinct aspects of the shed-building project, you can see that if you purchased each video series separately, you'd spend over $200. Multiply 30 times $7 or $9.

Watch this video that explains what's going on.

Just watching ONE of my videos could save you $50. Heck, the one video that shows you how to expertly square up the floor would save you that in headache pills!

Originally, I thought there would be about 100 videos in the entire set. I was wrong. There will be many more. How many? I don't know. I already have about 60 completed, and I've not even finished framing the roof!

Here's what's going to happen. Each week, the price of the entire video set is going to go up. If you want the current best price, you need to act now.

Next Monday, August 6th, the price will jump to $69. Each week after that the price will go up as I add more videos to the package.

Act NOW and you get all the videos I create about the shed for just $50.

This sale ends on Sunday, August 5th, at midnight ET. Make sure you're one that gets the entire series for the $50 price. I can't ever imagine the price being lower. Invest in the series NOW to get this huge value that will save you time and money.

If you decide to make this investment, realize that you'll not get access to the videos until the project is COMPLETE. I envision you'll get access to the videos late in September. You need to be patient. I'll get the videos to you, but you need to let me finish the shed first. I can't create a video until I do the job, right?

Right now I'm too busy building the shed to help edit the videos and write the comments that accompany them.

DeWALT Saw Stand Tips Video

Hi, I'm Tim Carter and I want to talk about a really great saw stand. This is a tool accessory that you would use to mount a miter box saw, or really any type saw. Frequently, a carpenter would use a saw stand out in the field, in your driveway or anywhere they need to set up a saw. The stand is extremely helpful in keeping the saw stable and assists when cutting long lengths of wood.

This DeWalt Saw Stand is one of the best engineered tool accessories I have seen. If you knew how saws were setup in the old days, before saw stands like this, you would understand how great this is.

The stand is made of aluminum with folding legs. The saw stand has slotted rails for mounting the compound miter box saw and bolting it in place. It includes a bolt kit that will allow mounting of just about any saw. The mounting brackets can moved right and left on the saw stand to position your saw where you want it.

A great feature of this saw stand are the end supports. They slide in and out and are adjustable over a long distance. The end plate on the end supports is the proper height to match the table height of the saw. This keeps the lumber nice and lever as it is being cut. The end supports also provide a positive stop so you can repeat cutting lumber to the same length without measuring each piece.

Extending the end supports on both sides of the saw stand, allows cutting long pieces of lumber with the lumber fully supported.

Once you remove the saw from the stand, the legs collapse and fold down. There is a handle under the stand for ease of carrying it. The DeWALT 7232 Saw Stand is a remarkable tool accessory. And I highly recommend it.

You can see that these saw stands are great tools. You want to get one if your project calls for cutting a lot of lumber with a miter box saw. It provides a stable platform for your saw. Beats the upside-down garbage cans or stacks of lumber to hold the saw in the good old-days.

Saw Stand Tips and Options

DEAR TIM: I'm tired of setting my miter saw on a board balanced on two garbage cans. I'm looking for stability, safety and ease of use. What kind of saw stand do you use and why did you select it? What did you do before you had one? If you can't afford a fancy saw stand, what can you do to compromise? Oscar P., Woodbridge, VA

DEAR OSCAR: In the old days when I was a young buck carpenter, I did the same thing you did. I set my saw up on a 2x12 that was balanced between two overturned garbage cans. It was a crude method, but it worked. The hard part was creating a level platform where material being cut was at the same height as the table of the miter saw.

I've seen many different solutions to this problem over the years. Any number of carpenters have built their own platforms, tables, etc. to create a workstation at a job site. I'm sure many of these work well.

I graduated from the garbage cans to carpenter benches I used to make from scrap 2x12s. You could make these any height you wanted so they'd be comfortable, but the issue was always stability. As the bench got taller, it became very top heavy. Once you add a heavy miter saw to it, it became even more likely to tip over.

Then there was always the problem of uneven ground. If you had the carpenters benches set up on a lawn, construction site or anyplace where the ground was humpy, you constantly fought trying to keep the stand level and stable.

To cut long material, such as 16-foot lumber, you'd have to set up satellite carpenters benches that were tough to get into the same plane as the bench the saw rested on. I'm sure you can see the challenges.

This is the ultimate saw stand. It beats out setting saws on garbage cans and makeshift platforms. Photo Credit: Tim Carter

Recently I finally switched to a manufactured saw stand that undoubtedly came out of the mind of an engineer or two that's struggled like you, I and millions of other carpenters.

The aluminum stand I use has brackets that allow you to mount just about any miter saw to the stand. That's an enormous advantage. Attaching the brackets to a saw takes but minutes. The brackets are equipped with spring-loaded clamps that allow you to place the saw at an infinite number of positions on the stand. This comes in handy when you're cutting very long material.

The sturdy folding legs open wide at the base providing astounding stability. Once the stand is set up and all four legs are in contact with the ground or a floor, the saw stand is rock solid.

Telescoping supports that slide out from each end of the stand produce the needed support when cutting long material. These have been engineered so they are in the same plane as the flat table of the miter saw. No matter how high the flat table is off the stand, you can adjust the supports so they match that height.

These telescoping supports are engineered to act as material stops as well. They have brackets that rotate up or down allowing you to adjust them to act as a small wall. You simply adjust the distance of this stop from the cutting blade and it allows you to cut multiple pieces of lumber the same length without having to measure each piece. That's an enormous time saver.

The stand I use is affordable, but if your budget won't allow it, you can mimic what it does by creating your own wood benches that are more stable than the ones I made many years ago. The biggest issue you'll discover is the benches will become heavy and they'll take up lots of room in your garage.

There's nothing wrong using modern collapsible saw horses, a 2x8-foot piece of plywood, a few 2x6's and some hardware to create a temporary workstation that acts as a fantastic saw stand. If you think about this, you could create your own system that breaks down and sets up in minutes.

Some carpenters create saw stands where the saw is lower than the flat surfaces on either side of the miter saw. There's nothing wrong with this method at all. The flat surfaces on either side of the saw make for a superb work surface to ensure cuts are square and the material being cut is always stable.

The key is to create a system that can be put up and taken down in minutes, is not cumbersome, and ideally can be done by one person.

You can watch a saw stand video that contains secret tips at www.AsktheBuilder.com. Simply type "saw stand video" into the search engine at www.AsktheBuilder.com. There are MANY ADDITIONAL wall-building tips at www.AsktheBuilder.com.

Column 946

Pocket Door Contest Entries

VOTE FOR A WINNER: CLICK HERE

Here are the entries for the LE Johnson Pocket Door Giveaway.

Please read all the entries and then follow your heart.

If you vote for the person that really deserves the LE Johnson Pocket Door Hardware kit, your wildest dreams will come true. Seriously.

May the best entry win!

Tim Carter

For MORE INFORMATION about LE Johnson Pocket Doors, click here.

 
Donna Jones

I live in a 1969 brick home that I bought 5 ½ years ago. As a single person, retired, and a woman, it is expensive and difficult to afford the repairs and replacement items that are continually needed. The sliding bedroom doors do not stay in and I have taken one out afraid it would fall on grandchildren when they visit. I would like to one day make that closet a small bathroom. This is where I would like a pocket door. My bedroom is small and it would be nice to have extra wall to place bedroom furniture. I have plaster walls. So how does it work?


Kevin Shawler

Our door between our utility room and half bath is poorly designed for ease of functionality. A pocket door would be more ideal.


Jim Ruggierro

A pocket door should have been installed by the home builder in between the master bath and the master bedroom, but for some reason was not, so whilst one is lying in bed, and I or my spouse need to use the facility, there is a "straight shot - line of sight " to the "event" transpiring, including sound! I don't need a "150-word" explanation of why I would LOVE to have a little more privacy now and then for such occasions...


Ed Santos

I would love to build an extension onto are closet as her clothes are jammed to one side because she cannot reach that far back to make efficient use of the space. She is only five foot two and that is quite a reach for her. With a pocket door installed I can build a small platform in front of it so she can reach the top of the rack and won't have to stand on her tiptoes to reach the hanger. I know this is not a large opening but every little bit helps when you live in a mobile home. We are senior citizens so this may be the last thing I can do for her.


Joe Parks

My wife and I have lived in our house for 33 years and she has always wanted our pocket door replaced. I have replaced a lot of things in our house over the years and the pocket door is the only thing she has ever asked for, so this request for the door is for her. We are close to retirement and I am trying to update while I still can. Thanks so much.


Nony Capellan

We have 2 pocket doors and both are sticky opening and closing, one does not close fully and leaves a scratch line but do not know what causes. Something is wrong with the hardware, installation, or both. Would be very happy to get a good solution to the problem as we love to have a properly working pocket doors. Thank you and best regards.


Mona Greer

I would love to win this for my daughter as she owns her home and I don't ... can't install anything here where I live :(she has so many doors in her 3-bedroom home, installing a Pocket Door would be great. I absolutely love the pocket doors, if you've never had them, well you are missing out on a great invention. Would love to have them where I live, but like I said impossible, so I'm trying to win one for her. She would love it. When opened, they take up no space at all and you have more room to rearrange your furniture. Like in one of my bedrooms, I cannot open the door all the way back, because of the stupid door, have a night stand that will only fit one place and the door is in the way. So I am making the best of a bad situation, why they did not install pocket doors here, and why anyone would even build a home and not put pocket doors would be a big mistake to me. Please check into the pocket doors, try just one you will love them 🙂 Thanks Tim 🙂


Alice Thompson

Have tiny house and bathroom only 4 x 6. Also have disabled child in wheelchair. Pocket door would enable more access to the bathroom in wheeling in son for bath. Also think they look sophisticated. Would love to win!


John Thompson

Our family of four lives in a little cape in New Hampshire but we only have one bathroom. So you can imagine that our bathroom gets quite a bit of traffic having two children around the age of 10. So we would love to install a surface pocket door for our bathroom in our small cape. There is a small linen closet right inside the bathroom. When that linen closet door is open, it knocks into the bathroom door. To top things off, there is a short shower/tub wall that provides less than two inches of clearance between the door and wall. So those two doors and shower wall really makes it difficult to enter our only bathroom. Installing a LE Johnson surface mount pocket door would prevent many bruised knuckles and foreheads when entering the bathroom. Check out our video for a demonstration of the tricky door situation.


Lee Hemphill

This door used to be an outside door in which the previous homeowners installed a doggie door (we don't own a dog). Behind the door is a 7ft x 15ft room which is the laundry room and storage. Getting items in and out of the room is troublesome since the door takes up nearly half the width of the room when opened. It's hollow core and has unfortunately encountered a couple of mishaps where items piled in the laundry room fell on it and a family member tripped against it, resulting in holes in the door which I cannot repair. It's not only unsightly, but guests always think it's an exit door. A pocket door would solve the problem of space and guests would not try to exit into my embarrassing laundry room!


Sarah Yost

I have two reasons, one named Clara and one named Evelyn. Sure, they look sweet, but they're trouble. The older one (2) likes to open and close doors, often when the younger one (9 months) is in the path of the door swing. Putting pocket doors in the most frequented areas of the house will save untold amounts of money in ER bills. It will probably save my sanity, too, or whatever is left of it.


Heidi Halvorson

In 2007, our little town was devastated by a flood that involved 3/4 of the homes and businesses including my in home child care. As of yet, we have not had the cash or the energy to redo our basement where we had our bedroom and our son's. It has been almost 5 years and now it is FINALLY time to attack the basement. Yeah!! I am wanting to use 2 - 6 foot wide pocket type doors as dividers to create 2 walls in a portion of what was the living room. I want it to appear open, but when my disabled brother in-law comes to visit, he can close both pocket doors and have privacy for sleeping. The rest of the time, I would use that space for exercise equipment. I am hoping to win this contest so we can move on with our project. Thanks for considering our project.


Brent Clary

To be honest, I am really wanting to tackle this project for my lovely wife! I know that this would be a great addition to our living room. This is something that she has mentioned before and, until now, I was not sure how this could be possible. So please, "help an Aggie out" to win some brownie points!!


Miriam Cavazos

Ever since I was a little girl, I would get this "Oh wow!" expression on my face when I would see movies where pocket doors were closed- so dramatic! Finally at age 30, I purchased land and had a small home built. A pocket door would put the finishing touch on a dream accomplished by this single gal.


VOTE FOR A WINNER: CLICK HERE

How to Build a Wall

DEAR TIM: I've decided I'm going to build an outdoor shed using wood, but I've never built a wall before. It can't be that hard. Is it just a matter of banging together some studs and covering it with sheathing? What secrets can you share that will save me time and ensure that the job will get done right. The last thing I need is my wife and neighbors chortling as they see my flail around with a hammer and saw. Help me Tim, you're my only hope! Arlo E., Albany, NY

DEAR ARLO: The last thing we both need is you to be the laughing stock in your household and neighborhood. How about I transform you into a superhero? It's possible, but you need to really pay attention.

Building a wall for a shed or a house is not that hard, but then again, there are many places you can make a mistake. It's all a matter of how big your appetite is for margin of error. Some people don't care if a wall is out of square or uneven. Others, like me, expect near perfection, or as close as you can come to it working with rough lumber.

This wall was built in less than an hour by two people. But it took four to stand it up! Photo Credit: Tim Carter

Understand there are many ways to achieve your wall-building goal. You could talk with ten different master carpenters and get ten different sets of instructions. What follows are methods I've used to build walls that are square, plumb and level.

Let's talk about the basic components of a frame wall. You have a bottom plate, the actual vertical wall studs and the top plates. You may also have other larger lumber pieces used to create beams, or headers, over doors and windows.

The top and bottom plates should be lumber that's straight as possible. I prefer to build walls on the ground so I can nail through the top and bottom plates into the ends of the wall studs. If you attempt to build the wall in place, and I'll never forget watching a vocational education teacher do this at his own home, you'll be flailing and toenailing the studs into the bottom plate. Toenailing, while acceptable, is much harder to do in my opinion.

Use 16-penny sinker nails to connect the plates to the wall studs. These nails are generally 3.25-inches long and the shaft of the nail is about one-eighth inch thick.

The wall studs at each end of the wall need to be perfectly straight. Take your time and find these true studs. Using straight studs at the corners allows you to easily connect the walls together as you build your shed.

It's mission critical that the top and bottom plates be the exact same length. When I say exact, I mean it. The vertical wall studs need to be the same height. Doing this allows you to square up the wall on the ground before you begin to add sheathing to the wall.

Before you add the plywood or oriented-strand board sheathing to the wall, you must square up the wall. Failure to do this will cause you great headaches and embarrassment.

I chalk a line on the floor and then temporarily toenail the bottom plate to the floor making sure the edge of the bottom plate is just touching the chalk line. The nails must be driven through the bottom of the plate so that you can remove them after you have the wall sheathing applied to the wall.

Once the bottom plate is straight and secure, take out your tape measure and check the diagonal measurements of the wall. You do this by hooking your tape measure to the exact corner of the bottom plate at one end of the wall and stretch it to the corner of the top plate at the other end of the wall.

Undoubtedly the two diagonal measurements will be different. Gently tap the end of the top plate one way or the other until the two diagonal measurements are the same. When they are, the wall is perfectly square. Secure the top plate of the wall temporarily to the floor using a few nails. You don't want the wall to move as you apply the sheathing.

With the wall square, it now becomes easy to apply the wall sheathing. If the wall is not square, or the bottom and top plates are not straight, it becomes very problematic to apply the sheathing.

The wall sheathing is nailed to the wall studs with 8-penny nails. I prefer to use nails that are ring shanked. These have tiny ridges on the shaft of the nail which provide more surface area and create better holding power.

Once the sheathing is applied, you can remove all the temporary nails that were holding the wall to the floor. It's time to tilt the wall into position.

Be sure you have plenty of help when you tilt up the wall. It will be heavy. If it's windy, be very careful. The wind can easily blow the wall over. Brace the wall once it's raised up to prevent it being blown over by the wind!

You can watch a wall-building video that contains secret tips at www.AsktheBuilder.com. Simply type "wall building tip video" into the search engine at www.AsktheBuilder.com. There are MANY ADDITIONAL wall-building tips at www.AsktheBuilder.com.

Column 945

Concrete Deck Pier Video

Video - Concrete Deck Pier

This item was so good, I featured it in my June 19, 2016 AsktheBuilder Newsletter.

Below is the transcript for the above video.

Hello, I'm Tim Carter of AsktheBuilder.com. I want to talk a little about the piers. Specifically, about the forms to create them. Check these out.

I'm using this 12-inch diameter top and a base that flairs out to 18-inches. It is called Form-Footer and it is really an unique system. It comes as a kit and you just snap it together without the need for tools. It even comes with the reinforcing steel already cut and already bent. That is an enormous time saver if you are DIYer.

The base is 18 inches in diameter, then there is a reducer collar from 18 to 12 inches. The tower is two sections that snap together and the top is a ring that holds it all together and has two supports for the top of the rebar. In the base, the reinforcing steel is in a cross pattern, then there are two vertical bars. The vertical bars are held in place at the top and bottom for proper alignment during concrete pouring.

If you need to go taller, just add additional tower sections in case you need to set the base deeper into the ground due to your frost level.

Why is this form so much better? In the old days, you would have first pour a pad in the bottom of the hole and then use one of those cardboard tubes for your form. This needed extra time as the pad would have to dry for a day before you added the cardboard tube and arranged the rebar inside the tube. That all took time. This system is already to go right from the box.

Level the soil at the bottom of the hole, place this form into the hole, put a little dirt around the base to hold it plumb and you are ready to pour. Check into this system on your next deck or shed project. It is easy and quick, and no cutting of steel with a hack saw.

The next video will show one of these just set into the hole and a second one with the dirt around the base waiting for the pour.

Wall Building Tip Video

Hello, I'm Tim Carter of AsktheBuilder.com. I need to explain something that should have been explained in the last video.

You'll notice that not all the sheathing is on. This is the seam between the two top plates. One is 16-feet long and the other is 8-foot long. Now the top plate needs to be installed on the wall before the sheathing is installed. If you don't have this top plate on and when you go to lift the wall up, the people lifting the wall won't do it exactly at the same time and without the top plate, the seam will come apart. By putting on the top plate now, it locks the seam in place. In this case, I used a 16-foot 2x4 that goes back 8-feet from the seam in both directions.

One little tip. Notice that the top plate doesn't go all the way to the end of the wall. It ends 3-1/2 inches before the end. Just the size of a 2x4. This is done so the top plate from the adjoining wall overlaps and ties the two walls together. Be sure to allow room to tie your walls together. It makes for a stronger corner.

How To Foam Insulation Board Video

How To Foam Insulation Board

Hi, I'm Tim Carter from AsktheBuilder.com. I want to talk about little about closed cell foam insulation and how is can be used to insulate the floor system in a shed or out building that has a wood floor. There are two benefits from this product.

First, I am using the closed-cell foam insulation, 4-inches thick, in between the floor joists. Each inch has an R-valve of 5. In this application, the foam blocks are just pressed fitted into place. So to keep them from falling over the years, we installed pressure-treated blocks to support the insulation.

The other benefit of this product is it is a tremendous vapor retarder. Lots of moisture will come up out of the soil under the shed and try to get into the structure. This insulation will block that moisture.

Just be sure you cut it nice and snug between the floor joints and you will be good to go. So remember, closed-cell foam insulation is a great insulator for floor systems.

July 20, 2012 AsktheBuilder Newsletter & Tips

I made a mess of the building site where my shed is going last week. We had to dig the eight holes for the piers and oh my, what a mess! There were piles of dirt and rock all over the place.

Sometimes that happens. Because the site is so tight, there wasn't much room to put the dirt. Just about every ounce of it has to be shoveled back into the holes by hand. UGH!

My new friend Robert Moore from Baltimore, MD, arrived up here in New Hampshire to help me for about eleven days. In just two days, we got the floor frame complete and the floor joists in. If we really hustle today, we should get the treated plywood floor on. By end of day Saturday, we'll have walls up!

Speaking of messes, I made another one in last week's newsletter when I mistakenly said that Mt. Washington, in NH, is the tallest peak east of the Mississippi. Get out the fork! Time to take a big bite of humble pie! Pass the Cool Whip!

Bill Delaney, Mike Sullivan, Vivian Cancio, Donald Lee Shea, Phil Heaton, John Lund, Herb Daniel, Jeremy Wrenn, Steve Loyola, Daniel Strom, Timothy Peck, Michael Keener and Geoff Moore all politely *reminded* me that Mount Mitchell in NC is the highest peak east of the Mississippi. Thanks for catching that! Mt. Washington is the highest peak in the Northeast and home of the notorious fierce weather.

Planning App

When I do an autopsy on mistakes on jobs, as I did last month down in Antigua, in almost every case the mistakes can be traced to poor plans.

Chief Architect has come out with a free app, for now at least, that helps you plan a house or just a room. For years, this company has made fantastic planning software - I've tested it - so this app should be stellar.

If you have an iPad, go get the planning app now. It's FREE.

Repairing Potholes in Asphalt or Blacktop

If you live in a place that gets freezing weather, then you know all about potholes. Roadways can be filled with them, but so can your driveway.

You can make permanent repairs to blacktop with cold-patch blacktop that comes in a bag. Yes, it's absolutely possible.

The folks at Quikrete created a video about this, but I don't agree with one thing in their video. They say to " ... overfill the pothole by 2 to 3 inches ....." I've used these materials in my own videos, and I've never seen them compact that much.

I made my video years ago and intend to make a new one. I'll be trying out the Quikrete product for sure, to see if it actually compacts that much.

If you really want your patch to never come out, I have a secret trick for you. Both my video and the Quikrete one do NOT mention this secret.

When you're doing your preparation work, make the bottom of the hole wider than the top. Think of a dovetail joint in woodworking. When the patch material hardens, it simply can't lift out of the hole because it's locked in place. This is why amalgams and tooth fillings hold in your teeth. Dentists make sure the hole is wider at the bottom of your tooth than the top.

Last Call for Pocket Door Contest!

Do you want a chance at winning a FREE Pocket Door Hardware Kit from LE Johnson? If so, you have to tell us why. Your chances of winning improve greatly if you also submit a photo and even a video!

Go here to enter this contest.

Special Shed Shout Out!

As the shed-building project is now in high gear, I want to share each week some material tips with you. As you build things, I want you to use things that will last!

Last week I had the pleasure to use for the first time a great plastic form for the concrete piers. It's call the Form Footer. I saw this product last October in Chicago at the Remodelers Show. I knew then it would be easy to use, and I was NOT disappointed. What I really liked was the 1/2-inch rebar came with the form already CUT and BENT! You don't need any tools to get this product assembled.

Let me tell you, cutting 1/2-inch rebar is no easy task, unless you have a great recip saw and the right blade.

Two days ago, Robert and I installed lots of Simpson Strong-Tie joist hangers and corner supports. We used a combination of the special Simpson joist-hanger nails and screws. My trusty DeWALT cordless impact driver did a stellar job of driving the screws.

The day before we used Simpson's special hold-down anchors to permanently lock the treated 6x6 posts to the concrete piers. I've used Simpson Strong-Tie framing connectors for years and have always felt they are a superb product.

I rate both products 5 hammers! That's as good as it gets! Next week I'll have a super video for you to watch about Dow closed cell foam insulation. I'll also be telling you about the benefits of Southern Yellow Pine - especially for wood-floor systems.

Camper Gets Interior Make Over

"My husband and I bought a gooseneck camper in 2011. It was an old camper and had carpet on the walls and ceiling of the sleeping area. The first time we used the camper, I could not breath while in the sleeping area. I had some kind of reaction to something in the carpet. I was so stuffed up and my chest felt tight like I could not get air.

So later I had some teenage grandchildren pull the carpet out. I did not take any pictures of the carpet in the camper. I have a picture of the carpet removed and of what I did to insulate and finish the camper.

I used a foam board that had foil on the outside and has a good R value. I also glued the stuff to the ceiling and walls as the camper is fiberglass. I was afraid to use anything but glue because of the possibility of cracking or putting holes in the outside shell of the camper and making it leak.

The window frames were tricky because the stuff I was using was much thicker than the original carpet. I removed the window frames and made little risers out of half inch strips of wood that I painted and screwed to the frames.

I am pleased with my work and so is my husband. I can sleep without breathing problems in the camper now."

Joy Davis

The inside of the camper before starting

Insulation is being installed as well as the Wainscoting

The finished camper interior

If you want to submit pictures and the story behind your project, CLICK HERE to go to the Before & After Submission Page.