DIY Shed Project – How to Build a Shed Video

Hi, I'm Tim Carter from AsktheBuilder.com. It is July 4th and I am excited about starting the shed project. I want to give you a little tour of the shed construction site.

I was wearing the DIY Shed t-shirt, but didn't pan down far enough for you to see the logo.

First on the tour is the framing lumber. It has been onsite for a while and I just uncovered it so you can see it. In the back is the blue Dow closed-cell foam insulation that will be used to insulate the floor of the shed.

I will try to tape as many videos as possible from my point of view. Therefore, you will see things as I see them.

This is the stack of shingles already on the job site. The orange form behind the tree is a form for the footer. Up in another tree is the web cam that is pointed directly down on the shed construction site.

The site has several small trees that will be removed as we begin construction. So there is a quick overview of the shed project.

July 3, 2012 AsktheBuilder Newsletter And Tips

Happy Birthday America!!

You could be on vacation right now. It's one of those crazy weeks where a holiday falls smack dab in the middle of the week. As such, this is going to be an abbreviated newsletter.

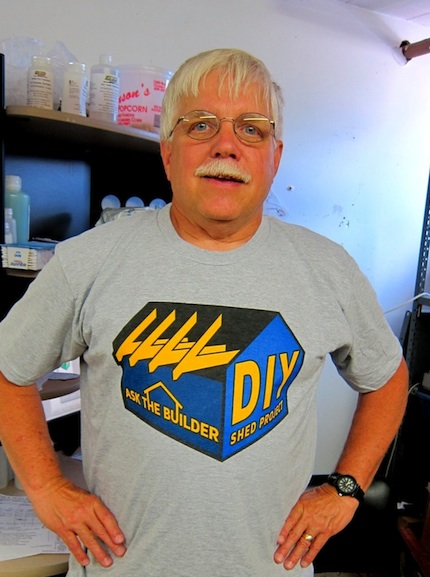
Unfortunately, I'll not be resting on the 4th of July as I'm gearing up to start the shed project! Many of the materials are here, and I intend to break ground next week. This week, I'll be taping the planning, site work and layout videos. If everything goes per plan, next Tuesday - July 10th - I'll be working with a 12,000 pound excavating machine leveling the site and digging the holes for the piers.

An hour ago, I went and gave the okay to the T-shirt printer. He printed off one shirt to make sure the colors were fine and that I liked the look. If you backed my shed project on Kickstarter and chose an award that includes the T-shirt, this is what you'll be getting.

DIY Shed Project T-Shirt

I'm thrilled with what Craig Grant, a graphic designer from Atlanta, GA, did the logo for the project. You can see some of his other work at: www.copynumberfive.com


Tip of the Week - Roofing Consult in Antigua

This week's tip comes to you in story form. I think you'll find it interesting. This is a MUST READ if you're thinking of starting a big project soon. You could easily get into trouble.

Last week I was in the West Indies in Antigua. I was hired as an expert witness by a property manager. The job was to do a forensic inspection on a leaking roof. The house was built up against the sea, and it was a magnificent place to be. As you might expect, it was HOT and HUMID. I was on the roof in the morning, but even getting off the roof before 11:00 am, I was exhausted.

While up on the roof, I taped videos of the mistakes made by the builder. You can see one of the videos in my One-Day Consult product in my shopping cart.

http://shop.askthebuilder.com/one-day-consult/

After getting off the roof, I combined all of the videos I shot into one giant video that showed all the errors. I then compiled a written report for the property manager. I even burned 3 DVD's there so the attorney and judge for the case could see the defects without having to try to visualize them reading a confusing written report filled with technical jargon. By using video, it's just like you're up on the roof with me. Plus, the video camera doesn't lie or spin the facts as some experts have been known to do.

The dispute between the owner of the building and the builder has been ongoing for the past four years! I'll have to go back to appear in court late this year or early next year.

I'm telling you this so that you don't become a victim of poor workmanship. All the mistakes I uncovered could have been avoided with minimal effort. My inspection turned up the following mistakes:

  • poor plans and written specifications
  • homeowner placing too much trust with the builder
  • lack of proper inspection of the work
  • builder deviated from plans
  • wrong materials were used for the climate and conditions
  • homeowner advanced the builder too much money

There were other flaws, but those are the most egregious ones.

What's the takeaway for you? It's simple. You MUST have great plans and specifications for any job you intend to hire out. The plans and specifications should be so detailed, the builder should never have to ask you a question. He knows everything you want, exactly how it should be built and exactly what materials should be used.

As the project is happening, If you don't know what to look for during the job to make sure it's RIGHT, hire someone who can. There are great private inspectors out there. I would hire one with the ASHI certification.

You must never, ever, ever pay money up front or advance too much money on a job HOPING everything works out. Don't allow Jedi mind tricks spewing from the builder's mouth lull you into giving him money he doesn't deserve just yet.

Deposits: The only time a deposit is acceptable is when the material for a job is custom ordered. It's unrealistic for you, the homeowner, to expect a company to order the custom materials HOPING you'll buy them when they do arrive. NEVER advance money to a contractor for materials if the materials are STOCK items at a local store.

If a contractor doesn't have enough money to buy the materials himself, and/or doesn't have a charge account at the supply house, that should be a giant flashing red light to you.

Affidavits - Legal Receipts: Before you pay money to a builder, you must obtain signed, notarized, etc. affidavits that are legal documents that protect you from liens.

Talk to a fantastic real estate or contract attorney to familiarize yourself with all of the laws of your state about contracts, liens, affidavits, etc. Spending one hour with an attorney getting a copy of your state's Cliff Notes about what to do BEFORE you sign a contract will be the best money you'll ever spend on a big job. All too often people go to the attorney AFTER they're in trouble.

I don't heavily advertise that I do consults like this because they're so time consuming. What's more, if you have to travel any distance a three-hour flight can easily turn into a 12-hour nightmare. Read about my American Airlines Flight 673 to Antigua last week. Jeesh.

http://www.timcarter.com/american_airlines_flight_673.html

The consult price may take your breath away, but it just boils down to time. Talk to any attorney and you'll quickly discover that an expert witness gets a minimum of $200 per hour. The three days to do your consult, including all the expenses to get there and back, is actually a bargain for what I charge.

http://shop.askthebuilder.com/one-day-consult/

If you just need help on the phone, I do that as well. That's not as costly and sometimes I can get you out of trouble in just 15 minutes.


Privacy in a Wide-Open Space

Have you been in a home that has a large archway between two rooms? One that allows the two rooms to act as one large room? This architectural feature was commonplace in homes built in the early 1900's. There are tens of thousands of them in some of our older cities.

In Cincinnati, OH, where I worked my entire career, neighborhoods like Hyde Park, Pleasant Ridge, Clifton, Avondale, etc. were loaded with these houses. But most had something at each of these openings that created privacy in about ten seconds.

Pocket doors - In seconds you could pull out two pocket doors from either side of the archway to create instant privacy.

LE Johnson Pocket Doors

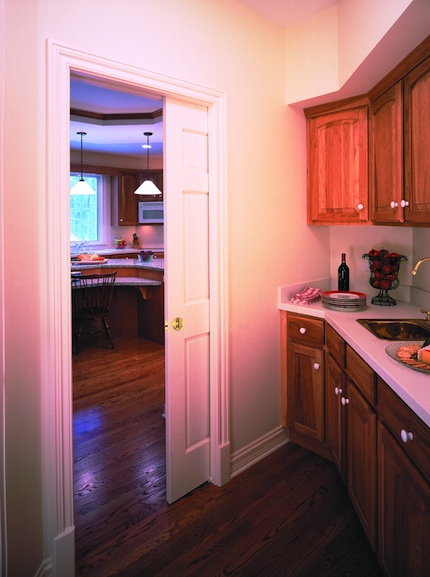
I've had pocket doors in many of my jobs and I had several in the last house I built for my family. They are enormous space savers and they are attractive. I love how the doors hide away until such time as you need them.

You may be a person that's heard bad things about pocket doors. How the rub, how they jump off the track, how they are flimsy. Well, if you use LE Johnson hardware and frames to install the doors, you never have a problem. I mean NEVER.

Are you getting ready to remodel? Build a new home? You absolutely MUST go look at all the different photos of how pocket doors can be used in a home. PAY ATTENTION to the types of doors that are being used in each situation! One door has fifteen panes of glass in it! Another door has a giant pane of frosted glass. Would you install that door in that room? Check it out!

You can use pocket doors between just about any room, for a closet, and in a situation at a large archway where two pocket doors meet in the center! Would you like to win a pocket door kit? How about a contest?

REPLY back to me saying, "Tim, I want you to run a CONTEST to give away a free pocket door kit." I think I might be able to make this happen, and we can have some fun with it along the way!

http://www.johnsonhardware.com/pdgal.htm


New Tool Conferences - Milwaukee and Bosch

I've been absent from your email boxes for over two weeks because of an insane travel schedule. A little over two weeks ago, I was in Milwaukee and then Chicago for five days total.

I was fortunate to attend the annual conferences the two manufacturers put on. Unfortunately, there are many tools still under an embargo so I can't talk about them. But here are a few things I can share.

Milwaukee has had a heated jacket out for years. This may not mean much to you if you live in Florida or Southern California. But if it gets cold where you live, can you imagine having a heated jacket powered by a small lithium-ion battery that's hidden in a side pocket of the jacket?

Milwaukee Heated Jacket

Now Milwaukee has improved on the jacket and offers it in a High-Visibility and black model. It has extra storage pockets, is water resistant and comes with controls so that you can adjust the jacket temperature to whatever the outdoor temperature is. This jacket works with the Milwaukee M12 system giving you 6 hours of run time. If you use the M18 batteries, you can get 18 hours of run time!

The jackets will be available in red, black, camouflage and the new high-vis color!

Bosch unveiled a sophisticated laser leveling tool that shows you high and low spots on a floor. This tool is perfect for those who want large ceramic tile or hardwood floors to be in the same plane with no humps or dips.

Bosch Floor Laser

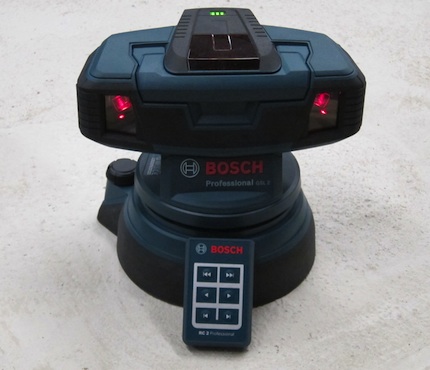
It's ingenious how the tool works. It projects two laser beams like spinning tilted saw blades. These beams cross over one another creating a three-dimensional letter X. Where the two beams intersect at the center of the X, that means the floor is in the same plane. But if you see two parallel lines out on the floor that means the floor is high or low where the lines are not one.

You use a special target you set on the floor at the parallel lines that tells you how high or low the floor is!

Perhaps the biggest news - as far as I'm concerned - is the advancements in technology that are allowing the tool manufacturers to get the performance of an 18-volt cordless tool from a 12-volt tool. That's huge.

I also discovered there are vast differences between the cordless batteries from one manufacturer to another. Just because a cordless tool battery says lithium on it, don't let that send a tingle up your leg. There are so-so lithium batteries and there are GREAT ones. I wrote a quick column that highlights what the best batteries have in them.

https://www.askthebuilder.com/cordless-power-tool-batteries/

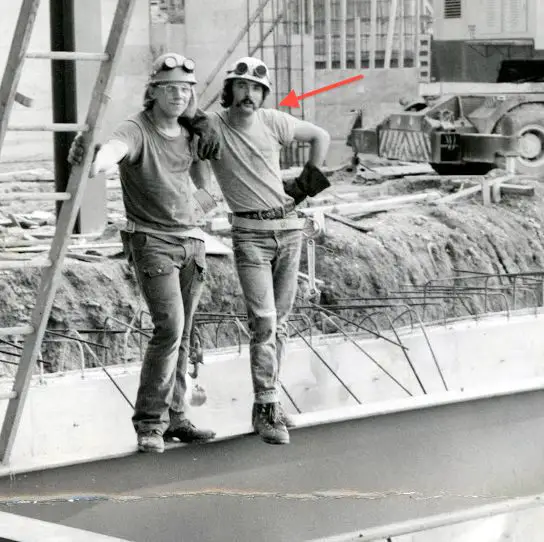
While at the Milwaukee Tool Conference, they asked for a few volunteers who have worked in the field. Most of the people who attend these conferences are hobby bloggers and only a small handful actually have any hands-on experience working with tools for a living.

Tim doing high steel work.

I have worked out on structural steel, so I volunteered. Here's a photo of a much thinner Tim Carter with more hair when I was working on the steel.

Tim and Mike Wilson

Failed Deck Sealer

Three years ago, I sealed my dock with a great clear water repellent. It did a fantastic job of repelling water, but the wood turned gray pretty quickly. I tried to remove the sealer a year later, but it really was holding on well to the cedar decking.

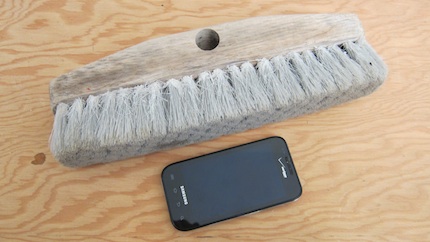
Before I left to go to Antigua, I was using a scrub brush on a pole on the dock to remove some duck droppings. Lo and behold, I was easily able to scrub off the deck sealer! After three years of sun and rain, it finally broke down.

I'm sharing this just to let you know that you need to be careful when you clean existing sealed decks. If you scrub too hard, you could remove the sealer - especially if the sealer is a less expensive one.

Cordless Power Tool Batteries

DEAR TIM: I'm considering getting some new power tools and wonder if the cordless tools I see really live up to all the marketing hype. I find it so hard to believe that a battery-powered tool can deliver the torque and power that I'd get from a traditional power tool powered by 120-volt electricity. I used a cordless tool years ago and the battery just didn't last long and it seemed weak. Do you own cordless tools, and more importantly, do you use them for tough jobs? Alicia M., Boulder, CO

DEAR ALICIA: I've got news for you. You absolutely want to give cordless power tools a serious look. Don't allow your past experience with cordless tools to taint the performance of the new tools. There have been enormous advancements in battery and tool technology that make these new power tools serious contenders.

First and foremost, I own a wide assortment of cordless power tools. I've had them for nearly two decades. I'll agree that the first generation or two of cordless batteries left me hopeful for better performance. I put up with lackluster performance to be free of the electric cord in certain situations.

Here's an example of the latest cordless power tools. Just a week ago, I used a powerful cordless impact driver to remove a few porch railings on a lower deck of mine. To do this job with a traditional corded tool, I would have had to drag to the back of the house a long extension cord to provide the power. For safety's sake, that cord would need to be plugged into a GFCI outlet to protect me in case the dew from the grass tried to short out the cord or the tool.

Instead, I grabbed my cordless impact driver and was working within seconds with no fear of electrocution. I didn't have to waste the time or energy futzing around with a power cord. Suffice it to say the railings all came off and the battery was not exhausted at all. My cordless impact driver is a must-have tool for me.

The latest technology in cordless tool batteries is lithium. This natural element is the lightest of all metals, and it's rapidly become the gold standard of cordless battery anatomy. You'll find lithium in the battery cells of the top cordless tools that you look at.

But there's much more to it than just what's inside the battery cells. Leading cordless tool manufacturers build their batteries differently than others. Heat buildup in a cordless tool battery is not good for the battery. This is why certain manufacturers go to great lengths to design the inside of the batteries so the cells are slightly separated, nest in trays to create an air space and are heavily protected from damage in case you drop a battery pack.

This is what the inside of a typical cordless tool battery looks like. The round cylinders are not rolls of coins. Those are the actual power cells. Photo Credit: Tim Carter

Furthermore, the leading tool companies have started to include electronics in the form of tiny circuit boards that help manage the power output of the batteries so that the tool motor is protected as well as the batteries. The tools are smart and have internal protection in case you try to work the tool too hard. Cheaper cordless tools will actually burn up in your hands because they don't have this overload protection.

The fascinating thing about the cordless tools and the batteries is that two tools that look the same and have the same voltage can produce strikingly different performance results. This is why it's imperative that you take the time to read high-quality tool reviews that cut through some of the marketing hype.

I can tell you for a fact that the internal electronics that are found in some cordless tool batteries absolutely enhance their run time and the actual power delivered. Realize that to get maximum run time and power, you have to couple the battery with a state-of-the-art motor that doesn't waste the battery power.

As with most things, you'll quickly discover that the sales price of the tool will almost always communicate to you which tool has the best batteries and internal components. It costs money to create a great cordless tool motor and a battery with the latest technology. That's why the top tools cost more.

Less expensive tools often may have the magic word lithium on the box, but that doesn't mean the battery is the best nor does it mean the tool possesses a sleek motor that will perform for years with no burn out.

The higher the voltage of a cordless tool, the more power it has. That's a fact. But here's the amazing thing. I recently was at a tool conference where a 12-volt cordless tool performed as well as an 18-volt tool. It's all a matter of how the motor, electronics, gearing and battery are combined. Twelve-volt cordless tools might be perfect for you because they are lighter in weight and fit the hands of a woman better.

If at all possible, try to watch videos of the tools in side-by-side tests. Try to see if you can use a cordless tool at a store before you commit to buying it. Read independent tool reviews that address battery life. Look for batteries that have fuel gauges on them.

One thing is for sure. If you spend the money on a high-quality tool, you'll get the power you need and long battery life.

You can watch videos of cordless power tools in action at www.AsktheBuilder.com. Simply type "cordless saw drill" into the search engine.

Column 941

June 12, 2012 AsktheBuilder Newsletter & Tips

I've been holding off on two projects here at my house this past week because of the never-ending rain. The rain clouds went away, and this past weekend I cleaned my lower deck and washed down the siding on the house. Kathy is very happy!

I discovered years ago a fantastic brush I use to wash down painted wood siding. It's a brush made to wash RVs and large trucks. The bristles are tough enough to clean away dirt, long enough to match the profile of what you're cleaning and soft enough so they don't scratch glass or painted surfaces. Here's a photo of it.

Long Handle Brush

I don't have a brand name of my brush, but the closest brush like it I could find on Amazon is the Camco 43633 RV Wash Brush with Adjustable Handle. My brush is so important to me, I have it stored in a special location in the garage so it doesn't get damaged or lost.

On another note, last week I sat for the exam for my General Class Ham Radio License. I'm proud to say I passed with a 94%. This means I now have privileges on several high-frequency radio bands that allow me to talk with people all over the world.

I know what you're thinking. "Tim, you can do that with Skype for free without a license." But when the Internet is down, there's an emergency, etc. I'll be able to communicate while the masses will be in the dark.

That's why you should consider getting into the hobby.

Tip of the Week - Pipe Dope

Three weeks ago, a good friend had several leaks develop on new shut off valves that were threaded onto male adapters. He had used Teflon tape to prevent leaks. Well, he ended up with some leaks.

I'm a master plumber, receiving my license back in the 1980's, and I gave up on Teflon tape long ago. If you don't apply it just right, you can have problems. I've always preferred using pipe dope or pipe thread sealing compound. The pipe dope I use contains Teflon.

Pipe Dope

Pipe dope is a paste you apply to the male threads of a male-female threaded connection. You don't need much, but you should completely coat the male threads.

I've NEVER had a leak when I've used this compound. EVER.

Groupon ALERT

Do you use Groupon? Be careful. A close friend called me on Friday. He felt his girlfriend in San Francisco got hoodwinked with a classic bait and switch.

She bought an $89 deal where a duct cleaning company said they would clean her air ducts. The company shows up, cleaned the SUPPLY ducts only and then tells her, "If you want your RETURN ducts cleaned, that will be an additional $300.00."

Under pressure to make a decision, she gave them the extra money.

I don't have access to what the wording was in the Groupon deal. It's entirely possible the written offer said that only the supply ducts would be cleaned, and in fine print said there may be additional charges. If you decide to use Groupon or any other online coupon crowdsourced deal, read and understand the offer.

When it comes to duct cleaning, you don't just clean part of the ducts. It would be a waste of time. You clean all of them.

Milwaukee Drill/Driver and Grinder Videos

Please watch these short videos:

Milwaukee Half-Inch Cordless Drill/Driver

Milwaukee 4.5-Inch Grinder

Kickstarter Shed Video Project Summary

I want to thank you for supporting my first Kickstarter project - assuming you were interested and were able to pledge. I received many emails from folks who wanted to help, but couldn't. I totally understand. The project is now closed and you can't pledge or donate to it.

Here's the good news. It was a learning process for all of us - especially me. I've never done a project on Kickstarter, but can tell you I'll be doing many more. See below what Project #2 will be.

I goofed up on the rewards for this first one. Future projects will have the rewards set up differently. Once a project is launched on Kickstarter and one person chooses a certain reward, you can't go in and modify that reward. You can create new rewards as the funding is happening, but that can get tricky.

Next time the rewards that have videos will be priced closer together. I don't know what I was thinking in this last project. In the future, one reward might be a fun one including all the bloopers that happen during that project. It's easy to get flustered or tongue tied while on camera. I'm sure in this shed project, there will be plenty. I'll create a blooper roll for that.

I've also decided that the project funding time is going to be no more than two weeks. That's plenty of time for you to decide you're all in.

Creating great rewards is challenging. That's why next time YOU will be part of the process. Yes, you're going to help create the rewards. I'm looking forward to that!

I can tell you the next project will be rebuilding a ceramic tile shower - Start to Finish. That video series will have some incredible detailed ceramic tile instructions.

Last Minute Father's Day Gift Ideas

Do you need a hint on some gift ideas for your Dad? Or, are you a Dad that likes to leave hints?

Here are two:

Do you want the tool storage solution I use in my garage and work area?

Or how about a RotoSaw? This is a really handy tool that allows you to make precision cuts. It's a combination of a small router and a jigsaw in one tool. That's the best way, I feel, to describe it.

Need more ideas? Use my Gift Guide! Yes, I know it says Christmas on it. The suggestions and links are still good. Go ahead, download it and get something nice for your Dad now.

Handyman Work

I received an email from an out-of-work craftsman last week. It's a long story, but I told him about a friend of mine who retired to the Del Webb community in Hilton Head, SC. Two or three days a week my friend helps a neighbor. This neighbor started a robust handyman company doing minor repairs and painting for many in the community. In fact, the Del Webb community is so big there are several competing handyman companies that are operated by residents who live in the community!

With the Baby Boomer population starting to swell and retire - well some are retiring, I'm still working and will be for a while - there's a huge opportunity in your city or town.

If you have some skills and are looking for work, think about this: Would you be interested in me hosting a live online TV course about Handyman Businesses? If so, REPLY to me and let me know. I can make it happen pretty quickly.

Australia Stain Solver

Do you live in Australia? Reply to me if you want to buy Stain Solver in Australia.

Cleaning Tip of the Week - Picnic Coolers

Friends of mine are already camping and July 4th is around the corner. Is your picnic cooler grungy looking, smelly or ???? You don't have to buy a new one.

You can make it like NEW and smell fresh with Stain Solver.

Password Tips

Last week I had a conversation with a very good friend of mine - Leo Notenboom. He operates the great website: www.Ask-Leo.com.

Leo produces a fantastic newsletter each week like this one, but it's all about computer stuff. If you're a PC user, Leo's got you covered. He doesn't delve into Apple or Mac issues. If you use a PC, you *need* Leo's newsletter. But I digress. I have Mac newsletter tips for you too, as I use a Mac. But that's another week.

Leo and I were talking about passwords because of hackers trying to get into my website. At the server level, you can see this happening. They haven't gotten in *yet*, and we're trying to make it very tough for them.

Undoubtedly, you have to use passwords for all sorts of things you do online. The discussion turned to what should I be doing at AsktheBuilder.com. Here's exactly what Leo said. Understand there was discussion in front of what you're about to read, but it's not that important.

What follows is the best part of the conversation. What you're about to read is VERY IMPORTANT. I can tell you that I've already changed many of my passwords to the type Leo describes below. Here is part of what Leo said to me:

"S0meT1me" is a much better password. One type of attack (dictionary) thwarted. However there are 221,919,451,578,090 possible combinations, and a brute force attack from an offline compromise (of the LinkedIn variety) could crack it in probably under an hour.

"--S0meT1me--" is WAY, WAY better. How much better? 546,108,599,233,516,079,517,120 possibilities, and using the same calculation that got me the "under an hour" figure above now returns 1.74 thousand CENTURIES. And yet it's JUST as easy to remember.

There's actually a strong argument that says:

----password----

(16 characters, the word password preceded and followed by 4 repeating, arbitrary characters) is even more secure. 21,930,887,362,370,823,132,822,661,920 possibilities and almost 70 million centuries.

BOTTOM LINE: when in doubt go long.

So there you have it. Think about your passwords.

Enjoy the rest of your week!

Tim Carter

Founder, www.AsktheBuilder.com

Do It Right, Not Over

How To Use a Pressure Washer

DEAR TIM: I want to rent a pressure washer to clean any number of things around my home. I intend to clean my composite deck, my patio, my driveway and wash down my house that has a combination of wood and vinyl siding. I’ve never used one before. Are they hard to use? Can you share some tips so I don’t hurt myself, my husband, my pets and my house? Peggy M., San Jose, CA

DEAR PEGGY: I’ve used pressure washers for years, and I'm here to tell you they're magnificent tools. When used to clean things that can withstand the pressure and power from the tip of the wand, they're enormous time savers. The famous line from the movie Spiderman, "With great power comes great responsibility.", describes much of what you need to know.

I actually don't think many people realize the enormous force that's generated at the tip of the wand where the water spray exits. Depending on the power of the machine you rent and the tip you use, the water stream can etch and erode concrete. That should help you understand what it can do to human or animal tissue, composite decking, wood, vinyl or any other material that's softer than concrete.

In other words, you must have a healthy respect for the machine and what it's capable of doing to you, your pets or your possessions. I can tell you that I'd spend the first 15 minutes testing out what the machine does on things you're going to throw away.

It's vital that you keep pets indoors so they don't think the spray wand is a play toy. My dog loves to play in water and thinks that the pressure washer is a great thing to be around. Not only is the sound from the gas engine hard on her hearing, the spray from the want could blind her or cut into her skin in less than a second. The same holds true for you and your husband. Never point the wand at an animal, human or plant.

You need to wear safety glasses or even goggles for full eye protection. The blast of water aimed at a driveway or patio edge can shoot up sand, rocks or dirt directly into your face. Paint chips from siding can fly into your face. This happens without warning. If you rent a gas-powered machine, wear ear muffs or great ear plugs.

Be sure you understand how the machine works. Many pressure washers depend on the incoming water from the garden hose to cool the pump that creates all the pressure. If you have the pressure washer on, but no water is flowing through the wand, you can damage the pump. Read the owners manual or any quick-start guide the tool rental business provides.

New pressure washers typically come with an assortment of tips for the wand. These can range from 0 degrees up to 40 degrees. The lower the number, the more concentrated and dangerous is the spray of water. I would start cleaning the house siding with a 40-degree tip to see if it achieves what you want. You'll probably have to use a 25-degree tip to get good results.

Never aim the spray wand up as you clean siding or aim it at cracks where siding butts up against windows, doors or any trim boards. You can drive water deep into these cracks and cause leaks or damage to your home. Never aim it at vinyl siding overlap seams such that the water stream gets behind the siding.

Remember, siding is installed knowing that Mother Nature's rain aims down not up. In rare instances rain may be horizontal, but almost never does rain blow hard in an upward fashion. It can happen because of the shape of roofs and dormers during violent wind storms or hurricanes, but it's not normal.

The last time I cleaned my own composite deck with a pressure washer, I damaged it. I was fatigued and not paying attention. I was also in a rush. For about one second, I got the tip too close and it sliced into the deck board. It's impossible to repair that damage. It's a good thing it's in an out-of-the-way place that I can hide with a few potted plants.

It only took two seconds to cause this damage to the composite decking. Photo Credit: Tim Carter

Realize that pressure washers can readily peel paint from just about any exterior surface. If you want to use it for this purpose, hold the spray wand so the stream of water attacks the paint at a very low angle. The spray wand would be nearly parallel with the painted surface.

Never allow children to play with a pressure washer. These machines should be in the same category as handguns or rifles. They're that dangerous when it comes to children and what harm can result if this tool is misused.

You can watch a video showing you the components of a pressure washer and how to use it at www.AsktheBuilder.com. Simply type "pressure washer video" into the search engine.

Column 939

Replacement Roof Job

Bill Leys sent in pictures of a roofing job that his company did in California. A condo building had a leaky roof. Well, I will let Bill tell the story.

"Hi Tim,

Here's a job done by my company, Central Coast Waterproofing. We are specialty contractors out of San Luis Obispo, CA. We travel the state repairing and waterproofing roof decks over living space.

This job is a 30 unit condo building in the Los Angeles neighborhood of Brentwood. It's 3-years old and the tiled roof deck originally installed leaked from the first storm after the building was occupied.

The developer's insurance company paid to have the tile and mud bed and waterproofing removed to the plywood, all new flashings, scuppers and floor drains were installed. Then we installed Hill Brothers Chemical Co. Desert Crete pedestrian traffic coating to 3500 square feet of area. Then we stamped the waterproofing to look like tile. Desert Crete is an ICC-ES evaluated decking system that is Class A fire rated as a roof and is One Hour Rated as a fire barrier between ceiling and roof.

The general contractor was Cal Building & Maintenance of Hawthorne. Shortly after the completion of the work, Los Angeles received some of the worst rain in recent years (March 2011) and the roof passed the test! Not one leak occurred."

Bill Leys
The Deck Expert

Thanks, Bill. Below are four before and four after pictures of the roof replacement.

If you want to submit pictures and the story behind your project, CLICK HERE to go to the Before & After Submission Page.

As a follow-up to this older story, read the Roof Replacement Costs column. It includes pricing from 2021 for roof installation and/or replacement.

Patrick Klever’s Basement Renovation – Part 1

"Thanks! I'm a civil engineer in construction management, and my home is where I get to play, doing the things I would otherwise only supervise! LOL

While in college, I figured out that if I didn't have to worry about money, I would've designed and built houses for a living. I have a long-standing principle that the difference between C+ and A- is not that much; and I believe that people would be willing to spend the little extra that it takes a builder to get to A-.

These days (as I get older), I think that the ideal job would be to host one of those DIY TV shows. You get just enough "hands-on" combined with a motivated crew, a compressed timeline, someone else's money (and cleanup), and continual variety.

BTW, I'm also going to send pix of the retaining wall and paver patio that I completed in November during visits home from Bulgaria. 🙂 It has a water feature that will be completed this summer. This was at the extreme end of DIY effort!"

Patrick T. Klever, PE

In a series of articles, Patrick walks us through his remodeling of his basement. The basement is a 1,000 square foot walk-out basement. The project included two bedrooms, one bathroom, an eat-in kitchen with all appliances, a living room, storage and closets and laminate flooring. He also installed a 200A subpanel.

The project took almost a year to complete. His cost was $13,000 and the only work he hired out was the sheetrock, and that was to save him six-weeks time.

In this first article, are two "before" pictures. "... the areas separated by the load-bearing walls running the length of the house didn't vary much from those two photos."

The bathroom project included granite tile and a granite-tiled countertop. It required moving the contractor-installed plumbing from the south side of the wet wall to the north side.

If you want to submit pictures and the story behind your project, CLICK HERE to go to the Before & After Submission Page.

Patrick Klever’s Basement Renovation – Part 2 The Kitchen

In this second article, Patrick Klever, a civil engineer in construction management, describes his basement kitchen. The kitchen has all appliances, including a dishwasher and garbage disposal. The cabinets are prefab, DIY assembly. To make the kitchen, the inside unit of the heat pump had to be moved from the sink vicinity to behind the wall behind the pantry. The apartment size fridge includes an icemaker. The kitchen floor is ceramic tile. It also has enough room for a full-size, eat-in dinner table.

If you want to submit pictures and the story behind your project, CLICK HERE to go to the Before & After Submission Page.

Patrick Klever’s Basement Renovation – Part 4 The Living Room

In the fourth article, Patrick Klever, a civil engineer in construction management, shows us the living room, the kitchen and the hallway in his basement renovation.

The living room view 3 approximates the location of one of the "before" pictures of the basement.

Hallway: The water heater was installed bu the contractor between these two load-bearing walls. Patrick had to move the water heater in his very first project when he moved in back in 2007.

View 2 of the living room shows the "before" picture for the window that was put in last weekend. Unfortunately, he doesn't have an after picture yet.

If you want to submit pictures and the story behind your project, CLICK HERE to go to the Before & After Submission Page.

Patrick Klever’s Basement Renovation – Part 3 The Bedrooms

In this third article, Patrick Klever, a civil engineer in construction management, describes the bedrooms. Bedroom #1 required a window seat to provide an egress window. As Patrick put it, "This area had to be "carved out" from the area of the bath. The open space above the closets was designed so that the space would not be wasted due to the narrowness of the closets, preventing access above the clothes rods."

Bedroom #2 can also function as either an office or a dining room.

If you want to submit pictures and the story behind your project, CLICK HERE to go to the Before & After Submission Page.