Patrick Klever’s Basement Renovation – Part 5 The Transport

In the last of the basement photos, Patrick Klever, a civil engineer in construction management, sums up his basement project.

"It shows what can be done by a determined DIY individual. The box on the top of the 2002 Kia Rio contains ... the fiberglass bathtub for the basement. It was transported 3 miles, without incident using the nylon twine freely given out by Lowes. Now ... there was a helluva lot of twine tied with good Boy Scout knots in six different directions taking into account wind forces, uplift, and poor roads, but twine nonetheless (it really is pretty strong!).

As a matter of fact, all of the materials for the basement project -- with the exception of the sheetrock -- was transported by either a Kia Rio, a Dodge Intrepid, or a Pontiac Bonneville. It just took a little planning.

Hope you enjoyed the smile!"

Patrick Klever

A job well-done, Patrick. Thanks for sharing your photos on your DIY basement renovation. And judging from your email, you work for the U.S. Army. We all thank you for your service! - Tim

If you want to submit pictures and the story behind your project, CLICK HERE to go to the Before & After Submission Page.

Ryobi 18V One+ Portable Fan Review

Ryobi Portable Fan

Ryobi 18-Volt ONE+ Portable Fan

This could be my shortest tool review ever as there’s just not too much to say about this handy little fan.

This 10-inch fan is compact, has two speeds and did run for me on low speed for over 10.5 hours on the initial battery charge. It’s quiet and looks good.

It has plenty of adjustment detents that click the fan into the right position.

Because the cubic feet per minute of air flow through the fan is modest, this is not a fan for cooling a room. I’d rate it more of a personal comfort device, or something that’s used to dry paint on a chair or other smaller project.

The 18-volt battery is installed in the back of the fan. This location gives the fan great stability with a low center of gravity.

The only reason I’m giving it four hammers out of a possible five is because its not bigger. But then it would be too big.

Okay, I’ll give it five hammers for its class! Way to go Ryobi engineers!

Tim Carter

June 2012

Ryobi Portable Fan

Ryobi Portable Fan

Ryobi Portable Fan

How to Install Sliding Drawer Curbs

I had a pesky problem with pull-out drawers in my pantry. Wrapping supplies and food-storage containers would slide off the low drawer and fall behind it inside the pantry. You had to get on your hands and knees to go fishing for them. What a pain in the you-know-what!

The photos clearly show the Before mess and wrapping boxes falling off the drawer.

I then went out to the garage and found some perfect scrap 1/4-inch plywood. The piece going across the back could have been two inches longer, but the small gaps between it and the sides will not allow any boxes or containers past.

I used my sweet Paslode Impulse nailer to attach the plywood to the sides of the drawers with small 5/8-inch nails.

The front of the side curbs was angled back so as not to present a harsh corner when the drawer is open.

Happy Storage!

Tim Carter
Founder - www.AsktheBuilder.com

If you want to submit pictures and the story behind your project, CLICK HERE to go to the Before & After Submission Page.

June 5, 2012 AsktheBuilder Newsletter & Tips

This past weekend we had very rainy weather here in New Hampshire. Two and one-half inches of rain fell at my house on Saturday in 18 hours. That's a bunch no matter how you look at it.

Do you want to see deep-blue water along the Maine coast this summer? Are you looking to rent a nice place while visiting Bar Harbor, Maine and Acadia National Park? Call Rebecca Richardson at 207-288-0307 or visit her rental website. She's a real pro, and has some great places to stay. I recently had to deal with Rebecca, and she's a pro.

June is stacking up to be a busy month. I'll be heading next week to Milwaukee and Chicago on business. The Milwaukee and Bosch Tool conferences are back-to-back. No doubt I'll be seeing lots of great tools.

I just reviewed a fantastic Milwaukee 1/2-inch drill driver this past weekend. That review is below. I'm also shooting a video tomorrow of one of their 4.5-inch grinders. I tested it on Sunday, and it was fantastic.

With Father's Day just around the corner, you may need a gift idea. I've got them for you, that's for sure! Just peruse my Father's Day Gift Guide. Ignore all the references to Christmas. That's a Jedi Mind Trick.


Internet News that Affects You

I realize this is a home improvement newsletter, but you get it electronically over the Internet.

My guess is you want me to share Internet news that directly affects you and your money, right? I've got news for you if you depend on great free online content you use before you start a big project at your home. Or do you like to watch DIY videos so you learn how the pros do things? The days of high-quality *free* online content could be coming to an end.

Microsoft is trying to hurt you. It's a very subtle thing, but it will affect you and millions of other consumers over time.

If you use Microsoft's Internet Explorer browser to surf the Internet, its latest version 10 of that software has a new default setting that will have Do Not Track set to the ON position. This is a setting that tells websites you visit that you do not want a tracking cookie placed on your computer.

You might think that's a good thing. It's not if you like free content. High-quality free content could pretty much disappear on the Internet if this change takes hold. Websites like mine depend on ad revenue to keep the lights on and servers spinning.

Not that you care, but my ad revenue at AsktheBuilder.com is down by 92 percent. I'm only able to survive now because you may be one of the few subscribers to this newsletter that routinely purchases my ebooks, checklists and Stain Solver. I sincerely thank you for doing that.

If you use software that blocks the display of behavioral ads, ad revenue will drop and websites will go out of business. It's that simple.

So what do you do? If you want great free content, you need to support websites that create it. You should understand the Internet ecosystem and be aware that writers and publishers like me have bills to pay. Thousands of great websites that have offered free content for years are suffering right now. Please be aware of that and of big companies that are trying to hurt us small fry.


Help Wanted

If you're an architect looking for a quick little side job, please reply. I need you.

If you're a graphic designer that wants to help me with a small project, I'd like to hear from you as well.


Absolute Last Chance

I was going to warn you over the weekend, but I decided I'd give you a break.

My Kickstarter Shed Project IS GOING TO HAPPEN. I know it for a fact.

You have LESS THAN 48 HOURS to get each of the 30 ebooks that's going to contain over 100 step-by-step shed building videos for only $1 each.

^^^^ READ the above sentence again. ^^^^

A video series this detailed does not exist. If it does, it's well hidden online. I can't find anything even close.

At Noon EDT on June 7, 2012, each of the 30 ebooks in this series is going to sell for $7 each. I guarantee that will happen too. This is going to be the best $30 you've ever spent in your life.

Go now to the Kickstarter page and pledge $30 and be done with it. You have less than 48 hours to save $180 dollars.


Tip of the Week - Tough Love for Dannielle

Dannielle Schoelch emailed me last Friday. Here's what she said:

"We had a cedar 3 rail fence installed six weeks ago. We had a few issues with how they installed a few things, but settled for the looks of that. Then three weeks later, black stains/streaks from the nails were appearing. Long story short, after the company that installed it denied that, I found out the nails they used were Coated Sinkers. They should have used Galvanized Ring Shanks. They finally agreed to come out, told us they would easily just replace the nails with the right ones, and fix the other issues, and get the stains off by power washing. Here's the thing, I also noticed the boards cracked at the nail. Could this be from corrosion from the bad nails?

Once they finished, we noticed more cracked boards, which they deny is from them, old nails on the posts, under the rails, which means they'd have to take the rails off again, black holes everywhere from the bad nails, and bad streaks. Also, nails poking out and exposed in places, and boards not on all the way, etc. One of our gate's hinges is holding onto 6-inch pieces of wood because they measured the posts too far apart, and had to make up for it. We're not happy, and they've been quite mean to me and blame me. They said they can replace one board, and fill in the nail holes with wood filler.

What do you think needs to be done? We paid almost $5k for this fence and I feel ripped off."

# # #

I wrote back to Dannielle. It was a rough Tough Love email. She didn't respond to me. I figured she wouldn't. I graciously shared with her what she needed to do to fix the problems with her fence, but I also gave her some extra unsolicited advice. That's why she didn't respond to me. Who wants to get corrected in a situation like that when you're in pain?

But here's the tip for you - and this has nothing to do with fences.

I told Dannielle that she made a serious mistake - as do thousands of people each day - by not doing all her research before the project started. She hired a contractor HOPING everything would be done right, and HOPING they knew what they were doing.

Hah! Hope - it's the emotion of last resort. You hope for things when you can't control them.

The sad thing is, Dannielle had complete control over the outcome of her fence project - she just decided not to exercise that control.

Dannielle is just like many who email me. Last Friday she was calling to me for help asking me to throw her an Ask the Builder Life Preserver because she's drowning in a pool of fence problems.

If you could read all the email I get each week, you'd immediately see the common scenario. Folks jump into projects without doing any research, make mistakes and once they realize they're in trouble, they come running to me to help them get out of the mess.

In a nutshell, I told Dannielle I had an entire Fence category full of columns at my website, and that I had columns about the correct nails and screws to use outdoors.

I also reminded her about my columns about drilling pilot holes when you are near the end of a piece of lumber, and that I had a column about extractive chemical stains in cedar and redwood.

Most importantly, I told Dannielle about my Contractor Hiring Guides. If she had purchased one, in less than an hour Dannielle would have discovered the real Professional Fence Contractor in her city.

Bottom Line: STOP before you sign a contract. Come to AsktheBuilder.com. Spend an hour or two reading my past work. USE the Search Engine heavily at my website. That's what it's for.

Dannielle could have saved time, money and frustration by coming to my website before she called any fence company for a bid. So can you.

Just Do It.


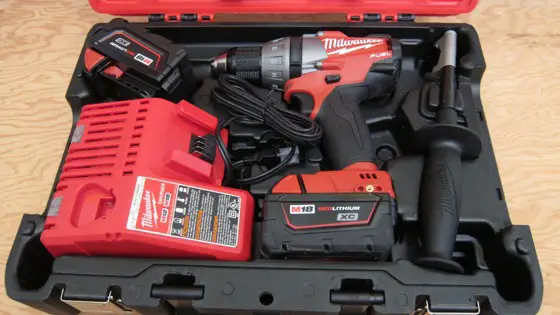
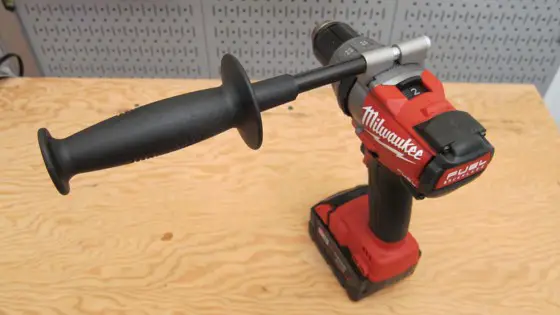
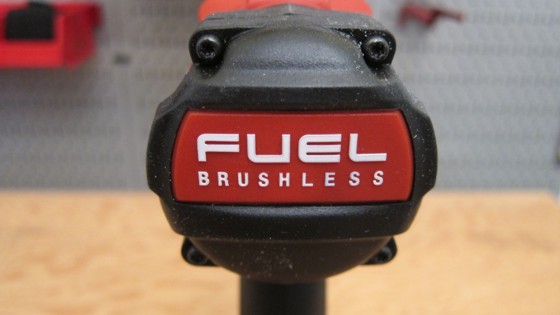
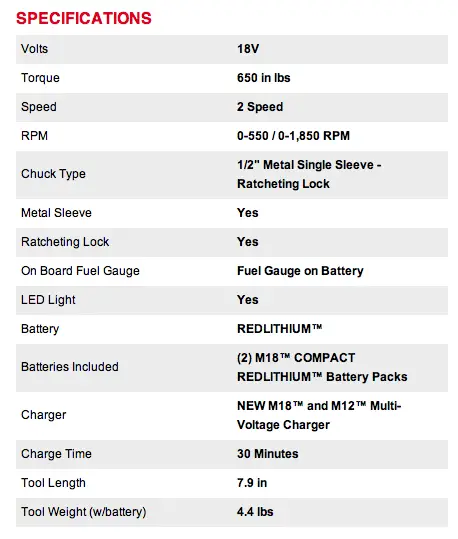
Milwaukee 2603-22 Cordless Drill Driver Review

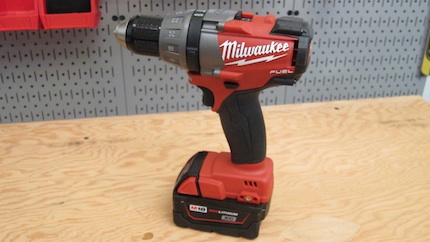
Are you looking for a superb half-inch drill driver? A cordless one? One that really scored well in my test? Then read my review and watch the video. You'll love it. If you want to buy the drill, I have a handy link for you in the review.


Deck Ledger Board Flashing Drawing

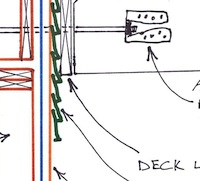
Thousands of wood decks are not connected properly to houses. Heck, it could be tens of thousands. Water can leak into your home if this happens to you. Need I say more?

A friend asked me to draw for him how I properly flash decks that I build. Once the drawing was done, I thought, "Hmmmm, maybe others would love to see this."

I added helpful notes and made a second expanded drawing that zooms in on the all-important flashing detail. You can download the two drawings and the notes right now.

What other drawings would you like to see? REPLY to me and I'll see what I can do.


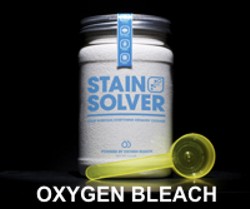
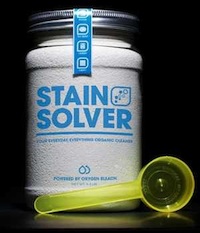
Cleaning Tip of the Week - Smelly Dish Rags, Sponges and ?

If you have smelly things that are water washable, you can not only clean them, but deodorize them as well.

Stain Solver is a powerful deodorizer. The oxygen ions that are released when you mix the powder with water blast apart the odor molecules rendering them unsmelly. That's a non-scientific way of explaining it.

All you really care about is that your stuff doesn't stink, right? I thought so.

Milwaukee 2603-22 1/2-Inch Cordless Drill Driver Review

If you're looking for a durable cordless drill that accepts drill bit sizes up to one-half inch, then you absolutely must give this drill a serious look. Out of the box, it's well-balanced, comfortable and engineered to be a workhorse.

This drill is part of the Milwaukee M18 Fuel™ series. The drill contains a new brushless motor. This technology is now sweeping the entire power tool industry. Also onboard the tool is an advance microprocessor that helps manage the delivery of energy so the tool and battery work together to provide the best amount of power when you need it while protecting the motor and battery. It's ingenious.

If you want torque, you get it with this drill - 650 inch pounds if what Milwaukee says is true. I don't have scientific testing equipment to take my own measurements.


The ratcheting drill chuck gives you great control when driving and the two-speed transmission gives you great speed-torque choices.

Drill Specs milwaukee cordless

I loved the fuel gauge on the battery that tells you how much power you have. Even if you run out, the battery will recharge in 30 minutes using the enclosed charger that will also charge the 12-volt Milwaukee batteries.

Milwaukee claims that their brushless motor will last 10 times longer than their competitors. If this is true, that's a major reason to purchase the tool. I can tell you from buying high-quality tools in the past that they will last. I have a right-angle drill that's 25 years old and it still runs like a champ. It was the best drill made at the time, so think about paying the extra money for quality.

As crazy as this sounds, I fell in love with the durable red and black plastic hard case the kit comes in. I'm not a fan of the soft-sided bags many of the tool companies have switched to. The soft sided bags don't prevent tool damage when the tools are stacked like cordwood in the back of some builder and remodeler pickup truck.

I'm giving this drill the best score you can get here at AsktheBuilder.com - 5 out of 5 hammers. You'll love this tool.

The only reason I’m giving it four hammers out of a possible five is because its not bigger. But then it would be too big.

The above is an affiliate link. I get a tiny commission if you purchase this item from Amazon.

How To Repair Concrete Driveway Cracks

DEAR TIM: My concrete driveway has eight large slabs. The driveway slopes down from my garage to the street. The straight-line gaps between the slabs has enlarged, some cracks are as wide as 2 inches now. I patch them and they open up again. Is there a guaranteed way to repair these cracks so I don't have to do it every other year? What's happening and how would you fix the cracks? Ed S., Steator, IL

DEAR ED: Concrete cracks of any type are the bane of many a homeowner. They can be in flat slabs, retaining walls, foundation walls and steps. Concrete has fantastic compressive strength, but usually only ten percent of that in tension when you try to pull or stretch it apart. This lack of tensile strength explains, for the most part, why concrete cracks.

Let me say right away that it's impossible to completely cover this topic in this tiny column. Entire books have been written about concrete crack repair. I'm just going to try to focus on your situation and give you an interesting option.

This crack is now 2 inches wide and opens up every year. It can be filled and made to look presentable. Photo Credit: Ed Sedlacko

First, your slabs look to be in great shape other than the gaps between the slabs. This makes the repair job much easier to do so that you get results that are aesthetically pleasing. It's important that the repair not detract from the overall look of your driveway, but still be functional.

If you try to fill the cracks with a hard material like more concrete that contains small aggregate like pea gravel or very coarse sand, it will eventually crack as well. The gaps you have are far too wide for most institutional and commercial caulks designed for filling concrete cracks.

Doing a specialized and exhaustive search on the Internet, you may discover some product used by airports, state departments of transportation or other owners of massive amounts of concrete pavement that will fill those massive cracks. But the look of the repair may not be in your best interest.

As crazy as this sounds, I'm going to suggest you repair the cracks with wood. I know this may sound quite nonsensical, but wood and concrete have been used for years together. It was a fad in the 1950's and 1960's to install redwood slats in-between concrete slabs and sidewalks in modernistic homes that were popular in that time period. I've personally inspected houses with this combination and the redwood used had lasted for well over 25 years.

Because of the natural water repellents that are in redwood, it would last for decades, even though it was exposed to moisture in a slab on the ground. Using some new water repellents and drainage aids, I believe you can get strips of wood to last at least thirty or forty years, if not more.

The first thing you need to do is clean out the gaps between the slabs to the thickness of the slabs. Scrape off any old patching tar with a stiff putty knife and remove residual tar or asphalt compounds with mineral spirits and gentle scrubbing with a wire brush.

Dig a 4-inch wide trench along the sides of the slabs from the crack or gap closest to the house all the way down to the street or sidewalk. This trench should be a deep as the slabs are thick.

Fill the trenches on either side of the driveway with small rounded pea gravel. This gravel is the size of marbles or actual peas that you eat. Do the same for the gaps between the concrete slabs, but stop filling the gaps about 2 inches from the top of the slabs.

Purchase some redwood or other fine-grained lumber like teak that's naturally resistant to rot. Cut the strips of wood to fit each of the gaps making sure the shape of the strips is wider at the top than at the bottom. This tapered shape will allow you to tap the pieces of wood into the gaps between the slabs with little effort.

Each strip should be cut so that it's 1 and three-quarter inches from top to bottom. This dimension allows the wood to be recessed below the top of the slabs about one-quarter inch.

Before you install the wood, completely coat all the sides, edges and ends with three coats of a high-quality synthetic resin water repellent. It's very important that the ends are well coated. In fact, I would dip the end of each piece of wood into the can of the sealant for at least two minutes allowing the water repellent to be drawn deeply into the end grain.

Once the wood strips are in place, fill any small gaps between the wood and the concrete slabs with medium sand. The sand will be natural looking and it will finish off the job nicely.

The pea gravel under the wood strips and on the sides of the driveway acts as an interconnected series of drainage channels that will remove any standing water from around the wood. This will significantly extend the life of the wood strips.

Column 938

May 30, 2012 AsktheBuilder Newsletter & Tips

This past weekend was a mixture of work and relaxation for me. I hope you had a great Memorial Day Weekend, and you reflected on those who offered up the ultimate sacrifice so that you have the freedom to read this newsletter that I'm allowed to write. All too often I feel many take our freedom for granted.

On Sunday, I cleaned a wonderful teak table that's on my deck. My daughter Kelly helped me with this job. Early the next morning, I sealed it after it had dried. Visit my Restoring a Weathered Teak Table page at my website to see dramatic before and after photos and secret links to the products I used to achieve the stunning results!


Tip of the Week - Difference Between an Impact Driver, Drill and Screw Gun

Check out the photo. Sure, the tools are all the same color and they all spin, but what's the real difference?

The common electric drill needs very little explanation - it accepts drill bits ranging in size from 1/16th-inch usually up to 3/8-inch diameter and sometimes 1/2-inch diameter. A variable-speed motor in the tool allows it to spin very slowly or quite fast providing you with great control should you choose to use it.

A screw gun is very similar to a drill but it accepts bits that fit the slots in different screws. An adjustable clutch on the tool allows you to tell the screw gun when to stop turning. This prevents the screw from snapping. It also allows you to control how far you drive the screw into the material. In the case of drywall, you want the screw head recessed below the surface, but not so deep as it tears the paper from around the screw head.

An electric impact driver is much like a screw gun. It accepts all sorts of driving bits and even smaller sockets. The internal clutches and gearing provide enormous torque at low speeds so that you don't strip the head of the screw or nut. While you can use low speeds on a drill and a screw gun, you simply don't get the torque. This single feature makes in impact driver invaluable.

Here's the drill / impact driver combo kit I've been using lately, but I expect to be testing a kit from both Bosch and Milwaukee very soon.


Hong Kong Subscribers and Photos

Do you live in Hong Kong? Or, do you have any great street photos showing the typical buildings, architecture, etc. from street level? Do you have photos of side streets, back alleys, etc.? My son needs them for a video game project. I'd be eternally grateful if you could forward a few to me. The higher the resolution the better.


Impressive Space Station and Northern Lights Video

Russell Morris, who lives in Queensland, Australia, sent me a link to a delightful video that you might enjoy. It's a respite from some boring home improvement video I might ask you to watch!


LAST Chance for Shed Videos

My DIY shed project on Kickstarter is just about to close out. I need your help to make the goal. You get some amazing swag if you back the project.

IMPORTANT NOTE:If you back the project at the $30 level, you'll get the entire video series for that one-time low price. I guarantee you that you'll never, ever be able to get the 100-plus videos I plan to tape for that price. I'm serious. This is your last chance.

If you *ever* plan to build a shed, you'll find these step-by-step videos invaluable. There are going to be over 100 videos total in 30 different ebooks about each phase of the project.

When the ebooks that contain the videos are in my shopping cart, you'll see them at $7 each. That means the entire video series will be priced at $210 if you buy the ebooks/videos one at a time.

But for the next week, you can get each ebook for just $1 each. That's an insanely low price.

If you're a long-time subscriber to this newsletter, you know that I meant what I say. You'll never see this low price again.

Go ahead, back the project right now. You'll not regret it for a moment.


Lumber Strength and Grades

You may not be aware that different species of lumber have significant differences in strength. And within each species, the actual grade of the lumber can have an impact on its strength.

In the photo below, you can see the arrows point to both the species of wood and the grade. The blue arrow points to the grade with SEL meaning *select*. The red arrow points to the species with SYP meaning Southern Yellow Pine.

For example, Douglas Fir is perhaps one of the strongest framing lumbers while hemlock is not all that strong. I say this assuming you're comparing two pieces of lumber the exact same size and thickness.

Southern Yellow Pine is a species I used regularly when I was building, and it's a very strong wood. It also accepts chemical treatment very well, which is why it's often the species you buy when you get lumber that you use outdoors.

The fewer knots one finds in lumber, the better its grade. Knot-free or nearly knot-free lumber is often graded select. You then step down to #1 and #2 grades as the knots become larger and there are more of them in each piece.

If you want a really informative brochure that talks about both hardwoods and softwoods, including photos, tables, and a great glossary of wood terms, you should download the FREE Hardwood Handbook put out by the Southeastern Lumber Manufacturers Association.

WARNING:It's a pretty big file, so if you click the link, go do something else while it downloads. You'll enjoy it!


Cleaning Tip of the Week - Aquarium Algae

Sandy shared with me how she used Stain Solver to clean years of algae from aquarium rocks. She said, " ... the Stain Solver produced amazing results without the worry of any harm to the fish."

To get rid of any hard water deposits on the glass of the aquarium you'll need either white vinegar or muriatic acid. These chemicals can absolutely harm the fish!!!


Upcoming Tool Reviews

Oh, I've got some tool reviews ready to do the later part of this week! I'll be shooting a video of two Milwaukee 4.5-inch grinders, a RotoSaw and a Senco Finish Nail Gun.

The second week of June I'll be getting my annual dose of new Bosch and Milwaukee tools as I'll be attending their annual tool conferences. It's always a pleasure to see all the new power and hand tools.

REPLY to me. Tell me what tools you want me to review. I'm SERIOUS. Click "Reply" and tell me. The same is true for products. What New Products do you want me to review? You have to Reply - I've got mystic powers, but ESP is not one of them. :->>>

Restoring a Weathered Teak Table

The weathered, gray teak table in the photos below shows how the original sealer succumbed to Mother Nature. You can see grease stains near the center of the table.

Stain Solver oxygen bleach was used to remove the failed factory-applied sealer, all the sun-damaged gray wood fibers and the grease.

I used Extreme Defy, a synthetic-resin water repellent, to seal the table. It comes in different colors, but my wife Kathy likes the Cedar Tone color because it resembles what the teak looks like when it's wet.

NOTE FROM TIM CARTER - Founder of AsktheBuilder.com - posted October, 2016: I no longer would apply Defy deck sealer to any exterior wood that I own at my own home.

Tim Carter

The weathered table before.

The table is now clean and dry and the center panel has been coated with the new water repellent.

The weathered table after cleaning and sealing.

All photos by Tim Carter.

If you want to submit pictures and the story behind your project, CLICK HERE to go to the Before & After Submission Page.

May 22, 2012 AsktheBuilder Newsletter & Tips

I hope you had a swell weekend. Mine was spent in Maine on my ham radio helping 120 bicyclists stay safe. The club I belong to, CNHARC, was the official communications provider for The Seacoast Bike Tour.

Saturday was uneventful, but on Sunday around noon two cyclists got tangled up and crashed just minutes after I had passed them while I was on roving patrol looking for problems. One woman had to be transported to the hospital. I’m hoping she’s okay.
Nubble Lighthouse

On Saturday, one of the rest stops the cyclists checked in at was on the coast in Maine. It was at the infamous Nubble Lighthouse. All I can say is that it was one of those rare days when it appeared a tanker filled with deep-blue dye crashed spilling its cargo into the ocean. The water was so blue!

Smart Money Magazine

I was interviewed yesterday and today by a very intelligent young woman named Jennifer Wieczner. She reached out to me about a story concerning DIY videos. After doing some research, she discovered that I have quite a following on YouTube and have lots of DIY videos as you already know.

But she needs YOUR help. She asked me moments ago if I knew of any homeowners who had watched a DIY video that led them astray, or caused them to waste money because the info in the video was wrong or incomplete.

Has that happened to you? Have you had a bad experience watching a DIY video? Jennifer needs to hear from you NOW. Please Cc: me in the email as I’d love to hear the story as well. Time is of the essence. She’s on deadline. That means email her NOW. Jen's email address is: [email protected]

Tip of the Week - Exterior Painting

Are you going to paint outside this year? If the surface already has paint on it, you really need to clean it to get fantastic results. Paint is just colored glue. Dirt, grease and sun-damaged old paint pigment all get in the way of a good bond.

Pressure washing does NOT remove all the dirt. If you want to get the surface clean, you need to wash it like you do your car - with a sponge, brush or surface agitation. I prefer to use a brush that’s used to clean RV’s. These are soft enough so they don’t scratch the paint of the RV, but stiff enough to get off the dirt.

To remove algae, mildew and sun-damaged paint pigment, my Stain Solver does an amazing job. Look below, the 9-pound size is now on sale.

Win an iPad!!!!

If you’re on Facebook, remember I told you months ago you should be, you can possibly win an iPad (16 GB and WiFi only). You only have nine days to react.

You need to take photos of an outdoor project you made with real wood. It could be a deck, gazebo, arbor, fence, porch, raised garden bed, etc. It just needs to be an exterior project made from REAL wood.

On June 1st, the photo you submit to the Wood Facebook fan page may be the one that wins!

Go to the following page, LIKE the page, post your photo, and tell them the city/state where the project is, when the project was constructed and WHY you chose real wood. It’s that easy. Get the camera out NOW and take your photo. Hurry! CLICK HERE TO ENTER.

Concrete Crack Repair

I’ve written in the past about using epoxy to repair concrete cracks. It can be a cracked driveway, cracked foundation, cracked patio, etc. Some epoxies are stronger than concrete and some have great flexibility.

I was sent some great concrete epoxy by the Roklin Company. They have a fantastic epoxy system that just may work for you. They also have concrete surface repair products as well as asphalt repair products.

These deserve a serious look if you have concrete or asphalt that needs attention. Good News! I negotiated a 15% discount for you! Use this promo code before it expires: ATB15 CLICK HERE TO SEE the PRODUCTS.

I did NOT get paid anything to write the above. I’m simply impressed by this company’s products.

Stain Solver Sale

Stain Solver Oxygen Bleach

I’m having a Memorial Day Clean Up Sale. The 9-pound size of Stain Solver is now on sale. You get a 15% discount. The photo you see is the 2-pound size. The 9-pounder comes in a one-gallon white plastic bucket.

But here’s the catch. Only 300 people get it at this price. Oh, and you get Free Shipping too with the Sale Price. CLICK HERE TO GET TO THE SALE.

If you want the discount and have some cleaning to do, you need to order *now*. You can only get this discount at the AsktheBuilder.com shopping cart. It’s not for sale on the Stain Solver website. I guarantee you we WILL SELL OUT of this size.

Mosquito Devices

Do you own one of those mosquito magnet machines that runs on propane? Or some other large-scale machine that claims to keep a bigger area free of mosquitoes? Have you had success or failure? What machine do you have that works best?

Deck Stain Test

The official AsktheBuilder Deck Stain Test has begun! I’m testing 16 different deck stains, some tinted, some toned and some clear. This is a real live test in real conditions down on my dock. The sun blasts my dock from sunrise until mid afternoon. There’s no shade. This is going to be a long-term test that runs for at least two years, possibly three. Here’s a photo of the pieces of wood that were just stained and out drying.
Deck Stain Sample Test Pieces

Four pieces of wood were stained with each stain - two each of treated lumber and two of cedar decking. One piece of treated and cedar lumber is being put in my garage attic out of sunlight and rain. These will be taken out of storage and put up against the outdoor samples from time to time to show how the stains are doing. I’ll take side-by-side photos.

I’ll have the first results available at the end of summer. We need to let Mother Nature work on the wood for at least three months. I’m sure you’ll be stunned by the results!

Sincerely,
Tim Carter
Do It Right, Not Over!