What's in this Issue?
 Another week has blown by. The unseasonable very warm weather is now history, and we're back to very normal early spring cool temperatures here in New Hampshire. In fact, tonight it's going to be downright cold. 23 F is the predicted low as I type this.
Ice out on the lake happened last Thursday. It was magical to watch it all disappear in a matter of hours. By the end of the day, I had dropped my dock back into the water. That's the official start of summer as far as I'm concerned.
I sent in a soil sample to the State of NH Co-operative Service late last week. Kathy and I are putting in a vegetable garden in a new spot in our yard. We figured we'd let the soil scientists help us succeed by telling us what needs to be done with the soil. I know it needs amendments. It's got great drainage. I've got some great plans for this garden.
Deck Cleaning and Sealing eBook
I've finished writing my latest eBook about deck cleaning and sealing, but now I'm in the process of completely reformatting it. I should have it ready for you next week, just in time for the annual Spring Stain Solver Sale. Pay attention to next week's newsletter for the sale news.
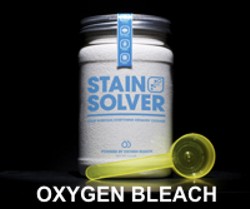
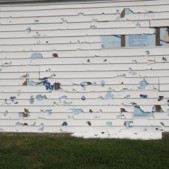
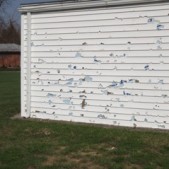
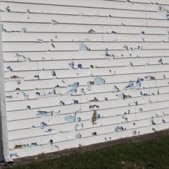
You may be a past customer that's purchased Stain Solver to clean your deck, patio, house siding, or any other outdoor thing you own. It's the cleaner of choice for thousands. It's great to use to clean any deck, be it wood, composite or totally synthetic.
I need one last favor from you concerning the eBook. Your questions last week were absolutely amazing. Wait till you see all the questions and my answers. Oh my gosh, wait till you see the fantastic questions. Many I would have never thought to include.
But here's what I want to know now. Could you please share with me what deck sealer you have had the best luck with, the worst luck with, and how long, on average, before the sealer you've used fails?
Please take the quick survey here:
AsktheBuilder.com Deck Sealer Success Survey
I'll be sharing all this data in the eBook so you can see who's having the best success and with what product.
Finally, do you have any stunning photos of your deck? If you happen to have Before and After photos, that would be fantastic.
Would you like to show it off? Do you want your deck photos in the eBook? I can't promise it, but if you want to let others see the magnificent deck you have, you can submit the photo(s) here. If I use your photo(s) in the eBook, you'll get a copy of the eBook at no cost and I'll send you a 4-pound container of Stain Solver to use on any cleaning project at your home.
Decorate with Doors
 Have you given thought to doing some interior remodeling this spring? Are you tired of the bland doors you have between rooms? Are you aware that you can get some stunning doors that hide away in a pocket or slide on a wall-mounted rail that allow you to stop futzing with the swinging-door blues?
LE Johnson has been, for years, the hardware I've used to create the pocket doors in my past homes and many of the houses I built and remodeled. Some people shy away from pocket doors because they feel they're problematic. I never had an issue with any LE Johnson door at my house or on my jobs. The last thing you want is a problem with a pocket door. I've never had a problem with LE Johnson.
Imagine a new door or doors in your house that have decorative glass in some or all of the panels. The look is absolutely a show stopper. You'll feel better about your home and your friends and neighbors will be green with envy.
If you're planning to build a new home or do a room addition, absolutely plan to install space-saving pocket doors. They're easy to install, and they glide like the door is floating on air. Want more information about these great doors? Spend plenty of time at the LE Johnson website.
Tool Review - Coast Rapid Response 3.00 Pocket Knife
I received a pocket knife to review last week. Looking at it through the clear rigid plastic packaging, I was anxious to test this attractive knife.
You'll see why when you see its photo. I think you'll love my review, if not, I want to know why.
Actually, you can HELP me once again. You're able to leave comments at the bottom of all my columns and reviews. Tell me what you think of the review in a comment. It's easy to do!
Don't forget to use the social media button widget at the top left of the page. Clicking those buttons helps spread the word about AsktheBuilder. Believe me - I really need your help doing that.
Invisible Websites
Have you ever stumbled upon a website, a nice looking one that looks professional, and then discover the information at the site may be bogus? Or there's a hidden agenda?
While doing research for my Cleaning and Sealing Your Deck eBook, I came across any number of websites that make you wonder about the quality of the information at the website.
When you click the About Us link on these sites, you typically get wording like this:
"Welcome to XXXXXXXX website. This site is a compilation of the best expert advice for your xxxxxxx projects. Whether you need to know about how to blah blah blah blah blah, this site is a resource for do-it-yourselfers looking for home improvement advice. Check back often for updates and new articles."
There's no mention of who's creating the content at the website, no names, no nothing. Yet they say it's "expert advice". Are you serious? How can they make that claim? How can you validate the claim if you don't know who wrote it and their level of experience?
This is what I'm fighting each day online.
Here's how you can help. When you visit a website to get information about a topic, STOP reading what you went there for and go find the About Us page. Click and read that first.
If you don't discover anything about the person, the expertise they have, number of years of hands-on experience in the field, awards they've received, etc., then I suggest you have no way to gauge if the information you're about to rely on is really expert advice.
Of course, it's even worse in forums and advice you glean from social media posts. How do you know the expert level of people in those situations?
I'm on a crusade now to try to educate consumers just like you to not pay any attention to sites like this and to spread the word to your friends to avoid them. These sites are making it increasingly difficult for AsktheBuilder.com and other great websites to survive.
Tip of the Week - Disguising Blacktop Crack Repairs
You may be getting ready to seal your blacktop drive this spring. If you have cracks in the drive, you may be using a special caulk for the purpose.
If you want to do a better job of disguising the crack, just caulk about a foot of the crack and press down in the caulk some of the small loose stones that erode from your driveway. Be sure the stones are clean, dry and dust free.
You can also sprinkle some dry coarse sand onto the top of the caulk. Tap it down to embed it in the caulk with a paint stick or wood shim. Adding the stone and sand makes the repair more durable and it helps to match the crack with the drive.
REPLY to this Newsletter
You can help me in another way. If you like this newsletter, I want you to just click Reply and send me a High 5, a Thank You, or any other salutation.
I may not be able to respond due to my workload, but your reply sends all kinds of good vibrations through the Internet and it helps me in more ways than you'll ever know. Thanks in advance if you can do this.
Cell Phone Do-Not-Call List
If you don't want telemarketers to call your cell phone, you need to call this number and get your cell phone number added to the Do-Not-Call List. 888-382-1222
Video of the Week - Replacing an Asphalt Shingle
Do you have a damaged roofing shingle or two on your roof? Can you get up there safely? Do you want to try to tackle the job yourself to save some sweet moola?
Watch this video.
Q & A of the Week - Flagstone Patios
DEAR TIM: I want to dress up the look of our existing concrete patio. Is it possible to install flagstone or similar material directly over the concrete? What do you use to adhere the flagstone to the concrete? Can I enlarge the patio without fear of future cracking where old meets new? Kathy D., Batavia, IL
DEAR KATHY: Wow! What a gorgeous patio you will have. Flagstone can be installed directly on concrete. In fact, it is the only way I would do it if you desire an easy to maintain surface and one that stays flat for the entire time you intend to use it. Your biggest challenge will be ....
Click Here to read all about Kathy's challenges and how I suggest she do this job.