DEAR TIM: One of my New Year projects is to organize my garage and workshop. My tools are scattered everywhere and I waste time looking for them. My dad used pegboard for his tool organization, but the simplistic hooks never seemed to fit the tools properly. I want as near a custom solution as possible. Surely you've come across some great pegboard as well as pegboard hangers and hooks that work well. Talk to me about the workbench that should be up against the pegboard if you can. Help me Tim, you're my only hope! Lisanne L., Denver, CO
DEAR LISANNE: Oh can I speak to wasted time looking for things. That used to be the bane of my existence until I just knuckled down one weekend and designed a series of storage shelves and pegboard that completely solved my problems.
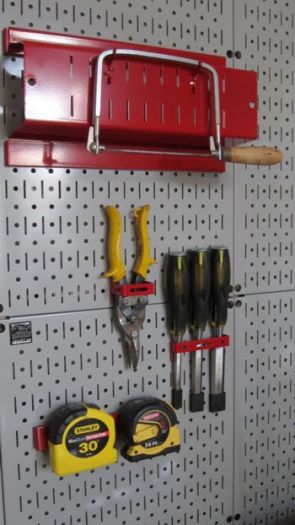
This is my favorite pegboard and hook system. The pegboard is metal and the hooks will NEVER come out when you take a tool from the wall. Photo Credit: Tim Carter
My dad also had the traditional pressed wood-fiber pegboard. In fact, I believe it's still pretty popular. But I was also disappointed with the hangers and accessories that go with the wood system. Often they would come off the wall as I removed the tool. Talk about frustrating! And if you use a tool often, the friction caused by moving the hook enlarges the hole in the wood panel.
Several years ago, while at an industry trade show, I saw a new inventor who had suffered like so many and solved the pegboard problem. I actually walked by his tiny booth, but stopped dead in my tracks and did a 180-degree turn and went back to see what he had. Oh, am I ever glad I did that!
This genius developed a system of metal panels that allowed you to use your traditional round pegboard hooks and accessories if you wanted, or you could upgrade to his nearly unlimited assortment of metal hooks and hangers that fit into narrow slots on the metal pegboard.
You may not think this is a game changer, but it is. The most compelling aspect of this system is the way the metal hooks and hangers slide up and then down into the slots. The metal hooks and hangers lock into the metal board and absolutely will not come out when you reach for your tool.
You can easily remove the hooks and hangers if you wish to re-arrange how your system looks. But realize that in normal day-to-day use, the pegboard hooks that fit in the slots will not come out.
Here's the best part. I don't care what tool or thing you have that you want up on your pegboard, the metal pegboard system I use has a hook, hanger, shelf, bracket, parts bin, etc. to hold absolutely anything you can dream of putting up on your pegboard.
Here are some examples of what I can put on my pegboard with ease using the special hooks and the metal board system. I can hang any cordless drill or tool. A special shelf holds spray cans of paint or adhesive with a extra vertical surface on the front of this shelf to hang small tools. A handy shelf that has a dowel rod for a roll of paper towels is on my wall system.
How about a bracket that hold plastic parts bins? Yes, I've got it. U-shaped brackets for ratchets and wood chisels are right there on my pegboard. Horizontal u-shaped brackets for hammers, baseball bats, shovels, flashlights, etc. can be found on my system. Special brackets for screwdrivers are also on my pegboard.
Oh, and I forgot to tell you the metal panels, hooks, hangers, shelves, etc. come in an assortment of bright colors. You can mix and match. If you want the tough industrial look, you can go with galvanized metal panels. Suffice it to say I pretty much guarantee you'll fall in love with this system like I have. In fact, I'm willing to bet you a dinner for two at my favorite chili parlor you'll love it.
The biggest mistake you can make with a workbench that sits in front of a pegboard system is making the workbench too deep. You'll be tempted to make it at least 24 inches deep, but I'm here to tell you that's a mistake. You'll have a very hard time reaching over the workbench to get to tools that you need.
I prefer a workbench that's no more than 20-inches deep when it's in front of pegboard. I want convenience when reaching for a tool.
If I need more space to work on, I use a stand-alone table in the workshop. What's more, the work bench height and work table heights are not always the same. You may discover, depending on your height, that you want a workbench that's at least 36-inches tall. If you're a short person, you may discover that a 32-inch height is absolutely perfect.
Test this by just temporarily supporting a piece of plywood and try to work on things as you would on a work bench. If you discover that you're standing on your tip toes or lifting up a shoulder to do something, the work surface is too high.
You can watch a great video about the metal pegboard system I use at my AsktheBuilder.com website.
Column 914