Milwaukee Fluorescent Light Bulb Tester Video

Hi, I'm Tim Carter and I have a game changing tool I want to show you. This device is a fluorescent light bulb tester. It can test to see if the bulb is out, the ballast is bad and tests the filaments in the fluorescent bulb.

In normal garages, you can just extend the testing antenna. If your garage ceiling is 8-feet high, you can test the bulbs while standing on the ground. In my case, the ceiling is 11-feet high so I need a short ladder.

The first step in the testing is to turn off the light fixtures. To test the bulbs, turn the dial to Lamp. Now extend the antenna and place the cradle on the end of the antenna on the fluorescent tube. Then press the Test button. If the bulb flickers, it is good. If there is no flickering, the bulb is bad. This way you know exactly which bulb to replace.

If both bulbs tested okay, the problem might be in the ballast. Change the dial to Ballast to start the test. Note that this only works on T8 Electronic Ballasts.

You can also check tubes even when they are not installed in a fixture. Just check the bulb without installing it. If it flickers, it is good.

To check the filament, just insert the pins on the bulb in the socket located on the bottom of the tester. Turn the dial to Pin and press the Test button. If the test beeps, the filament is good. Be sure to test each end of the fluorescent tube.

This test will be a huge time saver for locations with hundreds of fluorescent bulbs.

The above is an affiliate link. I get a tiny commission if you purchase this item from Amazon.

December 6, 2011 AsktheBuilder Newsletter And Tips

What's in This Newsletter?

Latest News
Tool & Product Reviews
New Feature - Your Project!
Cheryl & the South Africa Hardware Store
Tub or Tile First?
Wet-Dry Vac Guide
Winter Fireplace & CO Danger
Touch Not This Wall
Facebook News

Yesterday I was up on my land in New Hampshire burning some brush piles before the rain and snow hit.Once the fires were started, I was doing some clean up. There are any number of traditional stacked rock walls on the land, and some of the rocks have tumbled to the ground.

I was trying to lift a few and pulled a muscle in my back. That's when the light bulb went off in my head about Wally.

I came across Wally Wallington about four or five years ago. I can't remember how I found him, but by gosh if you've not seen him, you NEED to.

Faced with a situation on a construction site where he was working, Wally figured out on his own a method that early people could have used to build The Great Pyramids and Stonehenge.  He calls it The Forgotten Technology.

The best part is he's actually created full-size stones and moved them by himself to prove this.

Wally has a DVD that shows you exactly how to move 10 ton blocks of stone sideways or up as high as you want - totally by yourself.

You're insane if you don't order this. It makes the perfect stocking stuffer for this Christmas.

If you mention my name when you order, he'll give you a $2 discount.

Be sure to go to the bottom to see the latest book I read.


Tool and Product Reviews and Ads

I try to feature new tools and products as often as possible in this newsletter.

A month ago, I was talking with Dan, a close friend of mine,  and he told me that I keep forgetting to mention to you that I don't feature things that FAIL my testing.

DUH! My policy had been to not say a word because I didn't want to harm the company. I also may expose myself to some liability. A company may say my testing was flawed and that I caused them millions of dollars of lost sales.

Suffice it to say that when I mention something in this newsletter, it's a product I would use in or on my home.

New Feature - Your Project!

I'm starting a new feature in the newsletter. I want to feature your home improvement victories!

While it can be anything, it would be great if you have done a project using some of my advice. For example, I regularly get photos and emails from people who have grouted a tile floor using my four-part series.

All you have to do is send photos to me, a description of the project, what you discovered, etc. and a note saying I have permission to post the content on my website and in the newsletter.

If you have a video and have uploaded it to YouTube or some other sharing website, I'll use the embed code as well. Send me the link to the video.

Let's see your sweet skills and magic! Send me stuff! Show off your work!


Cheryl and the South Africa Hardware Store

Cheryl wrote to me after I published the tip about using emery boards to sand with.

"I thought I would share a lighter moment of sanding with you. I have a little sanding machine made by Black and Decker called a "Mouse". I'm not sure if you get them in the States.

In South Africa, it's fairly unusual to have women doing woodwork. I went down to our little local hardware store where I was approached by one of the sales assistants with the usual condescending attitude. I asked him to point me to the sandpaper as I needed sand paper for the mouse.

With absolute pity in his voice, he replied that I should rather try the pet shop next door. No amount of explaining could convince him that I was sane."

Cheryl, let's hope the sexist store clerk also subscribes to this newsletter and the next time you see him, he has well-deserved egg all over his face!


Tub or Tile First?

Gordon Berry wrote to me:

"I really appreciate all the information your newsletters. I'm replacing a bath tub and tiling the bathroom floor. Is it better to tile the whole floor and then install the tub on the tile, or is it better to install the tub on the floor then tile up to the tub?"

Gordon, I absolutely put the tub in first if it's one that just has the front apron. If it's a decorative tub like a claws foot or soaking tub that is finished on all sides, then I do put the tile floor in first.

You install heavy tubs with an apron first because there's too great a danger you'll damage the tile moving the tub into place.

In the past, I've done some crazy things to minimize the chance of wood rot when I place a tub on a wood sub-flooring system.

I like to apply two coats of urethane to the wood floor system before the tub install. I then lay down 30-pound felt paper on the floor under the tub and under the tile underlayment. I lap the felt paper up on the walls about an inch and a half.

The tile needs to be installed after the drywall is complete and you've possibly even painted. I do install the tile under the toilet and absolutely under vanity or other cabinets in the room.


Wet-Dry Vac Guide - Unique Uses

Oh my, you know the saying, "Be careful what you wish for."

You may have been one of the well over 100 subscribers that sent an email to me about a cool way you use your wet-dry vacuum.

Well, the guide is almost finished. Each day several new uses dribble in. I'm going to have it all ready for you next Tuesday.

Wait till you see how Anne plans to use hers in a few years. Oh my!


Winter Fireplace and CO Danger

Bill Hannigan  of North Ft. Myers, FL wrote to me after the last newsletter:

"Your recent newsletter reminded me of an incident a friend experienced some time ago that could have led to loss of life and home.

He had mounted a pretty powerful whole house ceiling fan in his upstairs ceiling. The on/off switch was installed on the wall by the stairs. That winter he was coming down the stairs and, without thinking, switched the fan on to check to see if it was working OK.

This pulled embers from the downstairs fireplace onto the living room carpet and smoked up the house. Fortunately the screams from downstairs told him that he had done something wrong, and they were able to save the house but not the carpet. Luckily there were no injuries."

Bill, guess what? I did the same thing about 30 years ago at my sister's house at a family gathering. What a young idiot I was.

This is why I tell people to put whole house fans on a separate circuit and to TURN OFF that breaker once the heating season arrives and fireplaces, furnaces and water heaters are in use.

Whole house fans can be a serious carbon monoxide hazard as these powerful fans will suck massive amounts of air down exhaust vents for boilers, furnaces and water heaters in order to satisfy their voracious appetite for air.


Touch Not This Wall

Touch Not This WallAbout a week ago, I finished reading a very powerful book called Touch Not This Wall by Harley Melton.

Harley is a Vietnam veteran that used his combat experiences overseas to help guide the storyline. It's a book centered around the very special friendships warriors forge when faced with death or severe injury as each hour ticks by.

But the book also dives deeply into what happened with virtually every Vietnam veteran when he/she came back to the World. You start to understand how it can take decades to readjust to a place that had changed oh so dramatically in just a few short years.

I couldn't put this book down. On more than one occasion I was crying. It held a special meaning for me as I found it to be a touchstone about my dad's WW II experiences.

You see, I had to send my dad back to Heaven when I was just 24.  I never got the chance to talk to him about his war experiences, so Harley helped me part way across that bridge.

I urge you to order this book if you're a war veteran, know one, are married to one or are the son or daughter of one. It will absolutely help you grasp a better understanding of what war does to the minds and bodies of young men and women.

You can only get the book by mailing cash or a check to Harley.

Send $13 - cash is better - to:

Harley Melton
5480 Laurie Lane
Memphis, TN  38120

For gosh sakes, be sure to include your name and address so Harley knows where to send your book.


Facebook News!

AsktheBuilder on FacebookDo you use Facebook? I've got a Facebook Fan Page that really sees some action during the week.

We have lots of fun there each week. Go look for yourself..

Please go there now and LIKE me so you can start to get FREE tips from me when you login to your Facebook page.

How To Do Insulation For Basement

DEAR TIM: I'm going to be remodeling my basement and want it to be toasty warm. How would you do insulation for a basement remodel like this? Would you use basement foam insulation or just the old standby fiberglass?

What's the worst thing that can happen if you do the job wrong, and how do you avoid problems down the road? Is the insulation for basement wall in new construction any different than a remodel job? Kimberly C., East Hanover, NJ

DEAR KIMBERLY: Your questions are ones that could generate probably four or five correct answers. Any number of insulation experts would probably tell you their method is the best. The good news is that I know of at least two methods that work well.

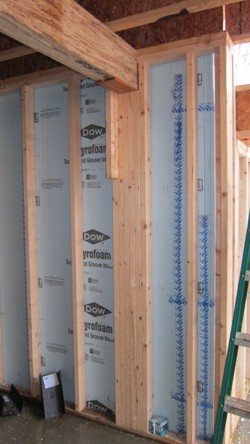
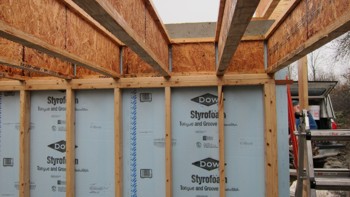
The rigid foam insulation is placed between the stud wall and the foundation wall. The butt seams of the insulation must be taped. Photo Credit: Tim Carter

The rigid foam insulation is placed between the stud wall and the foundation wall. The butt seams of the insulation must be taped. Photo Credit: Tim Carter

I find it interesting that you have thought ahead as to what is an unintended consequence of doing the job incorrectly. This is absolutely a concern because once you finish the walls, you hide the work and can't see problems until they get so bad they work their way through the walls.

I feel the biggest problem you can face in a basement remodel in a climate where the basement walls can be cool or cold is mold or mildew. Most basements, especially ones in houses built before the 1960's, have an issue with high or excessive water vapor. Water leakage into finished basements is also a huge issue. More on that in a moment.

This water vapor comes from two primary sources, water that's working its way through the foundation walls or the concrete floor. Prior to the 1960's, it was not a common practice to install a vapor barrier under the concrete floor, and not all houses had the minimum damp-proofing sprayed on the outside of the foundation walls before they were backfilled. Water vapor readily works its way through solid concrete.

The water vapor that concentrates and builds up inside a basement will readily condense on cool or cold masonry foundation walls. It may never get so bad that you see the beads of water. In most instances, it's just an invisible fog on the walls much like the mirrors in a bathroom fog up after you shower. You see the fog on a mirror because it obscures reflections. A water vapor fog on a concrete wall is absolutely invisible.

This water on the walls is the needed fuel for mold and mildew growth. When you insulate a basement in order to finish it, you need to account for this water issue.

There are two ways to insulate a basement that do a superb job. The first one works well if you're on a tight budget. The key is to create an air space between the foundation wall and the backside of the stud wall that you'll construct for your wiring and fiberglass insulation.

The air space can be as little as one-half inch and still be effective. This air space allows for minimum air circulation should water vapor get to the cold wall. You just make sure the fiberglass batts in the wall don't contact the foundation wall.

The rigid foam insulation is placed between the stud wall and the foundation wall. Photo Credit: Tim Carter

The rigid foam insulation is placed between the stud wall and the foundation wall. Photo Credit: Tim Carter

What's more, it's mandatory that you install a vapor barrier on the warm side of the stud walls before they're covered with drywall or paneling. This vapor barrier can't guarantee that water vapor will not find it's way to the foundation walls, but it surely helps funnel the water vapor to rise higher into your home eventually exhausting through great roof ventilation.

Perhaps the most effective way to install basement insulation is to use both rigid foam insulation in conjunction with stud walls that also contain fiberglass batts.

The rigid closed-cell foam is installed in large sheets, usually no less than one and one-half-inches thick, over the entire surface of the foundation wall. You want the foam to cover the foundation wall from the top of the floor slab all the way to the very top of the foundation wall.

The closed cell foam insulation is an exceptional vapor barrier, and when the seams at all butt joints and the corners are taped, it will be very hard for water vapor to get to the cold walls. The stud walls are built tightly against the foam pressing it to the foundation. Fill the stud cavities with un-faced fiberglass batts for a toasty warm basement.

The foam insulation method works best if the foundation walls are smooth. If the basement is an old stone foundation, spray foam insulation companies can spray expanding foam directly on the rough masonry. It'll be expensive, but it can be done and it will do a fantastic job.

If there are any issues whatsoever with leakage into the basement, this MUST be solved before you begin to remodel. The best method I have seen over the years is to control this water on the outside of the foundation before it comes into the house.

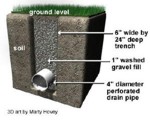
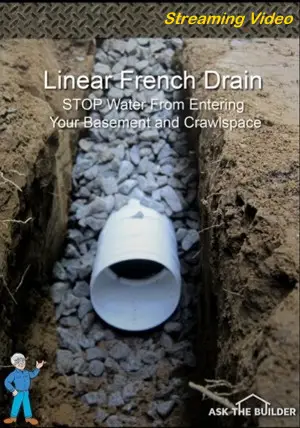
You can capture and divert subsurface water in a yard by using a linear french drain. I explain these in great detail at my AsktheBuilder.com website. Just type Linear French Drain in the search engine once there.

Click HERE to see a much larger graphic and a complete description of Linear French Drains in just one of my columns dealing with French Drains.

Column 912

December 4, 2011 AsktheBuilder Newsletter And Tips

What's in This Newsletter?

Latest News
Checklist Sale Ends Soon
My Christmas Gift Guide
Meghan's Gift Guide
Facebook News

Three VERY Quick things. A regular newsletter is queued up for Tuesday if you just happened to subscribe. I rarely send something out on a Sunday.The Tuesday newsletter is packed with great stuff.

Cheryl's visit to the South Africa hardware store, the Wet-Dry Vac FREE Use Tips Gude, Moving HEAVY things, etc.


Checklist Sale ENDS in 12 Hours

The insane flash sale is almost over. It ends at midnight tonight Eastern Time (December 4, 2011).

As you can tell, I'm still alive. My buddy Chuck threatened to email Kathy telling her what I did. But I told him I would gather all the local wizards here in central New Hampshire and cast a hex on him. He knew I was serious.

Bottom Line: Save over $400 now. If you were to buy all my 31 checklists one at a time as you need them, you'd spend over $500.

You can have ALL of them NOW for $79. When you go to the cart, it will say "Five Category Checklist Bundle". Believe me, that's the product. You get ALL of the checklists when you buy this item.

If you're an old-time subscriber, you know that sales like this happen about as often as a blue moon.

Just go buy them now and you'll be set for ALL of the projects around your home.


My Christmas Gift Guide

My Christmas Gift GuideI can really use your help, seriously.

My Christmas Gift Guide has now been out a little over three weeks. It's filled with great ideas in case you need tools for that special someone.

Your support by using the Gift Guide to shop at Amazon.com allows me to continue to offer the thousands of columns and hundreds of videos at AsktheBuilder.com and this newsletter at no cost.

I'm trying my best to expand AsktheBuilder.com in an effort to give you more of what you want and need. Using my Gift Guide allows me to do just that.


Meghan's Gift Guide

Meghan's Gift GuideAre you in need of gift ideas that are not tool related? If so, I believe you'll love my daughter Meghan's gift guide.

It's got 300 suggestions that will fit everyone's budget. This guide has gifts for people of all ages.

It's going to WOW you when you visit it. There's no need to download it, as you can just view it at her website as if you were flipping through a catalog. Once you're there, just click the "Expand" button to make it work.

Click here to get access to this FREE Holiday Gift Guide.


Facebook News!

AsktheBuilder on FacebookDo you use Facebook? I've got a Facebook Fan Page that really sees some action during the week.

We have lots of fun there each week. Go look for yourself..

Please go there now and LIKE me so you can start to get FREE tips from me when you login to your Facebook page.

Chip Seal Video

Chip Seal Video Transcript

Oh, you know the two most common driveway materials here in the tri-state area are blacktop and even concrete. You see them all the time but to me, they're kind of plain vanilla.

If you want a driveway that is drop-dead gorgeous, durable and built the way roadways we're done 70 years ago, you want a driveway like mine. A tar and chip driveway.

The way you install a tar and chip driveway is really simple. You just need to bring liquid asphalt cement to the job site. It's pretty hot. It's about 350 degrees so you have to be careful. You can get burned by it and they spray it onto your driveway and it's about 3/8 to a quarter of an inch thick. And into that hot tar, they dump gravel chips. It can be brown gravel that's beautiful. You can also get gray gravel and if you come up with any different color that you can think of they'll put it into the tar.

The tar really doesn't care what goes into it. It's very important that they put just enough tar down. If you put too much the tar can actually ooze through the surface and cause a problem on hot summer days. But I've never seen it happen with the different companies that I use to install my tar and chip surfaces.

You probably want to know what the tar and chip surface looks like up close and personal. That's a good point. I have a light loose coating of these brown stones on my drive. But look here. This is exactly what it looks like if I brush them away. These brown stones are firmly locked into the tar and it basically looks not much different than a standard blacktop roadway or driveway.

And it provides excellent traction in the wintertime and if you do want to plow the tar and chip driveway, it’s not a problem. Just tell your snowplow operator to hold that blade up about one-inch and he won't push any of the stones off of your driveway.

If you want a tar and chip driveway go ahead and open up your yellow pages (this video was recorded before the Internet search engines were popular), start calling around the different blacktop contractors. if you're really lucky you just might find one that still knows how to do a tar and chip surface. I'm Tim Carter, Ask the Builder. If you want to discover more home improvement tips, go to AsktheBuilder.com

Related Links

Tar and Chip Drives Support Giant Truck!

Step-by-Step Tar and Chip Installation Method

CLICK HERE to get FREE QUOTES from local companies that can do chip seal and tar and chip.

December 1, 2011 AsktheBuilder Newsletter And Tips

What's in This Newsletter?

Latest News
Wet-Dry Vac Top Tips
Insane Checklist Sale
My Christmas Gift Guide
Facebook News

I've got just TWO quick things for you - well actually three.A monster REGULAR newsletter comes out next Tuesday.

I'm going to share with you a fantastic book I just read about the Vietnam War. It was sent to me by a Veteran. It was POWERFUL.

And wait till you read about Cheryl's trip to the hardware store in South Africa!


Wet-Dry Vac Top Tips

Who would have ever thought that's Bob's email to me about how he used his wet-dry vac to unclog a tub drain would snowball!

I continue to get other great tips sent to me.

A light bulb went off.

How about YOU and I create the world's largest collection of CRAZY UNIQUE things you can do with a wet - dry vac? You send in a great tip and your name will appear right there with the tip. You'll be famous!

This is going to be a FREE guide I give away to anyone who comes to the AsktheBuilder.com website.

Maybe it's a tip where you use one in reverse - the blower aspect.

Whatever your unique and most helpful uses are, SEND them to me now. Please change the Subject Line to VAC.

Please put in your name, city, state, country, whatever so I can CREDIT you. If you want to be anonymous, just say so.

If this turns out well, we'll do it with countless other topics. What do you think?


INSANE Checklist Sale Ends in 72 +/- Hours

Want ALL 31 of my checklists that usually sell for $17 EACH for just $79?

You now have only about three days left (sale ends December 4, 2011 at Midnight ET) to take advantage of this. Do the math.

$17 X 31 = $527. You SAVE well over $400.

Kathy has been distracted and luckily no one has forwarded her a copy of the last newsletter. You better hurry before she finds out.


My Christmas Gift GuideMy Christmas Gift Guide

Have you downloaded and looked through my Christmas Gift Guide? You should!

Just go here and CLICK the giant cover of the gift guide.


Facebook News!

AsktheBuilder on FacebookDo you use Facebook? I've got a Facebook Fan Page that really sees some action during the week.

We have lots of fun there each week. Go look for yourself..

Please go there now and LIKE me so you can start to get FREE tips from me when you login to your Facebook page.

Advantech Flooring Tips Video

Advantech Flooring Tips

Hi, I'm Tim Carter and I'm out here on a jobsite in a light rain. Look at this. The carpenters are putting down the subfloor. This is an OSB product called AdvanTech.

The claim to fame for this particular product deals with swelling. In the past when I installed OSB, it could swell if it got wet and it won't come back down to its original shape. But this product will be as smooth as the day it was installed.

Even with a quarter-inch of water standing on it, if we came back tomorrow, it would still be flat. No swelling, no nothing. Really neat. So if you are going to do an OSB subfloor system, be sure you use a product like this.

Foundation On Bedrock Video

Hi, I’m Tim Carter from AsktheBuilder.com and we’re at a new construction site here in New Hampshire. I want to show you something interesting about how they dug the hole for the foundation and how they got it ready to pour the footer.

There is solid bedrock at the bottom of the hole. They used a machine that blasted through the rock like a giant jackhammer. They dug the hole a little lower then they needed and here’s what they did.

The footer they poured is about 10-inches high. It looks like it is poured on a very thin layer of sand. However, this is really a layer of coarse rock, about 2-inches in diameter and very angular. This was compacted and leveled to provide a flat surface to pour the footer. The footer is not poured directly on to bedrock. The bedrock would be to irregular for the footer.

This is one way to prepare the foundation hole to pour the footer on top of bedrock.

November 28, 2011 AsktheBuilder Newsletter And Tips

What's in This Newsletter?

Latest News
Hand-Powered Sanding Trick
Wet-Dry Vac Follow Up Tips
Flash Checklist Sale!
Dangerous Backdrafting Issues
Help Stop a Monopoly
Facebook News

Yes, I know I just emailed you yesterday. But today is the infamous Cyber Monday!I don't want to be outdone by all those other websites, especially since you and I are friends.

I want you to be able to save some sweet moola with me that you can then use it to buy some other gifts!

Before we get to the unbelievable offer, here are a few tips:


Hand-Powered Sanding Trick

Keith Elder emailed me after the last newsletter was sent. He said:

"Just thought I would share a little discovery with you.  When you have those tiny areas which need sanding, instead of folding sandpaper, go to the dollar store and buy a batch of emery boards. You find them in the nail polish section. They are basically sandpaper on a stick and work really well."

Great tip Keith! I'll add that to get in tight spots take a scissors and trim the emery board to an arrow point.


Wet-Dry Vac Follow Up Tips

Beverly Saltonstall wrote to me after seeing Bob's use of his wet-dry vac to clear his tub drain clog in the last issue:

"I liked your wet-dry vac trick.  Every now and again, I plug up my garbage disposal and it throws up!!!!  I get the handy shop vac out, suck everything out and it is working good as new again.  I have an old Craftsman 16 gal vac that has to be near 25 years old.  I empty my pond with it and use it for all kinds of stuff, and it is still chugging along.  Great stuff those old Craftsman products!"

I want to also add that be sure to stuff a wet rag tightly over the tub overflow as you put the hose of the vacuum on top of the drain to get maximum drain-clearing power.


FLASH Checklist Sale!

Checklist SaleFor years, I've sold these great checklists that help you know the most important parts of a job. They really help you find a pro to do a job, or if you're a DIYr, going through the checklists HELPS YOU know where to really pay attention.

I've got about 31 of these bad boys from Interior Painting, to Bath Remodeling, Kitchen Remodeling, Room Additions, and even New Home Construction.

If you went and bought each one separately, you'd spend over $500. No lie. Do the math.

Just ONE checklist can save you hundreds of dollars in mistakes and immeasurable frustration and stress.

I do now sell them in bundles. For example, the Indoor Projects Bundle costs $61. The Outdoor Bundle costs over $80. Those two contain just a handful of ALL of the checklists.

Since it's Crazy Cyber Monday, you can have ALL of the checklists, even my WalkThrough Inspection Checklist for only $79.

That's insanity - on my part.

This deal expires when one of these two things happens:

Kathy finds out what I've done - she'll kill me. Fortunately she doesn't read my newsletter.

or

I'm still alive on Sunday December 4th at midnight Eastern Time and stop the sale.

If you're an old-time subscriber, you KNOW this is a crazy insane sale price.

You'll regret not taking advantage of it. I know that for a fact.


DANGEROUS Backdrafting Issues!

This is the time of year people die from carbon monoxide. If you did a kitchen remodel job recently and installed a powerful vent fan, be aware they can be deadly.

These fans can exhaust tremendous amount of air and they will get the replacement air from the source of least resistance.

That source could be the flue of your furnace, water heater, or other fuel-burning appliance. It could suck in exhaust gas into your house when those fuel-burning heaters are working!

Then there's the triple whammy. Imagine someone having the exhaust fan on high, another person is using the central vacuum and someone else is taking a shower using that exhaust fan. See the problem?

Read this past column of mine to see how to solve the problem. The link to the video about the same vent is right there in the column. Watch it!

If you want one of the cool vents I talk about in the column and video, I'll arrange with Jimmy to get you one. Who's Jimmy? He's the inventor! REPLY to this newsletter email and put "Jimmy" in the subject line. I'll hook you up.


Help STOP a Monopoly - READ THIS!

If you're a seasoned subscriber, you know where I stand with increased government in my life and yours. Grrrrrrr.

Here's a very important factoid: Since the 4th quarter of 2007, there has been only ONE reported incident of a table saw blade contact with the already existing improved saw blade guards. One incident!

It's a long story, but a clever man has pretty much cornered the market on table saw safety. He's lobbying HARD with the Consumer Product Safety Commission to have a new regulation passed that will drastically increase the cost of any table saw.

I'm VERY MUCH against this regulation for many reasons. The bottom line is the tool industry can, and has done, an excellent job of increasing tool safety.

Go to the Power Tool Institute website and read much of the information on the home page. I HOPE it motivates you to Send a Comment to the CPSC while you're there. You'll see the handy buttons to send a comment.


Facebook News!

AsktheBuilder on FacebookDo you use Facebook? I've got a Facebook Fan Page that really sees some action during the week.

We have lots of fun there each week. Go look for yourself..

Please go there now and LIKE me so you can start to get FREE tips from me when you login to your Facebook page.

Water Damage Tips

DEAR TIM: I was at a party this weekend and of all the crazy things to talk about, a discussion started about what's the biggest danger to a house falling down. Wind, poor soil, bad foundation, poor construction, ultraviolet light, etc. were all debated heavily. I so wish you would have been there to settle the debate. What, in your opinion, is the biggest danger to a house? Can you give examples and then offer solutions? Mike C., Bar Harbor, ME

DEAR MIKE: The answer was right there in front of all of you! After all, you live immediately adjacent to the ocean there in Bar Harbor! Had I been invited to the party, and mind you I would have driven from New Hampshire to get there, I would have done my best to convince the crowd it's just one thing: water.

This house is succumbing to the methodical attack by rain water. The water will win in the end unless the wood surfaces are maintained. PHOTO CREDIT:  Tim Carter

This house is succumbing to the methodical attack by rain water. The water will win in the end unless the wood surfaces are maintained. PHOTO CREDIT: Tim Carter

If houses could talk, and in a way they do when they finally collapse, they'd be screeching like the Wicked Witch of the West did when doused with water at the end of the L. Frank Baum's children's book The Wonderful Wizard of Oz.

I realize we can't go back in time and talk with the builders thousands of years ago, but the circumstantial evidence they left for us all around us screams that they knew that the strongest building material is stone. Look at all the great buildings that are still standing after thousands of years. They have one thing in common - stone.

And granite is perhaps the most durable of all. These wise builders knew that water quickly caused wood to rot. They realized that if they wanted to build something that might last thousands of years, they had to use stone.

But even stone is not immune to destruction by both wind and water. All you have to do is visit the Grand Canyon to see what ever patient water can do when combined with gravity. Look at how wind and water are eroding the great Sphinx.

Here in the USA, we still build primarily with wood because it's very cheap when you consider the other options. But the wood we use today in no way resembles the wood taken from the forests 200 years ago. Many of the old growth trees that were felled by our ancestors had much tighter growth rings. In these trees, the summer wood that's much denser and far more resistant to rot made up a much larger percentage of the wood in the tree than the framing lumber you and I can purchase at a lumber yard.

When water saturates wood, it's the fuel to start wood rot. If allowed to continue, as you see happen in abandoned homes or ones that are occupied and neglected, the house, or parts of it, will collapse.

Water will blast apart masonry chimneys over time, it will do the same with rock foundations, and it absolutely will conquer poured concrete given enough time. Add in some freezing weather to this recipe, and the destruction of brick, concrete, stone, etc. is accelerated from the expansion of the water that seeps into micro cracks and then freezes.

Water will attack and corrode steel or iron in a house. Think of how steel is used to support primary structural elements in a home and how thousands of uncoated steel nails are used to connect critical pieces of wood framing. Water laughs at the thin electro-galvanized coating on certain nails used in residential construction. In just decades, it can wear through this and attack the steel core. This is why double hot-dipped galvanized nails are better, and stainless steel fasteners are the best.

Look back at the builders of old and you'll discover they knew all of this. They used simple felt paper to cover the wood framing of houses to keep them dry. The masons of old knew to use mortars that contained lots of hydrated lime in them, as this material would work over time to actually heal tiny hairline cracks in the mortar where water would try to enter.

The roofers of old knew to use 40-pound tin coated steel or copper for roof flashings. These materials could last well over one hundred years and could be soldered to prevent water from touching the wood. These same roofers knew that using stone as a roofing material, slate, would help slow down water's relentless attacks.

The sad thing is that much of the hard-earned knowledge of the older builders is being lost. All of their knowledge can be found in many older homes. You just have to look for it.

You'll see they knew all about stone, slate, copper flashings, heavy felt paper, etc. They also figured out that generous roof overhangs would help keep water away from houses just as we use an umbrella in a rain shower.

The older builders also knew all about the surface tension of water. Who would think that would be something you'd have to worry about? But that's why masonry and wood window sills had a kerf channel cut into them on the front edge of the underside of the sill. This channel causes the water to stop and turn into a droplet that falls to the ground instead of clawing its way under the sill towards the wall face.

I feel there's an abundant amount of evidence that proves that water is the primary foe of a house, and that the long lost builders knew it and tried their best to educate us.

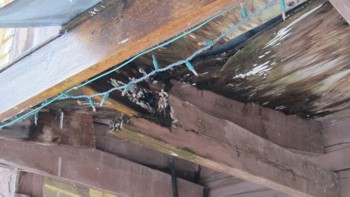
Severe wood rot has decimated the roof rafter and the plywood roof sheathing. You can see the white wood fungus growing on the underside of the plywood.

Severe wood rot has decimated the roof rafter and the plywood roof sheathing. You can see the white wood fungus growing on the underside of the plywood.

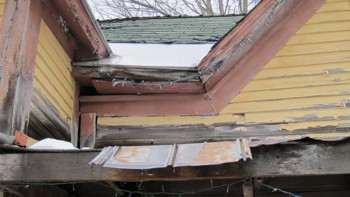
Wood rot is causing the center portion of the house to collapse and pull away from the left section. This is what's causing the giant opening just below the roof overhang.

Wood rot is causing the center portion of the house to collapse and pull away from the left section. This is what's causing the giant opening just below the roof overhang.

Column 911