What's in This Newsletter?
Latest News
Retaining Wall Design
Deck Cleaning Season
Leveling a Floor
Montrose, CA Meet Up
Austin, TX Meet Up
ATB Survey
Disclaimers & Other Stuff
Latest News
I'm typing this at 38,000 feet as I fly Southwest 897 from New Hampshire to California. I'm starting a 12-day business / pleasure trip that ends up in Austin, TX. Lisa, the humorous blonde flight attendant on this leg of the trip joked about Bearnaise sauce on my fantasy meal that I asked her about. She said it would be exceptionally good today. Three hours into the flight, I'm still making do with a small packet of Lorna Dunes while I wait on the steak and mashed potatoes on this 5.5-hour flight into LAS.
My long-sleeved tie-dye shirt must have set off the TSA profiling this morning. I was pulled from the line and screened for explosives. I passed with flying colors even though hours before I was handling ammo loading a gun. Looks like my pre-dawn shower saved me! Go Dove soap!
Too bad I don't use an iPhone any longer. If I did, I could really use the new California Essential Guide application. It's a handy travel app loaded with video content created by a subscriber to this newsletter, Veronica Hill. Veronica used to edit and publish my weekly column when she was the Features Editor of the Victor Valley Daily Press.
Veronica has transitioned from the newspaper industry to the Internet. She's become the go-to authority on California travel. If you plan to come to the Golden State to see the sights, don't do it without her new app. Hurry Veronica, make a version for my Android phone!
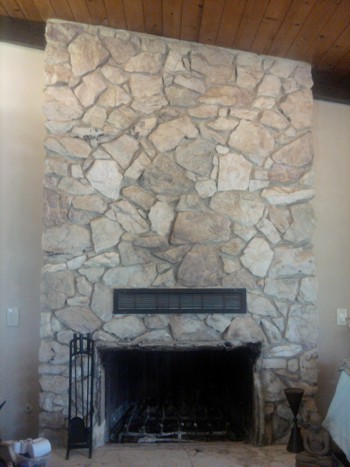
Retaining Wall Design
Is a retaining wall job in your near future? My retaining walls up in New Hampshire are starting to peek out from behind the snow. Remember that gravity wants to tip them over. What's more the taller the wall, the tipping force grows exponentially. Consider leaning the wall back to account for this. We call that batter.
If you're building the wall from just stacked stone, the taller the wall the larger the stones you need to use to make the wall last longer than you. Be sure to bury the first course of the wall into the soil about one-third the height of the first row.
I've got many more tips for you about retaining wall construction at my website. Take some time and read the past columns there.
Deck Cleaning Season is Here
On Sunday, Kathy and I had to drive our youngest daughter back to URI as spring break was over. It didn't seem like spring as we pulled up the driveway past piles of snow still 4-feet high.
But think about it. In just 9 weeks or so, the boats will be zipping up and down the lakes up here and everywhere for the official start to the summer - Memorial Day weekend!
If you're going to clean your deck to seal it, you surely want to consider doing it with my Stain Solver oxygen bleach. It's not toxic like chlorine bleach. It's safe for all your plants and landscaping. It won't turn the wood white like chlorine.
Here's the BEST part. We've switched to all-new packaging, sizes and pricing but I still have a few of the older, less-expensive size of Stain Solver at my AsktheBuilder.com shopping cart.
To clear those out of the warehouse, I'm having a honest-to-goodness clearance sale. If you want Stain Solver for just about the lowest price you'll ever see again, now is the time to buy it.
The quantities of each size are limited. When they sell out, you'll see the new size on the page with the higher price. There's no need for a promo code as I've already discounted them 20 percent. Go NOW and get the last of the old containers at this amazing price.
Note: This sale is only at the AsktheBuilder.com store. If you go to www.StainSolver.com, you'll not see the special pricing. You can go to the Stain Solver website to learn all the cool stuff about it, but use this link to get the special pricing.
Leveling a Floor
Gail and John visited me yesterday to look at my refrigerator I had listed on Craigslist. Once they discovered who I was, they had a question about a basement remodel job.
The previous homeowner installed a plywood floor on flat 2x4 sleepers that he didn't shim. The floor had more humps and dips than an old country road.
John was about to tear up the flooring to start over. I suggest an alternative. What about two quick coats of water-based urethane over the plywood and then mixing up some self-leveling floor compound? The urethane prevents water from entering the plywood that could cause it to swell and buckle.
They loved the idea. See what happens when you come visit me face to face? You get personal service to your home-improvement problems!
The Montrose, CA Meet Up
I may be meeting you for the first time in person in on Wednesday, March 30th! I've already got quite a few RSVPs for the informal meet up at the Coffee Bean and Tea Leaf in the center of downtown Montrose, CA at 1:00 pm.
It's located at the corner of Ocean View Boulevard and Honolulu Avenue. Some moms are bringing their sons, so there's no excuse for you not to be there other than work, distance or health reasons. My buddy Don Vandervort said he'd show up so if you have any home-improvement question, we'll be able to help you.
The Austin, TX Meet Up
On April 6th at Noon, I'll be doing another meet up. This one will be in downtown Austin, TX within walking distance of the Hyatt hotel. I'll decide where it will be in a few days and send that out. Did I say how much fun the meet ups are? I'll post a photo of the Montrose one the AsktheBuilder Facebook fan page.
Here's what you missed in the last few days by NOT being an AsktheBuilder fan on Facebook:
We did another guessing game about a unique metal bar I took a photo of. I helped Kelly determine how fast to jack up here sinking home. Elice had a mystery clunking noise in her sump pump. We solved that together. Kristin had a wallpaper question about her new post and beam home. And much, much more!
ATB Survey
Several days ago, I asked for your help. I'm doing a massive make over of the AsktheBuilder website. I'm not removing any of the content, but I'm interested in what you want MORE and LESS of.
The early results are absolutely unbelievable. You may have taken the time to share some real gems that will really help make the website better.
To put it mildly, the survey results are highly stratified. One thing's for sure, and this is nothing new, it's impossible to satisfy everyone.
I did want to share one quick fact with you. A few people commented on the unanswered questions in the Comments section below each column. Years ago I started to answer questions there and had to stop because it was taking hours and hours of time each day.
There is now so much traffic to the website that I could spend 24 hours a day and never get a lick of work done. That's why I put the announcement pointing you to the Ask Tim page if you have a question.
A member of my staff spends all day dealing with these questions and passes off the ones she can't answer to me. We at AsktheBuilder.com appreciate your patience when you use this free service.
Tim Carter
Founder - www.AsktheBuilder.com
Do it Right, Not Over!
Disclaimers and Other Stuff
I do product reviews frequently. Please read my Disclosure Policy to understand the relationship between me and the companies that make the products or offer the services I review.
PERIODIC OFFERS: This is a free newsletter filled with thousands of dollars of advice for your use and pleasure. From time to time I do offer you some of my products to help offset the time and resources I put into this newsletter. I hope that you consider this when you see me make you an offer.
FOLLOW ME ON TWITTER
Friendly Question Reminder!
If you have a question for me, don't hit the Reply button just yet. Go immediately to my web site and type in the keywords about your problem into my Search engine. The search box is at the top of every page of my web site. You could have your answer in seconds if you do this! Please pay attention to all links you see at my web site. The exact products and services you often need are right in front of you, and you might be ignoring them.
AsktheBuilder.com
100 Swain Rd
Meredith, NH 03253, USA