Urethane Grout

DEAR TIM: A bucket of premixed urethane grout got my attention at a tile store. The salesman was chanting all the benefits of this new product, but I’m a little skeptical. What’s the difference between urethane tile grout and traditional tile grout? Is this grout in a bucket just a fad? Do you think it’s as durable as traditional cement-based grout? Would you use it in your own home? Saundra P., Lexington, KY

DEAR SAUNDRA: A little over a month ago, I discovered this fascinating new urethane grout. I’m getting ready to test it on a small project so I don’t have any real testing data to give you. However, I can tell you that based upon my research so far, it appears to be a top-line product that I’ll use in my new home project that’s starting soon.

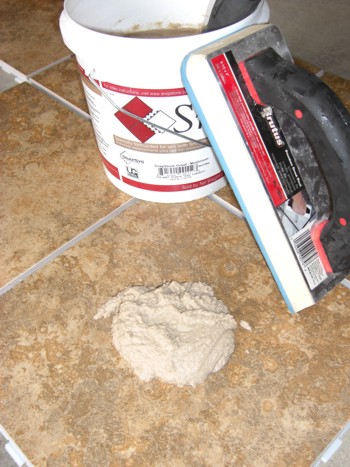
Yes, the urethane grout is premixed and comes in a bucket ready to go! PHOTO CREDIT:  Tim Carter

Yes, the urethane grout is premixed and comes in a bucket ready to go! PHOTO CREDIT: Tim Carter

I can understand being a skeptic with respect to home-improvement products. Failures can be expensive and time consuming as most things we install in our homes are meant to last. The last thing you want to be doing is chiseling out defective experimental grout from a tile floor.

The good news is that there have been hundreds, if not thousands, of innovative products over time that have quickly proven they have the mettle to withstand Mother Nature and the abuse we humans generate. I feel this urethane grout will be another one to add to the list.

Let’s talk about the differences between the urethane grout and cement-based grout. Because urethane grout is only available in a sanded version, we’ll limit the comparison to those two products.

Both products have a fine aggregate, usually fine silica (quartz) sand, as the foundation of the product. This sand is what really produces the strength and durability of grout. Silica has a hardness of seven on the Mohs scale, and not too many naturally occurring things are harder than quartz. When sanded grout is dry and you rub your finger across it, you can readily feel this sand.

Urethane grout is premixed. You open a bucket, stir it to fold in any of the urethane polymer that’s separated during shipment and immediately get to work. Cement grout is a powder you mix with water. If you add too much water, you can significantly reduce the final strength of the grout. Unequal amounts of water in different batches can lead to mottled coloration of the dried grout. Cement-based grouts are dusty when you pour and mix them.

The urethane grouts use polyurethane resins and polymers as the binder to hold together the sand particles. Traditional grout uses Portland Cement. Urethane is very sticky and bonds exceedingly well to just about anything.

The pigments in the urethane grout are a special coating that’s permanently bonded to each of the fine sand particles. The finished colors of the grout are solid, colors that are ultraviolet stable. They will not yellow nor fade when exposed to harsh sunlight that might stream through a patio door. Pigments in traditional grouts are powder additives that colorize the cement which then coats the silica sand. It can wear off over time. You’ll see this on older grout floors as the sand particles look white or a light color.

Because urethane grouts air dry, you have to wipe off any excess grout film quickly from the tile surface. It’s best to just work a small area of probably 10 square feet at a time. Always squeeze all the water from a sponge as you gently wipe and film from the surface of the tile. Excess water can weaken urethane grout.

The drying or curing time for these urethane grouts is about the same as cement-based grouts, however in very humid locations the curing time will be longer. They’ll not achieve a great hardness until the water in the emulsion has a chance to evaporate. Simply follow the instructions on the product label and you should be fine.

You’ll discover that the urethane grouts are more expensive than the cement-based products. However, factor in that the urethane grouts are more flexible than traditional grout. If there is slight future movement, a cement-based grout will usually develop a hair-line crack. The urethane grout may be able to withstand that stress without cracking.

If you’re a rookie and don’t know how to mix grout, the urethane grout takes away all that worry. You simply open up the bucket, mix and spread. If you have any leftover, you can save it if you follow the directions on the label. Once traditional cement-based grout is mixed with water, it will harden. You can save leftover dry cement-based grout, but you must tightly seal it so that humid air will not react with the cement powder.

Column 825

March 31, 2010 AsktheBuilder Newsletter And Tips

What’s in This Issue?

Latest News
Selling My Home
Home Inspectors
Pearl from Trinidad
Albuquerque Meetup
Stain Solver Sale Postponed
Construction Details
Tim’s Tools

I do product reviews frequently. Please read my Disclosure Policy to understand the relationship between me and the companies that make the products or offer the services I review.

FOLLOW ME ON TWITTER

Friendly Question Reminder!

If you have a question for me, don't hit the Reply button just yet. Go immediately to my web site and type in the keywords about your problem into my Search engine. The search box is at the top of every page of my web site. You could have your answer in seconds if you do this! Please pay attention to all links you see at my web site. The exact products and services you often need are right in front of you, and you might be ignoring them.

Latest News

Since the last newsletter, I've been busy. We did the final push here at my Cincinnati house getting it ready for the first Open House, which was this past Sunday. My good friend Roger worked here for three days helping pack up my office and do any number of other tasks. Without his help, I was doomed. Kathy and I are both beat as you might expect. I know Roger was tired too!

Selling My Cincinnati, OH Home - Who Wants the AsktheBuilder Home?

If you've been a subscriber for the past year, you know I've been getting the house ready for sale as I've been in New Hampshire while Kathy was here in Cincinnati with Kelly. Both come to NH in August. Be sure to look at the photos and videos.

The Cincinnati Enquirer did a feature article on the house two weeks ago. The reporter, Amy Howell, did a magnificent job capturing the back story.

Here's the bottom line: You can buy the house. As you can imagine, it's truly one-of-a-kind. Or, if you know someone who wants it and they buy it, I'll pay you a finder's fee. All they have to do is identify you as a subscriber to my newsletter. I'll pay you a one percent finders fee. Do the math. That's a big number.  The house is in excellent condition, as you might expect, and shows really well. Be sure to look at all the pages at the website.

Home Inspectors - Be Careful Out There!

While on the subject of my house, I'm confident the buyer will order a house inspection. No worries, as there are no major defects in my home.

But what if the wrong inspector shows up? Overnight I got a very troubling email from a home inspector named George that lives / works in New York. I'd prefer not to tell you his last name or the city for the obvious reasons.  Here's what he sent to me:

"Mine is not a question but a comment. The present day fiber cement siding was started to be made in the mid 60 when asbestos fell apart. You are misleading people when you tell them it has been around for 90 years. The product we see today is a blend of cement, cellulose, and silicate. It does and will wick water if not sealed at cuts. It will fall apart and turn into mush if exposed to prolonged or constant moisture contact I worry as a Home Inspector when I see information like this. Please rethink these statements. I teach home inspectors, one of my classes is on Fiber Cement siding products."

So what's the error here?  He went to my website where I have at least four or five columns about fiber-cement siding. The first few were written about ten years ago and document the history of the product. Here's the first column I wrote about fiber-cement siding.

You'll note in the column I clearly state that the original fiber cement used asbestos. Then at a later time, asbestos was removed and wood fibers substituted in its place.

Within the past two years, I wrote the latest column on fiber-cement siding talking about how it's having problems. This is what the inspector talked about in his email to me.

So what's the problem? In my opinion, this inspector - and he says he teaches other inspectors - isn't very thorough or he misinterprets things he sees. I never said in my columns that the original siding had wood fibers. I clearly state in the other one there are moisture issues.

What if your inspector makes mistakes like this while looking at a home you're buying? George gave me his phone number and said I can call. You bet I will today.

The first thing I'll be asking him is if he carries any certification. I'll wager you one pint of mocha chip ice cream from Aglamesis that George is *not* ASHI certified. If you want to take this bet, then email me immediately.

Pearl from Trinidad Needs Tile Advice

I just got an email from Pearl Bhagan who lives in Trinidad, West Indies. Here's what she wrote:

"We have made a tub enclosure from cement board. Other than using tiles over the cement board, what can I use that would look spectacular? Thank you so much."

Pearl sent a photo of a dramatic layered platform with steps leading up to the tub. She's mixing two different tiles and granite. So there's lots going on.

I suggested that she might consider accent tile in the field tile above the tub area. There are colored tile you can use for this as well as textured tile with unique patterns. You can also create your own design like my daughter did for her tub/shower area. Go to my past column about Granite Tile.

Albuquerque Meetup!

Last week, I announced I'll be in sunny Albuquerque, NM, April 16-20th. You and I can get together! I'll be in town for a secret Internet conference. My initial invitation may not have been enticing because I talked about golfing or lounging around the pool with you at the resort. That offer is still open. However, maybe you don't golf or soak, and instead you want to drink some bean juice. I'm doing that too!

Two of my very close Internet buddies will also be in town for the event. Randy Cassingham of This is True and Leo Notenboom of Ask Leo.

Designed for the Somewhat Smarter Reader

http://ask-leo.com/

Both of these wise men have newsletters similar to mine and are inviting their subscribers. We're all going to meet at Starbucks on Monday April 16th, between 5 and 6 p.m. Be at the Starbucks at 901 Rio Grande Blvd, Suite A-190 about 1/2 a mile north of old town. I'll be tweeting the event. See my Twitter address above.

Stain Solver Sale Postponed

Because it's Easter week, I'll not do the Stain Solver sale. Look for that huge announcement next Tuesday.

Construction Details

I get requests every week from visitors to the website about how things should be built or connected when you are doing building or remodeling. For example, you may want to know how a deck post should be anchored to a concrete pier. You may want to know the best pier design. A pier is a vertical column that transfers the weight of a structure to solid rock or good bearing soil.

You may want to know how to frame a wall. What does a door header look like? How many studs do you have under a header at a door or window? Maybe you want to know how to pour a footer or build a block wall and need a simple drawing of its cross section. Does this make sense?

Anyway, I've decided to build a collection of these construction details and sell them for next to nothing to help you build things the right way.

Here's where I need your help. What do you want to see? What are you having trouble visualizing? Email me back and *please* change the Subject Line to:  Construction Details. I'll get started on this project immediately.

Tim's Tools

I want to announce another new feature at AsktheBuilder.com. Frequently, I get emails from people asking me what tools do I use and what products can be found in my home. It makes sense. If they work for me and I feel they are great quality, you'll feel comfortable about buying the same thing.

Here's a new page we just built and it will grow for sure. All the things you'll see here I own and use on a regular basis. I'll never put anything on this page that I haven't tested and like. So you can purchase them with confidence.

The links are affiliate links to Amazon.com. This means if you buy the item via that link, I do make a small commission. It's only fair that you know that. These are tools I'd have my Mom use if she was still here.

AsktheBuilder.com

Hanging Window Coverings

DEAR TIM: Window coverings are part of building or remodeling, so I felt you’d know a little bit about them. Is it hard to install blinds and window coverings? What things do you have to think about when you’re working with them? I just saw an ad for solar window coverings that says I’ll save all kinds of money. Is that true? Should I even consider discount window coverings, or will they fall apart? I don’t want to waste money. Krista B., Sammamish, WA

DEAR KRISTA: I know enough about drapes, curtains, valances and window coverings to be highly dangerous. All you have to do is ask my wife. Just this past weekend she walked away from me in complete frustration after I hung a window covering at the wrong height. I made a bonehead mistake that had me using my pry bar to take out the carefully placed brackets so they could be lowered to the correct height.

These simple window coverings were made by my wife in an afternoon. PHOTO CREDIT: Tim Carter

Installing window coverings can be somewhat problematic. There are all sorts of things you have to take into consideration when working with the hardware and the surfaces in and around the windows. Years ago, I remember my Dad swearing at the plaster walls as he blasted craters next to the casement windows while trying to install simple rolling blinds. The tiny nails and screws shattered the plaster and didn’t hold well at all.

There are other things that can go wrong, some of which you might not discover until you’ve already spent hundreds or thousands of dollars. For example, you may love a heavy curtain rod that mounts on the wall beyond the outer edges of woodwork trim. Imagine what happens in a bay window situation where the window trim is somewhat close to the intersecting corners of the angled walls? Yes, the curtain rods can interfere with one another.

You may have an installation emergency working with wide windows. The metal rods can easily droop once the window covering fabric is attached. You’ll need to ensure there is a way to support the hardware so the coverings are straight and not sagging. Not only will you need a small hook, bracket or other piece of hardware, but you’ll also need a place to insert it that won’t interfere with the operation of the window. As you can see, there’s lots to think about.

I had to deal with this sagging issue recently. It can really be an issue with windows that are found in thicker exterior walls like mine. My one home has walls framed with 2x6s instead of the more common 2x4s. This means the windows are two inches farther away from the inside surface of the wall.

In my case, the window coverings and valances were hung in the same plane as the interior wall. These were suspended by a thin round tube that could only span 26 inches without drooping. My window was nearly 5-feet wide so I had to install a vertical wood trim piece that projected from the center of the two windows back towards the room about one and one-half inches. This piece of wood was the perfect solution allowing me to screw in a simple L-hook that held up the small round drape rod.

We may have seen the same marketing push for the solar window coverings. These products are very intriguing, as I like everything solar. The ones I saw contain a fluid that heats up and stores this heat only to release it later after the sun goes down. You only install these coverings on south-facing windows.

My mantra with products like this always focuses on the real payback savings. Remember, you never ever save money on any home-improvement energy-related purchase until such time as you get back the money you spent, plus interest, in fuel savings. Simply put, if you spend $1,000 on these window shades, you don’t save a penny until you actually experience fuel savings in excess of $1,000. Then, after that time, you do start to save. Be aware that some payback periods can easily exceed ten or more years. These payback periods can be reduced by rebates, tax credits and other incentives.

Be very careful with discount products. They may be made with inferior materials that quickly degrade once exposed to harsh ultraviolet light from the sun. Any hardware that comes with these products may also be of marginal quality.

Measuring for window coverings can also be a challenge. Mistakes can be expensive, especially for window treatments that fit within an opening. Window coverings that extend sideways and below a window can be much more forgiving.

If you’re building a new home or doing an extensive remodel job, consider installing solid-wood blocking in places where you’ll be installing hardware. This requires the preselection of your window coverings early in the job so that you can tell the carpenters where to place the wood blocks. You’ll never regret installing these simple scraps of lumber.

Column 824

March 23, 2010 AsktheBuilder Newsletter And Tips

What’s in This Issue?

Happy Spring
Painting Vinyl Siding
Ask Me, but ...
Deck Cleaning
Pressure Washing
Travel News
Latest Columns
Tim Carter’s Fire Pit

I do product reviews frequently. Please read my Disclosure Policy to understand the relationship between me and the companies that make the products or offer the services I review.

FOLLOW ME ON TWITTER

Friendly Question Reminder!

If you have a question for me, don't hit the Reply button just yet. Go immediately to my web site and type in the keywords about your problem into my Search engine. The search box is at the top of every page of my web site. You could have your answer in seconds if you do this! Please pay attention to all links you see at my web site. The exact products and services you often need are right in front of you, and you might be ignoring them.

Happy Spring!

It's official, Spring is here and now's the time to start thinking of all those projects you'll be doing this year. I'm here to help as best I can. The next few issues of this newsletter will focus on things that I hear about in the spring: deck cleaning, pressure washing and, believe it or not, gutter guards.

Painting Vinyl Siding

Bill Hutchin from Flemington, NJ wrote:

I've read your article about painting vinyl siding.  My question is: Should the siding be brush painted or sprayer painted?

Bill, you can do it either way. If you decide to spray it, you better work on a calm day. You'll also spend lots of time covering all the things you don't want paint on like windows, doors, etc.

If you've never used a sprayer before, be sure you practice with it until you get the paint consistency correct and the proper technique of using the tool. Once you master it, they do a great job.

Be sure you use a paint that has a combination of urethane and acrylic resins. These will bond best to the vinyl. Sears Weatherbeater ULTRA and Sherwin Williams Duration both contain these the last time I checked. Finally, you really need to clean the siding well. Liquid dish soap and water with a scrub brush or great sponge should do well. Don't try to do this with a pressure washer as you can easily get water behind the siding.

Ask Me, but ...

You might have a misconception about Ask the Builder. Let me tell you what happened last week to me. A few days after a subscriber got my newsletter, he hit "Reply" and asked me a series of questions that would have required me to type a response perhaps 10,000 or even 20,000 words.

The project he needed help with was enormous and he pretty much expected me to guide him through it because, after all, I'm Ask the Builder. When I told him that I didn't offer that platinum service, he was pretty upset.

As you might expect, no one has that kind of time, well, at least I don't. I do get many, many questions each day, but most can be answered in one sentence - or the answers are already at the website in a past column or video of mine. Please always take your time to scour the website before you ask a question.

I know you may not believe this, but the ads you will undoubtedly see at my website often are the exact solution to your problems. Why? Because they are contextual. This means that the ads match almost identically to the products I describe in my columns and videos. Ignoring those ads can cost you hundreds, if not thousands, of dollars.

Deck Cleaning

Ten days ago, I gave four talks at the Cincinnati Home and Garden show. It was loads of fun and the last one was packed. The audience even clapped when it was over. That made me feel like it was worth it to come 1,000 miles to give the talks.

I promised JoAnn Kirchgessner that I'd mention her. She attended the show with two friends. JoAnn is the hair stylist that cut my hair a few years ago. She owns "A Little Off the Top" on Harrison Avenue in Cincinnati. JoAnn, there's less and less to take off the top lately, especially near the back!

One of the things I talked about on one of the days was the issue with BAD information out there. You can get bad home-improvement information on the radio, TV, magazines, and newspaper columns (not mine!).

The day of my first talk, The Cincinnati Enquirer had a column in it from Martha Stewart about cleaning decks. It's syndicated like mine, but I had no idea this diva had any knowledge of how to properly clean a deck. After all, she's a cook right? Oh, and she knows how to do extravagant decorations.

Well, I was right. She has no idea. I read part of her column at one of the presentations. In it she, actually her ghost writer, said to mix chlorine bleach with water to clean the deck. WRONG! Chlorine bleach is toxic to all surrounding plants and trees, will take the color out of the wood, and it destroys the lignin that holds wood fibers together. It's also corrosive.

You want to use Oxygen Bleach instead. Oxygen bleach will not hurt plants, restores the wood to it's original color and will not accelerate corrosion of any fasteners or structural framing connectors - yes, chlorine bleach will do that.

Where do you get oxygen bleach? I happen to sell the most powerful in the USA and in a week I'll be announcing the huge annual Spring Sale. Watch for that next week. You do not want to miss this sale. Why? Because we only do it once a year.

Pressure Washing

I can't tell you how many wood decks I've seen ruined by pressure washers. I've even taped a video about this. It's a little corny, as it was taped to play on the local ABC-TV affiliate in Cincinnati about nine years ago. They wanted me to be as entertaining as possible when I taped with them, thus the wardrobe you'll see.

Pressure washers are great machines. In fact, I'm about to begin testing a great one from Campbell Hausfeld. I'll have that review for you next week.

But a pressure washer can cause severe damage to wood - if used improperly. The concentrated stream of water will easily erode the soft spring wood that's between the darker bands of hard summer wood.

Be very, very careful if you decide to use a pressure washer on a wood surface. Start with as wide a tip as you can and don't use anything less than a 25-degree tip.

Travel News

When I travel, I try to carve out time to visit with you. I'll be in Albuquerque, NM, from April 12-16th. I'll be at the Hyatt Tamaya resort for a conference. If you're a golfer, you can play with me on Tuesday and Friday if you choose. There are four of us playing on Tuesday, but only two of us on Friday. If you don't care to chase white balls, then we can possibly meet one night for liquid refreshments at the resort and soak in the hot tub. Email me soon so I can adjust my calendar.

Latest Columns

Need to Clean Tile Grout? Yes, you need Stain Solver.

Steel Beams are Strong as Can Be!

Hiding an Indoor Pool

Bathroom Tubs - Lots of Choices

Tim Carter's Fire Pit

If you're a new subscriber, I have a secondary website that might be of interest to you. It has nothing to do with home improvement, and everything to do with improving our great nation.

The best part is that it doesn't make any difference how you feel, as you can voice your opinion on any of the topics discussed there. Just leave a comment.

I hope you stop by my Fire Pit and share your point of view.

AsktheBuilder.com
Easy Access Cabinet Drawer

DEAR TIM: I’m in the market for a new kitchen. As I get older, I’m not getting any more limber. A kitchen designer was singing the praises of using one or more cabinet drawers to gain easy access to pots, pans, appliances, etc. inside of my new cabinets. I’ve always had shelves inside my cabinets. Would a cabinet drawer be able to handle nearly a hundred pounds of heavy pots and pans? If so, what other cabinet drawer accessories might be available? Connie P., Chattanooga, TN

DEAR CONNIE: I can surely identify with your observation about age and how joints don’t seem to bend as much as they used to. What’s more, have you discovered yet that when you bend down and try to get up that gravity seems to pull harder than ever? If not, you will. I sometimes feel like I live on the planet Jupiter, where gravity is many times stronger than it is here on Earth.

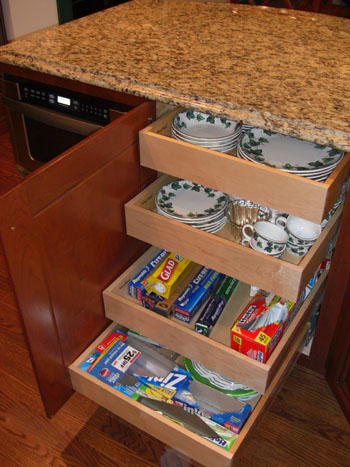
This kitchen cabinet has four drawers that operate on smooth rollers all of which are hidden behind a swinging door . PHOTO CREDIT:  Tim Carter

This kitchen cabinet has four drawers that operate on smooth rollers all of which are hidden behind a swinging door . PHOTO CREDIT: Tim Carter

You’re going to thank your lucky stars that your kitchen designer crossed your path. Our current kitchen has nothing but drawers in every cabinet. We have a wood cabinet drawer, often several, in each and every cabinet in our kitchen. I have to tell you that when my wife Kathy ordered all of them, I didn’t think it would make my life easier. Oh well, yet another time she was right and I was wrong.

To really appreciate what I’m talking about, you have to look at how the cabinet drawers operate. Low-quality cabinet drawers open and close with a simple wheel or two that rolls in a channel that’s screwed to the sides of the cabinet. The drawers, both exposed and hidden inside the cabinets, operate on precision cabinet drawer glides that have countless ball bearings inside them. They glide effortlessly and are built to last.

Don’t confuse the drawers I’m talking about with the traditional box drawers you’ve seen for years in kitchen cabinets. Yes, we have a few of those traditional drawers. But the majority of the drawers in our cabinets are what I call hybrid shelves. These drawers are boxes indeed, but they have shallow sides, perhaps only three inches deep or so. Large items can be easily stored on and in them and you can grasp the sides of these things when the drawer slides open because nothing is blocking you.

My favorite cabinet in our new kitchen is the multi-drawer cabinet that’s next to our microwave cabinet. I might add that even our microwave is one that has a drawer. Instead of a swinging door like many, when you open our microwave the entire front of the appliance slides out revealing a drawer platform.

Anyway, this cabinet next to the microwave has four hidden drawers behind a large swinging door. There are four drawers that glide out with ease. Two of the drawers store all of our everyday plates, bowls, cups and saucers. The other two drawers have all of the wraps, foils, sandwich bags, garbage can bags, etc. Besides the traditional silverware drawer, these hidden drawers get the most use in the kitchen.

Tucked cleverly under the gas cooktop you’ll discover a drawer that has all of Kathy’s cooking weapons. I call them that because some of these tools look fierce and many have sharp moving parts. This drawer has an assortment of built-in dividers that allows you to segregate the tools so they are easily found. In the back of this drawer is a handy compartment for the hand whisks Kathy uses to whip eggs and all types of other sauces.

Beneath this tool drawer you’ll discover 3-foot-wide drawers where all of the heavy pots and pans are stored. Once again, these drawers open and close with ease and are unaffected by the weight of the heavy stainless-steel cookware.

Be sure to visit several cabinet showrooms and ask the salespeople there to show you as many different cabinet drawers as they can. Once you do this, you’ll discover uses for drawers that you never imagined. I can tell you that don’t miss bending down hearing my knees crack and pop or getting on my hands and knees to see what’s deep inside a base cabinet. With drawers, you just pull it out to get what you need.

One of the cabinets we have in our new kitchen is a large vertical pantry cabinet. This cabinet has five different hidden drawers in it. Many of our dry foodstuffs are located here. Fortunately for us when this cabinet was ordered the first time, it came too big. Our kitchen designer forgot to take into account the heavy woodwork of a nearby arched opening into our dining room.

The contractor had to order a new cabinet and told us the old one was ours to do with what we wanted. The drawers worked so well, I removed them from the cabinet and put them inside a pantry on the other side of the kitchen. Kathy loves those extra five drawers as do I. They make it so easy to see what you have instead of things getting lost on deep shelves.

Column 823

Pedestal Sink

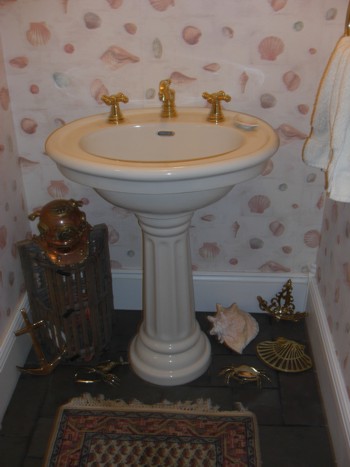
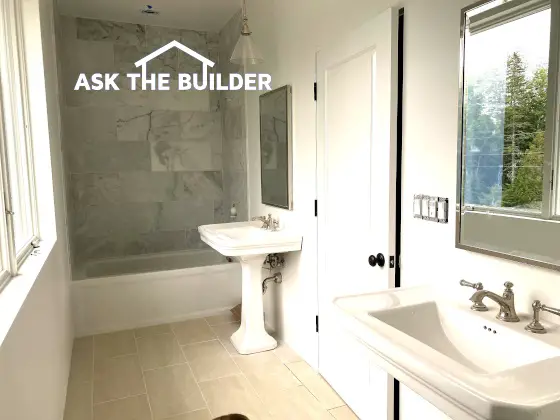
This pedestal sink was installed in a couple of hours. It’s not too hard to do. PHOTO CREDIT: Tim Carter

Pedestal Sink Ideas | This pedestal sink was installed in a couple of hours. It’s not too hard to do. Two pedestal sinks in one bathroom are not a bad idea. PHOTO CREDIT: Tim Carter (C) 2021

Pedestal Sink Ideas - They Look Great But Are They Practical?

DEAR TIM: I’ve always liked the look of a pedestal sink. Can you tell me the pros and cons of pedestal sinks? Are the hard to install? Have you had personal experience with these sinks? I don’t want to make my decision based on my emotions. I know they look great, but are they practical? Amy H., Lexington, KY

DEAR AMY: I believe I can help you, as I’ve had lots of experience with these elegant sinks. I grew up with a traditional cast-iron bathroom pedestal sink (sometimes spelled pedistal) in my childhood home. One of the things I hated about that particular sink was the fact that the hot and cold water had their own faucet. You couldn’t get warm water. Your hands either were under the cold faucet or the hot one. That problem was long ago overcome with faucets that had only one spout.

What are the Pros of Pedestal Sinks?

There are quite a few pros of pedestal sinks. Perhaps the biggest one is styling. These sinks offer a classic look and one that, in my opinion, dominates the bathroom area. The colors, styles, and shapes of pedestal sinks are such that you can almost always find one to fit any decorating theme or time period no matter if it’s Victorian, ultra-modern, or somewhere in between.

Related Links

The DXV Fitzgerald Pedestal Sink Review - WOW!

Sewer Odor from Pedestal Sink? Really?

Are Pedestal Sinks Easy to Care For?

Pedestal sinks are to care for. Keeping them looking brand new is very easy if you just periodically wash them with liquid dish soap and water. Never use any abrasive cleaner on the glazed finish you find on almost every one of these plumbing fixtures.

CLICK or TAP HERE to get FREE BIDS from local plumbers to install your pedestal sink.

Do the Faucets Add Panache?

The faucets for these sinks also are a favorite of mine and add lots of panache. I don’t know how to say it, but pedestal sink faucets are some of the most gorgeous ones I’ve ever seen on any sink. The spread faucets that have separate hot and cold valves and then the center spout can take your breath away. As you might imagine just about every metallic finish you could want can be found whether it be polished nickel, bronze, brass, etc.

pedestal bath sink

These two pedestal sinks look great but might not be the most practical thing for a teenage girl. Narrow cabinets hide behind the mirrors, but no way will you or anyone be putting a hairdryer in one! Copyright 2021 Tim Carter

What are the Cons of Pedestal Sinks?

There are several cons to pedestal sinks, especially if you choose to use one in a bathroom. There’s simply no space to put things on top of the sink. Many pedestal sinks have a flat rim around the sink basin, but it’s usually only a few inches wide and rarely flat. This is not enough room to put much more than a toothbrush.

Pedestal sinks have no storage space. Traditional bathroom vanity cabinets that have a flat countertop not only provide lots of storage space on the countertop, but you can also hide things inside the cabinet. You can often create this space easily with a 12-inch-deep wall cabinet that you install over the toilet.

How Do You Professionally Install a Pedestal Sink?

To install a pedestal sink like a pro, you need to do some planning. Since there is no cabinet to hide the drain line and water supply lines, it takes a little finesse to rough in the piping so that all of the connections are hidden as much as possible. This means the drain line must be perfectly centered and the water supply lines installed at the right height and very close to the centerline of each of the faucet valves.

Do You Own Pedestal Sinks?

I happen to have several pedestal sinks in both of the homes I currently own. The ones in the powder rooms are fantastic, but the ones in the bathrooms get frowns and thumbs down from all the women in the house. They have to put all their personal grooming things on the floor and toilet seat while they use them. That’s not very popular.

From a purely functional standpoint of using them to deliver water and get rid of it, these sinks are fine. I’ve never had a problem except in the ancient sink I used as a kid. If you want to wow your house guests at a party, then a pedestal sink in a powder room is a no-brainer. They look fantastic in these small half bathrooms.

Is it a Good Idea to Read Installation Instructions?

Be sure to read the installation instructions that come with these sinks. Typically you have to bolt the actual pedestal to the floor. The sink itself is almost always bolted to the wall. This means that it’s a fantastic idea to install blocking in the wall so the bolts go into solid wood.

CLICK or TAP HERE to get FREE BIDS from local plumbers to install your pedestal sink.

Be careful about applying too much pressure when you tighten the nuts that attach the drain and faucets to the sink. Most pedestal sinks are vitreous china and you can crack this clay material if you get too aggressive with your wrench and elbow grease.

Column 822

March 14, 2010 AsktheBuilder Newsletter And Tips

What’s in This Issue?

Cincinnati Home and Garden Show
Blueprints
Monster Checklist Sale
Bathroom Exhaust Fan Fires

I do product reviews frequently. Please read my Disclosure Policy to understand the relationship between me and the companies that make the products or offer the services I review.

FOLLOW ME ON TWITTER

Friendly Question Reminder!

If you have a question for me, don't hit the Reply button just yet. Go immediately to my web site and type in the keywords about your problem into my Search engine. The search box is at the top of every page of my web site. You could have your answer in seconds if you do this! Please pay attention to all links you see at my web site. The exact products and services you often need are right in front of you, and you might be ignoring them.

Latest News

Cincinnati Home and Garden Show

In less than four hours, I'll be on the stage again doing my last seminar at the Cincinnati Home and Garden show. Several subscribers stopped by to say Hello!, including Jim Mullaney my pharmacist, Patrick Klever, who works for the Corps of Engineers, and a wonderful woman (I'm so embarrassed as I forgot your name - shame on me!) who cut my hair one rainy night three years ago. Patrick gets the award for distance traveled to get here. He came from Bulgaria! Now that's dedication. Yes, there's more to that story as you might suspect.

Blueprints

One of the attendees of the seminars brought blueprints of his home. He's embarking on replacing a standard 3' 0" exterior door with a 6' 0" sliding door. He was all worried about the structural aspects of the job. Because he had saved his blueprints, I was able to put him at ease within about ten seconds. The plans clearly showed that he just needed a simple header and no concentrated loads were over the new doorway.

If you're lucky enough to have the blueprints for your home, do everything possible to preserve them.

Monster Checklist Sale Almost Over!

Five days ago, I announced the crazy sale of most of my checklists. It's been an overwhelming success. When I came up with the idea, I was positive many would buy not one or two, but ten or twenty. That's exactly what's been happening. Quite a few have bought each and every checklist.

These checklists are designed to help you find the professional contractor in your city or town. They contain secret videos in them I taped showing you where to go to find them and exactly how to spot them. The videos were shot on location at a real building supply business. They are must-see!

This promotion ends in less than 48 hours - 8 a.m. ET on March 16, 2010, to be exact. I've sold these checklists for over 15 years and have NEVER had a sale like this with prices so low. How low? The checklists usually sell for $17 each, but for the next few hours you can get each one for $2. Yes, two bucks. Call me insane, but it's true. You better hurry.

Bathroom Exhaust Fan Fires

Lola from Topeka, KS wrote to me overnight:

"I would like to know if bathroom exhaust fans start fires if left on too long. And if so, how long is too long?"

Lola, you bet they can start fires. How common is it and what are the real causes? Well, you'd have to scour the NFPA records database for those answers. But I can tell you that about five years ago, a neighbor's house 100 feet from mine had a fire caused by an exhaust fan.

Lint buildup, worn motors, years of vibration fraying wires, etc. are all possible causes of an exhaust-fan fire.

I would always defer these questions to your local fire prevention officer. Just about every fire department has one. Fire service personnel are some of the most helpful government workers out there. They don't want to carry you out of your home, and will almost always do a no-cost inspection to keep you safe. Call them ASAP to see if they'll look at your fan. You should consider installing a digital timer for the fan switch. That's what I have in all my bathrooms. The longest the fan can run in my home is one hour.

AsktheBuilder.com

March 9, 2010 AsktheBuilder Newsletter And Tips

What's in This Issue?

Latest News
Garden Tool Storage
Tile Backsplashes & Electrical Outlets
Pocket Door Tip
Appearance This Weekend
Ice Dam Damage
Checklist Sale
Stain Solver Help
Liquid Wrench
Fire Pit

I do product reviews frequently. Please read my Disclosure Policy to understand the relationship between me and the companies that make the products or offer the services I review.

FOLLOW ME ON TWITTER

Friendly Question Reminder!

If you have a question for me, don't hit the Reply button just yet. Go immediately to my web site and type in the keywords about your problem into my Search engine. The search box is at the top of every page of my web site. You could have your answer in seconds if you do this! Please pay attention to all links you see at my web site. The exact products and services you often need are right in front of you, and you might be ignoring them.

Latest News

I've been chugging away at getting the Cincinnati house ready for the big Open House in less than three weeks. This past week, I made tons of progress. My productivity was high because I knew where each tool was that I needed.

I can't say enough about storing tools. If you leave your tools scattered all over the place, you waste tons of time looking for what you need. This is one reason I'm a big fan of Rick Grove's Wall Control system that allows me to store tools on metal pegboard so that I can see what I have.

I'm also a fan of those open storage pails, boxes, buckets, etc. that have countless pockets and slots for hand tools, pencils, razor knives, rasps, screwdrivers, etc. There are many available, and you can't go wrong with just about any brand.

Garden Tool Storage Outdoors

If you store garden tools outdoors in a garage or shed, and you live where it gets cold in the winter, you'll have to deal with rust. Steel and iron tools will start to rust because of condensation that forms on the tools with changes in humidity and temperature.

There are any number of ways to deal with this, but a very light coat of oil will go a long way to prevent rust. As you get out your tools this spring, you'll probably note a fine film of rust on shovels, rakes, spades, etc. That could have been prevented had you cleaned the tools in the fall, allowed them to dry and then wipe down the metal parts with an oily rag. Be sure to burn the rag once your done. Spontaneous combustion is a reality.

Tile Backsplashes and Electrical Outlets

Lamar Hutchinson of Loreauville, LA wrote to me:


I am installing some 1x1 glass tiles on mesh backing as a kitchen backsplash. There are several outlets in the area of installation, ranging from electrical to phone. My questions is: do I leave enough space to have the outlets removed and after the glass tile is installed, so I need to put outlet spacers in so I can bring those outlets flush with the tile?

Lamar, I believe I understand your dilemma. I tackle this issue by backing out the screws that hold the electrical outlet to the box inside the wall. Be sure to turn of the circuit breaker that controls any of these devices you're working with. You need to get the outlet so that it sits on top of the tile. This means you cut the tile pieces so they are right at the edges of the electrical box in the wall.

Once the glue sets, you then tighten the outlet so the little round or square tabs contact the tile. Your method, if I understand it, will achieve the same result, but with a little more work. You'll have to have an assortment of spacers to get the outlet exactly where it needs to be. My method eliminates this guesswork.

Pocket Door Tip

Last year I remodeled our master bathroom. Kathy's closet has a pocket door that was just the thing to save very valuable space in the bathroom. The pocket door allowed us to place the opening to the closet immediately adjacent to the bathroom door.

Had we used a traditional swinging door, the two doors would undoubtedly bang into one another.

One of the things I do when installing a pocket door is use decorative brass screws on the top and side door jambs. These screws allow me to remove the jambs in seconds should I have to adjust or remove the door.

To make this process painless, I also prepaint the jambs before installing them. If you install raw wood and allow the painter to paint them in place, the paint can cause the jambs to stick to the door casing.

If you have a remodeling project coming up or even a new house, take a hard look at pocket doors. They are great if you use the pocket-door mounting hardware and track I use!

Author's Note: After reading this newsletter, subscriber Charlie Brown emailed me with a great pocket door tip.

"Because you gave information on Pocket Door Tips thought I might share a neat little add to any installation.

When framing the cavity why not add a little bounce to the door. This is done by taking two hack saw blades together (has the best bounce) and screwing them to the back in a bow like manner to replace the rubber bumper half way down the door. This eliminates some bang as well makes it possible to push in on the door and have it come out of the cavity for those of us that don't like to deal with those little pop-out pulls. I've done many and all work very well."

Appearance This Weekend

If you live near or in Cincinnati, OH, I'll be speaking on Friday, Saturday and Sunday at the Cincinnati Home and Garden Show. The times are:

  • Friday - 5 p.m.  
  • Saturday - 2 and 6 p.m.  
  • Sunday - 2 p.m.

Stop by and say "Hello!"

Ice Dam Damage, Contractors and Limited Money

Janet Murray emailed me over the weekend lamenting about water damage caused by the heavy snow that hit the East Coast last month. Her ceilings and walls and her mother's were damaged by dripping water.

She wanted to know who to call in to fix the work and how to make sure that she doesn't get ripped off. You may face the same anxiety when you go to hire a contractor.

I told Janet that the first step is to consider modifying the roof IF she intends to live in the house for a period of time. You can retrofit a roof with the ice-dam membranes by removing the lower courses of shingles on a roof. It's not easy, but it's possible.  You want to do this so that you'll never have the leak again. Why patch the ceilings and walls to only have to do it again in the future?

I then told her that she could possibly find a handyman who could do the repairs and needed painting.

Just after sending the reply, I got a similar email from a woman who was wringing her hands about not being able to make a mistake when hiring a contractor. Funds were limited and she had to get the work done right the first time.

That's when the lightbulb went off. For over fifteen years, I've been selling these checklists for all sorts of indoor and outdoor projects that help you discover the REAL pro in your area. In fact, I taped a series of videos just for these checklists that show you the secret way I would go find a pro carpenter, plumber, painter, electrician, roofer, etc. no matter WHAT city or town I was in. You give me two hours in any city and I'll find the pro you need. But the great news is, my checklists show you how to do it!

After reading those two emails, I got the feeling that you and many others in these horrible economic times could be in the same boat. You can't make a mistake. So to help you, I decided to do something I've never done before.

I told Roger, my virtual assistant, to slash the price of all my checklists - except for the New House and WalkThrough ones. My helpful checklists usually sell for $17 each, but for the next week you can get any one you need for just $2. That's not a typo. Yes, just $2 for any of the checklists.

These are Instant Download .PDF files you get immediately. You can get as many as you want for the $2 price. It's a steal when you see all the special questions I have you ask each of the contractors. At this price, you should consider buying any checklists you may need for future projects.

If you want to see how good they are, just buy one. Open it up, look at all the questions and background material, and see for yourself. If you feel they are worth it, then go back and get whatever else you need.

This crazy promotion ends on Tuesday morning March 16, 2010, at 8 a.m. ET. You need to react now to literally save hundreds of dollars. Actually, thousands of dollars as you'll be sure to get the pro who'll do your job right, not over!

Stain Solver Help

I'm in the midst of redesigning containers and fancy new labels for my Stain Solver. But I need your help.

Often I get people who want to get a sample or smaller test size before purchasing my small 4-pound size. Can you tell me if you would buy a 1-pound size container or would that be a waste of time? One pound of Stain Solver would fit in a one-pint container.

I'm also looking into small sample packets that could be mailed in an envelope. To get one of those - when available - you'd only have to pay $2 to cover the cost of postage, handling, etc.

Do either of these ideas appeal to you, or is it an exercise in futility?

By the way, the annual Spring Stain Solver Sale is just a month away. If you have a deck to clean or any other project, wait till you see the sale news!

Liquid Wrench Six Pack

After driving back in the snow and salt from New Hampshire to Cincinnati, OH, I tried to get the key in the padlocks on my trailer. Forget about it. The key slot was filled with salt deposits. With great effort, I was able to dissolve the salt and finally get the key to work.

Yesterday, I got a sample pack of six new cans of Liquid Wrench products that may have prevented the agony. Imagine if I needed to open the trailer while I was on the road!

In this sample pack are six different cans of lubricating spray. There's penetrating oil, lube spray, regular oil, dry lubricant, chain lube, silicon spray, and even a white lithium grease spray. Wow!

I'm about to try these products on several things around here, not the least of which are the rollers and hinges on my garage doors. Let me tell you, you want those working well all the time as the garage door is usually the largest and heaviest mechanical device in most homes.

I'll let you know how it works on the padlocks.

Tim Carter's Fire Pit

If you're a new subscriber, I have a secondary website that might be of interest to you. It has nothing to do with home improvement, and everything to do with improving our great nation.

The best part is that it doesn't make any difference how you feel, as you can voice your opinion on any of the topics discussed there. Just leave a comment.

I hope you stop by my Fire Pit and share your point of view.

AsktheBuilder.com
March 3, 2010 AsktheBuilder Newsletter And Tips

What’s in This Issue?

Latest News
Storing Paint
Stain Solver News
Cincinnati Home and Garden Show
Installing Hugh Ceramic Tile
Latest Columns
Fire Pit

I do product reviews frequently. Please read my Disclosure Policy to understand the relationship between me and the companies that make the products or offer the services I review.

FOLLOW ME ON TWITTER

Friendly Question Reminder!

If you have a question for me, don't hit the Reply button just yet. Go immediately to my web site and type in the keywords about your problem into my Search engine. The search box is at the top of every page of my web site. You could have your answer in seconds if you do this! Please pay attention to all links you see at my web site. The exact products and services you often need are right in front of you, and you might be ignoring them.

Latest News

I survived the mini-hurricane in New Hampshire late last week. It was an epic Nor'easter. The wind really picked up after 10 p.m. on Thursday night. Earlier in the evening the wind-driven rain found a breech in the flashing around the top of a French door in the lower level of the house. I didn't build the home I'm in, so I'll be fixing that leak when the weather gets better.

I'm back in Cincinnati, OH, now for the entire month of March. The mission is to cross off all the tiny honey-do list items that have persisted here just as in any house. These to-do tasks need to be completed by March 28th, the day of the one-and-only open house.

I've made great headway the past two days completing jobs. You'll hear more about this in the upcoming weeks. If you know of someone who might want to purchase this great home I built with my bare hands, let me know. It's a four bedroom Queen Anne Victorian that looks 125 years old, but was built in 1986.

Storing Paint

One of the things I'm doing here is touching up small places on both the walls and woodwork that have the traditional wear and tear dings and scratches. Fortunately, when I painted these surfaces over the years, I saved the leftover paint.

I discovered many years ago it's a mistake to save the paint in the cans from the paint store. Not only do you have to deal with lots of air in the cans, but you also have an issue with rust at the lid lip. The excess air in a paint usually causes a nasty skin to form on top of the paint.

What I've discovered that works best for me, and you may have an even better idea, is to use the inexpensive food-storage containers you can buy in the grocery store. They come in different sizes and the trick is to fill one nearly to the top with the leftover paint.

If the paint is water-based, I always add an ounce or two of water at the top of the paint before sealing the lid. This prevents the skinning effect. Using a permanent marker, and I do this before filling the container, I write on the side of the container the room the paint was used in, the mfr., paint type, paint name, formula if available, etc.

Let me tell you how well this works. Yesterday, I had to touch up many spots in my living room. I painted this room about ten years ago. If you were here with me today, I'd bet you $100 you couldn't find one spot where I touched up the walls. The paint matched perfectly and it's consistency was just like the day I opened the original can. Suffice it to say I store this leftover paint indoors at about 65 F.

Stain Solver News

If you're a new subscriber, and I have about 1,300 new per *week*, you probably don't know about Stain Solver. It's a magical oxygen bleach I've blended and sold since about 1996.

About a month ago, I wrote a column for my newspaper clients talking about using oxygen bleach to clean ceramic tile floor grout. Two weeks ago, The Washington Post newspaper ran this column. Talk about a tsunami, the rush of orders from readers almost tilted my shopping cart. In a little over 96 hours, we got over 500 orders from just the readers of this column in the DC area. I had not anticipated this kind of response.

I immediately had the idea that I should tape a video showing you exactly how this magical powder really cleans floor tile grout. We taped the video one afternoon two weeks ago and had it loaded the next day at the Stain Solver site. It's right there as soon as you land on the home page.

I urge you to watch the video to see how it works. You really need to watch the last ten seconds of the video. What I said the entire video was unscripted - especially the last few lines. If you're not smiling at the end of that video, you must be in a really bad mood today.

Finally, there are hundreds of uses of this product around your home. One of the craziest uses is to dislodge that pesky brown caramelized grease you often see on the outside of pots and pans. I experimented one day soaking a pan in the Stain Solver solution for about six hours. Lo and behold using a Dobie pad and some elbow grease, 90% of the encrusted brown spots came off after the soaking! The same happened on stainless-steel cookie sheets. I could go on and on, but rest assured Stain Solver will blow you away.

Cincinnati Home and Garden Show

If you're near Cincinnati, OH, the second weekend of March, I'll be speaking at the Cincinnati Home and Garden Show. I am scheduled to talk Friday, March 12th at 5 p.m., Saturday the 13th at 2 and 6 p.m., and on Sunday the 14th at 2 p.m. The best time to stop by would be Saturday, as I'll be just hanging out with you between the two talks. I'll be talking about the top five issues I see homeowners struggle with each day, some exciting new products I've discovered and answering your questions.

I'll also consult with you at no cost about any issue you have with your own home. If you come, be sure to bring photos of the problem if you feel it will make it easier to describe it. Be sure to come up to me at the end of the talk and identify yourself as a newsletter subscriber.

Installing Huge 18x18 Ceramic Tile

Michelle from Kearney, NE wrote to me with a very interesting question:

My husband and I are about to install 18x18 porcelain tiles in our kitchen. Problem is: when we ripped up the original flooring, we discovered large nasty patches of paper and glue from old linoleum. We're preparing to install cement backer board as a base, but we're afraid the tiniest bit of un-levelness on the plywood subfloor will cause tiles or grout to crack.

I've been told by a co-worker that a good bed of modified thinset to adhere the  backer board to the subfloor should bypass this problem. Is he right? Or will we need to spend a weekend choking on adhesive remover to get rid of the old glue?

Michele, you've got an issue no doubt. It's compounded because of the giganzo tile you've decided to use. Ceramic tile loves to be installed on a subfloor that's in the same plane. This doesn't mean that the floor is level, just that there are no humps or dips in the floor. These imperfections can cause tiny gaps under tile. If you step on a tile with a gap under it, it creates tension in the tile and it can crack.

Tiny tiles can be installed on a floor that's wavy because they lay flat on the gentle undulations. But giant tile like the ones you're going to use, well, they're problematic. You need to get that floor as smooth as possible before installing that tile. Yes, you can trowel on thinset and put backer board over that, but my guess is that it will not guarantee that the floor will be in the same plane.

Open the windows and get a long straight edge to help you discover high and low spots. Use a pourable self-leveling floor compound to solve any issues.

Author's Note:

Jeff Phillips sent the following email after reading this Newsletter.  Thanks for sharing all this info, Jeff!!!!

Hi Tim,

Regarding the inquiry about the large format tile and floor prep ...

You give good advice that gets to the point and simplifies the job where possible, so they can just get the thing done. You helped me some months back re some reframing I was doing, so I try to return the favor if I can. So, here's some more ideas that may help down the road:

You are right - plane has to be the same. There are other things that will determine if the tile is to break on them: deflection, subfloor composition, trowel size and technique, selection of bonding materials, and if they back butter doing so correctly.

The inquiry did not say if the base was concrete or wood.

Being a vinyl residue and since they talked about using backerboard, it was probably wood not concrete.

If wood, I think you steered 'em right with scraping it up, using a leveler, and so on. The other solutions all come after getting the bond breakers off and fixing plane and there are so many good choices out there, just pick one.

If it was concrete, Franmar makes a soy-based adhesive remover called "beaneedoo" that has low voc's and even softens old cutback. http://www.franmar.com/product_info.php?cPath=22&products_id=42.

The other thing with large format tile, especially porcelain, is to use a mortar that offers both bond and compressive strength. Here the field is limited to, in my opinion, one at the top, and a couple just below, and a lot of wannabes that will take your money and give you regret in return.

MAPEI is a favorite for a lot of specifiers in the Chicago area, but my preference is Laticrete. A bit pricey for common installers' preferences but no call backs and for me I think that makes the cost worth it. Their Sure Set is designed for large format and no back buttering and good pot life. Just set, adjust, and go. Here's a point of reference: http://www.laticrete.com/Portals/0/datasheets/lds2610.pdf

I like your newsletter and glean tidbits for my future file. Stay at it!

Jeff

Latest Columns

Thinking about building on bad soil? Look at this building collapse in China!

Questions about Lumber Drying?

Vinyl Siding Replacement

Tim Carter's Fire Pit

If you're a new subscriber, I have a secondary website that might be of interest to you. It has nothing to do with home improvement, and everything to do with improving our great nation.

The best part is that it doesn't make any difference how you feel, as you can voice your opinion on any of the topics discussed there. Just leave a comment.

I hope you stop by my Fire Pit and share your point of view.

AsktheBuilder.com
Bathroom Tub Fixtures

DEAR TIM: Can you moderate a discussion between my wife and I about bathroom tubs? What exactly is a bathroom tub fixture? I think it’s a light above the tub. My wife believes bathroom soaking tubs will add value to our home, but I’m skeptical. Finally, can you clear up the confusion we have about bathroom garden tubs. It’s all so confusing, as when I grew up we had a simple bathtub. Period. Ted S., Chevy Chase, MD

DEAR TED: I hate being drawn into these tug of wars between spouses. How long have you been married? Never mind, I pretty much know. Ted, the sooner you discover to capitulate in wrangles with your wife, the smoother things will be. I’ve borrowed a nickname for my wife from a great past television series she and I watched. It really keeps the peace around our home when I call her She Who Must Be Obeyed.

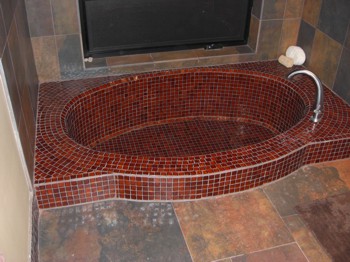
This unique bathroom tub is sunken into the floor and covered with tiny mosaic tile. PHOTO CREDIT:  Tim Carter

This unique bathroom tub is sunken into the floor and covered with tiny mosaic tile. PHOTO CREDIT: Tim Carter

I will give you the first point in the contest. Over the past 40 years, there has been a dramatic increase in the types, styles, and models of bathroom tub fixtures. That being said, the second point goes to your wife. The term fixture is taken from the plumbing code and refers to any fixed item that’s connected to a end of a plumbing drain line in a room.

For example, sinks, toilets, showers, tubs, urinals, etc. are fixtures. Yes, I know you’ve heard the word used more frequently with lights, but a bathroom tub fixture is the actual bathtub. In fact, to get technical, there is a numeric value attached to each fixture in the plumbing code that’s used to size the large drain stacks that collect all the water and waste that comes from each individual fixture. This numeric value is called a fixture unit.

You and your wife should spend lots of time looking at bathtubs. I’m stunned by the subtle features that are being incorporated into many models, even lower-grade builder models.

Just this past weekend, I was staying at a very nice condominium in Vermont. I was there as a guest with some friends and we all skied for two days. The bathroom I used in this condo had a simple cast-iron bathtub, but it’s design was very different than the vast majority of the ones I’ve been in before. The long side of the tub that touched up against the tile wall had a very large shelf along the entire length of the tub. It was wide enough to easily set a paperback book, bottle of wine, glasses, candles, a vast variety of body care products, etc. I could easily see soaking in this tub with a cool glass of any liquid refreshment sitting on that shelf.

The term bathroom garden tub, I believe, is purely a marketing term. I’ve seen these platform or sunken tubs set up against a large window that looks out to a garden or small privacy area of a yard. In fact, last fall I was visiting another friend in Phoenix, AZ, who had the most unique garden tub I’ve seen. It was a sunken tub that was covered with gorgeous mosaic tile. I didn’t have time during that visit to take advantage of this miniature swimming pool, but you can bet the next time I’m there I will soak in it gazing out the window at the garden hardscape and metal sculptures with Camelback Mountain in the background.

As you start to narrow your decision about bathroom tub fixtures, be sure to consider all the aspects of tub installation. Bathtubs are, for the most part, permanent fixtures. They are intended to be in place for decades. If you intend to be in this house for a long time, then be sure to invest in a quality tub. Price is usually a good barometer of quality. Higher prices often mean better products.

Whatever you do, don’t go cheap on the bathtub faucet. Once again, these faucets usually stay in the wall for a long time. Buy a cheap tub faucet, and you’ll regret it. Look for a faucet that’s priced in the middle part of the price range. I also recommend getting replacement cartridges for the faucet at the same time so you have these parts on hand years from now. Put them in a plastic bag and attach it to the inside wall of the vanity cabinet for yourself or a future homeowner.

Once you have your new bathtub, be sure to care for it. All too often people ruin bathtubs in short order using cleaners and cleansers that create permanent scratches. Be sure to carefully read the manual that comes with your tub. Most list approved cleaners that will not harm the surface of the tub.

Avoid the use of cleaners that contain abrasive particles. These cleaners really work well, but they absolutely can and will scratch acrylic finishes over time. Don’t believe me? Have you ever seen crystal-clear plastic kitchen utensils that have been cleaned in a dishwasher many times? The objects get a frosted look to them because of the small amount of pumice and sand that’s in dishwasher detergent. This abrasive element is what really cleans the dishes as the water thrashes it against your plates, glasses and bowls.

Imagine how much harm that same fine grit can do when you lay into it with your elbow grease in a new tub? If you have hard-water stains, just lay a paper towel over them and soak the paper towel with white vinegar. Come back in six hours and lightly scrub with a regular brush. The stains disappear with no damage to the tub or surface.

Column 819