What’s in This Issue?
Latest News
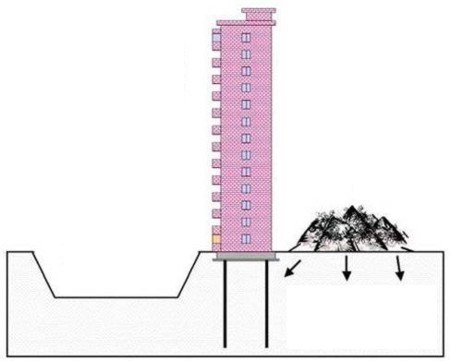
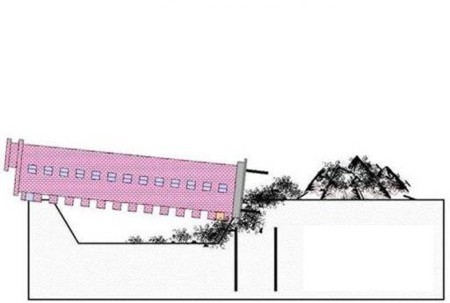
Water Streaming From Bath Fan
Top Adventurer Award
Ceramic Tile on Top of Vinyl Tile
Stain Solver Promotion
Remember, Do it Right, Not Over!
Welcome if you are a new subscriber. If you like this newsletter, feel free to forward it to as many of your friends as you wish.
I do product reviews frequently. Please read my Disclosure Policy to understand the relationship between me and the companies that make the products or offer the services I review.
Friendly Question Reminder!
If you have a question for me, don't hit the Reply button just yet. Go immediately to my web site and type in the keywords about your problem into my Search engine. The search box is at the top of every page of my web site. You could have your answer in seconds if you do this! Please pay attention to all links you see at my web site. The exact products and services you often need are right in front of you, and you might be ignoring them.
Latest News
Happy New Year! It's Twenty Ten, or whatever you chose to call it. It's off to a cold start, that's for sure. I just looked at the current temperatures as I write this and at 3 pm it's 46 F in Miami, FL. Brrrrrrrrr! Yesterday I drove with my son 17 hours to get back to New Hampshire from Cincinnati, OH. It wasn't bad, but it was 9 F in Utica, NY as we stopped for gasoline. With a stiff wind, that was pretty cold. No worries, summer will be here soon. The days are getting longer. Woo Hoo! Get out the wake board.
Here at Loch Winnisquam in New Hampshire, the lake has not yet frozen over. It's tried a couple of times, but the wind picks up and breaks apart the ice and relatively warmer water deeper in the lake is brought to the top by the wind. That melts the ice. But as I type this and look out the window, overnight the ice built out from the shore about 100 feet.
I'm all rested up from the three weeks back in Cincinnati, OH with Kathy and the kids. This is a huge work month for me. There is nothing but opportunity as far as the eye can see. As I said last issue, forget about hoping for change or waiting for help from someone. If you're struggling, you need to pick yourself up and get moving. It's not easy, but there is work out there. It may not be what you want, but now's not the time to be choosey.
Water Streaming From Bath Fan
Paul Greenburg, from Woodbridge, CT wrote to me:
Tim,
I have a Broan Heater/Fan Combination in my bathroom ceiling. There is now a constant stream of water that drips out of it when we use it as we shower. Is there a roof leak?
Paul must have been in a rush when he used the Ask Tim form at my website, as the Bathroom Fan Ventilation column he needed to answer his question was right here:
Top Adventurer Award
Four years ago, I had the pleasure of meeting a man up in New Hampshire named Fred Hoffmeister. Fred and his wife Sandi own The Maria Atwood Inn in Franklin, NH. Sandi is also a dear friend. I stayed in their cozy bed and breakfast the first time I came up to look for land in NH. It turns out Fred is also a real estate agent, and he represented me when I bought my land and the house on the lake. He and Sandi are really good people - hard working and honest.
Two weeks ago they got amazing news about their son Marc. I've never met Marc, but I've heard lots about him. I think it's best you just read what Fred sent me:
As some of you may know, my son, Marc Hoffmeister was recently promoted to Lieutenant Colonel. He is a West Point graduate Class of 1992 who served a tour of combat duty in Kuwait then a second tour in Iraq (2006-2007). He will be going back for a third tour next Fall!
In April 2007, he was severely wounded when his Humvee was hit by an IED (Improvised Explosive Device) near Al Hillah and still struggles with nerve pain and limited mobility in his now titanium arm. Other painful injuries were the result of the blast impact on his head and ears.
He has been an inspiration and voice for wounded warriors to recognize that physical limitations need not change WHO you are, just how you go about achieving things. An avid adventure racer, mountain climber, and cyclist, last year he led a team of Purple Heart recipient soldiers to climb Mount Denali (a.k.a. Mt. McKinley, the highest peak in North America located in Alaska!).
As a result of those activities, Marc has been recognized by National Geographic as one of the top ten Adventurers of the Year in the Dec/Jan print edition of Adventure magazine! National Geographic is allowing readers to select a Reader's Choice award recipient from this year's class of Adventurers of the Year via ONLINE VOTING.
Click on the Link to read more about his team, see photos from the expedition and watch a You Tube video of their time from Pre- Iraq to the climb.
Okay, I'll give you the link to click that Fred talks about in a moment. But let me explain that the National Geographic site is a little cryptic. When you get to the page, you'll see Marc. I urge you to watch the video and read the story about him. You'll get a taste of what our military is trying to do to keep underpants and diaper bombers from coming over here to kill us. But I digress......
Just to the left of Marc's photo at that page is a Text Graphic that says: B A Best of Adventure in black and red. You need to click THAT link to go to a page that allows you to rate on a scale of 1 - 10 what you think of each person who's been nominated. In other words, it's a little work. But PLEASE take the time to do this as Marc has made a tremendous sacrifice for you and me so that we have the freedom to even vote and surf the Internet freely.
Vote 10 for Marc!
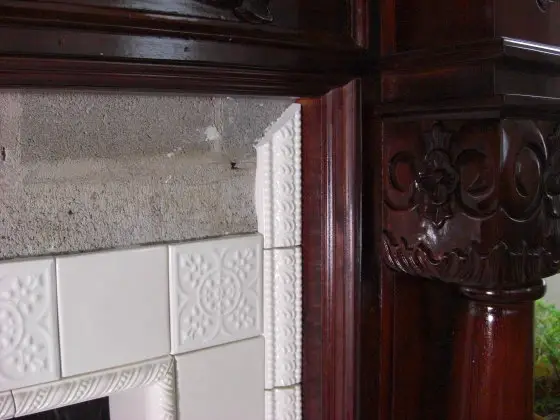
Ceramic Tile on Top of Vinyl Tile
Jeanne Stone of Charlottesville, wrote to me the following:
Dear Tim,
Can ceramic tile be installed on top of vinyl tile? Our tile retailer says it can, but my husband says no. Help!
I responded:
Jeanne,
I really need to know more. Vinyl tile is really a dense material, so that's why the retailer said Yes. But if the vinyl tile is on a wood-floor system that has lots of bounce, your tile can crack. If the vinyl tile is coming loose from the floor, curled, etc. then that is also a major issue. But let's imagine the vinyl tile is in great shape and firmly attached, it's on a concrete slab that's crack-free, I'd install the ceramic tile over it in a heartbeat. Make sure you consider the use of a crack-isolation membrane under the tile so that the new floor can move independently of the substrate.
Stain Solver Promotion
Back in November, I did a promotion with my oxygen bleach Stain Solver that's been pretty successful. But before I tell you about what the promotion is, I have to tell you about a phone call I got while driving back yesterday to New Hampshire. It was from Scott, and he and I had talked on the phone two days earlier.
Go to Stain Solver
Scott had purchased 8 pounds of Stain Solver to clean the horribly dirty grout in his kitchen floor. He used my product and wasn't satisfied. When this happens, 999 times out of 1,000, I discover the homeowner doesn't use it correctly. Scott told me on the phone, "Tim, if your product doesn't work, the floor is coming out. I've tried everything, but nothing even remotely gets the gunk out of the grout. I've HAD it with this tile floor. I'm hoping your Stain Solver can save me thousands of dollars."
As you might imagine, Scott was frustrated. I told him first, that if he can't get it to work, he can get a refund by sending it back. Once we crossed that bridge, I asked him if he'd be willing to do a small test area following my instructions. Scott said, "Yes, but it better work." I told him to mix just one 12 oz glass of hot water with two tablespoons of Stain Solver. Stir till dissolved and pour half of it on 4 tiles. "It's important that the grout joints stay flooded with the solution for at least 15-20 minutes," I said. I also sent him a photograph of the exact brush to use. The other half of the solution is used in the scrubbing process or if the solution soaks into the grout. He said he'd let me know.
On Friday, I got a text message from him saying that my test didn't work. As you can imagine, I was crushed. I knew something was wrong with what he was doing. I texted him back to send the product back to us.
Then yesterday he calls me and says, "Tim, I've got good news. The tile grout in that small test area looks fantastic! Once the grout DRIED, it looked like new. There's still some dirt, but I believe I can get it out." I asked a few questions and discovered what the problem was. His scrub brush was too flimsy, and are you ready for this, the bristles were barely touching the grout because the grout joints were well below the top surface of the surrounding tile. Duh!!!! I never thought to warn people about that thinking that they would always make sure to tilt the brush or do whatever to make sure the bristles were in contact with the grout.
The Bottom Line: Another satisfied customer!! And I discovered something very valuable. Oh, I reminded Scott that he would NEVER have to scrub the floor again. He didn't believe me and asked how was that. I said, "It's easy. All you have to do is add Stain Solver to your regular mop water. Mop the floor and leave the mop solution ON THE FLOOR for 10 minutes. Let the Stain Solver work in the grout by itself with no scrubbing, then come back and rinse the floor with clean water." I know for a fact that works if you do this every week.
Be aware that not only does Stain Solver clean grout, it cleans anything that's water washable. It gets out odors, even cat urine. It's amazing.
So back to my promotion. You know the old saying, "All Good Things Must Come to an End"? Well, I've decided to end the FREE Shipping promotion that's been going on for 10 weeks. As soon as we sell out of all the product that's in the current warehouse, the Free Shipping goes away. What does this mean to you? It means that if you don't order some within the next few days, you'll have missed out on significant savings. I can't say how much, because the shipping can vary from $6 all the way up to $42. It costs a lot of money to ship 50 pounds to California! I have no clue when, if ever, I intend to bring back the free shipping. You'll be upset if you miss this promotion. If you get to the shopping cart and see nothing about Free Shipping, that means you hesitated.
Go to Stain Solver
AsktheBuilder.com