September 29, 2009 AsktheBuilder News And Tips

What’s in This Issue?

Ron Goens and the VacuFlo 566Q
Portable Heaters
Molly Malone’s Get Together
AsktheBuilder Contest Finalist
Shower Door
Standby Generator
Paint Simulator
Stain Solver Sale
One Last Task
New Pegboard

FOLLOW ME ON TWITTER

Friendly Question Reminder!

If you have a question for me, don't hit the Reply button just yet. Go immediately to my web site and type in the keywords about your problem into my Search engine. The search box is at the top of every page of my web site. You could have your answer in seconds if you do this! Please pay attention to all links you see at my web site. The exact products and services you often need are right in front of you, and you might be ignoring them.

The last two weeks have been a blur. Just over a week ago, I got my mother's will successfully filed with the Probate Court. It's not that hard to do, but then again it's not easy. An attorney friend of mine helped explain to me the forms I had to file. The rest of the week was spent in a cage fight with Mother Nature. I was on a tight deadline trying to get a large list of things done on the exterior of my Cincinnati, OH home. High on the list was washing the exterior of the frame house. The biggest mistake I made, and it was a HUGE one, was not taking a video of the process. There simply was no time. As I was finishing the job with my good buddy Dave Buescher, the roofing company supervisor Vern walked around the corner and said, "Wow, the house looks like it was just painted. What is that you're spraying on the siding?" My reply: "Stain Solver". I painted my house about nine years ago with Sears WeatherBeater ULTRA. I can tell you that the house, after cleaning off the diesel soot, grime and mildew that's eating the aerosol sugars from all the trees around my house, looks like I painted it a few days ago. You may be able to save yourself thousands of dollars on a paint job, by just thoroughly washing your house instead. More on Stain Solver later in this newsletter. In fact, the huge sale I mentioned two weeks ago started the instant I sent this newsletter to you.

I also supervised the roofers who are at the house. The first week was glorious weather and they worked every day. But last week 4.75 days were rain-outs. They were able to get some work done on Thursday morning, but it started to rain again at 10 a.m. The GAF Slateline shingles are looking spectacular. I'll have a photo of the completed roof for you in November. Why so long? Because I want to wait until the leaves fall from the oak trees so that you can really see the roof. These special shingles really give the appearance my Queen Anne Victorian home looks like it has a real slate roof from the street.

Ron Goens and the VacuFlo 566Q

I had to make an emergency repair last week on our central vacuum unit in the garage. The motor in the existing one gave up the ghost. Fortunately, I had a new Vacuflo 566Q sitting in a box waiting to be tested. It only took me about 30 minutes to get the new vacuum installed and operating. It was a breeze to hook up, the instructions were clear and it works like a champ. I decided to change how I vent this unit to the outdoors, so I visited a real craftsman Ron Goens. Ron and his wife Donna have operated a true mom-and-pop business for years. Ron has installed hundreds of central vacuums, intercoms, bathroom and kitchen fans, basically anything you see in a Nutone / Broan catalog. Ron had the plastic fittings I needed to complete the job. The PVC pipe used for central vacuums is a different type than that used for plumbing work.

While there, I discovered that Ron is now doing all sorts of service work on Nutone and Broan products. If memory serves me right, he said he was an authorized repairman for all their products. Ron does work in the Greater Cincinnati area only, so if you have a bathroom fan that doesn't work, an intercom, a central vac unit, etc. give him a call. He's a real pro. I love telling you about the real pros I work with and know about from my own personal experience. Call Ron at 513-458-5555.

If you don't have a central vacuum in your home, you can almost always add one. They are FANTASTIC. I have one in my NH home as well. Ask Ron about what it takes to install one in an existing home.

Portable Heaters

Winter is fast approaching. I was surfing the ConstructionComplete website and came across some sweet heaters that can take the chill off a garage or other cold workspace. There are two sizes of these portable propane heaters: 35,000 Btus and 125,000. They both operate on propane, but the larger one can be purchased if you want to direct connect it to a natural gas fuel source. The smaller heater will work great with one of the propane canisters you already own for your outdoor grill. I'm absolutely going to get the 35,000 Btu one for my garage here in NH. Last winter there were times I wanted to work out in the garage, but it was too cold to work in just light work clothes. If you decide to buy one, be sure to pay attention to any venting recommendations.

The Molly Malone's Get Together

While I was in Cincinnati, OH for the two weeks, I announced I'd love to get together with you - that is if you live in or near Cincinnati. Well, I discovered that you might come a long way for such an event! Philip Bender drove from Canada to be there. Wow! Truth be told, he was on his way to Lexington, KY, but all the same he made the effort to show up. Mike Kegley, Fred Sandborn, Janent Dieman, Clyde Wearner, Laurie Bozych, Joe Siefert and Joel Suggs all showed up. The three hours we spent together seemed like 15 minutes to me. It was a fun time! I'll be heading out to Southern CA the last week of October, should you want to have a get together. Let me know if you live in the LA area.

AsktheBuilder Contest Finalist!

I just discovered I'm a finalist in a huge contest. An ad network named Chitika has named me as one of the top four web sites that creatively mixes their ads in with other ad networks. They told me I could announce this to my friends, and you're one! I would appreciate it if you could vote for me. You must act FAST. The voting ends on September 30th. That's tomorrow!! Please hurry and vote now.
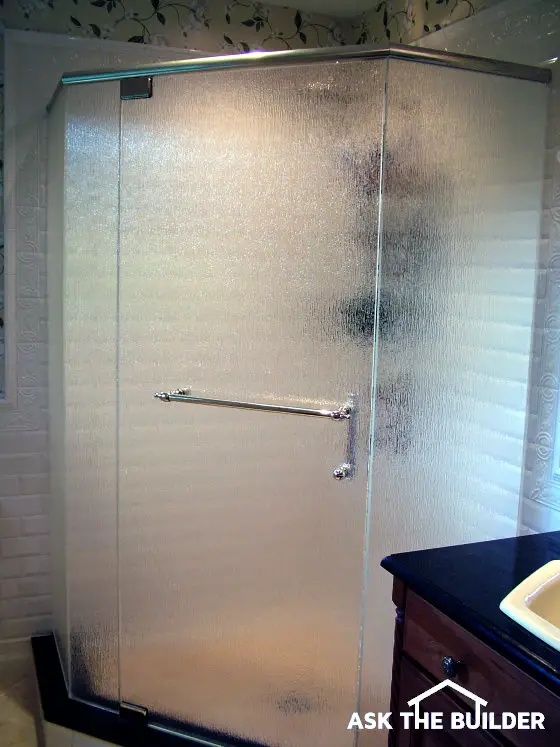
Shower Door

Just before I got back to Cincinnati, OH, the top-flight installers from Basco were there installing the fantastic shower door in the master bathroom. It was the last remaining item to complete the job. They did a superb job with the neo-angle shower frameless shower door. You can see the exact shower door and read all about what Kathy picked out in my Shower Door column.

We love the frameless look. If you go visit the Basco shower-door photo gallery, you can see that the possibilities of how you can modernize your bathroom are almost endless. I've used Basco products on my jobs for years, and never did I get a complaint from any of my customers.

Standby Generator

Just before I got back to NH, there was a pretty bad storm. The electric power to the area was down for a while. But at my house, the power outage lasted about eight seconds as our Kohler standby generator kicked in. Recently, I uploaded the video we shot about its installation. If you've never seen a standby generator, you should watch the video. They are totally different from the tiny portable generators that you connect extension cords to. You may want to consider a standby generator if you want to power lots of things at the same time at your home. That's the other big difference. Standby generators can produce much more electricity than the smaller portable generators. Please watch my video!

Paint Simulator

Overnight, I got a press release about an online tool that allows you to see what a room in your house might look like before you paint it. There are similar tools out there like this, but I thought you might want to have some fun with this one.

CRAZY Stain Solver Sale

I talked about the roof on my Cincinnati, OH house last issue. Before I rushed out the door to drive back the 15 hours to NH, I ran out of time to scan the quotation from Joel Cornelius Roofing. Suffice it to say it was over five figures. Ouch!!! And remember, I had to supply the shingles and felt paper. To raise the money to pay for the roofers, I need to convert the bags of powder in the warehouse into cash. It's that simple. To get you to react, I'm having the biggest sale I've ever had. The sale ends in three days. That's when I have to write the check to Joel. You and Joel win.

If you're a previous Stain Solver customer, you know all the things it cleans: clothes, ceramic tile grout, decks, roofs, patios, ANYTHING that's water washable. It's the most natural cleaner out there - just dried hydrogen peroxide and soda ash. That's it - no harmful or toxic chemicals like chlorine bleach.

Anyway, if you buy NOW, I'll take 30 percent off the 50 and 16-pound sizes. If you buy less, you get less of a discount- 20 percent on the 8 and 4-pound sizes. I can guarantee your satisfaction and I GUARANTEE you'll not see a sale like this for many moons. The sale ended at 5:00 PM Eastern time on Friday, October 2, 2009.

One Last Task

I do have one final thing to do in the master bathroom in Cincinnati, OH. The day before I came back to NH, Kathy picked up the edge pull hardware and the face pulls for the pocket door that gives you access to her walk-in closet that's inside the master bathroom. That pocket door will be trouble-free for years because I used the correct frame in the wall and it has bulletproof trolleys that the door hangs from. They simply can't come off the track. If you're going to install one or more pocket doors, use the frame I use all the time.

New Pegboard

In a few days, I'll be installing new pegboard in the garage in my NH house. Right now it has traditional wood pegboard. The previous owner of the house installed it. I wanted the metal pegboard that has the hooks and hangers that simply will NOT come out when you pull a tool away from the wall. That's why I use the pegboard from Wall Control. I met Rick, the owner, at a national products show probably five years ago as I was wandering the aisles. His product really caught my eye as I wanted a smart-looking product that had hooks that don't move. Rick's got what you need. Go see for yourself!

AsktheBuilder.com

Stair Treads

stair treads

These oak stair treads go well with the white square balusters. PHOTO CREDIT: Tim Carter

Stair Treads

DEAR TIM: The stair treads in my home are in sad shape. One stair tread is cracked and others are scratched from years of abuse. I know I can hide the problem with carpet stair treads, but that’s not really my style. What’s it take to refinish oak stair treads? If that’s too hard, would you recommend stair carpet treads as an acceptable solution? As you can tell, I’m floundering not knowing really what to do. Please point out any pitfalls if possible. Mary Beth M., Cincinnati, OH

DEAR MARY BETH: Wood stair treads really take a beating in many houses. It’s a combination of things that put them at great risk for damage. For one, the typical motion of a foot is to slightly slide across the tread as you plant it on each tread as you climb stairs. That scuffing action, in the presence of any dirt or grit, can rapidly wear any finish on the treads. Treads can crack if a concentrated load is placed on a single stair tread. This can happen if, for example, a cast-iron tub is carried up a flight of steps, but is set down as the workers rest and reset their grip.

You might be able to make all the repairs to the treads and bring them back to prime condition with a concentrated work effort. I would absolutely try to do this since you do have a fallback position with the rug stair treads.

Hardwood stair treads are primarily finished by hand. You may be able to use a belt sander on a wide portion of the flat tread, but you must be very careful not to sand too much wood. This will cause you tremendous frustration as you then try to blend in the edges next to the stair risers and the side stringers. Professional floor refinishers have scraping tools they use to pull off the old finish and take the wood down to a satin-smooth finish. I highly recommend getting one of these scraping tools.

Don’t cut any corners as you try to refinish the wood. To get professional results, you must have the wood nearly as smooth as glass before you stain it or put on the first coat of finish in case you want the natural look. All dust must be removed with a tack cloth, rags damp with mineral spirits, or use of a vacuum that exhausts outdoors.

Staining oak is not difficult, but you need to wipe off excess stain to prevent a blotchy appearance. The finished color of the stair treads will look exactly what the treads look like as you apply the stain and immediately wipe it off. As the stain dries, it will dull and get somewhat lighter. It will darken when you apply the first coat of clear finish. I would apply no less than three coats of finish to the stair treads. You should lightly sand the treads in between each coat of finish.

AsktheBuilder Podcast

CLICK this image and listen to the first call on the podcast. I talked to Jill about how to repair wood kitchen flooring, and possibly installing an inlay border as an option. Copyright 2018 Tim Carter

You do have a unique option where you can blend carpet with the oak treads. In my home, I have a stair runner carpet that goes up the center of the stair treads. There is about 6 inches of oak tread exposed on either side of the carpet runner. My wife selected an Oriental style runner that really looks superb, but there are an almost unlimited number of carpets that you can use for runners. If you do this, you can shortcut your refinishing efforts by only working on that part of the tread that’s visible.

Repairing the cracked stair tread may not be too hard if you can inject the crack with an expanding urethane glue or a heavy-bodied epoxy that’s formulated to bond to wood. If you carefully place the glue so that the top of the crack is left open for some wood filler, the crack can disappear once you stain and add urethane to the tread. The key is to carefully place the glue or epoxy so that you don’t get any on the wood adjacent to the crack.

If you do decide to use stair tread carpet, it’s really important that you have a professional install it. I would visit one or two specialty carpet stores and talk with the store managers about who they have that’s an expert in stair carpet. The carpet on steps can’t budge. It must be tightly wrapped and fixed to the treads so that it never detaches causing you or someone else to slip and fall.

If you decide to use the carpet runners, take a few minutes to look at the decorative trim you can use to add sizzle to your stairs. There are all sorts of stair rods that are placed at the base of each stair riser. These decorative brass and chrome rods are not functional with modern installation techniques, however years ago they held stair carpet in position.

This hardware is installed after the carpet is in place. Only a few simple tools are required, those being a hacksaw, drill and screwdriver. The rods come in different styles so be sure to look at a good variety before you make your final purchasing decision.

To keep stair treads looking great, be sure to vacuum them regularly. Sand and grit can easily accumulate on stair treads because the soles of shoes bend as you go up and down stairs. If you walk on and slide your shoes on the sand and grit, you’ll ruin all that hard work you invested. This is one reason outdoor shoes are left at the door in my NH home. It’s easy to keep floors and stairs looking great if you just wear slippers indoors.

Column 798

Standby Generator Video

Standby Generator

Here is my standby generator, that creates electricity automatically in case of a power outage. These standby generators are completely different from those portable gasoline generators, that you often see at tool rental stores and home centers. Those don't create nearly as much electricity and are not automatic.

This generator runs on propane, but they use natural gas. My generator creates 17,000 watts or 17 kilowatts of power. That is plenty to operate my boiler, microwave, refrigerator, well-water pump, my septic system pump, miscellaneous lighting in the house and some other circuits. Generators come in different sizes depending upon what you want to operate if the power is interrupted.

An automatic standby generator needs to be installed by a professional. These complex machines must be installed properly. Don't think for a minute, even if you are a serious DYI'er, you can do this job. They require a fancy, computerized transfer switch that automatically turns on and off when the power to your home is lost, and then restored.

Inside the standby generator control box is the transfer switch for my house. On the outside of the box, there is a light indicating whether the power is coming in from the utility company or the standby generator. In a power failure, the transfer switch flips to receive power from the generator. The switch does not allow electricity to go back outside the house through the utility company lines. This protects an utility company employee working on the lines. If power went out to the utility pole, he could be working on a line that he thinks is dead, but it is actually energized.

Secondly, there is a computer inside the panel that automatically turns the generator on once a week to exercise it. That is important so you know that the generator is working in case of that power failure.

The installer used metal conduit to run power cables from the generator to the main circuit panel in your home. Existing cables in your home have to be spliced into a new circuit panel that connects to the transfer switch. It is all very complicated, and believe me, it is not a job for a rookie.

Last year, there was a horrible ice storm here in New Hampshire. Many of my neighbors were without power for days and days and days. But my house was without power for about 5 - 6 seconds. These standby generators turn on automatically. You don't have to worry about a thing. Don't have to fuel it up. I was sitting by the fire, reading a book. It's that simple.

Standby generators are on guard 24 hours a day, 7 days a week, 365 days a year. They are waiting to do their job if the power goes out. You don't have to worry about a thing. You don't have to pull a cord to start the generator. You don't have run any extension cords. These generators are already connected to your electric system. Standby generators are fantastic.

Tim's wife, Kathy, was without power for days after a major storm. Click to read about that outage in the September 30, 2008 AsktheBuilder Newsletter

Read Rebecca's Generator Mistake in the November 29, 2015 Newsletter.

Read the December 2, 2015 AsktheBuilder Newsletter for a Standby Generator Follow Up.

Shower Door

framelsss shower door

This frameless shower door really adds to the appeal of this custom bathroom. This was installed by Basco as mentioned in the September 29, 2009 AsktheBuilder Newsletter. PHOTO CREDIT: Tim Carter

DEAR TIM: I need a new shower door for my bathroom. While visiting a showcase of new homes, I saw lots of interesting shower doors that had very different glass. After seeing all of them, I’m convinced I want a frameless shower door that will make my bathroom like a dreamy spa.

What do I need to know about frameless shower doors before making a purchasing decision? What do you recommend to ensure the shower door doesn’t leak in the future? Patty P., Stoneham, MA

DEAR PATTY: A glass shower door, especially a frameless glass shower door, can add the pizzazz it takes to really move the needle when it comes to eye appeal in a bathroom. As with many building products, shower doors have really come a long way since the first sliding one my Dad installed at our home over 40 years ago. Cleaning that beast was almost impossible, as gunk would accumulate in the track that sat on the tub edge.

Recently, my wife and I had installed a glamorous frameless shower door in our master bathroom. I’ve always wanted one, but never realized how dramatic the look would be in our own home. I have a second neo-angle shower door in another bathroom, but the aluminum framing around each panel of glass, plus the aluminum at each corner makes it look clunky compared with the new door.


Before you make your final decision to buy, there are quite a few things you need to consider. First and foremost, you should make sure you’re dealing with a company that sells both standard and custom shower doors. Look for a dealer that’s been in the business for a long time, preferably over 30 years.

You should be able to choose from numerous frame finishes that should match identically the fixtures and faucets in your bathroom. In our bathroom, the new shower door handle is polished nickel that matches exactly the finish on the shower faucet as well as the nearby vanity faucets. Better yet, the style of the shower door handle also matches the design of the faucets. One would think that they were made by the same company, but they’re not.

I feel the glass options are very important. My wife was able to pick from 16 different types of glass. Our pattern is called Rain, and looks like random vertical grooves made by water drops that might run down a glass panel. The grooves are on the outside of the panels so it’s easy to squeegee the inside to keep it sparkling clean.

The shower door seal is really important, but the curb the door assembly rests on is the foundation of a leak-proof installation. In my opinion, it’s mandatory to use a solid material with no or minimal seams for the curb. I used three pieces of granite for my curb, and the seam at each corner of my neo-angle shower where the granite meets is bonded permanently with epoxy. You can use marble, solid-surface material, cast stone, etc. I would never recommend ceramic tile for the curb, as each grout line is a possible leak location.

The curb should also be sloped back towards the shower. It must be level side to side, but it should slope inwards to the shower so that water doesn’t pool against the intersection of the shower door panels and the curb.

Make sure the shower wall surfaces are squeaky clean before the new shower door is installed. This ensures the caulk that creates the leak-proof seal will adhere well to the wall surfaces. Follow the manufacturer’s recommendations as to wait time before you use the shower. Some want you to wait 24 hours, allowing sufficient time for the caulk to cure.

Leaks from frameless shower doors can sometimes be traced to poorly positioned shower heads. There can be a small open gap between the door and the adjacent pieces of glass. Make sure the water stream coming from the shower head doesn’t aim directly at these gaps.

Consider installing a rain shower head if you have a chronic leak. These heads produce a gentle stream, and the water tends to fall straight down instead of an angle. The only disadvantage of the rain heads is they don’t produce a vigorous stream of water that you might need on an early morning as you begin your day.

As you might imagine, over the years I've installed quite a few shower doors on my jobs. In almost every case, it was one made by a company named Basco. They happen to be based in Cincinnati, OH. My customers never had an issue with these doors. That's important to me - no problems after the install. That's why I used them to install the door in my own master bathroom. The order process was easy, the measuring crew and install crew were professional and Kathy is happy. That's all that matters. Of course the door looks fantastic and fits like a glove.

Column 797

September 16, 2009 AsktheBuilder News And Tips

What’s in This Issue?

Roofing Tips
Bathroom Remodeling Rebates
Laptop Incident
DIY Hardwood Refinishing
Massive Stain Solver Sale
Christmas Gifts You Make

FOLLOW ME ON TWITTER

Friendly Question Reminder!

If you have a question for me, don't hit the Reply button just yet. Go immediately to my web site and type in the keywords about your problem into my Search engine. The search box is at the top of every page of my web site. You could have your answer in seconds if you do this! Please pay attention to all links you see at my web site. The exact products and services you often need are right in front of you, and you might be ignoring them.

Last Friday, I drove from New Hampshire to Washington DC so I could participate in what's believed to be the largest citizen protest in the nation's capital. Suffice it to say this drive of only 515 miles took me 11 hours, two of which were spent crawling across the Garden State Parking Lot, affectionately called the Garden State Parkway by locals. The traffic from the Tappan Zee Bridge to south below Newark was jammed. Rain, mid-afternoon Friday traffic and just general congestion accounted for the mess.

I left DC on Saturday at 2:30 to drive back to Cincinnati, OH. I'm here now starting the probate process for my Mom's estate. Boy is that a rat's nest of paperwork. Next week, I deliver the speech to doctors and other health-care professionals here in Cincinnati. I intend to share some good stuff about the power of geo-targeted search advertising, long-tail marketing and ways to use video to boost business for these pros. If you want me to speak to your group sharing the skills and magic of what I know about Internet advertising, just email me.

While I'm here, I'll also be sprucing up the exterior of the Cincinnati house getting it ready for sale in the spring.

This Thursday night (September 17, 2009) I'll be getting together with subscribers who responded to my invitation last week. We're going to meet at Molly Malone's at 6111 Montgomery Road in Pleasant Ridge here in Cincinnati, OH. Be there at 7:30 p.m. Philip, from Ontario, Canada, is going to try to make it. If he does, he'll win the Most Dedicated Award! If you intend to come, please email me so I know how many tables to reserve.

Roofing Tips

A crew of roofers is at my Cincinnati home installing new GAF Slateline shingles. Wow, are they gorgeous, the shingles not the roofers!

These shingles mimic the look of traditional slate, and are very attractive on my Queen Anne Victorian home. When they get the front of the home done, I'll upload a new video about the finished job. I could have applied the shingles over the existing roof, but chose not to. I feel it's really important to strip off an old roof so you can see the condition of the wood sheathing. Plus, the new shingles tend to look better when they lay on the smooth wood.

I urge you to take the time to read the installation instructions of whatever roofing product you intend to use on your home. Be sure that no shortcuts are taken on your roofing job. This roof of mine is very complicated, and it's a challenging job for the roofers. Watch this video showing all the different angles of the roof.

Bathroom Remodeling Rebates

You can tell the recession is deepening. Deflation is becoming more apparent. Prices of things are dropping. In fact, just yesterday I got a depressing email that the local granite fabricator I used for my own recent bathroom remodeling job went out of business. How does this relate to a rebate? Overnight I received a press release about a rebate program if you are thinking of doing a bathroom remodel. You can get up to $500 in rebates, the news item said. Rebates are not only incentives to buy, but they are a form of deflation. I can't vouch for the quality of the items that have the rebates. You need to do your own due diligence on that. When it comes to fixtures in a bath, I tend to go with a sure thing. I want quality and parts availability down the road. In my own bathroom remodel, I used faucets from the Moen Showhouse collection. Kathy loves them and so do I.

Here's where you need to go to get information on the $500 Rebate Program. (Rebate program has ended.)

Laptop Incident

This newsletter was supposed to go out yesterday. For two years now, I've been using a wonderful Apple MacBook Pro as my computer. One of the software packages I have is iWork. In it is a word processing program called Pages. I use that to write my columns and this newsletter. Well, let's say I *used* to. I had been plugging away for three hours and was just about finished. All of a sudden my laptop completely shut off. The battery had died, and I didn't get the warning the battery was low. Poof! All of my writing was gone. Can you believe that the Pages software has no default AutoSave feature built into it? That's insane. If you are an Apple employee and have access to the software engineers, please tell them that's UNACCEPTABLE. I used to be a WordPerfect user for years and well over 15 years ago WordPerfect had autosave built in.

A buddy of mine who is an Apple expert said I should start to use Google Documents as it autosaves your work every couple of minutes. I've used Google Documents for a few years, but mostly to share documents with others. But from now on, it's going to be my primary word processing software until Apple gets a revision done to Pages. Shame on you Apple.

DIY Hardwood Refinishing

Money is really tight now for many. If your hardwood floors have some minor scratches, you may be able to restore them with minimal effort. Remember, you walk on the floor finish, not the wood. If you allow the finish or urethane to wear away, that's when you have to sand floors. If you periodically add a new coat of urethane, you never really have to sand your floors. Read this past column to get an idea of how easy it is to keep your floors looking great.

Massive Stain Solver Sale

As I said earlier, I have a new roof being installed on my house in Cincinnati getting it ready to sell. I installed the original roof myself with three helpers 23 years ago. You can imagine the shock I had when I opened the bid. I'll scan it and share it with you next week. It took my breath away, and when you see it, note that I had to supply the shingles and felt paper. All 60 squares worth! But to pay for the roof, I need to convert bags of raw materials in the warehouse into cash. My pain is your gain. Kathy and I are deeply discounting the price of the 16 and 50-pound size. The sale will only last three days. You must be prepared to act next week.

When I told this to Ellen, she heads up the Stain Solver operation, her words were, "You're nuts. You'll not make any money lowering the price that low." Well, I need you to make me look good. Watch for the next newsletter.

Christmas Gifts You Make

While on the topic of shrinking household budgets, look at the calendar. Yikes! Christmas is just around the corner. Instead of buying gifts that may put tons of financial stress on you, why not get creative and make some gifts of your own? This past spring I used a very simple tool to make a stunning window seat bookcase frame and two tables.

You can use this same tool to make smaller items out of wood. The possibilities are endless. I'm talking about a pocket-hole jig. Watch the video at this web site to see the pocket-hole jig I own.

AsktheBuilder.com

September 10, 2009 AsktheBuilder News And Tips

What’s in This Issue?

PEX Tubing vs. Copper Tubing
Rusty Gas Piping
News About Stain Solver
Window Leak
Pocket Door Update
Time is Running Out
Latest Columns and Video

FOLLOW ME ON TWITTER

Friendly Question Reminder!

If you have a question for me, don't hit the Reply button just yet. Go immediately to my web site and type in the keywords about your problem into my Search engine. The search box is at the top of every page of my web site. You could have your answer in seconds if you do this! Please pay attention to all links you see at my web site. The exact products and services you often need are right in front of you, and you might be ignoring them.

I'm in New Hampshire writing this today, but tomorrow I'll be driving towards Cincinnati, OH to do some exterior work on our house there to get it ready to sell. I'll also be monitoring the roofers who will be putting on the new GAF Slateline shingles. Wait until you see the eBooks and videos that I'll be producing about different aspects of the roofing job. Wow!!!

I'll also be shooting a video or two in the newly remodeled master bathroom. I have some cool things to show you in that room. If you live in or around Cincinnati and want to get together one evening at a local establishment, send me an email with "Cincy Visit" in the subject line. I'll then email you with a time and place where we can all have a drink and visit with one another.

If you work for a company that makes or promotes home-improvement products, remember that I actively test as many tools and products as possible sharing the results here in the newsletter.

PEX Tubing vs. Copper Tubing

Jenee Bobbora, a subscriber to this newsletter asked me an interesting question overnight:

"Do you have an opinion on PEX vs. Copper plumbing?  I have to decide ASAP, and my builder tells me that right now they are priced about the same. The PEX carries some extra cost due to the special tools that are needed.

I live in Houston, TX, and it is hot here. I am a bit concerned about my water sitting in plastic pipes but most people I ask say it is better than copper now for a number of reasons. I would love to know your thoughts."

Jenee, I'm a licensed master plumber, and have been one for many years. Installing copper is what I did for over 30 years. It takes lots of time to cut copper tubing, clean the ends, clean the fittings and solder all of that. None of that effort is required for PEX tubing. You run one continuous piece of tubing from a central manifold to the fixture. It takes seconds to crimp on a brass fitting to the PEX tubing.

The PEX should not cost more because of the crimping tool, it should cost less! There's an enormous time savings in labor. What's more, the tools are used on job after job, so the cost of the crimping tool is amortized over many jobs. Add up the cost of an acetylene torch, the B-tank, tubing cutters, etc. and I'll bet a plumber can spend as much for copper tools as he might for the cutter and crimper for PEX.

I have PEX tubing in my New Hampshire home. It's used for both my water lines and my radiant heating system. I love it. Even though I used copper for years in all the jobs I did as a plumber and builder over the years, I'll be using PEX in the new home Kathy and I will build soon. Copper is a wonderful time-tested material, but there have been issues with it and aggressive water. There were also issues with early PEX systems, but I feel those have been solved and that the connections between the PEX and the fittings are now reliable.

Read this about aggressive water.

Rusty Gas Piping

Last year here in New Hampshire, I had a standby generator installed. Next week, I should have a video loaded for you to watch about it. Part of the install included running a new propane gas line to the generator. It was cold at the time and impossible to paint the black iron piping that was used in two locations where the gas-pipe risers come up out of the ground.

The pipes developed a thin coating of rust in the past nine months. It's important to paint exposed black iron pipe because if left alone, the rust will eventually cause a gas leak. All you have to do is look at the exposed threads on some of the pipe. You can clearly see that metal has been cut away at the threads making the pipe thinner at the threads. The rust weakens the piping and if subjected to stress, the pipe can snap at a thin thread where it connects to a fitting.

I used a special Rustoleum primer that's formulated to bond to metal that has lightly rusted. The printing on the small can is so tiny I can't read to see if the paint contains zinc chromate. If it does, that's a very good thing as this material bonds well to rusty metal and prevents rust once you apply the finish coat of paint. I'll be applying the finish paint just before lunch today as soon as it warms up. Be sure you paint any rusty gas piping inside or outside your home.

News About Stain Solver!

If you're a new subscriber, you may not know about Stain Solver. It's a fantastic oxygen-bleach cleaner Kathy and I developed about 13 years ago. In the past year, I decided to really pay attention to the business and make it grow.

I got an email yesterday telling me that the Stain Solver business was nominated for a special grant to help market the business. If I was lucky enough to win, the grant could help me do things that I've always wanted to do.

But I need your help now, meaning right now. To proceed to the judging phase, I have to get as many endorsements as possible. Some companies in this competition have over 1,000. Would you consider voting for me? You have to do a simple registration at this website to vote, but it takes less than a minute or so.

Please go here and read the story. In the left column, you'll see a blue button that says: Endorse this Story Now. But up at the top you'll see a small text link that says Login or Register. You have to register in order to endorse me.  Thanks so much for doing this for me, and wish me good luck!

Window Leak

A friend of mine just discovered a chronic leak beneath a window at his home. The cause of the leak was traced to Tyvek that had been improperly installed. On top of that the window was not flashed properly.

If you're doing a room addition or building a new home, it's mandatory that you invest the time at the website of the window and door manufacturer whose products will be used on your job. Take the time to review the printed installation instructions or any videos they may have posted. You then need to make sure your windows are installed correctly. This means you must inspect the work or pay a professional to do it for you. It's not easy, I know that. But unfortunately you must take some responsibility to ensure the job gets done right.

Pocket Door Update

Recently, I've been telling you about a pocket door I installed in Kathy's new bathroom. These doors are space savers and they can be trouble-free if you use the right hardware and frame. One thing I discovered years ago is the advantage of pre-painting the door before it's installed. As with all doors, it's very important that you paint all surfaces, especially the top and bottom of the door. You can't allow pocket doors to warp. Not painting the top and bottom of the door increases the likelihood of warping as water vapor can enter the end grain of the two vertical stiles of the door.

Time is Running Out

With winter just around the corner, remember that certain projects are temperature sensitive. Read the labels on paint, sealers, etc. and they have a minimum application temperature. Some products also need to cure several hours before the temperature can drop to a certain level. Failure to do this can lead to problems.

Get these projects done now before you bump up against these temperature restrictions. Okay, I don't want to hear from you if you're a gloater who lives in southern Florida or sunny southern California where the temps are nearly always above the limits year round. Blah blah blah...... :-> But if you do email me and get in my grill about your great weather, we'll talk about hurricanes and firestorms instead.

Latest Columns and Video

I took a cool hike to the top of Foss Mountain in New Hampshire on Labor Day.

Do you really need a Firewood Rack?

What kind of pegboard should you install?

Do wallpaper and tie dye clothing clash? Look at the photo in this column. Ignore bald spot.

There are different ways to paint a door. Here's one way I do it to get pro results.

AsktheBuilder.com

Roofing Contractors

DEAR TIM: I’m flummoxed trying to chose between all the roofing contractors in my town. I’ve heard nothing but horror stories about poor workmanship, leaks and rip offs. How can I make sure that I hire the best roofing contractor for the money? What are the top things I should look for when I meet with a residential roofing contractor? I feel so vulnerable and can’t afford to make a mistake hiring a slick salesperson. Rebekah H. Quaddick, CT

DEAR REBEKAH: Your anxiety is shared by tens, possibly hundreds, of thousands of other homeowners if my email Inbox is an accurate statistical sampling of the entire country. It’s my belief that this apprehension is rooted in the fact that a vast majority of homeowners don’t really know how roofing systems work, how shingles are installed, the purpose of flashings, etc. because many people have never even stood up on a roof. If you fit this description, you and countless other homeowners don’t know the right questions to ask or know if a roofing contractor is pulling the wool over your eyes in a sales presentation.

This is a fairly normal job site scene when you hire roofing contractors to install a new roof on your home. PHOTO CREDIT:  Tim Carter

This is a fairly normal job site scene when you hire roofing contractors to install a new roof on your home. PHOTO CREDIT: Tim Carter

It’s my belief you have to spend some time educating yourself about roofs before you contact roof contractors to come over and look at your house. In fact, you can really save lots of time if you go to the trouble to select the actual roofing material you intend to use. I would visit a business that sells the roofing materials to roofers that you plan to use. Do this mid-morning or mid-afternoon when they are usually not too busy. Ask to speak with the general manager or the owner. Talk to them about which shingle or roofing product they feel is the best value for the money and would work best on your home. Take photos of your house with you that show the roof.

Once you have zeroed in on the roofing material you intend to use, obtain from the manufacturer the written installation instructions for that exact product. In most cases, these are available in seconds by visiting the manufacturer’s web site. Print the instructions and read them. You’ll discover while reading them that certain accessory materials are required to install the roof correctly. Remember, whomever you hire must do all the things listed in the instructions to ensure you end up with a valid warranty.

This may seem like a boring task, but it’s absolutely necessary. You must understand the system so that you can ask the right questions when you interview the different roofing contractors and possibly any salesmen that may come to your home.

Here’s an example of what you might ask. Many asphalt shingles require felt paper or other approved underlayment be put over the wood sheathing. The instructions often say the type of underlayment. Ask the roofers to describe the layers of material they will install, but don’t mention the underlayment by name. See if they describe it perfectly. You can also ask questions about the nails or fasteners that will be used. The written instructions are very clear as to the type and length of the fasteners.

You may inquire about a roofing contractor license. Your state may require this formality. You can get the answer to this from your local building department or state web site that deals with contractor licensing.

As you start to obtain written estimates, make sure you have the contractors bidding on the same material and the same conditions. If you intend to strip off all the old shingles, be sure all contractors will do this. The same goes for any flashings, vents or other materials on the roof. Communicate to all contractors they all will install new flashings or reuse existing ones if in excellent shape. Each roofing contractor will give you an assessment about the flashings after they come down from the roof. Ask each roofer why they feel the way they do about your roof system. See if they will take photos for you of the existing roof if you can’t get up to look at it yourself.

You need to be sure you get copies of all insurance documentation with each bid. The roofers must have general liability and workman’s compensation insurance. Professional contractors will readily supply you with a certificate of insurance showing that the premiums have been paid in advance.

When you get ready to sign a contract with a roofer, be sure that all the things you discussed are in writing on the contract. Specify in the contract the exact materials and color with a line that says, “ .... all materials shall be installed in accordance with the written instructions as provided for by the manufacturer.”

Do not forward any money to the contractor unless the roofing materials you select are special order. The roofing contractor doesn’t pay his employees in advance, nor does he pay for materials in advance. Since this is the case, why should you forward money? Agree to a time table to make partial payments as the work progresses if necessary.

Even if the materials are custom ordered, most professional roofing contractors have credit accounts at the supply houses. It’s fair for the contractor to ask for the money for the custom materials in advance in the event you decide to not install your roof. You can always decide to buy the materials yourself and have them at the job site should you feel uneasy about advancing money.

It may be a great idea to hire a home inspector to look at the final roof job to ensure it was installed correctly. Put this item in the contract and state that the final payment for the work will not be made until the inspector certifies the roof has been installed correctly.

Column 796

Firewood Rack

DEAR TIM: My husband says we must have a firewood rack, but I say it’s not going to work. The only place available at our home for the firewood storage is a sloping hillside. All the storage racks I’ve seen are made for level ground. Do you have any suggestions for an outdoor firewood rack that might have adjustable legs? Money is really tight right now, and if there is another way to solve this firewood storage rack inexpensively, I’d be grateful. Melissa T., Stowe, VT

DEAR MELISSA: I have to agree with you, as I’ve done pretty exhaustive searches and the photos of each firewood log rack I’ve seen show the rack on level ground or a driveway. That’s not to say firewood racks can’t be modified, but that could take some work.

I’m also sensitive to your budget issue, as undoubtedly are many other homeowners in these challenging financial times. Just this past weekend, I solved my own firewood outdoor storage problem by building three outdoor firewood racks in one using the actual split firewood and salvaged oak 4x6’s that came in a shipping crate. This project only cost me my time, with no out-of-pocket expenses.

A firewood rack may not be necessary if you creatively stack your split firewood.  How NOT to stack firewood is shown in the upper right corner. Previous homeowner just scattered cut links on the ground. PHOTO CREDIT:  Tim Carter

A firewood rack may not be necessary if you creatively stack your split firewood. How NOT to stack firewood is shown in the upper right corner. Previous homeowner just scattered cut links on the ground. PHOTO CREDIT: Tim Carter

Salvaged wood beams for a project like this can often be found at trucking companies or businesses that ship and receive granite, stone or marble. You can also purchase these strong materials at a lumber yard. Be sure to get treated lumber if at all possible.

Frequently homeowners underestimate the weight of firewood, especially if it’s a dense hardwood like oak or locust. This is why you frequently see the firewood rack glamor shot with the rack resting on a concrete, brick or blacktop surface. If the rack was placed on soil, the weight of the wood very likely would drive the legs of the rack into wet or damp soil.

The ground surrounding my outdoor fire pit is also sloped like yours. I used 4-foot-long 4x6’s to make level, or nearly level, stacking platforms for my firewood. The advantage to using shorter lengths of the wood beams becomes clear when you see how little you have to lift the downhill end to make it level. Often a medium-sized piece of split wood that is placed perpendicular across the end of the first step of the wood beams is enough height to set the next step of the homemade firewood storage platform.

The primary purpose of the firewood racks I’ve seen is to create support at the ends of the pile and a level surface off the ground so the wood doesn’t contact the soil. The short wood beams in my homemade firewood rack provide plenty of space for air circulation at the base of the pile of wood. I use the actual split firewood at the ends of the pile to provide the necessary support so gravity doesn’t cause the wood to tumble off the pile as it gets higher.

My homemade firewood rack works best with split firewood. I’ve discovered over the years that fires seem to burn best when you throw on pieces of wood that are not too much larger than the diameter of the fat end of a baseball bat. Split wood also dries and cures faster, so you might as well split the wood before you stack it so it’s ready to use when you want to burn it.

I take similar-sized split pieces of firewood and use them at each end of the pile to create a stacked structure that retains the weight of the wood next to it. All you have to do is place the first row of the wood perpendicular across the large flat 4x6’s that are set parallel and spaced about 14 inches on center. This tight spacing allows the beams’ outer edges to be about 18 inches apart. This is typically the ideal length for pieces of firewood. This spacing of the wood beams provides the most amount of stability as you stack the wood.

The next layer of wood at each end of the pile is set perpendicular to the row beneath it. Use three or four pieces of wood at each row, not just two. You’ll discover quickly that this stacking method is very stable. Always stand at the end of the rack and look at the pile as you build it to make sure the wood is always centered over the wood beams. The firewood that is placed between these two end structures can be all stacked the same direction perpendicular to the run of the wood beams.

Once the firewood is stacked, you need to cover it. But you can make a big mistake if you cover it completely with the pile wrapped up like a Christmas present. If you drape a large waterproof cover over the wood pile, you’ll trap water vapor and liquid water in the pile. You just need to cover the top and the top 25 percent of the sides of the wood pile. This allows air to readily pass through the stacked wood to dry it rapidly when it does get slightly wet from a rainstorm.

If you do decide to purchase a firewood rack, be sure you can adequately support the legs. The weight of the firewood can bend the bottom supports of the factory-made firewood racks if they don’t have solid support. Keep in mind that soil strength changes significantly when soil becomes wet. You may think the soil is plenty strong when dry, but after a rainfall your firewood rack and all the wood in it may be scattered on the ground after it collapses.

Column 795

September 1, 2009 AsktheBuilder News And Tips

What’s in This Issue?

Chicago Trip Update
Repointing Mortar
Last Call for the Super Deck Sealer
I Need a Favor From You
Electrical Outlets on a New Tile Backsplash
The Pocket Door in Kathy’s Bath
Speech at Children’s Hospital
Ladies Only

FOLLOW ME ON TWITTER

Friendly Question Reminder!

If you have a question for me, don't hit the Reply button just yet. Go immediately to my web site and type in the keywords about your problem into my Search engine. The search box is at the top of every page of my web site. You could have your answer in seconds if you do this! Please pay attention to all links you see at my web site. The exact products and services you often need are right in front of you, and you might be ignoring them.

Never forget that all past issues of my Newsletters can be found at my website.

I'm back in New Hampshire. The drive back with my son was fantastic, but no matter how you slice it, 15 hours door to door is exhausting. It's 887 miles if you take the shortcut through Vermont on State Route 9 that cuts across the southern part of the state leading you into Keene, NH. Let me warn you now if you go across Vermont Route 9. The line painting on that road is unacceptable. It's very dangerous, and I can't believe the VT DOT has allowed the white shoulder and double yellow line paint to fade as badly as it has. Driving that road at night over Hogback Mountain is an accident waiting to happen. I can only imagine how hard it is to do in a rain at night.

If you're a new subscriber, you're unaware that I shot myself three weeks ago with one of my nail guns. That injury is getting better, although I'm beginning to wonder if I didn't shoot that finish nail into the larger arm bone where it connects to my wrist. Three nights ago, I bumped my wrist onto the wooden arm of a chair at dinner and almost passed out from the sharp pain.

Bottom Line: Be careful around any power tool.

Chicago Trip Update

A few weeks ago, I was in Chicago for just over 26 hours on business. I was able to squeeze in two meetings with three great subscribers. The first night I shared some liquid refreshment with Robert Tingler and Tim Haeussler as we sat outdoors at an Irish Pub next to the Chicago River. We talked about all sorts of things, not the least of which was a neat set of saw horses that Tom has designed. Tom just told me that he's taking my advice and producing great plans for these tools. I hope to have them available for you late September. Wait until you see these sawhorses! Tim talked about his encounter with a faulty step ladder. His advice is to stay off ladders that have worn or broken parts.

The next morning I had breakfast with Hans Perlich. It was fantastic to hear about how he's recreated himself with a cool job of installing LED lights in commercial applications. The bottom line is that I really enjoy meeting subscribers like you. When I travel, I try my best to carve out small slices of time to meet you. There were several other Chicago residents who wanted to meet, but we couldn't match up schedules.

Repointing Mortar

If you have to tuck point mortar joints in a wall, chimney, a horizontal patio, etc. before the snow blows, you may be interested in a very handy tool. It's called the Quickpoint mortar gun. If you've ever used a caulk gun, then you'll understand this tool. It applies brick mortar into cracks faster than you can caulk a crack with a caulk gun - I mean MUCH faster. Tuckpointing the traditional way with a plasterer's hawk and pointing trowel is tedious. This Quickpoint tool is simply amazing. I had this tool in my own hands about a week ago and have never seen anything like it.

You can get the tool with or without an electric drill that powers the auger at the bottom of the hopper. I wish I would have had this tool years ago when I built all my brick patios. I had to use the clumsy mortar bag that's similar to what bakers use to decorate cakes.  You absolutely have to go to this page to see the tool and watch the videos down near the bottom of the page showing a real-time use of the tool. There's no fancy smoke and mirrors editing. You see the real speed of the Quickpoint. This tool gets two hammers up from me!

Last Call for the Super Deck Sealer

In the last newsletter, I mentioned the synthetic-resin deck sealer that has the nanotechnology sunscreen. You wouldn't believe the interest I got from that. Perhaps you were one who emailed me with questions. John Meredith, the president of Saver Systems, agreed to continue the promotion another few weeks telling me in an email, "...we'll make as much sealer as necessary to satisfy your subscribers."

You can't ask for more than that from a company, especially since the general public can't buy this product until next spring! If you're a new subscriber, I saw the actual test panel that showed virtually no color fade from extreme UV testing. But at the same time, all the other national-brand deck sealers failed the test. You can see the actual test photographs here and buy some of this magic sealer now.

I Need a Favor From You

Each issue of this newsletter, I try to share some of the best products and tips in an effort to save you time and money. For example, here's another money-saving tip as we all need to save money now! I want you to call your insurance agent who handles your homeowner's insurance. Confirm with this person that your policy is really a catastrophic loss instrument, not a policy to cover this and that - EVEN THOUGH YOU CAN BUY THE POLICY WITH A LOW DEDUCTIBLE. My feeling is that the deductible limits are teasers that lull you into thinking you can make claims that might be several thousand dollars. They are also, in my opinion, high-profit centers for the insurance companies.

The truth is that there are unwritten rules the insurance companies use that if you make X number of claims in Y time frame, you get cancelled. If you get cancelled, you have to get an insurance policy in the secondary market at a much higher annual premium. My experience has been that they don't tell you up-front *not* to use your policy - except for catastrophic losses.

To SAVE money, raise your deductible limit to the highest amount so you lower your premium. You only want to use your policy in the event of a major catastrophic loss. Don't believe me? Then ask your agent to put in WRITING exactly how many claims, and what the dollar amounts can be, that you can have in each calendar year BEFORE you get cancelled.

Here's what I would love from you if possible. I know you very likely have a mailing list. I get put on many friend's list where I see an email going out to 10, 20 or even 50 friends or coworkers. Is it possible for you to forward this newsletter to your own friends list, tell them why you like the newsletter and ask that they consider subscribing?

I ask this for a simple reason: Since I don't actively sell ads in this newsletter, I need constant growth in the subscriber base. As you can imagine, I can't send this newsletter out for free. I try to recapture that expense by sending traffic to my web site. The occasional Stain Solver sale promotions also help cover the cost.

If you can help me add new subscribers, I would greatly appreciate it.

Electrical Outlets on a New Tile Backsplash

Joann Lewis of Jacksonville, NC wrote to me:

"I have installed a tile backsplash with six outlets that I need to tile around. I was told they need to be pulled out so they sit on top on the tile. Can I do this myself, and how do I do it?"

Joann, you bet the outlets need to be brought out to the same plane as the surface of the wall tile. When you remove the cover plate from an outlet or switch, you normally see little square or round ears that touch the electrical box or the wallboard or plaster. The tile needs to be cut so that it extends under these ears. You simply unscrew the screws that hold the outlets to the box just enough that you can get the tile under the ears. After the tile mastic dries, tighten the screws.

The Pocket Door in Kathy's Bath

One of the tasks in my recent bathroom remodeling project was to install a new pocket door for Kathy's closet. You may think this in no big deal, but what if I told you that on one side of the pocket was an existing wall in the bedroom that I absolutely didn't want to demolish. I had access to the other side of this wall as part of the bathroom remodeling.

Using my pocket-door frame of choice, I was able to remove the wall studs in this wall and install the pocket-door frame with no harm to the drywall. I did have two small drywall screws to spackle over where the thin pocket-door stud connects to the top frame.

I tell you this story simply to let you know in certain situations you can install a pocket door in an existing wall with minimum disruption. When I showed the photo of the completed door to Meghan, my oldest daughter, after arriving back here in New Hampshire, she couldn't believe the closet door was a pocket door. She was well aware the door would have to slide into the wall behind Kathy's nightstand.  In about a month, I'll show you this door and the completed bathroom in a special video. I didn't have time to tape the video before I came back to New Hampshire.

Speech at Children's Hospital

I've been hired to give a speech about how doctors can utilize the Internet to help build their practices and connect better with their patients. This speech will happen the last week of September. I mention this so that you're aware I do public speaking on Internet topics as well as general motivation. If your company or group is looking for a speaker, just contact me and I can tell you if I'm available. I guarantee you that you'll discover some things about the Internet and email marketing that you'll simply not believe.

Ladies ONLY

I have two things I want to share here. Every now and then I wish I could be a woman. Ninety-nine percent of the time that feeling overwhelms me when I see how much closer the women's tee is to the hole on the golf course. The other times it happens when I see beautiful things that women wear. Yesterday, I was strolling around the Meredith, NH Fine Arts and Craft Fair and ran into a gold and silversmith, Thomas Kuhner. The jewelry he makes himself blew me away. The pierced earrings and necklaces were to die for. Gentlemen, if you're reading this, you better visit his web site and select something for your main flame. If you're a woman reading this, wait until you see some of the pierced earrings that are exact copies of flowers.

This is a perfect segue to a very funny related video. Each time I watch this video, I laugh out loud. You may have to watch it twice to get all the lines. It's hilarious.

AsktheBuilder.com

Pegboard

DEAR TIM: Pegboard used to hang in my father’s garage. However, the pegboard hooks would always pull out of the board when you grabbed a tool. Are there different pegboards that eliminate this pesky problem? Do you use any handy pegboard accessories in your workshop? I’m getting ready to install pegboard and want to get one that lasts a long time and looks great at the same time. What else can you share about pegboard storage? Sam T., Vienna, VA

DEAR SAM: I have crisp memories of my own father’s wood pegboard that hung in his tiny storage room under our front porch. He had hooks for pegboard that also pulled away from the board just as you describe. I remember him installing new hooks that had tiny retention clips that helped hold each pegboard hook tightly to the surface. But even these hooks failed over time enlarging the holes in the wood material.

Metal pegboard will absolutely solve the problem of hooks that move if you purchase one that has pegboard hooks that lock into position. I have used this system in my old home and am about to install it in my new house because it’s performed so well. There are plenty of pegboard systems out there, and with little effort you’ll discover plastic pegboard and steel pegboard as well as the standard wood pegboard made from wood fibers and glue.

This pegboard is doing a good job of keeping tools organized and off the workbench. PHOTO CREDIT:  Tim Carter

This pegboard is doing a good job of keeping tools organized and off the workbench. PHOTO CREDIT: Tim Carter

What I like about metal pegboard is its ability to create a striking pegboard display. The brand I use comes in a variety of colors that have a glossy powder coating. The vibrant colors allow you to theme your workshop or garage. Every color in the rainbow is available, as well as white, black and galvanized metal for that industrial look. If you choose this pegboard system, your friends and neighbors will be insanely jealous. I can say this with confidence as every person who’s seen my metal pegboard has commented on it.

When it comes to accessories, there is nearly an endless variety. You can get pegboard bins, a pegboard shelf that has a built-in paper-towel holder, other pegboard shelving, and very cool pegboard-organization hooks made for special tools. Believe me, the manufacturers have thought of just about every hand tool that needs to be stored, including gardening tools, and have made hooks that fit the tools perfectly.

I’m a big fan of the special accessories made for groups of tools. For example, my metal pegboard system has special holders that work great for regular screwdrivers, phillips screwdrivers or nut drivers.

Special hooks are made for every imaginable hand tool and even some power tools like a corded or cordless drill. What’s very cool about the metal system I have is that you can convert your wood pegboard to the metal pegboard but still keep all your old pegboard hooks. You can get the metal pegboard that has the regular spacing with the traditional round holes as well as the newer sleek slots for the hooks that will not pull out of the board.

Not too long ago, I got some very interesting magnets made for metal pegboard. These magnets allowed you to place tools just about anywhere on the metal pegboard. If the tool you want to hang has steel or iron in it, it immediately is held to the wall by the magnet. This works only with steel pegboard that allows the magnet to bond to the board.

There’s not a doubt in my mind that my metal pegboard system can last several generations. My son and daughters can use it if they want, as you can remove the panels from the walls in my garage and workshop in minutes. The entire system can be moved to another house or location in minutes. Wood pegboard is probably more affordable, but I can tell you that my brightly colored metal pegboard really gets me in a good mood when I’m in my garage and workshop.

When you first install pegboard, it helps to lay out the tools you want to store on the floor in the manner you want them on the wall. This planning is helpful so that you know how much pegboard to buy.

I always try to sort tools by the type and especially for which ones I use most frequently. The high-use tools need to be placed on the wall in positions where they are easiest to reach. Try not to cram tools next to one another making it hard to grab them.

What I really like about the metal pegboard I use is that it will take both the sleek hooks that fit into the vertical slots as well as standard round hooks meant for wood pegboard. If you have an older hook accessory for your wood pegboard, it can be used right alongside the newer hooks.

Column 794