DEAR TIM: Some of the concrete walkways on our 100-acre island association development are disintegrating. The top surface is crumbling. Other concrete adjacent to it poured at the same time is in great shape. What is the problem, and can a thin concrete overlay be added to the walkways that are sound below, but the top surface is spalling? Roland M., Boothbay Harbor, ME

CLICK this image and listen to the first call on the podcast. I talk to Vic about how he can use a concrete overlay to save THOUSANDS of $$$. Copyright 2018 Tim Carter
DEAR ROLAND: You and the other members of your association were very likely victims of poor workmanship. The spalling of the concrete walkways can almost always be traced to any number of issues with regards to mixing, placing, finishing and curing the concrete. Since you are on a small island, I will assume that all the concrete is made on site in small batches, not delivered in large ready-mixed trucks that come over on a ferry boat.
The good news is that you are going to be able to install a concrete overlay that will perform well for the next 50 years, if not longer. Even better, if you and some of the other residents on the island are willing to do a little bit of labor, this is a do-it-yourself task that I feel many homeowners can complete with professional results.
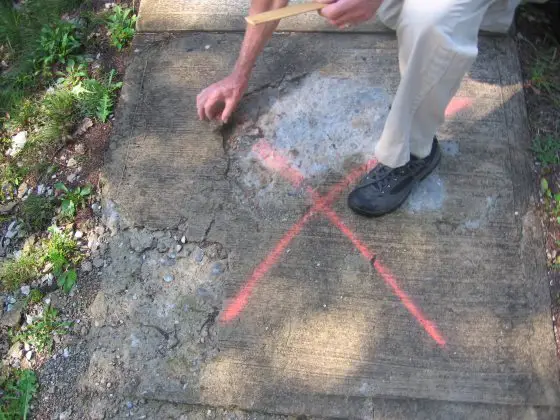
Disintegrating walkways at island association. PHOTO CREDIT: Roland Miller
Let's talk first about some of the primary reasons why the original concrete failed so it doesn't happen to you when you start your concrete overlay project. Since you have a mixture of concrete in great shape next to concrete that has spalled, my instincts tell me that the failure is due to a finishing error. The installer probably troweled water into the surface of the concrete to make the finishing go faster with less effort. He could have also troweled it too soon while the bleed water was on the surface of the concrete.
The spalling has happened because there simply was not enough cement paste at or near the surface of the concrete slabs. The cement in concrete is the glue that binds the sand and stone together. If you add too much water to concrete, you dilute the cement in the mixture. When this happens, concrete is very susceptible to spalling from freeze-thaw cycles. I have to believe you get cold weather with snow and rain in the winter months. These are ideal conditions for freeze-thaw failure.
To repair your damaged sidewalks you need a few materials and tools. I recommend that you practice the technique on a sidewalk section that is fairly remote. You can also practice in a garage using some precast concrete pads that you can buy at a home center.

Close-up of sidewalk spalling. PHOTO CREDIT: Roland Miller
The concrete overlay mixture is made from sand, very small stones, Portland cement and fresh water. Look closely at the surface of the existing sidewalks that are in good condition. See if the sand particles in the concrete match the sand on your beaches. I find it hard to believe that the contractor didn't use the abundant sand you have all around you. If the concrete was ready mixed and brought from the mainland, then visit the concrete plant and find out where they got their sand. You want to use the same sand if possible to get a close match on the final finish.
Stones used in concrete impart great strength. But the stones must be sized properly. The diameter of any stone should not be more than one-third the thickness of the overlay. This means that if you are pouring a thin concrete overlay that is one-half-inch thick, the largest stone in the mix should not be much larger than one-eighth inch in diameter! That is the size of many grains of coarse sand.
I would use one measure of Portland cement for each 2.5 measures of sand. If you plan to do a thicker concrete overlay, then use 3 measures of gravel, 2 measures of sand, and 2 measures of Portland cement.
The key to ensuring a permanent bond between the existing slab and the new mixture is to be certain the old slab has all loose material swept away, it is clean and it is slightly damp. You should also apply a coat of cement paint to the old slab immediately before you pour the overlay. Cement paint is made by mixing fresh water with Portland cement. Blend it to the consistency of regular paint and brush it on the damp slab.
Try to work on overcast days when the temperature is cooler. Sunny, hot and windy days are the worst conditions to pour concrete or work with concrete overlay materials. After you pour the material onto the slabs, use a straightedge to remove excess material. Let the mixture start to set until your thumb can only depress the mixture an eighth of an inch. When this happens, it is time to use a magnesium or wood float to create a sandy top finish on the overlay. You can also use a broom to create a broom finish.
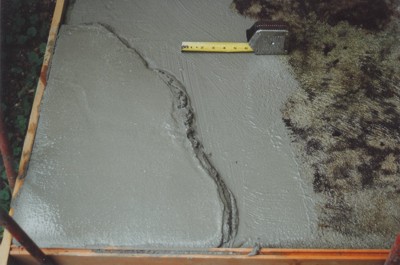
You can successfully add a thin layer of concrete or stucco to concrete walks or drives that have failed surfaces. PHOTO CREDIT: Tim Carter
Once the concrete has been finished, apply a spray-on curing compound. Do this immediately after the concrete is finished. This compound prevents the water from leaving the overlay mixture too rapidly. The water is needed to allow the new concrete mixture to achieve its full strength.
This column was featured in the August 24, 2008 Newsletter.
Column 739

 I have been exchanging emails with Graham Green who is a subscriber to this newsletter. He lives in a remote part of New Zealand. The wonder of the Internet!