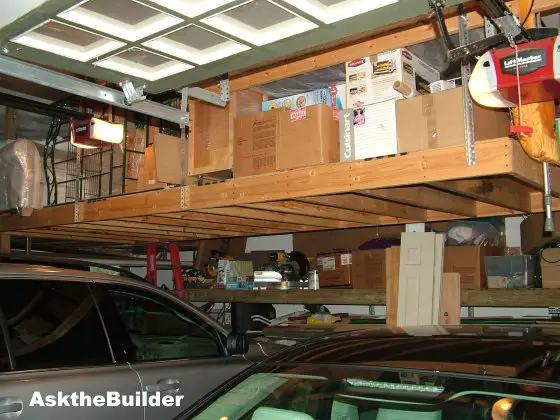
This overhead storage platform was built in less than a day, and has already saved me thousands of dollars of storage fees. PHOTO CREDIT: Tim Carter
Garage Storage
DEAR TIM: I think overhead garage storage is the answer to my clutter problem. There is a giant void space over the hood of both cars in our wide garage. I need a diy garage-storage system that will support furniture, boxes, and other normal household items. How would you support a platform like this without any poles or columns that otherwise would get in the way of the cars? Is it safe to consider a project like this? Bill M., Drexel Hill, PA
DEAR BILL: As you probably know, there are many garage storage systems on the market. I have seen many different types at the trade shows I attend. Some use pulleys, ropes, cables, hydraulics, etc. to take advantage of that wonderful space you describe in all garages.
Two years ago, I had the same problem you have. We moved my daughter back from college with all of the stuff she had in a one-bedroom apartment. My outdoor shed had no room, and my attic was full. We decided to price an off-site storage facility, and the annual cost for the needed space was over $1,000.00. I found that to be too much to swallow.
Driving home in shock from the storage business, I thought about my garage. Within a few minutes, I had come to the same conclusion as you did - the space above the hoods of the cars was enormous. Once home, I discovered that I could easily fit a platform that would be 16-feet long, 6-feet wide and have a vertical space of 45 inches. The best part was that because of the height of my garage ceiling, the underside of the platform was still 81 inches off the floor. That is plenty of room for me to walk beneath the platform without hitting my head.
The most-important aspect of my overhead garage storage platform was the suspension system I designed. The platform itself was made from 2x6 lumber and one-half-inch-thick plywood. I spaced the 2x6's 16 inches on center so the platform would be sturdy. This platform is suspended from the ceiling with slotted steel corner irons. This simple hardware item is commonly used to hang garage door tracks and openers from garage ceilings. There is not one pole or column that holds my overhead platform up, although I did use several as temporary supports as the platform was being constructed.
To eliminate sway, I decided to attach one end of the overhead platform to a wall in the garage. I did this by screwing the one end joist to the wall studs. This simple connection made the platform rock solid as I knew that swaying back and forth would not be a good thing.
The connection of the slotted steel irons to the roof structure was done with through bolts, not lag bolts. Furthermore, I made the connection up high on the slanted roof rafters, not the horizontal bottom chord of my roof trusses. The sloped parts of the rafters are in compression while the flat bottom chord is in tension. My engineer friends told me it was a bad idea to add loads directly to the bottom framing member or the chord of the truss, but that adding the load to the sloped rafters acted like weight from shingles or snow above.
My calculations of the weight of the platform as well as the weight of the items being stored indicated that the total added load was less than 1,500 pounds. That is less than the weight of an extra layer of shingles on my garage roof. Since my trusses are approved for the weight of three layers of shingles plus any snow load and I only have one layer of shingles on my roof, I feel very comfortable that my platform will not cause the garage roof to fail.
I highly recommend that you consult with a residential structural engineer before you build your overhead garage storage platform. The engineer will check your garage and draw a simple plan showing you the exact parts you need and how many slotted steel irons are required. The cost of the consult will probably be less than two months fee for a storage facility. It is the best money you will spend on this project.
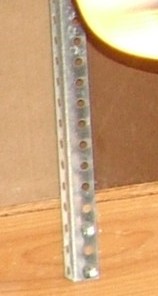
Close-up of slotted corner iron. PHOTO CREDIT: Tim Carter
When I decided the storage unit was too expensive, I decided to do some quick math. I quickly discovered I could purchase all of the materials for my overhead garage storage project for less than two-month's rent at the storage business. Since it took only one day to build it, I was really money ahead.
One tip that worked well for me was to treat the platform as if it were an outdoor deck. I mounted the one joist to the wall and worked away from that point. The temporary supports allowed me to make the platform level, and the addition of the plywood allowed me to easily square the platform. Once the plywood was in place, I was able to accurately locate where the slotted irons had to be placed at the ceiling to penetrate the drywall with minimal mess.
The slotted irons also are through bolted to the platform. Through bolts with a proper nut and washers will not pull out as a lag bolt might.
Column 731


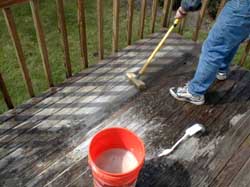 Many people do larger outdoor projects on the first real weekend of summer. One of them is wood deck cleaning and sealing. I have a huge category at AsktheBuilder.com all about
 Stain Solver is perhaps one of the greenest cleaners out there. My raw materials are made in the USA and the ingredients used to make the active cleaning agent are food-grade approved by the FDA! You can't get much purer and greener than that!