What's in This Issue
ANOTHER ENERGY TIP
THREE VIDEOS YOU SHOULD WATCH
GREAT CORDLESS CIRCULAR SAW
CONSTRUCTION CALCULATOR FOR IPHONE USERS
MY LATEST COLUMN
TRANSPARENCY - IT'S WORTH IT
GREAT TOOL KIT
STAIN SOLVER USES
BOSTON GREEN BUILD CONFERENCE
A NEW FIRST
ANOTHER ENERGY TIP
A very good friend of mine, Jerry Foutz, wrote to me about a product Black and Decker is selling. Jerry was reading a newsletter he gets that talked about this Energy Monitor tool. It allows you to see how much power things around your house use. Think of it as a small point-of-use electric meter. I looked it up, and the cost of the tool is $100.
That reminded me I had a similar tool in the EcoHatchery Starter Kit I talked about several newsletters ago. It's like the Black and Decker product, but it's called Kill a Watt. I unpacked it and plugged it into the outlet next to my sleeping scanner. My scanner is an energy vampire. You and I have many of these things around our homes. Things that suck tiny amounts of power when you think they're off. The Kill a Watt product has an outlet on it's face that you plug in the cord of the appliance you want to monitor.
After 98 hours, the Kill a Watt product told me my scanner wasted .24 kilowatts of power. I then went to see what a kilowatt of electricity costs me. If I read the bill correctly, its close to 20 cents. This means that each day the scanner is wasting a little over a penny a day as it sits idle.
This Kill a Watt product is very cool, and costs just $35 at Amazon, and with shipping it probably will be over $40. But do the math. If I bought it to try to save energy, I would have to keep my scanner off for nearly 11 years just to break even on the purchase price of the meter.
The point is just unplug things that you're not using. If you see a little LED light that is burning brightly on something in your house, it's sucking power. Unplug it if you don't need it.
THREE VIDEOS YOU SHOULD WATCH
Here are three videos I feel you should watch to help save you money this winter. You can use these tips to help you seal air leaks with foam insulation, or you can caulk interior cracks around windows and doors. The third video shows you how to possibly build some Christmas gifts this season using the cool pocket-hole jig I talked about a couple of newsletters back
GREAT CORDLESS CIRCULAR SAW
Are you starting to assemble your own Christmas gift list? Or maybe you're looking for a power-tool idea for a loved one. You can't have too many circular saws in my opinion. When I was still in the field building things, I always had three working circular saws in case one broke down. If you're a serious project hound, you'll discover having two circular saws has distinct advantages.
I just tested a fantastic circular saw kit. It's the Milwaukee 6.5-inch cordless saw powered by an 18-volt lithium-ion battery. This thing is a beauty. It came as a kit with the saw, a charger, two batteries, a soft-sided carrying case and a blade. I was amazed at how well balanced the saw is and its overall weight. The blade spins at 3,500 rpms, and that really helps chew through wood. The tilt bevel of the saw is excellent as it goes past 45 degrees to 50 degrees. The electric brake stops the spinning blade quickly when you let go of the trigger. In other words, the saw has lots of good features including the meter on the batteries that tell you how much charge is left.
I can tell you that if I got this as a gift from someone, I would be very happy. The tool is very well built, and with care could last generations. It's not a disposable power tool as many are today. This is a splendid circular saw.
You can buy it on Amazon using my affiliate link. If you don't want to do that, then shop any number of online power-tool dealers. The model number is 2630-22.
CONSTRUCTION CALCULATOR FOR IPHONE USERS
I bought one of the 3G iPhones three months ago. I love the phone, but deplore the AT&T service. If you're a seasoned subscriber you know my motto for them is NO Bars in More Places.
Anyway, the phone is really a computer. I purchased a little program through the Apple Applications store called inchCalc. It's just a fancy calculator that allows you to do the math to cut roof rafters and other tough carpentry problems. If you're a carpenter, serious DIY'r or want to have that power in your phone, check it out.
MY LATEST COLUMN
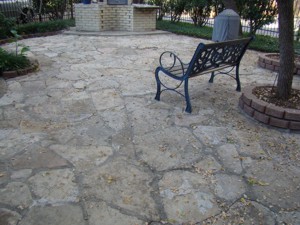
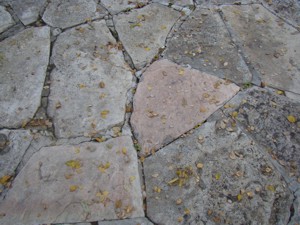
Albert asked me about a patio project. His patio needed work and he wondered what was the best way to approach the job.
TRANSPARENCY - IT'S WORTH IT
Do you work in public relations? Do you own a company or work for one that makes the occasional mistake? This may be of great interest to you. If you're a new subscriber in the past ten days, this may not make sense. But if you've received my past two newsletters, then you'll be able to appreciate this story.
I made a mistake in a newsletter two issues ago. It wasn't intentional. I was like a puppy dog in a china shop whose wagging tail gets it in trouble. I discovered my mistake within hours. It was very important to me to tell you as a subscriber that I goofed up and how I fixed it.
Within hours, I was overwhelmed by the response. It taught me a valuable lesson that many should follow. The lesson is that you just need to be as transparent as possible about what you're doing when it comes to business. That's a simple concept, but often overlooked. If you don't think it's important, read a few of the amazing emails I received:
Arthur H. wrote, "Well done. This is very well worded and very respectable, to admit a mistake. I wish more people out there had enough gumption to do that."
Jim H. responded, "Tim, after a lifetime working in the retail industry (the last 20 self-employed) I understand that there will always be unsatisfied customers. I think your correction message is a great way to handle the few complainers, show your ethics to all your customers, and ultimately it is the best marketing method I've seen in awhile-- good show!"
Nancy H. told me, "Oh, if only large companies had half of your integrity. What a joy it is to instill my faith in you as one of my experts that I constantly quote when discussing home improvement topics. It is your integrity coupled with your knowledge and entrepreneurial spirit that make you so successful! Don't ever lose sight of satisfying your customers and correcting your wrongs!"
I think you get the point. Just tell people what in the heck is going on. Live by the Golden Rule. It's that simple.
GREAT TOOL KIT
Here's another gift idea. This is an affordable one for sure. Two days ago, I reviewed a handsome tool kit for a person who is in their first home or has moved into an apartment. This 48-piece hand-tool kit from Great Neck has many of the basic tools you need.
One of the most interesting items in this kit was the razor knife. I still can't make up my mind about it. It's the most beautiful razor knife I've ever seen, and it operates like a pocket knife. It's a folding knife that locks in the open position like my Uncle Henry Knife I wear when I'm hiking. This razor knife is much thinner so for those with small hands it must be easier to manage. I loved the way it felt in my hand. The only thing I don't like about it is that your hand needs to be near the blade when you close it. When the razor knife is closed, it's safe as can be. The blade is not showing. There's a protective cover for the blade you put on it after you finished using it, but I'll bet many will lose that within a month.
But all that aside, if you don't like the razor knife just keep it in the took kit and use a traditional one. The other tools in the kit make it worth it. The storage box for all the tools is thin and has a clear cover so you can see all the tools. I especially liked the ultra-small screwdrivers that were part of the kit. All of us have a need for those around the house.
Here's an affiliate link to buy the kit now from Amazon. If you don't want to use that, then just search for the Great Neck 48 piece tool set.
STAIN SOLVER USES
Yesterday it was my turn to clean the cook top here at the house I bought in New Hampshire. It's a propane one with a stainless-steel base. It's not bad, but there was a ring of caramelized grease splatter around each burner. You can't use scouring powder on the cook top or you will scratch the finish. The previous owner, or their cleaning person, made that mistake already as the cook top is scratched in places from cleaning attempts. Regular cleaning methods will not touch this grease. It's baked on by the heat from the burners. Harsh chemicals can stain the steel, so you have to be really careful.
I took a paper towel and folded it over on itself several times to make a strip about one-inch wide. I then saturated it with warm water and opened it one layer sprinkling some Stain Solver in it. Then I folded the towel back to bury the powder getting it wet. This activates the oxygen bleach.
I then wrapped the paper towel around the base of each burner covering the grease spatter that was cooked on. I waited an hour and then used a simple Dobie Pad scrubber to remove the grease. The cook top looks like new. I would have bet money nothing but scouring powder would have removed that tough baked-on grease!
BOSTON GREEN BUILD CONFERENCE
I'll be in Boston next Wednesday November 19th at their downtown convention center. The Green Build conference is there. If you want to have a soda, I can meet you in the lobby of the convention center at some convenient time. This isn't the best venue to meet at, and I apologize for that. I'll only be in Boston that day, driving back up to New Hampshire that night after dinner.
A NEW FIRST
You may not think this is a big deal, but it is for me. Kathy and I are living apart because I'm in New Hampshire setting up to build our new home and she's still back in Cincinnati with my youngest daughter who wants to graduate from high school with her friends. We'll all be together the summer of 2010, but for now I'm flying, or should I say cooking, solo.
Accccckkkkkk! Boy did I take for granted all Kathy did in the kitchen the past 34 years. Three weeks ago, Meghan, my oldest daughter who is up here with me in New Hampshire, showed me how to make an apple pie. She basically did all the work with me just putting the crust in the glass pie pan. I was an observer.
Well three days ago, I made my first apple pie. I did use the pre-made dough that looks like a long white cigar. But every other step was all me. It came out great! I was so pleased I'm thinking of selling pies from a roadside stand next summer! Just kidding!
The lesson is that if I can try new things that require new skills, so can you. My next project is beef vegetable soup. Who has a great recipe for a soup that has a little kick to it? Tonight I'm doing pork chops in gravy with wild rice.
Index of past newsletters.