|
Building Simple Stairs eBook: |
|||||||||||||
| Ask the Builder Checklists: New Home: Indoor Projects: Outdoor Projects: Major Additions: Mechanical Systems: More Ask the Builder eBooks: Miscellaneous:
|
 
|
|
|||||||||||
|
|||||||||||||
|
5 reasons this is the only eBook you will ever need for Building Simple Stairs: |
|||||||||||||
 |
|
||||||||||||
|
|||||||||||||
|
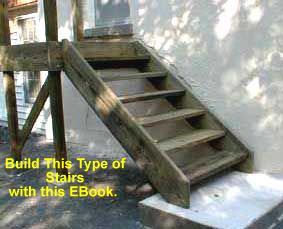
Discover The Secrets to Building Sturdy, Durable, Stairs: For only $17.00, the Building Simple Stairs eBook reveals all of the trade secrets you need to know for project success, regardless of your level of carpentry experience. This eBook shows you how to build simple open-riser stairs by providing you with clear, concise tables and diagrams, photos with crisp line graphics that are one-of-a-kind, material lists, and step-by-step instructions. The project is outlined for you in the following chapters: |
|||||||||||||
|
Table of Contents: Chapter 1: Planning and Stair Basics Chapter 2: Stringer Layout Chapter 3: First Riser and Bottom Seat Cut Chapter 4: Layout of all Treads and Risers Chapter 5: Top Vertical Stringer Cut Chapter 6: Second Stringer and Tread Width Chapter 7: Creating Tread Mortises and Final Assembly
|
Here is a sample page to give you an idea of how colorful, crisp and helpful this eBook is: 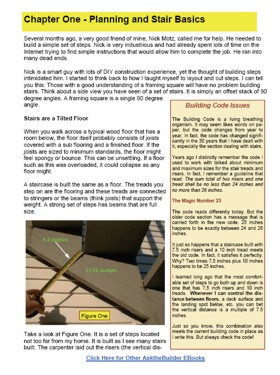 This eBook is loaded with step-by-step color photos! |
||||||||||||
|
|||||||||||||
|
|
This eBook is an instant download the moment your credit is approved. It comes to you in PDF format, that can be viewed with free Adobe Acrobat Reader software. |
||||||||||||
|
Final Note: "Having the right knowledge is as important as having the right tools for any project. Building Simple Stairs is an opportunity to discover the invaluable tips that determine the success of your Building Simple Stairs project. We are so confident that you will enjoy and benefit from this eBook that we guarantee your satisfaction, with our no-hassle, no questions asked return policy." Enjoy, Tim Carter |
|||||||||||||


June 17, 2008 AsktheBuilder News
What's in This Issue
HORRIBLE FLOODING
TESTIFYING IN FRONT OF A CONGRESSIONAL COMMITTEE
HONEST-AND-TRUE STAIN SOLVER STORY
NEWEST COLUMNS AND VIDEOS
Horrible Flooding
If you watch the national news, you surely are aware of the horrible historic flooding that is happening now in the heart of the Midwest. There are all sorts of heartbreaking stories about this, and you yourself may be a victim. If that is the case, I am truly sorry for your misfortune.
But here are some things you can take away from this event. If you have homeowner's insurance as I do, be aware that you have a better chance of flying to Mars flapping your ears than you will have of getting a check from your insurance company for flooding losses. Virtually every insurance company does NOT cover flood damage. If you want insurance for flood damage, get a policy from the Federal Government. Go here for more information:
Federal Flood Insurance Information
On a much smaller scale, if you have minor flooding on your own lot, a flooded crawl space or a chronic wet basement each time it rains, I can help you. You must read the customer review and see the photographs that Jim Sanders sent to me yesterday. He had all but given up hope, and his quality of life was suffering because of Mother Nature's whims. No more my friend. Jim has become another AsktheBuilder.com evangelist.
Go read this column, then look below it for Jim's comments and awesome photos he sent to me. If you suffer from flooding in your home, I believe I can take your pain away
 Jim Sander's Comments and Photos
Even though this column is about crawl spaces, the same Trench Drain device works for wet basements. I urge you to read ALL of the columns in my Drainage category to discover exactly how to install one of my Linear French Drains, and more importantly, why they work. When you do this you will get some insight into my college education. I believe you are in for one of those "I would have never guessed Tim has a degree in......"
Here is my Drainage category.
Testifying in Front of a Congressional Committee - Gulp!!!!!
 Yesterday I received a letter from the US Congress that started off:
"Dear Mr. Carter:
I am writing to invite you to testify at a hearing of the U.S. House of Representatives Committee on Small Business, Subcommittee on Regulation, Health Care and Trade, entitled "The Impact of Online Advertising on Small Firms". The hearing is scheduled for 10:00 a.m. Wednesday, June 25, 2008, and will take place in Room 1539 of the Longworth House Office Building."
It's the real deal. I am going to Washington DC to do this. Personally I feel it is an enormous honor, but I have to admit I am filled with apprehension. For years I have done expert testimony and been in countless depositions as well as testified under oath at trial. But golly, the US Congress!!!!
I desperately need your help, and I need it now - today or tonight. The rules of the Committee require that I submit my written testimony no later than next Monday. What written testimony you ask? Well, I have to write out my feelings about the impact of online advertising.
How can you help? There are forces at work that are trying to convince lawmakers that online ads are not all that great. I have the opposite opinion, and I have tons of proof - but would like more from you.
So tell me, are you a small business, or even a consumer who has been impacted by online advertising? If so, what has been the impact?
Have you benefitted from seeing an ad online that helped you in a time of need?
If you are a small business like me, how has online advertising helped your business? Has it allowed you to reach more customers than ever before? Would your business be as successful if online advertising didn't exist in its present form?
Here is what you might not know about online advertising. In many respects, it is contextual. What that means is the ads you see are often targeted to or match the content that is on the web page you are viewing. A simple example is one of my roofing columns. Let's say you are trying to figure out how to stop a leak in your roof. Please go to AsktheBuilder.com and see this column.
If you look at the Google ads in that column, you should notice that the ads deal only with roofing. Look closer and you may see names of *local* companies that you recognize. These are contextual ads become an aid not a nuisance because they directly relate to the problem you are trying to solve - your leaking roof. You don't want nor need to see car ads, tennis racket ads or ads for pumpkin pie. You need a roofer!
My contention is that this type of advertising is good because it helps you and I solve problems. You do realize there are only two primary reasons you and I get online, don't you? They both begin with the letter P - Pleasure and Problems.
The bottom line is I would love to include your story of how you have been helped by online advertising. Allow me to take your story to our lawmakers. Please hurry. I especially need to hear from you if you are a small business person or work in a small business. Tell me how online ads have changed your life and that of your family.
Time is of the essence.
Honest-and-True Stain Solver Story
Yesterday I was in my office late and the order phone rang. Something told me to pick it up even though it was after hours. On the phone was Marcella from Lancaster, Kentucky. She wanted to order my Stain Solver - the miracle oxygen bleach.
Marcella was a first-time buyer. Just days before some sheets of hers that were outdoors drying under a deck got stained from rainwater that dripped down through the boards. She tried everything to get out the wood stains, but nothing worked. A neighbor - who was one of my customers - gave her a small amount of Stain Solver in a plastic bag. Long story short, my Stain Solver made the sheets look like new.
You may think big deal, but what blew me away was the size of Marcella's order. I was thinking she would buy four pounds, maybe eight. Some might think she would get the twelve-pound size. Nope. Marcella bought the 50-pound size. Yowzaa! That's how impressed she was with what it did. I asked her what she planned to do with that much Stain Solver, and her reply was, "Tim, I plan to clean everything around my place now!"
I never cease to be amazed at the phone conversations I have with customers. Call late in the day and there is a darned good chance you will get me on the horn.
If you want to try any size of Stain Solver to get the same results as Marcella, then use this Promo Code now to get a 20 percent discount. You need to act fast as the code is only good for a few more days in June. (Expired on June 30, 2008.)
The promo code is:
june30 (expired on June 30)
Be sure you use lower case and no spaces when you enter it.
Newest Columns and Videos
Drilling Holes for PVC Pipe VIDEO
Cleaning A Roof with a Pressure Washer VIDEO
Index of past newsletters.
Overhead Garage Storage
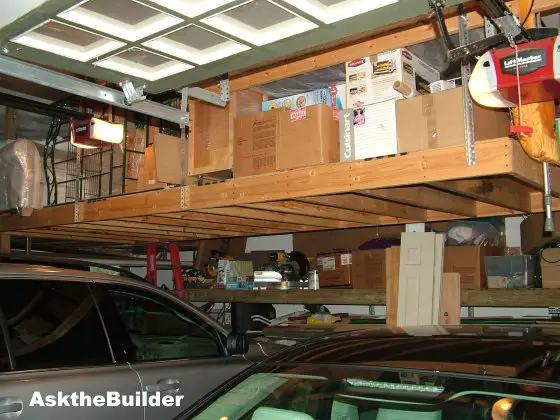
This overhead storage platform was built in less than a day, and has already saved me thousands of dollars of storage fees. PHOTO CREDIT: Tim Carter
Garage Storage
DEAR TIM: I think overhead garage storage is the answer to my clutter problem. There is a giant void space over the hood of both cars in our wide garage. I need a diy garage-storage system that will support furniture, boxes, and other normal household items. How would you support a platform like this without any poles or columns that otherwise would get in the way of the cars? Is it safe to consider a project like this? Bill M., Drexel Hill, PA
DEAR BILL: As you probably know, there are many garage storage systems on the market. I have seen many different types at the trade shows I attend. Some use pulleys, ropes, cables, hydraulics, etc. to take advantage of that wonderful space you describe in all garages.
Two years ago, I had the same problem you have. We moved my daughter back from college with all of the stuff she had in a one-bedroom apartment. My outdoor shed had no room, and my attic was full. We decided to price an off-site storage facility, and the annual cost for the needed space was over $1,000.00. I found that to be too much to swallow.
Driving home in shock from the storage business, I thought about my garage. Within a few minutes, I had come to the same conclusion as you did - the space above the hoods of the cars was enormous. Once home, I discovered that I could easily fit a platform that would be 16-feet long, 6-feet wide and have a vertical space of 45 inches. The best part was that because of the height of my garage ceiling, the underside of the platform was still 81 inches off the floor. That is plenty of room for me to walk beneath the platform without hitting my head.
The most-important aspect of my overhead garage storage platform was the suspension system I designed. The platform itself was made from 2x6 lumber and one-half-inch-thick plywood. I spaced the 2x6's 16 inches on center so the platform would be sturdy. This platform is suspended from the ceiling with slotted steel corner irons. This simple hardware item is commonly used to hang garage door tracks and openers from garage ceilings. There is not one pole or column that holds my overhead platform up, although I did use several as temporary supports as the platform was being constructed.
To eliminate sway, I decided to attach one end of the overhead platform to a wall in the garage. I did this by screwing the one end joist to the wall studs. This simple connection made the platform rock solid as I knew that swaying back and forth would not be a good thing.
The connection of the slotted steel irons to the roof structure was done with through bolts, not lag bolts. Furthermore, I made the connection up high on the slanted roof rafters, not the horizontal bottom chord of my roof trusses. The sloped parts of the rafters are in compression while the flat bottom chord is in tension. My engineer friends told me it was a bad idea to add loads directly to the bottom framing member or the chord of the truss, but that adding the load to the sloped rafters acted like weight from shingles or snow above.
My calculations of the weight of the platform as well as the weight of the items being stored indicated that the total added load was less than 1,500 pounds. That is less than the weight of an extra layer of shingles on my garage roof. Since my trusses are approved for the weight of three layers of shingles plus any snow load and I only have one layer of shingles on my roof, I feel very comfortable that my platform will not cause the garage roof to fail.
I highly recommend that you consult with a residential structural engineer before you build your overhead garage storage platform. The engineer will check your garage and draw a simple plan showing you the exact parts you need and how many slotted steel irons are required. The cost of the consult will probably be less than two months fee for a storage facility. It is the best money you will spend on this project.

Close-up of slotted corner iron. PHOTO CREDIT: Tim Carter
When I decided the storage unit was too expensive, I decided to do some quick math. I quickly discovered I could purchase all of the materials for my overhead garage storage project for less than two-month's rent at the storage business. Since it took only one day to build it, I was really money ahead.
One tip that worked well for me was to treat the platform as if it were an outdoor deck. I mounted the one joist to the wall and worked away from that point. The temporary supports allowed me to make the platform level, and the addition of the plywood allowed me to easily square the platform. Once the plywood was in place, I was able to accurately locate where the slotted irons had to be placed at the ceiling to penetrate the drywall with minimal mess.
The slotted irons also are through bolted to the platform. Through bolts with a proper nut and washers will not pull out as a lag bolt might.
Column 731
Laundry Room Cabinets
DEAR TIM: It is time for new laundry-room cabinets at my home. But after looking at several laundry-room designs, I am convinced my current laundry-room layout is bad. I don't want to order new cabinets until I am sure the floorplan will work. What is involved in remodeling a laundry room? Do you have any laundry-room decor ideas that would make working in this space more pleasant? What type of cabinets would you consider if this were your home? Cindy S., Kinnelton, NJ
DEAR CINDY: I have to admit that all the years I built, I pretty much neglected the laundry room in the houses I worked on. My guess is that it stems from the fact that as a kid my washer and dryer were in our basement. The process of cleaning laundry seemed pretty insignificant.
But when I built my own home over 20 years ago, I moved the laundry room to the first floor by my garage. My wife and I thought we had the perfect laundry-room design, layout and cabinets. We were wrong. I am in the midst of a laundry-room remodeling job, and I am here to tell you that the cabinets we chose to use were greatly influenced by the mistakes we made in the past.
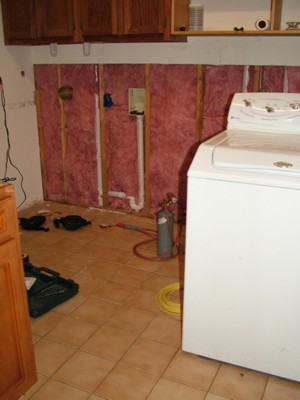
This laundry room is not yet ready for cabinets. Pipes, ducts and wires had to be moved to create the perfect layout and design. PHOTO CREDIT: Tim Carter
Our laundry room became the overflow for all sorts of items beyond detergent and fabric softener. Pet supplies, light bulbs, picnic supplies, children's sports equipment are just a few things that you can find in our laundry room. They were all visible on top of the few cabinets we had and some open shelves I built a few years ago in a last-ditch effort to control the accumulation of things.
The new laundry-room wall cabinets are 42-inches tall. Standard cabinets are usually 30-inches high. We decided to take the cabinets to the ceiling so that every square foot of available space is used for storage. These extra-tall cabinets are gorgeous, and do not overpower the room. You should price these out for your job.
As for the layout of your laundry room, you may be able to relocate things with a little bit of work. In my case, we changed the location of the dryer, washing machine and a 48-inch sink base cabinet. The old layout had the washing machine and dryer immediately adjacent to the main pathway leading from the garage to the rest of the house. When laundry was being done, baskets and piles of clothes were in the way as you moved about the house.
If your laundry room is large enough, I feel that you should consider a folding surface for clothes as well as a sink to rinse things before you wash them. We use the deep stainless-steel sink next to our washing machine to clean all sorts of things that would otherwise be a hassle in our regular kitchen sink.
You want to have superior lighting and a bright color scheme in this room. Doing laundry is work, and you should make the environment as pleasant as possible. If you spend lots of time folding clothes in this room, then make sure you have convenient power for a radio or maybe a small television. These things will help take your mind off the mundane chore of folding clothes.
Laundry-room flooring is fairly important. You want a material that is durable and will not show dirt. We have a ceramic-tile floor that is a light mottled brown. It does a magnificent job of hiding dirt, and when it is time to clean it, a mop makes it look like new in minutes.
If you are relocating your dryer-vent pipe, place the top of it 42 inches off the floor directly behind the dryer. This will allow you to easily connect the smooth metal pipe as you slide the dryer into position. The building code requires that smooth metal pipe be used to vent dryers. Avoid using the collapsible plastic piping as it can be easily crushed as you slide the dryer back against the wall. If this happens, your dryer will not work properly causing you to waste lots of energy dollars.
Removing a useless small closet in our laundry room opened up enough space to permit us to install 5 linear feet of additional base cabinets in our laundry room. I installed a second sink here that will come in handy for any number of things. We also were able to install a new wall cabinet in this location where all pet food and supplies will be stored.
We also decided to install laundry-room organizers in a large closet immediately adjacent to the laundry room. This will help keep the clutter under control as the shelves and drawers make use of all the space in the closet.
If you are planning to build a new home and have large dogs, think about installing a rectangular shower basin that can be used to wash off muddy beasts before they come in and shake the brown muck all over your painted walls and wallpaper. You can bet I will have one of these things in my new home that is in the planning stage right now!
Column 730
June 3, 2008 AsktheBuilder News
What's in This Issue
WATER HEATER ADVICE
TRAGIC CARBON-MONOXIDE DEATHS
HOME DESIGN SOFTWARE
RECORD STAIN SOLVER SALES
NEWEST COLUMNS AND VIDEOS
Water Heater Advice

I received an email a few days ago Bob Wilks asking about an item in my Water-Heater checklist. Actually, Bob was commenting on something he felt was missing in the checklist.
He had seen a television segment that featured what can happen if the flames or pilot light from a natural gas or propane water heater ignite fumes from gasoline, paint thinner or any other flammable vapor.
The building code mandates that the burner of a gas water heater needs to be above the floor at least 18 inches if the heater is in a garage. Note the word garage. You do not need to install the heater on a platform if it is in a basement or inside a home as most people do not store flammable liquids inside a home or basement. Or DO YOU????????
The lesson here is to make sure all flammable liquids at your home are in the garage and in a safe cabinet where they can't spill. The fumes of most of these liquids are heavier than air and collect on a floor. If your water heater is in your garage, then I would seriously consider figuring a way to safely store all flammable liquids outdoors in a metal cabinet or outdoor storage shed. Keep these liquids out of your home and away from gas heaters. Read the safety label on your water heater.
Tragic Carbon-Monoxide Deaths
Just two days ago, two sisters, who were in their twenties, passed away from carbon-monoxide poisoning here in Cincinnati. One was a young mom. How did it happen? The newspaper story says that they had a gasoline-powered generator operating in the basement. The electricity was not on as they had just moved into the house.
The two women went into the basement to check on the generator. My best guess is that it stopped operating as it ran out of oxygen. The two women were immediately overcome with the toxic carbon-monoxide gas as they walked down the stairs into the basement.
I have always assumed people knew not to ever turn on a combustion engine inside a home, but you know what happens when you assume. You can even have issues if the generator is outdoors next to your house and the fumes get sucked indoors through an open window, a vent or any other opening. What a sad tragedy.
Home Design Software
If you subscribed to this newsletter of mine, you undoubtedly are using a computer. For well over ten years, there have been different types of software that allow you to draw your own house plans. The original versions were not as robust as one might like, and the learning curve was steep.
Times have changed! You can now purchase software that will allow you to quickly draw plans for the most complex home or a small project like a planter stand for your yard. Any project in between is also possible, such as a room addition, a bathroom or kitchen remodel or a redesign of an existing room. You can even make three-dimensional models of what you plan to build!
I am currently using Better Homes and Gardens Home Designer Suite version 8.0 software to design my new home in New Hampshire. So far I am really pleased with the outcome and how easy it is to use the software. When you see all of the features this software has, you may consider it as you start to plan your next project.
Record Stain Solver Sales

I don't want to bore you with all of the details, but hundreds and hundreds of people helped break a record here at AsktheBuilder last month. Woo Hoo!!!!!
We had record sales of the all-purpose and 100-percent green cleaner Stain Solver. The craziest thing is that for the first time ever, the 50-pound size was the sales leader. We ran out of the green five-gallon pails not once but twice. My salesman had to rush to our headquarters on two different days with buckets packed into the trunk of his car. His regular delivery trucks were not able to get to us fast enough.
I realize that you might be rolling your eyes about me bringing up Stain Solver, but please understand that each week there are over 1,500 new subscribers to this newsletter. These newsletter newbies don't realize that 13 years ago I discovered the power of oxygen bleach liking it so much I developed my own product to sell. It is my duty to share with them the magic you already know about! You do want to share don't you?
To celebrate the record sales, I am going to give you a 20-percent discount on any size of Stain Solver. Look at the value per pound of that 50-pound size. It's a huge bargain. No wonder it helped break the record last month.
You will need this Promo Code:
Record
Act Quickly! Why? I may run out of the five-gallon pails again, and this Sale ended Friday night (June 6, 2008).
P.S. As a little bonus, I will autograph the sides of the green five-gallon pails that are sold as part of this Sale. Who knows what that pail might be worth in the years to come!
Newest Columns and Videos
Right Angle Drill vs. a Hole Saw Video
Index of past newsletters.
Screened Porch Design
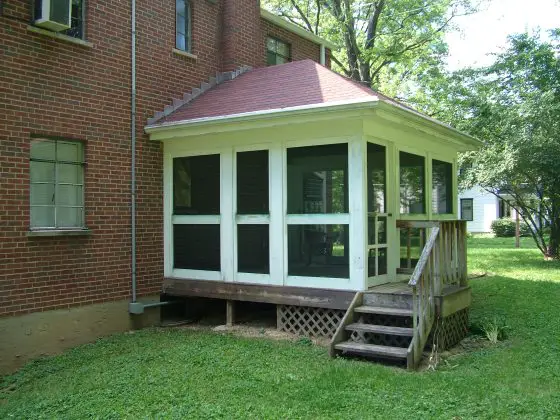
This screened-in porch needs a paint job, but its design is perfect. I know as the owner still compliments me 20 years after I built it. PHOTO CREDIT: Tim Carter
DEAR TIM: The next project at my home is a screened porch. I have looked at many screened-porch plans, but none of them really excite me. While looking at some pictures of screened-in porches, I have some really good ideas about what I want in my screened porch design. What should I take into consideration in this planning phase so that I end up with the perfect screened-in porch? Caroline M., Belmont, NH
DEAR CAROLINE: Screened-porch designs, and I mean good ones, are often hard to discover. My feeling about this stems from the fact that most of the ones I have seen seem to be mutations of decks that are just thrown onto the rear or side of a home. You have to keep many things in mind when you decide to build a screened porch.
The first thing you need to consider is the size of the screened porch. One really effective way to create the floor plan is to buy the furniture you intend to use on the porch before you build the structure. Set the furniture up in your yard spacing it exactly as you intend to place it on the finished screened porch. Be sure you have the spacing correct so people can walk freely around the chairs, tables and any decorative items you may have.
Use string to create the outline of the porch so you can see the shape and get fairly accurate measurements. My guess is that you will discover that you need a screened porch that measures at least 15 feet by 15 feet to seat at least eight or more people comfortably.
The outside design should match the style and character of your home. This means you should copy the roof pitch as well as the exterior trim details. The overhang of the screened-in porch needs to match your existing one or be in scale if your home is a two story.
Be very aware of interior hallways or pathways within the floor plan of the porch if you plan to have a door leading from the porch to your yard. A doorway will often consume 15 or 20 square feet of floor space inside the screened porch, especially if it is placed in a corner.
I urge you to give serious consideration to a vaulted ceiling inside the screened porch. This design detail is magical as it creates a feeling of immense spaciousness. A vaulted ceiling also helps keep the porch slightly cooler as hot air can easily rise up to the highest point of the roof and exit through ventilation devices installed with the roofing.
Your outdoor screened-in porch design should include soft indirect lighting that bounces off the ceiling as well as task lighting over a table. You want to be able to see what you are eating or what cards you were dealt as that poker game extends into the night.
Be sure to plan for adequate electric outlets in key locations where you might place a television, sound system or any other appliance than needs electricity. You must avoid extension cords at all costs, as they can be very dangerous.
You are going to get many pleasant benefits from your new screened porch, but be aware there are undesirable secondary effects that catch people off guard. These structures are almost always added to a home. The natural light entering the finished room that abuts the screened porch is always significantly diminished. That room will be dark and gloomy, so it may need additional artificial lighting to compensate. You can add skylights in the screened porch to help get additional light into the house.
Be sure the walls of the screened porch are tall enough so that views are not blocked by the roof overhang, any beams that are supporting the roof and the actual finished framing around the screens. You may discover that you need a wall height of at least 9 feet to ensure the views from the porch are only obscured by the screening itself.
The flooring of the screened porch is important. It needs to be weatherproof and good looking at the same time. Be aware that tiny bugs can come up through any cracks or gaps in the flooring unless you have screening that extends all the way to the ground around the structure. The roof will protect the flooring from much of the sunlight, but driving rain will get the floor wet on many occasions.
Be sure to include a powerful ceiling fan in your design. You may need the air movement on evenings or days that are hot and devoid of wind or breezes. A high-quality ceiling fan will be whisper quiet or completely silent so you can hear nothing but the pleasant sounds of nature just the other side of the screening.
Related Column:
Create a Utility Screened Porch
Column 729
How to Pressure Wash Your Roof Video
Free & Fast Bids
CLICK HERE to get FREE & FAST BIDS from companies who will clean your roof for you.
Roof cleaning may sound crazy, but cleaning roof shingles is a task many homeowners must do. Check the video for the moss, lichen and algae on Tim’s own roof. You can use a pressure washer to safely clean your asphalt shingles.
A pressure washer can damage roof shingles. You must use the correct spray wand tip when cleaning your roof. The 25 degree spray nozzle is generally the best choice. It will provide a fantastic stream of water to dislodge the moss and algae without damaging the shingles.
Try to stand on a dry portion of the roof when you work. Wet shingles can be really slippery. Always aim the pressure washer down the roof. Never aim it up the roof, as it can blast water under your shingles and cause leaks in your home.
Keep the tip of the pressure washer wand at least 12" away from the shingle surface when you begin cleaning. Clean off one shingle and check to see if the pressure washer is stripping away any of the colored granules off the shingles. Adjust the distance between the spray nozzle tip and the roof shingles to get maximum cleaning without damaging the shingles. Constantly stop and inspect the shingles to ensure no damage.
If done properly, you can remove years of algae growth, moss and lichen off your roof. And with no damage to the roof or to yourself. Just take your time.
This very controversial video was shared in Tim's July 11, 2014 Newsletter.
CLICK HERE to get FREE & FAST BIDS from companies who will clean your roof for you.
Drilling Holes for PVC Pipe Fittings Video
Here is a tip to remember when drilling holes for PVC pipe fittings. If your job requires that a PVC fitting be partial inside a stud, be sure to drill the right size hole. In a prior job, Tim was working with 1-1/2" PVC, so he knew that he needed to drill a 2-1/8" diameter hole for the pipe. But he soon discovered a little problem.
Looking at the sample holes, the PVC pipe fitting hub will not fit into a 2-1/8" diameter hole. It is large than the opening. Instead of having to spend time enlarging the hole you just drilled, be sure to drill a 2-9/16" diameter hole. This size will accommodate the PVC pipe fitting hub.
So before you start drilling holes in your studs for your plumbing project, think it through. Figure out if any fittings will be inside studs. If so, drill the right hole, the first time.
Right Angle Drill Versus a Hole Saw Video
Tim is getting ready to install a new sink drain. The drain requires a 2-1/8" diameter hole drilled through a 2x4 bottom plate and a 3/4" thick subfloor. Or about 2-1/4" wood thickness. Normally, a hole for a drain would be done with a hole saw. However, hole saws are only good for drilling through material about an inch thick.
As an alternative, try a half inch, right angle drill. These drills delivery incredible power to the drill bit on the end of the shaft. The right angle drill turns at a slower speed than a regular drill, but has a high power output. This drill will allow you to drill through that bottom plate and subfloor quickly. It also drills a very precise hole.
As Tim states, "There is nothing like the smell of pine shavings in the morning."
This set up will drill a hole through all the wood and allows the PVC pipe to be run to the basement. To do the job correctly, you have to have the right tool and drill bit. Even if you have visit your local tool rental store. It will save you time and money.
Plumbing Vent Pipe Tip Video
Plumbing Vent Pipe Tip
What do you do when you are installing a sink and there is an obstacle in the way for the vent pipe? The code requires a cross vent pipe to be installed and connected to the existing vent pipe. If there is a copper water supply line in your way, you could cut the copper supply line, redirect it and solder it back together. There has to be an easier way.
There might be - look up! The code does not state where the cross vent pipe goes. You might be able to run the cross pipe above the copper supply line. In the video, the cross vent pipe can be installed above the copper line supplying water to the shower head. Just drill through some studs to run it to the existing vent line.
So if you run into what might at first appear to be an obstacle, stop and think it through. Look for alternatives that will work. You might have to talk to a local inspector to see if there is an alternative that will work on your project.