We have been walking about ten minutes in the hills of California. The path followed can be seen in the distance. The plateau is called the Cobb Estate. This is owned by the guy who invented the Cobb Salad!
The Marx Brothers ended up owning the estate after the Cobb people went into business with Del-Monte. The panoramic view of the valley explains why they built here.
So you have heard it here first from Tim, Cobb Salad invented right here in this valley. (Background laughter.)
DEAR TIM: I need new roof shingles, but am paralyzed by fear of making the right choice of material and color for my home. Installing roof shingles doesn't seem that difficult, so I am considering doing the work myself. How do I select high-quality roof shingles? Should I install the new roof over the top of my existing asphalt roof shingles? What other tips can you share about residential roof shingles? Vickie E., St. James, MN
DEAR VICKIE: Many books have been written about roof shingles, so it is unthinkable that I can fully discuss all you have asked. But I am sure I can point you in the right direction so you have years of leak-free performance from the new high-quality roof shingles you will be purchasing.
Let's first get realistic about what is involved when installing roof shingles. It is dirty, back-breaking work. If the air temperature is above 70 F, then you will be hot up on the roof. As the air temperature approaches 90 F and above, it can become dangerously hot on the roof. Dehydration can make you fatigued, dizzy and more prone to cutting corners. On top of all of this, is the inherent danger of simply working up on a roof. Whether you intend to or not, you will obey the Law of Gravity, and it can be both painful and/or deadly.
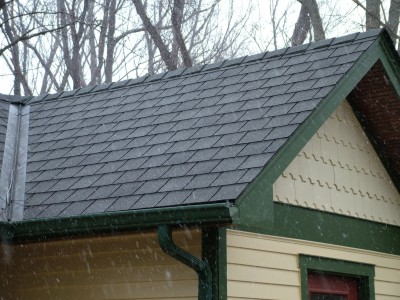
These asphalt roof shingles are made to look like slate. PHOTO CREDIT: Tim Carter
Can you do the work? The answer is maybe. I do not know your skills, and what tools you have. Did I face the same challenges when I did my first roofing job? You bet I did. For this reason, I say you should consider trying if your roof has a shallow pitch such that you can walk over it without fear of sliding off. The best thing you could do is to volunteer to reroof a neighbor's small shed to see if you have what it takes.
There are many different styles, textures and colors in asphalt shingles. There are almost as many different levels of quality. The price per square ( a square is enough material to cover 100 square feet) is an excellent barometer of quality. As the price goes up, so does the quality and the warranty. If you need help visualizing a color and texture, consider buying just one bundle of the roof shingles and lay them on the roof as if they were nailed. Then get down on the ground and look at them to see if you like the color and texture.
I urge you to purchase your roof shingles from a roofing wholesaler that sells roofing supplies to roofers. Visit these well-hidden businesses and talk with the manager. You can discover these oases of information by doing an Internet search or looking in the standby Yellow Pages under "Roofing Supplies". The manager or owner will give you a quick education on the levels of quality across the different shingles. It is best to visit these businesses in mid-morning or mid-afternoon when the roofers are at their job sites.
You can sometimes install a new asphalt roof on top of an existing one. There are building-code considerations, so always check with your local building department. Personally, I have discovered over the years that you get a better job if you strip off the existing roofing materials. This is miserable work, even with the best tools.
Read all of the written instructions you can get from the roof-shingle manufacturer. Instructions are often printed on the packs of shingles, but do additional research to locate photos or videos of roofing tips.
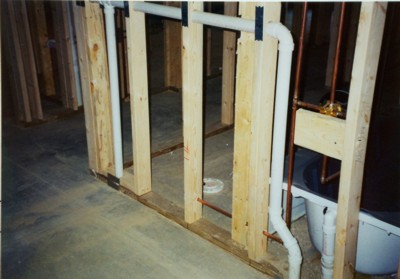
Keep in mind that a majority of roof leaks happen where the roof touches up against something that is not a roof. Examples are skylights, plumbing-vent pipes, exhaust fans, chimneys, walls that extend higher than roofs, etc. You need to expertly install flashings at these locations. Flashings are transitional roofing materials that connect roofs to things that are not a roof.
When you strip off the old roofing material, check the wood sheathing for damage. Be sure the wood is securely nailed to the rafters and there is no wood rot. Install heavy felt paper or a modern water membrane in place of traditional felt paper. Consider using the special membranes that stop water leaks caused by ice dams or wind-driven rain.
You can buy roof shingles that mimic slate or ones that look like wood cedar shakes. From a distance, they do a very good job of fooling the untrained eye. I have used the slate-look asphalt shingles on my Victorian Shed, and they really make it look fantastic.
If you live in a humid climate, be sure you consider buying roof shingles that contain copper in the colored ceramic granules. This copper is a natural biocide that kills the common roof algae that is responsible for the ugly black streaks you see on many residential roof shingles.
Top-quality roofers will install edge flashings as well as a base or sill flashings. These are very important pieces of metal that help keep water away from your wood roof sheathing. Attention to detail is very important when working with flashings. Discover how these work and you will have a roof that keeps you dry in all types of weather.
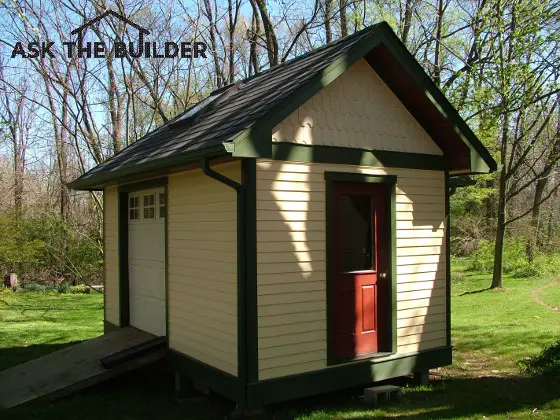
Wood sheds are perhaps the easiest and most economical outdoor shed you can build. Wood storage sheds are also popular because you can use different styles of wood siding and textures to create a wide variety of looks.
It is not hard to make a shed from wood look Colonial, Rustic, Contemporary, Victorian, etc.
Where Can I Get Two-Story Wood Shed Plans?
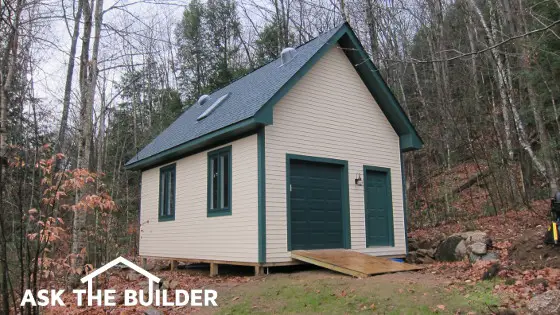
You can get them from me. I built a dazzling two-story wood shed in 2013. An architect friend of mine created detailed plans of my shed just for you.
This is my two-story wood shed that has a handy 6-foot-wide overhead door. You can pull in a garden tractor with ease. Wind can cause swinging doors to slam shut. An overhead door seals better against the weather. Copyright 2017 Tim Carter
This is a page showing a cross section of my own two-story shed. There are 17 pages to the set of plans!! CLICK THE IMAGE NOW TO BUY THE SHED PLANS. INSTANT DOWNLOAD
Most of the pre-built sheds I've seen at home centers are not too great.
You'll often see in the parking lot at a home center a line of ready-built wood storage sheds. Most of these are kits that are delivered to your home on a trailer.
It's important to realize you can assemble them or have a contractor do it for you. In my experience, these ready-built sheds are at the low end of the quality scale. If you are looking to build a shed in your yard that you want to last, you may want to avoid these products.
Shed Pictures Can be Glamorous
Wood prefab storage sheds are sometimes like the kits. They look good in pictures, but before you buy one, make sure it is practical.
A point often overlooked is you may see the sizes on a piece of paper or a plan and think it will work for your needs. You may even walk into a model and think it is spacious, but once you begin to store your things you realize you paid for a shed that is grossly undersized.
Easy Shed Space Planning Video
Why is Water the Enemy of my Shed?
Water will rapidly rot the framing lumber, floor joists, and floor of most wood sheds.
The first thing to remember is to pay attention to the different types of wood you might be using. Make the right choices and you can have a shed that can easily last hundreds of years if it is cared for.
Many wood sheds are designed to lay on the ground. Some are even advertised as ground contact where the shed is meant to be in direct contact with the soil. If the right lumber is not used, wood rot can happen in a short amount of time.
Can I Use Treated Lumber Floor Joists and Plywood?
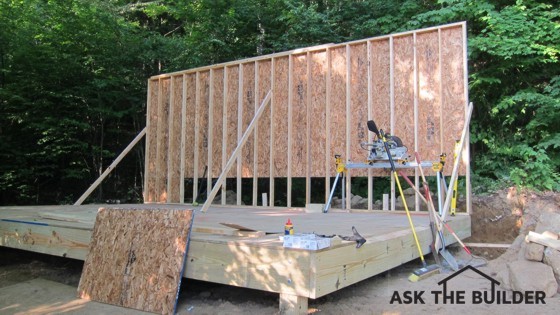
A wood shed can have a wood-floor system made with treated lumber joists and plywood that will last for decades. My own shed is built this way.
Another key point is you would have thought I was building an elevated deck in a corner of my lot if you would have seen my shed under construction. I used treated-wood posts that were approved for burial in the soil as the legs that support my wood shed.
This treated lumber wood-floor system will last for years. Treated-wood posts, rated for burial, were used as the legs. PHOTO CREDIT: Tim Carter
Treated-lumber joists were then attached to the posts just as you would to create a deck. These joists were covered with treated plywood so that if my shed floor got wet from equipment, there would be no rot.
Can Wood Rot Happen From Beneath My Shed?
Yes, wood rot can happen if you use untreated lumber to create your floor system. Water vapor from the soil will fuel the growth of fungi that will eat your shed floor.
This treated wood floor will not rot from the underside as water vapor from the soil saturates the shed floor. Regular plywood used for shed floors is a mistake. Make sure your wood shed has a treated-plywood floor.
All of the lumber used to build the rest of my wood shed was not treated wood. Well, I did use treated-lumber bottom plates for the walls just in case any water came into the shed from equipment I was storing.
The wall sheathing in wood sheds can be foam, oriented-strand board (OSB), plywood or a combination of these materials. On top of this, you nail your finished wood.
This can be textured plywoods like the traditional T1-11, lap wood siding, or engineered-wood sheet products that simulate stucco or some other texture. You will be amazed at the variety of wood products you can choose from to finish the exterior of your wood shed.
REMINDER: STOP and Plan for the Right Size
Perhaps the most important decision you must make when it comes to your wood shed is not the style, color or amenities - it is the size. The most common complaint I hear from people after they spend all of the time, money and effort is they wish they had built a bigger shed.
Please go up and watch the planning video above. It only takes a few minutes to figure out the size your shed needs to be.
It is easy to get the size right the first time. All you have to do is drag all of the things you want to put in the shed out onto your lawn where the shed will be.
Arrange the things in such a way that you can get to each item without having to move anything else. Try to organize the things in a square or rectangle.
Measure this outer boundary around all of the possessions and you have the outer walls of your new shed! My guess is you will discover that you need one about 10 feet wide by 14 or 16 feet long.
Read my Outdoor Shed Tips column for a question from Eddie on planning a shed.
A new toy - but a very useful one. It is a home security camera kit and it rules the world! Home security cameras can give you peace of mind, and a easy to set up. Below are some of the really neat features of a security camera kit.
This particular home security kit has four indoor / outdoor, full-color, security cameras. The remote security cameras connect to a DVR (digital video recorder) with provided cables up to 60 feet long. Connect the DVR to a small monitor, a computer monitor or a regular tv, and you can see what is happening immediately.
The cameras can be set to react to motion or programmed to take images every few seconds. These awesome security cameras even have night vision technology that allow them to see and record at night or in the dark.
These home security cameras are fantastic. Consider them for your home. They are easy to set up and can give you great peace of mind.
DEAR TIM: My wife wants me to install security cameras in and around our home as I travel on business quite frequently. Are wireless security cameras the way to go or should I consider wired home security cameras? Do you have to buy separate outdoor security cameras so I can view certain parts of my yard at night? How do you record what the cameras see? Greg H., Wooster, OH
DEAR GREG: Security cameras for home use are gaining in popularity. Years ago, you had to have a certain skill set to be able to install a grouping of home security cameras. But technology has advanced to a degree that you can purchase a home security camera kit that has everything you need to install cameras, digitally record what they see and even watch the images of all the cameras at once in real time. If you really want to make sure your wife is safe, you can watch things going on at your home while you are out of town on business!
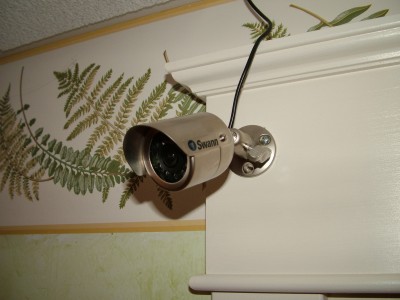
The home security cameras I have at my own home are very interesting. These security cameras record in full color and produce stunning clarity using natural available light. My cameras are equipped with infrared sensors that allow them to see at night nearly as well as they do in the daytime. To put it mildly, I am amazed at the quality of the images produced by the cameras.
This color security camera is smaller than a can of soup, but it produces clear images in natural light or even total darkness! PHOTO CREDIT: Tim Carter
Wireless security cameras are something you should look at if you need to install a security camera in a location that will be hard to extend thin video cables. Many of the compact home security cameras need a power supply and an additional cable that transmits the video signal back to a monitor or a recording device. Installing the cables so they are hidden can be challenging, so this is why many people are attracted to the convenience of wireless security cameras. But keep in mind these cameras need to have a power supply that can be batteries or a low-voltage cable from a nearby transformer.
Watch Tim's Video on Security Cameras. Click to play.
Many of the cameras kits you can buy have security cameras than can be used either indoors or outdoors. Outdoor security cameras are usually clearly marked for outdoor use. To minimize moisture problems, try to mount the cameras so they are protected by an overhang that will keep them dry from all but the most-violent wind-driven rain.
Be sure you look at home security cameras that are equipped with infrared sensors that give the cameras night-vision capability. My cameras that have this allow me to see my yard at night even when there is no moon in the sky. I am constantly amazed at all of the things I can see outdoors in the dark. You can buy a small camera that is rated for outdoor use, transmits in full color, has night vision and is smaller than a soup can.
The images the cameras see can be recorded on a powerful digital video recorder (DVR). I have a DVR that will record the images from four cameras at the same time. I can set the DVR to record only if the cameras sense motion, it can be set to take still shots every few seconds or it can record all it sees. The size of the hard drive inside the DVR can be huge so that you can record for weeks without recording over images.
There are many other options and recording features you can get with modern home security cameras. The best part is they are affordable, especially when you buy them in a kit. One of the kits I prefer has four indoor/outdoor color cameras that have motion sensing and night vision. You also get a fancy monitor and a high-powered DVR that allows you to record up to 55 days of images.
This kit can be connected to the Internet so you can view the images from a remote location. It can also send email alerts with image shots if you want to know when something happens that the cameras see. You can bet I will be installing this kit to watch over the jobsite of my new home as it is being built. Can you imagine how cool it would be to know when someone pulls up the road to the site or when someone is snooping around in the dark? The cameras would allow me to call the police from 1,000 miles away.
You do not need to be an electronics genius to setup and record images with these home security cameras. In less than an hour, you can have a kit unpacked, cameras in place and recording.
Many of the kits have all of the parts you need. It only takes a few skills to make the connections and be up and running. With a little effort, you can have images streaming out on the Internet so that you or a group of friends can view what the cameras see.
Remember that you must respect the privacy of others and do not record images that you have no rights to. When used properly, security cameras are powerful tools. Use that power wisely and responsibly.
DEAR TIM: You may not like this, but I am about to attempt some diy plumbing. I have all sorts of plumbing questions, and I need some help selecting some plumbing tools. What are the most important tools you think I should buy? The primary plumbing supplies I will be using are copper tubing for water lines and PVC for the drain lines. What plumbing tools have served you well in your career? Barbara D., Baltimore, MD
DEAR BARBARA: Believe it or not, I have no issues with anyone attempting to do diy plumbing. Even licensed master plumbers, like myself, had to solder their first copper fitting and weld their first PVC joint. But you will learn very quickly that plumbing is a true craft, and that you will not learn how to do it from watching shows on television. What's more, you need to develop a deep respect for the work immediately as your health and that of those around you can be negatively affected if you fail to do all things in strict accordance with all plumbing codes.
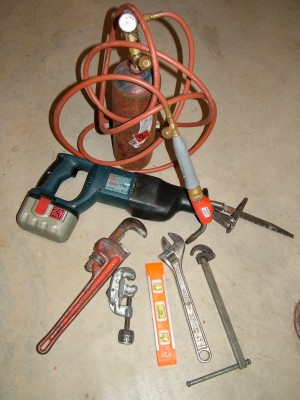
Let's talk about some of the basic tools you must have to work with copper tubing. I feel you must have a high-quality tubing cutter. This plumbing tool has a hardened-steel wheel that rotates around the copper tube. As you tighten the tool, the cutting wheel cuts into the copper with each revolution of the tool. The cutter makes precise cuts that are free from burrs you will get if you try to use a hacksaw.
These different plumbing tools have helped do lots of work. PHOTO CREDIT: Tim Carter
To melt the solder that is used to make leak-free joints, you can get by with a propane torch. But if you are thinking about doing lots of solder joints, an acetylene torch will serve you well as it burns hotter than propane. You will also need some small circular wire brushes and abrasive paper, but these are things that wear out and must be replaced on a regular basis.
You will undoubtedly need an assortment of wrenches to round out your plumbing-tool collection. A 14-inch pipe wrench is a great beginner size that will work well in many situations. I would buy an adjustable wrench that will work well on compression nuts and toilet bolts. You might find a need from time to time for an adjustable set of pliers. A basin wrench is a must-have tool. It will allow you to tighten nuts under countertops in that narrow space between the sink and the cabinet.
I will assume you already own different types and sizes of screwdrivers. You will need these for sure. The same is true for a hammer, tape measure, different levels and all personal safety equipment.
You will thank your lucky stars if you can afford a power mitre-box saw, a regular power drill and a right-angle drill. The powerful right-angle drill is made to accept boring bits that make the giant holes for PVC pipes that penetrate wall studs, wall plates and floors.
A power reciprocating saw is a must-have plumbing tool. These saws allow you to make any number of cuts when you are installing all of the pipes before the walls, floors and ceilings are finished.
There are many more specialized tools used by plumbers. I have so many, I sometimes marvel at the investment made over the years. For example, I have a special hand-held flaring tool made just for three-quarter-inch soft copper. The tool is used when you connect a primary water line to a water meter, the actual municipal water valve, or an interior shut-off valve in a home.
Then there are all of the pipe-threading dies I use to thread black-iron pipe for gas line work. The dies, ratchet, pipe vise, cutting tool etc. are all made to work with pipe that must be custom fabricated in each particular home.
Other plumbers could easily expand this plumbing-tool list. There are all sorts of tools you will buy if you really start to enjoy this line of work. I must admit that plumbing work is among that which gives me the greatest amount of satisfaction. There is something that is really special about soldering 50 or more copper fittings over a period of several hours, letting them cool and then turn on the water to see there is not one leak. That is a neat feeling!
I highly recommend buying quality tools. The extra money will give you tools that will not let you down in a time of need, but they will also last for many years. Visit a plumbing supply house that sells nothing but plumbing goods and you will often see the best tools on display.
Be sure to dry plumbing tools that get wet. Most quality tools are made so they have few parts that will rust, but all the same keep old rags handy that you can use to dry your tools. Keep them oiled if necessary to prevent rust when they are stored.
Avoid buying low-cost saw blades. Great saw blades that are more costly will often hold their edge longer and produce straighter cuts.
Installing a kitchen faucet is not as hard as you might think. Discover how to install a faucet as Tim guides you step by step. The first thing to do is to read the printed instructions from the manufacturer. Do not skip this important step.
The opening between the faucet and the countertop, or sink surface, must be sealed. Some faucets come with a built-in thin rubber seal. If the faucet you use does not have a seal, then use a ring of plumber's putty.
Use the large nuts to draw the faucet tight to the countertop. It is best to use a special plumbing basin wrench for this job. The design of the basin wrench allows you to reach the tight space between the sink and the cabinet. The swivel head allows you to use the wrench to tighten or loosen nuts.
The next step is to continue the water supply to the faucet. Tim prefers to use flexible supply lines with a braided stainless steel covering. This acts like armor that keeps the supply line from bursting. The supply lines come in a variety of lengths. Purchase the length the fits your plumbing job. The ends of the supply lines will have different size nuts. The larger nut connects to the brass threads on the valve outlet. The smaller nut is a 3/8 compression nut. This is a common size for shut off valves or fittings that solder to copper pipe.
When installing the supply line between the water line and the faucet, it is important to flush out the water line before connecting the supply lines. Why? Because there can be small pieces of copper shavings, sediment in the water pipe or leftover flux from the soldered connections. You do not want that material to get up into the faucet.
The basin wrench is needed to connect the supply line to the valve outlet. A regular open-end wrench can be used to connect the supply line to the shut-off valve or the water line fitting.
If the faucet comes with a veggie spray, be sure to connect it before turning on the water. Or your cabinet will fill up with water! The first step is to attach the decorative ring to the top of the countertop. Use plumber's putty to create a seal between the ring and the counter. Install the large nut and washer to the underside of the sprayer. Be sure not to over tighten plastic nuts.
Next, feed the flexible hose from the veggie sprayer through the top of the decorative ring down into the cabinet. Apply thread joint compound to the end of the threaded supply tube that feeds water from the faucet to the veggie spray. Tighten the nut on the end of the hose to complete the installation.
If you installed the faucet before installing any of the drain lines (easier to work under the sink without the drain lines in the way), be sure to have a bucket under the faucet when you turn on the water. The bucket will catch the water since the drains have not been installed. Test the faucet and veggie spray. You have completed the kitchen faucet installation. Easy if you take your time and follow the instructions.
"This is crazy." Have you said that when trying to remove a tree stump with a shovel? Some roots can be larger than your leg. Stump removal is a huge job and a shovel may not be the proper tool. Get some heavy equipment to remove the stumps and get them out of the way.
If you have many large tree stumps that you need to remove quickly, one option is to rent medium sized excavating equipment. A skid steer loader and a track excavator back-hoe. If just two people, you can make quick work of large stumps.
The equipment controls might appear confusing at first. But with some instructions and practice, it is easy to get the hang of the equipment.
An effective stump removal method is to use the excavator back-hoe to dig around the sides of the stumps, until they can be popped out of the ground. Then place the stump in the bucket of the skid loader. The loader can move the stumps to the staging area, where the stumps can be trucked off or left to decompose.
With the right equipment and technique, you can remove a lot of stumps in a short period of time. When a shovel can't clear the field, go for the rental equipment.
Expert Advice For Your Home
Subscribe to the FREE Ask the Builder newsletter to receive professional advice for your home. Complete the form below and each week you'll get:
DIY Tips
Tool Reviews
Project Guides
Product Discounts, Giveaways & more.
Unsubscribe at any time. We respect your email privacy.