When most people talk about power tools, they talk about circular saws and drills. But there is another powerful tool out there. It is the framing square!
What does it allow you to do? Lots of things. Most importantly, these allow you to cut roof rafters. This is needed for building a dog house, home roof, room addition or a garage.
How do they work? The framing square consists of two legs. The thinner leg is called the tongue. The fatter arm is the body of the square. The tongue is usually 16" long and the body 24".
Knowing the pitch of the roof you want to build, for example 4" of rise in 12" of run or 12" in 12", you use the framing square to make your marks. Holding the square on the lumber, the proper slope lines can be made on the piece.
Get a saw, a framing square and some scrap lumber and give it a try. In no time, you will be cutting roof rafters.
Is it too late for your deck? Has a pressure washer attacked it? A power washer can ruin your deck. Wood consists of two sections, spring wood and summer wood. Spring wood is the light colored wood in between the darker rings of grain. The spring wood is really soft and a pressure washer can tear this wood out of the lumber. This results in really grainy wood that needs a lot of sanding to get it back to a smooth surface.
What's the best way to clean a wood deck? One great alternative is oxygen bleach. Oxygen bleach is nontoxic and mixes with water. Once mixed, pour it on the deck and let it sit for 10 - 15 minutes. Then, lightly scrub it with a scrub brush on a pole. Finally, rinse it with a garden hose and the wood will look like new.
Using oxygen bleach, there is no erosion to the wood. Very safe. It is the only way to go. Stay away from those power washers.
Message from Tim:
Years ago while researching a column about cleaning decks, I discovered the wonders of Oxygen Bleach. It is perhaps the 'greenest' cleaner I know of as it uses oxygen ions to break apart stains, dirt and odor molecules. There are no harsh chemicals, and it works on just about anything that is water washable.
I decided to create my own special blend using ingredients made in the USA. In fact, the raw materials in the active ingredient are food-grade quality registered with the FDA. I call my product Stain Solver. I urge you to use it to help with cleaning your wood deck. You will be amazed at the results!
Does your project require you to constantly be changing drill bits? Try one of these new drill bit kits. A snap-lock drill kit features a quick change drill chuck. Mount the special chuck in your drill and you can then change drill bits or screw driver bits in a snap.
Also included is a combination drill bit that has a drill for drilling a pilot hole and a countersink bit. You drill the hole and countersink it all in one pass. After drilling the hole, just flip the bit around and the Phillips head screwdriver bit is on the other end. This one bit does the job of three bits.
Have you had problems drilling in screws and they fall over? A special screwdriver bit features a sliding collar that slides down over the screw holding it in place as you drive it.
If you want your next job to be a snap, just use the right tools.
When your project includes the addition or installation of wood siding, there are some steps to follow to ensure that your siding and the paint lasts a long time. First, be sure to primer and pre-paint the siding before it is put up. If a piece of siding has to be cut, prime the cut end before installing. That is where water can be sucked into the wood and cause the paint to fail.
If you make yourself a gage block, you will have evenly spaced siding. Cut the block to match the exposure of the siding. Hold it against the board just below the one you are installing. Set the new piece on the top of the spacer and it will be the correct distance each time.
One last tip, put a piece of metal flashing between the joint where two pieces of siding butt together. In case the siding ends separate, the flashing will keep water out.
Just follow these quick tips, and your siding installation project will go smoothly, last a long time and look great.
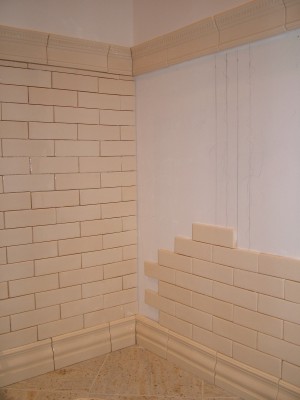
This is a unique ceramic tile pattern. This new tile mimics a pattern that is over one-hundred years old. It is no different than the running bond pattern found in brick walls. PHOTO CREDIT: Tim Carter
DEAR TIM: Regular ceramic tile patterns are uninspiring. My visits to home centers put me in a ho-hum mood. I want a distinctive bathroom ceramic tile that will add value to my home setting it apart from all others when I go to sell. What are some of the most unique ceramic tile patterns you have installed? Something tells me the most interesting patterns will be hard to install. What secret ceramic tile installation tips can you share? Cheryl H., Hazelcrest, IL
DEAR CHERYL: If you think ceramic tile patterns are boring now, you should have seen the somewhat limited supply of patterns just twenty years ago. Go back even further in time and the choice gets smaller. The 4 and 1/4-inch square tiles found in many homes, including an original bathroom in my own home, are giving way to all sorts of interesting shapes and finishes.
In my opinion, your disinterest can be traced to a poor assortment of tile patterns. I suggest you widen your search for distinct ceramic tile patterns and make sure it includes one or two specialty ceramic tile stores that sell nothing but tile, marble and possibly granite. If you have several larger stores like this near you, they will forever change your opinion about the selection of products you find at the average home center.
One of the most exciting things about tile patterns is the ability to recreate certain time periods. For example, different types of ceramic tile both with and without exquisite trim tiles have been made since the late 1800's. If you want a period Victorian ceramic tile, it can be found, even one with a crackled glaze. Crackled glazing has hundreds of random cracks in the thin glazing. Many people love this unique look and pattern. Tiles that resemble 1950's ceramic tile is also available.
Perhaps the most interesting ceramic tile pattern I have installed is one that looks like a brick wall. The tiles are rectangular in shape measuring 2-inches high by 6-inches long. But it gets better. This particular tile comes with a special base tile that looks like a wood baseboard. It doesn't stop there, as you can also order a special cap tile or cornice tile that is a great wall to top off the 2x6 tile when used as a wainscoting in a bathroom where you only want the tile to extend up the wall three or four feet.
You can make your own patterns as well if you have access to a wet diamond saw. Last year my oldest daughter asked me to make a unique geometric pattern from two different-colored granites. One was a jet-black granite with gold specks, and the other was a golden light-colored granite with various crystals in it. I used the saw to cut different rectangles, squares and triangles of all different sizes that fit together much like a jigsaw puzzle. The finished product was exactly what my daughter wanted, and it is installed on the large wall of her tub and shower area.
Some of these unique patterns can be hard to install, while others are no different than the most common ceramic tile. When you go shopping, ask the salespeople if the tiles come with self-spacing lugs on the edges of the tile. These little lugs are small bumps on each edge that create uniform grout lines when the tiles are butted tightly against one another. The line between the tiles often looks very narrow as you install each tile, but because the edge of the tiles is almost always a soft 90-degree angle, the grout line ends up about one eighth-inch wide.
While each ceramic tile seems fairly light, the accumulated weight of many tiles is very heavy. You can tell that when you lift a box of tile. As you install tile, it is best to work from the bottom row and stack tile as you go up the wall. If the first row of tile is not supported by a strip of wood temporarily screwed into the cement or waterproof-gypsum board, then the tiles may slowly start to slide down the wall. You will have a huge mess if this happens.
If you are using a decorative base tile and all of the rest of the tile stacks on top of that, then the tops of the base tile must be set in an absolutely level line. This may require you to trim off the bottom of tiles that are placed on a floor that is out of level.
Pay strict attention to the type of adhesive that must be used with the tile you buy. Some tiles can be installed with organic mastic that resembles thick cake icing. Other tiles should be installed using thinset which resembles bricklayer's mortar. Thinset comes in both gray and white, so use white thinset for light-colored tiles.
Always wait 24 hours after the last tile is installed before you begin to grout tile. The grout should be very firm, not runny. Grout that is properly mixed will be so stiff it will barely slump or droop. Grout mixed to this thick consistency and then troweled into the joints will cure very hard if minimal water is used to clean the grout joints.
DEAR TIM: Right at the top of my honey-do list is pouring concrete for a 15 by 25 feet patio at my home. The patio will be 5-inches thick. My calculations indicate this is almost six cubic yards of concrete. How many people will I need to help me pour this concrete slab. The closest I can get the concrete truck is 100 feet to the patio. What challenges do you see? Jay W., Green Bay, WI
DEAR JAY: Looking into the pouring-a-concrete-pad crystal ball, I see many challenges for you. This is a very big slab for a concrete rookie and his band of groupies. Without the proper number of people who have the right equipment and skills, I see nothing but problems. Lots of problems.
First, there are all sorts of ways to unload the concrete from the delivery truck into the forms for your concrete patio. I assume you are on a tight budget and can't afford the cost of a concrete pump that would make this job as easy as possible. You may be able to rent any number of motorized vehicles made to transport concrete. A skid-steer loader with a large bucket does a superb job as does a motorized hopper made specifically for moving concrete from a ready-mix truck to the patio.
If you are unable to get this equipment and must use traditional man-powered wheelbarrows, you must make sure your 100-foot travel distance is accurate. If this distance assumes the concrete truck is going to back onto your driveway, I sure hope your driveway was built to handle the load. A truck that carries that six-cubic yards of concrete in one load can weigh as much as 20 or 30 tons. You can order the concrete from some ready-mix concrete plants in small trucks that may only carry one or two cubic yards at a time. Large concrete trucks that carry 10 cubic yards of concrete can weigh in at a staggering 35 to 40 tons!
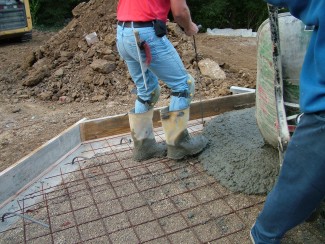
Pouring concrete can be hard work. Each wheelbarrow load can weigh hundreds of pounds. PHOTO CREDIT: Tim Carter
The topography of your yard is also important. If the yard is level, then moving the concrete from the truck to the patio forms will be somewhat easy. If a slope is involved, then the work will be very hard. A construction wheelbarrow full of concrete can weigh nearly four hundred pounds. Trying to push that up a slight grade is grueling work. Trying to hold back that weight going down a hill is a recipe for spilled loads. If you do have a sloped yard, then you will be transporting small loads in each wheelbarrow.
I estimate you will need a minimum of five people wheeling concrete. It only takes ten or fifteen seconds to fill a wheelbarrow with a full or partial load of concrete. The trip from the truck to the patio and back will be at least two minutes. Remember, concrete trucks only allow so much time to unload without charging you for extra truck time.
Once the concrete is dumped, you will need a minimum of three people, possibly four, to spread the concrete and screed it off. A screed is a 10-foot long aluminum or wood straightedge that is pulled across the wet concrete. The screed acts like a man-powered bulldozer by removing excess concrete. It also shows where the concrete is low.
Two people are needed to efficiently and accurately screed the concrete. The third person is spotting the deliveries of the concrete and using a concrete rake to puddle the concrete to the right height. This job requires great skill so the two people working the screed do not have to pull too much concrete with the screeding tool.
Prepare for hot or wet weather. High temperatures can accelerate the chemical reaction that causes the concrete to transform from a plastic mixture to man-made stone. You can have the concrete company add chemicals that will slow this reaction. Do not add water to the concrete mix to make it more plastic. This additional water dilutes the Portland cement making the concrete weaker than the original design strength.
All sorts of things can go wrong that will cause stress and problems as you pour the concrete. Wheelbarrows and other hand tools can break. Low pressure in the wheelbarrow tires can make wheeling nearly impossible. The concrete form boards can fail or bow because they were installed poorly.
You should place reinforcing steel in a concrete slab like this. A fourth person working inside the forms will be necessary to ensure the reinforcing steel is pulled up into the wet concrete. Steel mesh is often laid on the grade, and it must be pulled up with a large hook to get the steel into the center of the slab. If steel rods are used as the reinforcement, these must also be suspended above the grade so concrete flows under and over the steel.
Be very careful about getting wet concrete on your skin. The concrete is extremely alkaline, and can cause sever second and third-degree burns. I know this for a fact as it happened to me on a hot summer day pouring a large basement slab. I had two massive burns on my upper and lower leg that kept me from working for two weeks.
A router is like a specialized drill with interchangeable bits for cutting and shaping wood. The various bits allow grooves to be cut and all sorts of fancy cuts to dress up or decorate a plain piece of wood.
The router has a depth adjustment for the bits. Most are adjustable for 1/16 to 3/4 inch deep cuts.
Before changing the router bits, be sure to unplug the electrical power cord from the power source. Router bits are extremely sharp so they can cut the wood. Be careful when handling and changing these bits.
Wood routers are great for dressing up the edges of wood of most projects. There are 20 - 30 different types of bit for making various shaped cuts. And they are available in a wide variety of diameters. Just use your imagination on how you can put a router to use on your next woodworking project.
What is the most important part of building a new house or that new room addition? The blueprints or specifications! What should be included in the plans?
There should be clear, crisp drawings with lots of notes and details. Detail drawings are smaller drawings for a specific area of the house to show the builder exactly what to do.
Interior elevations should also be included in the plans. These are pictures of a bathroom or kitchen, that shows the builder or remodeler where things will go.
Exterior elevations shows what the house or room will look like from the outside.
Specifications are written notes at the end of the blueprints. These would be too cumbersome on the drawing pages or may be too wordy. But they are needed on the plans.
Be sure that the blueprints have a separate page for the electrical wiring, showing the location of the outlets, fixtures and switches. This is very important.
There is a computer CD-Rom available that has over 5000 plans on it. This is a great way to see what plans look like and what should be included. This is from Dream Homes Source.
Good blueprints and specifications ensures that everyone involved in the project knows what is expected. Be sure yours are good, detailed and complete.
Soldering copper tubing is not that hard, even if you are plumbing challenged. Some of the items you will need are lead free solder, plumbers abrasive cloth (like sandpaper), wire brush, flux and a torch.
The first step is to clean the copper tubing and fittings. Use the plumbers abrasive cloth to lightly sand the outside diameter of the tubing. The wire brush will be used to clean the inside of the fittings.
Once the fittings and tubing are bright and shiny, apply a small amount of flux to the outside of the tubing. The flux helps the solder attach to the pipe. Then insert the tubing into the fitting.
Very important, apply the heat to the joint, but do not apply the solder right away. Heat the fitting for about 10 seconds. Take the torch away and apply the solder. If the pipe and fitting have been properly heated, the solder will flow into the joint.
Follow these steps and practice a little and you will have great soldered joints every time.
Traditional shovels can be too big and too heavy for some people. There are shovels and spades available that are smaller and lighter weight. Ideal for use by some women.
These smaller shovels have the same profile and shape as their larger counterparts and they are just as strong. The smaller size is easier to handle. But it has the foot step on the blade and the D handle grip.
Border spades are also available in the smaller profile. These are used to cut sod or cut around your garden. The traditional spade takes a lot of force to push into the ground. The smaller blade takes less weight to push into the ground. Look for spade shovels with D handles made of metal, wood or stainless steel.
What is you have to dig a hole in the garden? The regular post hole digger is big and requires a lot of upper body strength to use. Check out the post hole digger that operates more like a backhoe. It has one blade that is driven into the ground. Then you pull a secondary handle than bends the blade over and scoops the dirt out of the hole. Another advantage of this style post hole digger is that the hole stays the same diameter all the way down.
Expert Advice For Your Home
Subscribe to the FREE Ask the Builder newsletter to receive professional advice for your home. Complete the form below and each week you'll get:
DIY Tips
Tool Reviews
Project Guides
Product Discounts, Giveaways & more.
Unsubscribe at any time. We respect your email privacy.