Resilient Flooring Materials

Resilient Flooring Materials
Sheet Vinyl, Vinyl Tile, Cork, & Rubber

Modern vinyl resilient flooring bears very little resemblance to the 'linoleum' of old. Linoleum, years ago, was made using canvas or burlap as a base material. Cork and wood dust was often pigmented and used for creating patterns. The final process then coated these materials with a solidified linseed oil and gum mixture.

Resilient floorings today incorporate a wide range of materials which make them far more durable and bouncy than the old 'linoleum'. Resilient floorings are available in several forms. The first choice for many individuals is sheet vinyl flooring. This material is manufactured in large pieces up to 12 feet wide. It comes in large rolls.

Another form of resilient flooring is vinyl tile. These tiles are usually available in 12" x 12" squares. Vinyl tiles are often used in areas which will receive extremely heavy foot traffic. They have excellent durability characteristics.

Cork flooring and rubber flooring are also alternative choices. Both of these materials perform well as flooring. Cork has been used for years in many commercial buildings such as libraries and churches. Rubber flooring is used commercially as well. It has a unique characteristic. When it gets wet, it usually is not slippery!

Plastic Flooring

Virtually everyone knows how durable plastic can be. Some plastics resist breakdown for hundreds of years. Poly-vinyl chloride (PVC) is one of these plastics. Plumbing and sewer pipes are made from this material, because we expect long useful lives from them. Resilient floorings also incorporate PVC in the manufacturing process.

The most important part of a sheet vinyl resilient flooring is the part you walk on. It is the top layer. This top layer is often referred to as the 'wearlayer'. Many high quality manufacturers use clear PVC plastics as their 'wearlayers'. The use of PVC as a wearlayer offers another distinct advantage. PVC plastics have the ability to be glued and welded together into one piece using special cements. These glues or cements actually soften the PVC molecules and allow the PVC molecules from two different pieces of material to interlock with one another as the cement or glue dries. This is important, in the event that your sheet vinyl floor requires that two pieces be seamed together. The special glues actually create one solid floor!

Thickness is Everything

It is extremely important to realize that the PVC wearlayers are available in different thicknesses. The thickness of the wearlayer can differ by as much as 500%!!!! That is an incredible difference. Usually, the products with the thicker wearlayer will cost more. The wearlayer thickness can be as thin as 0.005 inch or as thick as 0.025 inch. This is an important consideration. A thinner layer will be more susceptible to damage. Remember, the color and pattern of a sheet vinyl floor is protected by the wearlayer. If the wearlayer is deeply scratched or becomes worn, the color and pattern can and will become damaged beyond repair.

A distinct advantage to sheet vinyl flooring is its waterproof quality. Water which lays on top of the wearlayer will not harm the floor. Only when water is allowed to get underneath the flooring can it create a problem. Damp mopping will not harm a sheet vinyl floor, however, if you flood the floor and water seeps under the edges, or a seam is not properly glued, you can have a serious problem. Be sure that you do not use massive amounts of water when cleaning. If you flood your flooring with water, the water may flow to an edge and get beneath the flooring. This can cause the glue to fail in some instances.

Blacktop and Sheet Vinyl

If you have an asphalt or blacktop driveway, BEWARE! Asphalt is a product of crude oil, which we all know is black in color. When you walk across an asphalt surface small amounts of oil are picked up by your shoes. If you then walk onto a sheet vinyl floor, this oil is deposited onto the PVC wearlayer. This oil can permanently stain some vinyl floorings. Certain manufactures claim to have sheet vinyl PVC wearlayers that resist these stains.

If you have an older sheet vinyl floor, you very likely can see distinctive yellow paths where you commonly walk across the floor. In the past, many people associated this problem with wax buildup on the flooring. While the waxes will yellow, no one ever seemed to be able to explain the extra deep yellowing in the traffic areas! So, if you have an asphalt drive, I suggest you get in the habit of removing your shoes as soon as you enter the house. No matter what you walk on, you will be depositing the oil from the driveway onto something.

High gloss finishes available on both sheet vinyl flooring and vinyl tiles are accomplished by factory applied layers of urethane. These urethanes are not that different from urethanes that are used on hardwood flooring. These coatings, just like any other coating, can be damaged. The high gloss finishes will more readily show scratches or scuffs. Many manufactures make specific floor care products and coatings which will allow you to easily maintain these surfaces. As with anything, you must religiously follow directions to obtain the best results.

Manufacturers of Sheet Vinyl & Vinyl Tile Products

The following is a listing of several manufacturers who make a variety of sheet vinyl and vinyl tile flooring products. I suggest that you call them as soon as possible and request product literature. All of them will be glad to send it to you. Many of them will also produce a list of local suppliers who carry their products. Several of the manufacturers have wonderful floor 'maintenance and care' pamphlets.

  • Armstrong World Industries
    717-397-0611
    www.armstrong.com
    Vinyl Tile & Sheet Vinyl
  • Azrok Industries
    210-558-6400
    Vinyl tile
  • Congoleum Corporation
    800-274-3266,
    www.congoleum.com
    Vinyl Tile & Sheet Vinyl
  • Flexco Company
    800-633-3151
    www.flexcofloors.com
    Vinyl tile
  • Mannington Mills, Inc.
    856-935-3000
    www.mannington.com
    Vinyl tile & Sheet Vinyl

Sheet Vinyl and Vinyl Tile Floor Maintenance and Care

Immediately after Installation: Do not disturb seams which have been glued for at least 16 hours. Keep traffic to a minimum for at least two days to allow adhesives plenty of time to 'set' or harden. Use care in placing furniture and appliances. Heavy items can scar and indent the flooring permanently!!

Regular Maintenance: You must vacuum or sweep on a very regular basis to maintain the crisp reflective surface of the wearlayer. Dirt, sand, etc. which is walked on will scratch these surfaces! Once scratched, it may be impossible to buff out! Simply dust mop or vacuum on a regular basis, as it only takes a few minutes. When washing the floor, use the recommended and approved cleaners suggested by the manufacturer. Other soaps or cleaning agents may leave a residue that attracts dirt or dulls the wearlayer surface!

Periodic Polishing: If you must or want to polish your floor, do so only with approved polishes. Do not trust the labels of products you see in grocery or other stores. Only use polishes recommended by the manufacturers. The reason is simple. Non approved polishes may have chemicals that will harm the wearlayer of your flooring!! Once harmed, you may not be able to restore its luster. Always follow directions to the letter. You will obtain the best results when you follow the directions. If you need to strip previously applied polishing compounds, only use approved strippers!!!

Tips: Use nonstaining floor protectors under furniture legs. Wipe up spills promptly, as some drinks and liquids may contain pigments which can stain the wearlayer! If you have an asphalt driveway use only acrylic based driveway sealing compounds. This will minimize staining, but NOT totally eliminate the possibility of stains! Some carpet dyes can stain the wearlayers. Be careful of after market dyes or inexpensive carpeting! Floors can be harmed by direct, intensive sunlight. Draw shades or blinds during peak periods of sunlight!! Sustained 120 degree heat can also discolor or fade flooring as well. Any heat source should be watched closely.

Manufacturers of Cork & Rubber Flooring

CORK

  • Dodge - Regupol, Inc.
    717-295-3400
    www.regupol.com
  • Expanko Cork Co.
    800-345-6202
    www.expanko.com
  • Wicander Enterprises, Inc.
    410-553-6062
    www.wicanders.com

RUBBER

    • American Floor Products Company, Inc.
      800-342-0424
      www.afco-usa.com/
    • Johnsonite
      800-899-8916
      www.johnsonite.com
    • Musson Rubber Co.
      800-321-2381
      www.mussonrubber.com
    • RB Rubber Products
      800-525-5530

www.rbrubber.com

Column B13
House Plans And Blueprints

Blueprints & Plans
Door, Window & Room Finish Schedules

Many past customers of mine were intimidated by blueprints.  They didn't quite understand them and, in many instances, had a great deal of trouble visualizing what the new home or room addition was going to look like.  My guess is that this dilemma is prevalent among people who don't deal with blueprints on a regular basis.  I also found out that a very large majority of people felt that the quality of blueprints was very similar.  When you think about it, it makes sense.  Here are several large pieces of white paper with a bunch of lines, arrows, word, and numbers.  What really differentiates one set of prints from another, besides design?  The answer is very simple.  Detail!

A BIG Difference

Blueprints, just like anything else, are available in varying levels of quality.  This quality is a function of many things.  Several are as follows:  Accuracy of dimensions, experience level of architect / draftsperson, practical field experience of architect / draftsperson, knowledge of current building codes, presence or lack of explanatory notes, presence or lack of details of specific architectural details, presence of a separate electrical drawing or layout, presence or lack of written specifications,  and presence or lack of appliance, plumbing fixture, electric fixture, allowance, window, door, & room finish schedules.

Key Communications Tool

Blueprints are the heart and soul of a project.  They are the plans.  Poor quality plans in anything generally lead to failures, arguments, delays, etc.  This is especially true in building and remodeling.  The old saying, 'A picture is worth a thousand words.' is so true.  A clear, concise, detailed set of blueprints allows you to easily communicate what you want to your contractor.  They can and should become a part of the contract between you and your contractor.  In the event of a problem or a dispute you can quickly refer to the drawings for a crisp refresher of what exactly was supposed to be done.  However, blueprints can only settle disputes if, in fact, they have the necessary detail.

Plan Schedules

Poor quality blueprints are often cluttered.  They have too much information in a small area.  Dimensions and other details are awash in a sea of words and notes.  This is not only confusing, it becomes the breeding ground for honest mistakes on the contractor's part.  Some information which is common to each room can be put in one place on the drawings.  These are often referred to as schedules.  Schedules organize information and make it readily available.

Common schedules found on high quality blueprints are as follows:  window & door, room finish, plumbing fixture, electrical fixture, appliance, and miscellaneous allowance schedules.  These schedules are merely tables (a box of columns and rows) that list information about specific items.  Schedules allow you to quickly refer to a specific item.

Information about that item which can be of interest to many people can be assembled in one location.  Take for example a simple window.  The following people need to know certain things about the window: window supplier needs to know type, size, glazing, screens, etc., rough carpenter needs to know how big to make the rough opening and the size of the structural header over the window, bricklayer may need to know the size of the masonry lintel over the window, finish carpenter needs to know any special trim requirements, and the painter needs to know how to finish the exterior and interior of the window.

The same can be said for an entire room.  The workmen and women need to know what is going to happen to the floors, walls, ceiling, baseboards, window and door casings, wall  and window treatments, etc.  Think of the advantage if all of this information was gathered in one place instead of bits and pieces throughout the drawings.

The creation of a schedule is very simple.  If you don't have drafting equipment, don't worry.  A beginner can easily use 1/4" graph paper.  The task is to simply create a table  which lists the items and the notes explaining each item in an organized fashion.  An example of a door and window schedule can be found in the following sample schedule.

Sample Door And  Window Schedule

The only thing that may be confusing in the schedule is the first column "Mark".  This refers to the window or door location on the blueprint.  In other words, on the floor plan of each level of the house, windows and doors are drawn within the wall layout.  The architect assigns a number to each window and door beginning with #1.  So, if you count up all of your windows, exterior doors, interior doors, and garage doors and it totals 47, you better have 47 items listed in the schedule and numbers 1 - 47 assigned to the various doors and windows. It is a very easy system.

Mark Mfr. &
Model #
Struc.
Header
Rough
Opening
Ext.
Finish
Int.
Finish
Glazing Remarks
#1 Marvin
WDH2450
Dbl 2x8's 2'1"
x
4' 3"
Aluminum
Clad
Stain &
2 coats
Urethane
Soft coat
Low-E
Match existing
casings
#2 Stanley
DSD6068
Dbl 2x10's 6'2"
x
6'11"
Stain &
3 coats
Urethane
Stain &
2 coats
Urethane
None Use
adjustable
threshold
#3 Awsco
OCT24
Dbl 2x6's 2'1"
x
2'1"
Prime &
2 coats
acrylic paint
Stain &
2 coats
Urethane
Insulated
Glass
Include
stained glass
option M-360

Sample Room Finish Schedule

The room finish schedule should have an entry for every room and hallway in the house or room addition. You can hopefully see how simple they are to produce.

Appliance and plumbing fixture schedules are similar. For example, the appliance schedule would list each appliance from top to bottom in the first column. Other columns would list manufacturer & model #, color, special features, options, etc. The plumbing fixture schedule would list the room, fixtures for that room, manufacturer & model #, color, finish, handle options, etc.

The point of this exercise is simple. List as much information as possible about each thing in an organized fashion. These decisions eventually must be made by you. By doing it ahead of time and putting it in writing in the plan, you shift the ownership of all problems directly to the builder and contractor. If you create accurate schedules, I can assure you that your problems will be few and far between. Good Luck!

Room Flooring Walls Ceiling Baseboard Casings Remarks
Basement Concrete Concrete Unfinished None None Clean floors
and walls and
seal floor
Living
Room
Hardwood
Random Oak
Plank
1/2" Drywall
with Chair
Rail
Oak beams
and drywall
per plans
5" high profile
#276 poplar
stained
3" wide
Profile #415
stained
Floors to
have Walnut
pegs
Kitchen Cork with 3
coats of
Urethane
1/2" Drywall
with Wallpaper
Border
Trayed
drywall
ceiling
5" high profile
#276 pine
painted
3" wide
Profile #415
painted
Trim paint to
high gloss
Master
Bedroom
3" Wide
hardwood
border,
Carpet infill
1/2" Drywall
with
wallpaper
Drywall
with
stucco
finish
4" high profile
#355
painted
3" wide
Profile #415
painted
Carpet infill
to be
Berber
Hall "A" Hardwood
with Carpet
Runner
1/2" Drywall
with paint
Smooth
drywall
4" high profile
#355
painted
3" wide
Profile #415
painted
None

Do you have blueprints of your house? If you do, here is why you should preserve them.

Column B106

HVAC Static Pressure

hvac static pressure

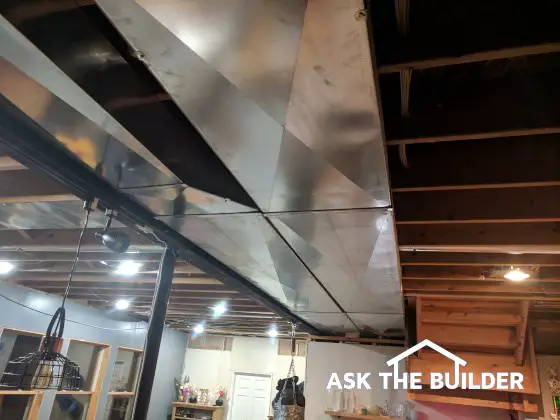
HVAC Static Pressure | See the long supply duct on the left next to the gray I-beam? Notice how it reduces down in width? That's what needs to be done in supply ductwork to maintain adequate static pressure as the main duct gets farther away from the furnace. The same-sized duct on the right is the main return air trunk line heading back to the furnace. This column has SO MUCH good information it's why I shared it with my 31,000 subscribers in my October 25, 2020 FREE newseltter. Copyright 2018 Tim Carter

HVAC static pressure is the measurement of the force the air inside your ductwork. The pressure reading at the furthest air register from the furnace or air handler must be equal to the pressure measured at the closest one.

HVAC Static Pressure Checklist

  • Main supply duct must get smaller as branch lines take off
  • Room farthest from the furnace can be just as warm/cool as the most comfortable room in the house
  • HVAC ducts should mimic blood vessels in your body
  • Install a damper control in each branch line

Related Links

Heating Ductwork - SECRET TIPS - Do NOT Share Please

Heat Loss Infrared Photos - MUST SEE Poor Workmanship!

HVAC Static Pressure Is Easy To Maintain

The first thing to remember is that each room in your home needs a certain amount of air flowing into it for you to be comfortable. I say this assuming your home has a forced-air heating system or an air-conditioning system for summer cooling.

It's important to realize that the air coming out of the supply registers in each room must be flowing at the same rate. This happens when the static pressure in the ducts is equal no matter where you measure it in the duct system.

Free & Fast Bids

CLICK HERE to get FREE & FAST BIDS from local HVAC duct contractors.

How Do You Balance Airflow In Ductwork?

The first step to balance airflow in ductwork is to calculate how many cubic feet of conditioned air must flow into each room to make the room comfortable.

Most people don't realize that residential heating and cooling systems are very complex. This is true for both forced air systems as well as hot water or steam heating systems.

There are many calculations that must be made to ensure that the properly sized equipment is selected. There are many controls on the equipment which must be properly adjusted to assure a well-balanced system. Ductwork must be properly designed and sized. It is by far the most technical aspect of residential construction.

How Do You Calculate the Correct Furnace Size?

When you decide to install a forced air furnace or air conditioning system, you need to make various calculations. Each room of your house, depending on its size, location, compass orientation, amount of glass, etc., requires a certain volume of air to enter it to properly maintain the desired temperature.

attic condensation

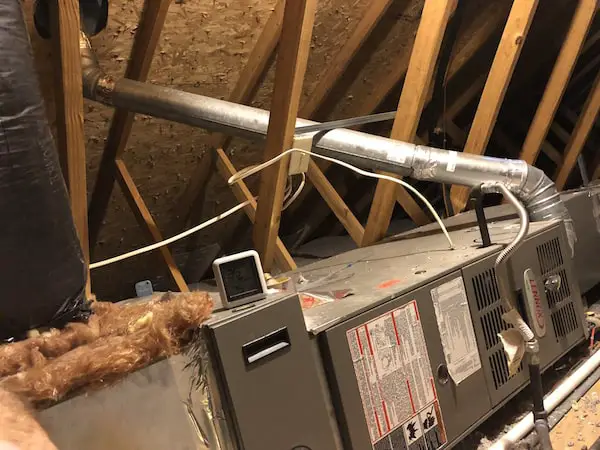
This is a furnace up in an attic. The photo was sent in by one of my newsletter subscribers. Several mistakes were made during its installation, not the least of which it's laying on its side instead of being a proper low-boy furnace. Copyright 2018 Tim Carter

As you can imagine, each room depending on the variables mentioned above will probably demand a different volume of air. A larger room will require more air than a smaller room.

A corner room may have two outside walls, while an interior room may have no exterior walls. You or your HVAC person must think and quantify all of these things to provide a comfortable interior climate.

What is the Primary Function of an HVAC System?

Interior climate control is the primary function of a heating and cooling system. A properly installed system will ensure that each room of the house is adequately heated or cooled.

An inferior system will result in widely different temperatures from room to room, hot and cold spots, excessive noise, etc. The trick is to make sure that the proper amount of air enters and leaves each room.

The calculations that are made to ensure the proper amount of air enters the room tell the HVAC person a very important number. It tells that person how many cubic feet per minute of air each room requires.

This, in turn, tells the HVAC person how powerful of a blower to install with the furnace. Common sense would tell you that if the calculations indicated that the entire house required 1,750 cubic feet per minute and the blower could only produce 1,200 feet per minute, there would be a problem. Let's assume that the HVAC person gets the right sized blower.

CLICK HERE to get FREE & FAST BIDS from local HVAC duct contractors.

How Do You Get the Right Amount of Air Into Each Room?

The challenge is to get the proper amount of air into each room at the same time. This is where things begin to get complicated.

Here's the problem. The furnace blower fan only creates a certain amount of energy at any given instant. This energy is constant. If one room gets too much air (energy), there won't be enough for the remaining rooms. Remember, different amounts of air (energy) are going to each room.

To achieve the goal of getting the proper amount of air (energy) into each room at the same time is to have equalized static pressure throughout the entire duct system. Static pressure in an HVAC system is the same thing as blood pressure in your body.

It's a time-tested principle that works. It is not that difficult to achieve in your HVAC system.

The principle is very easy to apply. Remember the initial calculation that indicates the total number of cubic feet per minute of air that your house requires?

How Important is it to Do the Airflow Calculations?

It's vitally important that you or your HVAC person correctly calculates this number. If you decide to do this calculation, you must obtain heating and air conditioning books which tell you how to do it. It is not that difficult, it just takes time.

Your local library probably has the books that you need. Once you have this number, and you have the separate number for each room, you are ready to design your ductwork.

HVAC Static Pressure & Ductwork Installation

Ductwork is like any other piping device. You can only get so much air through a duct at a given pressure. It makes sense. You must not forget this concept.

We also know that the furnace blower fan can only produce so much energy. This energy translates to pressure because it is pushing the air out of the furnace. The pressure at the blower will not be equal to the pressure at the air supply register in each room.

This is because the total pressure of the blower becomes divided by the number of air supply registers. However, the pressure at each register must be the same regardless of the size of the room or register.

Here is how it works. Once the air (energy) leaves the furnace blower it begins to travel down the main supply duct. This duct has a certain cross-sectional area.

An example would be a duct 8" high by 22" wide. Before the blower turns on, this duct, as well as all of the other ducts, are full of air. The blower is going to have to push this air out of the way in order to get the hot or cold air into the rooms.

It takes energy to push things. Remember, the furnace blower only creates a constant amount of energy at any given moment. When the furnace blower turns on, it begins to push all of the air down the ducts.

Every time a branch duct turns off the main duct there is less energy to push the remainder of the air. If the main duct does not reduce in size after several branches are taken off, the remaining air (energy) begins pushing extra air that it shouldn't have to push.

If this happens, this wasted energy results in lower energy (air) at the remaining supply air registers. The pressure of the air coming out of these registers will be lower than the pressure at the registers closer to the furnace.

As you can see, the main air duct must continue to get smaller and smaller as more branches go off to each room. This is exactly how your blood supply system is designed. The arteries close to your heart are much larger than the arteries in your hands or feet.

The downsizing of the main duct depends upon the amount of energy which is left after each branch duct leaves the main duct. Many factors come into play as to when this duct begins its downsizing.

However, if for some reason your main duct does not get smaller as branch runs are taken off, ask your HVAC person why. I hope they have a good explanation.

What are Other  Static Pressure Air Balancing Tips?

There are some other important points you should consider when installing a new furnace or replacing an existing one. Try to locate the furnace in the center of the structure.

Did you ever stop to wonder why your heart isn't in your head or your feet? By placing the furnace in the middle of the structure, you minimize the distance to the farthest room.

This means less air has to be pushed. Make sure that the HVAC person installs a damper control in each branch duct going to each room.

damper control

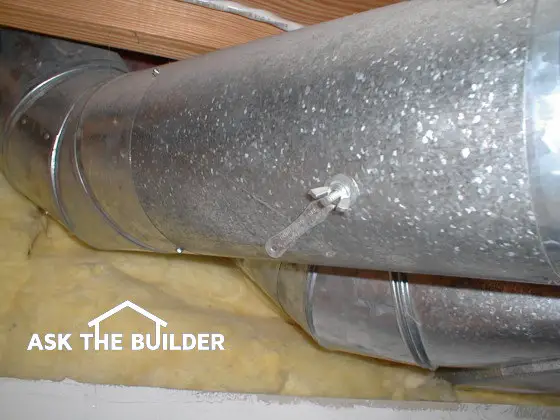
The lever you see on the side of the round metal duct is a damper control. It is connected to a round metal disk inside the duct pipe. If I rotated the lever so that it was straight up and down, the disk would block 90 percent of the air flow in the duct. Copyright 2018 Tim Carter

This damper control is very similar to a water faucet. You can limit the amount of air going to each room by adjusting this damper. This extra control will also help you to balance the system.

Ask to see the calculations that your HVAC person used to enable him or her to properly balance your system. These calculations will show each room and the amount of air each room needs. The air volume will be expressed in cubic feet per minute (CFM). Ask questions so that you fully understand the calculations. Spend a few minutes at the library or local bookstore. Believe me, you can't know enough about your heating and cooling system.

CLICK HERE to get FREE & FAST BIDS from local HVAC duct contractors.

Column B12

Foam Insulation Video

Need to put insulation around a window or door? Try this new spray foam insulation. It stays permanently flexible. Get the correct polyurethane insulation. One type gets rigid after curing, while the other cures flexible.

This expanding foam insulation bonds well with wood or metals. It is great for stopping those air leaks between doors, windows and the framing.

Do-it-yourself spray insulation is easy to do. Just follow the directions on the can for best results. As a precaution, wear rubber gloves and safety glasses.

When applying, only fill the crack about halfway with the polyurethane foam insulation. The foam will expand to fill the rest of the gap.

One last tip, wear old clothes. The foam can ruin your brand new shirt.

Wallpaper Around Windows Video

How do you get the wallpaper to match perfect above and below the window? You can't just draw a plumb line and hang the wallpaper. If you do the wallpaper pattern might not match the wallpaper that is already hung.

Most wallpaper, pre-pasted styles, expand when the activator is applied. In some cases, as much as 3/8" of an inch. Mark the wall with a plumb line that is 1/8" longer then the width of the wallpaper after the activator has been applied. Then when hanging the paper, keep it an 1/8" away from the line. That will ensure the seams top and bottom will look perfect.

Copper Fittings With Solder Video

There has been some changes in the process of soldering copper pipe and copper pipe fittings. Normally, you need some solder, soldering paste, sandpaper to clean the copper tubing, and a wire brush to clean the inside of the pipe. But, the solder is the most important component.

The new copper fittings eliminate the need for that roll of solder. They have the solder built-in the fitting! There is a small ring in the fitting where the solder is located. Just clean up the inside of the fitting and use the sandpaper to clean the outside of the pipe. Then apply the flux to both pieces, slide them together and apply the heat. When you see the solder coming out of the fitting, you are done. It's just that easy.

How to Solder Copper Pipe Video

solder copper

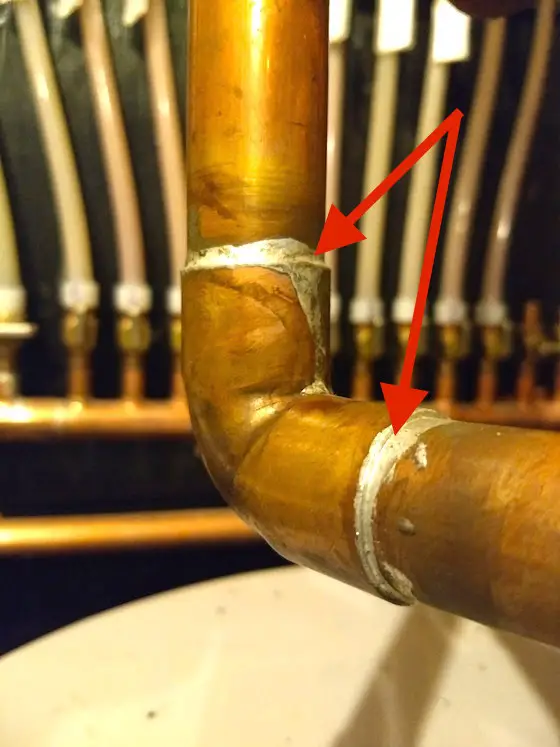
Solder copper - You do this when you melt solid solder and allow it to flow into the tiny gap between the tubing and the fitting. The red arrows point to the silver-colored solder. This popular video was shared with my readers in the  March 23, 2014 Newsletter. Copyright 2018 Tim Carter

You solder copper in seconds if you have clean copper, plenty of heat, some flux and no-lead solder. Heat the tubing and fitting enough so the solder melts with the torch away from the tubing and fitting.

Revised February 2018

Solder Copper Tubing In Seconds

You solder copper using a propane torch, flux and no-lead solder. You can use a torch that has mapp gas or even acetylene. Plumbers use acetylene because it burns hotter and they can get more work done faster.

Related Links

Soldering Copper Water Lines

Ten Easy Steps To Solder Your Copper Tubing and Water Lines

Clean Copper Is Key

You must clean the copper you intend to solder. Use abrasive cloth or plumber's sandpaper to make the copper look bright. A special round wire brush cleans the inside of copper tubing fittings.

Free & Fast Bids

CLICK HERE to get FREE & FAST BIDS from local plumbers if you're too timid to try to solder yourself.

Mix Up the Flux

Mix up the solder flux or paste in case it has separated. Take the solder paste brush and apply the solder flux onto the pipe and inside the fitting.

Assemble the parts to be soldered and heat up the torch. Acetylene or propane soldering torches work great.

Apply the torch to the joints for about ten seconds. Once the joint is hot, remove the torch and touch the solder to the joint. The heat in the pipes should be enough to make the solder flow into and around the joint.

If the solder doesn't melt after touching it to the copper for two seconds, pull the solder away and re-heat the tubing and fitting with the torch for an additional ten seconds.

Clean Off All Flux Residue

Once finished, use a rag to clean up the joint. Be sure to remove any excessive flux. Flux left on copper will corrode the pipe and cause a water leak.

CLICK HERE to get FREE & FAST BIDS from local plumbers if you're too timid to try to solder yourself.

This video was featured in the May 14, 2013 AsktheBuilder Newsletter.

Toilet Flange Installation Video

Due to technical issues, this video is not currently available for viewing.

The toilet flange must be installed on top of the cement board just before the ceramic tile goes in place. It is critical how it is mounted. Mark a line across the flange where the toilet bolts come up. Install this flange so the mark is exactly parallel with the wall. This will ensure that the toilet is square with the wall.

Toilet Video

Toilet Video

The tank is the business end of the toilet. It all starts in there. The water is stored in the tank until the handle is tripped. The handle opens the flapper valve, allowing the water to flow into the bowl. As it leaves the bowl, the water splits and goes to the water siphon jet hole and to the holes under the rim.

The waste water exits the bowl through the colon and through a passageway before leaving the toilet. That concludes Toilet 101. Tim's flushed with excitement!

Radiant Barrier Insulation Video

Due to technical issues, this video isn't currently available for viewing.

Radiant barrier chips are plastic chips that are coated with a highly reflective coating. They reflect heat back to its source. So in the summer, it reflects the heat from the sun back out of the attic. In the winter, the heat is reflected back down into the house. They are very effective.

A powered blower, much like a leaf blower, sucks the chips from a cardboard box and blows them into the attic. You want to achieve a layer of 7 - 8 layers of barrier chips. The advantage of this is if the top layer gets covered with dust, which blocks its reflective ability, the lower layers will continue to reflect the heat.

It is a great barrier insulation and is very easy to install.

Related Column: Radiant Barrier Chips Save Money