DEAR TIM: The door hinges in my existing home are starting to rust. The hinges in the house I grew up in never rusted and seemed better than my current door hinges. Can I switch out door hinges? The current hinges on my doors have large rounded corners, but the hinges I want have square corners. How do I successfully install the new hinges? Do I need expensive tools? Regina M., Johnstown, PA
DEAR REGINA: Your current door hinges are probably inexpensive steel hinges that have a thin brass coating. I have seen this type of hinge rust as well as the screws used to attach the hinges to the door and door jamb. These steel door hinges are very common ones used by production-door builders. If they can save a dollar or less per pair of hinges over high-quality ones, and they are using hundreds of pairs of hinges a day, one can see why they might want to substitute a low-cost product. The savings adds up to a big number over a period of weeks or months.
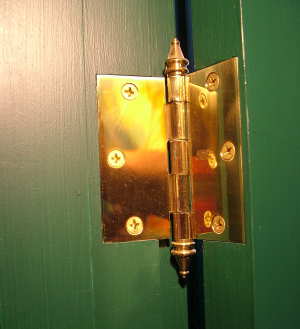
This door hinge is solid brass and is a traditional square-butt hinge. They are readily available, affordable and add a touch of class to any home. PHOTO CREDIT: Tim Carter
The hinges in your old home were probably solid brass. What's more they were probably thicker metal and had decorative tips on the hinge pins. You can still buy high-quality solid brass hinges, and some of the hinges have decorative hinge-pin kits that are still available. I am very partial to the Victorian style solid brass finials that adorn the top and bottom of my door hinge pins. The traditional ball tips are also still widely available if you prefer that style.
You can switch out your door hinges with relative ease. For the job to be as easy as possible, you need to find new hinges that are the same overall size as your existing ones. My guess is you will discover your existing hinges are 3.5 inches high. The thickness of the door hinge metal is also important, so try to take one of your existing hinges off the door and jamb so you can hold them up to the new hinges you are thinking about buying.
Assuming that you find new 3.5 inch square-butt hinges that are the same thickness or just slightly thicker, the only challenge will be to remove the wood on the door and the door jamb to create the 90-degree corner where the rounded corners are currently located. The only tools you will need to accomplish this are a simple razor knife with a new blade and a one-half-inch-wide wood chisel. These are fairly inexpensive tools and they will come in handy for other projects if you do not currently own them. You will also need a screwdriver or two.
The most accurate way to create the straight lines that will square up the existing hinge mortises is to temporarily screw one of the new hinges right on top of the existing mortised area for your current door hinges. The new hinge will lay up on top of the wood at each of the rounded-corner locations, but that is not a problem.
You will do just one hinge at a time, and there is no reason to remove the door from the door jamb. The entire process can be done with the door in the full open position.
Start the job by opening the door a minimum of 90 degrees. If you can open it even further, the job will go faster. Take some wood shims or a small block of wood and shove it under the lower corner that is below the door handle. This will prevent the door from dropping when you work on the top hinge. If you do not block the door and support the it's weight, it can create enormous stress on the other hinges once the top hinge is removed.
Remove the top hinge from the door and the door jamb. Temporarily install the new hinge in its place. Use the razor knife to slowly and carefully cut the lines where the wood must be removed at each rounded-corner location. Glide the edge of the razor along the metal side of the hinge to create the perfect lines at the corner. Push hard enough so the tip of the razor cuts into the wood the thickness of the hinge metal.
Once the lines have been created, remove the hinge and use the wood chisel to carefully carve away the wood. It will take minimal effort, if the wood chisel is sharp and held at a low angle. Once the wood has been removed, install the hinge and tighten all screws. Do the same process for each hinge.
Use extreme caution when working with the razor knife and wood chisel. Both tools are very sharp, and can cause serious injuries if you use too much uncontrolled force. Always use multiple gentle cutting strokes. Do not try to cut full depth with one stroke of the razor knife. Cutting across the grain of wood is always harder than cutting parallel to the grain.
If the old screw holes are too large to securely hold the new hinge, fill them with small pieces of wood and yellow carpenter's glue. Wooden matchsticks are great to use. Coat each matchstick with some glue, and force several at once into the screw hole. Let the glue set up for at least an hour before installing the new screw. If you need to work faster, purchase rapid-set carpenter's glue.
Column 633