Delta Faucets

Delta faucets have played a very large part in my career as a builder, licensed master plumber and homeowner. The name Delta faucets brings a smile to the face of any experienced marketing manager or progressive university professor whose field of study is marketing. Over the years massive sums of money have been poured into marketing campaigns to build the Delta faucet name so that consumers like you and I equate Delta with quality and style.

But great marketing can only carry a product so far. If the Delta faucets were not made well, they would have fallen by the wayside. When you buy a faucet, you expect it to last. If you have to pay a plumber to install a faucet, you only buy a cheap faucet one time. I can tell you for a fact, I have never had to replace a Delta faucet on one of my jobs because it failed prematurely. Each Delta faucet I have ever installed has performed just like an athletic workhorse.

I was first exposed to Delta faucets in the mid 1970's. Keidel Supply, a plumbing supply house in my city, was a stocking distributor for Delta faucets. They still are, and my guess is they sell thousands of them each year. When I first saw Delta kitchen and bath faucets, they were affordable, and appeared to be a good value to me at the time. After installing several, I knew they would work well for my customers. It was an exciting time to be a young plumber, as the switch from traditional rubber and plastic washers to washerless cartridges was in full swing, and Delta was at the head of the pack.

Delta faucets have always had well-engineered internal parts. It is not uncommon for a faucet cartridge to last 10 or even 15 years before the faucet starts to drip. In my own home, I have a kitchen faucet that is nearly 20-years old. It still has the original factory cartridge in the cold water handle. The faucet shuts off completely, and there is not a leak. That faucet handle has undoubtedly been turned on and off well over 250,000 times, and it still works just as it did when I took it out of its cardboard box.

Some older Delta faucet models have a small spring that is part of the faucet cartridge assembly. Many a homeowner has failed to replace this small part when installing a new cartridge. It is wise to replace this spring as they do wear out. Furthermore, different water systems throughout the nation have varied water chemistry that can weaken the metal used to make the spring.

The cartridges that control water flow through the faucet are fairly inexpensive. If you have a Delta faucet that you love and want to keep it for years, it makes sense to buy several replacement cartridges now while the parts are easy to come by. Store these parts in a plastic bag stapled to the inside of the sink base cabinet. In the event the faucet starts to leak, you have the original Delta replacement part handy. Once you discover how easy it is to install a new replacement cartridge, you will enjoy that feeling of satisfaction of a job well done.

Delta faucets have come a very long way. The styling and selection is now five or ten times what it was thirty years ago. The assortment of finishes is also astounding. I can clearly remember when polished chrome was the only real option my customers had. No one would have ever thought you could get polished nickel, oiled bronze and tarnish-free polished brass faucets back thirty years ago.

If you want your Delta faucet to last for 20 or 30 years, carefully read the installation manual, and follow the simple instructions. Pay attention to the cleaning instructions that come with the product. Avoid the use of abrasive cleaners, as they will scratch the finish of any faucet. To avoid water spots, take a few seconds to wipe the faucet with a dry dish towel as soon as you are finished using the faucet. A soft, cotton cloth will keep the finish looking perfect for years.

If you do have a hard water problem with the ugly white spotting, use a 50/50 solution of white vinegar and water to remove water spots from your Delta faucets. Never use harsh chemicals that say they will remove hard water deposits. The chemicals in some of these products may permanently damage your Delta faucets.

Column EM0040

DIY Heating

DEAR TIM: I need to replace my existing furnace, and am convinced I can do it myself. I looked at how the furnace connects to the metal ductwork, and I don't see any real challenges. Even the solder connections for the air conditioning seem simple. What obstacles do you feel I will encounter? Is it realistic for me to complete the job with no major problems? I am a serious do-it-yourselfer (diy'r), and have tackled all of my past diy projects with success. Patrick N., Laconia, NH

DEAR PATRICK: Your confident attitude reminds me of a real estate developer who requested a zoning change in my village a few years ago. I listened to him tell our planning commission how he got every other zoning change he had ever asked for from other local government bodies. He was proud of his 1.000 batting average. Unfortunately for him, my village spoiled his perfect record. I predict you are about to strike out as well.

Installing a furnace requires great skill, specialized tools and experience. This ultra-high-efficiency York furnace with a gas modulating valve took Richard Anderson, the BEST HVAC craftsman in greater Cincinnati, OH, several days to install. PHOTO CREDIT: Tim Carter

Installing a furnace requires great skill, specialized tools and experience. This ultra-high-efficiency York furnace with a gas modulating valve took Richard Anderson, the BEST HVAC craftsman in greater Cincinnati, OH, several days to install. PHOTO CREDIT: Tim Carter

Diy heating is perhaps one of the most challenging tasks I can think of when it comes to projects around a home. I can think of more physically demanding ones, like placing and finishing 20 yards of concrete in one day with just two helpers. If you want a formidable challenge, install a traditional post-over handrail with newel posts, volutes and goose necks. This master carpentry task is a photo-finish second place to heating, when it comes to precision and technical difficulty.

The skill sets you need to professionally install a new furnace are many. Furthermore, you need many specialized hand and power tools, especially when it comes to connecting the new furnace to your central air conditioner. For example, I doubt you have a set of refrigeration gauges sitting around to measure the high-and-low-pressure sides of your air-conditioner refrigerant. You will also need a two-stage vacuum pump to remove all air and moisture from the inside of the copper tubing after it has been brazed, not soldered. Don't forget to flow pure nitrogen through the copper tubing as you braze the copper connections.

I will assume you are installing a high-efficiency furnace, as they will give you a fantastic return on investment. The newer gas furnaces that sport gas modulating valves are state of the art, but my guess is that unless you have a heating and air conditioning contractor who will secretly buy the equipment, you may not be able to get your hands on the furnace you want. Heating equipment manufacturers often demand that their top-of-the-line equipment be installed by factory-trained craftsmen. This policy is a good one, as they do not want their furnaces and air conditioning equipment to become lab rats for people who feel they know more than they really do.

Once you remove your old furnace, you may be surprised to discover the shape and size of the new furnace and the interior air-conditioning coil that sits on top of many furnaces is quite different from your existing one. Connecting the ductwork above the existing furnace to the new one will require precision modifications. If you have not worked with sheet metal before, you may be in for a surprise. You need to learn all about s-hooks, drives and custom-offset ductwork.

One of your most serious challenges will be reclaiming the existing refrigerant that is in your system. Those of us who want to protect our planet's fragile atmosphere would sincerely appreciate it if you would not vent the high-pressure refrigerant into the air. Professional heating and cooling contractors have specialized equipment that allows them to reclaim the gas so it can be properly recycled.

If your existing furnace is fueled with natural gas, oil or propane, you will need to conjure up your best diy plumbing skills. You may be working with black iron pipe that needs to be custom cut and threaded. If you have all of the needed pipe-threading dies, cutters and the pipe vise, I am duly impressed. These expensive tools make sense for a plumber to own as he uses them frequently.

Diy heating is one of those tasks that homeowners need to avoid. There are many things that can go wrong, and worst of all, you may put yourself and your loved ones at risk. Furnaces and any fuel-burning heating device generates deadly carbon monoxide. Installing heating equipment improperly can be a recipe for disaster.

If you still think you want to tackle the project, absolutely take out the required building permit. Call for timely inspections to ensure all of the equipment is installed to code. You may need two different inspectors, as some municipalities may have a separate electrical inspector who looks at all of the electrical connections, fuses, switches and disconnect boxes.

Column 627

Kitchen Islands – Small 2×4 Ones Work Really Well

Kitchen Island Size

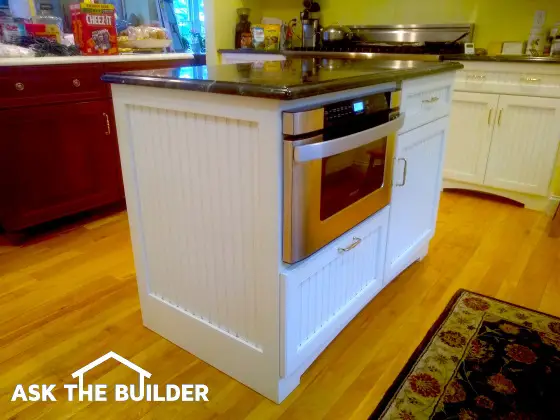
Kitchen Islands | This is an interesting small 2x4-foot kitchen island. Four people can work at it at the same time. It's in my kitchen, I know! Copyright 2020 Tim Carter

DEAR TIM: Kitchen islands have been in vogue for years, but I do not have one. I believe I have the space required but am not sure. What is the minimum size one needs for a kitchen island? Is there a maximum size? What keeps the islands from moving since they are not attached to a wall? Is it hard to install a sink in a kitchen island? Do you have other kitchen-island tips? Margo P., Valparaiso, IN

DEAR MARGO: Kitchen islands grew in popularity as the size of mainstream kitchens started to expand in the 1970s. I can clearly remember seeing my first kitchen island in a contemporary landominium housing development. Not only was the island enormous, the kitchen felt to me like 30 or more people could fit in it with ease.

How Do You Determine the Size of a Kitchen Island?

For planning and design purposes, kitchen-island sizing is a function of the amount of space you must provide around each side of the island. Different designers may tell you different dimensions, but 3 feet is always a good distance to allow between the edge of any side of the island and any other adjacent wall, cabinet, or appliance.

CLICK or TAP HERE to get FREE BIDS from LOCAL kitchen remodeling contractors.

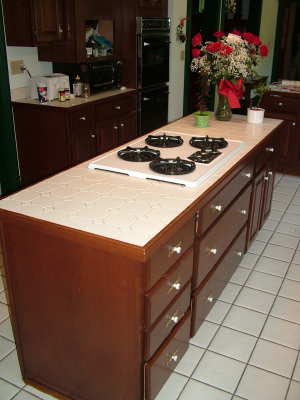
This kitchen island has worked well for 19 years, but would have done a better job had it been 1 foot deeper. PHOTO CREDIT: Tim Carter

This kitchen island has worked well for 19 years, but would have done a better job had it been 1 foot deeper. PHOTO CREDIT: Tim Carter

The 3-foot zone around the island means that you need open floor space that measures 8 feet by 9 feet for a tiny kitchen island that measures just 2-feet deep by 3-feet long. An island this small is virtually worthless.

What is the Smallest Useful Kitchen Island?

My personal building experience leads me to believe that a kitchen island size should be no smaller than 2-feet deep by 4-feet long. There is not a doubt in my mind that others feel differently.

For sake of example, I have a kitchen with an island in my own home. The island is just 2-feet deep, but it's 7-feet long. My wife and I love the length of the island but wish it were deeper. This island fits easily lengthwise into our kitchen which happens to be 20-feet long by 17-feet wide.

Why is Your Island Only 2 Feet Wide?

You may wonder why the island couldn't be deeper when the kitchen is 17-feet wide. My kitchen sports a 4-foot-wide walkway on the other side of one set of base cabinets that has a 1-foot overhang. This means for kitchen-island-planning purposes my kitchen is effectively only 12-feet wide.

What is the Maximum Kitchen Island Size?

The maximum island size, in my opinion, would be one that is 6-feet deep and perhaps 10-feet long. This is a massive amount of flat space, or even multi-level space, for an island. One of the things to keep in mind is how the top of the island will be cleaned. Each part of the top must be reachable by hand so spills, food, and dirt can be cleaned with ease.

Should All Islands Be Attached to the Floor?

Some islands may not have to be attached to the floor. The weight of the cabinets, top, and all of the things stored in the island cabinets may reach close to, or over, 1,000 pounds for a massive kitchen island. Smaller kitchen islands should be secured to the floor so they do not slide or tilt if someone leans or pushes against the island.

If you turn a standard kitchen island base cabinet upside down, you will discover a void space about 4-inches deep. This void space allows plenty of room so a carpenter can attach solid framing lumber to the kitchen floor. If this lumber is placed just inside the inner surfaces of the sides, front and back of the cabinet base, the cabinet will nest over the blocking. When done correctly the cabinet will not slide when pushed. To keep the cabinet from tilting over, the carpenter needs to install thin fasteners through the cabinet sides into the solid blocking.

Should I Install a Sink in an Island?

Consider installing a second kitchen sink in your new island. You will be shocked how much this second sink gets used. Kitchen island sink plumbing is very unique. You need to install a loop vent. Avoid using AAVs, because they will fail and allow sewer gas in your kitchen.

Be sure to install plenty of code-approved electrical outlets in the sidewalls of the island. These outlets will give you greater flexibility for days when lots of cooking is happening or for parties and gatherings. Consider a different countertop material than what you currently have on the rest of your kitchen cabinets. You might be able to get a complimentary top material that allows your island to become both the physical and visual center point of your kitchen.

Are Bookshelves a Great Island Accessory?

Bookshelves and other fancy island accent cabinets are widely available. You can also get special trim that finishes off kitchen island cabinets. Some kitchen island cabinets can be made to look like a piece of furniture. The possibilities are often endless.

Should I Hire A Kitchen Designer?

Visit a special store that just sells kitchen cabinets and consider working with a certified kitchen designer. These individuals have completed extensive course work and testing to ensure they are true kitchen-design professionals.

CLICK or TAP HERE to get FREE BIDS from LOCAL kitchen DESIGN & remodeling contractors.

A certified kitchen designer is well aware of the best options for your situation, and they are often up to date with the latest design concepts and options offered by kitchen cabinet manufacturers.

Column 626

DIY Underfloor Heating

DIY underfloor heating is a popular project, because many people hate walking across cold floors. There is often nothing more comfortable than soothing heat generated by a diy underfloor heating system.

Some diy underfloor heating systems are easy to install, while others require the touch and skill of a professional. The electric diy floor heating mats are very popular, because you simply unroll them, connect them to the electrical system and then cover them with the flooring material. Ceramic tile, granite flooring and any other natural stone product work very well with these electrical diy underfloor heating mats. The reason for this is simple: the underfloor heating mats are very thin.

The hot-water diy heating systems are more of a challenge. To produce enough heat, the diy underfloor heating water systems must have a pipe size with an inner diameter of nearly one-half inch or larger. These larger pipes can't be easily covered with flooring materials, so they often are installed within the concrete slab on under a wood subflooring system.

It is possible to do a diy underfloor heating system on top of a wood subfloor, but the pipes often must be covered with a liquid compound that looks like pudding but sets up and hardens like concrete. This is a very difficult multi-step process and many do-it-yourselfers are not equipped with the tools and skills necessary for a professional installation.

The hot water systems also require boilers or water heaters to generate the heat transferred by the heating pipes under the flooring. It takes great skill to size, install and connect these heating plants to the piping systems.

The biggest mistake a do-it-yourselfer can make while installing radiant heating in a floor is undersizing the system. It is very important to make sure the correct amount of heating is being installed to offset the cold or heat loss. Not all houses need the same amount of heating elements. A floor space that gets colder in the winter will require more Btus than a house in a mild climate. Pay attention to the sizing guides produced by the heating product manufacturers.

Electrical-wiring methods are very important when it comes to diy underfloor heating systems. Many do-it-yourselfers are not qualified electricians, and they can overload circuits if not careful. This grave mistake can cause deadly electrical fires.

An electrical underfloor heating system can draw significant electrical current, and you must make sure the mat is on its own circuit if the instructions or electrical code require it. Adding new electrical circuits is not a hard diy project, but it can be very intimidating.

Column EM0039

Ants

DEAR TIM: Two days ago, I ate a piece of watermelon before I went to bed and accidentally left the rind on the kitchen counter overnight. I woke up to find my kitchen invaded by small, black ants. They were everywhere! The little devil ants were crawling all over my counters and in my sink. The melon rind had several ants on it. I killed them all, and immediately took the rind out to the trash. It is two days later, and I am still seeing black ants. What can I do? I am fighting a losing battle here on the Outer Banks of NC. Teresa P., South Nags Head, NC

DEAR TERESA: The ants are just a nuisance. They can't harm your home, and they are just simply unwanted house guests much like some of my relatives and in-laws. The small ants were simply looking for some food, and were attracted by the sugar in the watermelon juice.

Ants are amazing insects. They have very structured colonies, and certain ants have very distinct jobs. All ants need to eat, and certain ants within the colony are the primary energy providers. Their responsibility is enormous as they are charged with finding food for the other colony members. These ants scout randomly for food, and are attracted by fragrances and food particles. Once they locate food, they communicate the findings to other ants within the colony.

These ants that explore the land around the colony were looking for food and knew to come to your house. There is a good chance they had been in your home before, and my guess is they found some small crumbs on the kitchen floor. The reason the ants came back is because they had left a chemical marker trail behind. These marker chemicals are called pheromones.

But this time they struck gold with the sugar-rich watermelon juice. This high-energy food source caused them to scamper back to the colony to announce the find while you were sleeping.

My guess is that once you killed the visible ants, you washed the countertop off. This would have removed the chemical pheromones from the counter, but the chemical trail was still on the floor. The survival programming within the ants kept telling other ants to come to your kitchen to get more watermelon juice. After all, they were unaware you had thrown it away once you decided to get up out of bed.

If you sweep the floor well, and then mop the floor with a solution of ammonia and water, you will stop the invasion of ants. The ammonia will remove the pheromones, and it will act as a powerful repellent to the small ants. Start with a solution of one part ammonia to one part water. If the odor of the ammonia is too strong for you, then cut the solution back to one part ammonia to two parts water.

Ants aren't the only creatures that love watermelon juice. Read Tim's story about the juice in his September 29, 2019 AsktheBuilder Newsletter.

Column EM0038

Diamonds

Diamonds and home improvement have much in common. At first blush, you may not think so. But there are hundreds, actually thousands, of instances where a diamond wedding ring or a diamond engagement ring has disappeared behind a wall, slipped into a floor crack, dropped into a sink or worst of all, been flushed down a toilet.

Talk to a seasoned plumber and my guess is he will tell you a few stories about successful treasure hunts where he has found a diamond or two. The hardest diamonds to recover are ones that have gone down a primary drainpipe. The water flow from a toilet flush can easily carry a diamond ring out to a sewer line. But if it ever happens to you, immediately call a plumber who has a camera scope he can send down the drain line. If the toilet was flushed just once and no other water goes down the plumbing drains before the plumber arrives, the diamond ring might still be in the drain line, and can be recovered.

I have a personal interest in diamonds because of my geology degree. A diamond is simply a mineral that we mine for its gemstone quality. There are plentiful deposits of diamonds in the world, and the supply that is released annually is tightly controlled. This low supply boosts the price of this gemstone.

If you want to discover more great tips and facts about diamonds, sapphires, rubies and other interesting gemstones, you should visit a cool new website I have discovered. It is called ExpertJewelryTips.com. I am convinced you will uncover many fascinating facts when you read the columns at ExpertJewelryTips.com.

Column EM0037

DIY Heating Plumbing

Diy (do-it-yourself) heating and plumbing is an ambitious goal to set, and one that is achievable if you have great comprehension skills, a boatload of tools and are mechanically inclined. In other words, diy heating and plumbing is much harder and far more complicated than painting or rough carpentry. Do not be lulled into a sense of empowerment by the countless diy books, radio shows and television shows about diy heating, plumbing and other topics. Certain diy projects require years of experience to achieve results that are close to that of a professional.

Diy heating is by far the most complicated. For sake of discussion, diy air conditioning should be included in the discussion about heating. The heating and cooling system in a standard home is by far the most complicated mechanical equipment found in a residential house. Not only is the equipment itself highly complex, but the calculations required to properly size the furnace, boiler and air conditioner are not easily performed by a do-it-yourselfer.

Many people are probably unaware that furnaces and air conditioners are like shoes. They come in all different sizes and styles. If you try to wear a shoe that is the wrong size, you are very uncomfortable. The same is true for furnaces and air conditioners. Put the wrong size in your home, and I guarantee you will be highly uncomfortable.

The tools needed to install air conditioners are expensive and complex. You need special gauges, a high-quality vacuum pump, special soldering equipment and a wide variety of other specialized hand tools.

The skills to install air conditioning equipment properly are not learned in a classroom or over a period of one week. It takes years of on-the-job experience to become qualified to deal with all of the unique situations one encounters when installing air conditioning in a home.

Diy heating requires that you know about furnaces and boilers. Furnaces are slightly less complicated than air conditioners, but they offer unique challenges. Fitting and working with metal duct work is not a job for a rookie. Boilers are more complex than furnaces, and you must be an expert pipe fitter to produce good results.

Many of the manufacturers of heating and cooling equipment will not sell their products to diy heating buffs. They know the challenges that face trained professionals, and realize it is beyond the scope of do-it-yourselfers to install their products.

Diy plumbing is another field that looks far easier than it is in the real world. Plumbing is directly related to public health, and the installation of both water supply lines and wastewater drainage lines must be done in certain ways to protect the health of communities and individuals within your own household. A rookie diy plumbing installation can send contaminated water backward into a public water supply system. A good-intentioned diy plumber can sicken his own family by installing drainage pipes that clog or emit sewer gas into a home on a regular basis.

Diy plumbing has been glorified on many cable television shows. It takes great skills to install plumbing in accordance with all codes and industry standards. Pipe sizing is important, as is the proper venting of plumbing fixtures.

If you are still in the mood to attempt your own diy heating and plumbing jobs, then be sure to research all methods, tools and codes with respect to your tasks at hand. Take out the necessary permits, and have the inspectors check your work. If you succeed, congratulations. If you fail, be prepared to open up your wallet a little further while you step aside for the professional to straighten out your work.

Column EM0036

Kitchen Sinks

Kitchen sinks are far and away the most important component found in kitchens anywhere in the world. The reason is simple to understand when you think how important water is in both the preparation and cleanup of food. The basic function of a kitchen sink is to serve as a waterproof receptacle for liquids and mushy solid foods of any type.

Kitchen sinks differ from bathroom sinks in both size and sometimes the material that makes up the sink. A kitchen sink needs to be robust in size so it can easily accommodate large bowls, pots and pans, and any other utensil that one might use to prepare food.

The kitchen sink must also be able to withstand the abuse these large, heavy objects impart on a sink. Most people know that smaller objects like glasses, plates and silverware can create scratches and nicks in kitchen sinks. Larger objects can do serious damage to sinks that are not made to withstand a certain amount of daily wear and tear. For this reason, heavy-gauge stainless-steel kitchen sinks are a favorite. Porcelain-coated cast iron should be considered if you want a vintage kitchen sink.

A bathroom sink can be smaller and made from vitreous china, since it is not exposed to the wear and tear of a kitchen sink. Cast-iron sinks are frequently used in bathrooms, as are porcelain-coated steel sinks.

Ever-changing trends put pressure on kitchen-sink manufacturers to explore other materials for kitchen sinks. Solid plastic is still available, and these sinks can be bonded to solid-surface countertops so the sink looks to be sculpted from one solid piece of plastic. Granite kitchen sinks, and those made from marble and other hard stones, make for a dramatic look.

Copper, brass and any other corrosion-resistant metal can be used to form a kitchen sink. Copper and any copper alloy offer a unique characteristic not found in any other sink material. Copper kitchen sinks have a built-in natural chemical mechanism that kills many bacteria and viruses within minutes of contact. This hidden quality can help keep you and your family healthy.

When looking at kitchen sinks, pay attention to the depth of the bowl. Not all sinks are created equal. Many kitchen sinks offer extra depth to make cleaning large bowls and pots a very easy job.

If your kitchen is large enough to handle two sinks, give serious consideration to this possibility. Many kitchen sinks are available in a double or side-by-side configuration, but these can only be used by one person. If you have two separate sinks in two different locations in a kitchen, two people can work independently without getting in each other's way.

The mounting method of kitchen sinks is also an option. The bowl can be placed under the countertop so that water and food can be pushed into the sink like water flowing over a waterfall. A second design is an overmount lip where the top of the sink is higher than the surrounding countertop. Over and undermount kitchen sinks are available in a wide variety of colors, sizes and material choices.

Column EM0035

Dryer Vent

I received this very interesting dryer-vent story from Steve L., who lives in Southern CA with a seemingly harmless variety of small wildlife. He shared this tale in the hopes that other people will be spared the olfactory misery he had to suffer.

The other day, I found a small mouse in my side yard where our dryer vents. I chased him from his hiding place and thought I had him cornered next to some recycling boxes near the dryer vent. I moved the boxes a bit to find that he had made a little bed out of vented dryer lint. Then in a flash, he darted toward me a few inches and then hopped right up into the dryer vent (the dryer was not on at the time).

I had never looked at the workings of this vent because it has one of those angled covers that directs the air down. I didn't want the mouse setting up shop in there so I ran in the house and turned the dryer on a minute, hoping to scare him out. I went back outside and saw no sign of him. I figured he probably ran away or, worst case, would crawl out when he got hungry.

That must have been a couple days ago. Well, today our laundry room really started to stink. I immediately suspected the worst. I pulled the dryer out and disconnected the few feet of flexible metal duct between the dryer and the wall.

I gingerly carried it outside. I looked inside and what do you know, a dead mouse sitting right in the 90-degree angle fitting that was attached to the back of the dryer. That mouse died within an inch of the inside of our dryer.

Here's how it all happened: I discovered that our exhaust vent has one big flap under that external angled cover. Years of lint had propped it open by about half an inch. I figure that little bugger was able to jump up nose first into that half inch opening and squeeze himself inside. His big mistake was crawling too far inside. The inside flexible ductwork followed an upside down U pattern. I think he was able to crawl up the incline from the hole in the wall to the top of the inverted U but then fell down the longer other side. He was not able to climb back up from the floor level where the exhaust exits the dryer to the top of the inverted U. Tough luck.

That duct has been thoroughly scoured and reinstalled and everything is back to normal. I'm now highly motivated to check that exhaust vent every week when I take out the trash. I also changed the course of the flexible ductwork. It now follows more of a C pattern, which hopefully won't be as challenging for any future invaders.


I have found that it is often best to vent fans and dryers through the roof. I urge you to watch this video of mine to see how easy it is to install the correct vent-cap flashing on a roof. Have no fear - if done right you will have no leaks.

Column EM0034

Restoration Hardware

DEAR TIM: I need some restoration hardware to help me put the finishing touches on an old home I am renovating. Can you still get authentic hardware for doors and cabinets? What other pieces of trim should I consider to bring this old home back to its former glory? Is it possible to use restoration hardware on new homes? Sandra F., Stowe, VT

DEAR SANDRA: Restoration hardware is readily available. In fact, you will discover many companies offer a wide variety of products at different price points. One thing I have discovered is that price is a fairly accurate barometer of quality. High-quality hardware often costs more money. It also pays to shop very patiently. There are all sorts of places on the Internet where you can get very good deals on restoration hardware. There are also specialty hardware stores that sell nothing but the best hardware, whether it is period or modern.

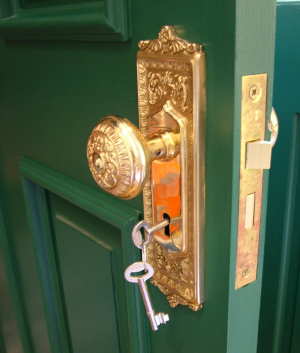
This ornate solid-brass door hardware is an exact copy of that made 150 years ago. It sports a full-mortise lockbox operated by traditional skeleton keys. PHOTO CREDIT: Tim Carter

This ornate solid-brass door hardware is an exact copy of that made 150 years ago. It sports a full-mortise lockbox operated by traditional skeleton keys. PHOTO CREDIT: Tim Carter

I have used all sorts of different period hardware on past jobs and in my own home. You can get restoration hardware for any time period. Victorian, early Colonial, art deco, old English, etc., are all available and in different finishes. The crystal doorknobs and solid-brass doorknob back plates, I grew up with in my 1930's house, can be found within minutes.

If you want to be authentic, be sure to look for doorknob locksets that sport full-mortise lock and latch mechanisms. Modern doorknobs are tubular in nature, and require the carpenter to drill a large round hole in the face of a door. Traditional full-mortise locksets required a deep cavity in the thinner edge of the door. Special power tools can easily create these mortise cavities in minutes, whereas old carpenters had to do it by hand. These full-mortise lockset locks use a traditional skeleton key. Nothing could be more authentic than that.

You should consider restoration hardware for every room of the house, including bathrooms and your kitchen. In the past few years, there has been an explosion of authentic products for bathrooms and kitchens. If your budget permits, you can even purchase period appliances for kitchens, and every single fixture you might imagine for any bathroom. Can you picture in your mind having a traditional 1950's refrigerator/icebox that looks like it survived a journey in a time machine? Those appliances can be delivered to your doorstep now sans the time machine.

I would consider looking at restoration hardware for any drapery rods, coat hooks, shelf brackets and even electrical switch and outlet cover plates. If you can find older brass light fixtures, you can replace any missing glass pendants and crystals with ease. One very attractive trim item, I used in my own home, is period stair rods and holders. When you place an Oriental stair runner carpet on a set of steps and then trim it with twisted rope stair rods, your friends and neighbors will know you are a serious restoration hardware buff.

Don't forget about the heating and cooling aspects of your home. Be on the lookout for authentic heat register covers. They are available in a multitude of finishes including brass, cast iron and nickel plate.

Cabinet knobs, drawer pulls and small door pulls are available in hundreds of classic styles and finishes. Hinges of all types are also ready for you to bring your home back to its former glory.

All of this restoration hardware can be used on new homes. In fact, the only things that separate a new home from an older home are the woodwork and the hardware. You can visualize this with ease if you stop and think of what a new house looks like just after drywall is finished and sanded. It looks identical to a 150-year-old home where the plasterers just left to ride home in a horse-drawn wagon. The walls and ceilings in both cases are flat, smooth surfaces just waiting for the finish carpenters to arrive the next day.

If you want to make a new home look old, you must pay attention to other things in the planning process. Older homes often had taller ceilings and they had windows and doors that were proportioned to the wall height. Many modern homes have simple 8-foot-tall ceilings instead of 9 or 10-foot-tall ceilings.

Give serious consideration to the flooring in a new home. Old homes almost always had hardwood floors that were often partially covered with gorgeous area rugs. That look can be easily duplicated today. Be sure to consider exquisite inlay borders for the hardwood flooring, or at the very least, create borders in rooms by mixing different species of hardwood flooring. Walnut hardwood flooring can be easily installed with select red oak for a stunning look. Try to stretch your budget to include as much quarter-sawn hardwood flooring as possible for a truly authentic floor.

Column 625