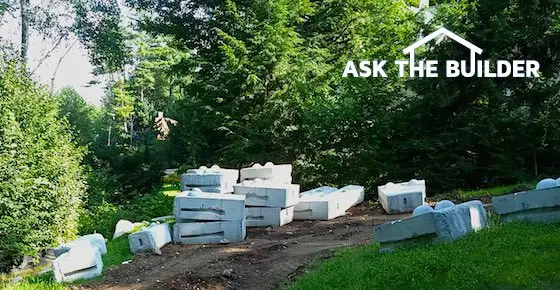
Paint vs. Vinyl Siding + Foam Insulation Board – Money & Energy Costs

Energy Savings Table

The following table illustrates that 1/2 inch foam insulating board can definitely save you money. In fact, it can go a long way in helping to pay for the initial cost of the vinyl siding installation. This table shows the benefits after 20 years, a reasonable life expectancy for a vinyl siding job. In other words, if you are going to install vinyl, there is a good chance it will remain on your house for at least 20 years. The heating costs have been adjusted for inflation (the adjustment is minimal and not realistic - the values have been adjusted just 1 percent per year). Actual annual inflation has been higher than 1 percent. Thus, your savings would be greater than those shown in the table if inflation is greater than 1 percent per year.

All figures are in dollar ($) values.

Your Monthly Heating and Cooling Cost (Actual Annual Cost divided by 12 months) Total Heating and Cooling Cost for the 20 year period (adjusted for inflation) Potential Savings available by using 1/2 inch Foam insulation board beneath the vinyl siding
$75 $19,817 $2,180
$100 $26,423 $2,907
$125 $33,029 $3,633
$150 $39,634 $4,360
$175 $46,240 $5,086
$200 $52,846 $5,813
$225 $59,451 $6,540
$250 $66,057 $7,266
$275 $72,663 $7,993
$300 $79,268 $8,719
$325 $85,874 $9,446
$350 $92,480 $10,173
$375 $99,086 $10,899
$400 $105,691 $11,626


Table Values courtesy of Heartland Building Products

Column B100

Aluminum Siding Painting Tips

UPDATE:  New information regarding painting aluminum has been added to this column. Be sure to check the Author's Notes following the article.

Oil to the Rescue

Did you know that paint companies employ chemists? These individuals know that you must create a barrier between the oxidized aluminum and the water based acrylic finish paint. It is easy to do.

Virtually every paint manufacturer makes a high quality oil based metal priming paint. This is the product to use to create the barrier. However, it is not necessary to apply the primer full strength. In fact, thinning it down actually helps the primer penetrate more deeply into the eroded paint finish on your siding.

The trick is to thin one gallon of paint with one pint of thinner. Be sure to use the approved thinner! Don't use gasoline, or some other solvent you think will work. The label on the paint can usually will tell you exactly what to use.

Surface Preparation

The key to any successful painting job lies in preparing the surface. The surface to be painted is the foundation. Poor foundations create poor results. This is true in any project.

Clean surfaces are the key. If you remember that paint is simply a modified glue, you will be on the right track. Glue likes to stick to rough surfaces - there is more surface area. Glue doesn't like dust. If you follow some of my painting tips, your upcoming paint job will last and last!

Manufacturers of Acrylic Aluminum Siding Paint

  • Benjamin Moore
  • Duron
  • Glidden Paint
  • Kurfees
  • Porter Paints
  • Sherwin Williams

NOTE:

To learn more about painting aluminum siding, read these highlighted articles.

Author's Notes: The following updated information was received from the Paint Quality Institute.  Debbie Zimmer addresses ammonia in latex paints and the resulting bubbling.

"Hi Tim,

Thanks so much for your questions and comments.  Regarding ammonia in latex paints, it is so low today that the off gassing (resulting in bubbling) is really not a factor.
 
Here are a few detailed points to consider:
 
1. Bare Aluminum: forms a strong oxide layer which is easy to stick to and is relatively inert to ammonia. Some folks confuse ammonia with acid. Yes --- acid will generate some hydrogen gas but there should not be a reaction with ammonia.
 
2. All Aluminum Siding is coated. This again generally results in a surface that is easy to stick to but for all intents and purposes, relatively inert to waterbased paints. Even under poor conditions, incidental exposure to Aluminum should not be a problem because of above (1).
 
Also, on occasion, we do speak about oxygen bleach but typically use the more common (common to homeowners) "bleach" term.  Perhaps we should use oxygen bleach more often.  We don't use brand names (in any of our materials), such as Clorox.
 
Tim, I'm really glad you asked the questions --- it helps us make our educational information stronger.
 
If you are ever in the Philadelphia, PA area, I would love to take you on a tour of our PQI facilities --- we have over 30,000 paint panels on exposure (a few dating back to the '50's) and 1000's with the most recent and forward looking technologies. In addition, our "farm" contains over 200 different surfaces and substrates (painted/not painted) on exposure as well.
 
Thanks again,"
Debbie Zimmer
PQI Director of Communications and Alliances
Dow Coating Materials, North America
The Dow Chemical Company

Updated: 08/23/2010

Column B122

Multi-Colored Vinyl Siding

Multi-Colored Vinyl Siding

Vinyl siding is really fun to install. I especially enjoy how you can transform an ugly or worn-out house facade into something special in a matter of hours. You can't do this with brick, wood or any other material as easily. The vinyl requires no painting or any other treatment. As soon as you nail a piece in place, you never have to do anything again except for periodic washing! If the house is simple and you have a large enough crew, you can complete a house in just 1 or 2 days!

The Impostors

Did you know that you do not have to settle for the solid color vinyl sidings that your neighbors are using? There are multi-colored vinyls that look just like natural wood siding. Any house that requires the look of wood can fool a person easily from the street. The siding products create a look that is very close to that of natural stained wood. Different colored browns, light greens and grays are common. These products would look great on the seacoast, in the woods, or in any standard subdivision.

When viewed up close you may think the multi-colored siding appears fake. Well, stand back about 20 or 30 feet and look at several pieces at the same time. I can assure you that your opinion will change in a hurry. If you are fortunate to know the location of a house that is covered with this product, you are in luck. From a distance, I'm positive you will think that the vinyl is wood.

Long Lasting Color

The multiple colors in virtually every siding are an integral part of the siding. You need not worry about them washing or rubbing off. The pigments that are applied to create the multi-colors are simply integrated into the siding as it is extruded.

Older vinyl sidings were prone to color fade. Many of the high quality (usually higher cost) sidings have solved this problem. There are higher quality ingredients and more of them in the high-cost sidings. Special coatings also can deflect and minimize damage caused by the sun's ultraviolet (UV) rays. The most common ingredient that prevents color fade is titanium dioxide. This is actually a pigment commonly found in paint. High amounts of titanium dioxide will absorb and deflect UV rays. To judge the amount of this pigment in the vinyl siding, look for a higher price tag.

If it costs you $300 to upgrade to the siding with the highest amount of UV protectant, do so. Think long term. You will be angry at yourself in 10 years should the color begin to fade on your lower cost selection!

Column B167

DIY Vinyl Siding Installation

DIY Installations?

Are you thinking of installing the vinyl yourself? Well, it can be done. The trick is to tackle a very small job at first. One of the best places to practice might be on a community service project. Perhaps a church in your city or town is constructing a house for Habitat for Humanity (I helped build one six years ago....it was a blast!) If so, I believe each of these houses is covered with vinyl siding. You can learn how to work with the material in the presence of experienced people and do a good deed at the same time.

Another great resource to learn about vinyl installation is the actual manufacturer. Most of them publish wonderful booklets outlining the step-by-step process. I have a past edition of Alcoa's booklet. It is easy to follow and contains great illustrations. Heartland Building Products also prints a handy guidebook. You can find these booklets at the local siding distributor in your city. Check the Yellow Pages under "Siding - Materials / Supplies".

Should you decide to tackle the job yourself, you will need some help. Vinyl siding is a two or three person job. The materials often come in lengths of 12 feet or more. On hot days, the material is soft and bends easily. Often, it takes two people to snap and lock a piece into position.

Expansion and Problems

Problems can happen after siding is installed. Vinyl grows or expands as the temperature rises. You need to account for this when you install it. For this reason, you never install it tightly between two other pieces of trim. Vinyl siding overlaps itself and each piece must be allowed to slide past the other. The instruction booklets address this topic in great detail. Do not skip these parts! You will end up with wavy siding.

Wind Problems

The primary reason I wrote this vinyl siding column was because of a letter I received from a reader. Her vinyl siding would keep her awake at night as the wind would blow. Her installer/builder told her this was normal! I guess it was on his jobs! Guess what? It is an easy fix. You do not have to tear the siding down and start over. You can purchase a $5 tool and unlock the siding pieces from one another. Upon inspection, the pieces that rattle will be nailed too loosely. You will quickly see that the head of the nail is probably one fourth or more away from the vinyl siding. These nails need to be driven closer to the siding flange. The manufacturers want to see them 1/32 inch away from the flange.

If your siding flaps in the wind, don't despair. Call your installer or ask a professional to renail and re-lock your siding panels. It is a "breeze"!

Column B167

Multi-Colored Vinyl Siding Manufacturers

Manufacturers of Multi-Colored Vinyl Siding

I find that the manufacturers of vinyl siding tend to be shy about their multi-colored vinyl siding products. Every time I ask, they comment that this product represents their most expensive item. I tell them that if homeowners knew how wonderful they look, they wouldn't mind paying 15 percent more. My guess is that you will feel the same when you finally see the variegated vinyl sidings.

The variegated vinyl sidings are usually found at wholesalers in your town or city. These are places where builders, remodelers and siding people buy their products. Look in your YellowPages under "Siding - Materials" or 'Siding - Supplies". Undoubtedly you will see a list of companies that stock vinyl and aluminum siding. Most of the names of these companies will be obscure to you. Homeowners simply don't realize that there are a vast amount of stores and building supply houses that builders and remodelers visit and shop. These are the places that have the real selection of materials!

Also check out the siding manufacturers listed below. In almost all instances, they will provide you with the local distributor of their product. Trust me, it will be one of those companies you find in the Yellow Pages.

Following is just a partial list of the vinyl siding manufacturers. I have tried to list the major players in the marketplace. There are other companies as well. Some may be regional manufacturers. Pay close attention to the warranty of the siding you select. Look for strong anti-colorfade warranties!

  • ABTco Building Products
  • Alcoa Building Products
  • Alside Siding
  • Certainteed Siding
  • Continental Manufacturing
  • Crane Performance Siding
  • Gentek Building Products
  • Georgia-Pacific
  • Heartland Building Products
  • Owens Corning
  • Variform
  • Wolverine Siding

Column B167

Vinyl Siding – Installation Tips

Vinyl Siding Installation Tips

Vinyl siding is just about the most popular exterior building material in use today. It is used in vast quantities in the remodeling market as people replace old aluminum siding or cover wood siding maintenance nightmares. Over 2 billion square feet of vinyl siding is produced each year in the USA.

Guess what? The number one problem with vinyl siding is improper installation! Over 99 percent of all problems can be traced to installers. Unfortunately, many installers use unskilled laborers to install the product. Or, some builders allow untrained individuals to attach it to walls and gable ends. While it is not a hard product to install, there are many things you need to know if you want a professional installation. Here are several of the most important aspects of installing vinyl siding:

Required Tools

Vinyl siding requires some very basic tools. If you are a DIY'r attempting this project you probably have many. Here is a list of tools that will help you complete the job: hammer, level, tape measure, chalkline, circular saw with a fine blade (saw blade will be installed backwards on the saw!), utility knife, tin snips, framing square, caulk & gun, drill (optional), cutting/sawing table, ladders and misc. other staging equipment. You will need some specialty tools as well such as a snaplock punch and a nail slot punch. A zip unlock tool may also come in handy.

Surface Preparation is Critical

The surface to which the siding will be applied must be as smooth as possible and solid. Now is the time to seal energy leaks. Caulk all cracks around windows and doors at this time.

If you want to increase the energy efficiency, you may want to install foil faced foam sheathing at this time. This is especially true if you are installing vinyl over an existing brick or wood sided house. If you are installing vinyl on a new home, be sure you have instructed your builder to install foil faced foam sheathing AND an air/water infiltration barrier.

Trim - The Detail Work is First - No Instant Gratification!

Corner posts, J channels, light blocks, dryer vent accessories, front door cornices, arches, etc. are all installed first. The vinyl siding is actually the last thing that is installed. The corner posts, J channels, and other trim pieces have a channel into which the ends of the siding rest. This hides the cut end of siding from view. Why? Vinyl siding is not solid. If you were to look at it sideways, it would be quite unattractive.

If you are working in warm weather, the vinyl siding and trim is very pliable. It will cut readily with a tin snips.

J channel is the trim piece that is used to surround windows and doors on many occasions. It is available in a standard width and often an extra wide width. The extra wide material looks more like real wood trim. I suggest you consider it. There are special ways that the trim must be cut and nailed. Each manufacturer publishes a handy installation guidebook with easy to understand language and illustrations. You must follow the instructions so that rain water does not get behind the siding and trim!

Starter Strip - An Aluminum Accessory

Vinyl siding pieces interlock with one another. You install vinyl siding from the bottom of the structure and finish at the top. The material is blind nailed through slots found at the top of the siding. So how does the first piece of siding keep from flapping in the breeze? You install a pre-bent piece of aluminum starter strip. It must be installed level or parallel with the line you wish to follow as the siding goes up. Remember, the first piece of siding is pulled up tight to the starter strip. Each successive piece of siding is pulled tight to the one below. So, if you goof up the starter strip, all the rest of the siding will be crooked!

Corner Posts

Vinyl siding and trim expands and contracts with changes in temperature. You need to plan for this. The corner posts must be installed 1/4 inch away from the soffit or other horizontal stop point at the top of each corner. Plumb each corner post and drive the first nail in the top of the nailing slots. All nails must be nailed in the top of the slots so that the corner posts "hang" from the nails. Keep the nail head 1/32 inch away from the vinyl. This will allow the vinyl room to expand and contract.

If you need to splice two lengths of corner post together, the upper piece overlaps the lower piece. This allows rain water to shed off just like a shingle roof.

Installing the Siding!

Look at a full panel of siding before you install it. Note the upper and lower corners on the front and back. There are factory made notches. These notches are important. You may find yourself replicating them on a cut piece. These notches allow you to overlap pieces of siding. The siding pieces can move sideways independent of one another because of the notching.

Wind can cause vinyl siding to rattle. The sun and heat can cause vinyl siding to grow or expand. For these reasons, it is VITALLY important that vinyl siding be nailed properly! If you nail too loosely, the vinyl siding will rattle and flap as the wind blows. If you nail it too tightly, it will bubble and bow on a hot day. The proper nailing is somewhat easy. The vinyl siding flange must be tight against the sheathing. The head of the nail must stop within 1/32 inch before touching the vinyl siding. This space is just less than the thickness of a dime! Make sure you and/or your installer does this part correctly!

Gable End Angles

How do you find these angles? Easy! Slide a full piece of siding so the top corner just touches the angle. Lay a scrap piece of siding against the gable end angle. Trace along the bottom of the siding a line which is parallel to the roof line. This is the line you need to cut to produce the gable end angle. If, after cutting, the piece fits (it should!), then save the outfall and use it as a template for all future cuts.

Installation Booklet

Get the booklet from the manufacturer! It will be a great aid to you.

Column B167

Installing Fiber Cement Siding

Every now and then, I stumble across a very interesting product. It appears that it has happened again. Fiber cement siding products are simply a magnificent alternative to conventional wood siding products - plain and simple.

The thing that is amazing about fiber cement is that it is not a new product. I have actually worked with the material for many years. Here in Cincinnati, you can drive through the older neighborhoods of Fairmont, Clifton, Norwood and Price Hill and find vast quantities of the material. Based upon the style and types of older houses you see it on, it apparently was a very economical material back 90 years ago. The good news is that it is still a very economical building material.

Concrete Roots

Portland cement was discovered in the 1800's. It didn't take long for inventors to find that it had lots of different uses besides a paving material. It made perfect sense to blend the cement paste with fine fibers and create an "armor" plate - like siding. After all, house were constructed with rock for years. Why not nail on thin sheets of rock? I sure wish I had thought of the idea!

Nails Without Splitting!

You would think that thin pieces of fiber cement siding would readily split when you drive a nail through them. It doesn't happen - unless you nail very close to an edge. Wait till you try it. You will be amazed at the ease of installing this water, fire and insect resistant building material.

If you choose to use fiber cement siding, it installs just like regular wood siding. There are a few exceptions - basically, you can blind nail this material very similar to the manner in which vinyl siding is installed.

Installing any siding correctly is becoming a lost art. Ninety nine percent of the installations I see are being done incorrectly. The siding installers seem to think that the siding will make the house/structure waterproof. Nothing could be further from the truth. Seams and butt joints between siding and trim are all excellent locations for wind driven rain to enter. This water will readily begin to rot the sheathing and your structural wood members.

If you ever have the luxury to partially demolish an older home built by old craftsmen you no doubt will run into some tar paper. Tar paper was the only water repellent available for the old timers to use. But guess what? It was very effective. Tar paper was used under old fiber cement siding, traditional wood siding and stucco. You need to use it under your new fiber cement siding at the very least. A better alternative is to use a moisture and air infiltration barrier. These products are easier to apply and offer great energy savings potential. If you choose to use tar paper, remember that you work from the bottom up. Each successive piece must overlap the one below. This is how water is shed to the bottom of the structure. Don't forget that your first piece should extend 1/2 inch over the top of the foundation. This will ensure that water will not roll back under the sill plate and into your basement or into your house should you live on a slab.

Trim First - Siding Last

Installing siding is a multi-step process. The fun part of actually applying the siding is usually the last thing you do! The first thing you must do is apply all of your inside and outside corner boards, window trim, starter strips and flashings. Once all of this detail work is complete, you can finally install the siding. Currently, the major fiber cement siding manufacturers do not have thick fiber cement trim boards available. I'm told this is a future possibility. As such you are forced to use wood trim or vinyl. Either material will do fine. To get long lasting results with wood trim, it is absolutely necessary that you backprime the wood BEFORE installation. Backpriming simply means that you must paint all surfaces, edges and ends of the wood before it is installed. It is actually preferable to paint it with two coats. When final cuts are made, these fresh cut ends need a coat of paint just before the wood is nailed into place.

Caulk & Flashing at Butt Joints

Because siding pieces only overlap one another 1 and 1/4 inch or so, butt joints (where two pieces of siding butt against one another) are highly susceptible to leaking. The manufacturers recommend that you caulk these butt joints. That is a good start. I urge you to cut small pieces of 30 # felt paper to act as a flashing. These strips of paper need to be two inches wide and two inches longer than the width of your siding material. As you nail the end of your first piece, slide a felt strip in place so it is up 1/4 inch from the bottom of the piece you are installing. One inch of the felt should be under the piece you are nailing. The remainder that is exposed will be covered by the abutting piece of siding.

Nails

Spend the extra money and use stainless steel nails. These nails are less prone to bending as you nail. Also, you never have to worry about rust!

Specific Installation Instructions

No matter who installs your fiber cement siding or panels, you MUST obtain and read the installation instructions. Each manufacturer has different ways to install their product. The process of reading the instructions may take only 1/2 hour!

If you hire a contractor to install the siding, make periodic visits to ensure that the job is being done right. Remember, the contractor can't see your house from his!!! Mistakes and leaks will not bother him.........

Column B185

Fiber Cement Products

Fiber Cement Products - Descriptions

I called all of the fiber cement siding manufacturers prior to writing this Builder Bulletin. Can you believe that I only received materials from two (FCP and James Hardie) of the companies? Human error was to blame no doubt. I am sure that you will have success when you call. The materials/samples I did receive are most likely VERY representative of what is out there. Let's start with the standard fiber cement siding.

Fiber Cement Siding

Both of the siding manufacturers make this product in a 5/16th inch thickness. The widths range from six inches all the way up to 12 inches. All pieces are 12 feet long. This allows you to recreate many different looks with respect to exposure. The only disadvantage in dealing with the larger widths (10 and 12") is that you often are not allowed to blind nail these products. I happen to like the blind nailing concept. It allows you to completely hide the nails. What a smooth, clean look you end up with!

As for patterns, you can get smooth, woodgrain, colonial smooth and colonial rough-sawn. Not all widths are available in all textures/patterns.

Some of the manufacturers offer their products pre-primed from the factory. You may find that this is an attractive option, especially if you are building during the wet/cold season.

Fiber Cement Panels

Do you know someone who has a newer Tudor style house? I'll bet they are having problems with rot in those pressed wood panels! Guess what? They can be replaced with fiber cement panels! How about T-111 panels? You know, those are the rough-sawn panels that have vertical channels every four or eight inches. These are also available in fiber cement. Stucco-look and simple smooth are also available. The panels are 5/16th inch thick. They come in four foot widths and in eight, nine and 10 foot lengths.

The panels are joined together using special vinyl trim pieces that are called for by the manufacturers. You CANNOT use aluminum trim! The alkaline chemical compounds in the fiber cement will eventually cause the aluminum to corrode. Don't be tempted to use aluminum!

If you are building a new home and want the Tudor look, then you MUST use the fiber cement panels. As long as you prepaint the panels and all of the wood trim pieces before assembly, you will have a virtual maintenance-free exterior!

Soffit Panels

These are basically identical to the siding panels. However, they are a tad thinner. The soffit material is 1/4 inch thick in most cases. It comes in either smooth or woodgrain texture. Soffit panels are available in eight foot lengths with 16, 24, 36 and 48 inch widths.

Cutting the Material

You have three choices. You can use a circular saw with a carbide blade, a guillotine cutter (similar to those used to cut vinyl tile) or a power shear. The power shear and guillotine are dust free. Carbide saber saw blades allow you to cut curves and circles.

Column B185

Cement Siding Manufacturers

Cement Siding Manufacturers

Cement siding is a most interesting product. It has been around for over 100 years, very much like cork flooring. It gained widespread acceptance as many row houses used it to resist "frost, fire & ants." Those claims are so true! I know of 15 houses within three miles that have it on the sides and roofs of the houses. What is mind-boggling is that the material has been in place since 1910 or so! The houses that have it as siding show no signs of blistering or peeling. If this isn't a reason for you to check out all the manufacturers listed below, then I don't know what is!

Based upon research materials sent to me just before writing this bulletin, one of the manufacturers clearly leads the pack in volume. That company is the James Hardie Building Products Company. Their U.S. capacity is approximately 900 million square feet of siding per year. Now mind you I didn't say that bigger is necessarily the best. That kind of production allows them to service demand.

I urge you to research all of the companies listed below. You will (hopefully!) find just what you are looking for. There is a very good chance that you will be able to readily obtain the product through a local lumber yard. Don't count on any of the home center stores... I doubt that they would stock or order it in. However, if you find that I am wrong on this point, don't hesitate to contact me.

  • Cemplank
  • CertainTeed
  • James Hardie Building Products

  • MaxiTile

  • Nichiha

Column B185

Fiber Cement Siding Accessories

Fiber Cement Siding Accessories

If you want to make sure that your fiber cement siding job is as maintenance free as possible then you MUST also call this company. They make specialized high quality vinyl trim pieces that compliment and fit cement siding, soffit pieces, and panels.

  • R. H. Tamlyn & Sons, Inc.

This company is an authorized manufacturer of vinyl trim pieces that fit James Hardie Fiber Cement Products. They have very nifty inside and outside corners, vinyl splicing H-channels, Z Flashings for panels, and very cool continuous soffit ventilation strips that couple with the fiber cement soffit panels.

NOTE: You must have the vinyl trim in place or you may VOID your siding warranty!

Column B185