Cast iron pipe is really easy to install. I have installed it myself on several recent jobs. You really only need two tools to install this fine material: a snap cutter and a small torque wrench. The snap cutter is an interesting tool. There are two types of cutters, both of which cut cast iron pipe by snapping it in two. The cutter has carbide cutting wheels that are attached in between the links of a chain. The wheels surround the pipe at the point where you want it cut. You apply pressure to the cutter with your arms and BINGO, the pipe snaps in two very cleanly.
Assembly of the pipe is even easier. The pipe and fittings are attached to one another by using rubber gaskets that slide over the ends of the pipe. The gaskets have small ridges on the inside to firmly grasp and seal the pipe. A large stainless steel band completes the installation. This clamp slides completely over the rubber gasket and squeezes it firmly against the pipe. When the clamps are installed properly and tightened according to the manufacturer's recommendations, the joints absolutely will not leak. Since the clamps are made of stainless steel, moisture, salt spray, etc. will not affect them.
Weight Considerations
Cast iron is a heavy material. It needs to be supported adequately so that it does not fall. Homeowners or non-professional plumbers who try to do their own installations often do not install adequate supports when installing drain piping. This is especially true of plastic PVC piping. They feel how light the pipe is and feel that they only need to support the weight of the pipe.This is where they make a mistake. What they fail to take into consideration is the weight of the pipe when it is filled with water! Drainage pipes can readily fill with water for two reasons: clogs or temporary filling due to large discharge amounts of water from multiple fixtures. I have seen a small 1 1/2 inch branch line from a kitchen sink completely fill with water when a standard double bowl sink was drained. Recently, I relocated my kitchen sink drain line. After the work was completed, I filled the sink bowls to flush the line of any small installation debris that may have found their way into the plumbing lines. Because I installed a cleanout which faced the ceiling, I was able to view the water as it rushed by. I was amazed to see the entire pipe fill with water as the plugs were pulled from both sinks.
You may choose to use this information to help you keep your drain lines clear. I do this once a week. I fill both sinks with water and pull the plugs! Flush a toilet or two at the same time if you wish to really clear your entire sewer line. If the plumbing system is sized correctly and you have no obstructions, you will not cause any harm to your system.
Many a homeowner backs away from soldering copper pipe. The torch, molten solder, leaks, high pressure, etc. cause one to hesitate. Heck, isn't that one reason why plumbers make so much money? Well, I'm a plumber and I'm here to tell you that with a little knowledge and one or two practice joints, you can successfully solder leak-free joints in copper tubing.Yes, the process is dangerous, you can cause fires, you can burn yourself (I have various deep scars from serious third degree burns), however, I can't recall reading a story in the paper about a homeowner who drowned from repairing a copper line. If you do fail, so what? Call the plumber to bail you out (figuratively speaking of course!)
The Basics
To solder copper pipe you must heat the copper pipe and the fitting to be soldered to a sufficient temperature. When the copper is hot enough, it will actually draw the solder into the joint by capillary attraction. Believe it or not, solder will actually flow uphill. A simple propane torch that uses screw-on bottles will adequately solder pipe up to 3/4 inch in diameter. Plumbers generally use acetylene torches for two reasons. The acetylene burns hotter than propane, allowing for faster solder times. The acetylene is available in larger tanks which attach to handy hoses and lightweight torches. If you want acetylene, you just need to go to a large plumbing supply house or a place that services welders.
Clean Pipe & Fittings
Solder, which is available in leaded and no-lead versions, attaches to the pipe on a molecular level. The surface of the soldered joint actually becomes an alloy where the copper and solder intermix. For this to happen, the copper must be very clean and free of oxidation. You can clean copper pipe in any number of ways. You can use coarse steel wool, sandpaper and/or a wire brush. Special round wire brushes come in a variety of sizes to clean the inside of copper fittings and valves. Simply twist the brushes or pipe to clean them. Even if you purchase new copper pipe, it too should be cleaned. You only need to brighten the area which is to receive solder.
Flux - The Catalyst
Flux is a chemical which helps you solder. It actually finishes up the cleaning job you started with the sandpaper and brushes. In addition, it prevents the pipe from oxidizing as you heat it. You can solder without flux, but it is really difficult! Flux is applied to both the pipe and the fitting with a handy miniature paint brush. You do not need massive amounts to be effective. Besides, once you start to heat the pipe, 90 percent of it boils off and evaporates.
Solder - Different Types - Beware!
Solder is available in three types: 50 percent lead/50 percent tin; 95 percent tin-antimony/5 percent lead; and lead-free solder.
Any water supply pipe should be soldered with solder that contains no more than five percent lead. If possible, use the lead-free solder. The 50 percent lead solder is used for copper drain lines. It melts at a lower temperature and is able to bridge larger gaps as it cools. This is handy when working with large diameter (up to 4 inch!) copper pipe and fittings.You MUST pay attention when you buy solder. The 1 pound rolls look very much alike. Carefully look at the label as you might purchase the wrong one.
Lighting & Working with a Torch
Plumbing torches can be lit with matches, lighters or preferably a flint striker. Matches and lighters can be dangerous, as you might not put them out. A flint striker makes sparks which ignite the flame. Plus, a single flint in a striker can last a homeowner 10 years or more!
Flame temperature is important. You need to set the flame on medium or high to generate enough heat to melt solder. If your flame is adjusted correctly, it will burn different shades of blue. You will notice at the center of the flame a darker blue section that comes to a point. This is the hottest part of the flame. You apply this part of the flame to the copper pipe.
Don't be afraid to heat both sides of the pipe. Rotate the torch around the joint for even heat distribution. When I use my acetylene torch and I am soldering 1/2 inch pipe, I can usually heat the pipe to the correct temperature in 10 seconds or less. A propane torch may take 15 to 20 seconds.
Always look beyond the pipe. Extremely hot temperatures are beyond the visible portions of the flame. You can easily scorch lumber or wires. If you are soldering near old lumber or in joist spaces near vertical walls, you can easily start your house on fire. Be careful and use flame shields. These are flame resistant fabrics or simple pieces of sheet metal which absorb and/or deflect the heat.
Applying Solder
As you heat the pipe and fitting you will see the flux begin to boil and evaporate. Once the flux stops boiling the pipe is generally hot enough to solder. Move the torch away and touch the solder to the pipe. It may take 2 to 3 seconds for the solder to melt. If the pipe is horizontal, apply the solder to the top of the pipe. The solder will roll around in an instant. If you have done the job right, a droplet of solder will be at the bottom of the joint. You can flick this molten solder away with an old rag. Blowing on the joint will allow it to cool. It will be hot, but rub the joint quickly with an old rag to remove flux residue. This will also polish the solder. Check the joint closely to see if you see a silver-colored band around the entire joint. If so, your first solder joint may be perfect. As I would say on a job: Another quality installation!
Common Causes of Soldering Leaks
Virtually every soldering leak is a result of "operator error" - that is, it can be traced to some fault on your part. Here is a list of some of the most common causes for failure. Most are easy to correct. Some will give you problems.
Insufficient Soldering Temperature
This is the most common problem. Rookies and homeowners apply the torch to the joint to be soldered. They follow immediately with the solder. Within 2 to 3 seconds the solder melts from the intense torch heat. However, the copper pipe and fitting have yet to reach the necessary temperature to allow the solder to be drawn deeply into the joint.
Insufficient or Stingy Use of Solder
Often leaks result because just one side of the joint was soldered or the solder was not left on the joint long enough. Try to look at all sides of the joint after soldering. If you do not see a thin silver line where the fitting meets the pipe, you may have a problem!
Flux Failure
The solder paste or flux that helps the solder flow in the joint can cause problems. First, if you have not thoroughly stirred it before use, you can have a problem. The chemicals in the flux can separate, especially in hot weather. Also, you can get the flux too hot and burn the joint.
Dirty Pipes - Hand Grease
You must already get the message that both the pipe and the fitting surfaces that are to accept solder must be perfectly clean. I have had problems where I touched a pipe surface with my hands before fluxing. The oil and grease from my hands fouled the pipe!
Water in the Lines
You can't solder copper pipe with water in the lines (unless you have a super powerful torch with a special tip.) The water acts as a heat sink. You can't get the pipe hot enough to melt the solder. A common problem is water that drains from above as you try to solder. Homeowners often can't trace the source. Well, you must open all valves to all fixtures and even flush the toilets! The best way I have found to evacuate the lines is to turn the main water valve off. Go to the top of the house and open all the faucets. Proceed to the basement opening valves on the way. Then open the lowest valve in the system. Had your plumber installed a boiler drain valve right next to the main water valve you could really do the job right! Just attach a hose to this and empty the water at a floor drain. This method allows you to get just about every bit of water from the lines.
Pressurizing the System too Early
If you have just one simple joint to solder, you can ruin it by turning on the water too quickly. You can actually blow air and water right through the hot, molten solder. I did this 20 years ago, I know!
It sometimes can take up to 20 or 30 seconds for a pipe to cool sufficiently. You can always cool it by pouring or spraying water on the pipe. Watch out for steam!
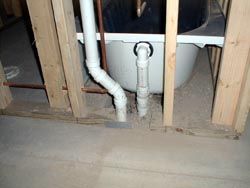
Here is a tub drain pipe and partial vent system. This is what the average bathtub drain and vent system looks like if you could remove the drywall or plaster from your walls. The plastic pipe connected to the tub is the overflow pipe. The chrome fitting up high on the inside of your tub is the overflow. Water enters it and flows down into the pipe. Just before the white pipe enters the gravel, you can see a tee fitting. Attached to it is a pipe that connects to the bottom of the tub drain outlet. The vertical pipe connected to the tub drops into a standard P-trap similar to one under any sink in your home. This trap connects to another tee fitting that is beneath the floor and is attached to the vent pipe that is passing through the notched wood floor plate.
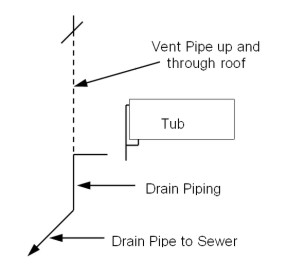
I have drawn an isometric drawing above to illustrate the actual piping connections in this situation. It should make sense to you.
Another Vent Pipe Photograph
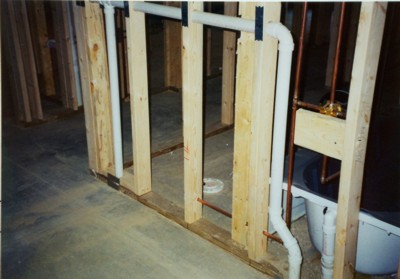
This photo is a continuation of the tub drain from the previous photo. In the isometric diagram above, I showed you - using the dashed line - the vent pipe that extends up straight to the roof. In reality, they rarely do this. Vent pipes can have all sorts of twists and bends in them as they travel from a fixture up to the roof. In fact, they can connect with other fixture vent pipes. This is why you might only see one or two vent pipes on a roof when the house below might have 10 or 15 separate plumbing fixtures.
In this photo, you can see how the vent pipe from the tub travels vertically up about four feet off the floor. It then travels horizontally until it intersects the vent pipe that services the toilet. You can clearly see the toilet flange on the concrete floor inside the bath area. The vents then travel horizontally a short distance and then start to go up once more towards the roof. They have a long way to go as this is a two story house and this bathroom is in the basement.
Whenever a vent pipe travels horizontally it needs to have fall so that condensate or rain water drains down the vent towards the fixture. You never want water to lay in the vent pipe as this water could block air that is trying to get to the fixture each time bath or sink water flows down the drain pipe.
You can also see that the vent pipe is protected from nail or screws with metal protection plates. These are a must as the wood framing is very thin after the holes have been drilled to accept the piping. It is a superb idea to take photos of the walls after all pipes, wires, etc. have been installed. Imagine how helpful photos such as these would be if you were remodeling or getting ready to drive a random nail in a wall. You would know what is behind the drywall!
I don't believe the average person realizes the dynamics of the plumbing drainage system in their home. After all, the water flows out of the sink and disappears. As long as this happens each time, who really cares what is going on?
But I have come to believe that knowledge is power. The more you know the better you are equipped to handle problems. This holds true with many things in residential construction, including plumbing drain and vent systems.
Sanitation is the Goal
If you study the history of plumbing, or visit a third world country, you quickly begin to appreciate the advancements of modern plumbing. Turn the clocks or calendars back just 125 years ago and you discover that plumbers were treated with as much respect and reverence as doctors. The medical profession connected the dots after the Civil War and learned that the spread of many common diseases was linked to poor sanitation.
Doctors discovered that bacteria in plumbing systems could easily spread in a household if waste and contaminated water was not disposed of properly. A simple open pipe in a sink proved to be inferior. It allowed vermin as well as noxious fumes to enter the house through the pipe. It didn't take long for the simple plumbing trap to be invented. The water seal in the trap stopped small vermin and blocked fumes from entering the living space.
Before long, plumbers learned what happens when water flows down a pipe. They discovered that the water that flows into a pipe displaces and removes air from the pipe. They learned that flowing water can actually create a powerful vacuum. Vacuums are a bad thing in plumbing systems as they can remove water from traps. Shortly thereafter, plumbers determined that pipes must be connected to the system that allows air from the atmosphere to enter the piping system. This air stopped vacuums and helped to improve sanitation within a home.
Venting Tips
Plumbing vent pipes are not much different than the drainage pipes. They typically are smaller than the drainage pipes for several reasons. First, they are designed to transport air. Air can be compressed and the quantity of air traveling in a vent pipe can be increased by simply boosting its velocity. Since water drains through a vent system by gravity, you generally can't increase its velocity. But a powerful vacuum within a drainage system that is created by a large volume of water can increase the velocity of the air entering the vent pipes.
It is not uncommon for all of the drainage pipes in your house to eventually join together and leave the house through a single pipe. Venting systems can be designed to do the same thing in reverse. I have plumbed many a house that had over ten fixtures that were served by a single 3 inch vent pipe that poked through the roof.
Awesome Books
If you want to learn more about plumbing vent systems, you should get a few books on the subject. One of my favorites is a book titled Plumbing a House written by Peter Hemp. Peter has included some wonderful 3D diagrams and superb diagrams of all sorts of drain and vent combinations. This book is worth three times the purchase price.
Keep in mind that you must always follow the plumbing code. It is in place to protect you and your family. Be sure to read up on the subject and practice working with pipe materials before you started plumbing in earnest.
Steaming hot water as soon as you turn on a shower valve is a great feeling on a cold morning. The same is true at your kitchen sink or any other plumbing fixture. As our lives become more fast paced, we don't want to wait for anything. Instant gratification is unfortunately becoming the norm.
The installation of a hot water recirculating loop system will allow you to have hot water at your fixtures. Those people who have their heaters below the piping system get the recirculating work done for free Those who live in slab houses or who have hot water lines below the heater must use inexpensive in-line recirculating pumps. The point is that you do not have to wait for hot water.
New Construction vs. Existing
If you are building a new home or rehabilitating one, now is the time to put in a recirculating loop! You will have no trouble installing the return loop lines and insulating all of the necessary pipes.
If your house is an existing two story house, it can be tough to get a return loop pipe up close to the second floor or higher bathrooms.
It is also virtually impossible to properly insulate all of the hot water supply pipes.
Existing ranch style houses that have a great majority of the plumbing pipes exposed in the basement are the best candidates for retrofitting. These houses allow you to insulate all but just a few feet of hot water supply lines. They also permit you to install a return loop close to each hot water fixture.
Retro-fit Recirculating Pump Manufacturers and Tips Sean Dougherty, an individual who works for The MWW Group, a public relations firm, was kind enough to develop this cool comparison of retrofit hot water recirculating pumps:
www.metlund.com Metlund's product, the D'MAND, requires the pump and valve to operate together under the sink, which creates a secondary requirement for electricity under the sink where there is not usually an outlet. In addition, it requires the user to activate it to call for water - in residential applications this will typically be a pushbutton. Therefore, the system saves the water and energy but doesn't provide instant hot water. At Grundfos, we don't spend a lot of time talking about cost savings with this product because we recognize that with water costs strictly regulated, the dollars returned from the water savings are modest. We do stress the comfort (hence the name) because that is the main sales feature of this type of product
www.lainginc.com/instant.htm Laing's Autocirc product uses a similar concept to the Grundfos Comfort Instant Hot Water System but without the timer - creating a recirculation loop using existing hot and cold water pipes. Instead of using the thermally activated valve, Laing's pump turns on automatically whenever the hot water supply line water cools and replaces that water with hot water. Of course, this 24-hour operation means more electricity use and more heat constantly in the pipes. Absent excellent insulation, this will drive up cost of operation. In addition, the pump is positioned under the sink, not in the boiler room, increasing the odds that electrical work will be necessary in addition to the plumbing.
www.grundfos.com Here is the one. It is Tim Carter, me talking now. The water circulation system that eliminates cold water runoff at the faucet, using a bypass valve and pump with a timer to control water flow. (You can find the nearest distributor at the Grundfos USA web site.) No return line is needed. The bypass valve has a thermostat that senses when hot water has reached the farthest plumbing fixture. The timer on the pump allows you to control when hot water is at the fixtures you need it to be at and when! This is the real deal. I highly urge you to give the Grundfos Comfort Series Pump a serious look.
Do I leave the valves open or closed when you solder them in the line?
David Griebel
- - -
Hi Dave,
It depends upon the type of valve! If you are soldering a traditional valve that has a rubber or plastic washer, then you open it. It you are soldering a ball valve, you keep it closed.
Once the solder is set, you should try to slowly cool the valve body to stop the heat transfer towards the actual washer and ball.
Your septic system can last over 200 years if sized correctly and maintained on a regular basis. This number was determined by experts at Colorado State University. Here are some important points that will help you get 200 years or more from your septic system.
Do not pour any harmful chemicals, toxic substances, anti-bacterial soap, solvents, etc. into your septic system. These things simply kill the bacteria!
Don't send ANY solid articles into the septic tank that will displace water! This means cat litter, sanitary napkins, cigarette filters, sand, lots of dirt, etc.
Minimize or eliminate the introduction of cooking grease or oils that go down your drains. Pour these into a glass jar and dispose of with your normal trash.
Space out your water usage. Do different tasks on different days. Introduction of vast amounts of water into the septic tank moves the solid waste particles into the drainfield pre-maturely!
Keep a good stand of vegetation over the drainfield. The roots of the plants help to aerate the soil.
Never compact the soil on top of the drain field.
Pipe all surface water and roof downspout water away from the drainfield. Flooded drainfields can lead to massive pollution problems.
Absolutely have your system inspected by a qualified septic service company. Watch how they measure for sludge.
Keep accurate records of your septic service. Note the length of time between service intervals and how much sludge was removed from the tank.
If you know where your septic tank and drain field lies, map it! Keep this drawing in a safe place and use it as a tool to keep your drainfield in tip-top shape. The map will allow you to keep heavy trucks, downspout drainage, etc. away from your drainfield.
Author's Note: We've received other questions with similar problems or questions. Here's one from Howard Stein of Oklahoma City, OK, regarding his home septic system.
"We have ten inches of snow and the temperature is near zero Fahrenheit. It will stay like this for several days. Is it safe to use our washing machine (doing regular laundry) in this frigid weather since we have a septic tank and fear that the "arms" cannot properly dispose of large volumes of water into the ground? Many thanks for your help."
Howard, typically in most septic systems, the tank and drainage fields are located well below the frost line.
I know you are going to hate me, but at this point in time, there appears to be only one company that makes a garbage disposal specifically for septic systems. I surmise that engineers at other companies are already developing similar machines that will not violate the patent rights of the company that introduced this new and exciting product.
The septic disposal is made by In-Sink-Erator, Emerson Electric Co.. They are the world's leading disposal manufacturer - in fact, the founder of the company, John Hammes, developed the first garbage disposal in his basement in 1927 using a tin snips and soldering iron. He invested 10 years of his time refining the disposal concept and decided to formally launch the business in 1937. During his first year in business, he sold a total of 52 hand made disposals. That is a whopping 1 disposal per week! This story reminds me of how a giant oak tree begins from a tiny acorn!
I have been a licensed master plumber for nearly 10 years. Before that time and during the past ten years, I have installed hundreds of In-Sink-Erator regular disposals. They truly make a fine product. I have never had to perform a service call due to a defective motor, grinders, etc. The only problem I ever had was when a helper forgot to remove the drain inlet plug for the dishwasher drain tube. Of course, this was an operator error, not a problem with the actual disposal!
The new septic disposal comes with a powerful 1/2 Hp induction motor that rotates the grinding disc at 1,725 rpm. As with all In-Sink-Erator products, they simply twist into place on the easy-to-install sink strainer. The grind chamber is corrosion proof and the actual grinders are stainless steel.
The unique Bio-Charge cartridge that contains the beneficial bacteria snaps easily into place on the side of the disposal. Once in place, the disposal automatically injects the proper amount of enzymes with each load of food that is ground up. A refill bottle of Bio-Charge will retail for approximately $8.95. The disposal retails for $179 in most major markets in America. You should be able to find the disposal at all major home center stores and any plumbing supply house that carries In-Sink-Erator disposals.
Tens of millions of people utilize septic systems to take care of sanitation needs on their property. It is no wonder that different additive companies target this market in an effort to push/sell products. Some of the additives are safe and cause no harm to the bacteria within the tank. Some additives destroy the bacteria.
The State of Washington took a leadership role regarding this topic. In 1993, the State Legislature found that "... most additives do not have a positive effect on the operation of on-site systems, and can contaminate groundwater aquifers, render septic drainfields dysfunctional, and result in costly repairs to homeowners ..." To make a long story short, the State of Washington's Department of Health started to study additives. They determined which ones were safe for septic systems with the intention of protecting consumers. Those additives that were approved are NOT warranted by the State of Washington to work. The approval simply means that the additive will not HARM the bacteria within the tank. For that reason alone, the results of their work are significant. At least you know the safe ones to buy. You then have to judge on your own if they work.
If you want the most updated list of additives that they deem to be safe, call, write or visit their web site:
Washington State Department of Health - Community Environmental Health Program P. O. Box 47826 Olympia, Washington 98504-7826 www.doh.wa.gov
The most recently approved "safe" septic system additives, as of January, 2007, are as follows:
Aquaterra GHSD-1 and LS-1472 Aquaterra Biochemical Corporation
Bio Blast Dr. Ricketts Nutritionals
Biocharge In-sink-erator Division Emerson Electric Company
Bi-Chem SM700 Novozymes Biologicals Inc.
Bio Choice ES Osprey Biotechnics
Bio-Clean Kinzie & Payne Biochemical Corporation
Bio-Green Delta Bioproducts International
Bio Kleer S Bio Aqua Enterprises Inc.
Bio-Jet-7 Jet Inc.
Bio-One One Biotechnology
Bio Rooter Drain Maintainer Western Drain Supply
Break-Thru Septic Tank & Cesspool Maintenance Hercules Chemical Company
Break-thru Septic Tank & Cesspool Restorer Hercules Chemical Company
Rid -X Septic System Treatment Reckitt Benckiser Inc.
Drain Care-Septic Tank Treatment Enforcer Products Inc.
Drain Out Enzyme Septic Treatment Iron Out Inc.
Drain Care Liquid Septic Tank Treatment Enforcer Products Inc.
Drano Plumbing System Buildup Remover S C Johnson & Son Inc.
DWT 360 Septic Tank Maintainer / WT 360 Waste Degrader Tri-Synergy Inc.
Instant Power Septic System Treatment Scotch Corp.
Liquid Alive Dymon Inc.
L.E.A.D. Enzyme Digestant Formula Corp.
Liquid Live Formula Corp.
Liquid Plumr Septic System Treatment Clorox Co.
Microbe Lift Ecological Laboratories
Microbe-Lift Septic Tank Powder Packets Ecological Laboratories Inc.
Microbe-Lift/ST Septic Digestant Ecological Laboratories Inc.
Plumb-Clean Kinzie & Payne Biochemical Corp.
Pro-Pump Cold Weather Powdered Digestant Ecological Laboratories Inc.
Pro-Pump Powdered Digestant for Septic Tank and Leachfields Ecological Laboratories Inc.
Pro-pump Septic Digestant Ecological Laboratories Inc.
Push Betco Corporation
Rid-X Professional Septic System Treatment + Drain Maintainer Reckitt Benckiser Inc.
Roebic K-37 Septic Tank Treatment Roebic Laboratories Inc.
Roebic K-47 Roebic Laboratories Inc.
Roebic K-57 Roebic Laboratories Inc.
Roebic K-87 Soap Digester FMP Soap Degrader Roebic Laboratories Inc.
Roebic K-97 Mainline Cleaner Roebic Laboratories Inc.
Roebic Liquid Grease Degrader Grease Trap Treatment Roebic Laboratories Inc.
Roto-Rooter Septic & Cesspool System Treatment (Dry) Changing Paradigms
Roto-Rooter Septic & Cesspool System Treatment (Liquid) Changing Paradigms
Roto-Rooter Treatment for Septic Tanks and Cesspools Roto-Rooter Corp.
Sea-Zyme Septic Tank Digester 2000 Century Products
Septic Helper 2000 Shar Lane Distributing Co.
Septic-Scrub Drainfield Flow Restorer Arcan Enterprises, Inc.
Septic Tank Aids Heartland Labs Division of A&V, Inc.
Septonic Septic Tank Additive AHT Field & Co.
Shactivate Sewage Digester Shar Environmental Products Inc.
Sludgehammer Blend Pirana ABG Inc.
Super Pack Bacteria Septiclear Inc.
Ultra Green 3 Enzyme Cleaner Iron Out Inc.
Author's Note: We've received other questions with similar problems or questions. Here's one from Howard Stein of Oklahoma City, OK, regarding his home septic system.
"We have ten inches of snow and the temperature is near zero Fahrenheit. It will stay like this for several days. Is it safe to use our washing machine (doing regular laundry) in this frigid weather since we have a septic tank and fear that the "arms" cannot properly dispose of large volumes of water into the ground? Many thanks for your help."
Howard, typically in most septic systems, the tank and drainage fields are located well below the frost line.