USG Corporation Drywall Book

gypsum construction handbook

This is the Bible of hanging and finishing drywall. I recommend you buy this and read the section on drywall. CLICK THE IMAGE to have a copy delivered to your home.

USG Corporation Drywall Book - Inexpensive and Remarkable

The Gypsum Construction Handbook is a plaster and drywall book by USG Corporation. It's is loaded with numerous photographs and diagrams. I highly recommend that you read it if you want to learn more about drywall. The name of the book is:

The United States Gypsum Corporation also has lots of great installation guides.

CLICK HERE and use their search engine to locate what you need.

Column B19

Secret of Chalk Resistant Paint

Secret to Selecting a Chalk Resistant Paint

Paint chalk is nothing more than broken down resin and pigment. A film of paint is basically like a very thick double decker sandwich (resin - pigment- resin - pigment - resin - pigment.......). A freshly painted surface has resin at the surface. You can prove this easily. After the paint dries, rub your finger across it. You will not have any pigment on your finger, it will be clean. However, do this same thing to a painted surface that has weathered outside for several years. Generally, you will get a film of pigment on your finger. The industry calls this chalk. The protective resin has broken down and left the pigment exposed. Thus, the key to chalk resistant paints is to purchase one that has quality resins and a high content of these resins. Since we already know that the resins are one of the most expensive ingredients in paint, you will probably pay a higher price for a chalk resistant paint. Beware of inexpensive paints and the claims they make!

To select a chalk resistant paint, you will need some very basic math skills. Most paint manufacturers list the contents of the paint on the side of each can. The contents are generally shown as two categories: PIGMENTS & VEHICLE. They are generally expressed as a percentage of the total volume. These categories are usually broken down again. The PIGMENTS will list various compounds which make up the pigments. The VEHICLE will list the amount of resin, any additives, and amount of solvent. Your mission is actually quite simple. To begin with, look for a paint that has a high vehicle percentage. Then, look to see if the resins comprise approximately 30 -35% of the total of the VEHICLE. If both of these values are high, you will be selecting a paint that has a very high total resin content. That is the secret.

Remember, the resin in the paint holds everything together. A high quality resin will resist breakdown. Also, the higher the ratio is between resin to pigment means that the pigment particles will be surrounded by that much more resin. This will make it harder for the pigment to get to the surface, where it appears as 'chalk'.

Column B13

Paint Characteristics

Chalk Resistant Paint Characteristics

Many people take paint for granted. They feel that it is a simple product which requires little understanding or training to work with. This is a misconception. Paints are highly sophisticated products. There are many, many different types all with specific formulations. Most paint manufacturers have chemists with PhD's that constantly work with the ingredients of paint in an effort to improve them. The chemistry of paint is not as simple as you or I might think. In fact, some paint formulas are highly guarded secrets.

The paints that you or I use on our houses naturally breakdown. The sun, water, chemicals found in rain water, etc. can cause paint to deteriorate. It is a natural process, as many objects exposed to the elements naturally deteriorate. Because of this, it becomes a challenge to locate, purchase and apply a paint which will not readily breakdown. In order to accomplish this, I feel it would be beneficial for you to understand what characteristics make paint long lasting and chalk resistant.

Most paints are made up of three primary ingredients. These ingredients are pigments, resins, and vehicle. Some individuals prefer to express the vehicle as a combination of two ingredients, solvents and additives.

The pigments are the ingredients which give paint its hiding ability. They also give it its color. A paint without pigment would be very similar to varnish or urethane, basically it would be clear. Pigments can also help to block the corrosive effects of liquids or vapors. They can also be formulated to minimize the effects of ultraviolet radiation (the sun's rays).

Resins for the most part are the most important ingredient of paint. These materials give the paint its ability to 'stick or adhere' to things. The resins also surround the pigments and enable them to stick together as well. Remember, for the most part, resins are formulated to be clear, so you can't really see them. That is why they can surround the pigment and give a uniform color or appearance when dry. The resins can be formulated from many different compounds. Oil based paints have alkyd resins. Latex paints have acrylic resins. Epoxy paints have epoxy resins. So, as you can see, there are different resins, all with different levels of quality. For the most part, resins are the most expensive ingredient in paint. So, if you were a paint manufacturer and you wanted to make more money, what would be the first ingredient that you would try to minimize??? Are you starting to get the picture?

The vehicle is that part of the paint which enables it to be a liquid. If paints didn't have vehicle, they would be solid chunks in the paint can. How would you apply them? Paint manufacturers figured this out a long time ago. They knew that they wouldn't sell much paint if people couldn't use them. For the most part, the vehicle in paint evaporates shortly after you apply paint. This part of the vehicle is called a solvent. The solids (pigments, resins, additives) are left behind on the object you painted. Different paints have different solvents. Oil based paints usually have mineral spirits or turpentine as their solvent. Latex paints consider water as their solvent. Some paints have alcohol as a solvent. The solvents in most oil based paints are considered to be volatile organic compounds (hydro-carbons). These compounds cause air pollution when they evaporate. In liquid form (paint thinner or mineral spirits) they can pollute soil or water. Some states limit the use of these compounds in paint. In the future, it may be almost impossible to purchase 'oil' based paints. Paint manufacturers are responding to this challenge. They are attempting to formulate latex or acrylic paints that have the same durability as oil paints.

Related Articles:  Tips, Chalk Resistant Paint, Peeling Paint

Column B13

Painting Technique – Backpriming

Painting Technique - Backpriming / Sources of Water & Water Vapor

Water is a very interesting compound. It is a basic necessity for life, yet it can be one of the most destructive forces that we encounter as homeowners. Water can shorten the lifespan of many building materials and finishes. Paint is very susceptible to damage caused by water and water vapor. Water vapor can cause a paint job to fail in as little as a week. Homeowners who have had encounters with water's destructive force quickly gain respect for it.

Backpriming is a simple painting technique which is frequently eliminated during the construction process. Because backpriming of exterior wood siding and trim can only be performed before wood products are installed, homeowners and builders should give serious consideration to this very helpful step in the painting process.

Backpriming involves the process of coating all surfaces of a piece of wood with paint or any other coating which will inhibit water or water vapor from soaking into the wood. Backpriming requires the use of slightly more paint and a little additional labor. However, the money invested in this process will pay huge dividends as long as the wood is in place. The paint or other coating which is applied to the 'back' side of the wood and other hidden edges will, for the most part, last indefinitely. Backpriming will significantly extend the performance of the initial and all subsequent paint jobs.

Paint is a coating which 'sticks' to wood or other surfaces which are painted. However, water vapor pressure can easily cause paint to lose its grip on wood. Water vapor pressure develops because of evaporation. Water, which enters wood through any number of ways, naturally wants to evaporate or turn into water vapor. You see this happen virtually every day. Laundry dries, water evaporates from your driveway, soil, hair, etc.

The evaporation process, if inhibited, causes pressure to build. Eventually the pressure becomes great enough to overcome the adhesive properties of the paint film. Bingo, you have a blister or an area which peels and flakes. The water or water vapor which causes this to happen can originate from various sources. Several are as follows:

Bath & Kitchen Exhaust Fans

These fans have the ability to concentrate and discharge massive quantities of water vapor. Cooking and bathing activities generate large amounts of water vapor, especially if the water is warm or hot. The ductwork which connects the fan to the outside discharge point can be a problem area. If this ductwork is loosely fit, moist air can escape into a wall or ceiling cavity. This water vapor, in its attempt to escape into the atmosphere, quite possibly will encounter a piece of painted wood. If the wood is not backprimed, you will have a problem.

Clothes Dryer Vents

Clothes dryers also produce large amounts of water vapor. This water vapor must not be allowed to vent inside of a house or attic area. The dryer vent must be a sealed ductwork connection straight from the dryer to the outside of your house. Also, attempt to locate the dryer discharge vent in such a way that the exhaust air can get away from your house as quickly as possible. Avoid putting these vents in attics in cold climates. The smallest leak in the ductwork can cause tremendous condensation problems.

Air Conditioner Condensate

Air conditioners, through the cooling process, extract water vapor from the air. This water then drains from the air conditioning unit. Window air conditioners are the biggest problem. The water can drip onto wood siding or windowsills. This water can find its way into a crack or bare spot and then soak into the wood. Eventually large areas of paint are peeling or blistering. Try to pipe this water away from painted surfaces.

Interior Humidifiers

Houses which have humidifiers attached to their heating systems can have serious paint peeling problems. If the humidifier is set too high, the water vapor which is in the air inside of the house can find its way outside. If you have wood siding, the water vapor may condense back to a liquid on the back side of the wood. If the wood hasn't been painted, the water will soak into the wood and come out on the other side, just beneath your paint. Set the humidifier so that just enough moisture is in the air which makes you feel comfortable.

Crawl Spaces

Crawl spaces which are unvented or lack vapor barriers can be problem areas. Water constantly is evaporating from the soil beneath your living space. That water vapor wants to get into the air outside of your house. It will push the paint off your house if it gets in the way. Install a good vapor barrier (minimum 6 mil plastic) over the soil in the crawl space. Make sure that there are vents in the foundation to let moist air out before it gets to any painted wood.

Surface Water

Surface water is any water which hits the outside of your house. Some you can control and some you can't. For example, it is next to impossible to stop rain from hitting your house. However, you can control or adjust lawn sprinklers, hoses, etc. from spraying water onto your painted surfaces. If there is the slightest break in the paint film, water will find its way into the wood. If enough water gets into the wood, peeling and blistering will result.

Column B30

Paint Before Installing – Backpriming

Backpriming Tips

Backpriming is really easy to do. It just require a little more paint and some space to stack the wood pieces while they dry. The effort which you invest will be worth it, trust me.

I have found that applying the paint with a paint roller works extremely well. I usually set up a painting table on sawhorses. The table can be made from scrap pieces of wood or pieces of plywood. It can simply be a long (16 foot) 2 x 12. You want something rigid, because the pieces of wood which you will paint are flimsy. Simply place the wood siding or trim piece on the table and roll the back side first. Just after painting this, paint all the edges. The only remaining area left to be painted should be the finished side which will show after the siding or trim is installed. Pick up the piece of wood and lay it somewhere to dry or lean it against the exterior of the house. If you use a quick drying latex primer it can often dry in as little as an hour. Consider using latex surgical gloves, as you will be getting paint on your hands.

The next step is to paint the unfinished side. Do this in the same manner as the first, however add one final step. Roller textures are fine for inside house walls. However, if you are using smooth siding and trim, brush texture looks better. I apply the paint with a roller and then glide a brush over the paint to make it look as if it was applied with a brush. It's quick and easy. Make sure you leave the brush in the paint can or roller pan when you are not using it. The primer will dry on the brush and cause problems.

Consider applying the second finish coat of paint before the wood is installed. This will eliminate ladders and scaffolding from being set twice or three times by the painters. This should save some money.

Also, don't forget to paint the ends of the wood. This is where 'end grain' is visible. These ends must be painted. This is where water can most easily enter wood!!! The carpenters who install the wood must be instructed to paint each edge in the event that they cut a piece of siding or trim. They will probably cut every piece! This effort is a must. The carpenters will grumble, but explain to them the importance of this very critical step.

Always make sure that you use the correct primer. Do not use top coat or finish coat paint as a primer!!!!! Primers are formulated to be more sticky. They will adhere better to unpainted wood, and finish coats will adhere better to primers. If you are not sure, ask the paint supplier. Ask for bulletins or manuals to read. The paint companies want you to use the right products. They don't want the paint to peel either! They want you to buy their paint in the future. Ask them for help and advice.

Column B30

Fiberglass Door Manufacturers

I have had the pleasure to visit two great companies both of whom make awesome fiberglass exterior doors. It is an amazing experience to be able to walk through a manufacturing plant and see each step of how a door is made. The machinery and the processes are astounding.

To cut to the chase there are two major players in the fiberglass door market:

    • Therma-Tru
    • Stanley

There are other players, but these doors - and especially those made by Therma-Tru - are the the only ones I would consider for my own home.

Therma-Tru has been making fiberglass doors for nearly 20 years. They have perfected the process and refuse to cheapen their door. They are constantly fighting off cheap knock-offs of their styles and patterns, but these cheap impostors made overseas are no match for the real deal made right here in Ohio!

Their Own Stain

Therma-Tru also has developed their own proprietary stain system for their doors. Years ago the original stains were just ones made by traditional paint and stain companies and they did not hold up very well. So Therma-Tru decided to make their own. You can really tell the difference. Their stains are long-lasting and if you simply maintain the clear coat, you rarely have to restain the outside of your door.


Here are some other fiberglass door manufacturers. I have not used their products and cannot vouch for their quality.

  • Beveled Glass Designs
  • Hayfield Windows and Doors
  • Jeld Wen
  • Kaylien Doors
  • Kolbe & Kolbe Millwork
  • Masonite Intl. Corp
  • Peachtree Doors and Windows
  • Pella Corporation
  • Plastpro
  • Precision Entry
  • Target Windows & Doors
  • Taylor Building Products
  • Trinity Glass International

Related Articles: fiberglass door makers, entry doors, fiberglass doors

Column B533

Door Hanging Instructions with Photos

Step By Step Door Hanging Instructions

Here is a very quick tutorial on some of the major steps you must undertake when hanging an interior door. It isn't that hard. The best thing you can do to help is to make sure the rough opening is square, plumb and in the same plane! If the rough frame is twisted, you will definitely have problems hanging and trimming the door.


Before you start, make sure the rough opening is slightly bigger than the overall width/height of the door in its frame. I like to have a minimum of 3/8 inch extra. Use a level and check the floor to see if it is out of level from side to side. If it is out of level, you must cut off the bottom of one of the jamb legs to insure that the door frame will be plumb. If you don't cut off a leg, you will end up with a gap at the top or one leg will lift off the floor.
 
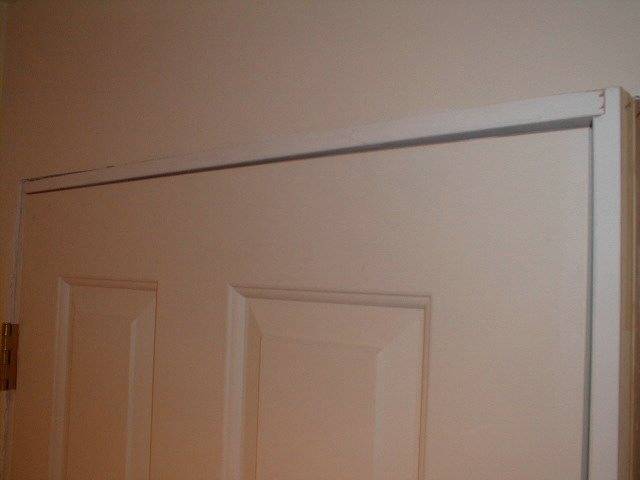
This is what happens if you don't adjust the jamb legs in case the floor is out of level. Note the huge gap along the top of the door on the right side of the photo. The hinge jamb is plumb in this photo and both jamb legs are touching the floor. I must cut off the right side jamb in this photo. You cut off the difference between the gap at the left and the right gap. In this case, I had to cut 1/4 inch off the bottom of the right jamb.
 
You don't need a helper to hang a door. I always secure the hinge jamb first to the rough opening. After I have made sure it is plumb and before I drive the first nail, I open the door and slide a few shims under the far end of the open door to keep the door from tipping out of the opening. Once open like this, the door and frame are highly stable. To test the door operation, drive one nail in on the other side of the door stop opposite the top hinge. Be sure you leave enough of the nail exposed so you can pull it out if necessary. Do the same opposite the bottom hinge and carefully close the door to check the backside gaps. The door MUST be attached to the rough frame at or behind the hinges for the best results. Do this after you check the gaps.
 
Shims are used to fill the gap between the door frame and the rough opening. You should always use two shims at the same time. They must be inserted so that the thin end of one is overlapping the thick end of the other shim. Adjust them both to close the gap. Be sure no drywall overhangs the rough opening. It will create a false gap reading. As you nail the frame tight, it will compress the drywall and the gap will be bigger than you desired.
 
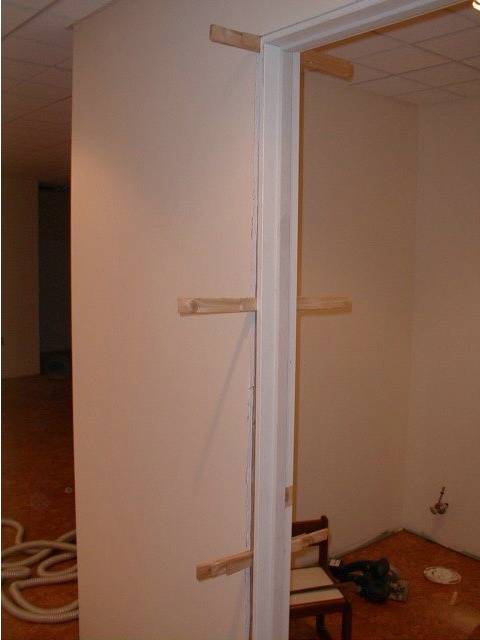
The lockset side of the door must be shimmed in at least four locations. You can see the top three in this photo. The hinge side needs to have shims at each hinge if there is a gap at these locations. I always try to frame the rough opening of doors in such a way that the hinge side is always perfectly plumb. If you can attach a door to the hinge side without shims, it is ideal.
 
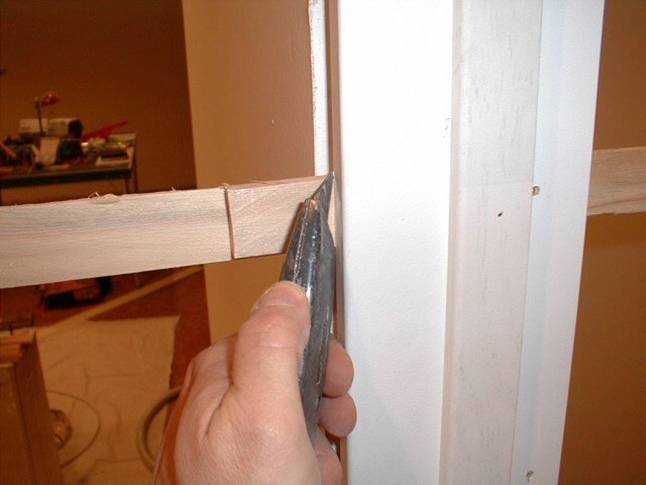
Once the door has been nailed in all locations and you are delighted with the fit, it is time to cut off the excess shims. It is important to use a sharp razor knife and to angle the blade in slightly as shown so that no part of the shims extends beyond the face of the door jamb. If this happens, the door casing will not fit tight against the door frame. Cut slowly and carefully because razor knives can cut to the bone. The voice of experience talking!

Column B375

Door Hanging Tips

Are you ready for a challenge? Well hanging an interior door is definitely a job that will test your rookie carpentry skills to the max. It is not too hard to hang a pre-hung door, but it can indeed be frustrating if you don't do things in a certain order.

Minimal Tools & Materials

You surely don't need many tools to hang a door. I use just a hammer, razor knife with new blade, nail sets, several levels (a 2 and 4 foot model), a framing square, a saw and a step stool or small ladder. The materials are simple as well. You will need a bundle of shims and a pound of 8 penny finish nails.

A Good Rough Carpenter

Let's hope that the door opening was built by a good rough carpenter. Do you want to be a superb rough carpenter? If so, work as a finish carpenter for six months first. You will see all of the nightmares that happen when rough carpenters cut corners.

If you want your door hanging job to start off smoothly it is imperative that the rough opening is:

  • The right size
  • Square
  • Plumb
  • In the same plane

Just how do you size a door rough opening? For interior doors I add two and one quarter inches to the width of the actual door and 2 and one half inches to the actual height of the door. Example: If you are going to install a 2' 8" door that is a standard height of 6' 8", then the rough opening should be: 34 and 1/4 inches wide and 82 and 1/2 inches high.

Check the Door First

The quality of many pre-hung doors coming out of the factories is fine but the workmanship of the people who hang them in the factories leaves a lot to be desired. The mortised or recessed areas they are creating for the hinges simply are not deep enough in many cases. The hinges are sometimes tilted and they don't fit well. If this happens it will cause the gapping of the door to be off and the door in some instances can bind.

The hinges should be perfectly flush with either the edge of the door or the surface of the door jamb. If for some reason the hinge mortise is too deep, you can fix that by unscrewing it and sliding a thin wood shim or stiff piece of thin cardboard behind the hinge.

Stripped Screws

I have also found that the factory workers sometimes strip the screws that hold the hinges in place. Use a hand screwdriver to see how tight the screws are. If you can turn them when they are already in all the way, the hole is stripped. Fix this by removing the screw and glue into the hole a small round peg of scrap wood. You can make a quick one with a razor knife. A golf tee also works well sometimes.

Lockset Hole

If you order your door from a traditional lumberyard you may be able to specify the backset of the door knob. This is the centerline distance of the lockset with respect to the edge of the door. Commonly it is 2 and 3/8 inches for interior doors. I prefer to use a backset of 2 and 3/4 inches. The locksets you buy often have adjustable latches that will work for this deeper backset. The deeper backset prevents rubbing your knuckles up against the door stop when opening or closing the door. If you have big hands, you know this is a problem!

Patience

Be sure you are calm before you start to hang your first door. Don't expect perfection the first time. It is important to screw the door jamb to the rough frame for long term performance.

Column B375

Mirrored Doors Sizes, Specifications & Tips

Mirrored Doors: Five Must-Do Installation Tips

Installing any door can be a chore. Some are definitely more difficult than others. Sliding mirrored doors are more forgiving than bi-fold doors. The sliders don't actually meet one another since they are in different planes. One of them can be cockeyed and the other door will mask it. You don't have this luxury with a bi-fold door. The gaps between the doors and the jambs need to be consistent for the doors to look smart once you are finished with the job.

1. Check for Plumb

Door openings can be out of plumb in two directions. Each jamb should be plumb if possible and the opening should be plumb front to back. The top and bottom tracks for sliders allow you to adjust for the front to back plumb. Plumb is important. The side and top jambs need to be square to one another for the mirrored doors to operate smoothly. The doors come with fancy and innovative adjustment screws on the top rollers to accommodate out of square and out of plumb conditions, but they do have limitations.

2. Measure Carefully

The tracks for the doors usually have to be cut. You will only get one chance to do this so make sure you measure and mark accurately. If you have a scrap piece of trim, use it as a template. Measure the opening, transfer this measurement to the wood, cut it and see if it fits perfectly. If it does, use it to mark the track.

3. Pay Attention

The bottom track is often the most important one in sliding doors. But if your door set works where the door weight is suspended from the top track then the screws used to mount that track MUST bite into solid wood. This is often not a problem, even if you are attaching the track to a drywall wrapped jamb. A flat 2x4 was probably used to create the rough opening and solid wood is just below the drywall. Make sure the screws used to mount the track penetrate at least one inch into solid wood.

4. Temporarily Mount the Bottom Track

Bi-fold mirrored doors work differently than sliders. The weight of a bi-fold door is always on the bottom pivot next to the side door jambs. These need to be installed in such a way that you can adjust them so that the doors meet nicely when they are closed. For sliders, you may want to pay attention to the bottom track placement. If you twist it, the doors will bind as you operate them. Hang the doors and they will tell you where the track should go.

5. Study the Instructions

Become familiar with how the adjustment screws work on the doors. They are REALLY important!

Standard Mirrored Door Sizes

Many houses have standard interior door openings, especially homes built within the past 40 years. The actual door height is often 80 inches. The width of the doors is most frequently 30, 32, 34 or 36 inches. You can find smaller ones but they will almost always be an increment of 2 inches such as 24, 26 or 28 inches wide.

It makes sense that companies that make mirrored doors would follow suit. You can trim and sand wood doors to fit. It is next to impossible to do this with mirrored doors. Thus if you want to sell mirrored doors for both the new and remodel marketplace, they better match existing, popular wood door sizes. This is why you have an excellent chance of finding a mirrored door that will easily fit into an existing opening. For example, common 4 foot wide sliding mirrored doors will fit openings that range in size from 44 to 48 inches wide. Five foot wide sliders will work if your width is 56 to 60 inches wide. Six foot sliders will work if your opening is 68 to 72 inches wide and eight foot sliders fit nicely in openings that are 92 to 96 inches wide.

The width tolerances for bi-fold doors is much tighter. You only have 1/4 inch of play. These doors come in widths of 2, 3 and 4 feet. Your opening must be 24 to 24 and 1/4 wide for it to work and so on and so forth.

There are two common heights for the doors: 80 and 1/2 inches and 96 inches. You will find that these heights work for just about every opening. All of the mirrored door manufacturers have handy measuring guides to help you determine the correct door for your home.

Various Door Specifications

Not all mirrored doors are created equal. The moving parts that allow the sliding and bi-fold doors to operate are critical. Look for door systems that have twin top wheels and nylon bottom rollers. Some door manufacturers offer a jump proof track. That is a handy feature.

The glass used in the doors needs to be shatterproof. Some accomplish this by applying a plastic backing on the mirrors that holds the glass together in the event of an accident. This is a must-have safety feature in my opinion.

You will find doors that are framed or frameless. Pick one that suits your style. The wood framed doors are elegant and are perfect for older homes. The metal framed doors come in gold, silver, aluminum, white, etc. There is one that will look good in any room of yours. I happen to prefer the frameless doors if I am in doubt of how they might look. The frameless doors also are decorator friendly. They look swell with any wall color. This is a great advantage if you like to change the look of a room on a frequent basis.

If you are installing a mirrored door in a bathroom, specify aluminum for sure. Failure to do this will result in a mess over time. The steel doors are well protected but they will develop rust over a period of time.

Companion Articles:   Brighten up Rooms with Mirrored Doors, Mirrored Doors & Manufacturers

Column B370

Mirrored Doors & Manufacturers

Mirrored Doors

There is something very special about mirrored doors. Architects discovered this many years ago. The home I grew up in had a full length mirror screwed to the back of several doors. I remodeled many a home that had gorgeous mirrored doors that were trimmed with fine moldings that made them look like custom doors. In some instances they were indeed custom.

This trend has continued for many years. I actually think that mirrored doors are gaining in popularity. One thing is for sure, they are much easier to install today than in past years. A person with moderate skills can install one in several hours.

Multitude of Designs

I was at an editors' conference in June. It was sponsored by Stanley Tools. The purpose was to show us their modern and wonderful exterior door facility in North Carolina. Part of the presentation was about their mirrored door line. What a surprise to see some of the wood framed mirrored doors. They were spectacular.

One of the most informative parts of the presentation was the cost savings. If you use mirrored doors in several locations in your new home, you can actually save money! The savings are greatest if you go with the eight foot tall doors. Once the carpenter hangs them, you are finished. No painting!

Decorative Glass

If you desire a really spectacular door, look for those that offer beveled or V groove glass options. This glass looks great in any room but if you can use it in an entrance hall setting for a coat closet, your friends and guests will surely be impressed. This option is not as expensive as you might think.

Various Manufacturers

Here is a partial list of companies that make mirrored doors. Call them for brochures:

  • Craft Diston Industries
  • Masonite
  • Slimfold Products/Dunbarton Corp.
  • Alumax Bath Enclosures
  • Arizona Shower Door Co.
  • JELD-WEN Windows and Doors/Interior Door Div.
  • Marshfield Door Systems
  • Peterson Industries
  • Rediframe Products/Div. of the Dunbarton Corp.
  • Southeastern Aluminum Products

Companion Articles:   Brighten up Rooms with Mirrored Doors, Mirrored Door Sizes, Specifications & Tips

Column B370