Exterior Painting Prep Tips

Exterior Scraping, Cleaning & Caulking Tips

The majority of homeowners and workers seem to desire instant gratification. The condition is growing worse each year. A homeowner decides to paint something in a weekend or just one day. They jump right in and paint. This is a big mistake. You must restrain yourself or your mate and have them perform the necessary surface preparation.

Remember, paint is nothing more than colored glue. When was the last time you saw glue that will stick well to a dirty, dusty surface?

Scraping

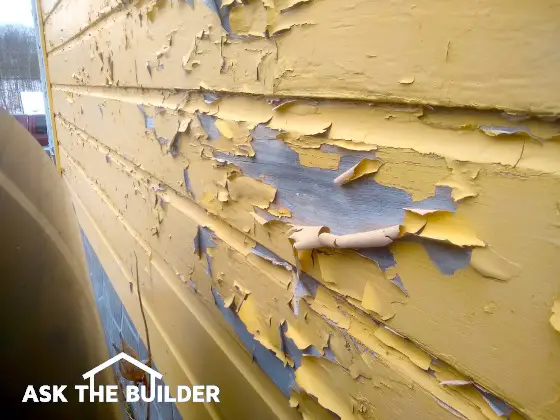
This is fairly straightforward. Loose paint must be removed. You can do it in any number of ways. Flat putty knives, or "pull" scrapers work very well. You may wish to use both tools. Pull scrapers are those that have shallow U shaped cutting blades. They really cut through old oil paints.

I urge you to wear goggles when scraping overhead. I have scratched my eyeball cornea on two occasions from paint scrapings. It is very painful and costs lots of money for medical care! Wear goggles!

Scraping is the first operation in surface preparation. Remove as much loose paint as possible. You then wash and rinse. I guarantee you that you will have to scrape certain areas again. Look closely at locations where bare wood is exposed. Where paint begins, the film may have lifted ever so slightly. Scrape these spots again. Resist the temptation to sand the edges of the paint smooth. Why? Because if the paint is old - say before 1978 - there is a great chance it contains lead. All you will be doing is generating toxic lead dust!


Is the exterior of your house looking drab? Find the professional painters by using my Exterior Painting & Staining Checklist. I offer a 100% Money Back Guarantee.


Washing

This is by far the most important aspect of surface preparation. I don't care how wet you get, you must hand wash your house. Use a large grout sponge and copious amounts of soapy water. Regular liquid dish soap will do just fine. It produces lots of suds. Experiment with soft brushes or whatever to make the job easier. Rinse the washed areas quickly so the dirty water doesn't dry!

Avoid pressure washing. Why? For one, it doesn't remove all of the dirt! It can also drive water deep into or behind wood siding or trim. I have seen people spray upwards on a soffit. They flood the soffit, the wood swells and 2 months later the new paint peels off! Pressure washers are instant gratification tools!

Caulking

Water that enters the end grain of siding or trim boards causes paint failure. You must do what you can to minimize and/or eliminate this kind of intrusion. I prefer the standard acrylic latex caulks for this purpose. Do NOT caulk the bottom edge of clapboard siding! These boards must be allowed to move and breathe. That small crack allows the siding to move. It can also allows water vapor to escape.

Always wipe caulking with a moist sponge as soon as it is applied. This will produce a clean, crisp joint instead of a finger smeared mess.

Tim provided another useful preparation tip in his June 1, 2010 Newsletter.

Column B321

Urethane Exterior Paint

My house really needs to be painted. Fortunately it is not peeling, as the original solid color stain is only 13 years old. My house is relatively young. I started building it in 1986. It is a work in progress as are most builder/owner homes.

The house has actually needed a face lift for over two years. The delay in painting was not really my fault. A manufacturing defect was discovered in my wood windows. They were rotting out. I negotiated a very fair settlement with the window company. They agreed to supply me with new windows in addition to paying for all labor to remove the old windows, install the new ones, paint all interior disturbed surfaces and paint the exterior of the home. They realized that the outside wood siding and trim around the windows would be disturbed and that trying to touch up would not suffice.

The biggest problem was that I had to wait nearly 11 months to get the windows. The last window was installed just about one month ago and I was finally able to begin the painting process.

Glad I Waited

It turns out that I really lucked out. Just before I started to arrange to get the paint, I was contacted by a public relations person from Sears. He invited me to the annual Sears Editors Conference. As we were talking he asked me what my latest project was. I indicated that I was getting ready to paint the outside of my house. He said, "Wow! Have we got the paint you need!" We discussed the new paint. Evidently it was a special new paint that combined water based polyurethane with high quality acrylic resins. It immediately caught my attention as I already knew how sticky urethanes can be.


Is the exterior of your house looking drab? Find the professional painters by using my Exterior Painting & Staining Checklist.

I offer a 100% Money Back Guarantee.


An Exclusive

The management team at Sears has a long history of developing innovative products. They also know how to secure exclusive marketing rights. This magical urethane paint is only available at Sherwin Williams stores. I am sure some small paint companies may try to develop their own version, but I doubt you will see it in major paints stores!

The name of this new urethane/acrylic exterior paint is:

Weatherbeater Ultra

Enormous Interest

I can always tell when a particular column I write strikes a nerve with average homeowners. I get lots of calls to my weekly radio show and I get an avalanche of email at my website. This column really got some attention! Each day I get no less than 10 to 20 emails from folks like you who want to know how they can quickly get their hands on a copy of this Builder Bulletin. Evidently, many people are disappointed with the performance of the exterior paints they have used in the past!

Read the Label

If you buy the new urethane paint and use it like I am on my own home, be sure to take 10 minutes and read the label. My guess is that fewer than 1 in 10 people actually do this. There is valuable information on the label that will help you get the most from the paint.

Be sure to remove mildew before painting. The best product for this is oxygen bleach. It is safe for the plants and trees around your home. Chlorine bleach can kill plants! You simply mix the oxygen bleach powder with warm water, stir for several minutes, pour it into a pump sprayer and wet the mildewed areas. Follow five minutes later with a soap and water wash and rinse with clear water. Call 513-407-8727 for oxygen bleach or go to www.stainsolver.com.

Column B321

Urethane Paint

Urethane Paint

Last year, I discovered a new house paint that blew me away. It contains a blend of acrylic resin AND water based urethane. It is VERY sticky and I used it on my own home. I am very pleased with the results and feel it will wear like iron.

Where do you get it? Well, the one I used was sold by Sears. It is called Weatherbeater ULTRA. You can get it mixed to any color you want.

Sherwin Williams makes this paint for Sears. But they are not allowed to sell this exact formulation in their stores. They make a house paint that contains urethane but it is not exactly like Weatherbeater ULTRA.

I suggest you try a quart or gallon of both on a test area and see which one you like. The guarantee that Sears provides is superb and the Sherwin Williams paint is good too. It is actually a tough call to make.


Have you picked out the paint color but don't have time to paint? Find the professional painters by using my Exterior Painting & Staining Checklist. I offer a 100% Money Back Guarantee.


Be sure to read the label and use the right brushes with the paint! Sears has brand new special brushes that allow you to put on the Weatherbeater Ultra faster and easier with better coverage.

Finally, you can cover oil based finishes with water based paints. Simply make sure the surface is clean and if it is glossy, sand it or roughen it up with a liquid deglosser.

Column B366

100% Acrylic Latex Paint & Primer – Manufacturers

100 percent Acrylic Latex House Paints and Compatible Primers

Following is a list of 10 manufacturers of 100 percent acrylic exterior house paints. All of them make a compatible primer. These are the paints you must get for a superior painting experience. Do not accept substitutes! Beware of paints that simply state "acrylic" paint on the label. Did you know that a manufacturer can put a small amount of acrylic resin in the paint and then add additional vinyl acetate or other lesser quality resins and STILL call the paint an "Acrylic Paint"? You have to be careful out there.

Martin Senour:

Top Coat: Platinum Exterior Latex
Primer: T.P.S. Exterior Latex Primer

Dutch Boy:

Top Coat: Dirt Fighter Exterior 100% Acrylic Latex
Primer: Acrylic Latex Multi-Purpose Primer Sealer


Is the exterior of your house looking drab? Find the professional painters by using my Exterior Painting & Staining Checklist. I offer a 100% Money Back Guarantee.


Fuller O'Brien:

Top Coat: Weather King™ II
Primer: Weather King™ II Exterior Primer & Stain Blocker

Glidden:

Top Coat: Endurance
Primer: PrimeCoat

Kurfees:

Top Coat: Supreme Acrylic House Paint
Primer: Supreme Acrylic Bonding Primer

MAB Paints:

Top Coat: Sea Shore/Four Seasons House Paint
Primer: Sea Shore/Four Seasons Exterior Latex Primer

Maxum:

Top Coat: 100% Acrylic Low Lustre
Primer: Acrylic Starter

Pratt & Lambert:

Top Coat: Accolade
Primer: Suprime

Olympic:

Top Coat: Overcoat House Paint
Primer: Primecoat

Sherwin Williams:

Top Coat: A-100
Primer: A-100

Column B366

Washable Paint – Interior Ceramic Paint Manufacturers

Ceramic Washable Wall Paint

I can usually tell when a particular column subject is popular. The Saturday after the column first appears I tend to get lots of phone calls to my radio show. I received many calls about this new ceramic wall paint. In fact, I was overloaded with calls!

To the best of my knowledge there are only two paint companies that make water based wall paints that are extremely washable. They use similar technology. The trick is to shrink the size of resin and extended pigment particles. One company uses ultra small ceramic particles and the other one uses very tiny resin beads to accomplish the same final result. The bottom line is that the film of paint has a very tight structure and few places for stain particles to grab on to.

The trouble with smaller paint companies is that they sometimes struggle to get full nationwide distribution. It is a daunting task to try to get a product into every paint store in the USA. It can take decades and tens of millions of dollars.


Have you picked out the paint color but don't have time to paint? Find the professional painters by using my Interior Painting & Staining Checklist. I offer a 100% Money Back Guarantee.


The two paint manufacturers that I found are:

Graham Paint Company
Ask for Aqua Borne Ceramic for Interior or Exterior. Graham uses the tiny ceramic micro-spheres in their paint.

Muralo Company
Ask for their Ultra line of paints for both interior and exterior. Muralo uses ultra small resin particles to achieve superior washability.

Column B369

Faux Finish Tips

Tim's Ten Secret Wall Glazing Tips

Secret Tip #1 Choose Your Method

There are two ways to apply glaze, the negative and positive techniques. The negative method is harder to do and is often used by pros. In this method you simply use a standard paint roller and apply glaze all over the wall. You then use a rag roller to remove excess glaze to a desired level/appearance that you like. You almost always need two people to do this because the glaze can dry before you remove it.

The positive method is the one I used. You simply dip the rag roller in the glaze and apply it to the wall as you would any regular paint. You still need to work quickly even if you use an extender.

Secret Tip #2 Practice!

Several walls in my basement have four coats of paint and five coats of glaze on them. I didn't plan to do that many, trust me! It takes a little practice to get the feel of how the glaze works and the rag roller applies it. I feel the best way is to simply practice on a separate piece of drywall. Just paint it on the floor and practice applying the glaze. Let the glaze dry and see what happens if you apply a thin coat over just part of the dried glaze. You will see why you must work fast as the color is distinctly darker in the double coverage area.

Secret Tip #3 Color Selection

Picking and mixing the right glaze color can be a challenge. The background or base paint color and the glaze color seem to work best when they are from the same color family. Color families are what you see on paint color strips. Notice how the colors go from lighter to darker on the same strip? This is all one family. Keep in mind that the lightest color on a strip can often be made lighter by mixing the formula half strength.

When you select your glaze color, always have the paint store employee mix it two shades lighter than the color you picked. For some reason they always seem to come out much darker if you mix it the actual formula you call for. The lighter colored formula should create the real color you are looking for. The color of the wet glaze inside the can just after mixing is the color it will dry. Paints often dry darker than what they look like wet.

Secret Tip #4 Wall Prep

The walls must be ready to go before you start. The glaze simply dries too quickly for you to be monkeying around with cover plates, masking off areas, spreading drop clothes or whatever.

Secret Tip #5 Paint Without Trim Where Possible

The hardest thing to do when glazing is to end the glaze in a corner or up against woodwork. In new construction it is possible to glaze the walls before trim is applied. You have to have a great carpenter who will watch the walls, but it is possible. This is what I did in my basement. I also used a trick up at the ceiling. I installed an eight inch wide wallpaper border so I wouldn't have to get the glaze tight against the ceiling. If you apply the trim after the glaze, take the time to pre-paint the trim so you get a finished look as soon as it is nailed to the wall.

Secret Tip #6 Starting and Stopping

Once you start to glaze a wall, you can't stop. You must proceed from a corner to a corner. If you double coverage an area, it will really show. Apply the glaze randomly on the wall. Do not make a crisp vertical line from the floor to the ceiling as you apply the glaze. Make the edge look as ragged as possible. You will blend into this as you move down the wall.

Secret Tip #7 Inside Corners

You must mask off inside corners to prevent glaze getting on a wall surface you are not working on. Use a special low tack masking tape. I like the 3M Safe Release white masking tape #2070. Apply the tape so that it is 1/16th inch away from the actual centerline of the corner. This allows you to get just a trace of glaze on the wall surface you are not working on. Then when you mask this corner later in the day to do the unfinished wall, apply the tape in the exact center of the corner. This gives you excellent coverage in the corner. If you do get water based glaze on a surface where it should not be, it can be removed if you act quickly. Keep a bucket of warm soapy water and a sponge handy. Use it to wipe glaze off a wall surface, trim, etc.

Secret Tip #8 Cutting Into Corners

The rag roller will not get perfectly into the corner. Use a simple brush and dab glaze into the corner to get you started. Dab it as randomly as possible to create the look of the rag roller. Only dab as you go. Do not let this glaze dry! You can run the rag roller over it to get as close as possible to the corner. Practice to see what I mean. Poor results can be wiped off the wall immediately with the soapy water.

Secret Tip #9 Have Plenty of Rag Roller Covers

The fabric that covers the rag roller wears out fairly quickly. I had to use three of them to finish my basement room. I was surprised at how quickly holes developed in the material. It is understandable since the rag rollers take lots of direct abuse as you twist them and rotate them on the walls. They can be cleaned and reused but don't expect them to last and last as a high quality paint roller cover might.

Secret Tip #10 Don't Be Afraid To Start Over

Attack a small wall first. When you are finished, stand back and look at it. The glaze should just be a thin coating that creates a magical 3D look. Some areas of the wall will have more glaze than others giving it the look of leather. If you don't like the look, let the glaze dry and repaint the wall with the base or undercoat color. I had to do this on a number of walls because I was not satisfied with the results. One person only should do the rag rolling. They will develop a specific technique that a helper may not be able to match.

Column B384

Faux Finish Techniques

The first time I saw a faux painting technique in action happened about six years ago. I was touring a model home that was under construction in Northern Kentucky. The builders were fans of mine and had asked me to stop by to see a hybrid home where they were using metal floor joists and wall studs. The nearly completed home was next door and two women painters were faux painting a room.

The Look of Leather

An adjacent room was already complete and the walls looked as if they had been covered with a high quality leather. The coloration, texture and 3D appearance was amazing. They were simply applying a translucent glaze over a base color and creating the look by applying a thin sheet of plastic throw-away drop cloth over the wet glaze. The plastic was crinkled and wrinkled while it was on the wall and when they quickly peeled it off, it gave this random texture and appearance. I was amazed.

Tough To Do

What the women painters were doing was very difficult. They were working super fast and had the technique down. You can achieve the same look yourself by using a different tool - the rag roller. I saw a very cool rag roller at the Sears Editors Conference in June, 2001. It is available at all Sears stores and is a very unique tool. It is simply a plastic tube that is covered with a fabric sock that has an opening at each end. The fabric is folded over the end of the roller cover and held in place with two inserts. You twist the rag on the tube before installing the inserts. The twisting produces the random pattern that is duplicated on the walls as the roller is moved across the wall.

Got Glaze?

Glaze is simply a paint product that is lacking in fillers or pigment extenders. Regular paint contains dust or finely ground particles that absorb the colored pigments added at the store. These solid particles produce the hiding power of paint. You don't want these particles in glaze. You want to be able to see through the glaze down to the base color of the wall. Think sunglasses.

I purchased my glaze at a Sherwin Williams paint store. You can also get it at Sears or any other paint store that carries a full line of products. If you open the glaze before color is added, it will look like diluted milk, but it will indeed dry clear. In fact, some people apply clear glaze to a wall surface to make it look like it is striped or even mottled. You can use the rag roller to apply clear glaze and it does give a wall surface a unique appearance as long as you do not completely cover all of the base color with glaze. If you do, the wall simply looks like it was painted with a semi-gloss paint.

Glaze Extenders

Latex glaze dries incredibly fast. There is no body to glaze since it is primarily a resin you are applying to the wall. This rapid dry time means you can put the room into use very quickly but it also means you can have a nightmare trying to work with it.

Full line paint stores carry additives that you can mix with paint or glaze. One of these happens to be a drying time extender. The one I used was called Floetrol® Latex Paint Conditioner. It is made by the Flood Company. It is a common paint and/or glaze extender. It is also milky in appearance but it doesn't change the color of the glaze.

The use of the extender is mandatory. It makes all the difference in the world. You never get double coverage marks if you keep up a steady pace going down a wall. The extenders are affordable and easy to add to the glaze. Only use as much as the label states!

Column B384

Kitchen Cabinets – Painting Tips

Final Gratification

This is what everyone always want to do first - paint. It is really the second to last step in the process. The application of paint is an art. Most people that I watch paint do a miserable job. Why? Because they were never really taught. They think that anyone can do it. Well, anyone can do it, but not necessarily well!

Let's do the doors and drawer fronts first. We can really make up some time with these articles first.

If you are using oil based paint, you will need two brushes: a 1.5 inch and a 2 inch wide brush. Buy the 1.5 inch one as a tapered brush. Be sure they are china bristle or a synthetic fiber brush that is suitable for oil! If you use water based paints, NO china bristle brushes! You will ruin them with the water. It swells the natural hair bristles.

Oh yes, we also need a roller pan and a small 2 or 3 inch wide fine nap roller. What? You are confused? You mean to tell me that you have never used a small roller to apply trim paint? See what I mean by everyone thinking they could paint....! Come on now, don't go away angry....
We are going to use the roller to apply the paint on any flat surface which will accept paint from the roller. The brush is used to smooth the paint after it is applied.

Painting Doors

Raised panel doors should be painted from the inside out. In other words, paint the flat center area first. Then paint the beveled areas of the raised panel. Finish the outer frame last. Detailing is everything. See where one piece of wood joins another? Those are the same places that brush strokes should end and begin. Speaking of brush strokes, do you know how to avoid them on long pieces of wood work? It is easy.

You avoid brush strokes by working from an unpainted area towards an area that was just painted. The final brush stroke is towards the painted area. Just as you finish the stroke you gently lift the brush off the surface while your arm is still moving. You will see the lift off mark for a few moments, but if you have a great self leveling paint, it will disappear! As soon as the door is painted, set it flat on a can or some other surface that is smaller than the door. This will allow you to get all edges painted. It will also reduce the risk of runs in case you put too much paint on. If you set the door on the floor, on paper, etc. the paint at the edges will stick and cause a big mess.

Drawers - A Piece of Cake

Paint the drawers in the same fashion. Set them on end to allow the paint to dry. Try not to get too much paint inside the knob or handle holes. If you do, remove the paint with toothpicks as soon as possible.

Let's talk about open time for a moment. High gloss paints require that you keep a wet edge. If you try to paint too large an area and the paint starts to set, you will have problems when you try to blend the fresh paint to the drying paint. Flat wall and ceiling paints are very forgiving. If you are used to this, you had better get ready for a BIG surprise. Paint one door or one drawer from start to finish. Don't try to get an assembly line going with that roller. Cover the roller pan or brush with aluminum foil to minimize exposure to air if you are worried about the paint drying.

Paint Indoors or in a Garage

Paint the doors and drawers in a covered area. Avoid direct sunlight and breezes. You will find it easier to keep the before mentioned 'wet edge'.

Cabinet Frames - Gravy!!

The cabinet frame is a cinch. Use the roller on the flat fronts. Use that tapered brush for all tight spots and cutting in against walls and countertops. Remember, no brush strokes!

Column B391

Kitchen Cabinets – Paint and Primer

Choose Your Weapon....

It is time to paint. What will you use? Most choose ease and convenience - water based paints. Why? Because they think it is easier to clean up when using water based paints. Well, that is not necessarily so. More on this later.

Oil based and water based paints will produce superior results. However, many experts will agree that oil based finishes will yield a glossier surface and will harden more rapidly than water based finishes. These are important characteristics if you want clean cabinetry as well as a functioning kitchen in a short period of time.

To Prime or Not to Prime....

This is a tough call. If you are painting over a clear finish like urethane or varnish, it is mandatory that you use a bonding primer. If you are painting over previously painted surfaces that will require two coats, then it is a great idea. If you are just applying a fresh coat of the same color or nearly so, then you might be able to get by with a top coat only. Be sure to clear this move with the manufacturer. Check the label of the finish paint. See what it has to say about the use of a primer. When in doubt, always read instructions. (That's a joke! Read before acting at all times!)

Remember, primers are formulated to bond well to the surface being painted. They also are made to even out the texture between bare wood and painted wood. Primer/sealers will also even out porosity in the event that bare wood has been exposed during sanding.

Column B391

Kitchen Cabinets – Painting Prep

Small Surface Area - Big Project!

Painting kitchen cabinets is a tough job. I can paint two bedrooms in the time it takes to do an average set of cabinets. To achieve really good results on cabinets, you need to break them down. This means removing all hardware (door knobs, hinges, drawer pulls, etc.). Skip this important step and your paint job will suffer!

Once the hardware is removed it is time to clean and sand. Any name brand liquid soap will do just fine. However, DON'T immerse the wood in water or subject it to excessive water, especially raised panel doors. Water can get in hidden spaces and cause swelling, warping, twisting, etc.! Use damp sponges or rags to clean. Rinse immediately and dry with a dry rag. Do not let the cabinets air dry.

Sand with medium sand paper to roughen up the surface. Coarse sandpaper can be too harsh and cause deep scratches. On wide open spaces use a sanding block or vibrating sander to maintain a level sanding surface. Sand paper in your hands is a mistake. You will sand more areas than others, trust me.

Column B391