Drainage

! ! ! See Author's Notes at Bottom of Column ! ! !

Make a Model Of Your Lot

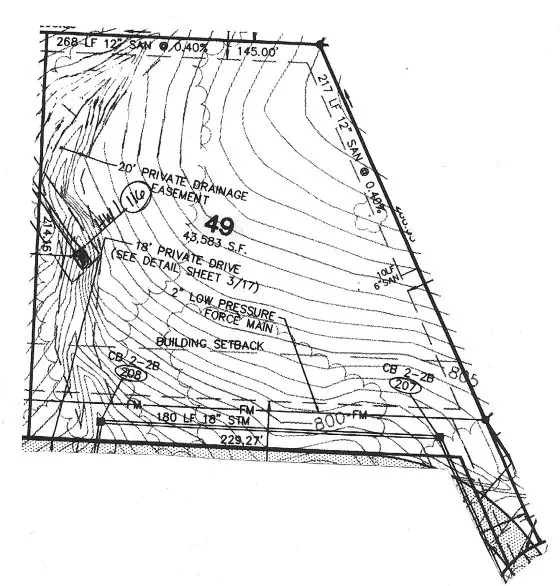
If you take some scrap cardboard and trace the different patterns of a topo map onto the cardboard and then cut out each pattern, you can make a 3D model of a building lot or piece of land. You take the cut out patterns and stack them on top of one another. One of the things that becomes very apparent when you do this is the fact that topographic lines that are spaced closely together indicate a steep hill or a cliff in reality. When you build a model, you will find this out in a hurry! If you have kids and are looking for a neat science project, see if their teacher will let you create a 3D model from a topographic map.

Coastal Lots

If you live or are relocating to a low lying coastal area, you know that the land is usually very flat. Try to see if you can raise up your house 12 or 18 inches from the normal level that everyone else builds. Have some extra dirt brought in and use this to taper the soil away from your foundation out towards your lot lines. The end result will be a very gentle slope that offers you lots of protection if a heavy rain floods all of your neighbors' houses.

 Drainage solution- trench drain.

Drainage solution- trench drain.

Soggy Lots

If you have a swampy or soggy lot now and need relief, then you need to look at this drawing.It is a plan or side view drawing of a linear French drain. These simple drainage devices can dry out wet soil in a big hurry.

Keep in mind that water likes to take the path of least resistance. It will flow through gravel much more quickly than through soil. As water migrates from the soil into these trench drains, the water is wicked from adjacent soil towards the drains. The net effect is that your lot dries up.

The backyard of my lot was a swamp each spring. I installed a single linear French drain on the high side of my lot to intercept all of the water that was coming from the land above me. It worked instantly and continues to keep my lot dry as a bone while my neighbor's lot above me is soggy and wet! I keep telling them to install a linear French drain, but they don't seem interested. What was that saying about leading a horse to water?

Drainage issues are critical and they can cost you huge dollars after you move in. It takes some detective work and some thought to figure out what will happen after you move in. Study the land and look at existing subdivisions to see how land forms and shapes affect drainage.


Author's Notes:

You may wonder if my advice is worth anything. Well, read what Jim Sanders wrote to me when he was at the end of his rope:

"Hi, I just wanted to write to give you the results of my "Trench Drain". I have had a wet crawlspace for 15 years. Water would fill the crawlspace at times, so we actually had to drill weep holes at the base so that it would enter the basement and eventually, the sump pump.

I have tried everything. Several contractors said that the only thing we could do was to bring the water into the house via drainage tile and let it enter the sump pump. That would work, but because I live on a 6' elevation, there is no reason that I should have water problems. It became like clockwork...when it rained, we would rush home from the lake or wherever we were vacationing so that we could be prepared to start the backup generator, in case the power failed. We even had our alarm company put a sump alarm on our system, so they could notify us if we had a power failure. Battery backup was not an option, because sometimes we lose power for days and during any rain, our sump would run every 7 minutes...just like clockwork.

I found your site and read the article on the trench or French drain. At first, it sounded a bit like "holistic healing" to me. I failed to understand why a 2 ft. deep trench, 4 ft. away from the house would do any good. How could this simple thing correct an extreme water problem that has plagued me for years, cracked my foundation, settled my garage floor and ruined almost every vacation?
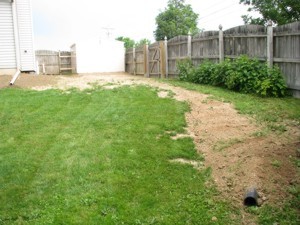
The Linear French Drain trench running from the house. PHOTO CREDIT: Jim Sanders

The Linear French Drain trench running from the house. PHOTO CREDIT: Jim Sanders

I decided "what the heck". I had to dig by hand using a trenching spade and a pick-ax, because the builder back-filled our property with brick and blacktop. It took quite a bit of time. Because the ground level varies so much on that side of the house, I was not able to achieve exactly 2 ft. deep. It varied from 18" to 30" in spots, but the slope was downhill. The trench is about 80 ft. long. At times, I thought about filling it all in, because I just didn’t believe that it would work.

I stoned it, put tile in, and filled it with #1 round stone. I socked the pipe just for safety measure and I also used geotextile fabric on top, so I could cover with dirt and grass. I also ordered some clay and pitched from the house to the drain.
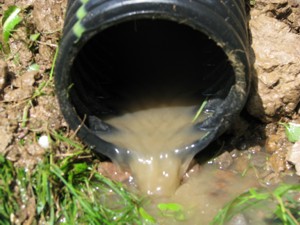
After a short rain, water is running away from the house. PHOTO CREDIT: Jim Sanders

After a short rain, water is running away from the house. PHOTO CREDIT: Jim Sanders

Result? For the last month, we have had 7 or 8 torrential rains, the worst of which was last night. It rained so hard, that our lawn washed out in spots because of the high clay content. Our sump pump, that normally ran every 7 minutes during and after rain, has not turned on for 4 weeks. The silt at the bottom of the sump well is now dry and cracking. Our crawlspace has not shown a trace of water or even moisture.

Since I couldn’t see correcting the foundation cracks or the garage floor settling and tilting until I corrected the problem's source, I waited to see if the trench drain worked first.

This week, I had a company come in and perform sort of a "mud-jacking" technique on the garage floor, which worked perfectly. Also, during the past few weeks, I parged the cracks in the foundation.
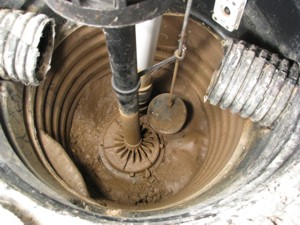
A dry sump pump. PHOTO CREDIT: Jim Sanders

A dry sump pump. PHOTO CREDIT: Jim Sanders

I just wanted you to know how this worked. I stressed for many years over this issue and the solution was nowhere near as difficult as I thought it would be.

As a side note, I went to the end of the drain tile during a hard rain to see what was happening. Water was running out of the drain tile in about the same exact volume that it previously ran out of the weep holes in my crawlspace. This winter will be interesting, because last year, the ground next to the house was so saturated that during a thaw, my sump would run constantly. I'm guessing that the ground between the trench and the house will probably be drier now going into this winter."

- Jim Sanders, Upstate area - New York

CLICK HERE to get FREE & FAST BIDS from local drainage expert contractors.

Column B289

 

Topographic Maps

topographic map

Learning to understand a topographic map that shows elevations will be worth the investment of time.

Back in the early 1990's we had a huge 24 hour rainstorm in my village. I had a rain gauge set up and it indicated that we received about 5.75 inches of rain in that 24 hour period. We had widespread flooding of many houses in my village. Many people couldn't believe how small creek beds that usually only have a trickle of water in them turned into virtual rivers.

Numerous houses had extensive basement flooding caused by streams that overflowed their banks and crushed garage doors and even basement doors in a matter of moments.

The point of the story is that just about everyone of these people never thought they would have a problem. Their houses and building lots didn't seem to be in a danger zone. After the storm and flooding were over, it was obvious that the damaged houses were in low spots or near the bottom of shallow valleys. It took a 100 year storm to point out the problem. This is why you need to think ahead when you buy a lot.

Bathtub Ring

Have you ever notice rings inside of bathtubs? If the tub drains slowly, you will see a number of rings that stair step down toward the bottom of the tub. Each ring represents the level of the water within the tub at a given moment in time. The ring also represents a perfectly level line as standing water in a tub, bottle, pond or lake is level due to the forces of gravity.

You can use this same principal to help you understand the funny crooked, curved and squiggly lines you see on a topographic map. Each of these lines is like a ring in your bathtub. They represent a layer of land or earth that is the exact same height above sea level.

Topographic maps allow you to get an idea of the three dimensional (3D) configuration of the land while looking at a two dimensional piece of paper. It is that simple.

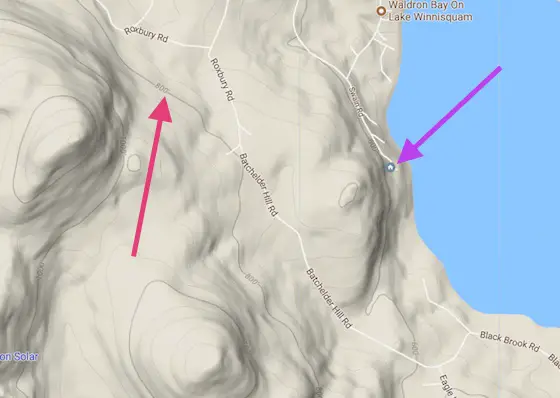
topo map 100 Swain Road

This is a topo map from Google Maps. You just select the Terrain option from the menu to see it. Note the red arrow pointing to the gray lines that have numbers on them. Any point on that line is the same distance above sea level as the number.

Column B289

Recessed Lighting Manufacturers

Recessed Light Manufacturers

Following is a list of some of the leaders in the recessed lighting industry. They have lights that span virtually any residential use you can imagine. If you live in a major metropolitan area, they will be represented by numerous lighting retailers. If you have lighting showrooms like those here in Cincinnati, you will find abundant literature, brochures, etc. at these retail lighting centers. Use the following names as an aid to identifying companies who have a track record in making these types of fixtures.

Finally, do not buy cheap fixtures. Make sure the UL label is clearly stamped on the fixture. Absolutely follow the installation instructions to the letter! Recessed lights often require a special type of plastic coated wire (Romex) that has a high temperature rating. If you use some old wiring from your basement, and/or wiring salvaged from a job it may be unsafe! It may not be rated at 90 degrees Centigrade. This is the temperature rating the wire must have. UL approved plastic coated wire that is stamped NMB is what you should look for. The letter B is the designation that indicates it can withstand temperatures up to 90 degrees Centigrade. This is vitally important. Be sure to look for this lettering on your wire.

  • Capri Lighting
  • Cooper Lighting - Halo
  • Juno Lighting
  • Lightolier
  • Prescolite
  • Progress Lighting
  • Thomas Lighting

Column B91

Recessed Lighting Design

kitchen with 3 levels of lights

There are three levels of light in this kitchen, four if you count the bright lights under the stove hood! Photo credit: Tim Carter

Wide Selection/Uses

What happens if you want to add recessed light in a finished ceiling? No problem! They make special housings that will slide in a hole you cut. What about low voltage recessed lights? They have those as well. What about sloped ceilings? Ever been in a room and have those lights aiming at your eyes? Well, that is not a problem anymore. You can purchase special housing that aims the bulb directly to the floor!

Want a super energy efficient recessed light that doesn't leak air? You can get those as well. A regular recessed light that is covered with insulation can leak up to 2.6 million cubic feet of air per year! That can equate to nearly 1 million BTU's of energy loss. Check out the air tight fixtures.

Recessed Light Suggested Uses and Installation Tips

I have used recessed lighting in just about every imaginable place you can think of in a residential house. My customers and myself have come up with some very imaginative uses. Many of them you might be familiar with.

Exterior Uses

Any covered porch is an excellent candidate for recessed lighting. It doesn't matter if the style of the house is contemporary or traditional. Of course, contemporary styling makes the choice a natural. But let's say you are building a period Victorian house. How would recessed lighting look? Well, consider using it on a covered front porch to wash the front porch walls with light to highlight the front door or ornate paint detailing for people who pass by your house when it is dark. Just like you might use landscape lighting to light trees to show them off, use recessed lights to wash your house with light.

Place recessed lights in soffits, cantilevered floors, etc. to illuminate or highlight features of your house. You will be surprised how striking the effect really is!

Interior Uses

I really like using recessed lighting in conjunction with other forms of light in rooms. I have already told you about my kitchen. Think of using recessed lighting in a study or den to create general mood lighting around the perimeter of the ceiling. If you plan your furniture layout and choices, you can place lights centered on these items to illuminate them fully. By using soft, low wattage bulbs you create a very soft low lighting mood. High intensity lights can be used at workstations or reading chairs.

Modernistic dining rooms offer a great place for recessed lighting. You can tray (layer) a ceiling and include recessed lights in the lower tray. The center of the ceiling can contain a chandelier as well. The recessed lights can be strategically placed to highlight furniture, paintings or decorative items. They can be turned on independently of the chandelier to create a glow in the room. Dimmer controls work great for this effect.

Recessed lights work great above tubs, showers, whirlpools, etc. I always installed recessed lights over the mirrors in my customers bathrooms. They could control these lights from a different switch that controlled the wall mounted decorative fixtures above or along side the mirrors.

Recessed lighting is often the safest choice for the interior of closets. Many house fires have been caused by objects (falling from shelves) coming into contact with unshielded bulbs from surface mounted fixtures.

Installation Tips

Have you ever installed a recessed light? If so you probably did it this way: open box, determine location, nail up fixture, begin wiring process, take muscle relaxant for strained neck muscles!

My electrician taught me the trick to avoid the muscle relaxants! It's simple. All you need to do is wire the fixture on the ground or floor level before you nail it in place. No more strained neck muscles. No more dropped wire nuts. You will be surprised how much easier this is.

If you are a DIY'r, please take the time to read the specific installation guidelines. If you didn't get any with the light, call the company and ask for some! If wired improperly, recessed lights can be hazardous. Do not underestimate the amount of heat a 150 watt bulb can produce!

Above all, please get your job inspected by a certified electrical inspector. People die every day in this country from electrical-related house fires. Don't you be one of them.

Column B91

Recessed Lighting Safety

Insulation + Lights = Fire?

Have you ever tried to change a light bulb that has been on for several minutes? Did you burn your fingers? Light bulbs get extremely hot. The surface temperature of a bulb can be hundreds of degrees.

This type of heat can cause fires. In fact, many residential fires have resulted from improperly installed or modified recessed light fixtures. This is especially true in older homes that have old recessed light fixtures. In these situations, homeowners have mistakenly covered older fixtures with insulation. This insulation traps the heat created by the bulb. This heat, in turn, can either melt the insulation on the electrical wiring or ignite combustible materials near the fixture.

This insulation craze, created by the energy crisis in the late 70's, caused the Underwriters Laboratories (UL) to respond. This is the organization that is responsible for the many improvements to our electrical fixtures, wiring and code requirements.

The individuals at UL mandated that recessed lights be equipped with a safety override switch within the fixture. This switch would sense when the light fixture was trapping too much heat. In such an instance, the safety switch would simply turn the light off automatically. Once the fixture cooled down, the light would then turn itself on.

Leaky Lights

But, this wasn't the total answer. The popularity of vaulted ceilings in the 80's created another problem. Recessed lights were installed in roof rafter spaces where insulation was absolutely necessary. However, the code and the lighting manufacturers said not to put insulation within several inches of the fixtures. As you can imagine, this caused major problems.

Every recessed light location was like a hole in your ceiling! Heat would leak out of the fixture as cold air blasted into your house. Many homeowners became disenchanted with recessed lights.The honeymoon was over.

In Contact (IC) Fixtures

Once again, the UL people responded. They developed guidelines that allowed manufacturers to build recessed light fixtures which could be completely covered and smothered with insulation. These fixtures carry an IC designation. The fixture will actually be labeled as such. This is your safety guarantee.

However, these lights often come with a slight penalty. They tend to use lower (less than 100 watt) wattage light bulbs. This is because the insulation covering or abutting the fixture will trap way too much heat from the higher temperature bulbs.

These IC fixtures are also equipped, as long as they are UL approved, with the thermal protection switches. So, if you install a bulb that is too powerful, the light will cycle on and off.

Column B91

Recessed Lighting – Hidden Lighting

kitchen with 3 levels of lights

There are three levels of light in this kitchen, four if you count the bright lights under the stove hood! Photo credit: Tim Carter

My wife designed the light layout in our kitchen. It was my job to install the lights. As I nailed up the 12 or so recessed light housings that she selected, I whined the whole time, saying that there would be too much light. After all, we had a decorative hanging fixture that would illuminate our island. Furthermore, there was a paddle fan over the kitchen sink that also had a light fixture.

Well, I was wrong. The recessed light fixtures created a ring of brilliant light over all the counterspaces. They compliment the softer light from the hanging fixtures. Kathy was right once again!

Hidden Light

The widespread use of recessed lights occurred in the 1950's. The contemporary housing trends of the 50's and 60's dictated that all aspects of a house were sleek. This meant that surface mounted fixtures were out and hidden, recessed lights that were smooth with the ceilings were in.

The advantages of recessed lights have stayed with us. The types of fixtures and the trims, however, have come a long way. The original recessed fixtures were very simplistic. There were very few trims available.

CLICK or TAP HERE to get FREE QUOTES from local companies that can help with your lighting needs.

Recessed Light Parts

Recessed lights are somewhat different than an ordinary light fixture. A recessed light has three primary components: the housing, the bulb and the trim. The housing is the main part of the light. It is installed early in a job, before the plaster or drywall is installed.

Bulbs for recessed lights are very specific. They do not resemble ordinary light bulbs, except for the treads. They are cone shaped and often come as spot or flood lights. Very often the inside of the glass surface is coated with a reflective material so that the light created by the filament is directed down, not sideways.

The trim is the part of the light that you actually see. There are a multitude of designs, shapes, finishes, etc. that are now available. Some of the most popular trims used today are those designated as spectacular. These trims have a highly polished interior surface which helps to reflect as much light as possible down into the room.

Column B91

Fluorescent Light Bulbs & Manufacturers

The following is a listing of some very standard 4 foot fluorescent bulbs, their manufacturers, the lumens per watt (This is a measurement of how efficient they are. The higher the number the more light the bulb produces per unit of energy.), the CRI, and the color temperature.

All the manufacturers have all this information about all of their bulbs and it is sometimes published on the packaging. But sometimes you have to ask for it, as it is not always printed on the label or container. At the end of the table each manufacturer is listed with their 800# in case you run into difficulty at a store.

Remember to do a little price comparison shopping. Compare the average life of the bulb to the price and keep in mind the efficiency rating. A lower efficiency bulb may cost less at the store, but may cost more to operate in the fixture.

Bulb Comparisons and Manufacturers


MANUFACTURER
 BULB/MODEL#
 LUMENS/WATTS
 CRI
 COLOR TEMPERATURE
 
SYLVANIA D830 FLUOR. 83 80 3,000K
 
GE SPX-30 83 82 3,000K
 
PHILIPS 30-U 76 85 3,000K
 
SYLVANIA D835 FLUOR. 83 80 3,500K
GE SPX-35 83 82 3,500K
 
PHILIPS 35-U 76 85 3,500K
 
SYLVANIA D841 FLUOR 83 80 4,100K
 
GE SPX-41 83 82 4,100K
 
PHILIPS 41-U 76 85 4,100K

MANUFACTURERS & LITERATURE

  • SYLVANIA
    800-LIGHTBULB (800-544-4828)
  • GE
    800-327-2080
  • PHILIPS
    800-555-0050

Sylvania has two excellent booklets on Color Temperature and Color Rendition. These books have excellent color photographs illustrating the effects of color temperature on objects. These booklets are Color is How you Light It and Understanding Lighting. I suggest you ask for them. Also, maybe your town has a lighting center like mine. Here in Cincinnati, Becker's has a light lab setup that will show you numerous fluorescent bulbs and how they change the color of pictures, fabrics, etc. The demonstration is dramatic! Hopefully, your town has a retailer like Becker's.

Column B101

Light Bulbs Alter True Colors

Kelvin and Color Rendition Scales

Kelvin Scale Comparative Values

The following list gives you a feel of where certain light sources are relative to one another on the Kelvin scale.

  • Candlelight
    1,850K
  • High Pressure Sodium
    2,000K
  • Regular Incandescent Bulb
    2,750K
  • Warm Fluorescent Bulb
    3,000K
  • Some Halogen Bulbs
    3,000K
  • Mid Range Fluorescent Bulbs
    3,500K
  • Cool Fluorescent Bulb
    4,100K
  • Some Metal (Mercury)Halide Bulbs
    4,500K
  • Special Fluorescent Bulbs
    5,000-6,300K
  • North Blue Sky light in low pollution area, low humidity, ideal weather conditions, high noon
    7,000-8,500K

Color Rendering Index

The color rendering index is an arbitrary scale of 0 to 100. It was developed in the 1930's, before fluorescent lights. True color samples (8) picked by the international lighting community are used to test the manner in which a particular bulb affects the color of the samples. Since the color of the sample is known, the amount that its color changes because of the bulb illumination determines the bulb's scale rating.A 0 rating would be the absolute worst, with a score of 100 being perfect.

Ratings can be all over the scale. For example, certain mercury vapor lamps have a CRI rating of 20! That is why your car looks weird in some parking lots at night. Some fluorescent bulbs have a CRI rating as high as 90.

For comparative shopping, any bulb with a CRI rating of 70 or higher will produce excellent color rendition. Values between 60 and 70 would be considered good. Below 60, and you run the risk of poor color rendition. Be careful!

Column B101

Light Bulb Comparisons

Advantages & Disadvantages of
Different Bulb Types


BULB TYPE ADVANTAGES DISADVANTAGES
INCANDESCENT low initial cost-numerous sizes-great color-various shapes-easy to wire-easy dimming capability poor efficiency-produces high heat-short life span-costly to operate-can cause glaring


FLUORESCENT long useful life-medium to high efficiency-various color range-low temperature & brightness-diffuses light somewhat higher initial cost-minimal decorative fixtures-some are sensitive to low air temperatures


METAL HALIDE very efficient-very long life-good to moderate color range-low operating cost high bulb cost-potential for glare-limited fixture selection-primarily an outdoor bulb


HIGH PRESSURE SODIUM very efficient-very long life-low operating costs high cost-poor color rendition-strong glare-primarily an outdoor bulb

Column B101

Light Bulb Color Temperature

Light Bulb Color Temperature

Many people are familiar with "cool" white or "warm" white fluorescent light bulbs. These bulbs have vastly different color temperatures. A "cool" white bulb commonly has a color temperature of 4,100K. This is in the low range of blue color, similar to ice. Hence, the "cool" adjective.

The "warm" fluorescent bulb often has a color temperature of 3,000K. It imparts a more orange / red light on objects. Because you normally associate warmth with red or orange objects, this accounts for the "warm" descriptive name, even though it is a cooler temperature on the Kelvin scale.

As we discussed in photography, color temperature can affect the way things look in your house. If you decorate with reds, browns, and oranges, you want to illuminate these rooms with bulbs that have a color temperature in the 2,750 - 3,000K range. Conversely, if you happen to like green carpets, or blue colors, light these rooms with bulbs that produce color temperatures of 4,000K or above.

What happens if you have both colors in a room? No problem! Use a mid range bulb. You can purchase bulbs that produce light in the 3,500K range.

Color Rendition

This color thing gets even more confusing. Don't blame me! I'm trying my best to make sense out of it.

Two different bulbs that have the same color temperature can produce vastly different looks on colored objects. In other words, an inferior or poor quality bulb can make a red object actually appear green! I'm not kidding! As such, light scientists developed a way to measure the ability of a bulb to render true coloration. They use a color rendering index. It is simply a scale of 0 to 100. The closer a bulb is to 100, the better job it does at rendering true colors.

When you purchase bulbs from a lighting store, they normally have this information in their catalogues. I doubt that you can easily obtain this information from a giant home center store that has hundreds of light bulbs on their shelves.

It is really worth it to visit a full blown lighting center. Ask the sales people what they know about color temperature. Ask for literature. The major bulb manufacturers have GREAT booklets on this subject with dramatic photography showing just what can go wrong.

Column B101