Hot Water Recirculating Loop

Hot Water Recirculating Loop

Are you old enough to remember the hilarious candy factory scene in an I Love Lucy episode? I am talking about the one where Lucille Ball was trying to grab candy from off a conveyor belt in a candy factory. The faster she picked off the pieces, the faster the belt turned. Soon she was placing candy in her mouth, her dress, everywhere.

A similar conveyor belt delivers consumers, builders, plumbers and other subcontractors to the marketplace each week. Depending upon the speed of the belt, these people may not have had a chance to gain the needed knowledge to be the best at what they do.

Are you sure you will have the best builder and plumber?

You must be on a slow conveyor belt as you are doing a superb job by reading this column and perhaps other like it to become a savvy consumer. Continue to do that and try to get as much great information as possible as you start to gather facts that will help you build the best possible home. But what about some of the people who will build your new home? Are you sure you will have the best builder and plumber? Here is one way to find out.

Homes that have simple basements often have the furnace and water heater down in this part of the house. It is a great place for this humble but ugly equipment. It just so happens that heat rises and that physical attribute can harnessed so that each time you turn on a hot water faucet in your new home, no matter what time of day or night, you can have hot water within one or two seconds.

How can you get hot water instantly?

But my guess is that you have rarely experienced this in any home you have lived in. Often it can take 10 or even 30 seconds to get hot water to a faucet. If your builder works with a superb and experienced plumber, you can enjoy instant hot water with very little effort and extra expense.

hot water recirculating pump

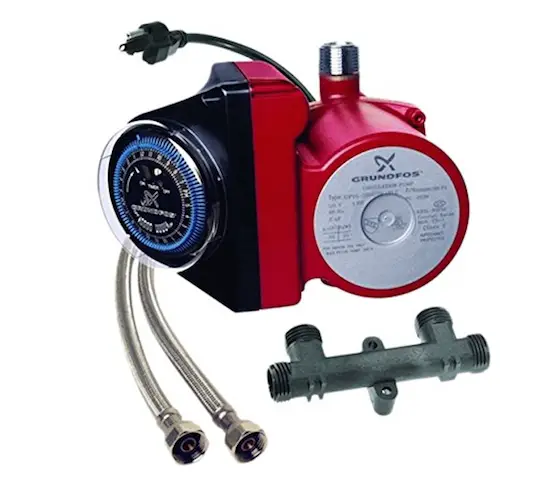
This is a reliable recirculating pump you can install on top of your water heater. The weird threaded fitting goes under the sink that's farthest away from the pump.

To enjoy instant hot water at all of your faucets, all that has to be done is to install a hot water recirculation loop within your new home. Commercial buildings, hotels, hospitals, etc. all have these things and they are hidden in the walls and ceilings of these large buildings you have visited and possibly work in. You have probably never given a second thought to the fact hot water seems to always be at faucets in these buildings.

How hard is it to install a hot water recirculation loop?

It is not hard at all. In fact, over half of the work is already done as the plumber installs water supply lines to each fixture group in your new home.

All a plumber has to do is install a 3/4 inch diameter line from the water heater that feeds all of the fixtures in the house that need hot water. He continues this 3/4 inch pipe throughout the entire house and branches off of it to feed hot water to each fixture.

But when he gets to the farthest fixture away from the water heater, he doesn't stop the line - as most plumbers do. Instead, he continues the 3/4 inch line all the way back to the water heater without interruption. This return line then connects to the bottom of the water heater where the drain valve is located.


For even more tips on how to correctly install a gravity hot water loop, read an additional column I wrote about this topic.


How does the loop work?

To make the loop work, this 3/4 inch supply line must be insulated as it leaves the water heater and makes it way towards each faucet that gets hot water. The return loop must also be wrapped with insulation after it passes the last faucet in the house and makes its way back towards the heater. But the last 15 feet of the return pipe should have no insulation on it. By allowing the water in this portion of the pipe to cool, Mother Nature sets up a very slow convection flow of water within the loop.

This very slow flow of water by gravity, allows the water within the piping system to stay hot. The insulation on the piping keeps energy usage to a minimum. A portion of this extra cost is often offset by the amount of water you otherwise would have wasted by turning on a faucet and letting water run until it finally runs hot.

CLICK or TAP HERE to get FREE quotes from local companies that can install a hot water loop in your house.

Interview your builder and ask him if he knows how to install a gravity recirculating hot water loop. See if he understands the physics of how it works. If he doesn't know or his plumber is in the dark, perhaps you should tell them to jump onto a slower conveyor belt.

Column NH059

Waterproofing Foundations

spray on foundation sealer

Foundation Sealer

You really can't be too careful when you start to build a new home. There are so many time-delay booby traps that can spring on you months or years after you move in. One that tends to shock many people is the simple task of waterproofing a foundation system. I can hear you now, "Tim, my builder did waterproof my foundation." Well, believe it or not in many cases that is not true.

What's the difference between damproofing and waterproofing?

Yes, your builder has already or plans to spray a black liquid on your foundation. He may even call it waterproofing. But the fact is this product may be just damproofing. There is a significant difference between damproofing and waterproofing. Because the buzzword mold is now as loud as the steel-against-steel clash of wheels on the rails of the L, you need to make sure the moisture from the soil can't possibly invade your new basement walls.

What causes that moldy smell in an old basement?

Perhaps the best way to start is to go back in time to a basement in an old home. Surely you can recall that smell, that dank moldy smell of an old basement. You were smelling mold and its growth was fueled by the constant stream of moisture from the soil through both the unprotected walls and through the concrete slab you walked across. Years ago, builders didn't regularly apply even a simple tar coating to foundations. They did not have access to large sheets of plastic that help retard the transfer of water vapor from soil through concrete slabs.

delta ms foundation waterproofing

This system connects to the drain tile. It's a great waterproofing solution. I'd add more gravel and no matter what the MS Delta people say, I'd cover the gravel with a foot, or more, of straw. Copyright 2018 Tim Carter

And believe me, water vapor readily passes through concrete. Granted, it does not transfer at the same rate as perhaps paper or cloth, but it does move to an environment of lower vapor pressure. Liquid water can soak into concrete. Surely you have seen damp patches of concrete before. Proof of this is easy as efflorescence is a prime example of water movement. The water enters the concrete, dissolves salts and then moves towards your basement. Once at the surface of the concrete wall, the liquid water evaporates and leaves the salt deposits behind.


Prevent a wet basements by using this Basement Waterproofing Checklist to hire a great professional. I offer a 100% Money Back Guarantee.


To permanently stop water and water vapor from entering your foundation walls, you need to waterproof them. There are any number of systems that do this, but I prefer the spray-on systems that seal the pores of the concrete. But don't confuse waterproofing with damproofing, not for a moment.

Damproofing is an inexpensive way to meet the lowest minimum standard of the building code. The usual weapon of choice for damprooofing is simple hot liquid asphalt sprayed on the concrete. Liquid asphalt is an excellent damproofing material, but alone it is not a waterproofing system.

Do you need to check local building codes?

And while we are speaking of the code, here is one of the traps. Every local building code can be different, but most state that unfinished basement living spaces just have to be damproofed. But what happens if you know you are going to finish your basement a year or so after you move in? The answer is to waterproof the foundation now for that possibility and to ensure your basement will indeed stay dry even if it remains unfinished.

What is a good waterproofing method?

The waterproofing method I used on my own home is still available.

It was called Tuff-n-Dri at the time and it was pioneered by Owens-Corning. They subsequently sold off this business segment to Tremco.

It's a mixture of hot asphalt and rubber. The coating ends up being about one eighth inch thick or even thicker. A special insulating panel is placed in the hot liquid that helps protect the coating from damage during backfilling and it acts as both an insulator and a drainage plane. The rubber in the mixture imparts elasticity to the coating so if the foundation cracks, the coating stretches over the crack to provide protection.

If you’re interested in learning more about the cost of foundation waterproofing I have an article here.

Damproofing compounds can't do this. If the foundation wall cracks, and most develop tiny shrinkage cracks over time, water can readily pass through to your basement. It is also better to waterproof from the outside rather than try to stop water once it is already into your basement space. Spend the money now and waterproof before the builder backfills.

Over the years, I've seen many different spellings of efflorescence. Here's my growing list: effervesce, effervescence, effervescent, effleresants, effloreflance, efflorescence, efflorressance, effluorescence, eflorescence, eflorescents, ellforesce and ifflorescence.

Column NH058

Design the Perfect Set of Steps

Daughter's New Stairs Before

Design the Perfect Set of Steps

Very few new homes are built that are step free. Yes, I have been in many ranch-style homes where all rooms are on one floor, but even those homes sometimes have a step down to the garage or a step down to an outside porch or patio. Traditional two-story homes that have a basement have many steps or sets of steps.

The truth be told, steps happen to be a significant part of the building code. Many people have been injured and even killed from falls on steps, so code officials strive to make steps as safe as possible. The design criteria for steps is very specific as the code officials over time have strived to perfect both the rise, run and width of steps and staircases as a whole.

What makes a perfect flight of steps?

If you are in the design phase of your new home, you have an excellent opportunity in many instances to install a perfect set of steps. But what makes a perfect flight of steps? I have built many sets of steps over the years and it shouldn't surprise you that I have developed a strong opinion as to the perfect set of steps.

The components of a set of steps are fairly simple. You have a riser and a tread. The riser is the vertical distance between two steps. The tread is the horizontal portion of the steps that you actually step upon as you travel up and down the stairs.

What are the best dimensions for stairs?

I have come to believe that a perfect set of steps is one where the riser is 7.5 inches and the tread is 10 inches. The steps also should have a one inch nosing. The nosing means the tread projects past the vertical face of the riser a set distance. Your foot needs this extra inch when you climb steps. You will often find your foot sliding slightly across the tread until your toe touches or nearly touches the face of the vertical riser. Without the extra one inch of space created by the nosing, the tread would feel narrow.

wood staircase with iron balusters new house

I know, it's hard to believe this is the same house and set of stairs shown at the top of this column! But that's the magic of using LJ Smith stair parts!


Author's Note: If you need step-by-step color photos of the stair-building process, you should consider my Stair Building eBook. This helpful guide is the answer to all of your frustration over the stair building process. Click the link and you will be amazed at what you will discover.


Within the criteria set forth in the building code there is an infinite amount of possible riser and run possibilities. Keep in mind that in the planning phase of your home, you often can make a set of steps work. If you tell your planner or architect you want 7.5 inch risers and 10 inch treads, they can adjust the staircase location and openings so the steps will meet the building code.

CLICK or TAP HERE to get FREE quotes from local companies that can design and install your stairs.

An often overlooked aspect of steps is the elevation of the finished floors at the top and bottom of staircases. Basement staircases often suffer in this regard. A set of steps in a new home may be built thinking the concrete floor in the basement is the finished surface. Well, at that point in time, it is the finished surface. But think what happens when you place thick ceramic tile or even a hardwood floor on the basement floor. The first riser height suddenly becomes too short and presents a safety hazard. The stairs must be rebuilt or you stick with a thin flooring material that keeps the stairs code compliant.

All of these same principals apply to exterior steps. Decks, patios, garden stairs, etc. need to be both safe and comfortable. The 7.5 inch riser and 10 inch tread works great for just about every exterior step application.

Column NH057

Visiting Your New Home

rain soaked framing lumber house under construction

Visiting Your New Home © 2017 Tim Carter

Today, I stopped by a new home that was being built by a former competitor of mine. He builds a great home and laughs and shakes his head when we talk about how I transitioned from being a builder to a writer. When I still built homes on a daily basis you could scarcely tell his work and homes apart from mine. One might think we were clones of one another. We had a very splendid relationship and still do. There was always enough work for both of us. If he was busy, he would often refer customers to me if I was a tad slow and of course, I would do the same.

As I strolled through this magnificent home that was framed and under roof, it brought back all sorts of memories about some of the signs a great builder leaves behind each day on the jobsite much as an animal that walks through soft mud. There were clues everywhere within the home and I started thinking how most people might not even realize what they might be looking at if they happened to walk around and in the home after the workers had gone home for the day.

Should your construction site be tidy?

For example, when I pulled into the jobsite, there was orange plastic fencing erected in critical locations that protected valuable trees and kept people away from dangerous trenches and machinery. I couldn't find a scrap of trash or cardboard anywhere on the lot. The building site was immaculate and even the trash dumpster and temporary toilet were discreetly placed so they didn't detract from the curb appeal of the home in its partially finished state.

Should lumber be left out in the elements?

The large garage was transformed into a dry and convenient storage place for all sorts of lumber. All too often, I have driven by jobsites and seen exterior finish trim lumber dropped directly on the dirt and left out in the elements. Not here. The lumber was stored up off the concrete floor so air could circulate around it and it was neatly stacked so that you knew exactly what material was where. One would think they were in the warehouse of a traditional lumber yard!


Don't try to do your own walk through inspection unless you are armed to the teeth with my 100% Satisfaction Guaranteed Walk Through Inspection Checklist!


House under construction

You want a great contractor no matter if you’re building a large new home or just remodeling a bathroom. Photo Credit: Tim Carter

Communication at the job site

The dining room of the home served as the command center for the builder. A large bulletin board was attached to the stud walls and on it were all of the safety notifications, building permits, emergency phone numbers and all necessary notifications as required by all government agencies. There were no less than two fire extinguishers within sight and as I continued my tour I saw many more throughout the home. There was also a dry-erase board that allowed subcontractors to post messages for the builder and other subs. What a great but simple idea!

house blueprints with marker and scissorsA complete set of rules and guidelines were also posted on the bulletin board. Consider these a code of ethics for all of the people who work on the job. The builder was communicating to each subcontractor and their employees what was expected and what would not be tolerated. These rules are such a simple thing, yet I have rarely seen them on another jobsite.

A giant rolling drafting table/storage box had a complete set of plans on it. This permanent set of plans allowed everyone who worked on the jobsite to see what was expected of them. It is not unusual for a subcontractor or an employee of a subcontractor to forget to bring plans to a jobsite. Different plans have been substituted by mistake and utilities are installed in the wrong locations because a sub is simply working from the wrong set of drawings. That couldn't happen here as the plans for the house were in the open and easily accessible.

The inside of the home was swept perfectly clean and there was no trash to be found anywhere. This type of environment can be self-sustaining. When a new subcontractor enters the jobsite, he can see it is spotless and he can't blame his mess on another tradesperson.


How would you like me to build your new home? It's probably impossible for me to fit your job into my schedule, but I will gladly share hundreds of my tricks and building secrets with you and your builder. Check out my New House Specifications.


Glancing at the workmanship even a novice homeowner who knows little about construction methods could see that the cuts on the lumber were precise, the walls were plumb and the holes drilled for plumbing and heating pipes were centered and neatly done. Craftsmanship seemed to emanate from the walls like sound from a bass drum in a high school marching band.

The message here is simple: visit your new home construction site often and unexpectedly. Give it a report card with respect to what you see. If you see disturbing things, discuss them immediately with your builder. From time to time people make mistakes, but if you see the same mistakes week in and week out, you better start taking photographs to record the oversights. The photos may just come in handy if a dispute develops.

Column NH056

Concrete Cracks

Concrete shrinkage cracks look just like this. The darker gray concrete slab touched the lighter gray foundation the day it was poured. Over a period of months, even up to a year or more, the concrete slab shrinks in size and creates a gap. Copyright 2018 Tim Carter

"On average, a concrete slab shrinks 1/16th inch for every ten linear feet."

Concrete Shrinkage Cracks Checklist

  • Concrete shrinks over time as it hardens and subsequently cures
  • Shrinkage creates tension forces that can rip the concrete apart
  • Control joints in the concrete help to prevent ugly random cracking
  • Shrinkage is about 1/16th inch for every ten linear feet

Related Links

Magic Concrete Crack Epoxy - Fixes Concrete Cracks

Reinforcing Steel in Concrete - Best Way to Hold Concrete Together

Concrete Shrinkage Cracks Cause Anguish and Arguments

Concrete gets smaller as the water in the concrete ever so slowly evaporates from the artificial stone.

I receive calls and emails from homeowners all the time about cracks that appear in new concrete sidewalks, driveways, patios, basement floors, slabs on grade, and foundation walls. Most homeowners are quite upset by the cracks.

Free & Fast Bids

CLICK HERE to get FREE & FAST BIDS from local concrete contractors.

Do Contractors Know Concrete Shrinks?

I don't think that most contractors know the true cause of cracks in concrete. They'll tell you that cracks are normal and shrug their shoulders.

Years ago, when I was still building, I discovered that concrete shrinks as it dries and cures. On average, a concrete slab shrinks 1/16th inch for every ten linear feet. This may not seem much to you, but what this shrinkage does is produce significant internal stress within the slab.

What Happens When Concrete Shrinks?

As concrete shrinks, stress is created within the slab. This stress or force is considered a tension-type force as the concrete is trying to pull itself apart much as you pull on two ends of a piece of newspaper. Pull hard enough and the paper tears.

Because I knew there was a chance for concrete to crack, I actually had a special section of my contract that told people I guaranteed their concrete would crack.

I realize this sounds nuts, but that sentence in the contract afforded me with enormous protection. I further stated in my contract that I would do everything in my power to minimize the cracks and encourage the concrete to crack at predetermined locations. But even with all of this, the concrete could develop a random crack all on its own.

Can You Control Where Concrete Cracks?

You can encourage concrete to crack where you want, but I wouldn't always guarantee this. The best way is to create a crease or straight line in the fresh concrete. Large slabs, driveways, sidewalks, etc. will require many of these lines. Contractors call them control joints because you try to control where the concrete will crack.

Surely, you have had to tear a piece of paper in half before and not had a scissors handy. If so, you probably creased the paper with your fingernail several times and then tore the paper neatly along this crease. The creasing action creates a pre-weakened zone in the paper by bending and breaking some of the fibers in the sheet of paper.

CLICK HERE to get FREE & FAST BIDS from local concrete contractors.

How are Concrete Control Joints Created?

Concrete masons create control joints by creating a line in concrete slabs as they are finished or immediately after they are poured. A saw cut or tooled line that creates a groove in a slab actually reduces the thickness of the slab at that location and makes it easier for the slab to crack. In the trade, these lines are called control joints as we are trying to control where the crack will occur.

How Deep Should Control Joints Be?

The Portland Cement Association and the American Concrete Institute agree that the minimum depth of a control joint should be 1/4th the thickness of a slab. This means the grooved lines you see in a typical sidewalk should be one inch deep, as many sidewalks are poured four inches thick.

Measure your grooves and guess what? I'll wager they are only 5/8 inch deep or perhaps 3/4 inch if you're lucky. A concrete saw can be placed in these grooves to increase the depth of the groove.

Will Steel or Mesh Help Hold Concrete Together?

Placing reinforcing steel, wire mesh, and even synthetic fiberglass fibers in with the concrete will help hold the concrete together in the event it does crack. I'm a huge fan of one-half inch steel bars placed at two-foot-on-center intervals in slabs poured on grade.

rebar before pouring concrete

Reinforcing steel is the best thing you can include when pouring concrete. When concrete cracks, the steel holds it together. (C) Copyright 2018 Tim Carter

This steel works well if it is in the center of the slab or just slightly below the center point. The steel has a far greater tensile strength than the concrete and holds the artificial rock together much the same way as the strings you find in common brown packaging tape.

How Do You Hold the Steel Bars Up During the Pour?

For years I've placed small pieces of solid brick under rebar to hold them up so they are suspended in the air and concrete can flow under and around the steel bars. If you're pouring a 4-inch-thick slab, you want about 1.5 inches of concrete under the bars. If the brick is thicker than 1.5 inches, then you need to dig a small recess for the brick to rest in so it puts the steel at the correct height.

Be sure you discuss what measures your builder intends to take to ensure your concrete cracks where it is supposed to crack. Keep in mind that your builder can't give you an absolute guarantee that the concrete will do what he or she says. If this person makes this lofty promise, then you might want to consider talking with another builder.

CLICK HERE to get FREE & FAST BIDS from local concrete contractors.

BXXX

Column NH055

Stucco Makes a Strong Home

Stucco Homes

I just got back from a five-day trip spent in the Rocky Mountains of Montana. I think it is fascinating to travel as you learn new things and the experience helps put things into perspective in your daily life. For example, driving south through the Gallatin River canyon from the town of Bozeman towards Big Sky, Montana, you can't help but get a feel for the permanence of rock. The Rocky Mountains have been around a long time and are still standing tall because of the rock they are made from.

The concept of building with rock and man-made rock is nothing new. The age-old fable of the Three Little Pigs is based upon the longevity of stone or masonry building materials as compared to wood or even straw.

Travel to Europe and you will see that much of their residential construction is based in stone, brick and stucco. They learned long ago that cement stucco, a man-made rock material, is both durable and attractive. The truth be told, Europeans used up much, if not all of their forests hundreds of years ago and were forced to find a different building material other than wood.

But you might be getting ready to make choices for your own new home. You don't have to travel to Montana, Colorado or even Europe to get some great ideas. Your trip might only have to last an hour or two as you drive around some of the older well-established neighborhoods of Chicago. I am confident when you do, you will discover quite a few cement stucco homes as well as others that use stucco on a part of the exterior.

Cement stucco is an amazing material for a number of reasons. For one, it is a man-made rock material that is incredibly strong. A well-built stucco home can easily last hundreds of years. I realize that might not mean much to you, but stucco can add both value and character to your new home.

Permanent pigments can be added to cement stucco as it is mixed so that it never needs to be painted. The stucco mason can build several test panels to show you what the cured colored stucco looks like when it is totally dry. You can whitewash stucco to create a cottage look. Whitewashing is simple to do and the look is unlike anything you have seen in a long time. You can simply leave stucco natural and let it achieve a patina over time.

Used with modern windows and doors, a stucco home can block those howling winter winds that try to suck heated air from your home. The stucco finish is a fantastic wind barrier, yet it easily transmits any water vapor that can cause mold to grow in other wall systems that do not readily allow water to migrate to the atmosphere.

If you hire a talented builder as well as a talented stucco mason, you will have an infinite amount of stucco textures and patterns from which to choose. There are classic stucco styles and as you drive around the neighborhoods scouting for stucco, be sure to take photographs of stucco textures you love. Often if you knock on the door of the home and tell the owners what you are doing, they will allow you to take close-up shots of their houses. Your interest in their home often creates pride in the homeowner.

Keep in mind that stucco can be painted if you so choose, but this takes a maintenance-free material and turns it into one that requires periodic maintenance. If you decide to paint, it is critical that the new stucco cures for a period of time. It can take three months or more for the stucco to release most or all of the moisture it contains. If you paint before the stucco is fully cured, the new paint job can peel in short order. The safest route may be to wait 6 or even 9 months to paint. Be sure to use the recommended primers as called for by the top coat paint manufacturer.

Column NH054

House Plans and Contracts

Today, I delivered 3.5 grueling hours of intense testimony during a deposition. I was issued a subpoena to come forth as a factual witness in a civil lawsuit between a builder and a neighbor of mine. Testimony given in a deposition has the same power as that given in an actual courtroom. I was sworn to tell the truth, more importantly the whole truth, and all of the questions and my answers were transcribed by an official court reporter.

So what does this have to do with your new home you might ask? It has everything to do with it. The disagreements between the parties in this lawsuit are many and most, if not all, of them can be traced back to a poorly worded contract, plans that had minimum detail, and expectations on the part of the homeowner that may not be realistic in the eyes of many consumers.

How important are detailed blueprints?

All too often I discover that people create an image in their mind of what they want their new home to look like. That is fine. It is exciting to dream about something new that gives great pleasure and especially something that might actually go up in value over time. But the challenge for many people, including some draftspeople and architects, is to verbalize or communicate those wishes, dreams and thoughts into a language the builder and subcontractors understand.

house blueprints with marker and scissors

The actual plans for your new home are the cornerstone to the foundation of the relationship between you, your builder, his suppliers and subcontractors. It becomes your voice when you can't be at the jobsite to talk over the screeching of saws and the pounding of hammers.


How would you like me to build your new home? It's probably impossible for me to fit your job into my schedule, but I will gladly share hundreds of my tricks and building secrets with you and your builder. Check out my New House Specifications.


Excellent plans, ones that include numerous detailed drawings of specific elements of the home, spreadsheet formatted schedules that contain each aspect of how a room is to be finished, which exact plumbing fixtures go where, what appliances are being installed, etc. can actually speak clearly for the entire length of the job. Believe it or not, it is entirely possible for a builder to receive a set of plans and specifications that are so detailed, they never have to ask one question of the architect or homeowner. The finished product turns out exactly as the homeowner desired, assuming, of course, the homeowner understood the plans.

What should be in the contract?

Once you have great plans and written specifications, you need a good contract. I am not an attorney but I can tell you that all sorts of things need to be addressed. For example, specific events need to happen for monies to be paid. A good contract talks about what happens if a change order is issued. Good contracts also spell out dispute resolution choices. Keep in mind that the plans and specifications need to be dated and the contract should refer to these with respect to the work that will be done. Consult with several good attorneys and find one that can show you a copy of a contract you understand and one that covers many of your concerns.

Try to address quality expectations up front. To the best of your ability produce photographs or cite things that both you, the builder and other parties can actually see that represent the quality you are looking for. It is okay for you to expect perfection, but clearly define what perfection means to you and be prepared to pay for it.

I talked about perfection today in my deposition. My discussion included a reference to a double standard. I felt it was very unrealistic for a person who makes mistakes in his or her work and still grabs a paycheck at the end of the work week to expect total perfection from another person.

Poor workmanship and perfection are never to be confused. Many instances of defects in new construction are poor workmanship and those errors must be corrected by the builder. Some flaws that people point out may not be workmanship defects but actual flaws in the material. For example, you may look at the face of a top model from five feet away and think she is gorgeous. But ask her if you can use a 10 power magnifying lens to look at the skin on her face. If you blink for a moment as you adjust the lens from her skin, you might think you are looking at the surface of the moon. Always keep in mind what you are looking at.

Column NH053

Waterproofing Tile Shower and Tub

overhead view bathtub tile grout

Here's the amazing sunken tub with the mosaic tile. You have no idea how hard it is to build one of these that looks this good! Copyright 2017 Tim Carter

Your new home may have a ceramic or even cultured marble tub or shower surround. When done right, they can look splendid for years. Surely you have seen a well-built ceramic tile or marble tub and shower that has stood the test of time as you have walked through an older home. For that tile and marble to last, the builders and installers made sure water did not seep behind the finish materials to cause wood rot.

What are some tips to keep the water in the tub or shower?

Your builder and his subcontractors can do the same thing in your new home. Fortunately, we have materials today that make this task not only easy, but the results are bulletproof. When done right, you can rest assured all water will eventually stay in the tub and shower where it belongs.

Virtually every tub and shower pan, even shower pans made with membranes, have a lip that folds up at the edge of the fixture. This lip is hidden by the substrate that is under the finished wall material. The purpose of the lip is to redirect water back towards the center of the fixture. A roofer would look at this lip and immediately recognize it as a flashing not much different from the ones he uses to redirect water back onto shingles so it can continue down the roof.

Need help with your bathroom remodeling? CLICK or TAP HERE to get FREE quotes from local companies that can handle your remodeling project.

What is the best location for installing a water resistant membrane?

The best defense your builder can employ is the application of a water resistant membrane on the stud walls that lap down over, not behind, this lip. This membrane can be simple asphalt-saturated felt paper, newer waterproof underlayment membranes or traditional plastic sheeting. If any water gets past the tile, grout and the cement board or water resistant gypsum board under the tile, it is blocked and redirected to the tub or shower by these thin, yet powerful fabrics.

The best part is that it takes perhaps three or five minutes to install these membranes. Often the material is scrap that might be lying around the jobsite. What better way to lower the input into landfills and to permanently waterproof one small part of your new home?

What is cement board and should you use it around tubs?

The next step to stopping water from even getting to this membrane is to take a few simple steps while installing the substrate on the walls. I prefer to use cement board under ceramic tile and cultured marble for many reasons. First and foremost, it is 100 percent waterproof. If the cement board gets wet and stays wet for years for some reason, it will not fall apart. You can't say that about many of the gypsum-based products that are currently on the market.

bathroom project shower tile walls backer board

During the remodeling. The cement backer board is visible on the right.

As this cement board is installed, I feel it is a good idea to pay attention to where the material contacts the tub or shower and where it touches up against another piece of cement board. For example, I try to create a crisp one-quarter inch gap between the cement board and the top of the tub or shower fixture. I also try to create these same, or slightly smaller gaps in the corners where one piece of cement board intersects another. Gaps are also created if there are horizontal seams where cement board is stacked upon one another.

How do you fill the gaps around the cement board?

Once the cement board is securely fastened to the walls, these gaps are filled with 100 percent silicone caulk. I suggest you leave several small gaps, perhaps one-half inch long, in the caulking bead at the top of the tub. Do this on every wall. These gaps are drainage holes that allow water to get back towards the tub or shower in the event water somehow gets to the membrane behind the cement board.

These steps are easy to do and should not add any significant cost to your new home. Even if it does cost an extra $50, it is well worth the price. Imagine how costly it might be to rebuild the shower 10 or 15 years from now. I can tell you, it will be 20 or even 30 times the cost to make these small modifications now.

Column NH053

Fence

There are four types of fences visible in this picture - chain link, picket, split rail and a privacy fence in the distance. PHOTO CREDIT: Roger Henthorn

There are four types of fences visible in this picture - chain link, picket, split rail and a privacy fence in the distance. PHOTO CREDIT: Roger Henthorn

There is an old saying that talks about how good fences make good or great neighbors. This is so true as a fence that is placed where it should be clearly defines and outlines the property the fence is surrounding. I have a fence along part of my north property line and believe me, it has come in handy on more than one occasion. Fortunately, my neighbor loves the fence and both she and my wife use this graceful wood fence as a backdrop for plants.

Where do you start when deciding on a fence?

If you decide you want a fence, the first thing you must do is some research. Start with your local zoning officials to see if fences are permitted and if so, what if any requirements there are with respect to height, type, style and position. The zoning restrictions concerning fences in my town and its suburbs are as plentiful as ticket scalpers at a Cubs game. You should also check your deed or other paperwork you received at your closing. You just might find other neighborhood or sub-division restrictions regarding fences.

Once you have been cleared for construction, you now need to verify where your property line is. If you don't have accurate property pins in place from a recent survey, I suggest you invest in a survey. The price of the survey is well worth it, especially if you take great care to mark and preserve the corner pins the surveyor will drive into the ground. These markers can be used to settle property line disputes in the future and they will be very helpful when you go to sell your home.

wrough iron fence & kids

Once you know what you can legally build and where to place the actual fence, it is time to select a material. There are countless materials and styles. You may want chain link, wrought iron, vinyl or wood fencing. My wife and I settled on a Victorian wood fence style that goes very well with our Queen Anne Victorian home. Cedar and traditional treated lumber were the woods I chose to use. I could just as easily have gone with redwood and even locust as they both contain great built-in preservatives to combat wood rot.

CLICK or TAP HERE to get FREE quotes from local fencing companies that can install your new fence.

How should you prepare treated lumber before installing the fence?

If you are going to use treated lumber for the posts and horizontal rails of your fence as I did and you are going to paint your fence, I suggest you get the lumber months ahead of time and stack it in your garage so it can air dry. Be sure to use small sticks between the layers so that air can circulate around each piece. Store the lumber flat and do not let the sun hit it. Often treated lumber has excessive amounts of moisture in it from the treating process. If this moisture is covered by paint, peeling and blistering of the fresh new paint in a few weeks or months is a real possibility.

Should you paint the fence pieces before installation?

If you really desire your paint job to stand the test of time, you should precut all or many of the actual pieces of wood that will be used to build the fence. I did this when I built my fence. I then pre-painted each piece of wood on all sides, surfaces and edges making sure to use the correct primer for the paint as called for by the top or finish coat paint manufacturer. If I were rebuilding my fence today, I would use an exterior paint that contains both urethane and acrylic resins. This paint has the best holding power and will last possibly 10 - 15 years without failure.

The nails, screws and bolts you use to secure all of the wood to one another is very important. Use only the highest double hot-dipped galvanized or stainless steel fasteners. These will not rust. If you use inferior fasteners, not only can the fence fall apart over time, but your paint job might start to develop unsightly rust spots in short order.

Before you start the actual construction of the fence, be sure you determine if there are any buried wires, pipes, cables, gas lines, etc. where you will be digging. Striking a high-voltage electric line with a sharp post hole digger can be a religious experience, if you know what I mean.

Column NH051

Costly Design Errors

garage layout

Can you see the mistake made by the architect in this photo? Look at the short stub foundation wall on the right then the height of the doorway from the garage to the house. (C) Copyright 2017 Tim Carter

I'll bet you have been to a party at a the house of a friend, neighbor or relative and noticed one or more builder blunders. Perhaps it was when you drove into the driveway and opened your car door only to find you were stepping in wet grass. Maybe you were in the first floor bathroom and wondered why you had to reach way behind you to get toilet paper. There are hundreds of places a builder or a subcontractor can make a mistake, but let them happen on other new homes not yours.

Where should you locate your air conditioning units?

Let's start with a few common exterior mistakes that can often be easily avoided. If you are going to have air conditioning in your home, think about where the outdoor compressors will be. Try to locate them on the east or north side of your home for maximum efficiency, but avoid placing them near bedrooms or other rooms where you will spend lots of time. New air conditioning units are being made so they produce minimal noise, but they are by no means silent.

How wide should a driveway be?

Driveways must be wide enough to allow you to easily exit and enter a car and still be on the driveway. A single lane drive should be no less than 12 feet wide and a double-wide driveway should really be 22 feet wide. These widths will handle beefy SUVs with ease and minimize door dings if two cars are parked adjacent to one another.

If you don't want your guests to cower in the rain waiting for you to answer the front door, be sure a front porch or covered entrance is included. Clever architects can provide this protection no matter what the architectural style of your new home will be.

Is the shower head too low?

Do a quick walk through inspection of your existing home. Make a list of things that bother you in each room. My guess is that you might wonder if the plumber who worked on your home was only 5 foot 2 inches tall. All too often, shower heads are installed too low and people squat and bend over when a relaxing shower was on the agenda. Toilet paper holders can be placed just about anywhere in easy reach so long as solid blocking is placed in the framing before drywall is installed.

How many electrical outlets is enough?

Don't forget to pay attention to simple things such as electrical outlets. Do you wish you had more in given rooms? Would you like to have outlets directly behind end tables that are placed next to beds and couches? You bet it is possible. What about a nice outlet or two right on top of a fireplace mantle? It can and should be done. You might also want a floor outlet or two in home offices that will have a desk out in the room instead of against a wall. Imagine how you might like a strategically placed floor outlet to power a coffee table that is lighted.

Traffic patterns in rooms and the house as a whole need to be studied. Pathways within rooms can gobble up valuable floor space. You can sketch these connecting walkways on your plans and see how well scale cutouts of your furniture will fit without extending into the traffic pattern.

Your builder may have great intentions and build your home to code, but the floor systems may be spongy or bouncy after you move in. This boo-boo can be avoided if you specify stiff floors that meet the 1/480 deflection design standard instead of the minimum standard of 1/360 in most building codes.

What is the best width for a hallway or stairway?

Think about hallway and stairway widths. Once again the building code minimum width of 36 inches is often chosen by builders. Avoid this at just about any cost and try to make sure staircases are 42 inches or more in width. You will never regret having a 48 inch or wider hallway.

attic truss design creating roof room

This is an attic space in a new home. Most builders would have used standard trusses and wasted all this space. (C) Copyright 2019 Tim Carter

How can you get extra space in the attic?

Often, the biggest builder blunder is overhead and out of sight. All too often regular common trusses are used over living spaces and garages. In certain places your builder may be able to install cool attic trusses or lower-headroom storage trusses that allow you to either create a full-sized room in the future or safely store some possessions on trusses that have been rated for this purpose. Last but not least, ask your builder to install a real staircase to these bonus spaces, not one of those light-duty folding staircases.

The other videos in the series (video 1 shown above) are available by clicking on the links below.

Video 2 - Contract & Specifications

Video 3 - Paying Contractors

Video 4 - Avoid Change Orders

Column NH050