Pressure Washer Damage – It Happens FAST

pressure washer

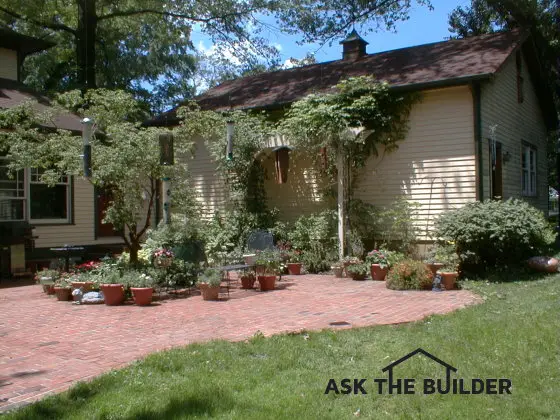
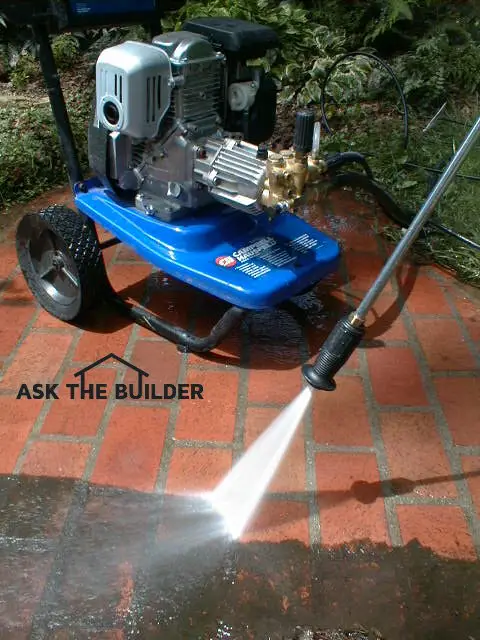
Pressure Washer Damage | That black goo is just one year's accumulation of maple tree droppings, algae and dirt. I can safely use the pressure washer on my patio because the mortar is about 7,000 psi strength and the brick are special outdoor paving brick that are very hard. The secret tips just below are SO GOOD I shared them with the 31,000 subscribers who read my November 3, 2020 FREE newsletter.

Pressure Washer Damage

DEAR TIM: I am on the fence about buying a pressure washer. I have seen how fast they clean things but I recently saw a wood deck that was ruined by a pressure washer. How do you feel about them? If you were buying one, what would you look for? What is the best way to use one to ensure you do not cause permanent damage to a surface be it wood, concrete brick or stone? Meghan T., Mazomanie, WI

DEAR MEGHAN: Come down off that fence and let's chat a while. I have used pressure washers for years and each time I hold the washing wand in my hands I am constantly in awe of their power. As you might imagine, I own quite a few power tools, many of which can create serious damage to a person's body or possessions, and a pressure washer most definitely deserves membership in this exclusive club.

IMPORTANT NOTE: Pressure washer damage photos to stone far below.

Pressure Washers Can Ruin Wood!

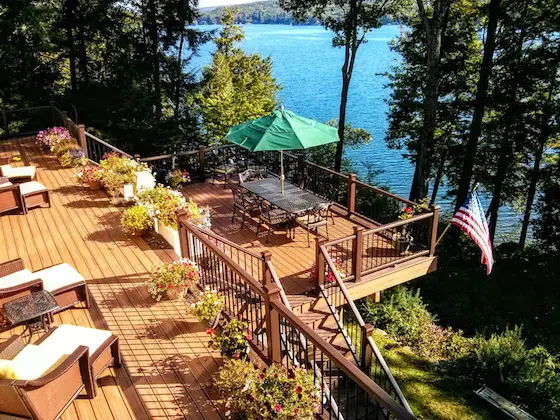
Pressure washers work. In some instances, they quite possibly work too well. I have also seen wood surfaces that have been damaged by pressure washers. But that aside, you can use a pressure washer to create a large, wide fan spray of perhaps two or three feet wide to rapidly rinse off a wood surface. To ensure you do not damage the wood, the tip of the wand that creates the spray might need to be three or four feet away from the surface.

CLICK or TAP HERE to get FREE BIDS from local cleaning companies who can SAFELY clean your things.

The damaged wood deck you saw probably was ruined when the person operating the pressure washer held the tip of the wand inches, instead of feet, away from the wood. The tip or nozzle on the wand may have also been the wrong type. Wide-angle tips of 25 or 40 degrees are safest for wood as they distribute the stream of high-pressure water over a wider area.

What Kind of Pressure Washer Do You Own, Tim?

I own a professional or serious-duty pressure washer. Mine is gasoline powered and develops 2,400 pounds per square inch of power while delivering 2.2 gallons of water per minute to the object or surface being cleaned. I use it each year to clean exterior paving brick patios and walkways around my home. These brick have a very hard surface and the mortar between each brick has an extremely-high cement content giving it enormous strength. The water blast from the pressure washer has yet to cause any visible damage to the brick or mortar.

Can a pressure washer damage masonry surfaces?

But don't think for a moment you can safely use a pressure washer on all masonry surfaces. Using a pressure washer, I can actually peel the finished surface from poorly-installed concrete. A well-intentioned do-it-yourselfer using a light-duty pressure washer can inject vast amounts of water behind the brick veneer wall of his home. This same pressure washer can quickly erode soft clay brick.

Should I Test On a Small Area?

Yes, if you're new to pressure washers, test on a small area and look for damage.

Therein lies the problem with these wonderful, yet powerful tools. You must know the limitations of both the tool and the material that is being cleaned by the pressure washer. Unfortunately one often finds out after the damage has been done. Most pressure washer manufacturers recommend that you keep the water spray as far from the surface as possible and slowly move it towards the object constantly checking for damage.

Should I Test Different Models?

If you want to buy the right pressure washer for the jobs around your home, I suggest you test drive several before making a decision. Visit a local tool rental store and see if you can rent one or two different models for a very short amount of time. Talk with the manager of the store and tell him what you are trying to clean and see which model he thinks will work best. Have him demonstrate exactly how to use the pressure washer while you are there.

Do Pressure Washers Require Maintenance?

Be very aware that pressure washers need a certain degree of maintenance and care. When the pumps that create the high pressure are operating, they get very hot. The water moving through the pump helps cool the pump parts. Read all instructions that come with your pressure washer and always follow them closely. Doing this prevents accidents to you, your home and damage to the actual pressure washer.

Can Pressure Washers Hurt Kids?

Children are fascinated with pressure washers. They often think of them as giant squirt guns. These tools should never be used by a child as serious bodily harm can result. If you think for a moment that your child or a neighbors' child might try to operate your pressure washer in your absence, consider doing something to make it impossible to start the machine.

Keep in mind that repeated washings can cause a slow and cumulative deterioration of a surface. You may not see the damage the first time, but after ten washings, a surface may start to show signs of wear.

How Powerful Are Pressure Washers?

How powerful are pressure washers? Read what happened to Robert Rothstein who emailed me on September 5, 2004:

"I was using a power washer to clean off some bricks on a wall. We etched some lines across some of the bricks. What is the best way to get the brick back to near matching the surrounding surface? Can the lines be "cleaned" off? Can the involved brick be stained?"

Bob is in deep trouble. I haven't seen his brick, but my guess is he actually wore away some of the brick surface. Don't ever underestimate how powerful and damaging these tools can be.

I saw this same damage done by pressure washers in Old San Juan, Puerto Rico after the unrest there in September of 2019. After the protests, government workers used them to remove hateful sayings created with spray paint aimed at the corrupt governor. The oolitic limestone on the buildings was ruined forever by the pressure washers. Look:

pressure washer damage stone

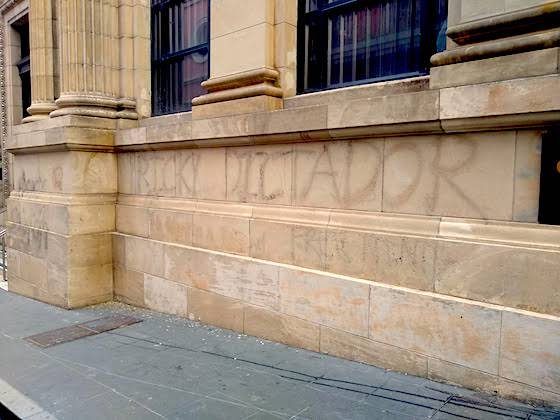
They should have just used paint remover. Ricky is now immortalized for centuries.
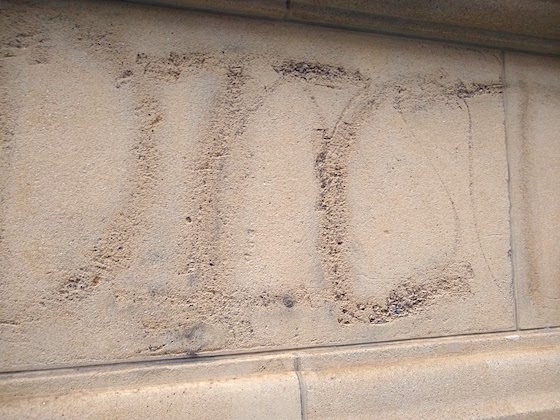
pressure washer damage stone

What a damn shame.

pressure washer damage stone

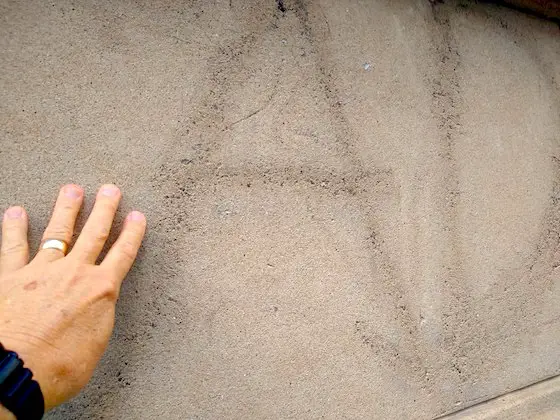
Don't put dangerous tools in the hands of those who lack critical-thinking skills.

Column 521

Outdoor Privacy Screen – Lots of Choices

privacy outdoors

Outdoor Privacy Screen | You would think this attached garage wall would be a liability next to the patio. Actually, it creates an enormous outdoor privacy screen from one of my nearby neighbors. The secret tips in the column below are SO GOOD I shared them with the 31,000 subscribers who read my FREE November 8, 2020 newsletter.

DEAR TIM: We are building a home in a subdivision and plan to have both a deck and a patio. But the area is devoid of trees and when I walk on my lot in what will be my future backyard, I feel like a fish in a bowl. How can I get some privacy while relaxing in my outdoor rooms? I am looking for some instant and hopefully affordable solutions. Cary R. Verona, KY

DEAR CARY: The options that are available to you are as abundant as smoking grills on the fourth of July. I can immediately think of no less than 20 or 30 different privacy screens built out of any number of building materials that will work. I understand your need for instant gratification, but I must tell you the most effective and eye-pleasing result, in my opinion, is a mixture of plantings and some long-lasting building material.

Can Architects Solve Privacy Problems?

Architects solved privacy problems years ago with the actual buildings. Buildings that are U-shaped or even square with all four walls opening onto an interior courtyard produce excellent environments for the utmost in person privacy.

A friend of mine owned a home in Florida where a simple wall on the front of his property created a privacy barrier for a small intimate patio where he read his morning newspaper. Hopefully you can modify the design of your home to incorporate a courtyard.

Should I Check Zoning Regulations?

The first thing you need to do is check with your local zoning officials. There are very likely zoning regulations that describe fences, walls and other building structures that you can use to create a privacy screen. Be aware that often there are loopholes in zoning codes.

For example, a zoning regulation may say that free-standing walls can't be any higher than 6 feet. But walls that are an extension of the house may have a height limit that matches the total height of the house. It sounds crazy, but you might be able to get enormous privacy if you just leverage the zoning regulations to the maximum allowable limit.

Can a Garage Provide Privacy?

Quite by accident, my wife Kathy and I created a fantastic privacy barrier with our attached garage. The shape of our lot made it such that we had to stagger the position of our garage with respect to the front of the house. The zoning laws in my village do not allow garage doors to face the street. I wanted an extra-wide garage. When you add all of these factors together, we ended up with this 30 foot long 12 feet high wall next to our patio. It created instant privacy from our neighbor to the west.

We softened the look of this harsh wall with a large arbor that has two gorgeous honeysuckle vines that produce yellow and red flowers all spring, summer and early fall.

Can an Outdoor Privacy Screen Stop Sound?

Don't forget to take sound into consideration when planning your privacy screening. Structures that are solid masonry work very well. They work even better when there is lots of vegetation nearby to help absorb the sound waves. Not only will these barriers keep your sound from traveling to the neighbors, they will help block offensive noise from polluting your private little outdoor space.

Should I Be Worried About Wind?

Be very aware of wind pressure as you think through what you will do. Strong winds can topple masonry walls and other wood structures that have not been designed to withstand the enormous pressure of wind pushing against a flat surface.

Any number of design elements can be included in the wall so that you and your family will be safe. Be sure to have a registered architect or structural engineer approve your design before you head off to the building department to get a permit.

WATCH THIS VIDEO to see the POWER of WIND.

Finally, even though you want an instant privacy solution, I urge you to consult with a landscape architect who can lure you to look into the crystal ball to see what lies ahead. This person may be able to show you photos or actual places where landscaping has been used alone or with a structure to create an outdoor paradise that is beyond your wildest dreams. Be careful, looking at these photos may be the ultimate enticement.

What is the Easiest Privacy Screen to Build?

Wood privacy solutions are among the easiest to construct, but they often become maintenance nightmares. But some wood structures built with redwood or cedar in drier climates can be easy to care for and look good for long periods of time. Simply be aware that wood might require a significant amount of upkeep to ensure it looks good.

Is Masonry a Good Choice?

Masonry walls have unlimited potential. You can stucco a wall, cover it with decorative tile or slate or even face it with real or artificial stone. Brick walls with weeping mortar joints can create a unique look and feel.

What is the Best Outdoor Privacy Screen?

The best privacy solutions are ones that are well-planned and leverage local zoning laws to the hilt. Don't expect the zoning officials to help you find the loopholes. You will have to read the code and, the definitions of the terms in the code. Then start to do some creative thinking!

Deck Piers and Footings

Deck Piers and Footings

concrete deck pier

Deck Pier Footing | Once a deck pier is installed, it's fairly difficult to determine how far it extends into the ground. This pier is twenty feet deep. I know because I installed it!

DEAR TIM: I am building a deck and wonder how far down I have to dig into the ground for the wood deck post. I had been told it must extend to the freeze/frost line. What/where is that? What diameter should the hole be? Is there a need for steel in this pier? Joanne C., Hanover, PA

DEAR JOANNE: The freeze or frost line is the depth to which the soil freezes or has been known to freeze at some point in the past. It is absolutely critical that the foundations of buildings extend below this point in a soil profile. Except for a few arid locations, soils typically contain water and this water expands approximately nine percent in volume when it freezes. The resulting pressure created as the water expands is so great it can actually lift concrete slabs, house foundations and deck structures with as little effort as an Olympic weight lifter expends picking up his gym bag as he leaves the locker room.

How Deep is the Frost Line?

The frost line depth is not consistent around the nation because there is such a dramatic difference in climate from state to state. The frost line in southern Florida is less than a foot, while in northern Minnesota it approaches 6 or even 8 feet.

The best source of information regarding your frost line depth is your local building department. These individuals perform daily inspections on jobs such as yours to ensure two things: the hole is the proper depth and the soil at the bottom of the hole is strong enough to support the concentrated loads being placed upon it.


Building a deck? Make the best decisions with my helpful and thorough Deck Installation & Repair Checklist. I offer a 100% Money Back Guarantee.


How is the Diameter of Piers Determined?

The diameter of the holes for your deck piers is not a number pulled out of the air. You may get the answer from your building inspector or you may have to consult with a seasoned architect or structural engineer.

How Much Do Decks Weigh?

Decks, especially large ones, create significant concentrated loads within the soil. If you calculate the weight of the entire deck, the furniture placed on it, and the combined weight of a large group of people who might be standing on it, you will be shocked at the number. Even a small deck might weigh in at 4,000, or more, pounds. The two connected decks at my house, one is 10 x 65 and the other is 24 x 16 could tip the scales at 12,000 pounds when you count all the lumber, decking, handrails, furniture, plants, etc. Look for yourself:

deck over water

Here's my own Trex Transcend deck. There's lots of railing. You're only seeing about 60% of the long upper deck in this photo. Copyright 2020 Tim Carter

If your deck is like most where it has two wooden deck posts and a rim joist that is bolted to the house, each of the two deck posts holds up approximately 25 percent of the total weight. In your case, the soil under each deck post may be called upon to support 3,000 or more pounds without flinching.

EB015 Cleaning & Sealing Deck eBoo CoverWhat size and shape should the hole be?

The diameter of the hole will probably be no larger than 24 inches in diameter and may be as small as 12 inches. Larger diameter holes spread the weight out over more soil area.

What is perhaps far more important is the shape of the hole as you dig it. All too often people dig post holes for deck piers and fence posts that look like an ice cream cone or a paper ice-ball holder - the bottom of the hole being smaller than the top of the hole.

Surely you've had an ice-ball in your hand on a summer day and squeezed the paper cone. The ice pops upwards with ease. Frost does the same thing with a hunk of concrete that's cone-shaped. Frost can heave a pier up 4 to 6 inches with ease.

Should a Deck Pier Hole Be Wider at the Bottom?

In fact, the shape should be the exact opposite. The bottom 25 percent of the pier hole should be larger than the top. As the frost drives deeper into the soil and tries to force the pier upwards, the flared base acts as a wedge anchor. For the pier to lift upwards the enlarged base would have to tear through the frozen soil. This is highly unlikely. The larger diameter base also helps spread the concentrated load over an even greater area.

Watch this video about how wedge anchors work in concrete block. It's the same principal for your deck piers when they combat frost heave:


Wood deck surfaces need to be cleaned and sealed to keep them in good condition. The cleaner I recommend is oxygen bleach.


Should I Use Reinforcing Steel?

Be sure to include two or three pieces of vertical reinforcing steel in the concrete as you pour the pier. This low-cost item adds enormous strength to piers that are taller than 30 inches. Long concrete piers poured on hillsides are subject to lateral or sideways soil pressure as the soil creeps downhill over time. The steel will help prevent the pier from cracking in two from this pressure.

CLICK or TAP HERE to get FREE quotes from local companies who can install a deck for you.

How Can I Center the Deck Post on the Pier?

If you want your wooden deck posts to be dead center in the middle of the concrete pier, then you need to be an expert surveyor or a person who builds deck like I do. Centering the deck posts is easy if you have the outline of the deck built and suspended in the air. This is very simple to do.

Start by attaching the rim joist to the house. Attach the two end joists of the deck to the rim joist using joist hangers. Temporarily support the other end of the joists with a piece of lumber making sure the joists are level. Nail the outer joist to the ends of the two joists that extend from the house. The outline of the deck is now complete. Check to ensure the deck outline box is both level and square.

Once the deck outline is square, drop a plumb bob from the corners to establish these points down at ground level. Use these reference points to easily locate the proper pier locations.

Related Links:

Footing Depth Below Grade

Column 519

Home Building Photos – Take Thousands of Them

3 film camera

Home Building Photos | This photo above shows you how important photos can be to CAPTURE the past! Modern digital cameras with instant preview screens ELIMINATE the need for two of the cameras above. And FILM? Are you kidding me? This photo was taken in September of 2003 before smartphones even existed.

Home Building Photos - You Can't Take Too Many

DEAR TIM: We plan to build a new home soon and wonder about how best to document the progress of the job. Taking photographs seems so straightforward but I wonder if they will be enough? Are some photographs better than others? Is digital photography acceptable? What cameras would you use? What are the key photographs you would take if you were me? Kristin P., Somerville, MA

DEAR KRISTIN: I can't begin to tell you how many times a photograph has saved me enormous amounts of time and money. I took many photographs as I built my home 18-years-ago and they come in handy from time to time as I do small remodeling projects around the house.

Just last summer the photos helped the crew that installed a buried radio fence wire that created an invisible fence for my new dog. The photos saved these men at least 30 minutes of exploratory digging, as they quickly located a nearby buried gas line and a downspout line.

Should I Shot Remodeling Photos?

You don't have to be building a new home to benefit from photography. Photos taken during remodeling jobs, and even during routine replacement of mechanical systems can be worth their weight in gold at a later date.

Homeowners can also use cameras to capture images of things that can't readily seen such as rotted roof sheathing, cracked and crumbling chimney crowns, and any surface that will be hidden by a building material such as concrete, drywall, exterior siding, brick, etc. These photos take the place of x-ray vision that seems to be available only if you happen to be a superhero.

home building photos

Upload your home-building photos and videos to the cloud for SAFE long-term storage. These are just a few of about 10,000 photos shot of my daughter's new home being built.

Can Photos Win a Lawsuit?

Not only are some photographs more valuable than others, but the actual method of photography can also be more valuable. Let's assume for a moment you and your builder get involved in a dispute in the future that gets dragged into the justice system. Photographs that were taken with a camera that uses traditional film or with cameras that produce instant photographs on real prints can't be altered.

Anyone who purchases an off-the-shelf software program and learns a few tricks can alter digital photographs to such an extent that the image doesn't really match what was shot by the camera. For purposes of evidence, traditional negatives or instant photographic prints are the best.

What Cameras Do Best?

I have three cameras that I prefer to use. They all take excellent photographs, but each camera has its strengths and weaknesses. My 19-year-old single-lens reflex 35 mm camera still works as well as the day it took its first photograph. I have an assortment of lenses and accessories that allow me to take just about any photo I need. Its powerful telephoto lens allows me to take distant photos as if I am standing right in front of the subject.

I own a popular instant camera that spits out the actual photograph within a second of shooting the image. This camera is invaluable if you need to know immediately that you got a great photo, not just any photo.

Digital cameras, of course, offer the same advantage, but you need to do several other steps with your computer and printer to actually produce real photos. A cool printer that does not require a computer simply uses the camera's digital media storage card to transforms the data into actual photographic prints. It can make an actual print in this fashion every 90 seconds. Video cameras capture moving images and allow you to describe with your voice the things you are taping.

I feel the most important photos and video clips are the ones you can't get once the house is built. Anyone can take a photo of a door trim miter joint that is sloppy. But you only have a limited amount of time to take photos of things that will be covered up. I would love to see you take countless photos of the different aspects of the work such as the application of the outer skin is applied to your house, be it brick, stone, stucco, siding, etc.

Take Photos of Utility Trenches

Furthermore, taking photos of open utility trenches showing the placement of pipes and wires may be very important. Photographs of plumbing pipes in interior walls might be priceless down the road.

open utility trench

There's no doubt about where the conduit pipes are! You can orient off the electric meter and the front door.

All structural components such as bearing walls, column to beam connections, truss connections to all walls, seismic connectors, nailing patterns of structural plywood or OSB at outside corners, etc. are just a few photos you would find in my job site album.

You may have to make numerous trips at different times of day to get the photos, but figure out a way to make it happen. If you have to hire a neighbor or a retired friend who can visit the job frequently, then do so.

A common mistake most people make when taking construction photographs is they are too far away from the subject. If you are taking a photo of a distinct item such as a flashing detail behind brick, be sure the camera is no more than 30 inches away from the subject, not five or ten feet. Distant photographs may not provide the needed detail an expert needs to see at a later date.

Take photos of things you think are not important. An expert may see lots of things you would never think to look at or study. It is better to have hundreds of extra photos instead of missing the critical photo that was never taken. The $300 - 500 you spend on film and processing will be the best money you have ever spent.

Column 518

Replace a Front Door – Slow Down!

glass window door farmcrest front door inside

Replace a Front Door | The biggest challenge in replacing this door would be making sure the woodwork surrounding the door is placed back exactly where it is now. The wallpaper will look perfect if this happens.

Replace a Front Door

DEAR TIM: My wife wants to change out the front door on our existing home. But the door is flanked on either side with sidelights. I am puzzled how to attack this project as the frames of the door and the sidelights seem to be permanently attached to one another. Can I easily separate them? Changing out the entire door seems as if it would be a nightmare as the brick touches up against the exterior door trim. What are my options? Jim L., Hickory, NC

DEAR JIM: You have a keen eye for the obvious. The frames of the sidelights and the actual door unit are connected and if they are like most, it will be a tough job to separate them. Perhaps the most challenging part is at your feet and you might have overlooked it. The threshold of the door typically is continuous under both sidelights as well as the door. You can't imagine the difficulty of disconnecting the door frame from the threshold with little or no damage to the threshold.

Is Replacing a Front Door Hard?

The task of replacing the entire door unit including the sidelights is not as hard as you might think. I realize you may be intimidated by the complexity since the brickwork is touching the exterior trim of the door. This is fairly normal.

What you might not realize is a gap on both sides of the door and sidelights as well as a gap between the top of the door and the rough framing. These gaps are hidden by the interior and exterior trim that surrounds the door and sidelight frames. Carpenters must create a larger opening for the actual door for a number of reasons.

The job of replacing a front door can be slightly more difficult if you have to move a front door sideways. This can happen where the door opening was not centered as it should have been during original construction.

Should The Weight of the Wall Bear on the Door?

First, the door itself should float in the opening. The weight of the structure should never be transmitted to the door or the door frame. By creating an opening larger than the door, the weight of the structure above is transferred to the framing material on either side of the door.

Why Should a 1/2-Inch Gap Be Above the Door Frame?

Secondly, the framing of the house can move as the house shrinks and it can move over time with changes in the weather. If the door and its frame were to be a tight fit, this movement would cause the door to bind on a regular basis. Finally, the rough opening might not be perfectly square and plumb. The finish carpenter needs some wiggle room to adjust the door as it is installed so it operates perfectly.


Have you found the perfect exterior door? Make sure you install it perfectly using my Exterior Door Replacement Checklist. I offer a 100% Money Back Guarantee.


Can You Get Replacement Sidelights?

The good news is that many new replacement exterior doors with sidelights are usually the same size or within a fraction of an inch of your existing one. The only exceptions might be door units that are 50 or more years old. Purchasing a replacement door that will fit can be done by discovering the actual unit dimension of your existing door and sidelights. The unit dimension is the actual width and height of the combined door and sidelight frames without any interior or exterior trim applied to them. Remove the interior trim that surrounds the door to begin this measuring process.

When Can You See the Door Frame?

Once the trim is removed, you should be able to see the side edges of the door unit. The sidelight and door jamb frames are typically three quarters of an inch thick. The interior trim often covers one half inch of this material. The next thing you need to discover is the actual bottom of the threshold. Using a tape measure, you should be able to get very accurate measurements side to side of the frame and the measurement from the bottom of the threshold to the top of the door frame.

What Should I Take To the Home Center?

Take these measurements and a photo of the inside and outside of the door with you to an exterior door store. They will have catalogs that list the actual unit dimensions of replacement doors. I am very confident you will find a door unit that will easily fit in your opening.

Do I Need to Make Adjustments?

The exterior trim of the new door may need a small amount of adjustment to make it look as good as new. If you have a gap, simply add some smaller trim moldings that complement the larger molding. If the factory molding is too large, remove the necessary wood to make the trim fit tightly against the brick.

What Mistakes Do Carpenters and Handymen Make?

Some carpenters make huge mistakes when installing exterior doors. They sit them directly upon the concrete slab or wood subfloor. When the interior finished flooring is installed months later, there is rarely enough room for a throw rug. The door bottom is simply too close to the finish floor and pushes the throw rug out of the way.

Should I Use a Flashing Pan?

It is always best to install a special flashing pan in the rough opening first and then place a 5/8 inch thick piece of redwood or CCA treated lumber on top of the flashing. The door threshold sits on this rot resistant wood and is now high enough so that most finished floor materials either slide under the threshold or can be notched to fit under the threshold. This gives you plenty of room for a throw rug in the entrance hall.


Column 515

Landscape Design

Landscape Design

Landscape Design ... PHOTO CREDIT: kevincaron.com

DEAR TIM: I am building a retirement home in Utah. The location boasts lots of sunshine, but winter weather is a reality. Since I don't want to spend lots of time taking care of the yard and the outside relaxation areas of my home, what materials would hold up best in this harsh environment? The area gets very little water so I want to hardscape with different natural materials instead of trying to coax plants to grow. Lacy O. Cedar City, UT

DEAR LACY: Just when I start to wonder if my college education would do anything for me, a question like yours ambles along. Seriously, I did graduate with my brain fairly stuffed with knowledge, but most of it was geology. It didn't take too many field trips out west to quickly learn that some rocks resist weathering much more than others. In fact, all one has to do is look around at the highest mountains or the tops of plateaus to determine which rocks are the toughest.

Where Can I See Durable Stone In My City?

You can sometimes get this same information from walking down a sidewalk in a major metropolitan area no matter if you live in Utah, Florida, Texas or any state for that matter. If the city has older buildings, there is a good chance many will have a stone or partial stone facade. When I look at some of the rock surfaces, they appear to be in the same condition as the day they were installed. But look closely at some buildings, and you will see rounded soft edges where 100 years ago was probably a crisp 90 degree edge. Some stones or rocks are indeed softer than others and subject to deterioration from regular weather including acid rain.

Can granite take repeated freeze-thaw cycles?

Granite is a plentiful rock that has a history of extreme durability. Some granites are much harder than others and repeated freeze-thaw cycles don't harm them in the least. The high-quartz content of this rock makes it naturally resistant to just about the harshest weather Mother Nature can stir up. Other igneous rocks that have a high silica content also tend to last for thousands of years.

Is limestone a good rock for landscaping?

Since your new home location is so arid, you will also discover that many limestones will also wear like iron. Limestones do suffer some surface degradation in regions that suffer from frequent acid rain, but acid rain is becoming less of a problem as utility companies continuously work to lower their emissions from power generating plants. Fine-grained limestone quarried in Indiana graces many of the monuments in our nation's capital and it has an excellent track record with respect to looking good for long periods of time.

What do you need to look for in hardscaping?

I feel the key to successful hardscaping is taking your time to investigate all of the different rocks and stones you have near you. Not only am I talking about size, but texture, color and surface roughness can help you create a magnificent outdoor living area. Visit all of the local landscape or hardscape stores as well as any rock or stone suppliers in your area. If you are lucky enough to have a university nearby, contact them to see if there are one or more geology professors on the staff. They can be an excellent resource with respect to local or regional sources of unique and beautiful rocks.

What Plants Do Well in My City or Town?

I understand why you might not want to deal with living plants in your hardscape areas, but I think you may be making a mistake. Undoubtedly, local landscape experts can show you plants that know how to thrive and adapt to all of the local weather conditions. If you are lucky, there may be some newer hybridized varieties that bloom more often and grow faster than traditional plantings.

Need help with your landscaping, CLICK or TAP HERE to get FREE quotes from local LANDSCAPING companies that can assist you.

Can you combine artwork with your hardscapes?

Landscape Design

PHOTO CREDIT: kevincaron.com

I have seen several very unique hardscapes that incorporate both dramatic and subtle artwork that is often a blend of rock and man-made materials. If planned well, these one-of-a-kind pieces of art can add sound as well as beauty and become a focal point of a patio or veranda. I especially like hardscape art that incorporates recirculating water. The moving water creates soothing sound that you no doubt deserve as you enjoy your endless string of off days.

When done tastefully, hardscapes make for unique outdoor eye candy. Talented landscapers for years have used plants of different heights, colors, leaf densities, etc. to create layers of greenery. That is the trick you must do but with rocks instead. Boulders or longer vertical rocks can act as a tree and smaller and smaller rocks fan out in patterns to create a feel one might get from real vegetation.

Can You Get Gravel in Colors?

Multi-colored gravel of all sizes covers the ground the same way hardwood bark mulch does in traditional gardens. There are many different colored gravels available. If you live near the ocean, do the same thing with seashells. They also work well as a mulch and even a surface for lightly traveled driveways.

Different Construction Quality Levels

Sun Room defects

Different Construction Quality Levels | I finished this Sun Room for my wife not too long ago. In this photo, it looks wonderful. You would probably think so if you were standing in the room. But there are no less than 20 small defects that some anal retentive people would freak out over.

DEAR TIM: My six month old concrete driveway is crumbling. The contractor visited and said I got what I paid for. Believe it or not, he said my house wasn't a "million dollar house" and he did not do as good a job on my drive as he might elsewhere. Is that fair? That answer seems totally unacceptable to me. Shouldn't the highest level of quality be done on every job no matter how much a house is worth or what the homeowner's income might be? Lori J., Cincinnati, OH

DEAR LORI: You have just lifted up a rock in the stream that I feel has laid untouched for too many years. The subject of quality in residential workmanship as well as materials used to build and remodel homes is one, in my opinion, that has not been addressed head on. It is a highly sensitive issue and undoubtedly will spark heated debate between all who have a skin in the game.

Are there different levels of quality in a remodeling project?

The quality problem is a tough issue to discuss because it is simply so subjective. Two people will have two entirely different opinions as to the quality of an item. I have worked for some people who are obsessive compulsive perfectionists. Many of these people expect absolute perfection from others, especially those to whom they are exchanging money for services, but they can't produce a perfection in the work they do. This is a classic example of the double standard. Other people I have worked for were as happy as clams and willingly accepted drywall that may have a few minor nail pops or seams that show in a certain type of light. Note, I am not saying this was acceptable workmanship, I am saying the customer found it to be so.

Quality is also a mind set issue from the perspective of the consumer. Visit a grocery or dry goods store and you often will see similar products that are in different cans. Take tomato paste or paint for example. What can be so different about these? Well, maybe certain tomatoes that are the best have a far less yield per acre than commodity tomatoes. Maybe the higher priced tomato paste has very special expensive spices in it. Paint, although it looks the same once the lid is popped open, can have vastly different ingredients -some of which cost far more money than others.

But many consumers readily accept these things and make decisions based on price, taste, performance, etc. when they buy these types of things. This thinking seems to fly out the window when they hire a contractor. There seems to be only one level of quality and it is a high one. If a contractor doesn't hit it, then he seems to be guilty of some infraction.

Can all contractors do the highest quality work?

The truth be told I believe each person should do the best job they can do every time they work. Therein lies the conundrum: Not everyone can do the highest quality work! Well, they can, but what is great work to them may be totally unacceptable to you. Some people do not possess the skill sets, hand-eye coordination and/or the training and experience to deliver work that is perfect or nearly so.

Add to this the fact that some building materials do not tolerate poor workmanship very well. Concrete happens to be one of these. There are very strict industry guidelines as to how concrete should be specified, ordered, installed, finished, etc. to get long-lasting results. Your driveway should not be falling apart. My guess is that an autopsy would definitively show a workmanship error or errors. Odds are your driveway will have to be replaced.


How would you like me to build your new home? It's probably impossible for me to fit your job into my schedule, but I will gladly share hundreds of my tricks and building secrets with you and your builder. Check out my New House Specifications.


Some poor workmanship can be easily fixed, but not all.

Sometimes mistakes or poor workmanship can be easily rectified. Take the case of drywall. A rookie finisher can mess up a wall or ceiling horribly and I or another experienced finisher can come in and make the surface look as smooth as silk in one day or less. The sheets of drywall do not need to be replaced; inexpensive topping compound just needs to be added and sanded.

There are several ways to fulfill your expectations on all future jobs. Contractors can possibly start to do what other companies do. I suggest they consider offering customers a variety of finish levels with corresponding prices. These finish levels would have to be clearly described or physical examples would have to be developed that matched the final product. If you can get by with a granite top that has some imperfections and the seams aren't perfect, then maybe you pay X dollars. If you want perfection, then you pay Y dollars as the fabricator decides they will have to spend many more hours measuring, fitting, polishing, etc.

Search the internet for associations that have written specifications  and installation instructions

You, as the consumer, can start to do a better job of defining exactly what you want done and then finding the contractor that can indeed fulfill your expectations. There are many associations that have thousands of written pages of specifications and installation instructions that can help you form written specifications. Don't depend upon the wording of the contractor in the contract. Include language in contracts that references specific written installation instructions provided by all manufacturers. These are very easy to obtain via the Internet.

CLICK or TAP HERE to get FREE quotes from local contractors to tackle your project.

Finally, take the time to find real professionals who already strive for perfection. Rest assured they are out there. They live in just about every city or town. These pros have a passion for their vocation. They use the best materials and spend the time on the job so they don't have to make a return visit to redo work. But the trouble is, their price is *not* always the most expensive one. It boils down to homework: lots of homework on your part to write the job description and then find a person who can prove to you they can do it.

Caveat emptor was the standard we were all held to until the recent wave of consumer law brought the scales of justice into a little better balance. Each party to a contract needs to work in good faith to fulfill the terms of the contract and in some instances they do. But the problem is, the contract may not have contained definitive enough language or terms that allow an independent third party to make a decision as to whether or not the terms of the contract have been fulfilled.

Surprisingly it is not as hard as you might think to write a crisp set of specifications that allow you to find a professional. Some of these specifications and forms are actually for sale on the Internet. Others can be obtained for free from manufacturers' associations or the actual product manufacturer. You simply have to incorporate the language into your set of bidding specifications, plans and/or the final contract between you and your contractor.

Deck Sealer – Clear Epoxy

DEAR TIM: I am so discouraged with wood deck sealing products. I love the look of my wood deck just after it is cleaned. But I have tried many clear sealers and my deck turns gray in six or nine months. The wood then starts to turn green and black. Store clerks tell me to use products that have pigments to stop the graying process, but I want clear. Is there a product you know of that really works? What is the best way to clean and prepare the deck before I seal it? Connie T., Mobile, AL

DEAR CONNIE: For years I have also told people to use deck sealers that had color pigments in them to retard the graying process. The microscopic pigment particles in the sealers and water repellent products are very effective at absorbing the ultraviolet light that causes wood fibers to turn gray. But my advice is now different because of a brand new truly clear epoxy fortified deck sealer that contains two revolutionary crystal-clear chemicals. One of the colorless chemicals deflects ultraviolet (UV) light and the other one absorbs it.

Many deck sealer companies for years have said their products were clear, but they actually contained small amounts of amber pigment that were mixed in to slow the graying process. But as you and tens of thousands of other people can attest, they performed poorly. I have fantastic news. The brand new crystal clear deck sealer doesn't turn gray even after 18 months.

The primary ingredients of this new deck water repellent are synthetic resins instead of the commonly used natural oils found in many heavily advertised national brands and others you might find at home centers. These natural oils are the ingredients that cause your deck to turn green and black. The oils are scrumptious food that algae and mildew eat several months after water soluble mildewcides and fungicides contained within the sealers are washed away by rain and snowmelt. Algae and mildew do not feast upon synthetic resins.

EB015 Cleaning & Sealing Deck eBoo CoverI have in my office an actual test fence sample used to rate the performance of the new clear sealer and compare it with other top-rated clear deck sealers. The strip on the piece of wood coated with the new sealer looks like a gorgeous piece of furniture. There is no visible UV damage that results in gray coloration. The other three vertical strips are gray in color and mildew has started to grow on one.

This test fence sample is astonishing when you consider the wood was tilted at a 45 degree angle and faced due south. It was in the middle of a field with no possible shade other than that offered by clouds. This method of testing produces the highest degree of UV punishment .

Perhaps the best part of the story is the water-based epoxy contained in this new product. You do not have to mix anything to activate the epoxy. Simply open the lid and stir the product. Once the epoxy dries in an hour or so, it creates a tenacious bond with the wood fibers of your deck and anything else it touches.

Last year, I tested a pigmented version of this same sealer on my front porch and accidentally got some of the epoxy sealer on the underside of my forearm. Several days later I noticed it while looking in the mirror as I brushed my teeth. Nothing I could do would remove it. It took about three weeks for it to wear off my skin. My front porch today looks exactly as it did a year ago. The color is rich and there is not a hint of gray.


The brand new clear sealer is revolutionary. It is truly the first clear deck sealer that works. Holding the test fence sample in your hand makes you an instant believer. The epoxy component in the sealer is also amazing. It adds a luster to the wood that makes your deck look like a piece of fine furniture.

Don't listen to the salesperson who says holding the tip of the pressure washer away from the wood is safe to do. The high pressure stream of water does erode wood. I get e-mail about this every year testifying to this fact. If you feel the need to pressure wash, then wait three days for the wood to dry and sand the deck to repair all of the damage. Do this before you seal the deck.

Message from Tim:

Years ago while researching a column about cleaning decks, I discovered the wonders of Oxygen Bleach. It is perhaps the 'greenest' cleaner I know of as it uses oxygen ions to break apart stains, dirt and odor molecules. There are no harsh chemicals, and it works on just about anything that is water washable.

I decided to create my own special blend using ingredients made in the USA. In fact, the raw materials in the active ingredient are food-grade quality registered with the FDA. I call my product Stain Solver. I urge you to use it to help with cleaning your deck or wood. You will be amazed at the results!

Ventilating Attics in Hot Homes

Turbine Vent

Ventilating attic space is super easy using a standard turbine vent. They come in different colors. Some have external braces. This one you see is Made in the USA. CLICK THE IMAGE TO ORDER ONE OF THESE GREAT TURBINE VENTS.

Revised March - 2018

Ventilating Attic Spaces - Do It With Turbine Vents

DEAR TIM: What about ventilating attic spaces in a Cape Cod style home that has a short knee wall in the upper level? I've asked three different contractors and received three different answers.

The attic and second-floor areas get stifling hot in the summer months. I'm getting new shingles installed and thought this might be the time to make changes. Joan S., Royal Oak, MI

Podcast 3

CLICK this image and listen to Ask the Builder podcasts! Copyright 2018 Tim Carter

Related Links

Turbine Vents Are Easy To Install

Hot Garage Ventilation - It's Not Easy

DEAR JOAN: You could have told me your house was a ranch, a colonial, tri-level, Victorian, etc. and my answer would be the same. High attic temperatures are a reality in just about any traditionally built home that gets direct solar radiation.

I've been in attics in the middle of the summer where it was nearly impossible to breathe. Sweat burst from my skin within seconds of entering the inferno. My best guess put the temperature somewhere near or above 140F in these wretched confined attic spaces.

Free & Fast Bids

CLICK HERE to get FREE & FAST BIDS from local contractors who can install attic ventilation fans.

This makes sense when you discover the surface temperature of the outside of a normal roof approaches 160 F on a summer day.

Flir camera roof photo

This is a photo of my own roof I took in the summer of 2015. I took it with a FLIR thermal camera attached to my smartphone. You may be able to see the white crosshairs and the temperature next to them: 155.2 F. CLICK THE PHOTO NOW TO HAVE THE FLIR CAMERA DELIVERED TO YOUR HOME.

Infrared Heat Cooking The  Sloped Attic Surfaces

Your Cape Cod home offers distinct challenges with respect to combating high temperatures and infrared heat. The bottom of the steep roof rafters typically rests on top of the first floor walls.

As they rise and meet at the center of the house, they create a smaller livable space on the second floor. Small vertical half or knee walls intersect the underside of the rafters. Most Cape Cod homes have a small flat ceiling area in the center of the second-floor living area. The rest of the ceiling space is created by the underside of the roof rafters.

Little Space To Insulate

The slanted ceiling is a huge problem area. Many Cape Cod roofs are framed with 2 x 6s and on rare occasions, 2 x 8s. The small vertical knee wall allows carpenters to use smaller dimensional rough lumber.

cape cod roof vent far shot

This Cape Cod home is easier to ventilate. Two turbine vents on the back roof will do a fantastic job so long as the front and rear soffit vents are clear and allow air to flow towards the turbine vents.

But this small lumber leaves very little space for both insulation and the required free air space above the insulation. Free air space above all insulation is a necessity. It is the conduit that permits the free flow of cool air through an attic space.

You Must Move Lots Of Air

To effectively cool your attic, which in turn helps to keep the finished living space cool, you must constantly exhaust hot attic air. The air in an attic gets hot not unlike air that gets heated in a furnace.

The actual roof surface temperature can soar to nearly 160F in direct sunlight on a hot summer day at noon. This intense heat passes through to the wood roof sheathing and wood rafters

Even though they do not glow as would a cooking element in an oven, they're radiating enormous amounts of heat. The air in the attic collects this heat and in turn, transfers it to the insulation. The actual insulation gets hot and transfers its heat directly to the finished ceiling. This is called conductive heat transfer.

CLICK HERE to get FREE & FAST BIDS from local contractors who can install attic ventilation fans.

Ventilate Attics Using Wind Power

I love using Mother Nature's wind power to exhaust hot air from attics. Wind-powered turbine vents do a magnificent job of pulling vast amounts of hot air from attic spaces. These inexpensive devices can be installed by your roofers in less than 30 minutes.

A typical home needs three turbine vents. I like to put them on the backside of a roof so they are barely visible from the front yard. Be sure to buy turbine vents that have external bracing instead of internal braces.

Powered Attic Ventilation Fans  Move the Most Air

Electric-powered attic ventilation (PAV) fans will also move lots of air. But these fans can develop so much suction they can actually draw air from inside your home.

powered-attic-vent-fan

This is an attic fan powered by electricity. They can move up to 1600 cubic feet of air per minute. Some are more powerful. CLICK THE PHOTO now to have this at your home in days.

If you use an air conditioner, this can be bad as you draw expensive cool air from your finished living space up into your attic. PAVs, as well as turbine vents, require abundant soffit ventilation or low-roof static pot vents that allow cooler outside air to readily enter the attic as hot air is exhausted.

Radiant Barriers Are Great - Dust Hurts Efficiency

I increased the comfort of my own home by installing radiant barrier chips. These highly reflective thin pieces of plastic act like mirrors and reflect heat back to its source.

They work exactly like a piece of aluminum foil that covers a casserole dish. But a single layer of any radiant barrier can lose its ability to reflect heat if it gets covered with dust. This is why the chips are so much better.

When the chips are installed tens of thousands of them float down onto the insulation. Look closely and you will discover that you might have six or seven layers of the radiant barrier on top of one another. The top layer may get dusty over time, but the chips just below work like they are brand new.

More Insulation Doesn't Mean Cooler House!

Adding more insulation will not necessarily make a house cooler. In fact, it can add to the heat load after the sun goes down. Insulation is designed to slow the rate of heat transfer.

That's great if you have a warm home and don't want the heat to seep into a cold attic. But you want your insulation, especially that which touches up against your ceilings, to be as cool as possible. If the insulation is hot, it slowly liberates this heat back towards the attic.

The best way to keep insulation cool, as well as attic air, is to move lots of air through the attic space. Even though the outside temperature may be 90 - 98F, it is much cooler than 140 - 160F. Your home air conditioner works very hard to combat extreme attic temperatures. Lower the attic temperature even by 15 - 20F and you will save money and be cooler.

CLICK HERE to get FREE & FAST BIDS from local contractors who can install attic ventilation fans.

Column 509

Move-in Deadline Creates Pressure

Move-in Deadline Creates Pressure

This bathroom is undergoing a major remodel. Each step must be done at the right time to minimize cost and get the job done fast. Photo Credit: Tim Carter

Move-in or Remodeling Deadlines

DEAR TIM: My husband and I are weeks away from moving into our first fixer-upper home. We thought we could rehab it in five weeks and are now overwhelmed with unfinished work. Move-in day is three weeks away and our new baby is due in four months. We both work on the house every free moment we are not at our day jobs, but it seems nothing is getting done. What is the best strategy to adopt before we move into the home? Jobi L., Erlanger, KY

DEAR JOBI: Your dilemma makes me feel as if I just exited a time machine. The exact same thing happened to my wife and I with our first home sans the baby complication. Almost 30 years ago, Kathy and I purchased an FHA repossessed home whose gaping hole in the roof over the master bedroom made it appear as if it had been a victim of a WWII bombing raid. I thought that three months of full-time work on the house with myself and two helpers would allow me to move into a totally rehabbed home. My math was way off. The three months turned into six months!

How do you calculate deadlines?

The first thing I would recommend is to stop for a few hours and regroup. Your situation can and should be approached as any mathematical problem. You have a crisp deadline just ahead and can probably calculate a realistic amount of time you both can work on the house between now and the move-in date. Do that calculation and be conservative in your calculations.

As soon as you finish that calculation, stop and think back about some of the tasks you have recently completed. Try to accurately determine the amount of time you spent patching plaster or painting a particular room. Think back to the amount of time it actually takes to paint a window from start to finish. These task times allow you to project how much time is required to complete a multi-faceted job with a respectable degree of accuracy.

Make an unfinished job list

It is now time to make the unfinished job list. Go into each room and make a detailed list of each task that must be done. A typical list might include: strip wallpaper from walls, wash down walls, ceiling and woodwork, patch walls, pick up materials, sand and dust walls and woodwork, paints walls and ceilings, paint windows and woodwork, clean tools, refinish floor, etc. Do this for each and every room and don't forget closets, hallways and staircases. Next to each task assign a realistic amount of time it will take you to complete that job.


Tasks to be performed Estimated Time
Remove Fixtures from Bathroom 2.5 Hours
Strip Wallpaper from Bath Walls 6.0 Hours
Wash Glue from Bath Walls 2.0 Hours
Patch Holes and Sand Walls 3.5 Hours
Prime and Paint Walls and Trim 7.0 Hours
Install Baseboard in Bedroom 4.5 Hours
Install New Closet Shelving 1.5 Hours


How many hours a week can be spend working on the project?

There is no doubt in my mind you will quickly discover that you and your husband combined can probably devote no more than 100 hours of work per week to the home. Many of these hours will be not be as productive as you might like since you will be working close to 14 hours per day. My instincts tell me that when you total the amount of hours you need to work to complete every unfinished task in the house, it will be hundreds of hours more work than you have time before the critical move-in day arrives.

Prioritize your tasks

It is now time to prioritize tasks. In my case, Kathy and I decided it was very important to have our master bedroom finished as well as the bathroom. We didn't want to go to work each day in dust-covered clothes, although for me it was an option. You must decide which rooms are the most important to finish and begin to focus all efforts on those rooms.

It is very important to make sure that you keep in mind what needs to happen to finish all tasks. For example, it would not be prudent to finish the kitchen if you discover three months from now you must remove its ceiling to replace the plumbing in the bathroom above. The time spent thinking about how tasks relate to one another will save you time and money as you progress with this ambitious house renovation job.

Be cautious around materials that can product harmful fumes!

I also urge you to consult your doctor. You need to protect your health and that of your unborn child. Some of the building materials you are working with may produce harmful fumes or by-products as they dry and cure. The existing home may have significant amounts of lead paint on the walls and woodwork. Old varnished woodwork can also contain lead. Sanding these surfaces can produce toxic amounts of lead dust that can have serious and permanent health affects.

Is it easy to underestimate the time needed for remodeling?

Underestimating the amount of time it takes to complete remodeling jobs is a very common rookie mistake. The lack of hands-on experience and professional tools, the inability to properly plan the staging of tasks and some poor quality advice found in home improvement television shows is partially to blame. Add to this the cumulative stress of fatigue and pressure from a looming deadline and the ingredients for a disaster are ready to be blended together.

It takes years of full-time hands-on experience to master certain tasks. If a person with no experience thinks they can install ceramic tile as fast and as accurately as a true professional, they are dreaming. Each craft has hundreds of small tricks that professions employ each time they are faced with a different situation. Add to this the constraints of materials that need to properly cure and dry before the next step happens and one can see why it takes weeks to do something instead of hours or days.