Deicing Salt and Concrete

Deicing Salts

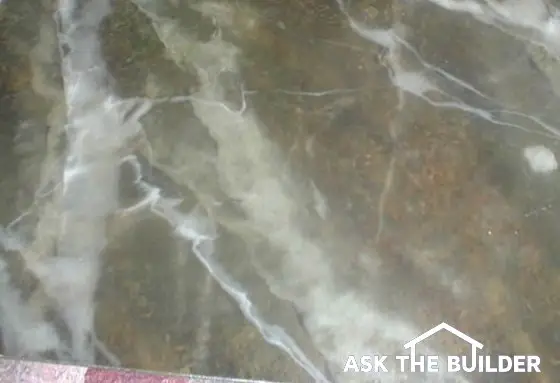
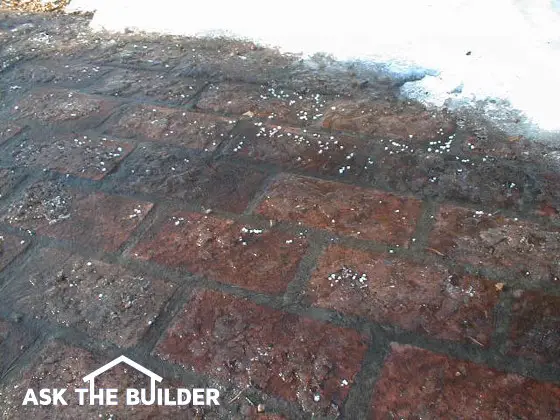
There is a one-half inch thick layer of ice on my front sidewalk paving brick. I sprinkled some magnesium chloride pellets on it and they started to work within seconds. You can still see a few of them up at the surface.

DEAR TIM: Ice and snow cause big problems where I live. My sidewalks, driveway and concrete and wood steps get slippery. Is it safe to use deicing salts on concrete, asphalt and wood surfaces? I have been told that deicing salts can cause severe damage to concrete. Are there safer salts that work differently than others? What about using fertilizer as a deicer and traction aid? Jenny L., Lewiston, ME

DEAR JENNY: Deicing salts can cause severe damage to concrete that has not been formulated, mixed, installed and finished properly. That is a fact. The good news is that it is easy to install concrete so that deicing salts can be used with confidence knowing that little or no damage will occur over the years. If you come to my city, I can show you city sidewalks and roadways that have had repeated treatments of deicing salts for years. These strong concrete surfaces have experienced none of the spalling or surface erosion that you have heard about.

The damage to concrete most people fear is actually caused by the freezing and thawing of water that soaks into the upper surface of the concrete. The use of deicing salts increases the amount of freeze-thaw cycles that a concrete sidewalk or driveway experiences. The volume of water increases by 9 percent when it freezes. This expansion creates internal pressures that can blast apart weak concrete.

Concrete that contains small air bubbles (air entrained), a minimum of 564 pounds of cement (6 bag mix) per cubic yard and a minimum amount of water when mixed (4 inch slump) can resist repeated episodes of ice expansion within the concrete. In addition, the concrete must be moist cured at or above 50 F for a minimum of seven days, produce a 28 day strength of 4,000 pounds per square inch and have a minimum drying time of 30 days before it is subjected to the first freeze-thaw cycle. These practices are commonly followed by experienced, professional concrete masons.

Deicing salts rarely cause problems on wood surfaces and asphalt. What little damage they may cause is far outweighed by the benefits of preventing personal injury as a result of a fall on some ice.

There are four primary deicing salts. All have different characteristics. The most common deicing salt is regular rock salt or sodium chloride. It is widely available and can melt snow and ice until the temperature drops to between 16 and 20 F. Below these temperatures the rock salt stops melting snow and ice. Rock salt also releases the highest amount of chloride ions when it dissolves. Chloride can pollute streams, rivers and lakes. The chloride also causes metal to corrode.

Stop - Purchase Deicing Salt eGuide NowGet a 24-page guide right now that answers all your questions about Deicing Salts. Will it RUIN your concrete? Did you know that salt can SERIOUSLY harm you? What about your expensive landscaping? You can have all these answers and more in less than a minute. Buy it NOW.

Calcium chloride is another deicing salt. Many people have seen these small rounded white pellets. It can continue to melt snow and ice as temperatures fall well below 0 F. It can cause skin irritation if your hands are moist when using it. Concentrations of calcium chloride can chemically attack concrete.

Potassium chloride is a deicing salt that available in some markets. It is not a skin irritant and does not harm vegetation. It only melts ice when the air temperature is above 15 F, but when combined with other chemicals it can melt ice at lower temperatures.

The newest deicing salt is magnesium chloride. It continues to melt snow and ice until the temperature reaches -13 F. In the photo, the air temperature was 0 F. The magnesium chloride melted through a 1/2 inch thick layer of ice in just 10 minutes. This salt releases about 40 percent less chlorides into the environment than either rock salt or calcium chloride. It is also less damaging to concrete surfaces of questionable or unknown quality. Magnesium chloride is less toxic to plants, trees and shrubs (see Author's Note at the bottom of this column). It also does not leave a powder residue when tracked into your home.

Avoid the use of fertilizers as deicing and traction agents. Those that contain ammonium nitrate and ammonium sulfate can rapidly disintegrate concrete. Don't take a chance if you don't know what is in the fertilizer. If you don't have salts available use sand to stop you from slipping and sliding.


Author's Note: In 2001, the USDA published an article entitled "Magnesium Chloride as a De-Icing Agent" that stated magnesium chloride led to "corrosion of steel and aluminum poles and pole hardware." Although used as an effective deicer, updated evidence after the publishing of this article on AsktheBuilder.com shows it can lead to harm of electric utilities. The article can be read here.

Also, a February 2003, Board of Montana Flathead County Commissioners minutes document called "Magnesium Chloride on Roads" on Corrosion-Doctors.org attests to magnesium chloride's corrosiveness on aluminum and steel. In a corrosion comparison done by Colorado D.O.T. and the University of Colorado, it was found that "road salt is more corrosive to the metals than mag chloride on a one time exposure." However, magnesium chloride corrodes over longer periods of time, and Greg Fulton, president of the Colorado Motor Carriers Association, said it corroded aluminum on his vehicles as well as led to wiring failure. This document can be read here.

Related Articles:  Deicing FactsGuidelines for Strong ConcreteMagnesium Chloride & Deicing Salt Companies

Column 251

New Home Building Budget

stairs platform rough framing

New Home Building Budget - It's Easy to Blow It Up

DEAR TIM: I am scratching my head about my new home project. I am trying to determine a realistic building budget, how to stay within that budget and how much house I can afford. How do I know how much I am allowed to spend on different fixtures and items within the house? Are there industry guidelines that I can follow? Mike M., Simi Valley, CA

DEAR MIKE: Wow! This is a common problem that befuddles many a homeowner. There is actually a straightforward solution, although it will take a few phone calls or possibly some field trips. If you did so-so in grade school math, it will really be a breeze.

You should absolutely use my New Home Construction Estimator to help you get close to the actual finished price of your new home. GO HERE to order it.

The first thing you need to do is to create your own building budget. This is the amount of money you can afford to spend on your new home. Often the best way to do this is to visit a bank or other lending institution. They can pre-qualify you with respect to just how much money you can borrow in today's lending environment. Add to this loan amount the equity in your existing home and you have a not-to-exceed number. The equity in your existing home is the amount of money you will have left over after you pay off your existing mortgage and pay any sales commission.

building budget

As crazy as this sounds, I would not use this number as my building budget. Surprises, cost overruns, and price increases can create financial hardships during a building project. I suggest you create a 10 to 20-percent slush fund to cover these contingencies. This means that you should multiply your not-to-exceed number by 0.80 to arrive at your CONTRACT SUM.

Remember, you'll have to add the cost overrun items to your contract sum to get to your FINAL COST.

Here's an example of the math.

Pre-approved loan amount: $500,000

Equity in your existing home: $250,000

TOTAL AMOUNT you can afford: $750,000

$750,000 x 20-percent slush fund = $150,000

$750,000 minus slush fund = $600,000

Your contract with your builder should NOT EXCEED $600,000 for you to stay within your budget. If you only have a 12.5% cost overrun, then you'll have a nice amount of dry powder once you move into your new home. I'd take $40,000 of the $75,000 you have left over and send it to the lender with your first loan payment. Over the life of the loan, this addition of principal early on will save you vast amounts of interest on the loan.

Determine Square-Foot Building Costs

With your budget in place, you can now call Realtors or visit new home builders to see if the amount of money you have available will "buy" the necessary space you need. If you fall short for some reason, you may have to purchase an existing home. Pre-owned homes almost always provide more space/square footage for the dollar.

Allowances are Budget-Busting TRAPS

If you are still in the building game, most builders provide allowances for fixtures and other items that you need to select. Examples of these are carpeting, cabinets, counter tops, faucets, hardware, etc. The problem is that sometimes these allowances are too low or people spend too much on one item and there is not enough left in the overall budget to fund the remaining purchases.

One method of determining realistic amounts for different allowances is to break the cost of the entire house down into its separate parts. Each aspect of building a new home can be represented as a fraction or percentage of the total cost. Lenders know this as do the appraisers that verify construction loan payments. As work progresses on your new home, they assign a value to each completed component.

Get the Secret Checklist

These appraisers work from a checklist that tells them what things are worth on a typical new home. For example, the footings and a full basement foundation may equal 15 percent of the total structure cost. Kitchen cabinets in your market may represent approximately 2 percent. All of the electrical fixtures could amount to 1 percent of the total cost of the home. Your bank's appraiser may supply you with a percentage breakdown list if you ask them for it. You can also get cost breakdown figures from different national construction cost books that are updated annually.

My New Home Construction Estimator has all the items you need to consider when building a new home. Purchase it now.

Using the list and your actual building budget, begin to do the math to see what you can spend in the different areas or to see if the builder has assigned allowances that are realistic. You may discover that his allowances are low for some reason. Remember that the percentage figure includes both labor and material for any given category. Labor to install many allowance-type items can consume up to 30 percent of the total cost you arrive at. Be sure to keep this in mind as you start to make product selections.

If you are like me you have dreamed of owning a home away from home. Imagine when the weekend comes, hanging out in a hammock at your own lakefront cottage, boating, antiquing in a charming little town, or whiling away an afternoon on your ocean-view porch. If you have imagined these things you need Better Homes and Gardens Second Home.

This inspiring volume will help you turn your second-home fantasy into the real thing. This book will take you through tours of gorgeous homes to see how other people have created their own great escapes. There are expert tips on everything from real estate shopping to building, remodeling, and decorating. There are hundreds of spectacular color photographs of beautiful homes and great locations. As for me, I'll keep dreaming ... until those lottery numbers come through or some forgotten relative leaves me an unexpected inheritance, the book will have to suffice.

Column 252

Waterproof Ceramic Tile Floors

Waterproof Ceramic Tile Floors

You must have the right drain assembly and the right membrane to have a lifetime of no leaks.

DEAR TIM: I built a shower stall on a concrete slab floor. Even though I caulked the seam between the walls and floor I get constant leakage on the other side of the shower. What did I do wrong? I need to figure this out before I install the wheelchair accessible shower upstairs. Robert D., Passiac, NJ

DEAR ROBERT: I'm not going to sugarcoat it. You really screwed up the basement shower. I'm afraid you are going to have to start over. The bad thing is that you probably will not be able to salvage much of the tile. Think of it as a tuition payment to the school of hard knocks!

Many people think that ceramic tile installations themselves are fairly watertight. They are far from that. Water can readily pass through tiny shrinkage cracks in the grout and around the contact point between the tile, grout and the shower drain. Leak proof tile showers incorporate special hidden membranes that are beneath the tile and a thin cement setting bed. You made your mistake thinking that the concrete slab would direct water to the drain. It simply doesn't work that way.

Years ago before the plastics industry was born, plumbers used thin sheets or lead for shower membranes or pans. They would skillfully form the lead into the bottom of the shower area and extend it up the shower walls approximately 9 to 12 inches. All seams would be soldered to make the pan leakproof. The lead connected to a special drain fitting that allowed water that seeped past the tile to go into the drain piping instead of your house.


I have written a cool eBook about Shower Pan Liners that shows you exactly how to install a shower pan liner. The book contains many step-by-step color photos and easy-to-follow instructions. Click here to see what other homeowners such as you have to say about it!


Lead shower pans over time do develop leaks. Corrosion happens for any number of reasons and tiny pinhole leaks cause water to spot ceilings and walls. When this happens or in the case of a new shower installation, it is time to call in the replacements. The premier shower pan membrane used today is a flexible plastic made from chlorinated polyethylene (CPE). I have used it countless times and have it in my own showers. I have never had a leak with this product.

You can buy other polyvinyl chloride (PVC) pan membranes but they tend to be stiffer and harder to work with. The PVC membranes have a memory and try to go back to their original shape when you try to bend them around wood corners. The CPE products are flexible and have no memory. They naturally conform to irregularities in wood framing and are very easy to work with. If it is necessary to seam pieces together, you use a special solvent that welds them together into one leak-proof piece.

Special clamping ring drains must be used with shower pan membranes. (See photo above.) These plumbing fittings have adjustable finished drains that allow you to adapt them to a wide variety of cement setting beds and tile thicknesses. The CPE or PVC membranes attach to the drain in the same manner that a rubber washer is sandwiched between a nut and a bolt. Once the clamping portion of the drain is tightened, all water that collects in the pan is directed to hidden weep holes within the drain fitting.

To prevent future leaks, you need to make sure the sub-floor beneath the liner slopes to the drain. If the liner is placed on a wood sub-floor, make sure all nail heads are recessed and there are no large splinters that could puncture the membrane. Small washed gravel needs to be placed over the weep holes as well. If you fail to do this, the cement base that supports the tile can clog these vital pathways that lead to the drain.

The floor and shower area for your wheelchair shower needs a special CPE liner that has fibers molded into it. These fibers allow thinset adhesive to be used directly over the membrane instead of a thick cement base. The thinset adhesive is like brick mortar and it readily adheres to the membrane's fibrous texture. If you follow the manufacturer's installation instructions, both of your showers will be leak free for years.

Related Articles:  Shower Pan CPE Membranes, Shower Membrane Installation

Column 253

Faux Painting

Faux Painting

Faux finishing can be done with simple materials found in your home.

DEAR TIM: I recently saw someone transform the walls of a typical drab room by using just paint and specialty glazes, some newspaper and regular painting tools. The effect was dazzling. What is really involved in doing faux painting? I also have a dreary, dark paneled family room. What can be done with that? Judy R., Falls City, NE

DEAR JUDY: Faux or "false" painting has really become popular. The reason, I believe, is straightforward. Just about any person who has some patience can create a multi-colored and often textured look that really catches the eye. I have seen some simple faux finishes done that look just like leather. If you become skilled in this craft, you can create marble, wood grained looks, stone blocks, etc. that can fool just about anyone.

Faux painting usually involves multiple steps. As you have noted, it requires minimal tools for most jobs and just a few special components. Large paint stores or home centers almost always carry the special glazes required for certain faux finishes. Some also carry unique tools that make faux finishes look professional.

The faux painting newsprint finish you saw requires that you apply a dark color on the walls as your base coat. The neat thing is that you control this color. It can be a green, perhaps a medium royal blue, or a bronze tone paint. The brown colors are the ones that will make your walls look like rich leather.


Want a faux finish but don't have time to do it yourself? Find the professional painters by using my Interior Painting & Staining Checklist. I offer a 100% Money Back Guarantee.


You need to visit your friendly newspaper printing facility. If you talk to the right person and show them your paid subscription bill, they will probably give you the necessary blank newsprint you need for your project. If you use regular newspaper that has ink on it, the ink will transfer to the walls. An average sized room, say 12 x 12 x 8 feet high will consume 125 to 225 twenty-four inch by thirty-six inch regular sheets of newsprint! You fold the newsprint accordion style or fan style before you begin to paint. All of the sheets need to be pre-folded before you start. If you waste time folding while you paint, the finishes will dry on the wall before you have time to work with them.

The next step is easy. You apply a cream colored glaze to fully dried paint. Lay a folded sheet of the newspaper at an angle and push it down into the wet glaze. Fold and unfold the paper until it is saturated with the glazing. Only work one wall at a time. Be sure to maintain the same angle as you work so the finish looks consistent. Step back frequently about six to eight feet and look at the results.

Faux painting

A faux finish can be made to look like genuine marble.

There are also some nifty paint rollers that will produce a similar finish. Some rollers that are available in stores have adjustments on them so a variety of finishes can be achieved with the same tool. You can even get instructional video tapes with some of the tools. These rollers save lots of time and may be just the ticket for a novice.

To avoid frustration, I would absolutely practice first on a 4 x 8 foot sheet of drywall in a garage or workshop. If you feel confident, then go inside and do a small closet. This will get you used to dealing with the corners. Get your technique down before you tackle your first room.

Dark paneling can be lightened easily with faux painting techniques. If the paneling has a grained or textured surface, you will end up  with a dramatic look. You apply a light colored oil based paint that has been thinned 33 to 40 percent with paint thinner. The paneling must be clean, dry and wax- free. If it has a urethane or old varnish finish, this finish will need to be softened with a clear finish softener available at a large paint supplier. You apply the thinned colored oil paint to only 3 or 4 boards at a time and immediately wipe it off. It is a magnificent look once finished!

Related Articles: Faux Finishing, Faux Finishing Basics, Faux Finishing Tools, Faux Finishing Books, Faux Finishing Wall Paneling, Rag Painting

Column 254

Find a Pro by Asking the Right Questions

DEAR TIM: I have always felt uneasy about hiring a contractor. I am never totally convinced I selected the right person. I am sure there are professional builders and sub-contractors out there, but how do you find them each and every time? Is there an easy way to find an honest and reliable contractor? Sally M., Kansas City, MO

DEAR SALLY: I can see why you would feel uneasy about hiring a contractor. After all, most contractors are aliens to you until you meet them the first time. My guess is that you don't typically invite total strangers into your home when the doorbell rings. To a degree, this is exactly what happens when you talk with a contractor for the first time.

Here are just a few of the monthly trade magazines I read. Professionals read these as well.

Your anxiety is deeply rooted and well founded. Think of it. You entrust a contractor to tear apart, rebuild, alter, repair, etc. your most valuable possession - your home! What's more, you might often leave this person or their sub-contractors alone in your home while you go to work, run errands or pick up your kids from school. For you to do this and not worry, you need to build trust in a person. You can't build trust by reviewing a quote or a bid.

Your observation regarding the existence of professionals is absolutely true. Just about every city or town has true craftspeople who use the best materials, take no shortcuts, and are dedicated to their profession. These individuals often have 15 - 20 years experience in their field. They are highly productive, want to maintain their integrity, and they invest in their business.


How would you like me to build your new home? It's probably impossible for me to fit your job into my schedule, but I will gladly share hundreds of my tricks and building secrets with you and your builder. Check out my New House Specifications.


Professionals can invest in their business in many ways. Just about every trade has a professional association. Active membership in one of these groups tells you that the contractor is willing to take the time to learn more about the industry. Continuing education is available in many forms. There are numerous conventions each year that offer hundreds of classes that help contractors and sub-contractors keep up with industry, business and regulatory changes. There is an abundance of fantastic trade publications such as Fine Homebuilding, Remodeling, Builder, Professional Builder, Journal of Light Construction, etc. to name just a few! If your contractor can prove to you that he/she reads some of these on a monthly basis, you may have found a winner.

Often people will tell you to ask for references or call the Better Business Bureau. These are excellent places to start, but they won't tell you the whole story. One excellent way to find a pro is to visit an old fashioned lumber yard or wholesale supply house where a sub-contractor buys his materials. Ask for the general manager or the owner. Request names of individuals who do the following: buy high quality materials, have been in business 15 years or more, and pay their bills on time. Ask the general manager for the 3 people HE would ask for quotes on jobs for his own home.

If you really want to find the professional, you will need to do some extra work. The best source of information about a person is the person himself. Anybody who works in the human resources department of a company will tell you this. You need to sit down and ask the contractor numerous questions about his business, ambitions, his management habits and other important topics. This process should be nearly identical to when you were interviewed for your last job or your most recent promotion. A professional will readily submit to this opportunity and readily answer any question you ask. If a contractor objects to a short interview at your dining room table or squirms during the process, then politely show him to the door and ask to see the next applicant!

Related Articles: Asking Your Contractor Questions, Building & Remodeling Trade Magazines

Column 255

Area Rugs – Spot a Great One

DEAR TIM: I am thinking of purchasing some area rugs for different rooms in my house. How do you pick the right size rug for a room? I have children and pets and am thinking it is not a good idea to get a good rug. How do you determine quality as all the rugs all look great at the stores? Do I have to buy a pad for an area rug? Roberta P., Inverness, FL

DEAR ROBERTA: Congratulations! You are about to make a very wise purchase. Area rugs, in my opinion, are one of the most interesting design elements you can introduce into a room. My wife and I own seven area rugs and we absolutely love them. One of them is octagonal in shape and looks splendid in our entrance hall. If you purchase a quality rug, your children and grandchildren will probably use it in their homes.

area rugs

This is a display rack at the store where we have purchased all of our rugs. Sam, the owner, is one honest businessman. The last thing we bought was an oriental runner that goes up our staircase!

There is no set sizing formula when selecting an area rug. The rug size is usually dictated by how the room is used. Some rooms may actually have two or more different sitting or activity areas. For example, we have two area rugs in my family room. There is a large one beneath the couch and two chairs that are opposite our fireplace. At one end of the room, we have a cherry card table with four chairs. Beneath this table arrangement, we have placed another smaller rug. The two rugs have patterns that compliment one another.

Don't always feel that furniture has to be completely on or off an area rug. Be aware that most rugs come in stock sizes. If you want a custom sized rug for some reason, you will pay a king's ransom for it. Flexibility is often necessary when trying to size an area rug.

Many people goof up the timing of the rug purchase. Area rugs are available in far fewer patterns and styles than wallpaper, upholstery, and window treatment fabrics. If you select your furniture fabrics and wallpaper first, you may have a hard time choosing an area rug. The rug should be the foundation of the interior design of a room. If you choose a large print pattern in the rug, try to use small patterns in the other fabrics within the room. If you are going to spend lots of money on rugs, furniture, fabrics, etc. within a room, I would absolutely hire a certified interior designer to help coordinate all of the colors and patterns.

Kids and pets can hurt area rugs, poor quality rugs that is! If you anticipate heavy use or wear on a rug, you will benefit by purchasing a high quality fabric. Wool is probably your best choice. The color dyes completely penetrate wool fibers. As wool wears, it releases cells much like a snake that sheds its skin. The newly exposed wool fiber cells looks as good as the ones that were just worn off. To even the wear on an area rug, you should flip or rotate it every six months. You can't do this with wall to wall carpeting!

Rug makers have developed a synthetic fiber - polypropylene - that mimics many of the qualities of wool. It has the look and feel of wool but only costs half the price of a wool rug. The synthetic fabric consists of small glass-like rods that do accept the color dyes throughout the fiber. However, foot traffic actually causes scratches on the small glass rods. The result over time is a dull look in all of the traffic lanes. The synthetic rug fibers crush more easily than wool fibers.

Pads are essential beneath area rugs. They absorb the shock of foot traffic. Select a pad that is no thicker than 3/8 inch and is sticky on both sides. Do not use padding that is made for wall-to-wall carpeting as it commonly is slick on one side. A slick pad will result in a fall for sure.

High quality area rug shops often let you "try before you buy." This transportable feature is another benefit of area rugs. If you grow tired of one, you can roll it up and put it in another room or sell it. I am confident you will be pleased with your area rug purchase as long as you buy from a reputable dealer.

Related Articles: Area Rug Tips, Area Rug Cleaning Tips, Area Rug Dealers

Column 256

Cracks Need Urethane Caulk

caulk gun and cartridge

You are looking at a professional caulk gun and a tube of superb urethane caulk. Urethane caulk is sticky, but once it cures it is as pliable as an Olympic gymnast.

DEAR TIM: I have some difficult caulking jobs around my house. One happens to be some wood wainscoting in my kitchen. Each winter cracks appear between the pieces. I also need to caulk numerous exterior cracks adjacent to brick, wood and aluminum. Are there any high quality caulks that can withstand lots of movement? While I have your ear, just how do you create really smooth caulk joints? Sarah G., Bloomington, IN

DEAR NANCY: Ouch! I'll tell you how to get those smooth joints if you would just let go. Seriously, you have entered the caulk market at a superb time. There are some new caulks that have been introduced to the residential marketplace that will work well for all of your jobs.

The caulk industry has seen ever increasing improvements in many of its products. Traditionally there have been two major groups of caulks: solvent based and water based. New federal anti- pollution regulations regarding the release of volatile organic compounds (VOC) found in solvent based caulks have caused the caulk manufacturers to shift their attention and improve the water based products. Water based caulks now have better flexibility and better adhesion on smooth surfaces. Many residential caulks are made that meet or exceed commercial caulking specifications.

Probably the most exciting new residential caulk is urethane based. The product has been around for nearly 50 years but until recently, it was used primarily by commercial contractors. If you like silicone caulk, you are going to love urethane caulk.

Urethane caulks cure chemically just like silicone. They exhibit very low shrinkage, have a high tear resistance, are paintable and have excellent water resistance. Silicone caulk users know that paint and silicone simply don't mix. Once you let a urethane caulk cure, you can paint over it with no problems.

The urethane caulks stick very well to just about any surface. Urethane caulks will fill cracks next to vinyl siding, cedar (or any other wood), aluminum, and any masonry material. The urethane caulks adhere well because of a cross-linking chemical reaction. As the caulk cures, it actually interlocks with the material it is applied to. Water vapor fuels the chemical reaction. Beware, urethane caulks don't discriminate. If you leave some excess on your moist skin, the caulk will stick to you too!

One minor drawback of urethane caulks is their cure time. If you intend to paint a urethane caulk, you need to let it dry for at least 2 - 3 days before coating it with a water based paint. A 7 - 10 day drying period is necessary for oil based paints.

Keep in mind that caulks are a maintenance item. Even those that are advertised with extended warranties (20, 30 or more years) can fail. You need to periodically check exterior caulked seams to see if they are still in good shape.

The art of caulking is fairly simple. Most people are handicapped from the start because of an inferior caulk gun. Inexpensive caulk guns found in most paint stores and home centers have a low pumping ratio action. This means that lots of caulk is released with each squeeze of the gun. Professional caulk guns release far less caulk with each full trigger stroke. This enables you to more easily control the flow of caulk from the gun.

The tip of the caulk tube should be cut slightly smaller than the size of the crack being filled. Apply the caulk so a slight amount of excess mounds up over the crack. Gently slide your finger over the fresh caulk. If excess caulk begins to overflow around your finger you need to wipe this excess caulk into a rag. Water based caulk joints can be touched up with a damp rag or tile grout sponge for that professional look.

Related Articles: Urethane Caulk Benefits, Urethane Caulk Companies

Column 257

Shovels and Spades for Women

shovels and spades

See that shovel second from the left? It is stainless steel! (It was the Tool of the Week in the July 26, 2017 Newsletter.) Oh my, it is a fantastic shovel. The long tool in the center is the very cool post hole digger.

DEAR TIM: I have numerous outdoor digging chores scheduled for this spring. I am a fairly petite woman and struggle with regular shovels. Are there shovels and spades available that are made more for women than men? What shovels are best for digging certain holes? Are there specific shovels and other digging tools that will minimize the work required for digging jobs? Pauline B., Spicewood, TX

DEAR PAULINE: Your back, leg and arm muscles are going to thank you this spring once you purchase some of the awesome new shovels, spades and post hole diggers that I have recently seen and tested. Some of these tools are so beautiful, it is a shame to get them dirty. I believe the explosive growth of gardening as a hobby is responsible for the abundance of new, excellent digging tools that are now available.

Why struggle with regular sized shovels!

I know why you struggle with regular sized shovels. Most are designed for use by construction workers that probably weigh 100 pounds more than you and have considerable upper body strength. A standard sized shovel has more surface area than a smaller tool. This increased area produces lots of extra friction when you try to cut through soil. For example, the blade of a flat spade I commonly use measures 7.25 inches wide by 12 inches long (87 square inches). It weighs in at a hefty 5 lbs. I recently purchased a beautiful border spade for my wife, Kathy. Its blade is only 5.5 inches wide by 9 inches long (49.5 square inches). It weighs in at slightly less than 4 pounds. Kathy looks like a well oiled machine when she digs effortlessly in the garden with this tool!

You can also buy small round point shovels that will allow you to quickly slice into moist soil. In fact, I had to recently purchase a new one for Kathy since I ruined her original one. The smaller round point shovels are excellent tools for mixing concrete and mortar in wheelbarrows.

What finishes are available on smaller shovels?

The smaller shovels are available in all sorts of finishes. You can get super durable high carbon steel, epoxy coated steel, and even rustproof stainless steel! The wooden handles are works of art. You can purchase gold stained Maine ash wood handles or ones made from beech. If you care for these tools by cleaning and drying them after each use, they will last for generations.

Get the right shovel for the right job!

I have seen people struggle when they dig holes for plants or dig drainage trenches. The trick is to use different tools for different parts of the job. If you want to dig a square or rectangular hole with straight sides and a flat bottom, then you will need a round point shovel and a flat spade. A round point shovel has a semi-circular blade that comes to a pointed tip. It requires the least amount of force when slicing into soil.

A flat spade tends to have a blunt tip. If you use this type of tool to make initial cuts into the ground, you may struggle. A flat spade works best to shape the sides of a hole once the majority of dirt has been removed with a round point shovel. Flat border spades work great for cutting and removing sod, especially if you sharpen the tip with a metal file.

What is a post hole digger?

If you need to dig post holes this spring, you may want to consider using a revolutionary post hole digger. Traditional post hole digging tools have two long cutting blades that resemble round point shovels. You drive the tool into the ground and then operate the handles much like a scissors to gather and remove the loosened soil. Because of the tool design, the top of the hole gets bigger as you dig deeper. These diggers also have a hard time capturing dry or sandy soil.

You can now buy a new post hole digger that works much like a mechanical backhoe. The tool has a single cutting blade. Once it is driven into the soil you operate a wooden handle that rotates the cutting blade 90 degrees. The cutting blade scoops and cradles the soil as you pull it from the hole. This new post hole digger allows you to maintain a consistent hole diameter from top to bottom.

Related Articles:  Shovel & Digging TipsShovels / Spades for WomenGarden Tools and Shovels

Mentioned in the July 30, 2008 Newsletter.

Column 258

Wet / Dry Vacuums Have Grown Up

wet/dry vacuum

DEAR TIM: It is time for me to purchase a new wet/dry vacuum cleaner. My older model created a dust cloud when I would try to vacuum fine dust particles. Can you safely use wet/dry vacuums to pick up large quantities of water? What else is new? Mark S., Union City, TN

DEAR MARK: Don't tell me about older wet/dry vacuum models! Mine also blew dust, even with a new filter. I was most upset at how the painted metal drums would rust within a year's time. It is my pleasure to announce that you can now buy any number of wet/dry vacuums that put older models to shame. Gone forever are the days of rust and dust!

I feel the biggest advancement you will find is the increased horsepower (hp) of the motors. 4, 5 and 6 hp motors are common. It is even possible to purchase a 6 hp vacuum with a detachable blower head. This vacuum does double duty. It functions as a standard vacuum but transforms itself with a flip of a lever to a hand held 200 mile per hour (mph) blower you can use to quickly blow leaves, dust and debris from your garage or any other surface. Industrial or professional wet/dry vacuums are available with even more powerful vacuum motors.


Virtually every high quality wet/dry vacuum made today comes with a high strength plastic drum. You will find that the capacities of these are enormous when compared to older models. 12 and 16 gallon capacities are commonplace. If you need more than that, you can purchase ones that have 20 or 25 gallon drums. Years ago it was a struggle to empty liquids from the drums. Just about every model I have seen is equipped with a drain valve. There is no need to remove the top and tip the tank. You just open the valve and the collected water drains in a flash. One vacuum is even equipped with a built-in pump. You attach a garden hose to the vacuum and as you suction water, it pumps the collected water to a remote location.

Modern wet/dry vacuums are equipped with excellent filters. Most models are outfitted with pleated paper single stage rinseable / reusable filters. If you intend to vacuum fireplace ashes, drywall dust, or other fine material you may want to upgrade to a two stage filter. These filters prevent the interior dust storms you and I used to create with older wet/dry vacuums.

New wet/dry vacuums are made to ingest large volumes of water. High quality vacuums are equipped with automatic shutoff devices that tell you when the drum is filled with water. If you intend to vacuum water only, you should remove the filter. Never use a wet/dry vacuum to pick up any flammable liquid or water that is contaminated with solvents. Vapors can ignite and create an explosion or fire.

Always keep the filter clean and in place when vacuuming dry debris or damp debris. You can easily ruin the powerful electric motors if you use a wet/dry vacuum without a filter in place. It is always a good practice to have a new filter in stock in the event you can't adequately clean your existing one or it wears out. Filters are inexpensive and a clean one will prolong the life of a high quality vacuum practically indefinitely.

When you turn on your new vacuum, you will be shocked at how quiet the new models are. Some models come with mufflers that allow you to direct the motor exhaust in several directions. You will also be amazed at the expanded line of accessories. You can purchase inflater nozzles for beach balls, air mattresses, etc. Special narrow car nozzles fit into tight places, hose grips reduce hand fatigue, and hairpin turn gutter elbows allow you to blow leaves from gutters while standing on the ground!

Some wet/dry vacuums can be hooked up to a nifty dust collection network for home shops. Clear rigid plastic pipe allows you to see dust and wood chips scoot to the vacuum. This is an excellent way to keep dust to a minimum if you use a table saw, miter box saw, radial arm saw, sander or any other woodworking tool indoors. I can assure you that the person who dusts around your home will appreciate this feature!

Click here to watch a video on two types of wet dry shop vacuums.


Related Articles:   Wet Dry Vacuum ComparisonWet Dry Vacuum - Your Household WorkhorseKeep Wet Dry Vacuum Filter CleanFilters - Dust Collection - Air Filtration

Column 259

Sheet Vinyl Woes

sheet vinyl manuals

These are actual flooring installation manuals published by the flooring manufacturers. They contain specific step-by-step instructions as well as exact products to use that compliment the flooring.

DEAR TIM: Three months ago, I had a new sheet vinyl floor installed. There are stains that seem to be deep within the vinyl and several seams are cracking. What's more, there seem to be spongy spots in the floor when I walk in certain places. The flooring was installed by a friend who is a serious do-it-yourselfer. He installed a new underlayment. Do you think the problems are his fault? How can I keep the floor looking great? Sandy J., Roseburg, OR

DEAR SANDY: Uh Oh... You are probably going to have to make an uncomfortable phone call. There is a very good possibility that all of your current problems can be traced to workmanship or unapproved material usage errors. I think you are going to be forced to do an autopsy on the floor to discover the source of the problems.

Sheet vinyl flooring requires a tremendous amount of skill and training to be installed properly. The major sheet vinyl manufacturers offer extensive factory training for full time professional installers. In addition, they have detailed instruction guides and specifications for each of their flooring products. If these are not followed you can have all of the problems you described and more! I'll bet that your friend made several critical boo-boos.

There are numerous types of underlayment that can go beneath sheet vinyl. Some are approved while others are not. These products must be completely clean and free of any ink, factory stamps, paints, etc. before they are covered with the vinyl. Sheet vinyl manufacturers publish what underlayments can be used with their products. You must check the list because not all approved underlayments can be used with each sheet vinyl!

The spongy areas of your floor might be traced to sub-standard or unapproved underlayment. I have seen many lumber yards sell overlay grade lauan plywood for sheet vinyl underlayment. The only lauan plywood that is accepted by most sheet vinyl manufacturers is Type 1 - Exterior Grade. A better underlayment would be poplar or birch plywood with a fully sanded face and exterior glue.

Poor quality underlayment can have hollow spots in between the veneer face layers. This might be the cause of the sponginess in your floor. Other poor quality underlayments contain water soluble colored extractive chemicals. These dyes might be causing your deep seated stains.

Sheet vinyl discoloration can sometimes be traced to the use of unapproved adhesives. Chemicals within the glues that hold down the vinyl can leach into the flooring and cause color changes and stains. Old adhesives left on existing floors can also react with new adhesives and create stains. The sheet vinyl written instructions tell you what adhesives should be used and what old adhesives require complete or partial removal. Poor quality floor mats, heat from floor registers, radiators and direct sunlight can also discolor new sheet vinyl flooring.

The seam failure you are beginning to experience can be traced to numerous errors. Sheet vinyl products require very specific seam adhesives and sealers. Off the shelf seaming products often are unapproved. The right products can almost always be found at the location where the sheet vinyl is purchased.

To keep a new sheet vinyl floor looking good, you must keep grit and dirt off the floor. These particles react with foot traffic to make human sandpaper. Regular vacuuming or dust mopping must become part of your housekeeping schedule. Wet mopping will also do a great job of removing grit if you frequently change the rinse water.

Companion Articles:   Common Sheet Vinyl Problems, Sheet Vinyl Defects

Column 260