Wood Deck – Clean / Seal

DEAR TIM: I have asked three different people and received three different answers about cleaning and sealing my new wood deck. Is it necessary to apply a sealer to a brand new wood deck? Do you need to clean new wood before applying the sealer? What is the best method to clean wood decks? I have had bad luck with past sealers. Is there one that resists mildew and algae? What is the best weather to clean and seal decks? Larry C., Apple Valley, CA

DEAR LARRY: I have had the same thing happen to me. Out of curiosity, I frequently ask employees of home centers and paint stores how to approach deck cleaning and sealing jobs. I have yet to get the same recommendation from two different people. What's worse, there is a considerable amount of questionable information being distributed. It turns out that many traditional wood deck cleaning and sealing products and methods might not be best for your new wood deck investment.

Unprotected wood is immediately attacked as soon as it is exposed to the sun's ultraviolet (UV) rays and water from snow, rainfall, and dew. The UV rays actually blast apart the wood cells on a microscopic level. This damage permits water to penetrate deep into the wood. This water can accelerate wood rot in untreated lumbers such as cedar and redwood. In addition, repeated water soakings lead to excessive shrink and swell cycles that result in cracking, cupping, and twisting. For these reasons, it is necessary for you to quickly seal any wood product that is exposed to outdoor elements.

wood deck splitting board

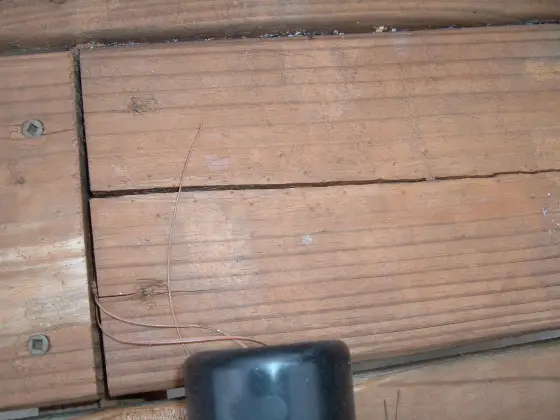
This decking split can get worse if the wood is not sealed on a regular basis. Water soaks deeply into unsealed wood and causes it to expand. As the water leaves the wood, the lumber contracts. This movement causes the split to grow in size and length. PHOTO CREDIT: Suzanne Wieczorek

Independent lab tests have shown that it really pays to clean new wood before it is sealed. The lab results indicate that sealers can penetrate up to 25 percent deeper into new wood that has been cleaned with an oxygen bleach solution. The cleaning action opens the wood pores of the freshly milled lumber. Oxygen bleach is a unique product. It does not remove the natural color from wood. What's more, it is non-toxic to plants that surround your wood deck. It also does not harm wood fibers. It is safe to use oxygen bleach on all woods except redwood. I have successfully used oxygen bleach on redwood, but in certain instances it has been known to darken it. If you want to be completely safe, use oxalic acid to clean redwood. Existing wood decks have to be deep cleaned before they are sealed.

Often I have been told by salespeople to use chlorine bleach to clean wood decks. Chlorine bleach - sodium hypochlorite - is a fantastic sanitizing product if you want to kill germs, however, it creates havoc when used on wood. Chlorine bleach removes natural wood color, destroys wood lignin (the glue that holds wood fibers together), can corrode metal deck fasteners and hardware, and can kill vegetation that surrounds decks.

EB015 Cleaning & Sealing Deck eBoo CoverYour disappointment with many wood deck sealing products is shared by many consumers and testing labs. Apparently many of the commonly available deck sealants contain wood protecting resins made from natural products such as tung oil, vegetable oil, linseed oil, and animal fat. These oils are gourmet foods for mildew and algae. To slow down mildew and algae growth, the sealers often contain toxic fungicides and mildewcides.

I have had the fantastic luck with synthetic penetrating water repellents. Look for ones that are formulated using synthetic oils and resins. These products contain no food for mildew and algae. If you want maximum performance and protection, be sure to use a pigmented (colored) product not a clear product. The pigment particles absorb and deflect UV rays helping to protect the wood.

I have found that cooler weather with daytime temperatures of 60 - 70 F are best for cleaning and sealing decks. The cleaners do not evaporate quickly and the penetrating water repellents have adequate time to seep deeply into the wood before the sun can evaporate them. Avoid hot, windy summer days for deck cleaning and sealing. Reserve those for fun in the sun, not work!

Message from Tim:

Years ago while researching a column about cleaning decks, I discovered the wonders of Oxygen Bleach. It is perhaps the 'greenest' cleaner I know of as it uses oxygen ions to break apart stains, dirt and odor molecules. There are no harsh chemicals, and it works on just about anything that is water washable.

I decided to create my own special blend using ingredients made in the USA. In fact, the raw materials in the active ingredient are food-grade quality registered with the FDA. I call my product Stain Solver. I urge you to use it to help clean your deck surfaces. You will be amazed at the results!

Metal Ceilings

DEAR TIM: I am doing an extensive redecoration of my home. I am not pleased with standard smooth or textured drywall ceilings. I would like a unique, classy effect. A 100 year old local ice cream parlor has a patterned metal ceiling that appeals to me. Is that material still available? If so, is it difficult to install? Do you think I can incorporate the look into other areas of my home? If so, where? Audrey P., Southfield, MI

DEAR AUDREY: Metal ceilings make me think of wide pin-stripped shirts, straw hats, handlebar mustaches and garter belts. These very classy ceiling materials are not only available, they are making a strong comeback. The great news is that they are affordable and fairly simple to install. If you are a talented painter, you can even finish them with an attractive two-tone paint job that really accentuates the relief of the metal panels.

The metal ceiling industry was introduced in America just after the Civil War. The industry peaked in popularity at the turn of the century as the middle class population used this decorative technology to copy the rich hand-carved plaster work found in the desirable mansions of the upper class. Commercial establishments quickly adopted the material because of its durability and fire resistance. As you know from your local ice cream parlor, these materials will stand the test of time if they are painted on a regular basis.

There are numerous manufacturers of metal ceilings and accessory pieces. There are nearly 100 different patterns to choose from and a multitude of decorative cornice and crown moldings that will produce an exquisite look in your home. Many of these patterns are exact copies of the original metal ceiling panels. They are often available in 2 foot by 2 foot squares or 2 foot by 4 or 8 foot rectangles. If you really want a distinctive look, some metal ceilings are available in solid copper, brass, or chrome. If you are not inclined to paint the metal panels yourself, you can also purchase pre-painted metal ceiling assemblies.

Installation of metal ceilings is not too hard. Most of the ceiling patterns are designed so that nails driven on twelve inch centers will blend into the pattern. As such, the instructions packed with your ceiling panels will probably tell you to install 3/4 inch furring strips 12 inches on center that run perpendicular to the ceiling joists. Check the furring strips with a string to make sure they are all in the same plane. If the strips have waves and humps in them, your metal ceiling will duplicate this look. To insure against rust from a future water leak above the ceiling, you need to prime the back side of the steel panels with an oil based primer.

Different manufacturers promote different methods of attachment. If you want an authentic look, you can still get the small decorative cone head nails. Believe it or not, you can also install the metal panels in an existing or new drop ceiling. If your existing ceiling panels are flush with the metal grid system, you simply install the precut metal panels between the grid work and the old ceiling panels. The old fiber ceiling panels keep the lightweight metal panels from floating up and down in response to wind blowing in windows and/or from pressure changes created when doors open and close. Specialized sleek suspension grid work is available with a narrow nine sixteenths inch wide flange. You can also purchase special snap in ceiling panels that completely disguise the suspension grid system.

Consider using the metal panels and decorative trim for hallway, dining room, den, bathroom, or kitchen wainscoting. With a minimum amount of preplanning, you can install full sized panels that only require trimming at each corner. The metal panels can quickly add a touch of class to a kitchen counter top back splash that will be the talk of your neighborhood.

Standard pattern metal ceiling panels are affordable when compared against other decorative ceiling treatments. Many patterns cost less than $4 per square foot. The brass and copper ceilings, however, will set you back quite a bit. They often cost $12 per square foot or more. If you choose to purchase and install these materials be sure to budget in an extra $30 for several pairs of heavy leather gloves. The metal panels have very sharp edges. You can cut yourself in a heartbeat if you are not careful.

Removing a Load Bearing Wall

DEAR TIM: I want to remove a large portion of the wall that separates my living room and kitchen. I am certain it is a bearing wall. Is this a job I can tackle? How do you size and install the new beam that will replace the old wall studs? How do I figure out if there are pipes, wires, and ducts hidden in the wall? Sally O., Millers Tavern, VA

DEAR SALLY: You better get out your surgeon's gloves, dust mask, X-ray equipment, and hard hat for this procedure. Structural alterations such as you have planned will involve possible triple utility bypass surgery and major amputations of several limbs that hold portions of your house upright. If you obtain a plan developed by a registered residential structural engineer, I believe you can tackle this job with a little help from a few friends.

Load bearing walls often run perpendicular to the run of floor or ceiling joists that rest on top of the wall. However, beware of walls that run parallel with floor joists. They can obscure hidden posts or columns like two that I have in my own home. You can create an opening in a bearing wall much the same as openings are created in exterior walls for large windows or doors. A beam is placed over the new opening. The beam accepts the load from above and concentrates it onto columns or posts at either end of the beam. The new columns or posts that support your new beam must rest upon solid bearing material. The weight of the structure above the beam will then be transferred to a spread footer, thickened slab, steel or wood beam, or possibly some other structural member below.

Sizing the beam and the posts that support the beam should be done by a professional. A structural engineer is trained to calculate the current floor, ceiling and roof loads and possible added loads caused by snow, attic storage, and additional roof coverings. If you undersize a beam, portions of your house can sag and even in extreme cases collapse. The fee to hire an engineer who can develop your re-support plan is minuscule compared to the cost of repairing structural damage after a collapse.

There are several different ways to install a new beam in a load bearing wall. In some instances you can hide the beam within the ceiling above. This works only if the beam height does not exceed the height of the floor or ceiling joists and there are no utilities that must pass through the new beam location. If you choose this method, the floor/ceiling joists above are attached to the new beam using metal joist hangers.

The most common approach is to install the new beam below the floor/ceiling joists. To install the beam you need to build a temporary support wall on either side of the wall you are removing. Hold the temporary walls back about 30 inches from each side of the old wall. This will give you room to work. Be sure to build your new beam and slide it up against the old wall before you build your last re-support wall. If you fail to do this, it is often impossible to get the new beam into position (the voice of experience talking......).

Just about every bearing wall has utilities buried within it. It is not uncommon to find plumbing supply and waste lines, heating and cooling ducts, electrical wires, and low voltage wires for telephones, doorbells, and intercoms. It is possible to relocate these utilities in almost every case, however, it may be time consuming, costly, and require extensive additional demolition.

You can often see where these utilities enter the bottom of the wall in a basement. In some instances, wires and plumbing vent pipes might be visible in an attic as they rise up from the bearing wall. Your best bet is to use an electronic device made specifically for this purpose. You can purchase hand held devices with a liquid crystal screen that will show you studs, hidden pipes, wires, conduits, and duct work. These units can "see" through plaster, drywall and wood.

If you choose not to use a device like this, simply peel away the covering on one side of the wall and see what hidden surprises you find. If you are lucky you will discover an old hidden "contractor" time capsule. I placed one of these on each of my jobs. My time capsules contain a newspaper from that day, rinsed out soda cans or bottles, and other package wrappers. It is fun to read old ads about how you could once buy milk for 29 cents a gallon or a new car for $800!

Related Articles:  Column & Beam ConstructionColumn to Beam ConnectionBeam InstallationHeaders, Beams and Wall Sensors

Disposals Harm Septic Systems – Garbage!

DEAR TIM: My husband and I live in a rural area that is not served by public sewers. Our household wastewater flows to a septic tank. I have been told that I can't have a garbage disposer because the food scraps will clog the system. Is this true? If I do decide to install a disposer will I have to pump out my septic tank more frequently? What about septic tank additives? Do they work? Patsy M., Tortilla Flat, AZ

DEAR PATSY: I have heard that same claim from other people including some septic system professionals. The truth of the matter is that garbage disposers can be used with septic systems that have been sized and built properly and are maintained on a regular basis. Grease and oils are the only food waste I would not pour into the disposer. Grease buildup can cause major problems within a septic system.

Septic systems are very good at breaking down common body wastes and regular food wastes. A regular septic system accomplishes this using a two part system. The first part is the actual septic tank. These large containers come in sizes that range from 750 to 1,500 gallon capacities. The tanks are sized in accordance with the number of occupants in the house. Your county health officials often have sizing guidelines. The primary purpose of the tank is to collect and separate the components of the waste that flows from your house into the septic system. The tank also acts as a holding area where the initial breakdown of the waste takes place.

The second part of the septic system is the drainfield. The drainfield consists of interconnected perforated pipes surrounded by gravel. The pipes fan out from the septic tank. The final cleansing of waste occurs within the drain field. Each time new water waste is added to the septic tank, some 1 to 2 day old partially treated wastewater flows from the other end of the tank to the drainfield. The waste water flows slowly through the drainfield pipes and into the surrounding gravel. Organisms within the gravel and soil act as natural filters removing toxins, bacteria, viruses, and pollutants.

The waste that leaves our bodies and typical food waste contain bacteria. These bacteria work within the septic tank to begin the waste breakdown process. However, all too often people inject household chemicals, anti-bacterial soaps, and other items that can kill this beneficial bacteria. When this happens, the wastewater that flows into the drainfield can contain nearly invisible solid waste particles that can and will begin to clog the gravel and soil within the drainfield.

Standard garbage disposers actually help the breakdown process. The grinding action that happens each time you turn on the disposer actually increases the surface area of the food particles by hundreds of times. This allows the food particles to be broken down that much quicker by the bacteria within the septic tank. If the waste particles are not broken down quickly within the septic tank, they can settle to the bottom of the tank forming a thick layer of sludge. As the sludge mass increases, it effectively reduces the working size of your septic tank. This in turn causes sludge to build up even more quickly.

You can now purchase fantastic garbage disposers made especially for people with septic systems. These disposals differ from ordinary ones in that they come with a nifty liquid biochemical dispenser. Each time you operate the disposer, some of the biochemical additive is automatically injected and mixed with the food sludge. Hundreds of millions of beneficial bacteria are transported into the septic tank and immediately begin to breakdown the food waste. These added bacteria help to keep the bacteria count within the tank at a healthy, active level. Tests have shown that these new disposers actually minimize the amount of sludge buildup within a septic tank. The intervals between normal septic tank maintenance can increase thus saving you money.

Certain septic tank additives contain chemicals that can hurt your septic tank and contaminate natural groundwater resources. Check the label and make sure they do not contain toluene, chlorobenzene, vinyl acetate, and isoprene. Never poison your septic tank with gasoline, paint thinners, harsh cleaners, pesticides, or antifreeze. Always keep in mind that you want the beneficial bacteria within the tank to thrive and survive!

Author's Notes:

June, 2000

New Sink Switch for Disposers!

Do you operate your current disposer with a wall switch or a switch hidden in the sink base cabinet? There is a better way! Get a sleek sinktop switch from In-sink-erator. This handy switch mounts right on the sink deck, eliminates the need for a wall switch and simplifies the electrical installation. Available in either white or chrome, this switch will complement any kitchen decor. You can retrofit existing installations, but if you are building a new home, this is a must have item that you need to incorporate in your sink. For more information about In-Sink-Erator products, visit the Insinkerator Web site or call 800-558-5700.

Author's Note: We've received other questions with similar problems or questions. Here's one from Howard Stein of Oklahoma City, OK, regarding his home septic system.

"We have ten inches of snow and the temperature is near zero Fahrenheit. It will stay like this for several days.  Is it safe to use our washing machine (doing regular laundry) in this frigid weather since we have a septic tank and fear that the "arms" cannot properly dispose of large volumes of water into the ground?  Many thanks for your help."

Howard, typically in most septic systems, the tank and drainage fields are located well below the frost line.

Related Articles:   Septic Tank MaintenanceSeptic Tank Garbage DisposalGarbage Disposal for Septic Tank ManufacturerSafe Septic Tank Additives

How To Install Ceramic Tile

DEAR TIM: I've decided to install new ceramic tile in my bathroom. I'll be doing the floors and the walls. Should I do the floors first and then the walls? What tools do I need? How do you start a wall tile job? Do you have any nifty design suggestions? Jaclyn E., Sherman Oaks, CA

DEAR JACLYN: You've selected one of my favorite jobs - ceramic tile.

Fun & A Challenge

I find it to be fun and challenging. It requires preplanning, patience, and plenty of time.

The layout, cutting, and fitting of tiles will make or break the appearance of your tile installation. If you assemble the necessary and affordable tools, you can complete this job to your satisfaction and the amazement of your friends and neighbors.

Full Tile Tool List

Here's a list of tools that I've used for years to successfully install thousands of square feet of ceramic tile.

  • tape measure
  • pencil
  • tile cutter
  • nippers
  • 1/4 by 1/4 inch v-notched trowel
  • a hammer
  • some 6d finish nails
  • 8 lineal feet of straight 1/4 inch wood lattice strip
  • putty knife
  • 3-inch wide-bladed scraper
  • grout sponge
  • rubber grout float
  • several buckets
  • accurate 4 foot level

Click the image below to BUY all, or some, of the tools in the above list.

Ceramic Tool List

CLICK THIS IMAGE NOW TO ORDER ALL THE TOOLS YOU NEED TO DO CERAMIC TILE.

Plumb & Level

Your tile installation is going to look superb if the carpenters who framed the walls and floors installed them plumb and level. High-quality ceramic tile is often manufactured to extremely tight tolerances.

Each piece of wall tile is basically an exact copy of the one before. If a wall or corner is out of plumb then each row of tile will get smaller or larger than the one below. If you have the ability to correct framing defects, do so before you add the waterproof backerboard.

CLICK HERE to get FREE & FAST BIDS from local ceramic tile contractors.

Walls First

I like to install most of my wall tile first. Installing floor tile early in the job makes it susceptible to scratches, chips or other damage as you work on the wall tile above.

Accidents happen and you don't want to do superb work only to have it damaged by working on top of it.

Sanitary Base

You begin the wall tile installation by selecting your base tile. Many wall tiles come with an accessory piece called sanitary base.

The bottom of this tile resembles - to a degree - wood toe strip that you might see on wood baseboards.

Some base tiles are meant to sit on the floor substrate and the floor tile butt into them. Other base tile are designed to sit on top of the finished floor tile.

Calculate Heights

This extra relief built into the tile provides a great finishing touch. The height of this base tile, the thickness of the floor tile, and your first row of wall "adjustment" tile need to be calculated before you begin to install your first piece of tile.

Level Is A Must

Most floors are not level. Ceramic wall tile must be installed perfectly level.

The sanitary base tile may rest on top of the floor tile producing a professional look. If the floor is out of level then wall tile stacked directly on top of the base tile will be out of level.

Adjustment Row

You correct this problem by installing the second row of wall tile above the base tile as your first full sized row. The row of tile between the base tile and the second row is your "adjustment" row. This row is generally only two thirds the height of a standard tile. This usually gives you plenty of room to adjust as the floor rises and falls.

Lattice Ledge

When you start to do a wall, always start at the middle and work both ways. I like to nail a one-quarter-inch-thick piece of lattice molding to the wall. It creates a small ledge my first row of tile rests upon.

This simple support strip prevents the first row of tile from succumbing to the forces of gravity while the adhesive dries. After several hours you can remove this piece of wood.

CLICK HERE to get FREE & FAST BIDS from local ceramic tile contractors.

Spacing Lugs

If your tile has tiny little lugs or spacing bumps on each edge of the tile be sure you push the tiles firmly against one another. The spacing lugs are very normal for most wall tile and you rarely see them for floor tile. Small plastic crosses or plastic discs are often used to create uniform grout lines for floor tile.

Fifteen Minutes

Only spread as much adhesive as you can cover with tile in 15 minutes. Don't worry if the horizontal and vertical cracks between the tile seem a little off.

When the tile is grouted these imperfections disappear.

Once you've installed all of the wall tile above the wood strip on all walls you can then install the floor tile. I say this assuming you're going to use a sanitary base tile that rests on top of the floor tile.

Grout Walls

If there's lots of wall tile, I'd go ahead and grout it before installing the floor tile. Don't allow grout to get under the lower edge of the first row of tile. It will mess you up when you install the adjustment row.

Floor Then Back To The Walls

Once the wall tile is completed and grouted you then can move ahead with the floor tile installation.

After you have that complete and grouted, the last step is to come back and install the sanitary base tile and finally the "adjustment" row of wall tile.

Accent Tiles & Accessories

You can purchase accent tiles that are very attractive. These tiles come in different sizes or sometimes match exactly the size of the tile you are working with.

Consider using marble corner shelves in your shower for shampoo and other items. These same shelves work great near a toilet for plants or other decorative items. Use a white colored inexpensive marble that goes with just about any tile color. The marble company will cut these shelves for you with a special diamond wet saw.

Now, thanks to new materials and techniques, it's easier for anyone to get professional-looking results every time. Master tilesetter Michael Byrne's fully updated book explains everything anyone needs to know about tiling in an easy-to-read format. 

Setting Tile delivers all the basics tilesetters rely on - plus all the fresh ideas and innovative methods they need to do the job right. This book demonstrates floor, wall, countertop and bathroom tile installation techniques.

It covers the many types of tile--including natural stone, explains tools, setting materials, preparation and layout. The traditional mortar-bed method is still covered, but easy-to-use backerboard and waterproofing membranes now get special attention. Michael did a great job in this book.

Related Articles:   Ceramic Wall Tile TipsCutting Ceramic Tile

CLICK HERE to get FREE & FAST BIDS from local ceramic tile contractors.

Column 226

Wood I Joists

DEAR TIM: My wife and I are building a new home soon. Our builder wants to use modern wood I joists instead of regular solid wood floor joists. He says they are stronger than solid wood. Will these products save the builder money and leave my wife and I with a flimsy floor? Do wood I joists offer other advantages? Is it safe to drill holes in the joists? Is there any other alternative floor joist material? Tony P., Wahoo, NE

DEAR TONY: Congratulate your builder for catching the wave. Wood I joists made from engineered lumber are an excellent building material. 627 million linear feet of these key structural members were made in 1997 for the North American construction market. That number represents 33 percent of the total lineal footage of floor joists used in North America in that same time period. By the year 2005, it is expected that engineered wood I-joists will be used in over 50 percent of the residential homes built in the USA and Canada.

Engineered lumber is very environmentally friendly. The lumber used to make the wood I joists probably came from a tree that grew somewhere on the 241 million acres of forest land that is suitable for repeated planting of trees and commercially logged. Currently, 27 percent more timber is planted and grown each year than is harvested. To insure that future generations have plenty of wood for their houses, the forest products industry replants about 3 million trees a day!

Wood I joists resemble traditional steel I beams. After all, a floor joist is simply a beam. The wood I-joist consists of a top and bottom flange that can be made from structural composite lumber (glued lumber veneer) or regular sawn lumber. These flanges are grooved to accept a 3/8 inch thick vertical web that is made from structural plywood or oriented strand board. All of the adhesives used to make these products are designed for exterior exposure until such time as the house can be protected from the weather. It is important that your builder keeps the wood I joists as dry as possible.

If your architect and builder work together you can minimize and sometimes eliminate bearing walls, beams, and support columns. You can purchase wood I joists in depths up to 16 inches. Using 16 inch deep wood I joists spaced at 16 inches on center, you can span 26 feet 1 inch and still meet virtually every modern building code. Just about every wood I joist is stronger inch for inch than standard solid floor joists. In many instances, the use of wood I joists can lower construction costs.

Wood I joists that are made in conformance to the PRI-400 Performance Standard as written and enforced by the APA / Engineered Wood Association are your guarantee of a quality product. This standard has made life easier for designers and builders by providing uniformity within the wood I joist industry. Companies that decide to meet the stringent testing and quality control can place the PRI trademarked stamp on the web of their products. Look for this on your wood I joists.

Your builder and all sub contractors can drill holes in wood I joists. However, most of them come with knockouts or prescored holes approximately every two feet on center for small water supply pipes and electrical wiring. Make sure your builder uses these whenever possible. Large holes for plumbing drain lines and heating and cooling ducts can be cut as long as the mechanics follow easy-to-follow guidelines provided by the manufacturers. Absolutely make sure that no one drills through, cuts or notches a top or bottom wood flange. Avoid rectangular holes with sharp 90 degree corners. The inside corners of the rectangular cuts should be rounded to minimize stress on the wood I joist.

You can also use wood floor trusses instead of traditional joists and engineered lumber wood I joists. These structural members remind me of the sides of many bridges that cross rivers. Floor trusses are very open and you can readily snake pipes, wires, ducts, etc. through them. These floor joists can be built to meet just about any need. If your carpenter leaves the sheathing off the end of the floor trusses the mechanical sub contractors will be able to install pipes and ducts much easier. Once these utilities are installed, the carpenter can button up the ends of your house.

Author's Notes - August, 1998:

Three weeks after this column ran in the Staten Island Advance, I received a letter from an Assistant Fire Chief of the New York City Fire Department. This individual - speaking on behalf of the department - felt that you and I should know that wood I-joists, "...may demonstrate excellent structural characteristics under non-fire conditions, it (wood I-joist construction) has proven to be disastrous under fire conditions with early collapse in under five minutes."

The Assistant Chief's point is right on target. Typical solid-wood floor joists take much longer to burn through in a fire. This means that a fireman charging into a burning building built with regular solid-wood joists can attempt to rescue you or a loved one with a degree of confidence. Firefighters die and are seriously and permanently injured every year when they are trapped in burning building collapses. This is a serious issue. The growth in usage of engineered wood products threatens the lives of firefighters all across the nation.

I responded to the individual and promised that I would post these notes. Furthermore, I urged him to continue to push code writing officials to mandate residential fire sprinklers in certain high probability fire locations in the typical residential home. I urge you to consider installing a simplistic, yet effective, fire sprinkler system in your home if you decide to use wood I-joists or floor trusses. Read my past column about nearly-invisible residential sprinklers. Fire sprinklers not only can save property but they can save the lives of you, your family and firefighters who are constantly on guard to serve, protect, and save you.

Tim Carter

Clothes Dryer Vents

clothes dryer vent double door

Look at the double doors. This keeps pests out and prevents cold air from backdrafting into your home. CLICK THE IMAGE to order it now.

DEAR TIM: I just discovered that my clothes dryer exhaust in my new home dumps into my attic near a roof vent. There is a large collection of lint in the attic. When asked, the builder states that this is perfectly acceptable. Is he correct? Is the solid vent piping better than the flexible piping? Can you vent a dryer through a roof or a soffit with minimal problems? What about those interior vent kits that claim energy savings? Is that an option? Bob E., Troy, MI

DEAR BOB: I see inferior dryer vent installations like yours on a monthly basis. Dryers that exhaust into garages and crawl spaces are also potential problems. Ask your builder if your local building inspector finds his installation "acceptable". Virtually every model building code addresses clothes dryer exhausting. The codes mandate that dryer exhaust needs to be ducted outdoors. Terminating the exhaust pipe near an attic vent does not meet this requirement, plain and simple.

Clothes dryer exhaust can cause major problems within a house. In your case you have two imminent hazards. One is a fire hazard with respect to the massive quantities of exposed fabric lint dust. An open flame could turn your attic into an inferno within seconds. I also suspect that you will have mildew growing in short order. The dryer pumps a large amount of humid air into the attic with each load of laundry that is dried. This warm, moist air is exactly the tropical climate that mildew thrives upon.


roof flashing for bathroom
I have found that it is often best to vent fans and dryers through the roof. I urge you to watch this video of mine to see how easy it is to install the correct vent-cap flashing on a roof. Have no fear - if done right you will have no leaks.


Interior vent kits do not meet most model building codes and they inject vast quantities of humid air into your home. Condensation on windows, within exterior walls, and in attics can result from this method of dryer venting. This trapped moisture can cause wood rot and mildew problems.

Dryer venting is not as simple as it seems. The blower motor within a dryer can only push the moist air so far. If you exceed this limit, the dryer will not dry clothes properly and the vent piping can clog easily with lint. The exhaust hood design, the type of exhaust pipe used (smooth metal vent vs. corrugated/flexible metal pipe), and the number of bends in the exhaust piping create friction that slows the air leaving your dryer.

Smooth metal vent pipe and exterior exhaust hoods that have openings of sixteen square inches or more offer the least resistance to air flow. If you have no bends or turns in the exhaust piping, you can place the dryer up to 64 feet away from the exhaust hood. The addition of four 90 degree bends allows you to have only 27 feet of straight pipe in between the dryer, the bends and the exhaust hood. Exhaust hoods with narrow mouths often have only ten to twelve square inch openings. If you use one of these with flexible piping that has four bends in it you can only have fifteen feet of straight piping between the bends, dryer, and exhaust hood!

Author's Note:  Since this article was written, the Code has changed.  Mark D. of  Laconia, NH, emailed me and stated that "Since the International Residential Code states "Max length of 25' (less for elbows)", why do you say 64'?"  Be sure to check the most recent Code for the correct lengths. Codes can be updated at any time.

You can vent a dryer through a roof if you use the correct exhaust hood. The best hoods are one piece and contain wide flanges that permit a leak proof installation under common asphalt shingles. The hoods include insect screening and a built-in damper that stops outside air and bumble bees from blowing or flying back into your dryer. Venting dryers through soffits is not a good idea. Humid air can often find its way into your attic through soffit vents.

Because you live in a cold climate you need to make sure your builder insulates the metal dryer pipe when he connects it to the new special roof exhaust hood. Without this insulation, the metal pipe will chill the moist air within the pipe creating condensation. This liquid water will run down the pipe and possibly leak from the pipe joints or show up as a leak under your dryer. High quality reinforced foil duct tape found at heating and cooling supply houses is the best material to use to secure the insulation to the metal piping and the insulation backing. Standard duct tape can fail in the extreme temperatures found in many attic spaces.

Check to see how your dryer vent pipe was fastened together. If your builder used screws, it was a mistake. The screw shafts inside the piping collect lint and cause additional friction. Manufacturers and building code officials prefer that you use the reinforced foil duct tape in conjunction with special large diameter clamps that squeeze the pipes together.

Natural Stone Pathway

flagstone patio

This is a flagstone patio I installed. You can't see the hydrated lime in the mortar, but it's there. Copyright 2023 Tim Carter

DEAR TIM: I would like to build a simple garden pathway using natural stone. Are there natural stones that I can use that are both durable and affordable? How would you create a natural-looking pathway using stones? Sarah T., Gastonia, NC

DEAR SARAH: I knew my college geology degree would come in handy! There are numerous natural stone products that can be used to create colorful and durable pathways in your garden or in any other part of your yard. Several products can also be used to build low, mortar-less retaining walls. I have seen quite a few highly durable and colorful natural stone products on my many geologic field trips.

Some parts of the nation are blessed with local outcroppings of natural stone that you can mine yourself. We have these in my own hometown. Southwestern Ohio happens to have an abundant supply of layered gray and buff-colored limestone. Limestone is calcium carbonate - a durable natural stone. Limestone deposits often appear in thin layers that make it easy to quarry.

Other parts of the nation have natural stones like slate, sandstone, flagstone, and granite. I was taught in college that stones that contain the highest amount of the mineral quartz tend to be extremely durable. Sandstone and quartzite are wonderful natural stone products that contain nearly 100 percent quartz. Some quartzites are available in a series of buff and brown tones while others can be found that are a rich medium green in color. The quartz particles within the rock shimmer when the sun strikes them just right.

The biggest problem in obtaining natural stone is usually the cost to ship the heavy material from the source to the point of use. For your garden path, you should consider a stone that is thin yet strong. By doing this you will get more surface area covered per ton of material delivered. Quartzite, slate, flagstone, and some limestones can be found that meet these requirements. Many large home center stores across the nation are beginning to stock natural stone products that are perfect for your project. Quartzite is available at many home center stores for just $2.50 per square foot. You can also locate natural stones by checking your Yellow Pages under the "Stone Products" heading. AUTHOR'S NOTE: You can tell this column was written before Google existed. The Yellow Pages and Classified Ads in newspapers were the search engines before the Internet existed.

To build the appealing path in your garden you will need minimal tools. A round-point shovel, a square point spade, rake, mason's hammer, level, string, small wood stakes, and a wheelbarrow will enable you to complete this project. Layout your path using the string and stakes. An 18 to 24-inch wide meandering path is usually suitable for one person to walk along. If you intend to have two people walk side by side down the path, plan for it to be 42 to 48 inches wide. Once the path is planned, you can calculate the square footage of stone material you will need.

I prefer to use crushed stone under and around the natural stone products. A 4-inch thick layer of crushed stone will provide plenty of support for foot traffic. You can purchase this crushed stone at gravel pits or quarries that sell this material to contractors who install blacktop or asphalt driveways. Be sure to get the grade of crushed stone that contains rock dust and stone chips that range in size from 3/4 inch down to the size of a pencil eraser. The rock dust and small stone chips will eventually interlock and resemble hardened concrete.

crushed washed gravel linear french drain

This is an example of crushed stone. It's best to use some that does contain different sizes of stone chips as well as some sand. Copyright 2018 Tim Carter

Use the round point shovel to do your initial excavation. The square spade can be used to cut a smooth surface in the soil to accept the crushed stone. Install the gravel and smooth it with your rake so that the center of the path is slightly higher than the edges. A slope of 1/8 inch per foot is acceptable, however, a one-quarter-inch slope per foot will work even better. This slope prevents the puddling of rainwater.

Trim the stones with the mason's hammer so that you have approximately one inch of space between the stones. If the stones wobble after you lay them in place, use hand fulls of fine stone chips and dust to fill in the void spaces beneath the stones. Once you are satisfied with the layout, sweep fine stone chips and rock dust into the joints around the stones. Water the pathway using a garden hose and enjoy the stroll through your garden!

Related Articles:  Natural Stone Path, Suppliers of Natural Stone, Building a Path of Natural Stone

Air Conditioning Sizing Problems

air conditioning

These are two AC units outside my own home. I have two separate systems in my home, one for the first floor and one for the second floor. Copyright 2018 Tim Carter

DEAR TIM: I have never been satisfied with the performance of our central air conditioner. Even though the unit runs 45 minutes or more each hour, the house never seems really cool. All of the rooms that face west become unbearably hot in the late afternoon. A neighbor's house across the street has an identical floor plan and their house seems very comfortable. Periodic checks of our system indicate that the refrigerant level is fine. Why am I so hot? Ron W., San Marcos, TX

DEAR RON: Your discomfort can be caused by any number of problems. However, I suspect that a mistake was made when you house was built. It is a distinct possibility that the outdoor air conditioner and the coil inside your air handler or furnace is too small.

I think that the cooling contractor either made an error in his sizing calculations or simply guessed at the size air conditioner needed to cool you home. Air conditioners are like shoes. Ones that don't fit are simply uncomfortable!

All houses attract and create heat. The infrared energy contained in natural sunlight is the heat energy that comes through windows, doors, air leaks, and through insulated walls and ceilings. Appliances, light fixtures, even our own bodies create heat within houses.

CLICK HERE to get FREE & FAST BIDS from local AC Technicians who can install the right sized AC Unit for your home.

All of this heat can be easily measured. Air conditioning contractors and manufacturers refer to the accumulated heat as heat gain. It is measured in British Thermal Units (Btus).

Air conditioning equipment comes in different sizes. The cooling capacity of a particular system is measured in tons. One ton of cooling equals 12,000 Btus or the amount of heat it takes to melt one ton of ice in a 24 hour period. Typical residential air conditioners can be purchased in sizes that range from 1 ton to 7 tons often in one-half ton increments.

My guess is that you and your neighbor have the same sized air conditioners.  Their house is comfortable because they have much less glass surface pointing west.  West or southwest facing glass allows enormous amounts of heat into your home.  This explains why your west facing rooms are so hot.

Air conditioning engineers have developed straight forward step-by-step procedures that allow just about anyone to calculate with considerable accuracy just how much heat accumulates in their house.

To calculate your house's heat gain, you simply need a measuring tape, notepad and pencil, a simple calculator, a compass, cooling load calculation tables, and several hours of your free time.

You first need to obtain a copy of the cooling load calculation tables. Cooling contractors and those in the industry commonly refer to this publication as Manual J. The tables are published by the Air Conditioning Contractors of America.

You may be able to find a copy of Manual J at your local library or from an air conditioning contractor of distributor in your city. The booklet looks intimidating but if you can follow step by step instructions, you can do the calculations quickly and accurately.  If your final total of Btus is in the tens of thousands (20,000 - 55,000 or more Btus), then you have done well!

Once you have completed your calculations and checked your math for accuracy, you need to look at your outdoor air conditioning unit.  Often you will readily see a plate that contains a model number, serial number and other numbers. 

The tonnage capacity of your unit is contained within the numbers on this plate. Your air conditioning service person can quickly tell you how many tons of cooling your air conditioner will produce after reviewing these numbers.  Divide your final total Btus by 12,000 and see if the two numbers match!

CLICK HERE to get FREE & FAST BIDS from local AC Technicians who can install the right sized AC Unit for your home.

Column 231

A Saw Horse Substitute – Tim’s Carpenter’s Bench

Years ago, a carpenter buddy of mine, Chuck Sallee, made some dandy carpenter's benches at a job we were working on. I liked them so much, I ended up making countless numbers for myself and friends. I even made a set on TV one day! You will love these strong benches.

Carpenter's Bench

DEAR TIM: I have never liked working with saw horses. I'm looking for a simple work platform or bench that I can use for various purposes around the house. My guess is that you were also frustrated with saw horses. What did you use in the on your jobs? Is it easy to find one in a store? If not, how do you build one? Melinda B., Cardwell, MT

DEAR MELINDA: Saw horses are okay for certain tasks but I only use them as a last resort. My weapon of choice around the jobsite is a wonderful multi-purpose carpenter's bench that I make from scrap lumber. The environmentally friendly benches are usually made by lunch of the first day. I use the scrap lumber that is generated during the construction of the wooden sub-floor or wall assemblies. The benches are far stronger than traditional saw horses and they also serve as a tool caddy, emergency stepladder, and a great place to sit down and eat lunch.

This bench has seen years of service. I use it as a painting platform as well as a tool bench.


You can see how well the bench supports a large miter saw. The lower shelf is handy for other tools or supplies.


You will not find my bench in a store, however you can build one in less than a half hour using some simple tools and minimal lumber. If your friends, neighbors and relatives are like my past customers, I guarantee you that you will be building quite a few of these great tools. I commonly left my benches behind for my customers as a gift. Trust me, your friends and neighbors are going to borrow your bench for extended periods of time and "forget" to return it.

To start this project you are going to need a circular saw, a drill with a one half inch spade bit, a jig saw, a level, a framing square, tape measure, pencil, a screw driver, and some 2.5 inch long galvanized coarse threaded screws. If you want a fancy bench you will need a router as well. Your lumber requirements are simple. All you need is a four foot length of 2 x 12 and a four foot by three foot piece of scrap 3/4 inch plywood or oriented strand board (OSB).

The completed bench measures 14 and 3/4 inches wide at the top, 32 inches long and it is 24 inches high. I always like to cut all of my lumber before I start to assemble the bench. The legs of the bench are made from two pieces of 2 x 12 that measure 11 and 1/4 inches wide and are 23 and 1/4 inches long. A V notch is cut in the bottom of each leg so that just a 2 inch long portion of the 2 x 12 contacts the ground at each corner.

All of the other bench parts are made with the plywood or OSB board. Six pieces need to be cut in order to begin assembly. If you are using plywood, be sure that all pieces are laid out so that the longest dimension is parallel with the grain of the wood. OSB layout is not as critical. The top measures 14 and 3/4 inches wide by 32 inches long. Cut out the top and bottom stabilizer braces next. The braces measure 3 inches wide by 30 inches long. The last piece to be cut is the bench's bottom shelf. It measures 11 and 1/4 inches wide by 27 inches long.

This is an adaptation of my workbench. It was built by Mike Radcow. As you can see, Mike used all 2x material to enhance the strength. But you also need to be strong to lift his model. It is a beautiful modification to my simplistic bench. Good job Mike!! PHOTO BY: Mike Radcow

This is an adaptation of my workbench. It was built by Mike Radcow. As you can see, Mike used all 2x material to enhance the strength. But you also need to be strong to lift his model. It is a beautiful modification to my simplistic bench. Good job Mike!! PHOTO BY: Mike Radcow

The bench assembly begins by attaching the top braces to the top outside 1 and one half inch wide corner of the 2 x 12's. Once attached, the top of each brace should be flush with the top of each leg. Use two screws at each connection point. The bottom braces are attached in the same manner. However, the bottom of the lower braces should be held up 4 inches from the bottom of the legs. The shelf can now be installed. If you cut your lumber correctly, it will fit snugly in between the legs and the bottom braces. The underside of the shelf should be flush with the bottom edge of the lower braces. Install 3 screws through each brace to secure the shelf. The braces act as shelf sides and form a convenient storage area within the bench. You will find this to be a perfect place to store nails, shims, paint brushes or other items for different tasks.

The final piece to be attached is the top. Once again, if all cuts are accurate you will find that the top overhangs the legs and top braces one inch on all sides. Attach the top by driving at least 3 screws into each leg and 2 screws into each top brace. Use the drill and jig saw to cut out a 2 inch by 4 inch rectangle in the center of the top. This cutout acts as a hand hold that allows you to easily lift and transport the bench using one hand. Equip the router with a profiled bit to give the top's outside edge and the interior edge of the hand hold a finished touch.

If you decide to stand on the finished workbench for any reason, be aware that it is unstable. If you shift your weight or change your center of gravity, the bench can tip without any warning (the voice of experience screaming!). You can fall and seriously injure yourself. Only use the workbench as a step stool as an absolute last choice. It is worth the trip to the garage or truck to get a stable step ladder.

Related Articles:  Work & Storage Bench Assembly, Carpenter Workbench with Tool Storage