American Standard Saybrook Filtered Kitchen Faucet

American Standard Saybrook

American Standard Saybrook | This is a dandy faucet that can deliver filtered drinking water with the touch of a button. See the end of the faucet with the button? You can pull that down about 16 inches to easily rinse things out or to rinse the sink. CLICK or TAP HERE to get one for your home.

American Standard Saybrook Filtered Kitchen Faucet - Beefy!

I've been a master plumber since age 29 and have installed countless faucets. I decided to switch out my basement kitchen faucet and install the American Standard Saybrook Filtered Faucet.

It was a breeze, but only because I've done lots of jobs like this.

This faucet is well-made and I can tell you it will last for quite a long time. The tip of the faucet is attached to a hose so you can pull it down to easily rinse things out.

Were the Installation Instructions Great?

Honestly, I thought the written installation instructions were lacking. I feel a DIYr that has never put in a faucet before will struggle and get frustrated faster than you can say, "Hand me the basin wrench." The instructions rely on illustrations to try to get you to do everything right, but if you don't know how to interpret the small parts, you'll miss a step.

Did You Have any Leaks?

No. American Standard designed all the hose connections so they have the correct compression washers or o-rings. It was really easy to create a leak-free installation with just an adjustable wrench.

What Tools Did you Need?

I needed the following tools to remove the old faucet and install the new one:

  • plumber's basin wrench
  • Phillips #2 screwdriver
  • 8-inch adjustable wrench - two of them

How Long Did It Take You?

It only took me 90 minutes at a leisurely pace to remove the old sink faucet and have this one operational.

What Important Tips Can You Share?

  1. Read the instructions and try to understand them.
  2. Assemble all the tools you need before you start.
  3. REMOVE the aerator before you turn on the water! Be careful about misplacing the small black washer!
  4. Get a large plastic zip-lock bag and put the manual, the special aerator-removal wrench, and the filter box in the bag. Tape this bag to the side of the sink base cabinet for you, a plumber, or a future homeowner.
American Standard Saybrook

This is the old faucet I was replacing.

American Standard Saybrook

The old faucet is gone and I've cleaned and polished the shelf of the stainless-steel sink. Don't skip this step.

American Standard Saybrook

Here's the finished faucet. I'd recommend this to any family member, friend, or YOU! CLICK or TAP HERE to purchase one now.

Check out my review of the OUTlet. Uh oh. It was a great idea, but they don't always work. Sorry!

Jack Up Floor Joists

sagging floor - house exterior

The Saga of the Sagging Floor | See that cream-colored painted wood in between the two garage doors? Behind it is a wood column that’s rotting away causing the living-room floor above the garage to sag. Copyright 2020 Tim Carter

QUESTION: Howdy, Tim. Well, I really need your advice. I’m thinking of re-siding my house and it’s time to bite the bullet about repairing a structural issue that’s been getting worse each year. The floor in my living room has sagged two inches! The cause has been traced to a support column in between my two garage doors. I’m terrified as to what this might cost to repair and I have no idea what’s involved. Have you ever had to do a similar repair and who is best suited to correct the problem? What kind of column would you install so it never happens again? Stephen L., Worcester, MA

Why Do Floor Joists Sag?

Do you have a sagging floor like Stephen’s? They’re more common than you might think. In my opinion, the most common causes of sagging floors are wood-eating insects, wood rot caused by water leaks, undersized beams, and lastly soil settlement. There are other possible causes but in my experience the ones above account for much of the misery.

Jacking Up Joists - True Story

Years ago, a married couple hired me to build a room addition and complete a kitchen remodel job. They were so pleased with my work they then re-hired me to do lots of remodeling work on an existing home they moved to as their family grew. The house had a horrible sagging floor situation in the center of the house. An undersized beam in the basement was to blame and I fixed it by installing a new column in the basement.

I had to cut into the basement concrete floor to pour a new 3-foot by 3-foot by 1-foot-thick concrete footing pad. Once that was cured, I rented two house-lifting screw jacks. I installed cribbing on the new footer pad to support the jacks allowing myself space to install a new 4-inch steel column under the sagging beam once we had it re-leveled.

The trick is to lift the floor slowly. There was a staggering 3-inch dip in the floor so I decided to lift the floor 1/4 inch per day. It was easy to do and since I was in the house doing other work. I didn’t have to make all sorts of special trips back and forth to the house to adjust the jacks each morning.

In two weeks, the job was finished. Once the old beam was level again, I got the precise measurement I needed between the bottom of the beam and the top of the concrete pad. In one day my welder cut the steel pipe and welded on plates so I could bolt the column to the concrete footer and to the underside of the wood beam. I had the welder drill a hole near the top of the column so we could fill it with dry sand. This prevents the steel column from bending in the event of a house fire.

Should I Expose a Support Column?

The first step in Stephen’s journey is to expose the support column in between the two garage doors to see what might be the problem. Wood rot from water leakage or an insect issue should be straight forward. It’s important to realize if you see carpenter ants, they usually only like to live and tunnel in soft, moist wood so the issue is most likely a leak.

Settling soil can be a tougher problem to trace. If the support column is not rotted nor eaten by insects, then you need to start to look for other clues that might indicate the footing or foundation below the column has dropped. Check the garage floor for cracks around the support column and use a level to see if the floor is sloping to that area.

Should I Hire a Structural Engineer?

I feel the best money Stephen could spend on the job is to hire a residential structural engineer. CLICK or TAP HERE to get FREE BIDS from local structural engineers for your job. This professional has dealt with similar issues and can create a drawing that will communicate to bidding contractors exactly what needs to be done to fix the problem. Don’t allow a contractor to tell you he knows what to do unless he happens to also be a registered structural engineer.

Should I Use Steel Support Columns?

I’m very partial to using steel for support columns. It’s stronger than wood in almost all instances and it’s easy to have a local welder create exactly what the engineer might draw. Just about every engineer will allow the contractor to use solid-steel shims to make it easy to install custom-length steel columns.

How Do You Support Joists?

It’s very important that the engineer show in his drawings how to temporarily support the floor or the house as the repair work is being done. What’s more, be sure the engineer makes a recommendation to the amount of lift the contractor can do each day. You don’t ever want to try to jack up a beam in one hour that’s sagged 3 inches!

When Should I Get Bids From Contractors?

Once you’ve got the engineer’s plan, it’s time to start talking to remodeling contractors. These pros have the required skills. It’s vital you interview them and ask for at least three references where they have had to fix a similar structural issue. You want to call those homeowners to ask how everything turned out. You don’t want to be the contractor’s guinea pig for goodness sake!

Keep in mind steel columns come both round and square. Welders can do all sorts of things to make it easy for you to attach wood to the steel column should that be required. I always used the square columns on my jobs as I found them infinitely easier to work with.

Column 1375

Build a Real Tree House

build a real tree house

Build a Real Tree House | You need very special hardware and suspension materials to build a real house supported by three, or more, trees. You also need a special engineer to make sure it’s all going to work. Copyright 2020 Tim Carter

QUESTION: Tim, I was spending a lazy weekend afternoon gazing at countless photos of actual treehouses that one could live in. I was intrigued and am seriously thinking of building one. Mind you, I’m not talking about some little box kids might play in and use a clubhouse. I’m talking a real two-bedroom home with everything you’d have in a home that’s built on a typical foundation on the ground. What’s involved in making this happen? Is it foolhardy? Will the house get damaged in a windstorm? Becky S., Rockfall, CT

Have you spent a dreamy afternoon or two as Becky did? I know I have. About ten years ago after first moving to New Hampshire, I thought about building a separate tiny structure up on a giant piece of exposed granite on my land. My oldest daughter had shown me a stunning photo of an enclosed deck surrounded by giant glass windows. The caption of the photo called it a lantern room.

I was mesmerized with this concept and went so far as to seriously think about building a two-room structure surrounded by nothing but glass. After a few days, the magic wore off. It’s a good thing because it would have been a nightmare to get to it in snowy weather much less heat it in the winter!

Can you build a treehouse?

An entire industry has blossomed because of folks like Becky. You absolutely can build a treehouse, a real house surrounding a single tree or suspended in between three, or more, trees. Wind is your biggest enemy when it comes to treehouses. Trees sway back and forth in heavy winds.

tree house

This is the tree house I stayed in for three days. It was in Ellsworth, Maine.

Will a treehouse get damaged by the wind?

A well-engineered treehouse will not be damaged in windstorms because it will float on a suspension system that’s connected to the trees. There are all sorts of systems and it’s going to require quite a bit of research as well as field trips to see which one you feel will work best. If you were to bolt the house support beams directly to the trees, the wind would tear the house apart as it stretches and squeezes the house.

tree house

Look at the special white slide plates that ensure the house is not ripped apart when it's windy.

How do you know if a tree will support a treehouse?

Before you get too involved in the project, I think the first person I’d consult with would be a certified arborist. I’d want to know if the trees I’m thinking of working with are strong, disease-resistant, and well-suited for holding up a house for 50, or more, years. I know for a fact not all trees are equal and some are far weaker than others. I’d want to know how fast the diameter of the tree increases so the ones supporting the house don’t start to get too close to the exterior finishes.

Once I knew the trees would work, I’d then go travel to see no less than five actual treehouses and talk with the owners. Most are proud of their structures and will almost always share their trials and tribulations. You can even stay in one for a weekend like I did in Downeast Maine. I highly recommend looking online for treehouses that you can rent for a night or weekend. Take lots of photos to see what you like and don’t like. Pay attention to how the house was connected to the trees and how all the utilities stretch up from the ground into the house.

tree house

This is the delightful outdoor shower I used while staying at this tree house.

Are construction costs higher for a treehouse vs a normal house?

Be aware that your construction costs are very likely going to be higher than those for a normal house. The builder will face all sorts of challenges working up in and around the trees that will undoubtedly slow him down. Address this topic with the owners of the treehouses you visit. You can diplomatically talk about this speaking in generalities and ranges of prices.

tree house

You need to make sure the trees don't hit the house!

How do I find a contractor to build the treehouse?

I feel one of your biggest challenges will be finding a builder who can do the job. My guess is very few builders have built a treehouse. It’s okay to use a builder who has not done one, but he needs to be extremely detail-oriented and he needs to prove to you that he has completed other projects that had very unique engineering challenges he successfully overcame. You must go visit those projects and talk with the homeowners. Do not simply trust what the builder tells you. There’s too much at risk.

CLICK or TAP HERE to get FREE BIDS from local Tree House builders.

You can also watch any number of online videos about treehouse construction and the types of suspension systems that are available. Pay attention to all the different products used and try to locate videos showing the methods the builders used to work up in the air. Scaffolding comes to mind, but your wooded situation may not be such a friendly place for pipe scaffolding.

tree house

The inside of a tree house can have all sorts of interesting features. Be sure you install a 5-foot diameter staircase, not a narrow 4-foot one like this.

Lastly, you should give serious consideration to all the exterior materials. Think about future maintenance. Imagine how much effort it might be to paint the house or do other things to keep the exterior in excellent shape.

This project will require an enormous amount of preplanning and due diligence if you don’t want your dream to transform into a nightmare. Take plenty of time to parse all the parts of your vision so you don’t overlook something that will leave you awake at night!

Column 1376

October 18, 2020 AsktheBuilder Newsletter

How are you today? I think you could be a new subscriber! I devote this top paragraph to you. It’s always a pleasure to meet a new subscriber.

On the other hand, you very likely could be a subscriber who’s like a fine wine, getting better with each issue. You’ve been with me so long there could be a layer of dust on your first issue dating back from all those years ago.

Some people dust every other week out of force of habit, and if you’re one, you might try an electric leaf blower for the task. It’s so fast!

CLICK or TAP HERE to see one I’ve used to remove dust from things. I’m telling you, don’t discount using one around or in your home. Inside, be sure to use an electric one.

Pro Dusting Tips: Be sure to use strong adhesive tape to secure irreplaceable family photos on your mantle or walls when directing the blower air at them. Turn on the whole-house fan and open key windows to suck all dust up into the attic and out of your house.

Pumpkin Carving Saw

If you had to carve a pumpkin in less than two minutes, do you think you could do it? I did it two nights ago!

pumpkin carving saw

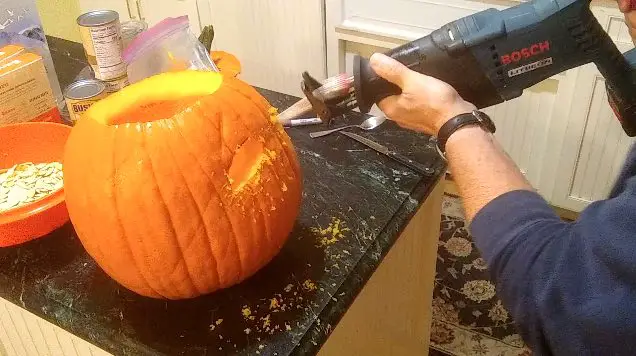
CLICK or TAP HERE to see how fast I did it. Ignore the items on the island! Nothing to see there.

Exploding Alkaline Batteries!

Alan lives in Rochelle Park, NJ, and sent me an urgent communique’ this past week.

He was replacing a triple-A battery in a bicycle light when in another room an older AAA alkaline battery EXPLODED.
exploding battery

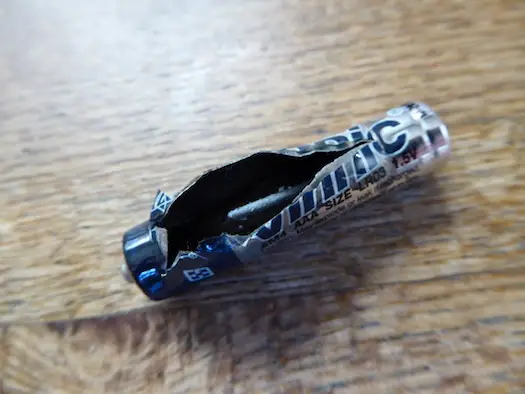
Alan said, “The battery had been sitting on a table on the first floor for about a week. I was upstairs and my wife was on her computer about 9 feet away from the battery when it blew up. We have no idea what triggered it.”

Let this be a warning to you. Dispose of old batteries properly and keep them away from any flammable materials. Punch some large air holes in a closed metal container where you intend to place the old batteries. These holes allow explosive forces to hopefully prevent the lid from blasting into the stratosphere. Store the batteries outdoors in case they explode before you can get them to the recycling center.

Noisy Neighbors in Apartment Building

Mary reached out to me days ago. She hails from Rockfall, CT, and had this great question, “What are the absolute BEST blown-in soundproofing materials for an apartment wall that I share with my neighbor? It's just a sheetrock wall. This is HUD housing and the management company here is willing to do this. I will also contribute to the cost to help save my sanity. Any other ideas would be very much welcomed. I trust your judgment and I love your column in the Hartford Courant!”

Let’s start with Mary’s last comment about my syndicated newspaper column. Do you read my column in your local paper? If so here’s a Pro Tip.

My guess is you might like several features in your local or online newspaper. If so, you should periodically write a pithy letter to the editor sharing with her/him WHY you like the feature. Give some examples of how it’s made you laugh, allowed you to make the perfect cake, or in my instance, perhaps I saved you a boatload of money and time.

Editors NEED periodic positive feedback from readers. Without this, they could start to think NO ONE likes a feature.

They’ll cancel it, replacing it with something else and believe me, it’s next to impossible to get them to change their minds. Understand, in my case, lots of editors get negative comments from contractors or manufacturers I call out in my columns. So I need your help to keep my column in your paper.

Now back to Mary’s issue with her sound problem. Sound is transmitted through the air as soon as something starts to vibrate. Thick dense walls and floors in older homes are harder to get to vibrate than thin crap walls in newer apartment buildings and condos.

CLICK or TAP HERE to get a feel about how to make things soundproof in your home. It can be done to an existing home, apartment, or condo with some effort. You need to think of your room or house as a ship at sea! This will make sense once you read the above column.

Granite Cobblestones - Great Edging

Here’s a photo of granite cobblestone edging next to the tar and chip driveway at my previous home in Cincinnati, Ohio. CLICK or TAP HERE to see amazing photos and a VIDEO of how this colored driveway was installed.
Tar and chip drive (Tim)

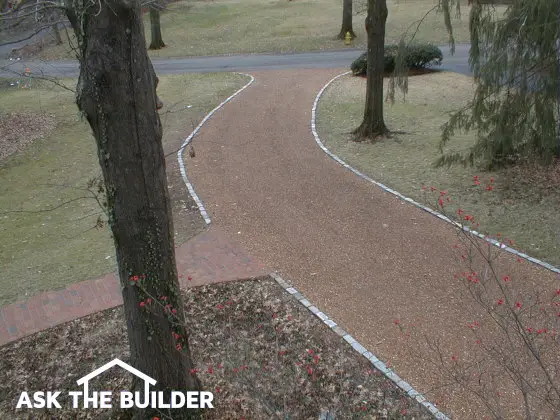
Did you know you can often purchase salvaged granite cobblestones? If those aren’t available, you can most certainly obtain new ones.

Granite cobblestones can have an interesting history. I cover that in this column you should peer at. You might be able to get granite that was harvested in Europe of all places!

CLICK or TAP HERE to watch a video about how easy it is to install granite cobblestones at your home.

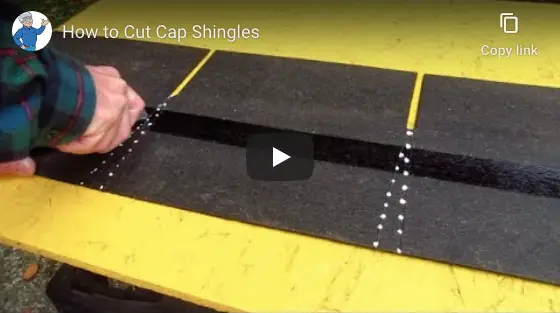
Installing Flashings on Metal Roofs

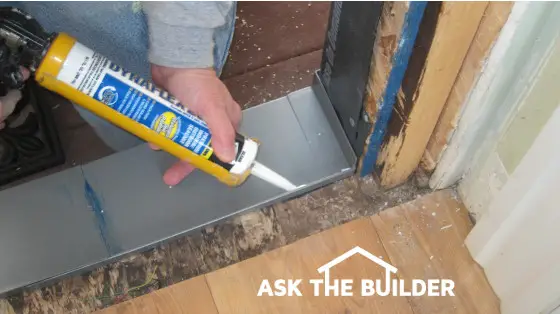
Ken, who lives in sunny and on-fire California, did an extensive phone consult call with me several days ago. He had a metal roof installed on his house a few years ago and has been wringing his hands about all of the flashings that surround pipes and vents poking up through the roof.

The installers smeared a bunch of caulk around them like this:
ken's metal roof pipe caulk

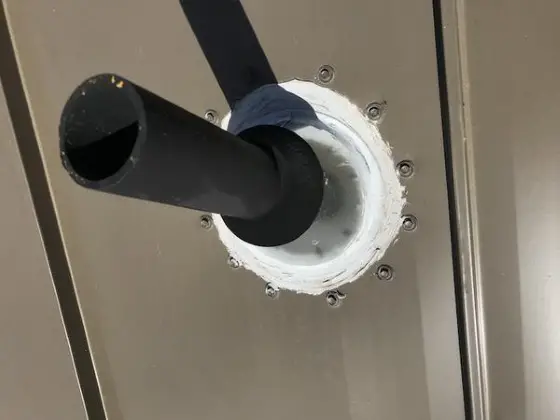
Can you see what’s wrong with this installation technique? How do feathers on a bird work? Have you engaged your God-given critical-thinking skills as to how asphalt shingles work with gravity to keep you dry?

You do know that caulking is NOT a permanent roofing material, right? The sun's ultraviolet light destroys caulk as you might crush an oyster cracker in your hand.

Do you have a clue how tinsmiths installed flashings 150 years ago with NO CAULK? Would you like to see how they did it?

I thought so. Ken asked me to make a video for him so he can do the roof repair himself saving thousands of dollars. Would you believe he was quoted $5,000.00 to do the work? I feel Ken could most likely accomplish modifying the flashings in about eight hours. If so, the money Ken invested in the phone consult and the video creation is going to pay off in spades.

Since I don’t have a metal roof with GOOFED-UP flashings to fix, I decided to make a model for the video using a paper cup and some old file folders.

paper vent flashing
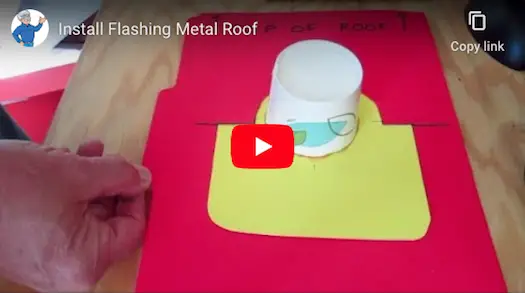
CLICK or TAP HERE and you’ll be amazed at how SMART those old tinsmiths were!

You need to understand I’ve installed lots of flashings in metal roofs for decades using this method and I’ve never had a leak.

That’s quite enough for a Sunday.

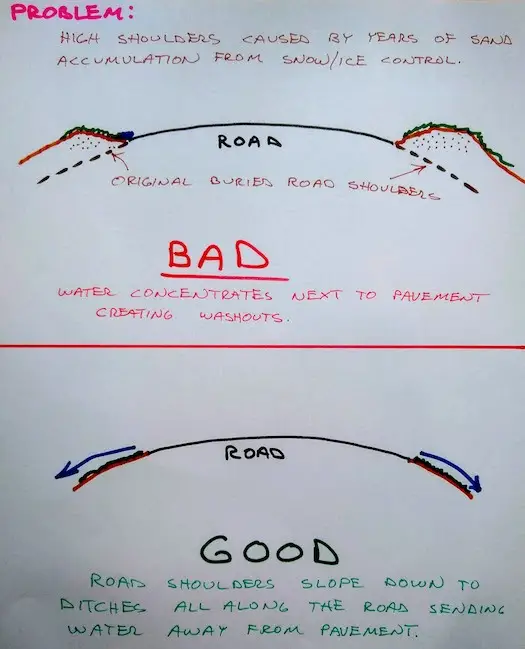
Oh, one more thing. After church today, I’m going on a walk down my street with Tamara. She’s a neighbor and board member of my association. She wants me to explain why all of a sudden we’re getting washouts along the pavement.

So simple! I made this fast drawing for Tamara to share with the other board members. You do know that roads have crowns. Why of course you knew that!

road shoulders Image

Tim Carter
Founder - www.AsktheBuilder.com
Best Darn Cleaner - www.StainSolver.com
Solved South Arm! - www.W3ATB.com

Do It Right, Not Over!

P.S. How do I stay warm in my cave above my FREEZING COLD garage all winter? I thought you’d never ask. CLICK or TAP HERE and watch the short videos.

October 11, 2020 AsktheBuilder Newsletter

Hello there! Guess what? Right here at the top of each issue is where I extend a warm welcome to you, imagining it’s our first time together face-to-face. Maybe one day that will happen at one of my meet-ups but for now it’s got to be virtual.

You, though, could be a trusty subscriber. We’ve been together on great days and not-so-good days. Do you remember the column I shared with you about the best way to clean paint brushes so you don’t ruin them? I have some paint brushes that are twenty years old and they're still in fantastic shape having been cleaned countless times. CLICK or TAP HERE to discover my cleaning secrets.

paint brush in paint can

Frustrated

Two days ago, I clicked out of a ZOOM video call I did with an airline pilot. It turns out he’s risked his life for me and other US citizens, possibly you, by giving twenty years to the US Navy before transitioning to flying Boeing 737s.

He hired me to do a phone consult as he wanted to sue a builder who’d constructed a three-seasons porch on his home. The porch is rotting away. I had to deliver a massive dose of tough love.

He had read my past column about what’s involved in suing builders - CLICK or TAP HERE to read it - but he still had questions. I was finally able to get him to understand that his money would be far better spent trying to start over rebuilding the room with a design that was immune to rot.

At the end of the call, I asked him what he did for a living and that’s when he revealed he was an airline pilot. I thanked him for keeping us SAFE when we fly in those giant aluminum tubes.

I then shared how I had once landed on and been catapulted off an aircraft carrier. He was intrigued by that, especially since I was not in the military! CLICK or TAP HERE to read how I scored that rare experience.

uss george washington

Now back to my frustration with this call. I continue to see this deeply disturbing trend of consumers, you may be one, who place far too much trust in builders.

You MUST STOP DOING THIS. If you’re going to invest a lot of money in a project of any type, you yourself NEED TO RESEARCH how the work must be done correctly.

Once you know this, THEN you can start to interview contractors asking them probing questions determining the depth of their ignorance. Yes, I meant that. CLICK or TAP HERE to understand WHY many of us are ignorant.

If you don’t want to invest all those hours, you can schedule a simple recorded 30-minute call with me. You don’t have to take notes. I’ll go over all the key issues concerning the job. You can download the recording and listen to it forever.

If the pilot had invested in one of these calls BEFORE he hired the builder, he would have saved about $50,000. I estimate it’s going to cost that much to rebuild his three-seasons porch.

Some complex jobs may require more than 30 minutes, but don’t worry about this now. CLICK or TAP HERE if you want to schedule a recorded call.

Telling the Truth

At the end of the call with the airline pilot, he thanked me for being out there championing the cause for consumers.

I mentioned it can be a lonely place because not all of my peers are willing to tell the whole truth about every subject. Speaking of the truth, you do know that a half-truth is a whole lie. Never forget that.

Last week I gave you an example of how I tell the cold hard truth. I BEGGED you to read a review I did about a new tool. Did you read that review?

The reason I wanted you to read it, even though you had no intention of buying it, was to prove that I often have to share the bad news about a new product so you don’t waste your money. And that's the TRUTH.

CLICK or TAP HERE to read that review.

theOUTlet Review

Please look at this photo. Would you want one of these in your home?

Do you think it’s easy to install? Seriously, how hard can it be to just remove an ordinary duplex outlet replacing it with this?
the outlet plug

Now I want you to ONCE AGAIN, read a review.

PLEASE CLICK or TAP HERE. You’ll not regret it.

A Fast Video - Roof Cap Shingles

Earlier this week, I uploaded a new column to my website.

It’s about the ubiquitous cap shingles you might have on the top of your roof. You should scan this column. CLICK or TAP HERE to do it.

Have you ever wondered how to create cap shingles? As I was loading the column, I went to YouTube to try to find a video showing you how it’s done.

I was looking for a video that cut to the chase, not some 45-minute documentary. All you need to see is how to make the six cuts on a 3-tab shingle. I couldn’t locate a pithy video.
How to cut cap shingles video thumbnail

So I grabbed my video camera and 30 minutes later I had the video shot.

CLICK or TAP HERE to watch it. Scroll down to see the video. It’s over in a flash. Don't blink!

That’s enough for a leaf peeping Sunday.

Tim Carter
Founder - www.AsktheBuilder.com
FANTASTIC Cleaner - www.StainSolver.com
SOTA Activator! - www.W3ATB.com

Do It Right, Not Over!

P.S. What about high-pressure sales tactics? Do you want to know how to PREVENT getting SCREWED? CLICK or TAP HERE now.

theOUTlet Review

theoutlet beauty

theOUTlet | You get four receptacles in a one-gang box. But...

theOUTlet - Clever Device But...

I had a chance to study a new quadplex outlet called theOUTlet. Most electrical outlets in your home are duplex outlets meaning you can plug in two things at the same time. TheOUTlet comes in two varieties - one with and one without USB charging slots.

The inventors of theOUTLET decided they'd add two extra outlets that rotate into view as soon as you slide a small button. This is similar to how the creepy clown pops out of a jack-in-the-box.

I felt I was qualified to render an honest opinion about this new device because I've wired homes, I've installed thousands of outlets and switches, and I've made up all sorts of joints in standard electric boxes jamming those wires into the box before finally trying to get a standard outlet or switch to fit in front of these bent wires.

What Didn't You Like About theOUTlet?

As soon as I opened the box and saw how big the actual device was I shook my head. The housing that holds the pivoting four outlets is huge. It takes up a vast amount of space in a standard one-gang electric box.

The inventors claim you need a box that has a minimum of 18 cubic inches of space to make this work. I went and bought one and can't see how it's possible to do this if the box you intend to use theOUTlet contains 12-gauge wires and is one that's somewhere in the middle of a daisy-chained circuit. Even with a house wired with 14-gauge wire, it's going to take deft skills to install this device.

Daisy-chaining means one wire comes into a box and a different one leaves the box to extend the current to the next box in the circuit. Think of how a freight train is connected together. All the cars are daisy-chained between the locomotive and the caboose.

The wires need to be long enough to extend to the outside of the box to give you enough room to connect them to the device. Once that's done, you then need to figure out a way to bend the wires to compress into the void space behind theOUTlet.  I'm not saying this is impossible, but I'm here to tell you it's going to be extremely challenging. Look at the photos below.

It's important to realize many of the electric boxes in your own home don't have 18 cubic inches of space. Smaller capacity single-gang boxes are quite common. This means before you invest in theOUTlet, you better take apart the outlet you intend to switch out to see if it will even fit. Look at the photos below to help you out.

I also wasn't a fan of the snap-on cover plate. I had a very difficult time trying to remove it by hand with the device in my hand where I could grasp all sides of it. You'll never be able to do this when it's on the wall. When you do remove it, the slider control pops off and goes flying through the air.

You then have to consider what four things are you going to plug into this device. Will the combined wattage of the things pop the circuit breaker at your panel? Yes, this same thing could happen if you plugged in the four things at two separate outlets on the same circuit.

I just feel that the average person might think that a fancy device like this might provide unlimited electricity - as if you put it in a bathroom and then plugged in a hairdryer, a curling iron, a personal beauty mirror, and a coffee warming tray.

Finally, there's the price. If you get the one with the two USB charging slots, you'll part with $50. You can purchase a standard duplex replacement outlet right now with two USB slots for $11. CLICK or TAP HERE to see it.

Look at these photos and you'll get an idea of the challenges of installing theOUTlet.

theoutlet width

The width of the device takes up just about all the width of a single-gang electric box.

theoutlet depth

The blue thing under the device is a standard 18-cubic-inch single gang box. There is not much space to jam wires and wait until you see how much space is taken up where wires enter the box at the top and bottom.

theoutlet rear

This is the back of the device. You insert your wires into the holes. 12-gauge wire is stiff! Think about having to stuff the wires back into the box where you can't get your fingers to manipulate them.

theoutlet coverplate slot

This is the slot on the bottom of theOUTlet. You'd put a screwdriver in here carefully and then pull back to pop off the cover plate. Close your eyes as the slider will go flying.

theoutlet by regular switch

Here's a great comparison shot. You're looking at a normal single-pole switch that would fit in a box. The depth of the dark-brown plastic body is almost identical to that of a normal duplex outlet. See how much space in the electric box you lose because of the giant white box on theOUTlet?

theoutlet switch width

Here's the same normal single-pole switch. It's not as wide as a normal duplex outlet, but it's close. Once again, just realize that the only space you have to fold wires is behind theOUTlet and you can't get your fingers or a tool in there to help manipulate the wires.

DIY Wiring Gang box

See all those wires bundled together inside the box with wire nuts? You might encounter this in the wall box you want to install your new theOUTlet. I'm here to tell you that you'll NEVER get it to work in many electric boxes in your home. If I'm wrong, HOORAY for you!

Do you have tiny tiny fingers? Then you'll love my Tactica M250 review.

Move a Front Door Sideways

moving a front door sideways

Moving a Front Door Sideways | Wouldn’t you love to know what the architect was thinking when she/he put the door off-center in this opening? Everything else about the house is balanced and centered! Copyright 2020 Tim Carter

QUESTION: Tim, I need your help and advice. I bought a foreclosed house for a really great price. The entrance hall is two stories high and features a large front door with a semi-circular window above it. But for some reason, the architect off-centered the door and window in the porch alcove. My contractor says the door and window can’t be relocated and even if so, it would be prohibitively expensive. The facing brick in this alcove is already removed, so I don’t understand why it can’t be done. What say you? Have you ever done something like this? How long would it take to remove the door and window, create the new opening, and reinstall the door and window? Vicky M. Orient, NY

I don’t know about you, but I was intrigued by Vicky’s question. She sent it along with a great photo using my Ask Tim page. Once I peered at her photo, I was perplexed why the contractor said the door and window couldn’t be moved. Perhaps he was having a bad day, has never done this task before, or he didn’t have the skills and courage to do it. The tall opening may have intimidated him.

Can You Relocate a Front Door Easily?

The good news for you, should you want to do a similar project, is that the door can be relocated. Fortunately, it’s a simplistic structural modification. Believe me, creating some openings can be very challenging and complex, but not Vicky’s job.

CLICK or TAP HERE to get FREE BIDS from local carpenters who can move your door.

What's an Example of a Tough Structural Change?

Here’s an example of a tough job. I remember years ago building a room addition on a large five-bedroom home that had solid masonry exterior walls. The architect had called for a new seven-foot-wide opening from the existing kitchen out into the new room addition. GULP!

I was able to install the two giant steel angle irons the engineer called for one at a time, and support all the masonry and roof load over this opening with no failure. That’s not to say I wasn’t nervous. Believe me, we were working diligently to get it done. I had planned every aspect of the task, and within four hours, both angle irons were in place and we toasted our success.

How Hard is Moving a Front Door?

Vicky’s task is so much easier. On a scale of 1 to 10 for difficulty, with 10 being the toughest job, I’d personally rate it a 2. The hardest part of the job, in my opinion, is to build a temporary inner support wall that would support any roof load that might be resting above the window and door. You just need to build this wall so you have room to work and the required room to shift the door and window is actually available outside on the front porch stoop. It’s caveman simple.

Every contractor looks at a job differently. This particular job is well suited for a three-man crew. The working space is tight and you don’t want folks bumping into one another.

What Do You Do First?

The first step is to protect the interior of the house from dust and debris. Plastic dust barriers need to be installed, and drop cloths need to be put down to protect the floor. Next up is framing the temporary wall. While this is happening, one of the workers can be outside starting to remove any nails from the door and window nailing flanges. You need to leave one or two nails in place so they don’t fall out until you’re ready to remove them.

Remove the door first and get it out of the way so it’s protected. Once the door and window are removed, it’s time to get any of the old framing out of the way. Assuming the correct-sized headers were used to frame the wall, these can be salvaged for reuse saving time and money.

How Straight Should King Studs Be?

With the headers out of the way, it’s time to install the new full-length king studs that run from the bottom to the top wall plates in one piece. Be sure these are perfectly straight with no twist or crown. The jack studs are up next. These support the headers and within a few minutes the new opening is framed and complete. I would expect all of the above work to have happened within four hours at the most. It’s important to realize that I would have come to the job with all the materials and equipment I needed so there’s no running to get anything.

Do I Need a Flashing Pan?

It's now time to install the new flashing pan or flashing under the door. Once that’s done, you can install the window first. I wouldn’t want to have the door in place and risk damaging it while installing the window. That’s the voice of experience talking!

exterior door flashing

This is the type of flashing you should install. CLICK or TAP HERE to get the one I used.

The door would be installed last, and then the wall covered with an air and water barrier according to the manufacturer’s written installation instructions. By this time seven or eight hours would have passed and it would be time for the bricklayers to get started the next morning.

There are lots of videos on YouTube showing much of what I described above. I feel it’s always a good idea for you to watch videos like this before you contact a contractor for any quotes. Get a feel for what’s possible and how long things take. Don’t forget if you create a free YouTube account, you can always post a comment to the creator of the video asking how long something took if he didn’t mention it in the video.

Column 1374