March 8, 2020 AsktheBuilder Newsletter

Is this your first newsletter from me? What you're about to see is as rare as rain in the Atacama Desert. Don't unsubscribe until next Sunday. Give me another chance to scratch your home-improvement itch.

You may remember an issue like this if you've received scads of my newsletters. Yes, it's time to grab a tissue. Maybe two.

Dick Christopher - A True Saint

This past Friday afternoon I attended the visitation of a very good friend of mine, Dick Christopher. It was somber as they often are and as I walked down the steps the wave of melancholy started to wash over me.

I had suppressed my emotions all week because I'd been working at a fever pitch the previous fourteen days on a secret project, and then this past Tuesday, I woke up at 2:45 a.m. to fly to Puerto Rico returning just 48 hours later.

I know, everyone's got a sob story.

When I woke up after the visitation, I was trying to stay afloat in the swirling emotional waters created by the tsunami of Dick's passing.

I feel you must read about Dick, see him, and most importantly listen to his voice. It's impossible for me to do all that in the format of this newsletter.

Please CLICK OR TAP HERE and I guarantee you, in fact I SWEAR TO YOU, that you'll walk away with at least one very important life lesson.

I'll be back here next Sunday with a near-normal AsktheBuilder.com newsletter.

73, Dick!

73 is a number radio operators say to one another at the end of a conversation to convey warm thoughts or "best regards".

Tim Carter
Founder - www.AsktheBuilder.com
Best CLEANER IN THE WORLD: www.StainSolver.com
73 to you Dick - www.W3ATB.com

Do It Right, Not Over!

P.S. Dick Christopher had a profound impact on my life and even though you never met him, you'll see and hear him by CLICKING or TAPPING HERE. I promise you that your life will be forever changed for the better.

Richard P Christopher N1LT

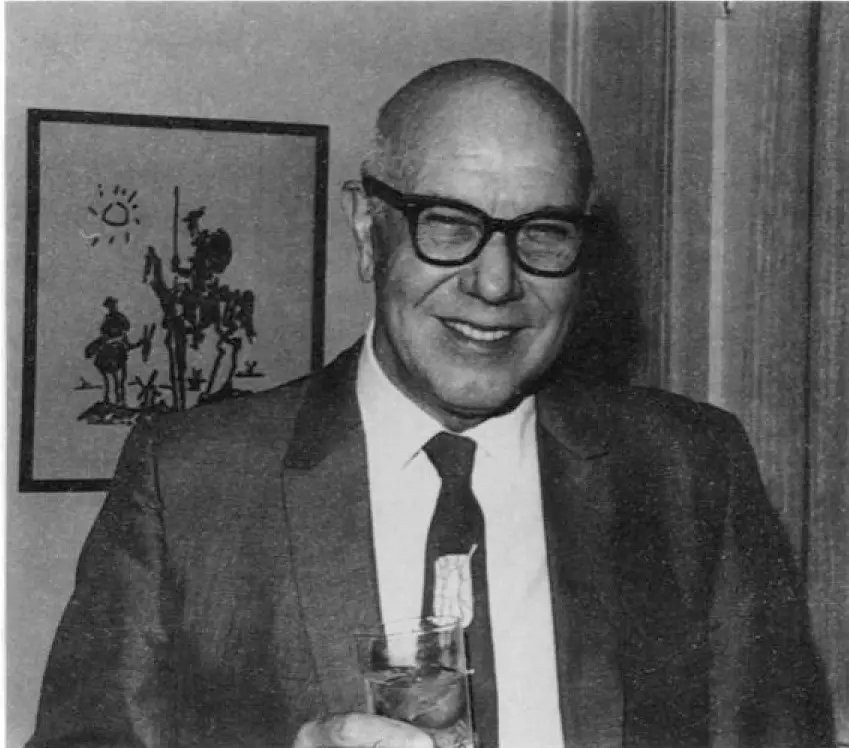
Richard P. Christopher N1LT

Dick Christopher was a good friend of mine. He was sent back to Heaven on February 23, 2020. I met Dick in the late summer of 2011 when I re-immersed myself into the world of amateur radio. It turns out Dick was the founder of the Central New Hampshire Amateur Radio Club (CNHARC). He welcomed me with open arms to the first meeting I attended in July of 2011.

Richard P Christopher

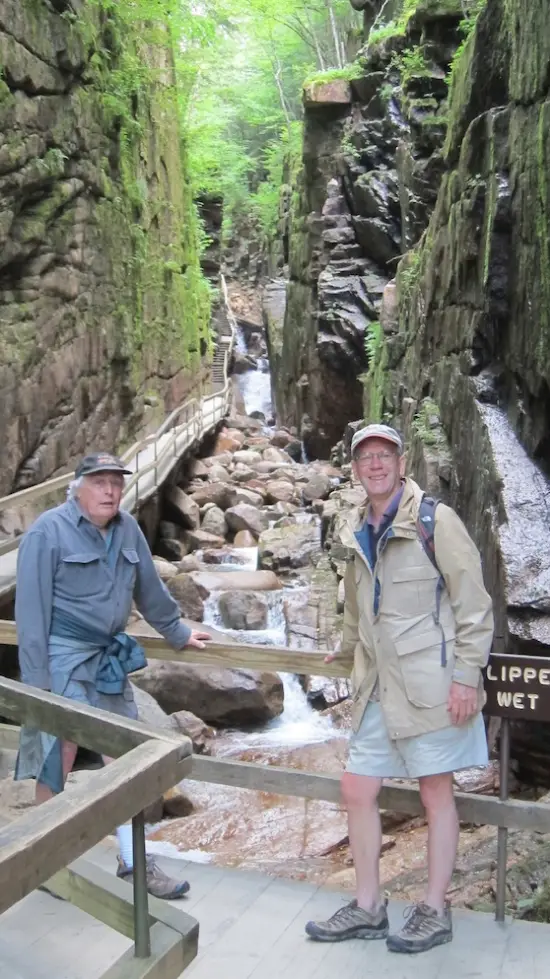
Dick is on the left and our mutual friend Jim Cluett is on the right. Location: Flume Gorge State Park, NH RIP Dick!

The morning I discovered Dick was no longer with us, I was overcome with a feeling of sadness. I found myself wishing I had spent more time with him or had even called to reminisce about great past times. (Read more about this amazing person in the March 8, 2020 Newsletter.)

That sadness only increased several days later when another radio buddy sent me a link to Dick’s online obituary. Here it is:

https://www.currentobituary.com/obit/241131

I’ve made my living the past twenty-three years creating those strings of characters. They’re called URLs. I pay attention to them and was aghast to see that Dick was now reduced to a sterile number at the end of a URL. It’s so easy to put his name there in front of the unique number, but alas the webmaster thought otherwise. Look now up at the top of your browser to see how easy it is to put his name in the URL.

Dick was more than number 241131. Much much more.

My anguish deepened as I read his obituary. It included a brief description of Dick’s work and his interests, but it failed to capture who Dick Christopher was. 

I decided that Dick deserved better. You need to know the Dick Christopher who I knew and came to appreciate.

Still Waters

Dick was quiet and reserved, like a remote woodland pond on a wind-free day but his understanding of what was going on and how things worked was as deep as the ocean. 

If you asked Dick a question, he almost always had the answer. When you did stump him, he knew where to send you for the answer. He never made you feel inferior because of your lack of knowledge. He must have been a fantastic mentor when he taught high school physics and math. Dick was smart but he never needed to boast or make anyone feel inferior.

A Tough Negotiator

One of my fondest memories of Dick was early in our relationship. He fostered countless people who wanted to immerse themselves in amateur radio. Within a month of meeting me, he could tell my appetite for all things radio was bigger than the Goodyear Blimp.

Dick knew that the real fun and satisfaction in amateur radio happens on the high-frequency bands. To play radio here, you need a class of license that I didn’t have. My license at that time only granted me only the lowest level of radio privileges.

A few months after meeting Dick, he called me. The call was extremely brief and to the point, but that was Dick’s personality. He was never a chatterbox on the phone or in person.

“Tim, it’s time for you to upgrade your license.”

“Oh, Dick, yes, I plan to do that soon.”

“I don’t think you understand me. I mean it’s time right now, in the next two weeks, to upgrade your license.” Dick’s voice was monotone but firm.

“Well, I want to understand all that’s involved and I’ve been studying the big book with all the information and questions. I think I’ll be ready to take the test in a few months.”

“No. You’re going to take the test, pass it, and once you have the new privileges you’ll learn much faster than by reading that book. Tell me now if you’re going to be at the test session before the next club meeting in two weeks.”

He was serious. The question pool for that exam has hundreds of questions. Many are quite technical. I was stammering and gulping because I knew he wasn’t going to hang up until I committed to being at the testing session.

“Okay, I’ll be there.”

“Good. Bring $15 and a copy of your current license.” And with that Dick hung up the phone.

I started to use an online study aid. I sat for the exam. You needed to get 27 of 35 questions correct to pass. I got 33 out of 35 and completed the test in about 20 minutes if memory serves me right. As you might imagine, Dick seemed even happier than I was that I had passed and was now a new General-class amateur radio operator.

Dick was right about high-frequency bands. The real fun of amateur radio happens when you can communicate with others thousands of miles away using a tiny box about the size of a paperback book and a thin wire dangling from a tree.

One day Dick and I went with a shared friend, Jim Cluett, to Cannon Mountain to operate outdoors on a late summer day. There are some splendid photos and quotes of Dick’s in this story. I recommend you read it.

Field Day

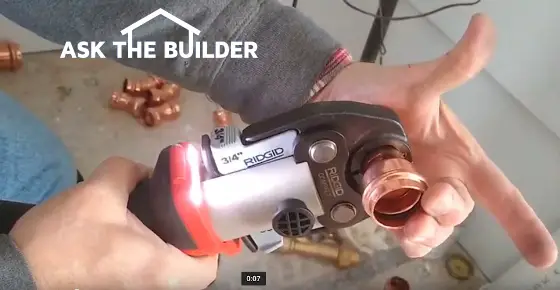
One event that Dick really loved was the annual Field Day that thousands of radio operators take part in all across the USA. It’s a 24-hour exercise where you’re encouraged to simulate an emergency of sorts and get on the radio outdoors if at all possible. You’re testing your capability to continue to operate using batteries or a portable generator while, dealing with bugs, the sun, wind, visitors, and storms. It’s more of a challenge than you may think.

Here's a video of Dick talking about Field Day.

Here's the video Dick was talking about when he was younger with the bushy hair:

As the founder of the CNHARC, Dick helped organize Field Day for years. He shared stories of past Field Days decades ago when many club members participated and were active the full 24 hours. It’s hard to say whether Dick loved radio or gardening more.

Giant Tomatoes

Dick was a master gardener. He had an amazing array of raised beds where he grew vegetables that could win the blue ribbon at one of the many late summer or fall fairs here in New Hampshire.

When I’d visit Dick in mid-summer, he’d take enormous pride in showing me all of his plants. He was happy to answer all of my questions. I happen to be a horrible gardener and marveled at Dick’s green thumb. He made it look so easy, yet I knew he devoted countless hours of work to cultivate and care for all those wonderful plants.

Sailing

Dick was an avid sailor and loved spending time on the water. He was a member of the prestigious Winnipesaukee Yacht Club and he owned a very nice 25-foot sailboat.

I was fortunate to be invited to sail with Dick at least twice. Both times our mutual friend, Jim Cluett, came along.

One thing that always amused me was Dick’s distaste of spiders. When you rowed out in the dinghy to get to the sailboat, you had to deal with the fabric weather covers that protect the cockpit from the elements.

Dick always asked Jim or me to peel back the covers and whisk any spiders we saw into the water. I did as requested and never said a word because I knew that if there were serpents in the sailboat, I’d never get out of the dinghy.

Priceless Interviews

Do you want to come to know and respect the Dick Christopher I knew? I hope so.

I’ll never regret investing the time it took to create these short video interviews with Dick. What a treasure it is to be able to see and hear him! Maybe they’ll inspire you to record a 60-Minutes style video of a person in your life who you want to be able to remember in “real-time”.

Dick Christopher was that person for me. 

Magic Wall-Hung Fancy Sink

Magic Wall-Hung Fancy Sink

Wall Hung Sink Bracket | This heavy antique fancy sink seems to be suspended in midair! There are two massive brackets bolted to the studs that come out at right angles under the sink to support it.  It's harder to install an undermount sink than a wall-hung sink in my opinion.(C) Copyright 2020 Tim Carter

Wall-Hung Sink Bracket - Thick Steel Required

DEAR TIM: I need your help solving a perplexing conundrum. I love all things old and have purchased a salvaged antique marble stone corner sink that I want to use as a powder-room lavatory. It already has a drain hole, so that’s not the issue. The faucet needs to be in the wall and I can handle that as well. My problem is I want the sink to appear as if it’s floating in the air with no visible means of support. The sink is really heavy, as it weighs close to seventy pounds. What can be done to achieve my goal and what other tips do you have to make sure this goes well? Are there any hidden problems you might know of I need to avoid? Sharon F., Key Largo, FL

Where Can You Find Antique Sinks?

You find antique sinks at salvage businesses that recover them from buildings that are scheduled for demolition.

Years ago I used to purchase quite a few salvaged building materials for some of my projects. I was so lucky to have a specialty business near me that foraged for one-of-a-kind building fixtures, doors, mantles, sinks, etc. in buildings slated for demolition. They had so many things you simply couldn’t believe it. One day I found a stunning solid-walnut fireplace mantle I incorporated into the last home I built for my family.

Is it Hard to Install an Antique Sink?

Installing an antique sink shouldn’t be a problem at all. I’ve been a master plumber since age 29, and I’ve had the good fortune to install one or two in my career. When deciding to purchase one, you usually just have to make sure the holes for the drain and faucet will work with modern parts. Even if a hole is too small, it can usually be enlarged with minimal effort.

Should I Test Fit the Sink?

The other thing you need to do is to be sure the sink is going to fit really well in the space where it will end up. Recently I had to install an antique sink corner sink in my daughter’s new home. I uncrated it to inspect it and to create a template because I wanted to see if the sink itself was square and would fit nicely in the corner of her powder room.

wall hung sink bracket

It's impossible to see the wall-hung sink brackets as they're covered by the cardboard sink template. The red lines indicate where the thick steel is bolted to the wall studs. The yellow lines indicate where the flat steel plate extends out to support the sink. The ends of the flat plates were almost touching in my installation.

Guess what? The old sink was about 1.5 inches out of square in just 30 inches! That’s a huge discrepancy. A rookie might have assumed the sink was square and been in for a surprise once the sink was lifted in place. I made a template of the sink using scrap cardboard and then padded out the wall studs to account for the out-of-square sink. After the drywall was installed the sink fit perfectly. All I had to do was squirt a small amount of caulking to seal the gap between the sink and the wall.

CLICK or TAP HERE to get FREE BIDS from local plumbers who can install wall-hung sink brackets.

How Do You Make a Sink Appear to Float in Space?

You use special L-shaped wall-hung sink brackets made from thick plate steel to support the sink right under its base. You can also use french cleats.

My daughter wanted the sink to float on the wall just like Sharon does. I was able to locate a company online that sold these very heavy steel wall-hung sink brackets that screw to the sides of wall studs. A 1/4-inch-thick steel plate extends out into the room that the sink can rest upon.

How Many Wall-Hung Sink Brackets Did You Need?

I had to install two of these, one extending out from each wall in the corner. The challenge was to make sure the brackets didn’t block the drain hole, didn’t extend too far out so as to be seen, and finally so they didn’t touch one another. Believe me, this exercise took some planning!

Do I Have to Alter the Wall Framing?

If you do have a conflict where the brackets don’t fit perfectly, you may have to install an extra wall stud, move one, or cut off a small amount of one bracket to resolve the issue. In all cases, you’ll be able to figure it out. Realize the 1/4-inch thickness of the steel plate is a non-issue. Even sitting on the toilet looking at the sink, you can’t really see the steel and you wonder how in the world the sink is not crashing to the ground.

Should I Seal a Marble or Stone Sink?

Before the sink is installed, I highly recommend that you apply multiple coats of the best clear stone sealer you can purchase. Local businesses that fabricate granite and stone countertops sell this product.

You need to seal the stone before anyone touches the sink because the plumber’s putty, caulk, etc. may have ingredients that can soak into the stone and permanently discolor it. After all this hard work, it would be a shame for that to happen.

What Surfaces Should be Sealed?

When sealing the sink, seal all surfaces. Seal the top, the basin, the inside of all drilled holes, and even the underside and back surfaces. Follow the instructions on the sealer label to see how to apply multiple coats of sealer. You’ll never regret taking the time to do this. Remember, workmen almost always have dirty hands and your sink may be one-of-a-kind. It’s not like you can go to the home center and get a replacement after all.

How Many Coats of Paint on the Brackets?

Be sure the steel brackets have been painted several times so there’s no chance the steel can rust. You don’t want rust stains bleeding through the natural stone.

Should I Do a Test Fit?

Before you set the sink on the brackets, do a dry fit. Carefully place the sink to ensure it fits, it’s level and all is well. Once you’re satisfied, then you can squirt adhesive from a caulk tube onto the steel brackets and maybe a little bit on the back surfaces of the sink where it contacts the wall.

Place the sink on the brackets, slide it against the wall, and put a sign on it DO NOT TOUCH so no one touches the sink until the adhesive dries. You’ll love your new sink, and I’d love for you to send me a photo of the finished installation!

Column 1343

February 29, 2020 AsktheBuilder Newsletter

Listen. This could be your first real newsletter from me. I want you to know right now it's NOT a normal one. Well, as you'll come to discover many aren't normal, hah! This issue is focused on sharing with you that my annual Treasure Hunt game is going to end in just a few hours.

You may have plundered one, or more islands with me looking for loot in the past. Remember that treasure chest we dug up that had the medium-blue sapphires in it? My gosh did they sparkle! Well, you know what's in store, so follow my instructions below to the letter.

LAST CALL

Treasure Hunt Ends 2/29/2020 at Midnight TONIGHT

Listen, you landlubbers, my annual Treasure Hunt game is about to end!

It's ending in just HOURS!!! You need to PLAY NOW.

You might be one of the winners of a $50 Amazon Gift Card! It's so easy to enter. CLICK or TAP the treasure map just below! Once there, click the links and answer the questions to be entered to WIN one of the gift cards.

Annual Treasure Hunt

CLICK or TAP HERE now to:

1. Watch a damn funny video of me wearing a large gold hoop earring
2. Listen to me use no less than three different accents
3. See STUNNING photos of house interiors that will WOW you
4. Answer dopey questions that will have you question my sanity

Seriously, my annual Treasure Hunt is lots of fun. TRY IT NOW.

Retaining Wall #FAIL

Please point your peepers to this photo:

Retaining Wall tiny - failed

Do you see what's wrong in the above photo?

Do you think you know what caused the problem?

What would you do to avoid the issue?

CLICK or TAP HERE to see my autopsy report.

DIY Tile Installation

Please peer at this fine photo:

large format wall tile

What's going on here?

How big are those slabs of stone?

Can you achieve professional results like this?

My answers might surprise you!

CLICK or TAP HERE now to discover the answers to your wildest questions about this photo. There are prizes waiting for you!

Remember, GO PLAY the Treasure Hunt Game NOW to have a chance at one of the $50 Amazon Gift Cards!

You'll see me back here in eight days. I'll be flying to Puerto Rico on Tuesday and coming back the next day. I promise not to get sunburned.

Tim Carter
Founder - www.AsktheBuilder.com
GET ORGANIC - www.StainSolver.com
Cool Waves - www.W3ATB.com

Do It Right, Not Over!

P.S. Does your chimney have the right cap on it? Some call it a crown. You'd call it that if you were a dentist, no doubt. CLICK or TAP HERE now to save yourself about $2,000 in repairs. When you get to that page, there are MULTIPLE chimney prizes for you. Scroll down to SEE ALL OF THEM.

Retaining Walls – Not So Simple

Retaining Wall tiny - failed

This is a tiny retaining wall and it failed. It’s leaning and the homeowner is none too happy! (C) Copyright 2020 Tim Carter

This column appeared in the February 29, 2020 edition of Tim's newsletter.

DEAR TIM: I want to build a retaining wall that’s going to look great for years. At my last house, I had a short retaining wall around a patio that started to lean out towards the lawn. The little wall was but 10 inches tall for goodness sake with no soil pressure against it. Why do you think that wall failed and what can I do to build retaining walls even three feet tall that will not tip over? Jonathan H., Melville, NY

It’s hard for me to fathom a short tiny retaining wall like that failing, but by gosh you can see it in the photo Jonathan sent me. Sure enough the tiny wall is leaning about three inches back towards his lawn.

There are two thoughts that come into my head as to why his tiny wall failed. I surmise the footing that’s under the wall is missing or a very bad design. I’ve seen very narrow thin footings under failed walls like his.

Jonathan’s wall is but 8 inches wide. I would have installed a footing that was no less than 6 inches thick with two number 5 steel rods in it continuous along the length of the footing. I would have made the footing 24 inches wide so it would be three times as wide as the wall itself. This allows fill dirt to be on top of 2/3rds of the footing. This weight helps offset tipping forces.

Jonathan also lives where the ground freezes. Frost heave could have easily tipped this wall over a little bit each year. Jonathan’s photo has a very important clue in it. The water from the patio-side of the wall has to drain somewhere and it appears it goes into the soil along a wide crack between the patio and the wall.

This water can be super-charging the soil under the house side of the wall. Frost heaving can be greater on that side of the wall because of this water concentration. Water freezing in the crack between the wall and the patio can also slowly start to tilt the wall away from the patio.

Retaining walls are not as simple to design as you might think. This is why structural and civil engineers are math experts. An interesting thing happens as a retaining wall gains height. Doubling the height of a retaining wall doesn’t mean the tipping forces behind it double. They increase in a non-linear fashion. The tipping forces on a wall of a given height can be three to four times what they are on the same wall half as high!

A three or four-foot high retaining wall can have tipping forces measured in the hundreds of pounds and sometimes higher than one-thousand pounds if the ground above the wall is sloping up away from the wall. Gravity, one of Mother Nature’s tools, is very patient and persistent. It can start to tilt the wall away just a fraction of an inch per year, but over time these fractions add up to whole numbers.

Mass, or thickness, is your friend in almost all cases when designing and building a retaining wall. The thicker the wall is at its base the better. The wall can get thinner as the wall gains height.

Concrete block retaining walls need to be reinforced. This means reinforcing rods need to be installed that tie into the footing and these rods must be surrounded by a concrete grout in the hollow block cores. Any block wall taller than three feet should be designed by an engineer if you want it to last for decades.

Retaining walls can have a backwards lean to them. Think of the wall as you pushing your shoulder against a millstone. You lean into the millstone to give yourself more leverage. The lean doesn’t have to be drastic, but it can surely help ensure the wall looks fantastic for many years.

Drainage behind retaining walls is also very important. I always installed perforated drain tile behind my walls and made sure the pipe had an outlet to daylight so water would never build up behind the wall. I’d never directly backfill against the wall with soil. I’d always install a 6-inch-minimum layer of washed gravel behind the wall so water could flow down to the drain tile with minimal resistance.

Here’s another tip if you want your new retaining wall to look fantastic for as long as you live. Once the wall is built, but before you backfill against it, coat the back of the wall with two coats of some asphaltic water or damp-proofing foundation coating. This will prevent, in almost all cases, water from seeping into your wall.

Water seeping into the wall can carry dissolved salts from the soil, from salted parking lots above you, or even salt in the ground water itself. This salt solution will seep through the wall, the water will evaporate on the visible side of the wall, and you’ll be left with pesky efflorescence salt deposits on the front face of the wall.

Don’t underestimate the soil pressure behind retaining walls, especially those with a parking area above them. Not only do you have to contend with the pressure and weight of the soil, but when a heavy truck parks just two feet away from the back of the wall, you also have added weight pushing against the soil. GL as we say in Morse!

Column 1342

February 23, 2020 AsktheBuilder Newsletter

My guess is you might be a new subscriber. Let's imagine you came into Skyline Chili to place a carry-out order. I used to make cheese coneys and 3-ways by the thousands there many moons ago. I would've sauntered up to the carry-out counter uttering these words, "Geia' sou". That's Greek for hello. I also would've asked if you wanted onions on your cheese coneys. You might have forgotten to remember drinks. Believe me, I'd make sure you had plenty of Pepsi.

Let's assume you've eaten about fifty 5-ways with me here over the years. I know, I know, I remembered to make yours inverted, so calm down. Tell me if you've ever eaten the little oyster crackers with a large dot of hot sauce on them. Man up if not!

Winter Cold & Tile Floors = BRRRRRRRRRR

About a month ago, I mentioned why my feet in the morning are NEVER cold when standing on my tile bathroom floor. Please peer at this photo:

uponor hepex

Questions for you:

1. How exactly did I create these warm spots?
2. Is it hard to do?
3. Can you create warm floors like this in an existing home?

CLICK or TAP HERE for all the answers and TWO amazing videos showing you some magic.

CLUES: Look for the keyword Uponor when you land on that page.

I NEED Your Help

I'm trying to decide the color to repaint my man cave and also which new door would look best. Currently, my man cave is canary yellow and I have a solid metal door. You can see part of the drab gray metal door on the right side of the photo below.
Tim's man caveYour input would be greatly appreciated. All you have to do is click the three following links to see my top three color and door choices.

Below those three links is a link to a page where you can provide your input.

Thanks in advance!

Choice #1

Choice #2

Choice #3

CLICK or TAP HERE to tell me what you'd select if you were my interior designer.

Combi Boiler Update - One Year In

Fifteen months ago, I installed a new combi boiler in my home.

CLICK or TAP HERE to see the one I installed.

Why did I choose this boiler?

1. It's a modulating boiler. This means the burner works like the one on your stove. You can adjust the flame to the amount of heat that's REQUIRED at that point in time. My old boiler was either on FULL BLAST or it was off. Imagine trying to simmer gravy with your burner on FULL BLAST! A modulating boiler saves you huge money on your fuel bills.

2. It's far more energy efficient. Only 5% of the heat created goes out through the vent pipe. My old boiler was wasting 15% of the energy put into it.

3. The boiler also acts as a tankless water heater. I have UNLIMITED HOT WATER for showers or other tasks so long as I have well water and propane. This is why these things are called combi boilers. They combine tasks into one machine.

My combi boiler is working so much better than my old boiler. In the past when the temperature outdoors dropped below zero, it was impossible to keep our giant living room warm. Weeks ago, it dropped to -9 F and I performed a test.

Before going to bed, I set the thermostat in that room, I have eight different heating zones I can control, to 70 F. The next morning before dawn, the room was 70 F. With the old boiler, the temperature would have been 62 F or less.

You may know that my daughter was just starting to build a new home last year at the time I was installing my new boiler. I suggested that she put in a combi boiler. Are you interested in the status of her new home? I'll have a report SOON, so be patient. Patience isn't your strong suit? Practice makes perfect.

My daughter decided to install a Noritz Combi Boiler because it's able to heat the house and domestic hot water at the same time. My boiler can't do this.

When I'm heating my house and then call for hot water at a shower or sink faucet, the heat is temporarily suspended from going out to the heating loops. It's never an issue unless you decide to compete in an hours-long water sports event at your home.

CLICK or TAP HERE to get lots more information and detailed step-by-step installation photos of my daughter's Noritz Combi Boiler.

BOTTOM LINE: I'm a HUGE FAN of these combi boilers. If I had to go back to work in construction do you know what I'd do?

All I'd do is install the Noritz Combi boiler all day long in many different houses. I'd do no other jobs but put these magic boxes on a wall.

It's SO EASY to install one. To make the job go faster, be sure you have a Ridgid Press tool so you don't have to solder any of the copper tubing!

CLICK or TAP HERE to see how FAST those tools make leak-proof joints. Here's what the tool looks like:

Install Copper Tubing Pipe Tool

For comparison sake, please watch this SHORT video to see how long it takes to solder just ONE HALF of a copper joint.

CLICK or TAP HERE to watch me solder a copper fitting.

Clean YUCKY DIRTY Floor Tile Grout

Please look at this photo. You don't have to come clean (pun intended) and share if your floor grout is unacceptable like this:

Dirty Grout Floor Tile

Do you want to see what the grout looks like CLEAN?

Do you want to know how EASY it is to get it clean like that?

I thought so!! CLICK or TAP HERE and watch the video showing me cleaning floor grout.

Want a DEAL on getting Stain Solver?

"Heck yes, Tim. Hand over the promo code now and all your delicate things will be given back to you unharmed."

Okay, okay, those N-gauge model-train locomotives in your hand ARE delicate!!! Be careful! Here's the promo code that EXPIRES in just 18 hours!!!!

PRESIDENT

CLICK or TAP HERE now if you just want to order the Stain Solver.

Remember, the President's Day Stain Solver sale ENDS TONIGHT at midnight.

! ! ! LAST CALL ! ! !

Treasure Hunt Game Ends Saturday the 29th!

My annual Treasure Hunt Game ends in days.

You can win one of five $50 Amazon Gift cards if you just answer a few silly questions.
Annual Treasure HuntCLICK or TAP HERE to play the game.

That's enough for a Sunday, right?

Tim Carter
Founder - www.AsktheBuilder.com
President for Life - www.StainSolver.com
Published in CQ Magazine - www.W3ATB.com

P.S. What do you know about retaining walls? Did you know that something VERY BAD happens the taller the walls get? And for all those algebra experts out there, it's a non-linear function.

Lookie, lookie here for the "dets" as the younger folk say. If you're older and a little crusty around the edges, CLICK or TAP HERE.

Installing Large Format Wall Tile – It’s All Finesse

large format wall tile

These large pieces of marble are in a master shower. This is not a beginner DIY project no matter what you’ve seen on TV cable shows! (C) Copyright 2020 Tim Carter

DEAR TIM: I’m remodeling a large bathroom in my home. The large shower stall is going to be tile as well as the floors in the room. I cut out some pieces of scrap cardboard to resemble large-format tile and it’s going to look perfect. I’ve never done a job like this. I’ve done my own tile work for years and had decent results, with the largest tile installed 8x8 inches. What tips can you share to ensure success? I want this job to look perfect in every way. Tom B., Charleston, SC

Do you have the drive and passion for tough DIY jobs like Tom does? If so, that’s a remarkable quality. I applaud it. Some pros try to talk you out of things. I will in certain situations if I know something is far too difficult or requires hundreds of hours of practice. Installing tile is not one of these situations, but installing large-format tile is absolutely one that a beginner should not try.

It’s important to realize that almost all tile and natural-stone products are made so the top surfaces are smooth. There are any number of Mexican tiles and some others that have an uneven top surface or slight bullnose edges, but let’s not worry about those for this discussion. I’m going to assume Tom is installing a tile or natural stone that’s got a very flat top surface.

For a finished tile job to look spectacular, the tile need to be in the same plane once installed. This doesn’t necessarily mean level and plumb, although those are two noble goals you should aspire to.

Flat, or in the same plane, means that the surface has no humps or dips in it. Imagine placing a large straightedge on a surface and the bottom of the straightedge on the tile. When the tile is in the same plane, there will be no gaps under the straightedge and it will not rock back and forth on a high spot like a teeter-totter.

When remodeling, you may have to apply thin shims or strips of wood to wall studs to get them all in the same plane. The tile backer board will conform to the studs so if the studs are all cattywampus, that Tim Talk for askew, then the backer board will mimic this unacceptable surface.

Forget about using large-format tile for the shower floor. You need to choose something that’s small because I’d recommend you install tile on top of a preformed shower base kit that has the shape of a very shallow funnel. You want all the water to run to the drain and these preformed shower floor kits achieve this goal. Large-format tile will have voids under them and will eventually crack.

If you’re building a new home, I highly recommend the use of floor trusses to get a perfectly smooth floor surface in wood-framed houses. If building on a concrete slab, ask the concrete masons to take extra time to get the floors flat in the places you’ll have tile. In a remodeling situation, you can use pourable floor-leveling compounds to get a floor nice and flat.

Be sure to install floor tile over a mat made to uncouple the tile from the floor. There are quite a few systems out there and this newer technology is paramount to a long-term crack-free tile floor. Pay very close attention to the stiffness of a wood floor system. If the floor is bouncy, there’s a good chance your large-format tile will crack over time. It’s a major job to try to stiffen an existing floor and that’s the subject of another discussion we may have on another day.

You may want to look into the wedge floor leveling products. These are handy products that allow you to get the top surface of adjacent tiles all in the same plane. The industry standard for allowable offset is 1/16th inch. This is actually quite large and you can almost always have a much tighter tolerance.

But be aware that if the wedge starts to pull one tile up out of the gooey thinset to make it flush with the adjacent one, a void space may develop under the lifted tile and that’s a possible crack location. This is why getting the floor flat in the first place is so important. These problems are minimized with smaller-format tile.

Once you have the tile installed, all your hard work can be ruined if you don’t know how to grout the tile. You need to use the right grout to avoid issues. Unsanded grout can be used on joints up to 1/8-inch in width. Use sanded grout for larger joints.

Water is your friend and enemy when grouting. Too much water when mixing will ruin the grout. Too much water when wiping and striking the grout joints will absolutely ruin it. Please watch my four-part Grouting Floor Tile series on my AsktheBuilder.com website so you don’t ruin your new tile!

Column 1341

February 16, 2020 AsktheBuilder Newsletter

I think you may be a brand-new subscriber! Holy watermelon, let's celebrate! Did you know you can eat watermelon in the shower and not worry about dripping the delicious nectar juice on yourself? A friend told me this was possible. Yes, you need to have the water on to make this work, not just stand in the shower sneaking extra melon with your clothes on, silly!

You could be a subscriber that's eaten celery and peanut butter with me over the past few years while we sat on overturned drywall mud buckets. Yummy! Do you remember that story I told at lunch about Dr. Caster, my historical geology professor?

Building Scars

Please look at this photo. What do you think of the different-colored brick?

HAH! That was a trick question! I shot this photo in Cincinnati, Ohio in Pleasant Ridge about four years ago while I was on a walk. The house was about 457 feet north of Montgomery Road on the east side of the street.

That's a beautiful multi-colored wire-cut brick isn't it? But what's going on with the mortar? CLICK or TAP HERE to understand what's in play and how you can avoid TENS OF THOUSANDS OF DOLLARS of repairs.

George Washington and Abe Lincoln!

Here's another photo to gaze at:
Metal Pot - Milk Stain

This is a metal pot. The black stain is from milk. How's that possible?

Easy - turn on the burner to heat it up, walk away and get distracted. You can also melt plastic birds on tea pots the same way.

CLICK or TAP HERE to see the metal pot after it soaked in Stain Solver.

What does this have to do with George and Abe? Both former presidents drank lots of milk, and Abe had a glass of chocolate milk each night with two pecan cookies. Don't believe the unfounded and ugly rumors about him and Disaronno. Not for a second.

What's more, how do you think George got his muslin frock clean after splattering it with cherry juice when he cut down his Dad's favorite tree?

He used Stain Solver of course! He also used Stain Solver to get the mud stains off his pants after crossing the Delaware River. The infantry of the Continental Army using Stain Solver to clean their uniforms in hot water pots hanging over campfires is a story oft told at West Point.

Abe wore white shirts when he did his legal work for the Rock Island Railroad. He routinely got black ink on his sleeves because he hated wearing sleeve socks. Abe's wife Mary loved to use Stain Solver to keep her man's work shirts looking like new!

Thomas Jefferson told his admirals to use Stain Solver to get algae off Old Ironsides before they finally switched to copper plates. He wanted the ship to look its best before he dispatched it to kick the Barbary Pirates' butts. But I digress.

Wait, wait ... I worry you think I'm being mendacious. Tsk tsk.

Let's celebrate Presidents Day with the new the Presidents Would Have Loved Stain Solver Sale!

Stain Solver is a multi-purpose certified organic cleaner. CLICK or TAP HERE to see my all-time FAVORITE before/after photos sent in by a customer.

Use the following promo code to get 10% off any purchase greater than $25.00.

PRESIDENT

You also get FREE SHIPPING to the four commonwealths plus the other 44 states that are all bunched up next to one another.

The sale ends in one week. I'll be sending out reminder emails, but realize that quantities of the size you want are LIMITED. We only have so many boxed at the fulfillment center - I'm telling you the truth about this!

CLICK or TAP HERE to place your order.

New Amazing Instant Whiteboard Product

Please use your peepers to peer at this photo:

post it flex write

That white rectangle is a very SMALL sample of a new product.

Can you finish the puzzle??? What were ALL of the WORDS I wrote on it???

CLICK or TAP HERE to see if you were right! There's NO WAY you'll guess right. BWAHAHAHAHAHAHAHAHAHAAHAHAHA

I'd say that's quite enough for a Sunday, what say you?

Tim Carter
Founder - www.AsktheBuilder.com
Salute to the Presidents! - www.StainSolver.com
Morse Contest Today! - www.W3ATB.com

Do It Right, Not Over!

P.S. How can you prevent cutting through buried electric cables? Call that number? Well, that's a start.

What about roofing nails? Did you know your roofer is almost FOR SURE going to use the WRONG ONES on your new roof?

CLICK or TAP HERE to discover the secrets about both topics.

Ken Caster Historical Geology Professor

Dr. Ken Caster - University of Cincinnati

I had the distinct pleasure to meet and be taught by Dr. Kenneth Caster at the University of Cincinnati (UC) between 1972 and 1974. He's one of a small handful of college professors that left an indelible imprint in my brain, fortunately for the better.

ken caster

This is Dr. Ken Caster. This is a Fair Use of the image as it's owned by a public-funded agency.

The first and only class I took from Dr. Caster was about fossils. Historical geology is a class based on the hundred of thousands, possibly millions, of plant and animal fossils that make up the march through time of the geologic record.

It's a topic deeper than the Mariana Trench in the Pacific Ocean, and it gets deeper by the day as more new information about the historical record of animals and plants is discovered.

King Caster

One of my most profound memories of Dr. Caster was his royal demeanor. He was a world-renowned geologist by the time I got to UC and he knew it. He had an entourage of graduate students that followed him down the hallways hanging on his every word.

As an undergraduate student, I don't ever recall him saying "Hello" to me while passing in the hallways going to and from class. It's as if I was invisible. That's okay because he was probably contemplating more behavioral discoveries about horseshoe crabs.

Dr. Caster was an authority on these amazing creatures.

Authority & Intimidation

When he'd come to teach each class of mine, he'd have an 8-inch pile of books, papers, and folders in his arms. He'd place them down on the desk next to the lectern.

I now think it was just a clever prop he used to project his power.

He'd immediately begin to teach and completely fill all of the blackboard space with impossible Latin names of the fossils. He'd also draw very detailed illustrations of fossils using colored chalk. Each one was a work of art.

To keep up, you had to know shorthand. I later discovered that a fellow professor, Dr. Bullard, would request the blackboards NOT be erased until such time as he could come in and photograph each one. Oh, how I'd love to have a few prints of Dr. Bullard's photos!

When it came time for a test, Dr. Caster would walk into the room head held high, he straighten the test papers on the lectern, gaze slowly across the entire class, and utter these words, "Today we're here to test the depths of your ignorance."

It was the most intimidating statement I've ever heard from a professor. He wasn't kidding when he said it.

But it was true. We were ignorant.

The Sharp Lens of Time

Years later, I finally understood what he was saying. Here I was, a junior still wringing wet behind the ears, not having a clue about what existed in the written record concerning everything about fossils.

Even if I understood and retained every word of what Dr. Caster taught in the historical geology class for the entire year, I might have only known 0.00001 percent of all there was to know at that time about fossils.

Yes, I was indeed ignorant.

Each time I turned in my test, I knew I had failed it. Dr. Caster made a point to ask lots of questions, most of which there was never time to answer. I'd estimate he had no less than thirty questions on each test. You had 90 minutes to answer thirty questions. Each one was an essay question.

Hah! There's no way you could write a detailed answer in three minutes much less ten. 

There was no such thing as a multiple-guess question on a Caster test. You brought several blue books with you and you would fill one or two for sure. At best, I maybe could only answer eight of the thirty questions.

How could I possibly pass the class if I didn't answer most of test questions?

That's the magical side of Dr. Caster. He knew we were Padawans. He knew we had no chance of truly understanding what he knew.

Test Scores

I have no memory of Dr. Caster returning graded tests. I have this sneaking suspicion he threw them in the garbage after skimming through them never lifting a finger to grade them.

Each quarter when my report card came in the mail I was astonished to see I had received an A for the class. Surely he had made a mistake.

No, he didn't.

Dr. Caster was measuring performance based on attendance and attitude. If you gave him your attention in class, watched him add to the air pollution level in Cincinnati by creating chalk dust, and you had the guts to show up for tests, you got an A.

attitude pin

I think Dr. Caster would have given one of these to each of us in his class, but that would expose his softer side. RIP Dr. Caster!

I hope you had the good fortune to be taught by such a magnificent human being. I'm so very grateful to have been in his classroom.

Rest in Peace Dr. Caster. I wonder if you're chasing horseshoe crabs up in Heaven!

Want to know about another UC professor that had a profound impact on my life? Then you need to meet Dr. John Alexander.