September 6, 2018 AsktheBuilder Newsletter

New subscriber? Welcome! The beverages and appetizers are in the other room. My good friend Dan will be around soon with a platter of delicious cannoli. There's no need to tip him.

Old salt subscriber? Be sure to remind the newbies that we all have to clean up after ourselves.

Did you know that the word cannoli is already plural? I didn't know that!

Sticky Hand Tool Handles

If you eat peanut butter and jelly sandwiches or have caramel corn while you work, you might end up with sticky hand tool handles.

Or, you could cook them like happened to subscriber Trish. She sent me this email a few days ago:

"Again I turn to you when I cannot find the answer to my question.

Hubby bought tools (screw drivers, pliers etc.) with ergonomically correct handles. We moved into a home that has a shed attached in the rear. All the tools were stored there in the famous Red Tool chest.

Due to, what we believe to be, excessive heat all the handles on the tools are now wet and sticky and nothing we have tried will change the effect.

Do you have any idea what we can do or must we just replace all the tools? The handles are mushy and appear ruined. I thought maybe varnish might help but wanted to ask you first.

Thanks for always being there for us."

Have you had a similar experience with hand tools? I want to see how widespread this problem is.

If so, would you take this short survey to help others?

CLICK HERE for the Sticky Hand Tool Handle survey.

Des Moines Deck Collapse

On Labor Day, an elderly couple was hurt in a deck collapse. They're both alive, but it could have had a more grim outcome.

CLICK HERE to read the short story. The Des Moines Register website will have you pulling your hair out trying to see the story. You may have to slide the headline up to see the story.

The only reason I bring this up is that deck collapses are more common than you think. Decks, like any other thing, have a life expectancy.

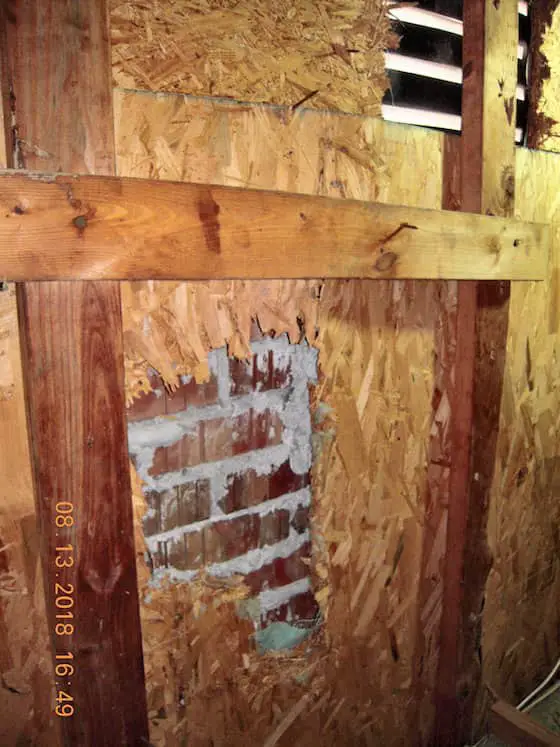
Some are short because inferior methods are used to construct the decks. The following is a photo I shot of a new deck being built on my street. I'd NEVER go out on this deck if invited to their home.

Treated Deck Post and Deck Beam

You may wonder what's wrong? Maybe your deck post, deck beam, and deck joist connections look like this.

The beam is made up of three joists, the wood you see with the white labels stapled to them. See the small toenails coming up into the beam from the post below. WRONG!

See the two small toenails in the joists above the beam that go down into the beam? WRONG!

The carpenter should have used metal structural post-to-beam connectors with approved screws.

Carpenters might not be using the correct fasteners with the approved galvanized coating to resist corrosion caused by the HIGH copper content of newer treated lumber.

If you feel your deck might be at risk, have it inspected by an ASHI home inspector.

SAFETY TIP: If you're at a party at someone's home and there's a gathering on a deck where people are dancing, GET OFF THE DECK. Dancing can cause decks to sway back and forth or pull away from the house.

The Power Is In The Question

Ian came to my website overnight looking for advice on how to install fence posts. He left a comment asking:

"I have pure sand for soil around here. Can I just fill it back in with the sand around the post? 6ft dog ear wood fence with 4x4x8 posts and a 2.5ft hole."

I've got lots of experience with this as I've built lots of fences and I've interviewed others who have installed thousands of them.

The best way to install fence posts is in this column:

Fence Posts

CLICK HERE if you want to see the column.

Ian poses a very good question because many don't have sand for soil. Many soils have a clay component.

But had Ian focused on why crushed gravel makes the best material, he'd have come away that sand might work for him. After all, sand is just tiny pieces of rock. The issue is most sand tends to have rounded edges, not an angular shape.

Sand will work, but crushed rock is better.

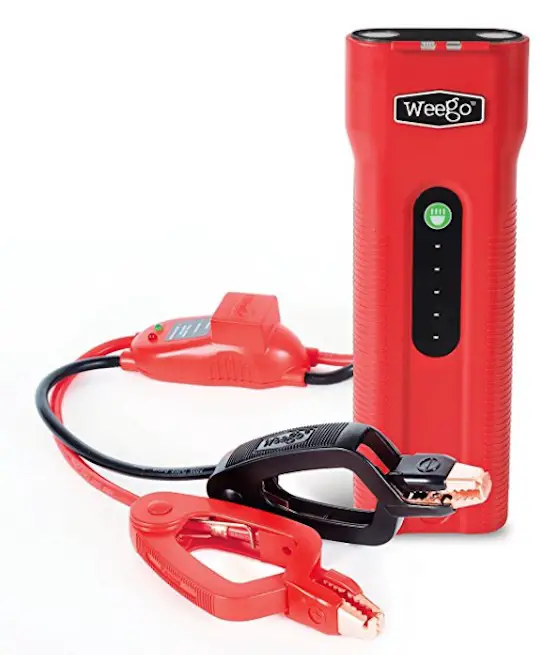
Great Extension Ladder and a Power Pack

I've got two new products for you to look at. Great photos here. CLICK HERE to see a new lightweight extension ladder I just got. I LOVE IT!

You'll also see a small power pack that can power all sorts of your things AND jump start your car or light truck! CRAZY it can have that much stored energy!!!

CLICK HERE to see both.

Stain Solver Sale

Remember, Stain Solver is on sale for just a few more days!!! ORDER NOW

Promo Code:

LBRDAY18

CLICK HERE to order.

That's enough for a Thursday.

Tim Carter
Founder - www.AsktheBuilder.com
Cleaning Crystals - www.StainSolver.com
Invisible Happiness - www.W3ATB.com

Sticky Hand Tool Handles Survey

Please take the following survey if you have hand tools with sticky handles.

Ask the Builder September 2018 Neat Products

Here are a few neat products I've held in my hands the first few days of September 2018 and feel you should know about:

Werner 24-Foot Aluminum Extension Ladder With Leveling Legs

Extension Ladder

This is a D-rung extension ladder, but it's got these amazing leg extenders that allow you to set the ladder up safely on uneven surfaces. CLICK the photo to see more photos and to BUY the ladder.


This is a nifty aluminum D-rung ladder that's rated for 250-pounds. I was able to easily carry it from up in my cul-de-sac once the delivery truck drove away. The adjustable leg extensions are wonderful and the embedded level allows you to set the ladder up safely! If you want strength and SAFETY, give this ladder a serious look. CLICK HERE to have one delivered to your home or office building.


WEEGO 66 Jumpstarter Power Pack

weego 66

This is the WEEGO power pack. It can power just about anything and jumpstart your car too! CLICK THE IMAGE to have it delivered to your home.

This small battery pack has the ability to deliver 2500 peak amps and 600 cranking amps to your worn-out car or truck battery. It powers up all sorts of other things like your laptop, phone, etc. It's a flashlight too and an emergency beacon. Give this a look-see! CLICK HERE to have one delivered to your home.

Retaining Wall Basics and Blacktop Cracks

precast retaining wall install

The giant precast-concrete retaining wall blocks stack and click together just like Lego blocks . (C) Copyright 2018 Tim Carter

Retaining Wall Basics

Question #1: Tim, I’ve seen quite a few failed retaining walls. Many have bulges or have tipped over. What needs to be done to ensure I only do mine one time? I’ve seen photos of walls hundreds of years old that look like they were built yesterday. What’s the secret? Chuck W., Boise, ID

I’m fortunate like Chuck and have seen my share of failed retaining walls. I grew up in Cincinnati, OH, and retaining walls can be found all over the city and in the suburbs.

You may have not enjoyed physics class in high school, but remember when one of your frustrated classmates might have said, “Give me an example of when I’ll ever use this stuff in real life!” Well, this is one of those times.

Gravity wants to tip over all retaining walls. It’s all part of Mother Nature’s plan to transport rock and soil back into the oceans. Those engineers that design a retaining wall that lasts and lasts can say they won an arm-wrestling competition with her - at least temporarily as Mother Nature always bats last.

The problem you face with retaining walls is the taller they are, the more weight they’re holding back. It’s very complex. This is why any wall taller than 6 feet should be designed by an engineer who’s got experience in retaining walls.

Short walls 2 feet high that you might build in your yard can be done with little fear of failure. But once you get higher than that, things can go wrong fast.

I’ll never forget the first retaining wall I built. It was a 50-foot-long wall that started out 1 foot high but ended up 42 inches high. I built it in front of another retaining wall and there was just 3 feet of dirt behind the wall, not a hill rising up behind the wall.

After five years, I noticed the tall end of the wall seemed to be tilting outwards. I had used regular brick, 4-inch back-up concrete block and some vertical steel rods in between the brick and the block to try to ensure the wall would not tilt. I lost that arm wrestling match!

Years later I discovered the freezing weather contributed to the failure. The soil behind my wall would freeze and expand. Each year the ice would push the wall out another 1/4 inch or so. A much-thicker wall and pea-gravel fill between the soil and the wall would have prevented the failure.

I have great retaining wall step-by-step tips and videos for you at my website. Go to: retainingwall

Blacktop Cracks

Question #2: Help, Tim! I need to patch some cracks in my older blacktop driveway and I don’t want to do it a second time. Let me state up front I’m no fan of the liquids or black caulks that end up looking worse than the crack itself. Have you figured out a way to patch blacktop cracks and disguise the repair? Constance M., Springfield, MA

I know I feel like Constance about the black caulk products and liquid crack fillers. They look like a facial scar to me. You may not pay much attention to aged blacktop but what you’re really seeing are tens of thousands of small rocks that have lost their jet-black coating of liquid asphalt.

Just this past week, I patched quite a few cracks in my own aged blacktop driveway. I’ve perfected a method of doing it so you simply can’t see the crack repair, even if you stand ten feet away.

I start by cleaning out the crack of all debris. If the crack is wide enough, I use my battery-powered demolition hammer with a 3/4-inch wide bit. I chisel the sides of the crack so the bottom of the crack is wider than the top. The profile resembles a dovetail carpentry joint or the shape of the hole in your tooth just before a dentist fills a cavity.

I make sure the crack depth is at least one inch before squirting in a magic epoxy I discovered about six years ago. It comes in caulking tubes and has a magic nozzle that mixes the two components that come out of the tube.

I keep the epoxy about 1/8 inch below the top of the blacktop and then begin to press into the fresh epoxy small stones that match the ones in the blacktop. You’ll find these all along the edge of your driveway. I embed stones as small as 1/8 inch into the epoxy all in a random pattern as you see in the blacktop. The last step is to scatter dry sand onto any visible epoxy and tamp it with my finger. Hours later you can sweep away the excess sand.

I’ve got step-by-step photos of this magic blacktop crack-filling process and a link to the epoxy I’ve tested at my website waiting for you. Go to: crackrepair

Column 1264

August 31, 2018 AsktheBuilder Newsletter

New subscriber? Welcome and don't be fall for the you-must-wear-the-funny-hat prank that some of the seasoned subscribers may pull on you.

Seasoned subscriber? You know better than to mess with the new arrivals!

Where did it go? How is it possible that we're at the end of another summer? Did you have a great one? I know I did, but I wish it was mid-July as I'd love a redo on August.

Do Less Labor - Labor Day SALE!

It's time for another Stain Solver Sale. Kathy and I own the company. Stain Solver is a certified organic multi-purpose oxygen bleach cleaner.

I believe it's the only certified organic oxygen-bleach cleaner sold in the USA.

Oxygen Bleach

Stain Solver is MADE in the USA with USA ingredients that are food-grade quality. CLICK THE IMAGE to order some NOW.

You can get 10% off any order $10 or more for the next week. See promo code just below.

CLICK HERE to order.

It makes lots of sense for you to think about the 9.2 and 50-pound sizes because you get the BEST PRICE per pound with these bad boys.

If you've heard me beat my chest for all these years and never tried Stain Solver, just get the small 2.2-pound size and watch magic happen around your home.

Yeah, I can hear you now, "Tim, I buy another brand. Your Stain Solver is too expensive."

Oh, you mean those other brands that have more FILLER than active ingredient? No wonder they're so much cheaper! By the time you add more to get your jobs done, you're paying MORE per cleaning job.

Stain Solver is super concentrated!!! You don't need that much to get superior results.

Use this promo code now:

LBRDAY18

Remember, you get FREE SHIPPING to any place in the lower 48 USA states.

CLICK HERE to order.

Revised Columns For Your Pleasure

Here are a few revised columns that can really help you.

For sure you MUST LOOK at the following one about Gutter Cleaning, Gutter Guards, and a COST ANALYSIS.

SPOILER ALERT: It may make more sense for you to NOT BUY gutter guards!

gutter guard

Gutter Guards - Maybe Not For You!

Broken Tiles

NO! Don't Use Broken Tiles to Level a Floor

brick veneer leaks

​​​​​​WTH is Going On Here? Brick Leak or ????

Instantaneous Hot Water Installation

Within 30 days, I'm going to be the proud owner of an A. O. Smith new Proline XE Combi Boiler/Water Heater.

I'm going to videotape the installation. I'm pretty sure you're going to be BLOWN AWAY by the transformation inside my mechanical room.

CLICK HERE to discover more about the amazing A. O. Smith ProLine XE Combi Boiler.

A. O. Smith ProLine Combi Boiler
That's quite enough for a Friday before a holiday weekend.

Be safe and be sure to order some Stain Solver!

Tim Carter
Founder - www.AsktheBuilder.com
Cleaner of Things - www.StainSolver.com
Amazing Stories! - www.W3ATB.com

Do It Right, Not Over!

Gutter Guard Madness and Leveling Floors Before Tile

Gutter Guard Madness

This is a great gutter guard, but the price installed will take your breath away. It may be cheaper to not install them. (C) Copyright 2018 Tim Carter

Gutter Guard Madness

Question #1: Tim, the annual gutter cleaning campaign is about to happen. What’s your feeling about gutter guards? Have you tested any? There are so many different designs, how do you even begin to make a decision? Are they really worth it in the long run? Is there a cheaper alternative? Molly B., Richmond, VA

Do you battle leaves in your gutters like Molly does twice, or three, times a year? I used to. My last house in Cincinnati, OH had over 400 linear feet of gutter on it! It was a nightmare cleaning the gutters out.

Gutter guard products have been on the market for decades. There are probably as many design patents for them as there are power boats on my lake the last weekend of the summer season!

Years ago, I did an exhaustive test of just about every gutter guard design. I discovered that almost all of them fail. The reverse curve designs allow small pieces of debris to be carried into the gutter where it’s impossible to clean out the decaying muck. Small debris of all sorts clog the holes, slits, and knockouts in the other designs. Most gutter guards fail miserably in the spring when the tiny debris drops from the trees like snow in a blizzard.

In those tests, I did discover a design that does work. It’s made with stainless steel micro mesh that’s as fine, or finer, than the weave of women’s pantyhose. Nothing but water gets into gutters protected by these guards.

However, many of these micromesh guards can only be installed by a dealer. The cost-per-foot bids you’ll get will take your breath away. Often the bids are thousands of dollars and some salesmen incorporate lots of high pressure and tricky sales psychology to get you to sign a contract.

If you’re leaning towards going this route, it may pay you to do an analysis to see if it makes sense to just pay a handyman, who’s got Workman’s Compensation coverage, to just clean out your gutters twice a year.

I did a simple math calculation and discovered that if you only plan to live in your home for ten years or less, it makes better financial sense to not install the gutter guards. That may seem like a crazy idea, but if you only have a limited amount of money, you need to protect your capital instead of giving it to a local gutter guard dealer.

I taped several amazing videos of gutter guards that have failed and have pictures of the micro mesh gutter guard that I ended up putting on my house. I have all of this amazing eye candy for you at my website. Go to: gutterguards

Leveling Floors Before Tile

Question #2: Hey Tim, I’m about to tackle a ceramic tile floor project. After doing some research, I’m quite confused about how to prevent cracks in the tile. I already know that my existing floor has some slight humps and low spots. What would you do to ensure the floor tile is crack-free for a long time? Sarah M., Jacksonville, FL

I applaud you if you’re ambitious like Sarah! Better yet, you’ll get a standing ovation from me if you take the time to research the project before you get started. Several hours of each day I do autopsies on homeowner failures that tumble into my email box. The common cause of these snafus is the lack of knowing what to do before starting a project. Most homeowners dive in, start to flail, and just hope things will work out.

Ceramic tile is a great product, but it’s weak if you try to bend it. It will crack. The tile will bend or crack if you step on it where there’s a tiny void space under it. You can eliminate these void spaces by installing the tile on a perfectly flat surface.

Note that flat doesn’t always mean the floor is level. Flat means the surface has no dips or humps in it. You can locate dips or shallow depressions in a floor using a long straightedge and a flashlight. Shine the light at a low angle to see if you see light beams passing under the straightedge.

You can save yourself lots of trouble and time by using amazing self-leveling floor compounds. These are powdered products you mix with water to the consistency of a thin soup. Gravity allows the liquid compound to flow across the floor much like water might in a flood.

When the compounds set up and get hard, they create a perfectly flat surface that happens to be level too. They’re a perfect substrate for ceramic tile. Professionals use these compounds frequently because they don’t want to have to come back to fix cracked tile. The compounds are not hard to work with, but they do require some moderate skill.

I assembled a handful of useful tips, sources of the floor leveling compounds, and some great how-to videos showing how to get your floor flat. Go here to discover all this great free information: floorleveling

Column 1263

Staircase Survey Where You Live DUH!

I need to know where you live if you took the Staircase Survey.

It was an Ooopsie By Accident moment! I should have put this question in the original survey.

Etymotic Earplugs and Earphones Review

etymotic earphones

Here are my Etymotic earphones. They fit comfortably and allow you to hear your music as well as what's happening around you. They'll keep you SAFE. CLICK THE PHOTO now to have a pair delivered to your home in days.

Etymotic Earplugs and Earphones - They Keep You Safe

I had the chance to test out a pair of Etymotic earplugs and earphones for the past two months. It's important to realize that I've tried countless earplugs over the years constantly trying to find a pair that minimizes harmful noise but allows me to hear things that could be dangerous.

Related Links

How To Protect Your Hearing - It's Easy

What are Noise Isolating Earphones?

Noise-isolating earphones are ones that can achieve extremely high, in the range of 35 - 42dB, noise isolation. They reduce most noise to safe levels to preserve your hearing. At the same time, they preserve non-dangerous sounds like speech and regular music sound levels.

For example, it allows construction workers to minimize harmful loud noises like jackhammers, but still hear the warning beeps of an approaching dump truck or another backing vehicle.

Musicians can use these to lower the sound level of amplified sound, but still be able to hear their instrument and how it sounds with the other pieces in the band.

See how clever these earphones and earplugs are?

Can You Hear Background Noise?

Yes, I was able to hear the nearby noise, but at a safe level, while doing my testing.

Can you Carry On a Conversation While Wearing Them?

Yes, you can carry on a normal conversation instead of YELLING like you might with traditional earmuffs.

etymotic earplugs

These are the Etymotic earplugs I used while target shooting. I found they were well suited for that activity. I know for any building noise, they'd work well.

Did You Like Them?

Yes, I found the Etymotic earphones and earplugs to be comfortable and they really reduced harsh noise.

They come in many different styles and types. You'll be stunned by all the models they have. There are different models for different needs.