White Salt on Brick and 3 Ways

white salt on brick

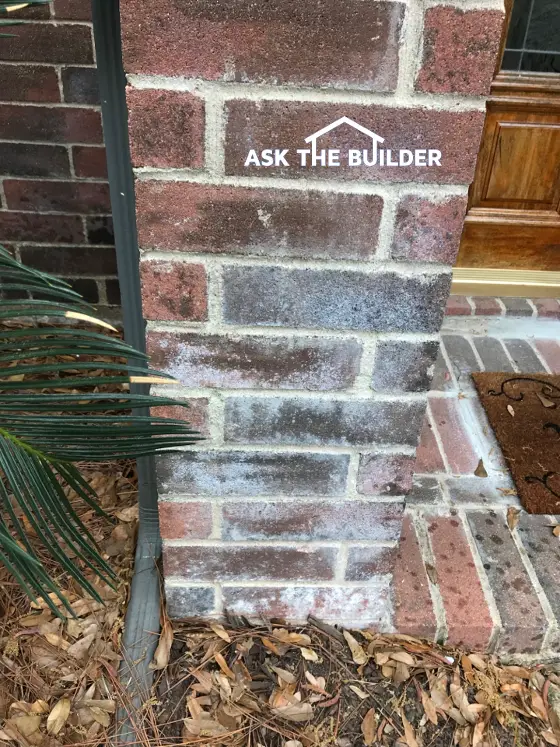
The white stains on Joel’s brick are water-soluble salts. Trying to clean them off with more water or acid is a MISTAKE. (C) Copyright 2018 Tim Carter

White Salt on Brick and 3 Ways

Question #1: Tim, I’ve got a mess on my brick home. I live in Houston, TX and have a sprinkler system for my lawn. The water sometimes gets sprayed on my brick exterior. White stains appear. I’ve tried scrubbing with water and a water/acid mix. Nothing is working. What’s going on and how do I stop it? - Joel

Answer #1: Joel’s problem is quite common. I even have the issue in my own garage in the winter months. He’s dealing with efflorescence.

Joel sent me three photos using the Ask Tim page on my website that allowed me to zero in on the exact problem. That old saying, “A picture is worth 1,000 words” is so very true. If you’ve got a problem at your home, by gosh I want to hear from you!

There are dissolved minerals in just about all drinking water. Some cities, towns, and wells have more than others. You might see white water stains on your drinking glasses or a dark countertop if a water drop dries.

The minerals can also be in Joel’s brick or the mortar in between the brick. Even if he poured pure distilled water on his brick, that water could soak into the brick and mortar, dissolve the salts and then bring them to the surface when the water evaporates.

The efflorescence on my garage floor is caused by snow and slush that contains rock salt used by my town in the winter to melt snow on the roads. This saltwater drips from the underside of my car and soaks into my garage floor concrete. As the water is drawn to the surface to evaporate the water goes into the air, but it leaves behind gorgeous fluffy salt crystals.

The only way to solve the problem is to stop getting the brick wet. When salts do appear, brush them off with a stiff brush while the brick is dry. Do NOT wet the salts. That just drives them back into the brick and mortar.

Question #2: Tim, I tried to be a hero at my house and now I’m a heel. I wanted to replace a dingy 3-way switch in our dining room with a new one. Now the light switching doesn’t work right. Sleeping on the couch is getting old. Help! - Rich

Answer #2: Ten years ago I taped a video showing how the wires are connected to a 3-way switch. It’s the most popular 3-way switch video in the world as it’s been watched over 1,293,393 times! You can watch this video on my AsktheBuilder website. CLICK HERE to watch the video.

The issue with the video is that it shows the wires with no drywall on the walls. That’s not too helpful to Rich or possibly you when you just see four wires poking from a hole in the wall!

Here’s how to get the switch working again. Be sure the current is off to the switch by turning off the power at the electric panel. Take small pieces of painters tape and put a little tab on the three wires that have insulation on them. The bare wire or one with green insulation is the ground wire. Connect that to the green grounding screw on the new switch and leave it there.

Number each of the tape tabs: 1, 2 and 3.  Orient the new switch so the screw that’s painted black is pointing up and the two brass screws are aiming down to the floor. Keep the switch in this position the entire time.

Start to attach the numbered wires to the screws in a clockwise fashion as you face the front of the switch. The #1 wire should be on the black screw then the #2 wire should be on the screw down low and to the right with the #3 wire on the remaining screw to the left of the #2 wire.

Carefully turn the power on and see if the switch works right. You may have lucked out and got it right the first time. If not turn the power off again and start to play musical chairs with the wires. Put the #1 wire where the #2 wire was before. Put the #2 wire where the #3 wire was just before and finish up putting the #3 wire where the #1 wire was.

Turn the power back on and see if the switches work correctly. If not, you’re one step away from success! Turn the power off and do musical chairs one last time. Move the wires around the switch one last time just like you did before. I guarantee you it will work perfectly this time!

I’ve created a free downloadable document for you at my website. This document contains diagrams of how the wires should be connected each time to the new 3-way switch. It also contains links to both my 3-way and 4-way switch videos. The PDF document also has several great photos of efflorescence and a link to a video I recorded about efflorescence. You’ll also discover the best brush to use to remove efflorescence from brick or concrete.

Just go to:  https://www.askthebuilder.com/b1241/ to get the free PDF document.
March 25, 2018 AsktheBuilder Newsletter

New subscriber? Greetings! Past patron? TNX, as we say in Morse, for your continued attention and trust!

Winter won't let go here in central New Hampshire. I woke up this morning to a fresh inch of snow. It will melt today, but that's not the point.

You may already be in flip flops and a t-shirt. That's why I'm going to start sharing tips about spring and summer.

Let's start with a fantastic gas can I've been testing for a month.

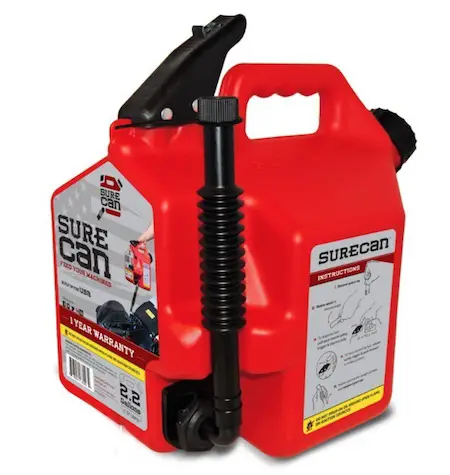
SureCan Gas Can

I've tried many gas cans looking for the perfect combination of features. I've finally found the Holy Grail of gas cans.

Here's what I don't like about other gas cans:

  • spout is too short requiring a pesky funnel
  • handle wrong orientation when filling - wrist bend
  • spout in the way when not pouring
  • hard to control flow

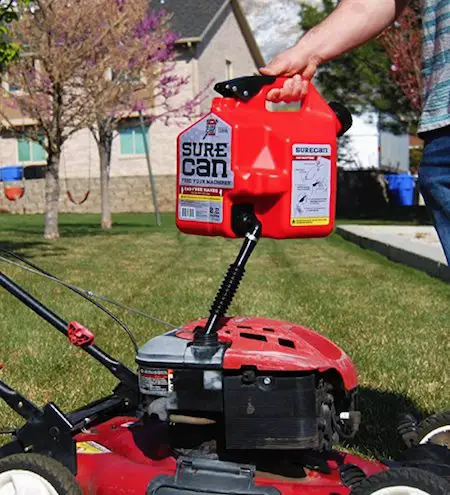
The SureCan solves all these. The spout ROTATES down so you can fill while the can stays in the same position ALL THE TIME.

The flow of gasoline can be controlled with ease by how much pressure you apply as you squeeze a lever. If you want a trickle, just give it a slight push. Full flow? Squeeze away baby. Look at the photo below. Note how the black lever is pushed down by the man's thumb and gas is now flowing.

That black lever has a NICE safety underneath it. You have to squeeze the safety before the black lever will go down.

surecan-gas-can

CLICK HERE to order one NOW.

Remember, I only share links to products that I use myself. I LOVE LOVE LOVE my SureCan gas can!

On-Demand Radio Show 4

My good friend Chuck uploaded my fourth FREE on-demand radio show on Friday morning. Already without telling you just under 100 people have listened to it. It costs you NOTHING to listen.

What does that mean to YOU that so many have beat you to it? It means:

  • my on-demand show is gaining traction
  • others are getting FREE TIPS you're ignoring
  • others are SAVING MONEY that you're wasting

I talked with Robert, Bob and Sue last week on the phone.

Robert's got a cracked floor joist under his bathroom. Bob wants to know if it's SAFE to use chemical weed killers and fertilizers on his rural lawn. Sue's got some rotten wood siding panels and wants to know the most cost-effective way to permanently repair them.

I end with a pretty funny story about my first job acting as a general contractor. I've uploaded a written TRANSCRIPT of that story should you just want to read it. Scroll down to get to it.

CLICK HERE to listen to my latest FREE on-demand radio show.

If you want to listen to my first THREE on-demand radio shows, CLICK HERE.

Attic Ventilation - The Real Scoop

A few days ago, I revised my past column about attic ventilation. There's lots of hocus-pocus out there concerning this topic.

I'm STUNNED by the amount of information that's not based in science I see at other websites. BE CAREFUL of following that other advice.

CLICK HERE to see how to COOL DOWN your attic. You need to do the work NOW before it gets too damn hot to be up in your attic or on your roof.

Clean Kitchen & Bath Cabinets

I had a subscriber contact me asking if our certified organic Stain Solver oxygen bleach was safe to use on kitchen or bath cabinets to deep clean them. This person had been ill and not been able to clean on a regular basis and things got a little out of hand.

The answer is YES it's SAFE to use Stain Solver on cabinets. This is because most painted cabinets are not damaged by sunlight. Sunlight breaks down the resins and pigments in paint.

Stain Solver will remove sun-damaged resin and color pigments. You WANT to remove these if you're repainting the outside of your home.

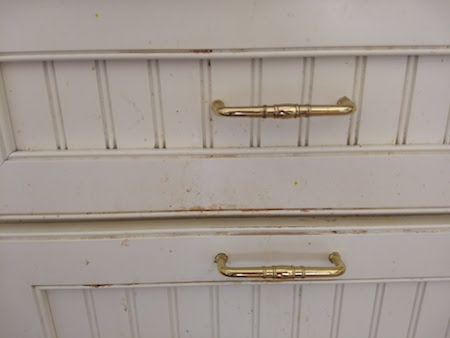
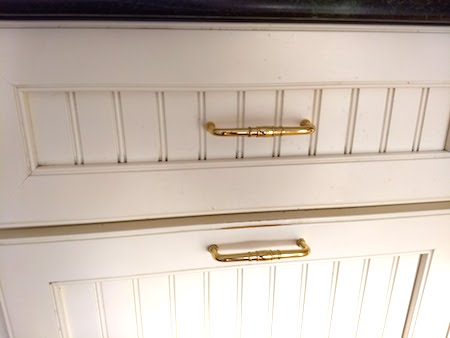
But if you're cleaning inside, you don't want to harm the paint. Stain Solver is SAFE on interior paints. Look at the stunning Before and After photos of these gorgeous cabinets:

painted cabinet

The After photo is just below. What a difference. The subscriber just mixed up some of the Stain Solver powder with HOT water.

She stirred the powder for a minute and then poured the solution into a small hand-pump spray bottle.

She spritzed the painted cabinet and let the solution work for just ten minutes. Then she rubbed the surface with a nice sponge.

The dark line above the lower handle is not dirt. The paint has worn away here because fingernails catch on that groove. The woman shared this because she didn't want anyone to think the Stain Solver didn't work in that spot. CLICK HERE to order some Stain Solver now.

clean painted cabinet

Spring Means WET Basements and Crawlspaces

My college degree is in geology. I had a focus on hydrogeology and geomorphology. Hydrogeology is the study of ground water and how it MOVES through soil and rock.

Geomorphology is the study of the surface of the earth. Think hills, valleys and other shapes.

Mix these two together with some common sense and you quickly DISCOVER how to STOP WATER from entering a basement or crawlspace.

CLICK HERE to see how it's done.

I'll Call You

Do you have a problem around your home you need help with? I'm now making no less than four or five FREE phone calls per week.

The calls are FREE. All you have to do is supply me with two or three decent photos so I can SEE what's going on.

If you want me to call you, take a few photos and then CLICK HERE and fill out the form. Or, just send them out of your phone to my email address - you've already got it if you're reading this - and send me a simple email with the photos attached.

I'd say that's enough for a Sunday.

Be SURE to read that story about my first general contracting experience. CLICK HERE for it.

Tim Carter
Founder - www.AsktheBuilder.com
On-Demand Radio Captain Magic

Do It Right, Not Over!

Heat Loss Photos

heat loss photos

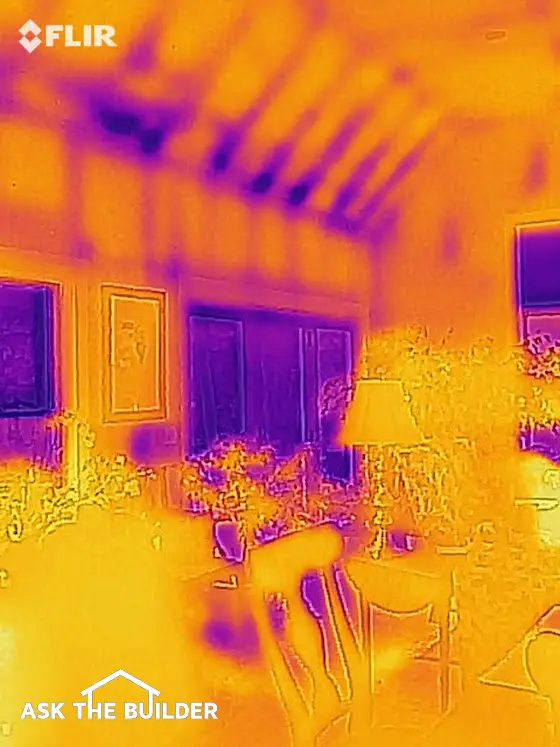
This is a thermal image taken in my own home. It's normal for the french door and the windows to be the purple and magenta. But you should NOT see that color up on the slanted part of the ceiling. The insulation contractors did a bad job. I didn't build this house, so it's not my fault. Copyright 2018 Tim Carter

Heat Loss Photos - I've Got Plenty

Heat loss, and heat gain in the summer, are both responsible for costing you money.

It's important to realize that you can't stop heat loss, but you can slow it down. In the photo above the purple areas on the sloped ceiling are caused by air flowing through the batt insulation.

The air enters the soffit just outside the wall under the roof overhang and travels up to the roof ridge vent. The air could have been blocked from entering the insulation by using baffles that shield the fiberglass from the moving air.

Seeing Heat Loss With a Thermal Camera

The human eye can't see heat loss or the heat signature of objects. But you can purchase an affordable thermal camera that can see it.

I happen to own the FLIR One camera that attaches to my Android smartphone.

flir thermal camera

This is my FLIR thermal camera that attaches to a smartphone. It can even show you where water leaks. Copyright 2018 Tim Carter CLICK THE IMAGE to have one delivered to your home.

The top photo was taken with my FLIR and so are the ones you see below.

heat loss photo

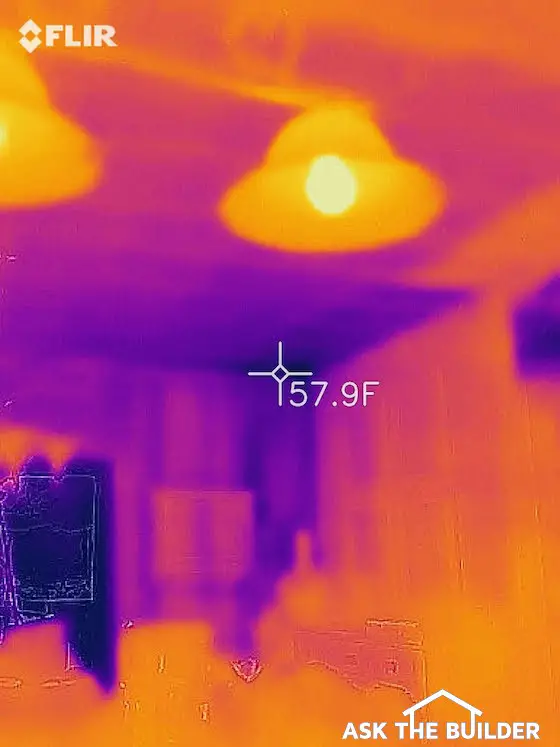
I've turned on the temperature function of the FLIR camera. You can see how cold the ceiling surface is in my dining room. Copyright 2018 Tim Carter CLICK THE IMAGE NOW to have a FLIR thermal camera in your hands in days.

thermal image sunbeam

This is a very interesting photo. The bright yellow line on the right side is my baseboard hot water radiator. The diagonal orange stripe on the floor with the temperature crosshairs is a sunbeam! Look how powerful the sun is coming in and heating up that strip of flooring and carpet. Copyright 2018 Tim Carter CLICK THE PHOTO now to have the FLIR camera in your hands in days.

March 21, 2018 AsktheBuilder Newsletter

New subscriber? Welcome! Existing one? TNX for your continued trust.

This is going to be a very interesting newsletter issue. Lots of moving parts.

Stick with me on this one, especially this first topic because it contains a much-needed reminder for you.

When Was the Last Time?

When was the last time you went out of your way to tell a business that you LOVED something they make, sell or provide? Be honest. Weeks or months?

Now, when was the last time you COMPLAINED about something - I mean go to the effort to write, call or speak with a manager? It's far easier to complain than to praise.

Here's why I'm asking you these two questions. Over the past month, you may be a NEW subscriber or an existing one that reads my weekly syndicated newspaper column in your local paper.

Hah! You may not even know I write a syndicated column! See how bad I am at sharing what's going on? Does my column appear in your local paper? If not, you can make it happen. See far below.

My weekly syndicated Ask the Builder column started in October of 1993 and still runs in about sixty newspapers around the USA. Some are damn big like the Washington Post, Orange County Register, Hartford Courant, Spokesman Review, Columbus Dispatch, and others!

For twenty-five years, I kept with the same boring format in my column.

CLICK HERE to see this old stale format. Seriously, please click that link.

About six weeks ago, I had an idea to change up the format of my column. I started to mention my website, videos, newsletter, podcast and other FREE things you could get at my website.

CLICK HERE to see one of these NEW format columns. I beg you to do this if you currently read my column in your LOCAL paper.

Pay CLOSE ATTENTION to the last two paragraphs in the NEW FORMAT and the last sentence in the column. Be sure you click that and get the FREE document I created! Tell me if you LIKE the new free document.

Here's what you need to know. I can see how many people subscribe to this newsletter each day. For YEARS, it's been about six or eight a day on average.

Guess what happened after my NEW FORMAT columns started to appear in your local paper?

You DISCOVERED all the free stuff at my website and you signed up for this newsletter. My signups all of a sudden jumped to 50, 60 and 80 a day!

That tells me you LIKED what you saw in my new format. Your local paper was not telling you about all the great free stuff you could get from me. But you know what? I've been wrong before.

Do you LIKE the new format over the old format? Do you LIKE that three topics are covered instead of one?

Did you like that the new column format revealed other ways you can get FREE tips from me other than the just my column in your paper?

If you do like the NEW format and you do read my column in your local paper, then you could help yourself and me by writing a short Letter to the Editor of your paper.

Tell her/him WHY you like the new format better than the old one and that you loved the fact that you discovered all sorts of new stuff at my website that helped you.

IMPORTANT TIP FOR YOU: Here's what I've discovered over the past twenty-five years of writing a syndicated newspaper column.

If you don't write periodic letters to the editor telling them what you LIKE in the paper - it can be a sports columnist, a recipe feature, a comic strip, a crossword puzzle - the paper starts to think NO ONE likes the feature and they CANCEL it.

It's easy for a normal store to judge how much you like a product. If your grocery store sells 500 jars of Raye's Sweet and Spicy mustard each day and it's the BEST-SELLING product in the store, do you think they'll stop stocking it?

It happens to be the best mustard I've ever had, but forget about that for now.

The fact the product flies off the shelves tells the store you love it. But newspaper editors have NO IDEA if you like something. They're not standing over your shoulder watching you read the paper.

Please consider going to your local paper's website and find the Letter to the Editor form. Just write whatever you want about my column or ANY feature and tell the editor WHY you like it/them.

I thank you in advance if you'll do this for me.

You need to do this for ANYTHING YOU LIKE at ANY STORE. Write letters, send messages, etc. to TELL the OWNER you like something.

Trust - It's DANGEROUS

Have you been burned before? You hire someone to do something and they do a crappy job. Sometimes you don't realize the job is bad because the mistakes are HIDDEN. The legal term for this is latent defect.

I know because I do lots of expert witness work.

It's important for you to realize I didn't build the house I live in here in New Hampshire. I'm currently working my butt off to build a new dream house for Kathy and I. But that's a story for another day.

Last week, I was in Portland, Maine, attending a very interesting construction conference - CSI Maine High-Performance Building Conference.

The event is over so don't try to buy tickets for goodness sake!

At the event one of the speakers, Steve Easley, talked about heat loss and the overall R Factor of walls in homes and other structures.

What overall R-factor means is what's the AVERAGE R-factor of a wall in your home? You may have R-19 fiberglass batts between your wall studs, but that doesn't mean you have a R-19 wall.

The windows, air leaks, solid framing members, etc. all have an R-factor much less than R-19. When you average out all the components in your walls, you may have an overall R-factor of 8 or less. GULP!

I decided to get out my FLIR thermal camera that connects to my smart phone this past weekend. It's such a cool tool to have. You can use it to spot all sorts of things around your home, including WATER LEAKS! Water leaks show up as blue or purple spots in thermal images because the wet surface is COOLER from the water evaporating.

Look at the CRAPPY job the insulation contractor did here at my house eighteen years ago:

heat loss photo thermal image flir


What you're looking at is the east wall in our giant family room. That's an Andersen french door and it was 7 F outside when I took the photo. The blue and purple tell you it's colder than the yellow and orange areas in the image.

Pay attention to the sloped ceiling above the door. There's NOT supposed to be blue and purple there! That's telling you the insulation at those spots is inferior or the idiot contractors did NOT put in insulation baffles to STOP air from the soffits from migrating through the batts as it travels to the roof ridge vent.

You don't want air moving through fiberglass insulation! The air moving through fiberglass significantly reduces the R-value.

heat loss dining room swain road

Here's a second image looking at the east wall in the dining room.


WTH???

Look at how much blue and purple is on that wall to the right of the dark-blue spot in the lower left of the image. That dark-blue patch is another Andersen french door so with all that glass, you bet it's going to give off a cold thermal signature.

I turned on the temperature feature of the FLIR thermal camera for this photo. The surface of the ceiling drywall right where it meets the wall is 57.9 F.

GIVE ME A BREAK! That ceiling should not be that cold.

Why is this important to YOU?

One thing I discovered at the CSI conference is that TOO FEW people are thinking long term.

How long will your home be a home for some family? It could be 100 years or more.

How easy is it to upgrade insulation or fix problems? It's NOT EASY.

If your home is going to be around for 100 years, how much ENERGY will be WASTED because some idiot worker did a half-baked job on your home?

How do you prevent errors like this?

It's NOT EASY - I'll grant you that.

You need to stop TRUSTING contractors. You need to STOP HOPING everything is going to go well. You need to stop cutting corners. You need to think LONG TERM.

Just yesterday, I shared in a podcast call with a woman that she needs to watch the carpet installers like a HAWK and be in the room when they nail down the tackless strip so the nails do NOT penetrate the electric cables that control the radiant heat mat in her floor.

Another tip is to install a thin metal plate over the wires so it's impossible for nails to penetrate the cables. But you need to make sure it's the RIGHT metal and placed in the RIGHT manner so it doesn't cut through the cables 30 years from now.

You need to be present or HIRE someone to be present to oversee workmanship in critical areas of your home that WILL BE COVERED UP.

If not, you'll probably just get screwed.

I'd say that's enough for today, how about you?

Please go write to your local paper editor now - it's so important!

If my column is NOT in your local paper, then by gosh TELL the editor to put it in the paper! They know how to get it, trust me.

Tim Carter
Founder - www.AsktheBuilder.com
Captain Magic Podcast Man - CLICK HERE for Podcast 3

Do It Right, Not Over!

Three Phone Calls and Three Happy Homeowners

Sandy's Brick Home

This is Sandy's brick home. The high-quality paint is peeling because there's no vapor barrier on the inside of the brick walls. Whitewash will solve the problem forever. (C) Copyright 2018 Tim Carter

Three Calls - Three Happy Homeowners

  • Chuck convinces Tim to get back in front of the microphone
  • Vic has a tilted concrete patio and needs to level it
  • Sandy's house paint is peeling, she wants to whitewash it
  • TJ wants to be his own contractor on his house building project - good idea or now

Allow me to preface this column by sharing a short story. My syndicated Ask the Builder column was born the first week of October 1993. Seven months later, I found myself in front of a live microphone at a local radio station trembling as I did my first call-in radio show. It was terrifying and fun at the same time. Soon it was nothing but fun answering questions I received from homeowners like you.

I continued to do the show for twelve years and then hung up my headphones. I got burned out waking up at 4:15 AM to get rid of the drag so I’d sound alert when the show started.

Seven weeks ago, a very good friend of mine, Chuck, called me and said, “Tim, you need to get back in front of the microphone. You need to start up an on-demand online radio show of your own.” BOOM - a month later my first show was done and it’s at my AsktheBuilder.com website. I just uploaded my third free on-demand radio show on my website for you.

This past week I had the pleasure to solve the problems of five homeowners just like you. They were scattered all across the USA. I think you’ll be interested in a few of the calls as I’m pretty certain you might have the same problems at your home.

Vic was one of my free phone calls. He lives in Maryland and had a gorgeous concrete patio in his backyard. The trouble is, one side of it had tilted so it was somewhat uneven. He didn’t want to spend the thousands of dollars required to jackhammer out the half of the slab that had sunken.

Fortunately for him, I was taught many many years ago by a master concrete mason how to solve the problem. Vic could invest just $100, or less, and get the same result as if he had poured a new slab. I shared over the phone how he could install a concrete overlay that would bond permanently to the old concrete.

The old master mason who shared his secret with me nearly forty years ago was kind enough to pass on his knowledge so I wanted to do the same with Vic and you. It’s important to realize you need to not only use a smaller pea gravel in the new concrete mix, but you also need to spread a layer of cement paint on the old concrete just before you pour the new concrete on top of the old. The cement paint ensures the two layers stick to one another.

I then spoke with Sandy who lives in the greater Washington DC area. It was a delightful call because she was so happy to discover she’d never have to paint her peeling brick home again. Sandy had been spending thousands of dollars buying the best paint and using professional painters only to have the paint peel after just a few years. Water vapor inside her older brick home was causing the problem. When her house was built, plastic vapor barriers for walls had yet to be invented!

Sandy has stumbled on several past columns at my website that dealt with whitewashing. I had the pleasure to work with traditional whitewash on one of my custom jobs over twenty years ago and it was a huge success. Sandy even discovered my column that contains my secret whitewash recipe.

A key point to remember is whitewash doesn’t peel if you apply it correctly. It chemically and mechanically bonds to brick, stone and even wood. In essence, you’re putting on a thin layer of rock on your home. Sandy was stunned to discover during the call that she could add color to the whitewash making it any color she wanted! I told her that I had another phone call months before with Maggie who wanted to put the whitewash on a dated brick fireplace in her living room. That was also a huge success.

I then got to speak with TJ. He lives in Oklahoma. He and his wife are going to build a new home and he wanted to know if he could save 10 or 20 percent by acting as his own general contractor. He told me he had a unique job that gave him two or three days off in a row allowing him to supervise the job.

He had contacted me via my Ask Tim page at my website and I had some background, but during the call, he gave me two pieces of information that changed what I was going to tell him.

Almost always I tell wishful homeowners that want to be their own builders that they’ll be lucky if their new house costs 15 to 20 percent MORE than had a builder done it for them. The reasons are many, but the few that stand out most are: project delays, change orders and latent defects discovered months after you move in. Almost all of these issues are caused by not having great plans and simple written specifications.

TJ, fortunately, has a home builder as a friend and he’s the person who told him to act as his own general contractor. The builder even offered to give TJ advice over the phone when he needed it and TJ could even tap into his builder’s sub-contractor network. Those two key elements allowed me to give TJ the green light to try it himself.

I’ve created a free downloadable document for you at my website. This document has more tips about how to mix cement paint and how to get pro results with concrete overlays, sources for all you need to do whitewash along with more helpful tips and links to great plans and specifications that will allow you to minimize cost overruns on your new home.

Just go to: B1240 to get the free PDF document.

Column 1240

March 17, 2018 AsktheBuilder Newsletter

New subscriber? Welcome! Not new? Thanks for sticking around!

Kathy, the kids, and I want to thank you again for all your warm and heartfelt sentiments in this very difficult time for us. If you've subscribed since this past Tuesday, you're unaware that we had to send Lady the Dog back to Heaven.

I created that page for a number of reasons. If you visited the page on Tuesday or Wednesday morning, it's much different now. There are many more photos, memories and a song.

New Radio Show For You

Moments ago, I concluded a phone call with my very good friend Dan. He's so very smart about many things. Dan's been receiving my newsletter for over ten years.

Podcast 3

CLICK this image and listen to Ask the Builder podcasts! Copyright 2018 Tim Carter

"Tim, don't use the word podcast with your subscribers. It's scary. Also, please just tell your subscribers to go to your website and click the play button on the player page. It's easy, it's fast and they don't need to do anything but sit back and laugh."

Good point Dan! How about calling it my new radio show since I do use radio waves to make it happen! In case you're a new subscriber, I'm a licensed amateur radio operator - W3ATB.

I use WiFi radio waves to do every aspect of the show!

How about you follow Dan's suggestion? CLICK HERE and have a listen. I guarantee you'll be amazed.

Oh, here's the BEST PART!!! DUH! I almost forgot to tell you.

When you CLICK HERE, not only do you get to listen to the show, but you also get to see ALL the photos of what I'm talking about!

Wait, there's more! I also have lots of other LINKS there for extra FREE information about what I'm talking about.

Here's what's in it for you when you listen to my latest new radio show:

  • I talk with Vic about how to save perhaps $5000 by doing a concrete overlay on his patio.
  • I chat with Tracey about where she can get traditional stair parts
  • I share with Sandy about how she'll never have to repaint her brick home again: CLUE: Tom Sawyer
  • I recall a story about how I avoided getting paralyzed by falling 20 feet to the ground.

New Building Technologies Conference

I was in Portland, Maine on Thursday attending a very cool construction conference. Lots of stuff I knew, but there was some great information shared about:

  • vapor barriers MUST BE installed under all concrete slabs that are in ANY building - CLICK HERE for BEST ONE
  • concrete should be in direct contact with the vapor barrier
  • new emerging trend is to put solid foam insulation on the exterior walls of home plus traditional fiberglass batts in the walls
  • repeated wet/dry cycles on exposed OSB panels GREATLY reduces their shear strength

I'll be sharing more of what I discovered in future columns so watch for those.

Roofing Ripoff Book 50% OFF SALE

Last year, I published my expose' book about WHY your asphalt shingles are falling apart.

While researching the book, I was the first person in the world to discover that copper ions react with asphalt molecules and prevent cross-linking.

Cross-linking is what causes asphalt to get brittle. When that happens, the colored granules come off, the shingles curl, and they crack.

roofing ripoff cover

This is the cover of my Roofing Ripoff book. CLICK THE IMAGE NOW TO ORDER IT.

But what if I told you that you can add some THIN copper to the top of your roof and significantly SLOW the deterioration of your shingles?

Adding the copper to a new, or newer, asphalt shingle roof can make the roof last 40, or more, years!!!!

I share in the book the best copper to get, how to install it, etc.

CLICK HERE to watch a video of me installing the copper.

You can now get a PDF electronic INSTANT DOWNLOAD copy of my book for LESS than $10.

It's an easy read. It's got GREAT COLOR PHOTOS, including the roof where I made the discovery about the copper!!!

CLICK HERE and use the following promo code to get 50% off Roofing Ripoff.

COPPER

This sale lasts only ONE WEEK. I doubt you'll ever get a better price than this. That promo code WILL EXPIRE next Sunday March 25th.

If you don't feel my book's worth it after getting it, just email me for a FULL REFUND.

If you want to read the first three chapters of Roofing Ripoff for FREE, CLICK HERE.

Stain Solver 9 Pound News

We finally have the 9-pound size of Stain Solver in stock.

Are you a new subscriber? Stain Solver is a product Kathy and I own/invented.

It's a certified organic oxygen bleach.

CLICK HERE if you LOVE the 9-pound size. We only made just under 7,000 pounds, and I guarantee you it won't last long.

You do NOT have to buy just the 9-pound size. You can buy anything your heart desires.

I just want you to know that there's a LIMITED NUMBER of the 9-pounders and when they're gone I can't tell you when they'll be back in stock.

Good luck. I hope we don't run out before you decide to pull the trigger.

That's enough for today. I'm starting to think too much about Lady the Dog.

Thanks once again for all your kind words about our loss.

Tim Carter
Founder - www.AsktheBuilder.com

Do It Right, Not Over!

AsktheBuilder Sad News – Lady The Dog

Lady the Dog

Lady the Dog

Yesterday, Kathy, the kids and I lost a very dear part of our family.

Lady the Dog died of a massive heart attack just after lunch.

I may not be the same for a while and I wanted you to know why.

Thanks in advance for any sentiments you might send our way. I'm sure you understand I'll not be able to respond back to you.

I knew it would be difficult, but not quite this hard.

Yesterday, I started to build a memorial page for her because I didn't want to forget anything about her.

Lady the Dog's Memorial Page

RIP Lady the Dog

Love,

Your Mom & Dad

Water vs Your Home – You Can Be the Winner

mortar joint

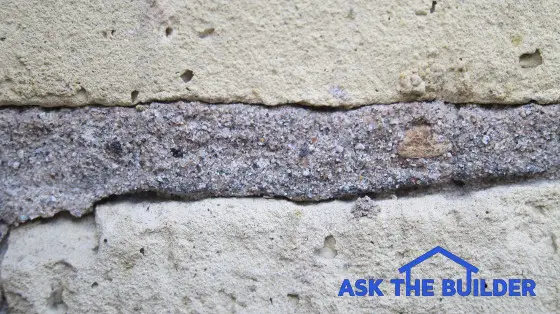
This is a closeup photo of a mortar joint between two layers of brick. Note the tiny cracks where wind-driven water can seep into the wall. (C) Copyright 2018 Tim Carter

Water vs Your Home - You Can Be the Winner

Unless you live in the Atacama Desert, you need to deal with water in and around your home. You may be one of my readers that lives in an arid climate and rain might only fall on or around you a few months of the year. However, you might be a reader that gets precipitation every month when you’re experiencing normal weather.

I’ve got a few stories to share that I’m confident will strike a chord with you. All of them originated on the Ask Tim page of my AsktheBuilder.com website. Each spring the number of messages I receive about wet basements, crawlspaces and soggy soil in the yard goes way up.

As an illustration, allow me to share with you the help request from Sara who lives in the greater Washington DC area. A few weeks ago, a horrible Nor’easter caused water to leak over her basement wall. She described it as a miniature Niagara Falls.

Sara lives in a brick-veneer home that’s only thirty years old. She has only been in the home for a year and has never had a leakage issue before the storm. As you might imagine, she was quite distraught.

I explained to Sara that the ferocious storm lashed her house with wind-driven rain. The force of the wind coupled with the weight of the water crashing against her brick walls drove water through the brick/mortar interface much like you’d hammer a nail into a soft piece of balsa wood. That water then ran down the back of the brick and found a way inside her basement.

The builder and bricklayer who built Sara’s home didn’t install the proper flashings and water-containment membranes to deal with this water. It’s a known fact in the industry that brick walls leak water. I shared with her a clear water repellent and a secret method to apply it that should stop almost all future water from leaking into her home.

A man in New Jersey landed on my Ask Tim page and was desperate. He’s building a new home and the same storm that pummeled Sara caused his basement to flood. The builder had yet to install the sump pump and all the water that cascaded down from the roof soaked into the fluffed up soil around the foundation.

The photos the homeowner sent me were distressing. The water that poured into his basement through the sump pit was filled with silt. The floor and walls were coated with the brown film. I pointed out that if the builder had installed a deep layer of straw or a layer of felt paper on top of the gravel that covered the foundation drain tile the silt would have never made it into the basement.

Backfill soil around new homes gets fluffed up and water flowing into the soil transports the small silt particles until such time as it hits a filter, barrier or the soil self-compacts. If the silt is not stopped, it can clog the gravel covering the drain tile and in the worst case, clog the drain tile.

The homeowner is going to dig a test pit along the foundation to see what happened. It’s possible the foundation was not waterproofed and the drain tile was not installed correctly.

Finally, I heard from Erica who lives on the West Coast. She’s dealing with a few issues, not the least of which is water that drips from her roof and splashes up onto her wood siding. She also told me when there’s a heavy rainstorm water flows overland down the hill behind her and hits her back wall.

Gutters at the bottom of roofs are a great way to minimize water issues on a home. A one-inch rainstorm drops about 1,870 gallons of water on the roof of an average three-bedroom home. Gutters and generous roof overhangs can prevent wood siding from rotting because of all this water.

The overland water that hits up against Erica’s home can be prevented by ensuring the top of the foundation or house slab is high enough so the ground around the entire home can be sloped away from the surrounding natural ground. All too often builders put houses too deep into the ground causing drainage nightmares.

The building code in most states mandates that at least 6 inches of foundation be exposed above the soil around a home. The ground around the home must then tilt away from the foundation and fall at least 6 inches in the first 10 horizontal feet of run.

This creates a swale or trough so water doesn’t come crashing against the house. It’s important to realize these dimensions are MINIMUM standards. It’s best to have more fall so water never runs up against the foundation.

I’ve created a free downloadable document that has the sealer Sara needs, a hand drawing of how drain tile and gravel should be installed along a foundation, a drawing of how high to place a foundation or slab to prevent flooding and lots of links to other helpful stuff you need to keep your home DRY.

Just go to: B1239 to get the free PDF document.

Column 1239