November 19, 2017 AsktheBuilder Newsletter

This is a weird newsletter with a potpourri of all sorts of goodies.

I think you're going to like it. Let's start with some something I've seen online that disturbs me.

Unethical Advertising

Yesterday I was uploading my latest videos to my AsktheBuilder Facebook page and the following ad showed up in my timeline.

Unethical Advertising

Image Copyright 2017 Facebook, Inc / Home Depot / Rheem

I get quite upset when I see things like this.

I feel it's highly unethical advertising meant to lure you into buying something under false pretense.

Have you ever stopped to do the math on how much you spend each day to heat the water in your home?

You should.

When you do, you'll be steaming at the above "$400-a-year-savings claim".

It's VERY EASY to come up with a fairly accurate number of what you spend to heat water assuming you heat with natural gas or propane.

CLICK HERE to see how to do it.

When you do the math, you'll probably discover you spend about $1 to $1.50 a day.

$1 per day times 365 = $365.00

$365 is less than $400 the last time I checked.

Sarcasm ALERT: So you buy a Rheem hybrid heater and you pay nothing to heat water, right.......

Let's all go out and buy one today!!! NOT!!!!!!

Big Buying Week Ahead

Can you believe my favorite meal of the year is in four days?

WOOT!!!!! Thanksgiving!!!!!

This holiday generally starts the Christmas shopping season for many.

If you shop at Amazon.com, please consider using the following affiliate link. It doesn't cause the price of anything you buy to go up.

Amazon simply shares a small part of their profit with me. It's a much-appreciated method of giving back for any money-saving tips I gave you over the past year.

CLICK HERE TO START SHOPPING

I'll resend this affiliate link on Thanksgiving night as a reminder.

Here are some GREAT Christmas gift ideas - fairly strange ones for the most part!

Succulent Tasty CA Dates

medjool dates
The fresh dates idea came from these EXACT ones I bought at a farmers market in Altadena, CA about twelve days ago. They're grown by the Davall Farm west of LA not too far from Joshua Tree National Park.

CLICK HERE to order them.

Be SURE you order the Medjool dates to get the ones I had. Two pounds is less than $16. WOWZA!!!!

When I bit into these plump moist dates, there was an explosion of flavor unlike any other I've ever had. I found it impossible to believe these tasty dates grew naturally!

They were the BEST MEDJOOL DATES I've ever had and Steve, my friend who lives in LA, said the same thing! He's a date connoisseur.

These are way at the top of my list for Santa. I'm trying extra hard to be good so I get some! Anyone you give these too will be very thankful!

2018 Calendar - NH Scenery

NH calendar

Frequently I share photos with you I take while hiking and exploring here in central NH as well as the White Mountains.

A local NH professional photographer, Chris Whiton, has produced a calendar that's now hanging on my wall. I see it everyday as I enter my man cave.

Each month has a fabulous NH nature photo similar to what you see above. Chris has gotten up in the middle of the night to hike in the dark on bitter cold days to capture rare and exceptional winter photos that you or I would never obtain.

At $13.00, this is a no-brainer. The nature-lover on your list will really cherish this calendar. CLICK HERE to order one.

New Video Format - NEED YOUR HELP!

Two weeks ago, I was getting ready to fly to LA to do a bunch of home repair projects for my good friend Steve and his lovely wife Karin.

I was lucky to leave LA with eleven new videos for you!

While taping one on the third work day, an idea popped into my head just as the camera began to roll.

I decided to turn the video into a fun guessing game.

Would you do me two favors?

1. Watch the following video - it's short.
2. Leave a comment at the bottom of the page telling me what you thought of the new format.

install anchor


CLICK HERE to watch the short video.

I edited and uploaded all the other videos. I don't want to overload you with new ones today, so I'm going to share them over the next few weeks.

If you LOVE the new format, then I'm going to start to do many more incorporating this format.

Remember, you need to TELL me in the comments below the video why you liked it. I'm also open to other suggestions - so tell me in the comments how to make the videos BETTER.

Click to read Tim's Update on the request in his November 19, 2017 AsktheBuilder Forgets!

That's enough for today.

Please consider once again using my Amazon.com shopping link. It will really help keep this newsletter coming to you.

CLICK HERE TO START SHOPPING

THANKS!

Tim Carter
Founder - www.AsktheBuilder.com & Dreamer of Dates!

Do It Right, Not Over!

Stop Woodpecker From Pecking House

stop woodpecker

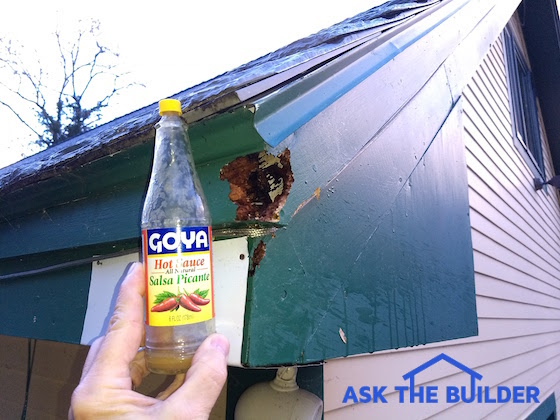
Here's where the devil woodpecker was munching on my house. See the aluminum sheet behind the bottle? You should see the size of the hole he created two weeks ago! CLICK THE PHOTO NOW to have the magic hot sauce I used delivered to your door.

Stop Woodpecker

I had a "Stop Woodpecker" sign up on my roof fascia board, but it didn't do any good.

As a matter of fact, I installed aluminum sheet metal thinking he'd go away.

White Hot Woodpecker Victory!

I had success once I started thinking about what made my eyes water.

Was there a way to make the wood distasteful so the woodpecker would leave?

Hot sauce! Of course, why didn't I think of it before?

Related Insect Links

Stop Carpenter Bees With Magic Powder

Termites and Your House

Stop Woodpecker and Grab Some Water!

I think birds hate hot sauce. The most compelling evidence lies in my experiments.

A few days ago I tried standard Tabasco sauce. It contains aged red peppers and vinegar.

It worked for a day, but then the invader bird came back enlarging the hole looking for tasty insects.

Goya Hot Sauce Rules

This afternoon he was back. Peck peck peck. I was determined to win.

I ran downstairs and grabbed my small squirt gun and rummaged through the spice cabinet.

Stop Woodpecker

Want to stop a woodpecker? Use this weapon to deploy a film of white-hot hot sauce on the wood! CLICK THE GUNS NOW to have these delivered to your home!

Boom! There it was. Goya Hot Sauce.

I twisted open the cap and the fumes about killed me.

Hot Sauce to stop Woodpeckers

This is the ticket. Want to stop woodpeckers at your home? Spray this on your wood. CLICK THE SAUCE BOTTLES NOW TO HAVE THIS MAGIC NECTAR delivered to your home!

I made a 50/50 mixture (half hot sauce and half water) and went outdoors.

The miscreant bird saw me coming and flew off. I then soaked all the wood with the hot sauce solution.

It's been hours and he's not returned. In the past it only took him a few minutes to come back to continue his mission of destruction on my home.

Periodic Spraying

I intend to spray the wood every few days to keep the woodpecker away. It's my hope that he'll discover some other better food source or fly farther away.

Let me know in the comments below how Goya worked for you!


Fraudulent Consumers Cheating Builders

Fraudulent Consumers Are In Every City and Town

Fraudulent consumers and homeowners take advantage of businesses each and every day. They target builders and remodelers because the average building or remodeling job can run in the thousands and tens of thousands of dollars.

The swindling homeowners can keep tons of money in their accounts and pockets because they have no morals.

I was a victim of an evil woman several decades ago who cost me approximately $60,000 in the early 1990s. I still simmer each time I think of how crafty and cunning she was.

Cheating Builders Too

There are plenty of dishonest builders and remodelers out there too. I've written extensively about them in previous columns.

It's important to realize this article is dedicated to all the double-dealing homeowners and fraudulent consumers who get great delight from not paying deserving contractors for satisfactory work performed on time and within budget.

Possible Reasons for Dishonorable Conduct

There are any number of reasons why fraudulent consumers would want to cheat a builder or remodeler. A point often overlooked is simple greed. I'm not a psychologist, but my guess is a greedy person desires to keep as much money as they can.

Another key point is selfishness. Selfishness is the root of all evil.

Related Links

Advance Payments to Contractors

House Plans and Contracts

A homeowner that withholds a final payment to a builder or remodeler for unjust reasons is only thinking of themselves. The homeowner doesn't care about the contractor's sub-contractors who have bills to pay, the contractor's own obligations and most certainly the contractor's peace of mind.

fraudulent consumers

Construction started on this house three years ago. It's possible the builder was dealing with a fraudulent consumer and pulled the plug early. A month ago the walls and roof finally went up. (C) Copyright 2017 Tim Carter

Free & Fast Bids

CLICK HERE to get FREE & FAST BIDS from local contractors who have families to feed.

Source of Misunderstandings

Some homeowners are indeed evil and premeditate their plan to not pay the contractor.  I've served as an expert witness for over fifteen years in homeowner/contractor disputes and have come to realize that most non-payment issues on the part of a homeowner stem from any number of misunderstandings.

The misunderstandings can be eliminated to a large degree with excellent plans and written specifications. It would be great if homeowners produced these, but most have no clue what to even specify.
If you're a builder and want to get paid, then the onus is on you to go to great lengths in the contract documents to explain exactly what you intend to do and what materials you intend to use.

Face-to-Face Meeting

Prior to signing the contract, it's a great idea for you to meet face-to-face with the homeowner and go over in painstaking detail all the fine points of what's going to happen.

Modern technology allows you to create electronic documents overflowing with color photos of construction details that might become points of disagreement months from now.

Eliminate Allowances and Change Orders

Allowances are hidden time bombs. Eliminate them in the bidding phase by requiring the homeowner to make the needed selections so they stay within budget. If a homeowner goes over budget on an allowance item, how are you to know if they have the money to pay for it four months into the job?

Change orders almost always add cost to the job. Eliminate them using technology to transform two-dimensional plans into 3D renditions so homeowners can see what is really going to happen.

Given these points it's still up to you the builder and remodeler to look for signs and past history that might telegraph you're about to sign up a miscreant homeowner.

There's a good chance the homeowner asked you for references before they chose you. It's your turn to be selective. Run a credit report on them. Do fast internet searches to see if some other business complained about them.

Demand bank statements. Be sure the homeowner has plenty of cash to pay you.

If the homeowner is getting a loan, get a copy of a pre-approved loan and contact the lending institution to ensure the homeowner has closed on that loan. Don't assume the pre-approval letter means the homeowner has the money!

Be bold. Be brave. Don't worry about losing a job by asking probing questions. There are plenty of other honest homeowners looking to hire you! You can only blame yourself if you get tangled up in the vile webs of a fraudulent consumers!

CLICK HERE to get FREE & FAST BIDS from local contractors who have families to feed.

How to Install Anchor in Concrete

Install Anchor in Concrete With Epoxy and Magic

When you install anchor (s) in concrete or concrete block, you want it to stay put.

The best method in my opinion is to create a wedge-shaped hole in the concrete using a hammer drill.

The hole will be wider deep in the concrete than the smaller entry hole you see on the face of the wall or ceiling.

The above video was one of Tim's favorite projects he did with Steve Loyola.  Steve helped with the Server Transfer for AsktheBuilder.com.

Related Links

Concrete Epoxy Repair Products

Anchor Concrete With Epoxy Video

Free & Fast Bids

CLICK HERE to get FREE & FAST BIDS from local carpenters who can install anchors using my method.

Anchor Dovetail Trick

I borrowed this secret tip from dentists and woodworkers. The fillings in your teeth don't come out because the hole the dentist drills is wider at the bottom.

Dovetail joints in woodwork don't fail for the same reason.

Permanent Epoxy for Anchoring Into Concrete

CLICK HERE to get the best epoxy to install anchor in concrete.

pc-concrete-tube

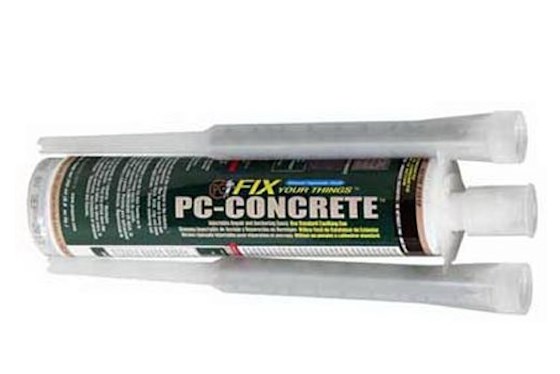
This is the magic epoxy that fits into a regular caulk gun. I've used it with great success. CLICK THE PHOTO NOW TO HAVE IT DELIVERED TO YOUR HOME.

It's important to realize the hammer drill needs to be angled about 20 degrees from perpendicular in both directions. This creates the required wedge-shaped hole.

Use Blower to Blast Dust

Use a turkey baster to remove all drilling dust. A wet-dry vacuum works well too.

Reverse the vacuum hose so it's blowing instead of sucking.  Slide just a small part of the blower hose over the edge of the hole. LOOK AWAY from the hole as clouds of abrasive concrete dust will begin to blow out of the hole.

Twist Anchor While Installing

After squirting in the wonderful PC Concrete epoxy you see above, twist the anchor back and forth as you slowly insert it into the hole.

The twisting motion coats the entire anchor and ensures the entire hole has no air in it. You want the hole to be completely filled with the anchor and epoxy.

CLICK HERE to get FREE & FAST BIDS from local carpenters who can install anchors using my method.

Garage Roof Repair Price

Garage Roof Repair - Can Be Simple

I took a much-needed break and traveled to Down East Maine a few weeks ago never dreaming I'd be thinking about a garage roof repair price! 

My wife, oldest daughter, my son-in-law and I saw brilliant fall color in the trees at Mount Desert Island. A neglected detached garage stared at me as I parked on the gravel drive in front of it.

garage roof repair

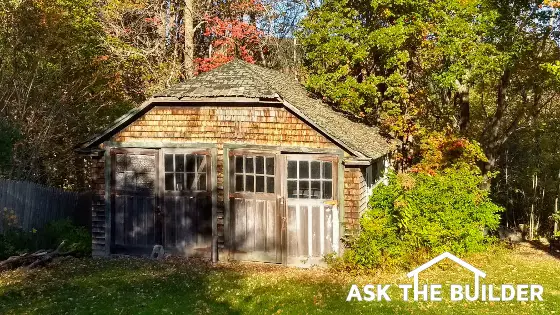
The garage roof looks really bad, but a good carpenter can restore it in a few days. (C) Copyright 2017 Tim Carter

It’s important to realize the roof of this garage was in horrible shape. I estimate the shingles were at least sixty or more years old. The colored ceramic granules on most of the shingles were gone.

Related Links:

Best Roofing Nails

Copper Roof Strips EXTEND Life of Asphalt Shingles

Free & Fast Garage Roof Bids

CLICK HERE to get FREE & FAST BIDS from local roofers who can put on a new garage roof.

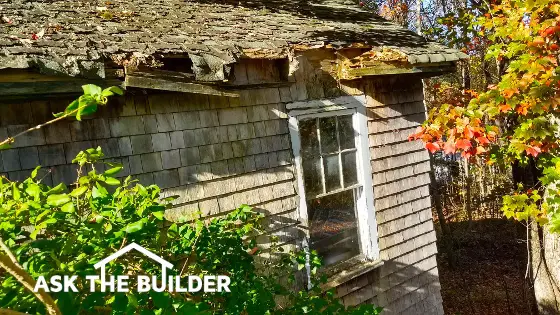
In addition I could see wood rot on the right side and front edge of the roof. The wood shakes covering the exterior walls needed some tender loving care as well.

garage roof repair

This overhang is in the worst shape. It can be rebuilt in a few hours. (C) Copyright 2017 Tim Carter

Valuable Garage Space

The second home I purchased back in 1976 had a nearly identical detached garage. Garages are valuable. To put it differently, there are quite a few uses for detached garages other than getting cars and trucks out of the weather.

In spite of the wretched exterior condition, the bones of the garage were still in great shape when I peered in through the windows. The roof was not sagging. The walls were not bowed out. The hinged garage doors didn’t fit quite right, but that’s a small job all things considered.

I walked outside walking around the garage within 30 minutes of arriving. All of a sudden I started to, imagine what the garage roof repair price might be. I approached this problem like I had done with hundreds of my past remodeling and building jobs for paying customers.

Garage Roof Repair Checklist

Here’s the simple list of what needs to be done to stop the decay of this gorgeous garage:

  • Remove existing shingles exposing wood roof sheathing
  • Remove rotted roof sheathing
  • Install new roof rafter tails or complete rafters where necessary
  • Replace rotted roof sheathing where necessary
  • Bolster interior collar ties if needed
  • Install new roof eave and fascia boards
  • Install metal drip edge at all fascia boards
  • New asphalt shingles with thin 12-inch copper ridge cap to extend the life of the asphalt

I quickly wrote on a piece of paper a fast material list and came up with about $1,200.00 worth of materials. The new shingles were the largest single cost item on the list.

CLICK HERE to get FREE & FAST BIDS from local roofers who can put on a new garage roof.

A point often overlooked is the time it takes to clear around the garage so you can work efficiently and safely. Out-of-control bushes on the right side of this garage needed to be trimmed back in my opinion.

Labor Costs Are Variable

Labor costs for garage roof repair are a moving target. It depends on the type of company or tradesperson you hire. I prefer to just go step by step and try to estimate the time for each of the tasks that need to be done.

I estimated it would take a seasoned carpenter and his trained helper about five total days to complete the entire job. This garage roof repair is much more labor intensive than it it material intensive. If the total cost per hour for these two workers is $120 per hour, then the labor cost is going to kiss up against $5,000.00.

Certain Jobs More Labor Intensive

Some jobs are the exact opposite. Take for example replacing a front door on a home. An expert carpenter can install a door almost always in one day. The door being installed may cost five times or more what the labor charge might be.

Get Lowest Price Using Specifications

Produce a simple set of specifications to get the best prices. Give these specifications to the carpenters and roofers who will be looking at your garage roof.

You must tell the bidders what you want. Here’s a simple list of things you need to list on your specifications:

  • brand, type and color of shingles
  • number of roof rafters or rafter tails that must be replaced if known
  • type of fascia or eave board that will be used
  • brand and type of any paint used to paint any and all repaired / replaced surfaces

When you go to this effort, it’s going to be far easier to compare the quotes as the material costs should be very similar if the bidding contractors sharpened their pencils!

CLICK HERE to get FREE & FAST BIDS from local roofers who can put on a new garage roof.

Column 1221

Colorize Mexican Tile


Colorize and Stain Mexican Tile - Use a Masonry Stain

It's so very easy to colorize Mexican tile. You can also stain patio pavers or Mexican tile using a liquid translucent stain.

Stain Patio Pavers Advice From Heaven

The advice you get from some experts is not always the best. Many people seem to think that painters tape should be used. Painters tape can stop some paint and stain from going astray.

Sanded Grout Is Too Coarse

The best way to stain patio pavers is to use a high-quality tapered paintbrush. The grout lines between pavers will thank you.

Dab out some of the stain away from the grout line. The next step is to flex the brush. You only want a few of the edge bristles near the grout.

Adjusting how much flex and how hard you press down on the brush controls the amount of stain that flows out of the brush.

Related Links

DIY Concrete Stain  Options

Concrete Stain Tips

Excellent Stain Patio Pavers Brush

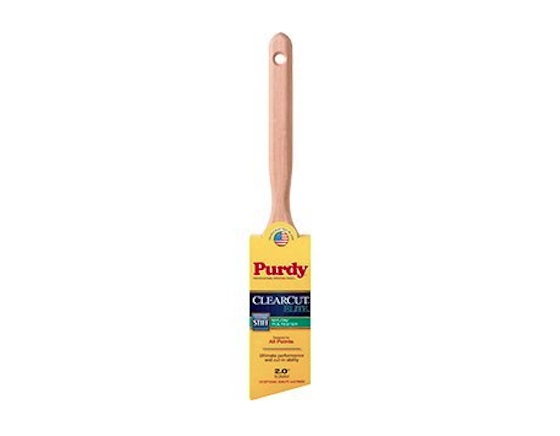
Here's the great brush I used in the above video:

Purdy Paint Brush

This is the exact high-quality paintbrush I used in the video. Be sure to clean it out frequently and it will last for years. CLICK THE BRUSH NOW to have one delivered to your home.

Pepe Corona Daltile Los Angeles CA

Yesterday my good friend Steve Loyola and I got some expert advice from Pepe Corona.

Pepe works the counter at the Daltile showroom and supply house in north Los Angeles just off the 2 Glendale freeway.

I was out in LA taping home improvement videos at Steve's house. One video showed how to repair a broken and cracked Mexican patio tile.

We needed to perfectly match the existing grout between the tiles.

The common premixed colored grout you get at the big box stores was not a match. We needed a custom color.

Expert Advice

Pepe is on the left and I'm wearing my Climb to the Clouds long-sleeved t-shirt. Thanks Pepe for the great advice! Copyright 2017 Tim Carter

Laticrete Permacolor® to the Rescue

The day before we discovered that Daltile was only eight miles from Steve's house. We called and discovered they stocked the Laticrete Permacolor® Sanded Grout system.

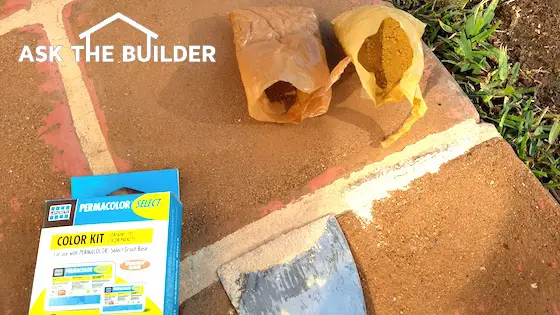
The Laticrete Permacolor® grout is something I dreamed about forty years ago. It allows you to create any colored grout you want.

laticrete permacolor

In just a matter of minutes, I used the two different dry powered pigments to create a perfect match. You can see the first attempt to the right of the wide putty knife. It's too gray. But the blend sitting on the edge of the putty knife is a perfect match. You always match the colors with the grout dry, not wet. Copyright 2017 Tim Carter

You mix small amounts of colored dry pigment powder with pure white sanded grout base to achieve the exact color you need.

Related Links

Grouting Floor Tile Videos

Patio Grout Repair Tips

The Daltile Oasis of Knowledge

Within minutes of walking up to the counter, I struck up a conversation with Pepe. I asked his associate moments before if they sold a grout release agent.

She asked Pepe to jump into the conversation.

It only took seconds for me to recognize Pepe was no ordinary sales counter clerk.

expert advice

This is just part of the Daltile showroom where Pepe works. Copyright 2017 Tim Carter

Steve and I had wandered into a lush oasis of knowledge and Pepe was there ready and waiting to dispense expert advice. He harvested this sweet nectar by working for 30-years in the homes of paying customers. In other words, Pepe is a true professional and you can trust his expert advice.

Forty Years of Expert Advice

I've dealt with counter sales people for over four decades. Some are as dim as a night-light bulb while others are as brilliant as a new LED flashlight.

Pepe is the latter. He's one of the rare craftsmen who has walked the walk for decades working at the homes of paying customers. He knows what works and knows what happens if you take a shortcut or use low-quality materials.

Setting tile and grouting is hard work. Pepe probably decided it's best for his body and mind to let younger men and women take his place in the field while he transitions to a different way to make a living surrounded by the materials and people he's worked with for years.

Many a craftsman does this and you'll do yourself a huge favor by taking the time to find them at off-the-beaten-path places like this Daltile showroom hidden in out-of-the-way places.

Thank Pepe for making my day and Daltile I hope you treat Pepe well so he doesn't end up working at American Olean, Marazzi, Interceramic, or Florida Tile!


How to Remove Paint from Patio Pavers Video

How to Remove Paint from Patio Pavers

Remove patio paint fast and easy with a pressure washer. Even soft Mexican tile can be restored safely.

Remove Patio Paint With No Damage

It's important to realize the key to prevent damage to the patio surface is using the correct tip on the wand and holding the wand at a very low angle.

Pressure washer tips normally come in these sizes:

  • 0 degrees
  • 15 degrees
  • 25 degrees
  • 40 degrees
  • wide angle rinse

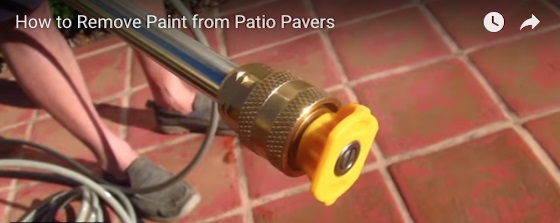
The 0-degree tip delivers a laser-type stream of water about the diameter of a piece of cooked spaghetti. It's very destructive and should never be used on wood, masonry or any other softer surface. It's best used on steel.

You should start with a 25-degree tip and see if you get acceptable results. Switch to the 15-degree tip if the paint is holding on tight to the patio.

remove patio paint

This is a 15-degree pressure washer wand tip. You can twist the tip to adjust the direction of the fan spray. Copyright 2017 Tim Carter

Related Links

How to Use a Pressure Washer

Paint Remover Stories

Free & Fast Bids

CLICK HERE to get FREE & FAST BIDS from local deck and patio-cleaning contractors.

Low Angle Digs Under Paint Film

Holding the pressure washer wand at a low angle is the best way to prevent damage. This angle allows the high-pressure water stream to get a purchase under the edge of the paint and peel it from the patio.

A point often overlooked is a high angle will erode the paint, but it can likely immediately damage the surface under the paint.

As long as the water stream is just glancing off the patio at a low angle, it usually will only attack the paint.

Pressure Washer Basic Safety

Pressure washers are very dangerous machines. The stream of water coming from the tip can cut into skin and it can cause permanent eye damage (blindness) if you get the stream in your eyes. NEVER allow dogs or other pets near the water stream while you're working.

Wear ear protection as the motor noise will cause occupational hearing loss.

CLICK HERE to get FREE & FAST BIDS from local deck and patio-cleaning contractors.

Metal Wine Storage Shelves

Metal Wine Storage Shelves

DEAR TIM: I just put a deposit on unique metal wine storage shelves at an architectural salvage business. This metal monstrosity used to hold auto parts. It just so happens it would be perfect to hold my wine bottles on top of an open bar area in my new home.

Without wine in it, it weighs well over 200 pounds. How do I make sure this will not come crashing down in the middle of the night causing untold damage and the loss of some fairly expensive wine?

Do I have options with respect to hanging it on the wall? How would you do this if you were building my home? How would you suggest painting it? Dot B., Carmel, IN

Hunt Architectural Salvage Stores

DEAR DOT: You’re so lucky to have an architectural salvage business near you. I had a similar business near me when I lived in Cincinnati, Ohio. My wife and I purchased a gorgeous solid walnut fireplace surround and mantle we used in our new home. I get great pleasure from seeing old items recycled so they get a second or third life rather than end up in a landfill.

Without seeing your new metal wine storage shelves, I’m guessing you have several options to secure it to the wall. My favorite method is to use a french cleat.

Free & Fast Bids

CLICK HERE to get FREE & FAST BIDS from local finish carpenters who can hang your wine racks.

Related Links

Wine Racks of All Types

Remove Red Wine Stains with Stain Solver

French Cleats are Strong

A french cleat will have to be fabricated by a local welder. Two pieces of metal make up a french cleat. One piece is a strip that’s nearly as wide as your new shelves. It get welded to the top rear edge of the shelves.

wine storage

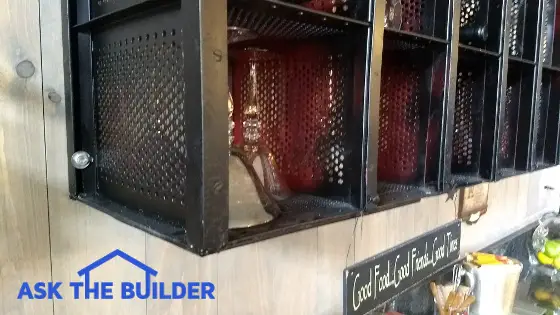
This wonderful metal storage rack used to hold auto parts. This ingenious method of reusing an auto parts shelving unit was done by Ms. Nancy McKechnie. Not only does she have a flair for decorating, but she also happens to be one of the best real estate agents on Mt. Desert Island in Down East Maine. Click here if you want me to put you in touch with Nancy. (C) Copyright 2017 Tim Carter

It’s important to realize the second piece of metal is bolted to the wall and it has a slight outward bend towards the top of the strip. It only needs to slant out about 1/4 inch. The metal strip on the back of the shelves slides down behind the slanted piece of metal on the wall. The two interlock and it’s impossible for the shelves to slide down from the wall or tip out so long as the metal strip on the wall is securely bolted to the wall studs.

French Cleat Video

In my opinion the best way to bolt this metal strip to the wall is to use through bolts. The easy way out is to use lag bolts that are just giant screws.

The issue with lag bolts is they can lose considerable holding power if the pilot hole is too large and/or if the bolt is overtightened by an aggressive installer.

wine storage

Closeup of the metal wine storage racks. This ingenious method of reusing an auto parts shelving unit was done by Ms. Nancy McKechnie. Not only does she have a flair for decorating, but she also happens to be one of the best real estate agents on Mt. Desert Island in Down East Maine. Click here if you want me to put you in touch with Nancy. (C) Copyright 2017 Tim Carter

Through Bolts Work Well

Through bolts are more work but they hold so much better. These bolts have nuts and washers on the end of the bolt that passes into the finished wall behind the metal wine storage shelves. In the event you were to use this method, the bolts would typically pass through solid blocking that’s been securely installed between the wall studs.

The only issue is you have to have access to the back of the wall to tighten the nuts onto the bolts. This requires lots of planning as the drywall on the other side of the room can’t be finished until the wine rack is installed.

Use Metal Rack Frame

If you can’t to a french cleat, then you might be able to bolt the shelves to the wall through strong metal that’s part of the outer frame of the shelving unit. It’s hard for me to give you expert advice here because I can’t see your shelves.

You’ll have to decide what type of bolt you’re going to use with this method. Lag bolts can work, they just have to be installed with great care and you need to make sure the bolt is passing directly through the center of a wall stud.

CLICK HERE to get FREE & FAST BIDS from local finish carpenters who can hang your wine racks.

Metal Wine Storage on Mt. Desert Island

Recently, I visited a new home where the wife did exactly what you plan to do. The salvaged metal shelving she purchased was a brilliant fire-engine red. She wanted it black.

Her husband got out a few cans of gloss black spray paint and did the front and sides and all he could easily cover. The inside vertical divider walls of the shelves still had some places where you could see some red.

The wife loved this two-tone look and I have to agree it was tastefully done. I mention this only because you may want to experiment with different colors.

Clean Off Oil & Grease Before Painting

Be sure you clean your metal shelving well before painting. I suggest you use mineral spirits to remove any and all oil that could be coating the metal. Be sure to do this outdoors as you never want to work with combustible liquids indoors for any reason.

Don’t throw away any oil-soaked rags or paper towels. I suggest you burn them safely as they can spontaneously combust if you just throw them in the trash.

Pay close attention to all the instructions on the paint can label to get the best results. Multiple thin coats of paint are usually better than a thick coat where you’re trying to save time.

CLICK HERE to get FREE & FAST BIDS from local finish carpenters who can hang your wine racks.

Column 1222

Behr Deck Over Problems

behr deck over

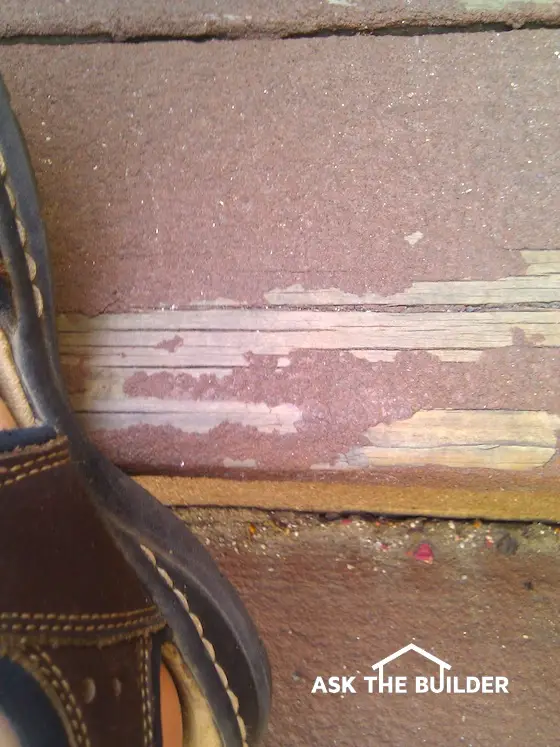
That's my left foot you see in the lower-left corner. See how this thick coating over the wood deck is peeling? What a mess! Once this happens, what do you do? Rip off all the wood? Do you think you can sand this mess? No way. (C) Copyright 2017 Tim Carter

Behr Deck Over Problems

Behr Deck Over is a thick coating you apply to worn-out decks. Dan from CT emailed me back in October 2016 about this very issue.

The coating was designed by the Behr chemists to both fill and bridge over large cracks you see in neglected wood decks.

It's important to realize that all coatings eventually peel. When this thick coating peels off your deck, it's going to be a nightmare.

Related Links:

Pressure Washers and Wood Deck Video

Deck Sealer Test Results

Free & Fast Bids

CLICK HERE to get FREE & FAST BIDS from local deck cleaning and sealing contractors.

Behr Deck Over and Applesauce

I attended the first-ever Behr Editors Conference a few years ago and had the opportunity to apply some of this product to worn-out treated lumber.

Not only was the product as thick as applesauce, but it also took some effort to apply it.

Wood Decks and Water

Wood is hygroscopic. This means that wood expands and shrinks depending on how wet it is. 

Metal is not hygroscopic nor is fiberglass or fiber cement siding. That's why paint has no problem sticking to your car, your boat or the Hardiplank cement siding on your home.

Treated deck lumber gets wet and dries out each time it rains. This back and forth movement of the wood will cause the Behr Deck Over to peel at some point just as you see in the photo above.

CLICK HERE to get FREE & FAST BIDS from local deck cleaning and sealing contractors.

Perfect Preparation Required

Oxygen Bleach

Stain Solver is MADE in the USA with USA ingredients that are food-grade quality. CLICK THE IMAGE to order some NOW.

You must do an excellent job of preparing the treated wood before you apply the Behr Deck Over if you want it to last a long time.

The best cleaner to use is certified organic Stain Solver oxygen bleach. Stain Solver is a simple powder you mix with water and apply to the dry treated lumber.

Best Way to Clean a Deck Video

Watch this short video to see the best way to clean a neglected deck.

Follow Behr Deck Over Instructions

Another key point is to make sure you read and follow all the instructions of the label of the cans. 

In the long run, it's the best way to ensure you get the longest life out of the product should you decide to use it.

CLICK HERE to get FREE & FAST BIDS from local deck cleaning and sealing contractors.