Water Drainage Tips

Water drainage needed to eliminate ponding water

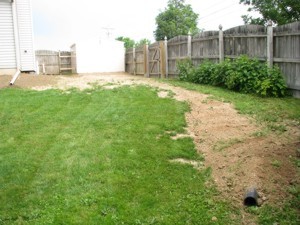
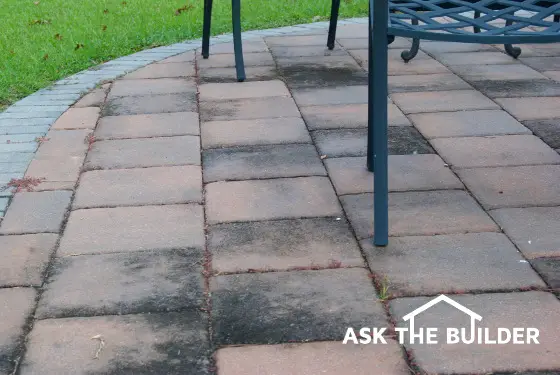
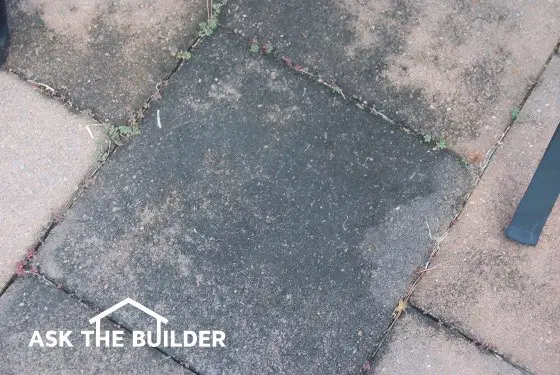
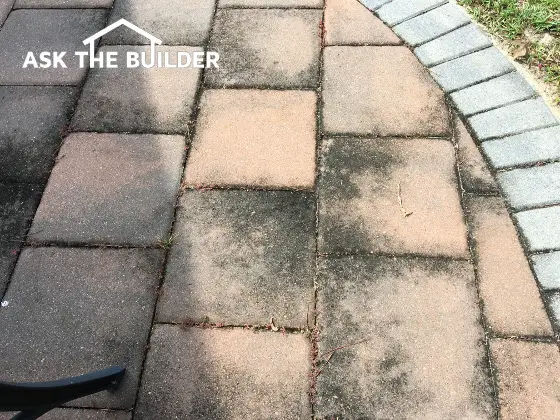
This standing water next my own shed is unacceptable. I finished the shed in late fall and was unable to start to work on the wall and drainage issues until the spring. It can cause many different problems. There are several ways to solve the problem. Look at the after photo below. Copyright 2017 Tim Carter

"Adding soil to the low spots is usually not a good method to fix poor drainage problems. There's a much better way to dry the soil."

Water Drainage Checklist

DEAR TIM: Spring is here and so are the incessant heavy rains. I have several places near my house where water ponds and I need some water drainage tips from you.

It can't be a good thing for my house, as I constantly am battling water in my basement and part of the house that has a crawlspace under it. My lot isn't really that flat, so I'm at a loss as to what's going on.

Do I have to call a professional to solve this issue, or can I just add soil to fill in the low spots? What are my options to get the standing water away from my home? Marion R., Evansville, IN

Water Drainage Solution | Let Gravity Suck Water From the Soil

DEAR MARION: While I don't have accurate statistics to support my feelings, I suspect you're in a vast majority of homeowners who have varying degrees of poor drainage issues on their land or near their homes. You're correct in assuming that ponding water is not a good thing for houses.

How Can a Geology Degree Solve Water Drainage Problems?

A geology degree can solve water drainage issues because water and soil are a core area of study.

My college degree was in geology. I gravitated to two disciplines within geology: geomorphology and hydrogeology. Geomorph, as we students affectionately called it, is the study of the Earth's surface features. Hydrogeology examines ground and subsurface water. I studied these topics for three years while in college.

Both of these areas of geology are especially relevant when it comes to understanding and solving water drainage issues.

If you think about the Earth on a very large scale and take into consideration gravity, you quickly discover that Mother Nature is doing her best to constantly carry all soil, rock, your house, your car, your possessions and you down and into the oceans.

Mother Nature is also a very patient woman.  She also has a split personality.

Her evil twin is constantly pushing land out of the ocean. This tectonic activity builds mountains where two crustal plates crash into one another. This is why the Earth has dry land that we build upon.

Related Links

Avoid Ponding Water from Roofs

Perfect Grading Around Foundations

Select the Best Lot With Great Drainage

Drain Water From Your Wetland Lot

Free & Fast Bids

CLICK HERE to get FREE & FAST BIDS from local landscapers who can solve your water issues using the advice in this column.

How Much Land Slopes Around My House?

Lots of land can be sloping towards your home. I have a giant mountain just above my house that funnels water towards my home.

What does all this have to do with the water at and around your home? Simple. Topographic maps can be found online. Older topographic maps are sometimes archived and might show what your land looked like before it was developed.

Topo Map NH

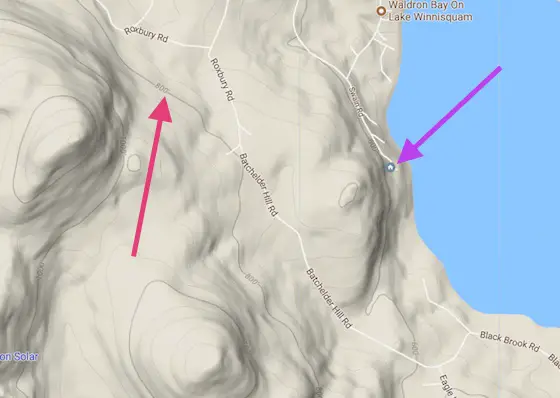
This is a topographic map from Google Maps. You just select the Terrain option from the menu to see it. Note the red arrow pointing to the gray line that has the number 800 on it. Any point on that line is 800 feet above sea level as the number. The magenta arrow points to where my house is. The land slopes quite a bit towards Lake Winnisquam. 2017 Copyright Google, Inc. ALL RIGHTS RESERVED

Your builder, or possibly the subdivision developer, undoubtedly moved dirt on your lot to prepare it for building your home. This process disturbed the natural slope of your lot as virtually no undisturbed land is perfectly flat.

What Causes Natural Water Drainage and Slope?

Natural erosion causes all land to have some natural fall or slope. You don't see water drainage issues on most land you walk across because it naturally slopes so water heads to a creek, stream or river.

When you do encounter marshy land, it's because of some temporary geomorphological process.

Lakes are a great example. You can find marshes next to lakes. Lakes are temporary geological features. Mother Nature is constantly trying to fill lakes in.

Is Adding Soil to Low Spots a Good Idea?

Adding soil to the low spots is usually not a good method to fix poor drainage problems. There's a much better way to dry the soil. Ponding water on your lot tells me that you don't have low-slope culverts surrounding your house like a moat surrounds a castle.

These depressions, or culverts, should have been created by the builder so surface water always flows around your house to the towards the lowest spot of land on your lot.

To provide great drainage around your home, you should always have the ground slope away from your home. The building code used to require that the ground should have 6 inches of fall in the first 10 feet of horizontal run away from your home. That can be confusing to some.

grade level

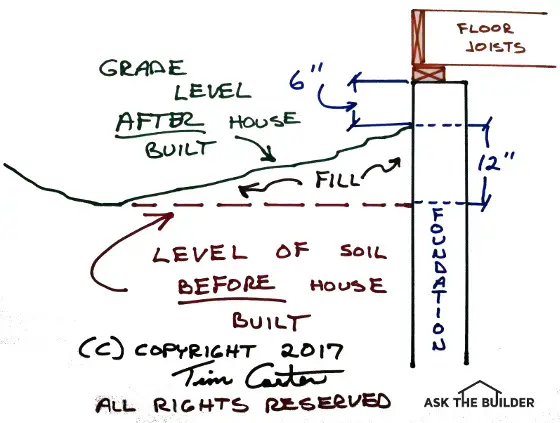
I made this drawing. You can see the foundation wall with a typical sill plate and floor joist. The red line is the lot before the excavator shows up. The top of the foundation should end up 18 inches ABOVE the red line. Use the dirt from the hole to create the slope away from the foundation. (C) Copyright 2017 Tim Carter ALL RIGHTS RESERVED

All it means is that within 10 feet of your foundation, the ground should slope at least 6 inches. This change in elevation could happen within a foot, meaning it would be a very visible slope very close to your foundation walls.

Can You Create a Sloped Swale Around Your Entire Home?

Yes, you can create a water drainage channel or swale around your home.

The builder should have then created an artificial channel around and away from your home that also has a slope to it. The water flowing away from your foundation would enter this channel and then flow, by gravity, completely around your home.

There should never be any ponding in this shallow channel. To achieve great water drainage, a slope of at least 1/8 inch per foot is required. More slope is better if you can tolerate it on your lot.

CLICK HERE to get FREE & FAST BIDS from local landscapers who can solve your water issues using the advice in this column.

Can You Capture Subsurface Water?

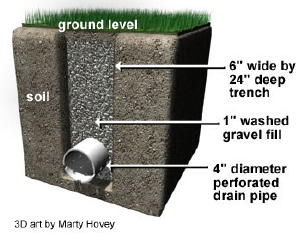
Subsurface water can be captured using a perforated pipe in a trench.

french drain pipe

Cross-section of a Linear French Drain including the all-important perforated french drain pipe. Copyright 2017 Tim Carter ALL RIGHTS RESERVED - Do NOT COPY this graphic.

Surface water is but one challenge around your home. You also need to deal with subsurface water that flows through the soil towards your foundation and crawlspace walls.

You can capture and divert this subsurface water by digging a narrow trench in the center of the artificial channel around your home. The trench contains a perforated pipe that collects and diverts the water away from your home.

linear french drain

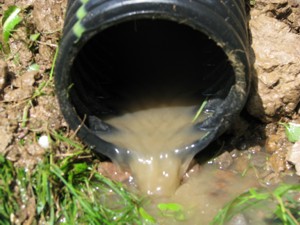
In the center of this gravel is a linear french drain. Some call them trench drains as I dug a trench and put in a perforated pipe. This area never has standing water in it now. Copyright 2017 Tim Carter ALL RIGHTS RESERVED

How Deep and Wide Should the Linear French Drain Be?

The linear french drain should be about 2 feet deep and 6 inches wide. The bottom of the trench should be parallel with the top of the artificial channel until it gets around your home.

The trench extends past your home towards the lowest point of your lot. The pipe slope can be reduced when the pipe passes the house. The pipe eventually pops out of the ground.

If you do this job, you're creating a linear french drain. They are extremely effective at solving water drainage issues because they intercept the water flowing through the soil. The water is channeled away from the house after it enters the perforated pipe.

Are There Step-by-Step Instructions to Install a Linear French Drain?

Do you want a step-by-step procedure on installing a Linear French Drain? Tim's Linear French Drain Streaming Video Series shows you how to keep your basement and crawl spaces dry or on the image below to order Tim's Streaming Video.

Linear French Drain Streaming Video

Do your own DIY install of a Linear French Drain with Tim Carter's time-tested methods and materials! CLICK IMAGE TO ORDER NOW!


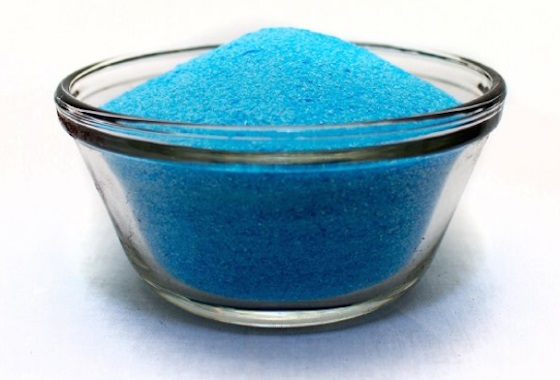
What Kind of Gravel Should be in the Trench?

You install a 1-inch layer of rounded or slightly angular gravel that's the size of large acorns into the bottom of the trench.

Trench Gravel

This is perfect gravel to put in the trench for great water drainage. Note there's NO SAND. The water can move fast through the large voids around each stone. Copyright 2018 Tim Carter

Gravel is laid on the perforated drain pipe. The entire trench is then filled with the rounded gravel. This system readily collects subsurface water before it attacks your home. Water will flow from the end of the drainpipe where it eventually breaks through the surface of the ground.

In conclusion, you can easily improve the water drainage around your home using a combination of sloped soil and simple linear french drains. You should install the linear french drains after the final grading is completed.  Be sure to do it before the grass seed is sown.

CLICK HERE to get FREE & FAST BIDS from local landscapers who can solve your water issues using the advice in this column.

Column 984

Clogged Toilet

Clogged Toilet - Plunger and Bucket

This plunger and a 3.5-gallon bucket are usually all you need to fix a clogged toilet. Copyright 2017 Tim Carter

"I've been a master plumber since age 29 and know how to clear most clogged toilets using nothing more than a few gallons of water."

Clogged Toilet Tips

  • Toilet paper and poor toilet design cause most clogs
  • Pour 3 gallons of water fast into a toilet bowl to remove a clog
  • Watch the toilet flush video below
  • Muriatic acid can fix slow-flushing toilets
  • CLICK HERE to Get Tim's FREE & FUNNY Newsletter!

DEAR TIM: Every now and then I have to deal with a clogged toilet. But lately the blocked toilet seems to be happening with greater frequency.

I don't know if the toilet or a clogged drain line is the problem. What can I do to troubleshoot the cause of the problem?

Is it possible for me to damage the bowl while clearing a clogged toilet? What do you do when faced with this unpleasant task? Harmony T., Sandusky, OH

DEAR HARMONY: You'd be surprised how many folks are stymied by this common problem.

What's the Best Clogged Toilet Fix?

The best clogged toilet fix might be to just using more water to force the clog past the toilet colon.

Most toilet clogs happen within the curved passageway in the china. Water is heavy and you'd be surprised by how it can fix a clogged toilet.


Clearing a clogged toilet happens all over the world each day. While traveling, you could even come across a blocked toilet in London! I've dealt with my fair share of toilets that don't want to drain, some even in hotel rooms I've stayed in.

I've been a master plumber since age 29 and know how to clear most clogged toilets using nothing more than a few gallons of water.

Also, poor toilet internal design and using too much toilet paper are almost always the cause of most clogged toilets.

This trick was covered in the DIY Plumbing Advice column also.

Free & Fast Bids

CLICK HERE to get FREE & FAST BIDS from local plumbers if you can't dislodge the clog on your own.

Related Links:

Simple Toilet Repair Hacks

Sewer Gas Smell and Toilets

How To Clean Tough Toilet Stains

Why Does a Toilet Clog?

A toilet clogs because toilet paper, solid waste and other debris gets stuck in a narrow passageway behind and under the toilet bowl. This passageway is called the colon.

You probably have never seen what the underside of a toilet looks like or seen the piping system that connects to a common residential toilet. If you did, you'd probably shake your head wondering how they don't get clogged more often.

Toilet bowls have a colon. A colon is a convoluted pathway inside a toilet bowl. It's much the same as a curvy road rally course with one or more hairpin turns. It's called a colon because it resembles your own large intestine! This pathway inside the toilet bowl helps create the water seal keeping sewer gas and vermin from entering your bathroom.

Do Toilet Drain Lines Clog Frequently?

A toilet drain line is the pipe in the floor under the toilet. These lines rarely clog. Almost all clogs are in the actual toilet.

The diameter of this colon is usually over 2 inches, and it connects to a 3-inch drain pipe in the floor. In some houses, the drain line may even be a 4-inch pipe.

If waste and paper can make it through the colon in the toilet, you can see that the larger drain pipe in the floor can easily accommodate the waste from the toilet. Hence, this is why a clogged drain line is almost never the problem.

How Can I Test to See If My Toilet Drain Pipe is Clogged?

You can do a quick test to see if the drain pipe in the floor is clogged. You just have to pour water into the toilet bowl fast.

It's important to realize you should make sure the toilet is flushing normally before you test to see if your drain line or colon is clogged or partially clogged. If you see the water swirl around the bowl and disappear with that classic slurping noise, you're ready to begin the test.

Fill a 5-gallon bucket with water and pour it into the toilet bowl as fast as you possibly can. I mean quickly!

If the toilet bowl does not overflow, this means that the toilet colon and the drain line are wide open. A plastic army man wedged in the colon allows the water to pass. However, the toy can block toilet paper and solid waste.

What Toilets Clog Most Often?

The toilets that clog most often are those with a sharp 90-degree bend where the colon ends at the underside of the toilet bowl. Toilets that have slow water flow from the tank to the bowl clog because the water is not getting into the bowl fast enough.

If the water from the bucket drains rapidly, you could still have a design problem with the toilet. I've seen discount toilets that have a very tight turn at the end of the colon where it connects to the drain pipes at the floor.

Solid waste and toilet paper can have a tough time passing through this very tight turn. High-quality name brand toilets don't have this design flaw.

Bucket Of Water Flush Video

Watch this very short video showing how small volumes of water do nothing to flush a toilet, but lots of water work to flush!

Do Water-Saving Toilets Clog More Often?

First-generation water-saving toilets do clog more often than newer toilets that have a better design.

The Federal government passed laws years ago. The laws limit the amount of fresh water that can be used to flush a toilet. 

Toilet manufacturers rushed to create toilets that conformed to this law, but some toilets would not flush well.

If you want a great flush, you need to have the water from the tank enter into the bowl as rapidly as possible.

CLICK HERE to get FREE & FAST BIDS from local plumbers if you can't dislodge the clog on your own.

Why Do Commercial Toilets Flush So Fast?

Commercial toilets flush fast because they use high-pressure water from water supply lines to do the flushing. There is not storage tank of water like you find on the toilet in your home.

This is why commercial toilets you use all the time don't have a tank. They use the high pressure from the water supply lines to create the flush.

The chrome valve assembly that you see at the airport, shopping mall, or rest stop toilets creates loud and furious "whooooshing" flush. The Sloan company makes most of these chrome valves.  They inject lots of water FAST into the toilet bowl whisking away the waste.

How Can I Prevent Toilet Bowl Damage?

You can prevent toilet bowl damage by not using anything metal to unclog the toilet.

You can damage a toilet if you use the wrong tools while fixing a clogged toilet. Therefore I'd only use a plunger and a bucket of water. That's all I've ever used in all the years of working on toilets. The clogged drain snakes made from flexible metal can scratch the polished china surface of your toilet if you get too aggressive.

As crazy as this sounds, water alone can often fix a clogged toilet without a plunger. You may have noticed in the past that when a toilet clogs, the toilet bowl fills with water from the tank but doesn't overflow. But when you come back minutes later to look at it, the water level in the bowl has mysteriously fallen.

Why Does Water Leak Slowly Past The Clog?

Water leaks slowly past a clog because of simple hydrostatic pressure. The nasty water that's almost overflowing in the bowl is higher than the top of the water seal trap in the toilet bowl. When the water drops to that level, no more water seeps past the water seal in most instances.

This happens because water from the bowl is seeping by the clog. Wait for the water level in the toilet bowl to drop on its own.  Pour a bucket of clear water into the toilet as fast as you can. In addition, be sure the water doesn't splash out or overflow the rim of the bowl.  The rush of the water dislodges most clogs.

I only use a plunger when several buckets full of clear water don't do the trick. Be sure the toilet bowl has more water in it than the normal level of water when using the plunger. The weight of the water, in addition to the action of the plunger, is what helps to clear the clog.

Should I Scoop Out Some Of The Nasty Water?

You need to scoop out lots of the nasty water in the toilet bowl to unclog it. Dump this water in an old bucket. Once the toilet is unclogged you can dump it back into the bowl to dispose of it.

You don't want to use a plunger when the water in the toilet bowl is almost overflowing the rim of the bowl, because you'll have a real mess on your hands. Remember that water is heavy and its weight alone can persuade a mass of toilet paper and solid waste to pass through the toilet colon.

Do Hard Water Deposits Slow Water?

Mineral deposits that collect around the siphon jet hole in the bottom of the toilet bowl can also cause the problem. The water from the toilet tank needs to enter the toilet bowl rapidly to force waste through the toilet into the drain pipe. A partially clogged siphon jet hole can mimic a clogged toilet.

Most of all a flapper valve can fool you. Flapper valves can close too rapidly not allowing enough water to enter the bowl.

The bucket-of-water test can clear clogs caused by this. Muriatic acid will dissolve hard water deposits that are clogging the siphon jet hole.

Muriatic Acid

Muriatic acid is powerful and needs to be treated with lots of respect. CLICK THE IMAGE TO ORDER SOME NOW.

Should Clean Clear Water Be in the Bowl Before Using Muriatic Acid?

Clear water should be in the bowl before you try muriatic acid. The toilet must be free of clogs. Pour a bucket of water rapidly into the toilet bowl to lower the water level in the bowl. Then add 12 ounces of muriatic acid to the water in the bowl. Allow it to sit in the toilet for several hours.

First of all be sure to wear goggles and old clothes as you do this. Pour the acid into the toilet slowly to minimize splashing. Open the bathroom window to ventilate the harmful fumes. Put the toilet lid down so that animals can't get into the harmful brew.

Are Wood Sticks the Best Thing to Use To Scrape Deposits?

After waiting several hours, and wearing rubber gloves, carefully use a small wooden stick to gently scrape the opening of the siphon jet hole. Do not use any metal to do this.

Before you flush the toilet, it's a good idea to neutralize the acid. You can use a cup of baking soda to achieve this goal. Add it slowly to the liquid solution in the bottom of the bowl and stir it with a paint-stirring stick.

Flush to Check For Progress

Now it's time to flush the toilet to see if the acid did its job. If deposits clogged the siphon jet hole, you should see a significant difference in the flushing action. The acid will not hurt the toilet bowl or the plumbing drain pipes.

In conclusion, you now know that you can use water and muriatic acid to solve most toilet clogs.

Patrick had an issue with his toilet clogging all the time. Read his story in the May 29, 2009 Newsletter.

CLICK HERE to get FREE & FAST BIDS from local plumbers if you can't dislodge the clog on your own.

Column 855

Roof Ventilation Fan

Roof Ventilation Fan

This is a powered roof ventilation fan. You’re in the attic looking at the underside of the fan. (C) Copyright 2017 Tim Carter

Roof Ventilation Fan

DEAR TIM: I’ve got a two-year-old and eighteen months ago I moved into a gorgeous ranch home built in 1950. Money is tight and I don’t want to make mistakes. The house needs a new roof. I climbed into the attic and noticed foil-faced insulation is attached to the underside of the roof and I see I have a powered ventilation fan. The roofers want to put in a ridge vent and I’m afraid to cut into my precious roof. What would you do? Is the fan I have a good idea? Should there be more ventilation? What about soffit vents? The house has survived for sixty-seven years without them? I’ve been on countless blogs until 1 am until my eyes hurt and the information is so conflicting. Help me Tim! Stacey V., University Park, MD

DEAR STACEY: We’ve got lots of ground to cover and I’ve got limited space in this column. Let’s discuss the confusing information you’re seeing on the home improvement blogs.

I’ve had the good fortune to meet many of the bloggers at media events. When I chat with them, I quickly discover that most have never worked in or on the house of a paying customer. Most of the bloggers have day jobs and just an interest in home improvement. Some have worked on their own homes and think they’re now experts.

In my opinion, you need about twenty years or more of day-in day-out field experience working for paying customers to be able to give sound advice. From now on when you visit a home improvement blog, go to the About Us page first. If that blogger can’t convince you he/she has worked in the homes of paying customers for decades, you might want to leave that website and find one like mine.

I’ve worked on many 1950s ranch houses just like you bought. In fact, my in-laws house was nearly identical and I put a new roof on it back in the mid 1970s. Back in the 1950s weatherstripping was minimal, air leaks were plentiful and heating fuel was cheap. So much air leaked into and out of these houses that humidity issues were rare.

Fast forward and many of these houses now have new windows and doors that have great weatherstripping. Air leaks have been caulked. Your house may be one that’s been retrofitted and the indoor humidity can be much higher than fifty years ago because cold dry air in the winter can no longer mix with the more humid air you have inside your home.

This is why roof ventilation is now much more important. The humid air needs to get up into the attic, which it does with ease, and escape back outdoors as fast as possible. You want air moving through your attic, even if it’s just enough to move the smoke from a burning incense stick.

The roofers are giving you good advice. I’d recommend a continuous ridge vent to help exhaust humid air from your attic space. For these to work well, you absolutely need soffit vents to supply the incoming air into the attic.

You’ve got a powered roof ventilation fan that the previous owner installed. You need to test it to make sure it works. Most have a built-in thermostat where they come on a set temperature and then turn off when the attic cools down. I’d have the turn-on temperature set to 120 F and the turn-off temperature set to 95 F.

I’m a big fan of roof turbine vents. Some people call these whirlybirds. They look like small round mushrooms sticking out of your roof. The vents have blades that are shaped to capture the wind and then spin. This spinning motion sucks air from your attic.

They work for free and can suck hundreds of cubic feet of air per minute out of your attic if the wind is really blowing. I’ve had these at my last house for years and they worked very well and never ever leaked. I’d install two of these turbine vents on the back side of the roof as high up as possible but not so high as you can see them from the street.

Whoever installed the foil-faced insulation up against the underside of the roof made a big mistake. I’d remove that as soon as possible and lay it on the floor of the attic with the foil facing up towards the sky. The foil, as long as it’s dust-free, will act as a radiant barrier and reflect the invisible infrared rays generated by the hot roof system back away from the inside of your home.

The way the insulation is now installed can cause condensation to build up on the underside of the roof sheathing. It also makes your attic hotter in the summertime which then makes your air conditioning work harder.

When the sun heats up the roof system, the insulation and the air in your attic my rise to 140 F or more on a brutal summer day. This heat in the attic space can’t easily escape back out to the outside because the foil-faced insulation is keeping the heat in the attic space.

Column 1216

October 1, 2017 AsktheBuilder Newsletter

Happy October! It's my favorite month of the year.

It's cool, the air is crisp and it's usually quiet in the woods as the birds and insects are getting ready for winter.

CLICK HERE and then scroll down to see photos of what Mother Nature has in store for all to see here in central New Hampshire in just two weeks.

There's some delicious eye candy at the above page. The photos were NOT enhanced in any way. What you see is what I saw when I took the photos last year.

New Stain Solver Website

The past week or so, my team has been hard at work creating a new Stain Solver website. I'm so very lucky to be surrounded by Ellen, Steve, Roger and of course Kathy my wife.

But we now need your help and valuable input.

My intention was to make the new site super sleek and easy to navigate. Below are two screenshots of the home page.

The top one is from a desktop computer and the second one is what it should look like on your phone or small tablet.

Using mobile devices to visit websites is a trend that's been growing by leaps and bounds. You may be reading this newsletter on your phone!

Creating a mobile-friendly Stain Solver website was long overdue, but now it's done and I think it's going to be easier for you to use. Next week we'll tackle updating the shopping cart making it more friendly.

Stain Solver Before & After

Stain Solver Home Page

Here's where we need your help.

What pages are missing at the new website?

What do you want to know about Stain Solver when you visit the site?

What things do you want to CLEAN using Stain Solver?

IMPORTANT TIP: The new site has a POWERFUL built-in SEARCH ENGINE.

Rather than give you pages of text links to slog through, we thought it best for you to just type in a keyword of what you want to know about.

All you have to do to find an answer to your problem is type one or two keywords into the Search Engine on each page.

Here are some examples of keywords that might directly relate to the problem you're trying to SOLVE:

  • deck
  • composite
  • shipping
  • red wine
  • algae
  • mold
  • boat
  • outdoor furniture
  • grease

Use the handy SEARCH box on each page and enter in just one or two keywords. See if the answer you need comes up in the search results.

If you don't find a page that has what you need, please respond to this email with the list of keywords you typed in that produced no useful results.

I'll then construct new pages to match what you need.

Happy hunting and CLEANING!

STOP Algae, Mold & Mildew on Patios FOREVER!

Do you have nasty algae, mold and mildew growing on your patio, sidewalk, driveway or wood deck?

What if I told you there was a way to stop it forever?

Stain Solver Mildew Prevention

That's not a bowl of kid's cereal above. It's secret magic crystals of goodness!

All you have to do is CLICK HERE for the solution!

Hurricane-Proof Shingles

Two monster hurricanes recently ravaged parts of the USA. Harvey happened to hammer Texas.

When it came ashore as a category 4 beast, it aimed right at the Mustang Island Episcopal Conference Center.
Hurrican proof shingles

There it is above after the storm. The green material on the mansard side walls is Davinci Roofscapes composite slate tiles.

It's the same material that I put on my roof here at my home two summers ago.

"Wind speeds were between 120 and 140 mph when Harvey came ashore," says Rob Watson, director of camps and conferences for Episcopal Diocese of West Texas. "We can't say enough about the DaVinci product. Only a few shingles blew off during the storm and the conference center received little structural damage.

"When we originally researched the DaVinci roof, we were told that it would stand up to hurricane conditions. I didn't expect we'd have to test that claim so soon. I was pleasantly surprised that the tiles held their ground."

I'm sharing this with you only so you know there are roofing materials that can handle just about anything Mother Nature can dish out.

Tool of the Week

I'm trying like the dickens to share a superb tool with you each week. Christmas is coming and you may want to surprise that special someone with a gift that keeps on giving.

This week, it's the Senco FinishPro XP25 finish nailer.

Senco Finish Pro 25XP

I tested this tool two months ago while helping my son build a custom desk out of used oak shipping pallets.

As you might imagine, I've used countless finish nailers in my life including the generation-one nailers made by Senco thirty-five years ago.

The FinishPro 25XP air-powered nailer was the lightest nail gun I've ever handled. It was a dream to use.

Senco has mastered nail guns and is, in my opinion, the undisputed leader in the industry. Their heritage with nail guns is both rich and deep.

CLICK HERE to get all the specs on this wonderful tool.

Click on these links to read my review on the Senco FinishPro Mg18 and the FinishPro XP16.

Christmas or Regular Shopping

Christmas is just weeks away. If you're happy with information you've received in this newsletter throughout the year, it's a great time to reciprocate.

If you shop at Amazon using my affiliate links, then I get a tiny slice of the purchase price as a commission. This does not cause the price of the item you buy to be more expensive.

I'll start to put in a friendly reminder link each week that you can use. Please click the image below to see what I mean. It's EASY!

Of course you can use these links all year and there's always one in the RIGHT COLUMN of the newsletter each week.

THANKS!

CLICK HERE TO HELP ASKTHEBUILDER FOR ALL THE HELP I'VE GIVEN YOU. THANKS!!!
I'd say that's enough for today, wouldn't you?

I'll be back soon with some revised columns for you.

Remember, please go visit Stain Solver and let me know what pages are missing. Only email me AFTER you've tried using the Search Engine at the website.

Tim Carter
Founder - www.AsktheBuilder.com

Do It Right, Not Over!

Composite Decking

composite decking trex transcend

Here's a multi-level deck covered with generation-three Trex Transcend composite decking. I built the one with the table and umbrella on it in the summer of 2016 with my own hands. The upper deck was original to the house, but I stripped it and installed all new decking, railing and low-voltage lights. Copyright 2017 Tim Carter ALL RIGHTS RESERVED

Composite Decking TIPS

  • Modern composite decking materials are a blend of wood and plastic
  • Water can penetrate some composite decking materials causing the wood to rot
  • Watch the composite decking video below
  • Composite decking capped with solid vinyl offer the best protection against deterioration
  • CLICK HERE to Get Tim's FREE & FUNNY Newsletter!

DEAR TIM: I'm thinking of building a deck and am leaning towards composite decking material for the decking, railings, and other accessories. I'm wondering about positive and negative feedback you may have heard on these products.

Are there any other things I should be concerned about regarding the construction and long-term maintenance of the materials? Joe R., Jefferson County, CO

DEAR JOE: Outdoor deck components including decking, railings, spindles, post wraps and caps, etc. that are made using a mixture of plastic and wood or other cellulose material are a rapidly growing building products category.

Composite Decking Industry Growth

You were possibly wooed by the extensive amount of advertising this industry is spewing out to consumers and contractors alike. Some of this advertising states that the composite decking materials will not rot. These particular claims made by some of the manufacturers, though, may come back to haunt them. Read my August 14, 2008 Newsletter for an interesting update.

Additional Composite Decking Articles

Composite Deck Rot and Maintenance

Composite Deck Mushrooms

Black Spots on Trex Decking

Free & Fast Bids

CLICK HERE to get FREE & FAST BIDS from local deck builders to install a new deck or replace your wood decking with composite material.

Generation One Composite Decking Materials

These composite decking materials first started to appear in the early 1990's. Trex was the one of the first manufacturers intended for its products to be very environmentally friendly. They made their composite decking material by combining recycled plastic milk cartons and discarded shipping pallets.

Many of the other competing products are now made using virgin plastic and cellulose fibers or flour and/or a blend of virgin products with recycled materials. Some are still made with 100 percent recycled materials.

Pros and Cons of Composite Decking

Depending upon whom you talk to, you will get both positive and negative comments about composite decking. Some homeowners on the East Coast were so unhappy with one of the brands of composite decking, they filed a law suit in a state court.

Somehow this case was certified as a class action in that one state. Rather than fight expensive future legal battles in a number of different states, the decking manufacturer decided to agree to a national settlement.

By doing this, any evidence or lack thereof concerning the plaintiff's claims was never disclosed in a public courtroom. Many people refer to this legal action the Trex class action lawsuit.

composite decking generation one Trex

This is generation one Trex composite decking. It was on my front porch when I bought my current home. You can see that the new generation three Trex Transcend is a vast improvement. Copyright 2017 Tim Carter ALL RIGHTS RESERVED

Scientists Study Composite Decking

Several renowned scientists have also discussed composite decking materials in three separate professional white papers published between September 2001 and December 2002 in the Forest Products Journal.

The findings in these three papers indicated that the wood fibers and other cellulose products used in the composite decking products they tested can and does rot if they're not treated with a preservative.

CLICK HERE to get FREE & FAST BIDS from local deck builders to install a new deck or replace your wood decking with composite material.

High Wood Content

At first blush, this may not seem like a big issue; the average person might think that the wood or cellulose content of composite materials is low. But it appears many of the products have a cellulose and/or wood fiber content of nearly 50% of the volume of the product and in some it can climb to nearly 70%.

Laboratory tests have shown that some of the composite decking materials can lose between 10 - 20% of their overall weight over time, which translates to a possible 40% or more loss of wood content due to rot.

In an effort to get to the bottom of the issue, I decided to interview fifteen of the most prominent composite decking manufacturers. I sent them a series of written questions asking about their products, whether their raw ingredients are virgin or recycled, whether they were aware of the Forest Products Journal white papers, whether they use a preservative in their products and a few other generic questions. Only one company of the fifteen responded, and they provided concise written answers to my questions. I found the silence of the other 14 manufacturers to be very disturbing.

IMPORTANT Author's Note (October 2017): This column was originally written on or about June 2004. Since that time several of the fifteen companies have gone out of business or have merged with the stronger composite decking brands.

What's more, when this column was authored, there were only generation-one composite decking products available for the most part. The industry has since matured and fixed many of the issues that were brought up in this column.

See below about the Latest Technology for what you should be looking for in a composite decking material.

Composite Decking Video

Here's a fascinating video that shows you just a little something you can do with composite decking.

Treat Wood With Borate

Further investigation revealed there is at least one preservative that can and is incorporated into at least one of the composite decking materials. This simple chemical - zinc borate - can be blended with the wood or cellulose component as the decking is manufactured.

The borate in the preservative acts as a poison to many fungi that typically would consume the wood fiber and produce wood rot. The zinc borate preservative is also long-lasting. It can remain active in the composite decking materials for 20 or more years.

Wood Fibers Must Be Protected

Most untreated lumber exposed to the elements rots over time. Don't think for a moment that the wood or cellulose fibers in the composite decking materials are totally surround and protected by the plastic component.

That is not the case. The wood and/or cellulose fibers not only can be readily seen at the surface of the products and at all cut edges, they are randomly interconnected throughout the entire length, width and depth of each board. Water can and does soak into many of the original composite decking materials and this water fuels the wood rot process in those materials that do not contain a preservative.

Latest Composite Decking Technology

If you are going to use composite decking material, you should consider buying one that contains preservatives. If you can't locate one that has that, then take a serious look at the latest composite decking materials that have a solid vinyl cap that prevents water from getting into the core of the product.

I put this capped composite decking material on my own decks and so far it's holding up great. What's more, the graining and coloration technology has advanced to a point where many of the latest composite decking materials look extremely realistic

Follow Composite Decking Installation Instructions

More importantly, be sure to follow the written installation instructions to the letter. Creating gaps between decking boards, spacing of other components and support joist placement are critical. If you fail to install the materials correctly, you or your builder may void the warranty.

Important News:

August 19, 2005 -

The U.S. Product Safety Commission has issued a Recall for certain Geo-Deck™ Decking and Railing Materials.

As of this date, they have received 370 reports of accelerated degradation. The composite material can fail and create a fall hazard to consumers.

This is a very serious matter.

Click here to read the full text of the recall notice.

CLICK HERE to get FREE & FAST BIDS from local deck builders to install a new deck or replace your wood decking with composite material.

A Simple Trench Drain

Linear French Drain Streaming Video

Do your own DIY install of a Linear French Drain with Tim Carter's time-tested methods and materials! CLICK IMAGE TO ORDER NOW!

Simple Trench Drain TIPS

DEAR TIM: Every spring, soggy soil in my yard prohibits me from getting a start on my spring yard chores. During periods of heavy rain, water flows toward my house causing periodic flooding.

em>Can this water be stopped? Is there a way to remove the water and dry out the soil? If so, do you think an average homeowner can complete the project successfully? Betsy, Wyoming, PA

DEAR BETSY: I've got some great news for you. You can prevent basement or crawl space flooding and dry out the soil by installing a simple trench drain.

Your early spring fever problems and flooding concerns can be cured permanently with some simple linear French drains. Some people call these ingenious in-ground gutters trench drains because you dig a trench.

Simple Trench Drain Captures Water

Normal soil makeup consists of small pieces of rock, organic debris, water, and air. In many soils (especially clay soils), the air content is highest in the upper 24 inches. As you go deeper into a soil, the weight of the overlying material compresses the soil and squeezes out the air.

When it rains, water enters the soil and pushes the air to the surface. Gravity then takes over.

CLICK HERE to get FREE & FAST BIDS from local landscapers who can install your linear french drain.

Related Links - Trench & French Drains

Trench Drain at My Last House

Drainage Tips

Water Moves Sideways Towards the French Drain Pipe

If your yard slopes and every yard and neighborhood has some slope, the water within the soil actually begins to flow downhill. Level yards suffer as the movement of the water through the soil is minimal.

You can accelerate the movement of water or intercept and re-direct sub-surface water by installing gravel covered perforated drainage pipes in narrow trenches. Water, just like most things, takes the path of least resistance. Subsurface water would much rather travel through gravel and open drain pipes than force its way through the soil.

A Ground Gutter

A linear French drain is simply a "moat", or gutter-in-the-ground, that protects your yard or house from sub-surface or surface water. You construct it by digging a 6-inch wide trench approximately 24 inches deep.

french drain pipe

Cross-section of a Linear French Drain including the all-important perforated french drain pipe. Copyright 2017 Tim Carter ALL RIGHTS RESERVED - Do NOT COPY this graphic.

If you want to intercept sub-surface water to dry out your yard, you install the trench along the highest part of your property. Extend the trench to the lowest part of your yard. If your intent is to protect your house from water, you construct the trench approximately 4-6 feet away from the foundation.

In many cases, the trench system is U shaped as it passes around your house.

Create a Lattice

If your yard is nearly level and you wish to drain it, you will probably have to dig a series of trenches and interconnect them. Consider renting a builder's level at a tool rental store to help you determine how deep to dig the trenches

Lots that appear flat often have sufficient slope that allows you to install the pipes so that they will extend to daylight at the lowest portion of your yard. You can use the optical or laser builder's level to tell you the high and low portions of your lot.

The bottom of the trench can be level or it can follow the contour of your yard much like a fence. If you can expose the end of the pipe to daylight at the edge of your property, you will obtain the best drainage results.

French Drain Pipe Video

Watch this video to see water flowing out of a perforated french drain pipe in my own yard! You can't believe how well these work.


CLICK HERE to get FREE & FAST BIDS from local landscapers who can install your linear french drain.

Compact Dirt

Remember, the holes in the perforated pipe point down. If they point up, they get clogged by pieces of gravel.

Remember, the holes in the perforated pipe point down. If they point up, they get clogged by pieces of gravel. Image (C) Copyright 2017 Tim Carter ALL RIGHTS RESERVED

Once you have the trench completed, compact any loose soil in the bottom of the trench. A 6-foot tall 4x4 works well for this purpose. Wear gloves to avoid getting splinters. Install a 1 or 2-inch layer of washed gravel on top of the compacted soil before you install the perforated piping. Do NOT lay the piping directly on the soil. You want the drainage holes through which water will enter to be up above the soil.

If you choose to use rigid plastic pipe that has two rows of holes along each length, be sure to install it correctly. The holes are supposed to point down, not up towards the sky.

Pipes Holes Down

The reasons the holes should point down are many. Remember that the water table in the soil builds from the bottom to the top of the soil profile. If the holes point down, the water enters the pipe sooner than if the holes pointed up. Also, water droplets or flow is not intelligent. It can't "see" the holes in the pipe and aim for them as it flows down through the gravel. Some water may find its way into a hole pointing up, but most of the water will flow around the pipe and then build up until it can flow into the holes.

Furthermore, holes that point up are perfect targets to get clogged with the rounded gravel. Always keep in mind the pipe is acting as a conduit for the water and the water table in wet periods is already up to the bottom of the holes. If the water table rises higher than the holes, then water squirts vigorously into the holes and is carried away by the pipe just as water charges down a stream bed in nature.

Fill To Top

After the pipe is installed in the trench, cover it with 1 inch or larger washed, rounded gravel. Fill the trench with gravel to within 1 inch of the surface. Place a piece of sod over the gravel to disguise the trench.

If you wish to control surface water that flows over your lot, allow the gravel to extend completely to the surface. If you widen the trench in the upper few inches of the soil, you can disguise the drainage system. Use colored stones, gravel or large stepping stones to create a walkway. To further enhance the illusion, install the trench with gentle curves as it traverses your lot.

CLICK HERE to get FREE & FAST BIDS from local landscapers who can install your linear french drain.

Column 175


Do you wonder if linear French drains really work?

Read an e-mail I received from Pat Jones in Vienna, Virginia:

A year ago last spring, I called your radio show from my home in Vienna, VA. I described my problem with water in my basement. It was very predictable, every time it rained 2" or more in 24 hours I would get water in my basement. Anyway, you advised me that a French drain would solve my problem.

So I rented the ditch witch and got a bunch of friends, following your on-line tips we installed the drain. Your tip about the plywood to have the dirt flow onto was a great labor saver. We did have a lot of trouble with rocks and tree roots stalling the machine but in the end it was a job well done.

Of course our work and your advice caused the drought in the Washington, DC area. We waited almost a year and a half before we got to really test the French drain. However when hurricane Floyd came through and gave us 4" in less than a day and the basement was high and dry I figured it was worth the drought. Now the neighbors are asking my advice, and I point them to your web page.

When we talked you said to let you know how it worked out. It worked out great!!

Thank you very much,

Patrick Jones


The straw layer mentioned in the column above is not necessary if you fill the entire trench with gravel to within one inch of the top. The reason is simple: Silt does not pass sideways through topsoil. The silt that turns stormwater runoff brown is eroded soil particles that are running in overland flow.

Silt particles get trapped and filtered in the upper layers of top soil. The vast amount of water captured by a linear French drain is water traveling sideways through soil. It is generally clear and free of silt. To prove this point, spring water and water taken from underground wells is almost always crystal clear. The silt was left behind at the surface as the water was entering the ground.

Sometimes inventions don't always help to eliminate wet basements. Read my June 27, 2021 Newsletter for one such invention.

Tim Carter


I received this email recently:

Tim,

We have a block and beam foundation, clay soil, no gutters and we end up with pools of water right next to the house and sometimes covering most of the back and side yard. In some places the water goes under the house. Because the soil is already about 6" or less from the wood siding and we need to maintain ventilation we can't build up with additional soil. It seems that if the trench is 4-6' from the house that a lot of water will still be pooling and going under the house. Mr. Gardner from Houston, Texas.

Here is the answer:

It is important that you put the drain that far out because if placed close to the house, the French drain acts like a vacuum and pulls the water through capillary attraction. You would be pulling the water to the house.

You need to create a slope from where the soil hits against the house to a spot about 6 feet out. Since you cannot do this by adding soil ... remove some. Create a slope and install the linear French drain.


Author's Notes: You may wonder if my advice is worth anything. Well, read what Jim Sanders wrote to me when he was at the end of his rope: "Hi, I just wanted to write to give you the results of my "Trench Drain". I have had a wet crawlspace for 15 years. Water would fill the crawlspace at times, so we actually had to drill weep holes at the base so that it would enter the basement and eventually, the sump pump.

I have tried everything. Several contractors said that the only thing we could do was to bring the water into the house via drainage tile and let it enter the sump pump. That would work, but because I live on a 6' elevation, there is no reason that I should have water problems. It became like clockwork...when it rained, we would rush home from the lake or wherever we were vacationing so that we could be prepared to start the backup generator, in case the power failed.

We even had our alarm company put a sump alarm on our system, so they could notify us if we had a power failure. Battery backup was not an option, because sometimes we lose power for days and during any rain, our sump would run every 7 minutes...just like clockwork. I found your site and read the article on the trench or French drain.

At first, it sounded a bit like "holistic healing" to me. I failed to understand why a 2 ft. deep trench, 4 ft. away from the house would do any good. How could this simple thing correct an extreme water problem that has plagued me for years, cracked my foundation, settled my garage floor and ruined almost every vacation?

The Linear French Drain trench running from the house. PHOTO CREDIT: Jim Sanders

The Linear French Drain trench running from the house. PHOTO CREDIT: Jim Sanders

I decided "what the heck". I had to dig by hand using a trenching spade and a pick-ax, because the builder back-filled our property with brick and blacktop. It took quite a bit of time. Because the ground level varies so much on that side of the house, I was not able to achieve exactly 2 ft. deep. It varied from 18" to 30" in spots, but the slope was downhill. The trench is about 80 ft. long. At times, I thought about filling it all in, because I just didn’t believe that it would work. I stoned it, put tile in, and filled it with #1 round stone. I socked the pipe just for safety measure and I also used geotextile fabric on top, so I could cover with dirt and grass. I also ordered some clay and pitched from the house to the drain.

After a short rain, water is running away from the house. PHOTO CREDIT: Jim Sanders

After a short rain, water is running away from the house. PHOTO CREDIT: Jim Sanders

Result? For the last month, we have had 7 or 8 torrential rains, the worst of which was last night. It rained so hard, that our lawn washed out in spots because of the high clay content. Our sump pump, that normally ran every 7 minutes during and after rain, has not turned on for 4 weeks. The silt at the bottom of the sump well is now dry and cracking. Our crawlspace has not shown a trace of water or even moisture. Since I couldn’t see correcting the foundation cracks or the garage floor settling and tilting until I corrected the problem's source, I waited to see if the trench drain worked first. This week, I had a company come in and perform sort of a "mud-jacking" technique on the garage floor, which worked perfectly. Also, during the past few weeks, I parged the cracks in the foundation.

A dry sump pump. PHOTO CREDIT: Jim Sanders

A dry sump pump. PHOTO CREDIT: Jim Sanders

I just wanted you to know how this worked. I stressed for many years over this issue and the solution was nowhere near as difficult as I thought it would be. As a side note, I went to the end of the drain tile during a hard rain to see what was happening. Water was running out of the drain tile in about the same exact volume that it previously ran out of the weep holes in my crawlspace. This winter will be interesting, because last year, the ground next to the house was so saturated that during a thaw, my sump would run constantly. I'm guessing that the ground between the trench and the house will probably be drier now going into this winter." - Jim Sanders, Upstate area - New York

CLICK HERE to get FREE & FAST BIDS from local drainage expert contractors.

This helpful article was featured in my March 28, 2013 Newsletter.

Column B339

Patio Moss Mold and Mildew Prevention

patio moss mold

Patio Moss Mold and Mildew Prevention | This ugly black mold and mildew on the patio can be prevented with a simple spray-on solution! (C) Copyright 2022 Tim Carter

"Moss, mold, and mildew need food to survive, just like you and me. The food sources can be an assortment of things..."

Patio Moss Mold and Mildew Prevention Checklist

  • Moss, mold, mildew, and algae feed off invisible food and water
  • Pressure washing can damage precast colored pavers and brick
  • WATCH the copper sulfate video below!
  • Copper sulfate is the secret to STOP moss, mold, algae, and mildew on your patio
  • CLICK HERE to Get Tim's FREE & FUNNY Newsletter!


DEAR TIM: My wife and I have an outdoor patio constructed with colored precast concrete paving blocks. It doesn’t take long each year for black mold and mildew to start to grow on it.

We also have an issue with moss and algae growing on it. I have to power wash it at least once a year and wonder if there’s a way to prevent the moss, mildew, and mold from growing in the first place.

Am I damaging my patio with the power washer? Why is it growing on the precast concrete pavers? This problem can’t be that hard to solve. Loren P., Okatie, SC

Related Links

Certified Organic Patio Cleaner

How to Remove Patio Algae Without Alien Help

DEAR LOREN: I used to have the same problem on two massive solid-clay brick paver patios in the back of the last house I lived in. It was a mind-numbing job that took hours and hours of work to restore the patio to brand-new condition each spring. I hated doing that job.

Why Does Patio Moss Mold Grow?

Let’s talk about why the moss, mold, and mildew grow in the first place. Many years ago, I couldn’t understand how it could grow on solid rock, precast concrete or brick, but now it’s crystal clear to me as I’ve attained more knowledge.

Moss, mold, and mildew need food to survive, just like you and me. The food sources can be an assortment of things just as we humans have countless different things we eat.

Dust, ultra-fine sugar aerosols from trees and bushes, tree sap, minerals, organic debris, etc. are all food sources for the unsightly things growing on your patio.

Free & Fast Bids

CLICK HERE to get FREE & FAST BIDS from local handymen that can apply a magic solution (see below) to STOP algae, mold and mildew on your patio.

What is a Fast Test to Grow Mold & Mildew?

You can do a fast test that produces dramatic results by just pouring out a small amount of carbonated soda that contains sugar or high-fructose corn syrup on your patio. You might have mildew growing on the spill in as little as forty-eight hours if you do it in a shaded area of your patio.

Water is the only other missing ingredient needed to fuel the moss, mold and mildew since their spores are constantly falling down on your patio. If you could keep your patio completely dry, you’d not have any growth.

But even morning dew is enough to sustain the green and black organisms. They’re tenacious and know how to make a little water go a long way.

Will Power Washing Damage My Patio?

Let’s discuss power washing. There’s a raging debate in the home improvement community about whether or not power washing can be destructive to concrete, brick, precast pavers, wood, etc. The unequivocal answer is yes - it’s destructive.

patio moss, patio mold

©20122 Tim Carter

The rate of destructive force is directly proportional to the pounds-per-squares-inch (psi) power the machine delivers, the angle of the spray-wand tip and the distance the tip is from the surface being cleaned. You just have to look at the Grand Canyon to understand that water simply flowing over rock can do damage.

Water directed at a surface with 1,500 psi or more can do immense damage on softer surfaces and it does cumulative damage to harder surfaces with each successive washing.

faded and new paving brick

Here's a great example of concrete paving brick ruined by pressure washers. You can see the aggregate in the concrete. The brand new ones have not yet lost the colored cement paste off the sand and gravel. Copyright 2022 Tim Carter

Will High Pressure Remove Colored Cement?

In your case power washing will rapidly remove the colored cement paste that covers the small sand and gravel particles in your precast pavers. If you had a saved paver in your garage that the installer left behind that’s never been washed or exposed to the elements you’d notice that it’s got a uniform color over the entire surface.

This uniform color is created by an ultra-fine layer of pigmented Portland cement that coats the sand and small gravel in the pavers.

After one or more washings, you’ll start to notice the individual colors of the different sand and gravel that was used to make the pavers. The colored cement will still be there between the individual particles of sand and gravel.

How Do You Prevent Patio Moss Mold Growth?

The good news is you can prevent the growth of patio moss, mildew and mold. All you have to do is borrow technology developed hundreds of years ago by mariners.

Clipper ships and warships that depended on speed to make money and win wars employed the use of copper plates on the hulls of the ships so barnacles and other marine life would not grow on the wood below the water line.

patio moss mold

Patio moss mold can be prevented using copper sulfate. ©2022 Tim Carter

Is Copper a Natural Biocide?

Copper is a natural biocide. It’s pure, it’s pretty much harmless to mammals and it’s found in multi-vitamins that you might take to stay healthy. Copper in our bodies helps us to retain iron and it aids in producing the energy you need to get through the day.

You can’t cover your patio with copper sheets, but you can spray on a liquid solution of copper that will soak into the top surface of the concrete pavers. This copper will stop the growth of the pesky green and black organisms in their tracks.

Do You Dissolve Copper Sulfate In Water?

The easiest way to apply the copper is to purchase copper sulfate crystals. This is readily available online and the blue crystals dissolve readily in warm or hot tap water.

bowl of copper sulfate

This is copper sulfate. It dissolves easily in water. Spray it on with a hand-pump sprayer. CLICK THE IMAGE ABOVE TO ORDER THE COPPER SULFATE NOW.

You can mix up to 1.75 pounds of copper sulfate in each gallon of water. This will create a very saturated solution. This much copper can be harmful to nearby vegetation, so just apply the solution to the top surface of the stone.  My guess is you’ll discover that two or three gallons of water is plenty to treat the average-sized patio.

You can cut down the concentration to about 1 or 2 ounces of copper sulfate per gallon of water. Test it to see if it's strong enough.

Copper Sulfate Video

Watch this funky video about copper sulfate. This guy is spot on with his advice!

Is it Best to Apply To Dry Pavers, Concrete or Brick?

I’d apply the solution when the patio is dry as a bone. You want the solution to soak into the surface. Concrete is absorbent unless it has a shiny steel-troweled finish.

Most exterior concrete is rough, so the solution will soak in. Apply just enough so the pavers get nice and wet, but not so much as the solution runs off into surrounding vegetation. You don’t want to poison expensive landscaping nearby.

How Often do I Apply The Copper Solution?

You’re going to have to periodically re-apply the copper sulfate solution because normal rainwater will leach the copper back out of the pavers. I can’t tell you how often because it’s a function of the amount of rainfall where you live. But I do know it’s far easier to apply this solution in minutes rather than bend over for hours and hours using a power washer!

CLICK HERE to get FREE & FAST BIDS from local handymen that can apply a magic solution (see above) to STOP algae, mold, and mildew on your patio.

Column 1215

September 23, 2017 AsktheBuilder Special News

This is a very special announcement if you happen to have relatives in Puerto Rico and are wondering if they're okay. The island was ravaged by Hurricane Maria.

I'm a ham radio operator and the over-arching USA association that is centered around amateur radio has set up a special webpage that may allow you to find out if your relatives are doing well.

Everything you need to know about how to get word to your loved ones in Puerto Rico can be found at a special page of the ARRL website.

CLICK HERE and I hope you get news soon.

Tim Carter
Founder - www.AsktheBuilder.com & www.W3ATB.com

Do It Right, Not Over!

Galvanized Nails – AVOID Cheap Ones

Galvanized Nails

Galvanized Nails | All the nails have been galvanized. The one being held was electro-plated and it’s rusting after just 12 years. Next to it is a new electro-plated nail. The four gray ones are hot-dipped nails, some have a distinctive irregular coating of pure zinc. The irregular ingots are solid zinc. Photo Credit: Tim Carter

Galvanized Nails - Always Get Hot-Dipped Nails

DEAR TIM: I'm getting bids on a new roof and some of the roofers want to use a nail gun to install the shingles. Is this a good idea?

I've also heard stories about inferior galvanized nails that don't hold up and start to rust soon after being installed.

What type of nails would you use when installing shingles on your home and why? How can you tell the difference between different galvanized nails? Cheri B., McAlester, OK

DEAR CHERI: Roofing nail guns are mainstream now and accepted by just about every roofing material manufacturer that I know of.

Drive Nails Correctly

It's important the guns drive the nails correctly per the written instructions of the shingle manufacturer, so be sure to take the time to read the written installation instructions about this.

Nails Need To Outlast Roof Material

While you're checking out the instructions, pay attention to the type of nail the shingle manufacturer recommends so you don't void the warranty. Realize the fastener is the lifeline of the roofing material.

It's vital the fasteners last longer than the actual roofing material. If the nails or fasteners rust and fail, the shingles can succumb to gravity and/or be blown away in a moderate breeze.

Free & Fast Bids

CLICK HERE to get FREE & FAST BIDS from local roofers who can supply the BEST NAILS.

Many Inferior Nails Used

You should be very concerned about using inferior roofing nails. I'm in the process right now of re-roofing my own home.

I didn't build the home I live in. It was constructed just fourteen years ago.

It had a heavy-duty architectural shingle on it that was supposed to last forty years, but it started to fail two years ago. You can read the saga of my failed asphalt shingle roof - Roofing Ripoff.

Roofing Ripoff book

This is the cover of my Roofing Ripoff book. CLICK THE IMAGE NOW TO ORDER IT.

Cheap Nails

Now that I'm taking off the curled, brittle shingles that are losing granules by the minute, I see the roofer used cheaper electroplated galvanized nails, many of which are rusting.

Gold Standard

When it comes to galvanized nails for roofing, the gold standard is hot-dipped galvanized nails. These steel nails are cleaned chemically and then immersed in a vat of molten zinc that sometimes contains some lead.

The molten zinc is very hot, usually between 815 - 850 F.

Hot-Dipped Galvanizing Video

Watch this video to see the steps it takes to hot-dip galvanize any steel item. It's fascinating.

Fast Process

It doesn't take long for the steel nails to rise up to that temperature and when they do, the steel atoms vibrate rapidly and interlock with the zinc atoms creating a zinc-steel alloy that resists rust quite well.

When the nails come out of the molten zinc, they also have an additional coating of pure zinc on them.

CLICK HERE to get FREE & FAST BIDS from local roofers who can supply the BEST NAILS.

Best Dipped Twice

Zinc doesn't rust and the coating protects the steel from the ravages of water. The best nails get a second dipping in the molten zinc bath.

Other Ways Not So Good

There are three other processes of galvanizing nails, but they simply don't offer the level of protection as hot dipping. Hot galvanizing is a process whereby zinc dust or chips tumble in a hot drum with cold steel nails.

IMPORTANT TIP: The hot galvanizing process doesn't sufficiently heat up the steel to produce a zinc alloy on all the nails. This process is cheaper to do for nail manufacturers than hot dipping.

Mechanically Plated

Nails can also be mechanically plated with zinc dust. The cold steel nails tumble around with the zinc dust, tiny glass beads and a chemical.

The glass beads and the chemical work to apply a thin coating on zinc on the nails. Once again, this process doesn't create the all-important alloy and the zinc coating can be uneven and thin.

Electroplating - The Worst In My Opinion

The final process is electroplating. Here the cold steel nails are immersed in a chemical liquid where electricity is applied to the solution and a very thin coating of zinc is applied to the steel.

electroplated-nails

These are very common nails your roofer may use for your shingles. These are the WORST ones. They look gorgeous, but they're electroplated. DO NOT ACCEPT THESE. CLICK THE PHOTO to discover MORE about these nails.

This process produces very shiny nails that almost look like too good to be true. They don't have much zinc on them and as I can attest, they rust in short order when exposed to the elements. They can even rust when NOT EXPOSED.

In my case and in many roofs across the USA, electroplated nails are rusting just from the CONDENSATION under the shingles! This condensation happens on many nights when dew forms on the cool nails because water vapor is present under the shingles.

When the sun comes out and heats up the roof, the water evaporates. The process starts all over again when the sun goes down and the roof starts to cool.

Electroplating Galvanizing Video

Here's a poor quality video showing the electroplating process. Only the first 30 seconds and last 30 seconds are important to watch.

All the video in between is just the drum turning and the chemical coating the bare steel washers.

The white plastic tank contains a liquid chemical that's transferring the zinc to the bare washers. It's NOT a giant vat of PURE MOLTEN zinc.

New Hot-Dipped Nails

Years ago, it was impossible to locate hot-dipped galvanized nails that would be comparable with nail guns. Fortunately, it's possible to get them for just about any roofing nailer.

IMPORTANT TIP: Be sure your contract with the roofer specifies hot-dipped galvanized nails and pay close attention to the minimum length called for by the shingle manufacturer. Be sure you LOOK AT THE BOX LABELS when the roofers come. You want to see the words 'hot dipped' on the label.

Nail Length

If you're applying a thin shingle to a wood surface and no other shingles are present, you might be able to get by with nails that are only one and one-quarter-inch long. The shingle warranties are very specific about the nail length and you want the right nail so they have enough holding power to resist blowing off by strong winds.

Look At Label

To tell the difference between nails, you probably need a little bit of experience. The first thing to look at is the labeling on the boxes or containers the nails come in.

The wording must say hot-dipped. If you just see the word *galvanized*, that's not enough. Don't be fooled by the words *hot galvanized* either. CLICK HERE to see a label with false advertising on it. These were being sold at one of the big box retailers you probably go to all the time!!!!1

It's got to say hot-dipped galvanized.

Traditional Hot-Dipped Nails

Hot-dipped galvanized nails not used in a nail gun are usually very distinctive. Often they have clumps of zinc on the shaft or the coating of zinc is somewhat uneven on some of the nails. Go back up and look at the photo of these nails at the top of this column.

You may even discover small ingots of zinc in the box or nail container. Other methods of galvanizing leave a much smoother appearance on the nail surfaces than hot dipping.

The Nails I Use

I'm using hot-dipped nails because I want no rusting. I want my realistic and gorgeous synthetic slate shingles to stay attached to my roof when any number of punishing nor'easter storms pummel my house with howling gale-force winds.

I have a feeling I'll be out the next day helping to secure my neighbors' roofs because their roofers chose to use the cheaper nails. Don't you make that mistake.

CLICK HERE to get FREE & FAST BIDS from local roofers who can supply the BEST NAILS.

Column 1097