Pebble Shower Floor

Pebble Shower Floor TIPS

DEAR TIM: I stayed at a rental home that had a pebble shower floor. The pebbles were both beautiful and rounded. I loved how they massaged my feet as I showered. I now want these pebbles in my own home. How hard is it to install a pebble shower floor? Are there different types and colors? Is it hard to install the grout between the pebbles? It must be hard to install the pebbles one at a time. Nancy McK., Bangor, ME

DEAR NANCY: I love pebble shower floors! My college degree is geology and whenever I can incorporate stone into my building projects I do it. At the present time I’ve been looking for small granite pebbles myself to use in a planned man-cave bathroom.

Related Links:

Ceramic Tile Installation Tips

Four step-by-step How To Install Sanded Grout videos

Pebble Shower Floor Adds Magic

The pebble shower floor material is available in quite a few shapes, colors, and textures. In addition you can purchase the pebbles either flat or slightly rounded.

The first thing to remember when considering this natural material is it can be used on just about any surface including shower walls, a kitchen counter backsplash and even as a countertop. By all means use flat smooth pebbles for countertops.

Free & Fast BIDS

CLICK HERE to get FREE & FAST BIDS from local tile setters who can install pebble tile.

Easy To Install

It’s not hard at all to install a pebble shower floor. For one thing, the pebbles come on sheets so you don’t have to install each pebble one at a time. Perhaps the best feature is each sheet interlocks with the one next to it but in such a way that the pattern appears random.

pebble shower floor

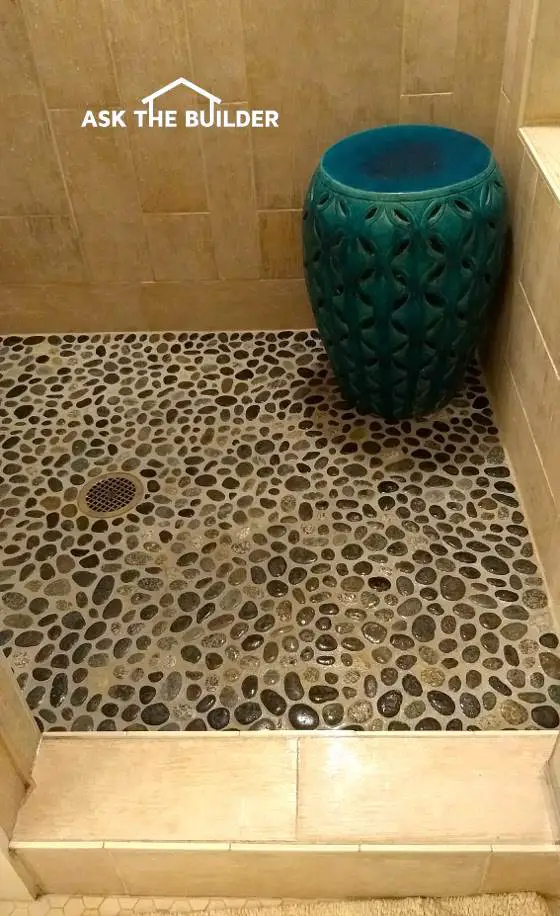
Here’s a magnificent pebble shower floor. The pebbles come in many different shapes, sizes and colors. (C) Copyright 2017 Tim Carter

It’s important to realize you use all the same tools and techniques installing the thin stone pebbles as you would install normal flat ceramic tile. Shower floor installations require a waterproof membrane or pan to channel each drop of water into the plumbing drain.

Pebble Shower Floor Installation Video

Watch this video to see how one tile setter puts a pebble shower floor in using thinset.

For this reason I prefer to install the pebbles on a concrete mud base just as the master tile setters of old did it. The cement mud is a mixture of coarse and medium sand and Portland cement. It resembles a stiff bricklayer’s mortar as you install it on the waterproof membrane.

Slope Pebbles To The Drain

Keep in mind the cement mud must have a gentle slope towards the shower floor drain so all water in the shower runs into the drain and doesn’t puddle. The installation of a cement mud floor requires considerable skill. By the same token it’s possible for a rookie to get it right if you just take your time.

I use thinset mortar to bond the pebble sheets to the cement mud floor. The thinset is waterproof and it contains Portland cement which helps create a permanent bond.

Cut Pebbles With a Diamond Wet Saw

Another key point is cutting the pebbles. Master tile setters years ago used nippers to make precise cuts to mosaic tile that resemble the pebbles. Nippers are a tool that pinch tile or the pebbles taking small bites of material. Cuts made with nippers take lots of time.

A diamond wet saw is the modern way to cut the pebbles. It won’t make sense for you to buy one for just one job. Try to rent one of these saws from a tool rental business near you.

CLICK HERE to get FREE & FAST BIDS from local tile setters who can install pebble tile.

You can minimize your rental cost by dry setting the pebbles in the shower floor without the thinset. Make all your cuts at once and don’t worry about setting the pebbles in wet thinset. Professional tile setters may have a helper feeding them cut pebbles so the pieces are set in wet thinset that has not skinned over.

You don’t need that pressure as a rookie. Make all your cuts in a few hours and then return the saw to keep your cost to a minimum. Once you get back home, mix up the thinset and install all the pieces at once with no delay.

Spread Thinset With Correct Trowel

Use the correct notched trowel to spread the thinset. The pebble manufacturer should have in the written instructions which sized trowel to use. A 1/4 by 1/4-inch square-notched trowel is the most common one to use.

You’ll use sanded grout to fill in the gaps between the pebbles. Sanded grout is a blend of Portland cement and fine silica sand. As a result, it’s extremely durable. The silica sand wears like iron.

Rounded pebbles look more interesting and will massage your feet, but it will require more grout than if you had used flat or sawn pebbles. Grout is not expensive, so if you like the rounded look and feel, then don’t worry about how much grout is required.

To summarize, before you select your pebbles, take lots of time to look at the wide variety of colors, shapes and textures. Some colors are striking and when coupled with a complimentary wall tile, you’ll have a shower worthy of a cover shot for one of the leading home magazines!

CLICK HERE to get FREE & FAST BIDS from local tile setters who can install pebble tile.

Column 1219

Surviving the Storm

Deck Funiture after storm

The Nor'easter scattered the deck furniture and pasted leaves everywhere. Copyright Tim Carter 2017

Surviving the Storm

A ferocious Nor’easter lashed central New Hampshire last night and my family and I did a good job of surviving the storm. The howling wind and rain knocked out my electricity before midnight. My cable Internet access was cut as well. It was impossible to get a good night’s sleep.

Standby Generator For Storms

I have a standby generator that powers essential systems in the house, but for some reason it failed to automatically start. I trudged out to manually start it an hour ago in total darkness. When you live in a rural area, you have a crisp understanding of the phrase pitch black.

It’s important to note I set a very powerful flashlight by the front door just a few days ago. Without that handy tool, I may have had to depend on the LED flashlight in my cell phone that currently has no service.

Coast flashlight

I love love love this flashlight. I own two of them they're so good. CLICK THE PHOTO NOW to have one delivered to your home.

The powerful storm has obviously done serious damage to the local cellphone towers near me, but I’m unable to find out as I’m now completely and utterly disconnected from all incoming news.

I’d like to add I’m very fortunate that it’s a balmy 60 F outside right now. It could have been 15 F with a foot of snow on the ground.

Related Links

Amazing Litium-Ion Small Storage Battery with Solar Trickle Charger


Cut Off From The World - What Now?

I sat at our breakfast table in a small state of consternation after coming inside from powering up the 17,000-watt generator. The lack of sleep and my dependency on having constant access to the Internet has created a fog of complacency that has frustrated me as I sit here.

I suspect I’m not alone. I’m willing to bet you, or someone you know, has become far too dependent on technology and modern conveniences. You may be surrounded by the same fog that surrounded me the past few years but don’t realize it.

Create the All-Important Checklist

I decided to write this column to help you and to create my own checklist so the next time a big storm hits, I’ll not only be ready to deal with the aftermath, but I’ll be able to go about most of my normal daily routine.

I’ve seen countless get-prepared checklists over the years. Most of them are quite good. You may be one that says, “Those are great ideas. I’ll knock out that checklist when I get around to it.” A week, a month and a season goes by and you’ve done little or nothing to get prepared.

Electricity is the cornerstone of surviving for most of us. It powers just about everything in your home you use on a daily basis including flashlights.

I’m now a fan of rechargeable flashlights that don’t depend on traditional batteries. I now have several flashlights that can be recharged with a 16,000 mAh storage battery that has its own small solar trickle charger.

Solar Charger

Here's the storage battery minutes after unpacking it. It comes with a handy carabiner so you can attach it to the outside of a backpack. This allows it to charge up as you hike. CLICK THE PHOTO to have one delivered to your home in days. Copyright 2017 Tim Carter

I suggest you invest in several of these so you can keep your cellphone topped off and even recharge a laptop if need be.

28-Watt Solar Panel Charges Many Things

I also own a 28-watt folding solar panel that connects directly to a hefty lithium-iron-phosphate battery. This battery not only has a built-in controller that regulates the incoming electricity from the solar cells, but it also has an inverter so it can convert the stored DC power into 120 volts of AC power. Small appliances or a traditional transistor radio can be powered by this very clever power pack.

Solar Panel

This is a magnificent foldable solar panel. It generates 28 watts and will rapidly charge 12-volt batteries. It has a built-in transformer so you can charge anything that uses a normal USB cord! CLICK THE PHOTO NOW to have this great solar panel delivered to your door.

Don't Depend On Electronic Memories

How good is your memory? How many telephone numbers have you memorized? Something tells me you’ve delegated this job to the memory chip inside your cellphone. If your cellphone battery dies and you can’t access your contact list, how will you call up the contractors, roofers, electricians, plumbers, etc. that you might need to help you restore your life back to normal.

It’s time to get a small waterproof note pad and write down important phone numbers that are need-to-know not nice-to-know. I have some Rite-in-the-Rain waterproof note pads up in my office, but guess what? Each page is completely blank. By the end of today, you can bet I’ll have stored many important numbers the way it was done twenty years ago.

Rite In Rain Notepads

These are fantastic waterproof notepads. They come in MANY sizes, formats and colors. CLICK THE PHOTO NOW to have these delivered to your doorstep.

What are the absolute basic things you need to survive for 24 or 48 hours? Make that list. Where are these items? My guess is they’re scattered all about your house.

What happens if you have to leave your home fast? A wildfire, a train derailment or some other calamity could cause local authorities to evacuate your neighborhood.

Great Daypack for Documents / Must-Haves

Give yourself an early Christmas present and purchase a go bag or a nice daypack that has enough storage space to hold all you need. Inexpensive things that you can duplicate can be already packed. More expensive things you need can be rearranged in a nearby location so you can pack up and be gone in ten minutes or less.

Northface Daypack

You need to have a pack already made up. It needs to be NEAR an EXIT of your home. CLICK THE PHOTO NOW to have a great daypack at your doorstep in days.

There’s a huge advantage in going to this effort. When you get stressed out by the disaster, you might not think clearly. You may forget some all-important item. You may waste valuable time trying to find something in the dark or the debris field surrounding you. When your life gets upended, you don’t need small problems to take up valuable time and resources.

Create a Communication Plan With Friends

I was really frustrated an hour ago because I couldn’t even reach out to my best friend who only lives eight miles from me as the crow flies. We’re both amateur radio operators, but I had failed to set up some agreed-to plan as to exactly how we’d use our battery-powered radios to communicate. That plan will be in effect by the end of the week for sure.

Chainsaw Can Save the Day

You may want to consider hand or gasoline-powered tools you might need to claw your way back to civilization. I own a powerful chain saw. I always make sure I’ve got plenty of fuel and extra chains. Three years ago, a freak snowstorm with wet heavy snow trapped me at the end of my street. It took hours of work to cut a path to freedom.

I suggest you gather all of the disaster preparedness checklists you can find and pluck tips from them that fit your life like a glove. Devote a day or just part of a day in the next two weeks to complete the most important things on the checklist.

I know I’m going to do everything possible to burn away the nasty fog that slowly and covertly surrounded me over the past few years. You should too.

Column 1220

Builder Abandons Job

Builder Abandons Job TIPS

  • Talk with general manager of local lumberyard
  • Request detailed cost breakdown in bidding process
  • Only pay for satisfactory work and materials stored on job site
  • Plans and specifications must be excellent
  • CLICK HERE to Get Tim's FREE & FUNNY Newsletter!

This column will help prevent the agony caused when a builder abandons a job. Yesterday, my oldest daughter Meghan and her husband Brent arrived at my house here in central New Hampshire. They flew in from California and tomorrow my wife and I will join them on an adventure to Mount Desert Island on the coast of Maine.

They plan to buy a lot so they can build a new home. My wife and I were invited to tag along to help guide them so they don’t make a mistake purchasing a bad piece of land.

A No-Show Builder in New Hampshire

Three days before, as my wife and I were getting back home from church we drove past a new house on our street that’s still unfinished. The builder started the home in May of 2016 and it should have been occupied by last Christmas as it’s not a very big nor complicated home. I met the single mom who owns it back in March as the building site was covered in a slushy snow.

Free & Fast Bids

CLICK HERE to get FREE & FAST BIDS from local builders who can help your dreams come true.

Related Links:

Finding a Pro Builder / Contractor

Payment Tips to Contractors


Builder Abandons Job

Construction started on this house three years ago. The builder poured the foundation and put on the first floor subfloor and then abandoned the job. A month ago, the walls and roof finally went up. (C) Copyright 2017 Tim Carter

On that day, she told me how she was having a tough time getting the builder to show up each day. She was bound and determined to move in by May 31st. It’s important to realize there were thousands of man-hours of work still left to do. Not knowing her at all, I didn’t have the heart to tell her that she’d be lucky to be in by Labor Day having seen how slow the project was moving.

The progress on this home has now ground to a halt. There’s been no activity for weeks. Kathy said as I was pulling into the garage, “That poor woman’s life has been ruined by the builder. I don’t want this to happen to Meghan and Brent.

Job Restarted After Three Years

Each time I go into town, I pass another new home job site. The foundation was installed three years ago and the house sat. Construction has finally resumed in the past six weeks. I don’t know any facts about this situation, but I know how to avoid it.

How to Prevent a Builder Abandoning a Job

Dad, how do you prevent a builder from abandoning a job?” Meghan asked me yesterday afternoon while we sat at a table. I know from reading hundreds and thousands of distressing emails that many homeowners suffer from this dilemma.

I shared the following advice with Meghan and Brent while we chatted. It’s important to realize the issue is complex. In the first place, you need to perform due diligence to find a professional builder who drives a project like a determined marathon runner runs a race.

CLICK HERE to get FREE & FAST BIDS from local builders who can help your dreams come true.

Go To The Lumberyard

Generally speaking, the first thing to do is talk with the general manager or owner of the largest lumber yard in the town or neighborhood where you’ll be building. You ask this business person for the names of builders that pay their bills early, only buy the best materials and are the only builders that the general manager or lumber yard owner would have bid on their own homes.

It must be remembered that the people running the lumberyard know who the true professionals are. They also know the builders who are to be avoided like the plague. It’s best to visit two different lumberyards if possible to see if you can get one builder’s name to pop up twice.

Find The Pro Video

Watch this video to see how to find a great builder or remodeler.

Know All the Costs

It’s equally important to obtain a very detailed cost breakdown of the new home. I created a spreadsheet years ago that’s available at my website. This document has 100-plus rows where you enter a crisp number for each thing that needs to be done to build a home.

For example, the spreadsheet forces you to put in a number for the foundation cost, the cost of the windows, all plumbing fixtures, the rough carpentry labor, and all the other costs to construct the home.

Tight-Fist Control of Money

You must have this information so you can control the flow of money as the project proceeds. You only should pay for items that have been installed to your satisfaction as the home is being built.

If you have a construction loan, the lender will usually only issue checks for work that’s been complete, but believe me their inspectors can be fooled or give away far too much money.

IMPORTANT TIP: Money is the only real motivator you have when building. You never have to worry if you have hired a professional.

However, having a choke hold on the flow of money allows you to sleep at night in the event your builder walks off the job or slows the project down. You’ll always have enough money to bring in another builder to complete the project.

Must Have Great Plans & Specs

A point often overlooked is it’s vital to have excellent plans and written specifications. A great set of house plans might contain twenty or more pages. Written specifications cover all the other things that don’t show up on the plans. These documents allow you to avoid confrontations or change orders that can cause delays and frustration.

Fire-The-Builder Clause

It’s equally important to have a simple paragraph in the contract that allows you to void the contract with the builder if no progress is made for a specified amount of time. There are certain weather conditions that might lead to a delay, but that should be discussed before you sign the contract with the builder.

In the final analysis, there’s more you have to do to ensure the builder does not abandon your job. The most important thing to do in my opinion is to spend the time up front asking tough questions of the lumber yard managers, the top local realtors and even talk with a few of the local residential architects who regularly work with builders.

All of these professionals know who the best builders are. Put on your Columbo trench coat and do the detective work required to locate the best builder. Rest assured I’ll be starting that process this weekend along the coast of Maine!

CLICK HERE to get FREE & FAST BIDS from local builders who can help your dreams come true.

Column 1218

Helly Hansen Rain Jacket

Helly Hansen Rain Jacket

Here I am staying nice and dry in my vivid blue Helly Hansen rain jacket. It really helps make my blue eyes pop! Copyright 2017 Tim Carter

I've been testing a Helly Hansen rain jacket for months. If you want to split hairs, it's official name is the Helly Hansen Chelsea Shell Jacket. But few use all those words when doing an online search to find this gem.

It's my policy to put products through real and extended testing so I can share with you a valid review.

Helly Hansen Rain Jacket Performance

This rain jacket is the absolute best one I've ever worn for any number of reasons.

In the first place, it kept me dry as a bone when I wore it in heavy rain. The jacket also was cut to fit very well.

Equally important the jacket looks fantastic.

Great Visibility From Reflective Stripes

This Helly Hansen rain jacket has some very sleek reflective stripes on the back, front and the bottoms of the sleeves. This comes in very handy as I like to walk down the dark rural streets near my home in central New Hampshire late on a winter day.

In late December, it's completely dark by 4:45 PM so this safety feature is very welcome.

If you want to purchase the exact men's Helly Hansen rain jacket you see here, CLICK HERE.

To view all of the different Helly Hansen rain jackets for men and women, click here.

helley hansen rain jacket sleeve

Here's the bottom of one of the sleeves. I loved the adjustable hook-and-loop adjustment, the black color that doesn't show dirt and the reflective safety stripe does a great job alerting drivers as your arms swing as you walk. Copyright 2017 Tim Carter

helly hansen rain jacket underarm vent

Here's a handy feature - an underarm vent. Unzip this vent to help keep you cool and to vent water vapor back to the atmosphere. Very clever. Copyright 2017 Tim Carter

helly hansen rain jacket rain beading

Rain doesn't stand a chance. It beads up and rolls onto the ground. Copyright 2017 Tim Carter

helly hansen rain jacket interior liner

The interior of this rain jacket is an open webbing that really allows you to breath. Behind the webbing is another layer that keeps you warm. Copyright 2017 Tim Carter

Given these points made in the above photos, this Helly Hansen rain jacket is hereby awarded the prestigious Ask the Builder 5-hammer rating.

It doesn't get any better than that - five out of five hammers!

Thanks Helly Hansen for making such a wonderful product!

Click here to read my Duluth Trading Firehose Flex pants review. They're great too!

October 10, 2017 AsktheBuilder Newsletter

AsktheBuilder Newsletter

Tomorrow is going to be a big day. My oldest daughter Meghan and her husband Brent are coming from Silicon Valley, CA for a one-week visit.

Kathy and I will join them for a five-day trip to Bar Harbor, Maine. We're pretty stoked about the adventure as you might suspect!

Yesterday, I finished a Pelican case project. I'll be doing some low-powered outdoor ham radio from Acadia National Park and don't want my gear to get damaged if I slip and fall on the granite hillsides where I'll be hiking.
pelican case ham radio
These durable cases can be ordered with or without inner protective foam. The foam can be cut with ease to the shapes you need so your gear is protected from shock if the case is dropped.

Everything I need to get on the air is in the photo sans my coax cable and a simple small 8 oz water bottle I use to get my yellow cord up and over a tree branch.

The cord is the halyard that allows me to pull up the ultra-thin black antenna wire you may see between the yellow cord and the blue Bioenno Power lithium-iron-phosphate battery.

Bar Harbor Meet Up?

If you live on Mt. Desert Island or in Bangor, Maine, do you want to do a little meet up? The best I can do is meet for an early breakfast perhaps next Monday, October 16th. If this is of interest to you, email me.

Driveway Erosion

Look at the photo below. What would you say if I told you that blacktop driveway is less than two weeks old?

driveway erosion repair

This brand new blacktop driveway is two weeks old. Driveway erosion repair is needed because the contractor used the wrong gravel at the edge. (C) Copyright 2017 Tim Carter

Do you see what the issue is? It's a very steep driveway near my home.

The water from a recent heavy rainstorm has started to UNDERCUT the new blacktop!!!! What did the contractor do wrong????

CLICK HERE to discover how to prevent this from happening at your home or in your yard.

Win Tools & More!

I met Tom Kraeutler about twenty years ago at a Sears Editors Conference in Florida. Tom is a friendly competitor of mine. He devotes much of his work week to his nationally syndicated radio show The Money Pit.

He asked me if I'd consider promoting a weekend warrior sweepstakes contest he's doing with Home Depot. The answer was an immediate "Yes".

It's a win-win-win. Tom has helped promote my Stain Solver, my recent Roofing Ripoff book and I've been a guest on his show a few times. You may win by entering the sweepstakes.

CLICK HERE to enter and if you WIN SOMETHING, please let me know!

Dedicated Page to You!

Would you like a web page dedicated to you for the rest of time? Yes, your name forever on a page! Imagine the bragging rights!!!!!

Here's how simple it is. Go to my new Stain Solver website and use the Search box on any page.

Type in one or two keywords about a stain or an object you're trying to clean.

If a page doesn't exist with the answer you need, I'll create the page and dedicate it to you!

Here's an example. Keri Weikel wanted to know how to clean her Chefman slow cooker. Look at her dedication at the bottom of this page.

Good luck!

Amazon Shopping Reminder

If you're new to the newsletter and you like what you see, you can reciprocate.

Anytime you SHOP at Amazon.com, please consider using my affiliate link to get to Amazon.

Amazon pays me a tiny fraction of their profit if you use my link. It costs you no more to do this.

This revenue HELPS keep the newsletter going. It's that simple.

CLICK HERE NOW to start shopping. Thanks very much!

New REVISED Columns for You

Here are a few columns you should peruse.

DR String Trimmer - WOW Can It CUT!

Interior French Doors - Gorgeous and Classy

Bosch Bulldog Hammer Drill Review - One Tough Hombre!

Compound Miter Saw - The Wonder Tool of All Time

Tim's Gutter Guards - What's on MY HOME

It's that time of year. You may GROAN about cleaning gutters. It's dangerous work.

I know of several people who've been seriously injured while cleaning their gutters.

Years ago, I almost fell off my own roof three times on slippery algae-covered shingles while scooping handfuls of leaves and MUCK out of my gutters.

Those days are GONE forever!!!

CLICK HERE to see photos of my own gutter guards.

You'll discover the BEST ONES on the market.

That's enough for today.

BTW, if you have questions or comments ALWAYS respond to this email.

What do you want to see in an upcoming issue?

What topic needs to be covered?

If you could wave a magic wand, what would you like to see at AsktheBuilder.com?

Tim Carter
Founder - www.AsktheBuilder.com

Do It Right, Not Over!

Bosch Bulldog Hammer Drill Review

I love love love the Bosch Bulldog hammer drill. Specifically the GBH18V 26K24 hammer drill kit.

My first hammer drill is a Bosch corded drill. It's important to realize my old drill is thirty-five years old.

For this reason, I'm able to weigh in on modern technology.

Related Links

My Professional Experience

Drilling Into Stucco

Here's the Bosch Bulldog doing what it does best. Drilling into solid granite like a sharp wood bit burrows into balsa wood. CLICK THE PHOTO NOW to have the drill kit delivered to your home in days. Copyright 2017 Tim Carter

18-Volt Bosch Bulldog Hammer Drill Power

This cordless hammer drill is powered by batteries. The batteries have copious amounts of energy.

Bosch Bulldog Hammer Drill

The battery is shy. It's hiding behind my rain jacket. It provides plenty of power when you need it. As a matter of fact it's got 18 volts and 6.3 Ah of power. Copyright 2017 Tim Carter

Hammer Drill Features

The photographs do a much better job of telling the story. With this in mind, look closely at all the great features!

The black accordion-shaped part is a vibration damper. You can see it above my right index finger. CLICK THE PHOTO NOW to have this handsome drill in your hands in days. Copyright 2017 Tim Carter

I drilled into solid granite on a rainy day. This helps dampen the dust created by the powerful drill. CLICK HERE to have this SDS-plus hammer drill in your truck in days. Copyright 2017 Tim Carter

Bosch Bulldog Hammer Drill

The tool has three settings. It will chip, drill or hammer drill. CLICK THE PHOTO NOW to BUY. Copyright 2017 Tim Carter

Hammer Drill Specifications

The specifications for the drill are here.

To summarize, I loved everything about this hammer drill. Cordless tools are here to stay.

Gone are the days of muddy extension cords. I won't mis them for a moment.

Drilling Into Concrete Video

This video demonstrates how to drill into wood and concrete using a hammer drill.

Driveway Erosion Repair – Use Large Angular Stones and Some Physics

driveway erosion repair

This brand new blacktop driveway is two weeks old. Driveway erosion repair is needed because the contractor used the wrong gravel at the edge. (C) Copyright 2017 Tim Carter

Driveway Erosion Repair

DEAR TIM: I need to make a driveway erosion repair. My new blacktop driveway is already falling apart. A heavy rain washed away the gravel on the edge of the driveway.

As a result, the gravel under the new blacktop is starting to erode. Why is this happening?

What's the best driveway erosion repair I can do so it never happens again? I’m handy and not afraid to work. Will your repair method stop soil erosion in other areas of my yard? Sally C., Hartselle, AL (This question was asked in Tim's October 10, 2017 Newsletter.)

DEAR SALLY: I’m sorry your new driveway is not holding up. The good news is you can restore it. Moreover follow my driveway erosion repair advice and you'll have a much better drive than before.

Driveway Erosion Repair & Mother Nature

Erosion is a natural process. I studied geology in college and hiked to the bottom of the Grand Canyon on my first major field trip. I witnessed the power of running water over solid rock. Water and gravity are great partners when it comes to erosion!

I also studied physics while in college. A point often overlooked by folks is the simple force equals mass multiplied by acceleration equation . This may seem complex to you, but your driveway erosion is a perfect example of this simple equation.

Related Links

Build a Great Gravel Driveway

Tar & Chip Driveways - Gorgeous & Practical

Soil and Gravel Erosion Solutions

Free & Fast Bids

CLICK HERE to get FREE & FAST BIDS from local driveway contracts who can repair erosion damage.

More Force Required to Move Large Stones

To put it another way, think about how much energy it takes to move a grain of sand. You can move a simple dry grain of sand with a puff of your breath. Use the same amount of breath but aim it at a small angular rock about the size of a grape. Your breath will not budge this small stone.

Size & Shape Of Stones Is Critical

Once you decide to start your driveway erosion repair, focus on both the size and shape of the stones you'll use along the edge of your drive. By all means increase the size of the stones.

Your contractor installed the wrong sized gravel along the edge of your driveway. For one thing the gravel must be the correct shape. Large pieces of angular stone require lots of energy or force to move them. In contrast, small pieces of round stone similar to ball bearings can be moved with a tiny amount of force.

My Own Driveway Repair Project

The gravel on the edge of my own steep driveway used to erode with each moderate rainstorm. I replaced the small 3/4-inch pieces of gravel with 3-inch sized stones. All of a sudden my problem disappeared!

At the present time my town needs to do driveway erosion repair but on its roads! The road crews install small angular stones in the road shoulder. The gravel is eroded by the force of the car and truck tires on right-hand curves. In the long run this erosion can be stopped by installing the same 3-inch sized interlocking angular pieces of rock. Much more force is needed to dislodge these.

CLICK HERE to get FREE & FAST BIDS from local driveway contracts who can repair erosion damage.

Erosion Repair Guidelines

Without delay you need to install the larger pieces of stone. Install the stone a minimum of 6 inches deep by 12 inches wide. Small angular pieces of crushed stone can be used to fill the gaps between the larger stones.

The angular stone is available at local gravel pits. This stone is used beneath new roads built near your home. The gravel pit will deliver the stone to your home. You’ll need to calculate how many cubic yards of stone you’ll need.

large stones blacktop driveway erosion

Large stones prevent blacktop erosion. These edge stones don't budge in the worst rainstorms. Copyright 2017 Tim Carter

Place Stone Below Drive Surface

By all means make sure the large stone is about 1 inch below the top surface of your driveway. Lawn mowers, snow plows and string trimmers must not be able to kick up the stones.

On the negative side you may not like the look of these larger stones. In that case think about the anguish you’ll feel as soon as a car or truck drives along the edge of your driveway and a large crack appears in the blacktop! The large stones provide support to the edge of your blacktop.


Prevent Soil Erosion In Yards

Stop soil erosion in your yard using the same method. In general, water flowing in small channels causes erosion. With this in mind make a hardscape feature in the channel. The rock will stop the erosion.

Fill the channel or rut in the yard with larger angular stone and place alongside much larger rocks as you might see in a local stream. Take photographs of a few creeks or streams near your home. The photos will guide you as long as you pay attention to the overall look of the natural stream.


Colorful Stones Add Accent

All things considered I believe you’ll love the look of the large stones next to your driveway. Install about five or ten feet of them and stand back thirty feet to look at your work. Use colorful angular stones to accent to your drive. Do your best to look at all the types of angular stone at the gravel pit and select one that you like.

CLICK HERE to get FREE & FAST BIDS from local driveway contracts who can repair erosion damage.

Column 1217

DR String Trimmer Review

dr string trimmer

This is my DR string trimmer. It's not all shiny and new like you might see in other tool reviews. The machine cut acres and acres of grass and weeds without fail. The weeds behind the string trimmer were gobbled up by the trimmer mower just minutes after this photo was shot. Copyright 2017 Tim Carter

DR String Trimmer Review TIPS

My DR string trimmer is now two years old. Surprisingly it's been put to the test several times a month as long as there's no snow on the ground here in central New Hampshire.

DR String Trimmer Power

A walk-behind string trimmer is a weed-wacker on steroids. Not only is it larger than a hand-held trimmer, but it also has significantly more power. It also cuts a 22-inch-wide swath of nasty weeds or grass.

Power is your friend when you decide you want to cut down weeds taller than you in a field or large backyard!

Another key point is the engine. The engine is a Briggs & Stratton that starts each time on the first pull. 

The engine is equipped with a smart self-adjusting choke. For this reason, you can get to work faster and you save your shoulder.

In the event you like specifications, they can be found at the DR Power website.

DR String Trimmer Video

This video gives you a great overview of my machine. You'll note the machines in the video are super clean, not at all like my beast that's been hard at work for two years!

Lightweight & Simple Design

The DR string trimmer weighs only 62 pounds. I frequently lift it up onto the tailgate of my Ford F-250 Super Duty 4x4 pickup truck. 

It's important to point out that you provide the power to push the machine around your fields and yard. With this in mind, you'll appreciate how the DR engineers created such a strong machine using such little steel.

Likewise I came to admire the simple design. The engine is connected directly to a pulley. A rubber belt weaves through two other tension pulleys before it gets out to the pulley that's connected to the spinning trimmer head. Certainly you can see how fewer moving parts means fewer things can go wrong.

dr-string-trimmer-cutting-head-logo

This is the business end of a DR string trimmer. You can see two different cutting cords. The green one has seen more service and has flayed ends. The blue twisted cord cuts better than the green one. Copyright 2017 Tim Carter

Tough Testing Conditions

Sooner or later you want to know how well the string trimmer cuts. The machine instantly impressed me.

It cut down 18-inch tall weeds like a regular lawn mower might cut 4-inch-tall dry grass. With this in mind I decided to put it to the real test.

I own 90 acres of wooded land in central New Hampshire. Eight acres of open meadow and cleared area along the driveway are here.

dr string trimmer test field

This is the bottom of the driveway to my 90 acres. The DR string trimmer has already cut lots of weeds. In the foreground, the field is free of tall weeds. Five-foot-tall weeds are to the left of my truck on the other side of the driveway. Despite the tall weeds and hilly ground, it only took me about three hours to cut the nearly one acre of cleared land in this photo. Copyright 2017 Tim Carter

Cutting Performance

The DR string trimmer can do a great job. A point often overlooked in other reviews is the mulching capability of the machine. When you have the engine throttle on high, the spinning 175 mil cutting cord pulls the weeds into the vortex under the head of the cutter. Weeds become fragments.

Walk slow to cut exceptionally tall weeds.

Cutting Tips

As you look down on top of the string trimmer, the spinning cutting cord rotates clockwise. The first thing to remember is you want to cut your weeds or grass in a counter clockwise pattern. The string trimmer instantly sends the cut weeds and grass out of the way.

Another key point is woody tree saplings. I was able to cut small oak saplings but it significantly reduces the life of the cutting cord.

With this in mind, if you just cut annual weeds with soft stalks, you'll soon discover the blue twisted 175 mil cutting cord can last for hours with little wear.

My Wishlist

On the negative side, I found the foam handle grip to be very inferior. Within a month of use, it fell apart. I feel most people would wear medium or lightweight work gloves. With this in mind an abrasive tape grip should be on the smooth steel handlebar.

Five Stars

In the final analysis, I feel the DR string trimmer is a tough lawn and field machine. The large diameter wheels and the machine's balance make it a dream to use on bumpy terrain like I have on my 90 acres.

As long as you keep the air filter clean and change the oil as recommended, this string trimmer will serve you well for many years.

Interior French Doors

Interior French Doors

These interior french doors just need trim, paint and hardware to be complete. PHOTO CREDIT: Brent Walter

Interior French Doors TIPS

"It's important to realize the first thing to get right as you begin to tackle your double interior french doors is the rough opening. This is the hole in the wall where the door fits."

DEAR TIM: I’ve decided to install some interior french doors. At the present time I’m a rookie carpenter, hence I’m intrigued by some pre-hung interior french doors I saw at a lumber yard.

What’s your opinion of these doors? What else can you share that will help me install interior french doors like you might do it?

What secret tips will make the job go faster and easier? Michael G., Burbank, CA

DEAR MICHAEL: Installing interior french doors, assuming you’re a real rookie carpenter, is going to sap you of every bit of skill and patience you have at this point in your DIY career.

Are Interior French Doors Hard To Install?

It’s hard enough hanging a single pre-hung door, much less a set of double french doors. I’ve installed many pre-hung interior french doors with great success.

Double interior french doors are hard to install because you have additional tolerances you must satisfy to make the install look professional. The gap around all the doors and in between the two doors needs to be consistent and as equal as possible. This is much harder to achieve than you might think.

Should I Buy Prehung Interior French Doors?

Yes, buy prehung doors by all means. The prehung doors have the correct clearances between the jambs and the doors. You have enough other things to worry about and you'll get a better-looking job.

Related Door Links

Interior Door Trim Tricks

Shimming a Door

How to Install a Pre-Hung Door

Free & Fast Bids

CLICK HERE to get FREE & FAST BIDS from local finish carpenters who can do this job for you.

What is the First Thing To Do?

The first step is to inspect the doors at the store. If you can see the hinge side of the doors, look to see if the reveal or gap between the doors and the jambs is pretty close all the way around the door.

You want a gap of just about one eighth inch everywhere. With this in mind, look at other doors if the jamb is bowed or the gap is wildly different. You certainly want everything in your favor before you take the door home.

How Do You Check the Rough Opening?

You check the rough opening to make sure it's wide enough and tall enough for the door. It's important to realize the first thing to get right as you begin to tackle your double interior french doors is the rough opening. This is the hole in the wall where the door fits.

I prefer to have my rough openings at least one-half inch wider than the overall unit size of the door. The unit size is the overall height and width of the frame that the doors hang from.

The same is true for the height. I like having the rough opening one-half inch higher than the the door frame’s overall height.

Interior French Door Installation Video

By all means this is a good video showing you many important steps in the install process.

How High Should the Rough Opening Be?

Remember, this height distance is measured from the top of the finished floor. It’s always better to have the door jambs sit on top of a finished floor instead of installing the door and then trying to butt up flooring to the door jamb.

Do the Interior French Door Jambs Have to be Parallel?

The interior french door jambs need to be parallel. Since the actual doors in your new french doors are undoubtedly perfectly square, this means that if the reveal or spacing in between the doors and the frame are equal, then the overall door frame is square. The two door jambs must be installed plumb, parallel and in the same plane.

IMPORTANT PRO TIP:  Not only must the vertical rough studs must be plumb in both directions, but they also must not be bowed nor crooked.

CLICK HERE to get FREE & FAST BIDS from local finish carpenters who can do this job for you.

How Do You Avoid A Twisted Rough Opening?

Not only does the rough opening need to be square and plumb, but it’s also very important the opening is not a helix. This means that the opening has to be straight and plumb in both directions. If one leg of the rough opening is not plumb then the two doors, when closed, will not be even at the bottom. Are you still wanting to do this install? It’s now just getting interesting.

What is the Helix String Test?

Use two pieces of string to check the rough opening. The rough opening is simply a square or rectangle when you stand back and look at it.

With this in mind, attach a string from one lower corner of the rough stud to the opposite upper corner. Do the same with the other two remaining corners.

These strings must be on the same side of the wall.

The string will create the letter X across the rough opening. The rough opening is twisted if there's a gap between the two strings.

Interior French Doors String Test

This is a crude drawing of a rough opening for interior french doors. The green lines are pieces of string attached to the corners of the rough opening. They must barely touch at the center of the "X". Copyright 2017 Tim Carter ALL RIGHTS RESERVED. Do NOT COPY

It's important to check the second string on both sides of the first string. A twisted or helical opening can look okay with the two strings touching in the center of the X, but the one string is actually putting pressure on the other string.

How Important is it for the Floor To Be Level?

It's important to have the floor level. You’ll also have an easy time if the floor under the door unit is level from one side of the opening to the other. If the floor is out of level, you’ll have to precisely cut down the door jamb on the high side of the floor the amount it’s out of level from jamb to jamb.

If you don’t do this, you’ll have to shim up the one jamb off the finished floor creating an ugly gap. Your margin of error here is less than one-sixteenth of an inch.

Do You Tack the Door Frame In Place?

Once you get the frame and the door jambs into the opening, tack it in place with 10-penny finish nails. Be sure to use thin shims to ensure the door jamb is plumb.

You’ll have to open and close the doors numerous times as you nail to constantly check the reveal and spacing between the doors and the door jambs.

Should I Use Hidden Screws Under Top Hinges?

Yes, you should install hidden screws under the hinges. After you’re satisfied that the door is installed and the spacing is perfect, I recommend installing a hidden screw behind the top hinge of each door. For this reason I prefer to use a 2.5-inch-long screw that’s driven through the door jamb into the rough opening framing lumber.

This screw ensures that the doors stay in position for years. After all there’s tremendous tension on the top hinge, and the screw will anchor the doors to the rough framing.

How Do You Set the Finish Nails?

You’ll also need a nail set tool to drive and set the finish nails below the surface of the door jamb. Be very careful as you hammer the nails so the head of the hammer never touches the surface of the wood. You don’t want any rookie beauty marks on the door jamb.

Nail Sets

These are standard nail sets. The yellow one has the smallest tip. These are very affordable and work well. CLICK THE PHOTO to have these nail sets delivered to your doorstep in days.

Should I Seal the Tops & Bottoms Of The Doors?

Yes, you should seal the tops and bottoms of the doors with multiple coats of paint or clear urethane finish. The french doors must not warp. For this reason, paint the top and the bottom of your wood doors with a minimum of two coats of paint or clear urethane.

This paint significantly slows the absorption of water vapor into the long vertical stiles of the doors. If too much water gets into the door, it can warp it.

Generally speaking, you'll struggle with your first attempt. Don't beat yourself up. Installing interior french doors like a pro can be done, however, you'll have to work hard this first time to get superb results.

CLICK HERE to get FREE & FAST BIDS from local finish carpenters who can do this job for you.

Column 842

Compound Miter Saw

Compound Miter Saw TIPS

DEAR TIM: A compound miter saw has bubbled to the top of my power-tool wish list. To be sure I need a compound miter saw to put up some crown molding.

Would it be better to get a sliding saw if I do go ahead? I'm a serious DIYr and would like a great saw. Furthermore I've read quite a few tool reviews for these saws and I'm confused. Andy D., Nashville, TN

DEAR ANDY: I am sorry to hear about your confusion after reading the tool reviews. That's unfortunate as a compound miter saw is a significant investment, and you do not want to make a mistake when you are buying a specialized tool.

Compound Miter Saw & Crown Molding

A compound miter saw is a specialized saw. It allows the saw blade to pivot in two different directions at the same time. This feature allows the saw to make a compound cut you'd find on the ends of crown molding. Hip and valley roof rafters have compound cuts.

tim compound miter saw

Compound cuts are very rare in typical residential construction. To put it differently the vast majority of angled cuts in a home are simple 90 or 45-degree cuts.

Baseboards and window and door trim casing miter cuts are made with the saw blade cutting down through the material at a 90-degree angle. Consequently the saw needs to swing to the left or right 45 degrees to make most miter cuts. With this in mind the saw you want to purchase will make these cuts with ease.

Free & Fast Bids

CLICK HERE to get FREE & FAST BIDS from local carpenters who will demonstrate how to use one of these fantastic saws.

Related Links

Miter Saw Stands Are Essential

Cutting Crown Molding with Ease

Roof Framing Basic Tips

Compound Cuts Without a Compound Saw

You can cut crown molding without a compound miter saw. The first thing to remember is to place the crown molding in the saw so it thinks it is already hanging up against the ceiling.

As an illustration the table of a regular miter saw and the vertical fence that rises up from the saw table are oriented at 90 degrees to one another, just like the typical wall / ceiling interface so it is easy to hold the molding at the funny angle.

If you put the crown molding upside down in the saw and hold it in the saw the same way it will be installed it your home, all you need to do is rotate the regular miter saw to the correct miter angle and make the cut. Because the crown molding is being held against the saw fence tilted down at an angle towards the table of the saw, the resulting cut is a compound cut even though you were not using a compound miter saw. Isn't that amazing?

compound-miter-saw

The compound miter saw is set at 45 degrees in both orientations for the purpose of making a compound cut. You'd use this setting to cut a cheek cut on a valley rafter for a 12:12 pitch roof. CLICK THE PHOTO NOW to have this saw at your home in days. Copyright 2017 Tim Carter

Sliding Saws Are The Best

I own a sliding compound miter saw. It is a fantastic tool and I use it frequently.

It's important to realize the 10-inch blade and the sliding function allow me to make precision cross cuts on material as wide as 12 inches.

A sliding miter saw in not much different from a small portable radial arm saw. While it can't do everything a radial arm saw can do, but it sure comes in handy most of the time.

compound miter saw compound angle gauge

This angle gauge allows the saw to tilt one way or the other past 90 degrees. In fact you can see you can go a few degrees past 45 degrees. CLICK THE PHOTO to have this delightful saw delivered to your home. Copyright 2017 Tim Carter

Very Versatile

A sliding compound miter saw is a wonderful tool to have around the shop or for a serious do-it-yourselfer. For one thing, you'll use it for many purposes. By all means don't buy it just to cut crown molding.

There are many finish carpenters who love their compound miter saws and use them regularly to cut crown molding. But realize that the master carpenters of yesteryear installed crown molding without this fancy tool, much less a saw powered by electricity!

CLICK HERE to get FREE & FAST BIDS from local carpenters who will demonstrate how to use one of these fantastic saws.

Good Better Best Saw

The best compound miter saw is hard to pin down. In general, tool reviews include bias. A point often overlooked is five different carpenters can have five different opinions when they test the exact same compound miter saw.

With this in mind here's a partial list of things to consider when deciding on a saw:

  • weight of the saw
  • size and horsepower of the electric motor
  • range of cutting angles
  • type and shape of the handle
  • diameter of the blade

Cut Past 45 Degrees

My miter saws can swing and cut past 45 degrees. For this reason all of the miter saws I own can make cuts up to 50 degrees.

For instance this characteristic comes in very handy when installing crown molding on outside corners. Frequently the needed angle to make perfect cuts is 47 or 46 degrees.

compound miter saw 60 degree miter gauge

This is the table miter gauge on my compound miter saw. Note how the table can rotate to 60 degrees! This is a very useful feature. CLICK THE PHOTO to have one delivered to your home. Copyright 2017 Tim Carter

Miter Saw Stand Essential

A miter saw stand is the number one accessory you should buy. My stand is lightweight and furthermore it keeps the saw safe and stable.

miter saw stand

The four-legged saw stand is made primarily from aluminum. It folds up for easy storage and transport. You can place the saw anywhere you want along the horizontal aluminum beam. CLICK THE PHOTO to have this stand delivered to your home. Copyright 2017 Tim Carter

Miter Saw Stand Video

Watch this video of my miter stand. The saw stand will make your mouth water.

Price Is A Good Measure of Quality

Price is often a very accurate measuring device when you are comparing the quality of compound miter saws. This is a very competitive marketplace, and there are enough manufacturers that they have to create crisp features that set them apart.

If you're a manufacturer that wants to deliver exceptional quality, then you will probably include high-quality parts that cost more. These costs result in higher retail costs to the consumer.

In conclusion, I try to purchase high-quality power tools to avoid heartbreak. I want to know it will be durable, and that it will produce accurate work. All things considered those things are very important to me.

CLICK HERE to get FREE & FAST BIDS from local carpenters who will demonstrate how to use one of these fantastic saws.

Column 712