Garage Roof Repair Price

Garage Roof Repair - Can Be Simple

I took a much-needed break and traveled to Down East Maine a few weeks ago never dreaming I'd be thinking about a garage roof repair price! 

My wife, oldest daughter, my son-in-law and I saw brilliant fall color in the trees at Mount Desert Island. A neglected detached garage stared at me as I parked on the gravel drive in front of it.

garage roof repair

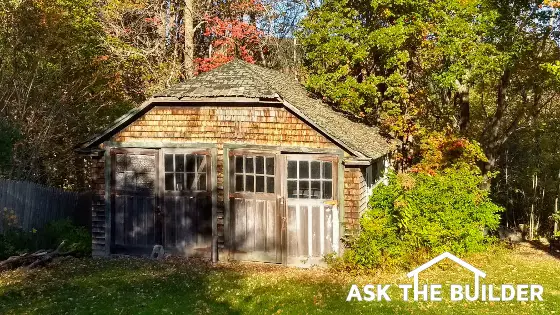
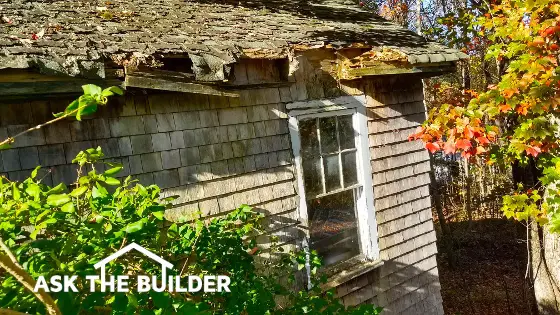
The garage roof looks really bad, but a good carpenter can restore it in a few days. (C) Copyright 2017 Tim Carter

It’s important to realize the roof of this garage was in horrible shape. I estimate the shingles were at least sixty or more years old. The colored ceramic granules on most of the shingles were gone.

Related Links:

Best Roofing Nails

Copper Roof Strips EXTEND Life of Asphalt Shingles

Free & Fast Garage Roof Bids

CLICK HERE to get FREE & FAST BIDS from local roofers who can put on a new garage roof.

In addition I could see wood rot on the right side and front edge of the roof. The wood shakes covering the exterior walls needed some tender loving care as well.

garage roof repair

This overhang is in the worst shape. It can be rebuilt in a few hours. (C) Copyright 2017 Tim Carter

Valuable Garage Space

The second home I purchased back in 1976 had a nearly identical detached garage. Garages are valuable. To put it differently, there are quite a few uses for detached garages other than getting cars and trucks out of the weather.

In spite of the wretched exterior condition, the bones of the garage were still in great shape when I peered in through the windows. The roof was not sagging. The walls were not bowed out. The hinged garage doors didn’t fit quite right, but that’s a small job all things considered.

I walked outside walking around the garage within 30 minutes of arriving. All of a sudden I started to, imagine what the garage roof repair price might be. I approached this problem like I had done with hundreds of my past remodeling and building jobs for paying customers.

Garage Roof Repair Checklist

Here’s the simple list of what needs to be done to stop the decay of this gorgeous garage:

  • Remove existing shingles exposing wood roof sheathing
  • Remove rotted roof sheathing
  • Install new roof rafter tails or complete rafters where necessary
  • Replace rotted roof sheathing where necessary
  • Bolster interior collar ties if needed
  • Install new roof eave and fascia boards
  • Install metal drip edge at all fascia boards
  • New asphalt shingles with thin 12-inch copper ridge cap to extend the life of the asphalt

I quickly wrote on a piece of paper a fast material list and came up with about $1,200.00 worth of materials. The new shingles were the largest single cost item on the list.

CLICK HERE to get FREE & FAST BIDS from local roofers who can put on a new garage roof.

A point often overlooked is the time it takes to clear around the garage so you can work efficiently and safely. Out-of-control bushes on the right side of this garage needed to be trimmed back in my opinion.

Labor Costs Are Variable

Labor costs for garage roof repair are a moving target. It depends on the type of company or tradesperson you hire. I prefer to just go step by step and try to estimate the time for each of the tasks that need to be done.

I estimated it would take a seasoned carpenter and his trained helper about five total days to complete the entire job. This garage roof repair is much more labor intensive than it it material intensive. If the total cost per hour for these two workers is $120 per hour, then the labor cost is going to kiss up against $5,000.00.

Certain Jobs More Labor Intensive

Some jobs are the exact opposite. Take for example replacing a front door on a home. An expert carpenter can install a door almost always in one day. The door being installed may cost five times or more what the labor charge might be.

Get Lowest Price Using Specifications

Produce a simple set of specifications to get the best prices. Give these specifications to the carpenters and roofers who will be looking at your garage roof.

You must tell the bidders what you want. Here’s a simple list of things you need to list on your specifications:

  • brand, type and color of shingles
  • number of roof rafters or rafter tails that must be replaced if known
  • type of fascia or eave board that will be used
  • brand and type of any paint used to paint any and all repaired / replaced surfaces

When you go to this effort, it’s going to be far easier to compare the quotes as the material costs should be very similar if the bidding contractors sharpened their pencils!

CLICK HERE to get FREE & FAST BIDS from local roofers who can put on a new garage roof.

Column 1221

Colorize Mexican Tile


Colorize and Stain Mexican Tile - Use a Masonry Stain

It's so very easy to colorize Mexican tile. You can also stain patio pavers or Mexican tile using a liquid translucent stain.

Stain Patio Pavers Advice From Heaven

The advice you get from some experts is not always the best. Many people seem to think that painters tape should be used. Painters tape can stop some paint and stain from going astray.

Sanded Grout Is Too Coarse

The best way to stain patio pavers is to use a high-quality tapered paintbrush. The grout lines between pavers will thank you.

Dab out some of the stain away from the grout line. The next step is to flex the brush. You only want a few of the edge bristles near the grout.

Adjusting how much flex and how hard you press down on the brush controls the amount of stain that flows out of the brush.

Related Links

DIY Concrete Stain  Options

Concrete Stain Tips

Excellent Stain Patio Pavers Brush

Here's the great brush I used in the above video:

Purdy Paint Brush

This is the exact high-quality paintbrush I used in the video. Be sure to clean it out frequently and it will last for years. CLICK THE BRUSH NOW to have one delivered to your home.

Pepe Corona Daltile Los Angeles CA

Yesterday my good friend Steve Loyola and I got some expert advice from Pepe Corona.

Pepe works the counter at the Daltile showroom and supply house in north Los Angeles just off the 2 Glendale freeway.

I was out in LA taping home improvement videos at Steve's house. One video showed how to repair a broken and cracked Mexican patio tile.

We needed to perfectly match the existing grout between the tiles.

The common premixed colored grout you get at the big box stores was not a match. We needed a custom color.

Expert Advice

Pepe is on the left and I'm wearing my Climb to the Clouds long-sleeved t-shirt. Thanks Pepe for the great advice! Copyright 2017 Tim Carter

Laticrete Permacolor® to the Rescue

The day before we discovered that Daltile was only eight miles from Steve's house. We called and discovered they stocked the Laticrete Permacolor® Sanded Grout system.

The Laticrete Permacolor® grout is something I dreamed about forty years ago. It allows you to create any colored grout you want.

laticrete permacolor

In just a matter of minutes, I used the two different dry powered pigments to create a perfect match. You can see the first attempt to the right of the wide putty knife. It's too gray. But the blend sitting on the edge of the putty knife is a perfect match. You always match the colors with the grout dry, not wet. Copyright 2017 Tim Carter

You mix small amounts of colored dry pigment powder with pure white sanded grout base to achieve the exact color you need.

Related Links

Grouting Floor Tile Videos

Patio Grout Repair Tips

The Daltile Oasis of Knowledge

Within minutes of walking up to the counter, I struck up a conversation with Pepe. I asked his associate moments before if they sold a grout release agent.

She asked Pepe to jump into the conversation.

It only took seconds for me to recognize Pepe was no ordinary sales counter clerk.

expert advice

This is just part of the Daltile showroom where Pepe works. Copyright 2017 Tim Carter

Steve and I had wandered into a lush oasis of knowledge and Pepe was there ready and waiting to dispense expert advice. He harvested this sweet nectar by working for 30-years in the homes of paying customers. In other words, Pepe is a true professional and you can trust his expert advice.

Forty Years of Expert Advice

I've dealt with counter sales people for over four decades. Some are as dim as a night-light bulb while others are as brilliant as a new LED flashlight.

Pepe is the latter. He's one of the rare craftsmen who has walked the walk for decades working at the homes of paying customers. He knows what works and knows what happens if you take a shortcut or use low-quality materials.

Setting tile and grouting is hard work. Pepe probably decided it's best for his body and mind to let younger men and women take his place in the field while he transitions to a different way to make a living surrounded by the materials and people he's worked with for years.

Many a craftsman does this and you'll do yourself a huge favor by taking the time to find them at off-the-beaten-path places like this Daltile showroom hidden in out-of-the-way places.

Thank Pepe for making my day and Daltile I hope you treat Pepe well so he doesn't end up working at American Olean, Marazzi, Interceramic, or Florida Tile!


How to Remove Paint from Patio Pavers Video

How to Remove Paint from Patio Pavers

Remove patio paint fast and easy with a pressure washer. Even soft Mexican tile can be restored safely.

Remove Patio Paint With No Damage

It's important to realize the key to prevent damage to the patio surface is using the correct tip on the wand and holding the wand at a very low angle.

Pressure washer tips normally come in these sizes:

  • 0 degrees
  • 15 degrees
  • 25 degrees
  • 40 degrees
  • wide angle rinse

The 0-degree tip delivers a laser-type stream of water about the diameter of a piece of cooked spaghetti. It's very destructive and should never be used on wood, masonry or any other softer surface. It's best used on steel.

You should start with a 25-degree tip and see if you get acceptable results. Switch to the 15-degree tip if the paint is holding on tight to the patio.

remove patio paint

This is a 15-degree pressure washer wand tip. You can twist the tip to adjust the direction of the fan spray. Copyright 2017 Tim Carter

Related Links

How to Use a Pressure Washer

Paint Remover Stories

Free & Fast Bids

CLICK HERE to get FREE & FAST BIDS from local deck and patio-cleaning contractors.

Low Angle Digs Under Paint Film

Holding the pressure washer wand at a low angle is the best way to prevent damage. This angle allows the high-pressure water stream to get a purchase under the edge of the paint and peel it from the patio.

A point often overlooked is a high angle will erode the paint, but it can likely immediately damage the surface under the paint.

As long as the water stream is just glancing off the patio at a low angle, it usually will only attack the paint.

Pressure Washer Basic Safety

Pressure washers are very dangerous machines. The stream of water coming from the tip can cut into skin and it can cause permanent eye damage (blindness) if you get the stream in your eyes. NEVER allow dogs or other pets near the water stream while you're working.

Wear ear protection as the motor noise will cause occupational hearing loss.

CLICK HERE to get FREE & FAST BIDS from local deck and patio-cleaning contractors.

Metal Wine Storage Shelves

Metal Wine Storage Shelves

DEAR TIM: I just put a deposit on unique metal wine storage shelves at an architectural salvage business. This metal monstrosity used to hold auto parts. It just so happens it would be perfect to hold my wine bottles on top of an open bar area in my new home.

Without wine in it, it weighs well over 200 pounds. How do I make sure this will not come crashing down in the middle of the night causing untold damage and the loss of some fairly expensive wine?

Do I have options with respect to hanging it on the wall? How would you do this if you were building my home? How would you suggest painting it? Dot B., Carmel, IN

Hunt Architectural Salvage Stores

DEAR DOT: You’re so lucky to have an architectural salvage business near you. I had a similar business near me when I lived in Cincinnati, Ohio. My wife and I purchased a gorgeous solid walnut fireplace surround and mantle we used in our new home. I get great pleasure from seeing old items recycled so they get a second or third life rather than end up in a landfill.

Without seeing your new metal wine storage shelves, I’m guessing you have several options to secure it to the wall. My favorite method is to use a french cleat.

Free & Fast Bids

CLICK HERE to get FREE & FAST BIDS from local finish carpenters who can hang your wine racks.

Related Links

Wine Racks of All Types

Remove Red Wine Stains with Stain Solver

French Cleats are Strong

A french cleat will have to be fabricated by a local welder. Two pieces of metal make up a french cleat. One piece is a strip that’s nearly as wide as your new shelves. It get welded to the top rear edge of the shelves.

wine storage

This wonderful metal storage rack used to hold auto parts. This ingenious method of reusing an auto parts shelving unit was done by Ms. Nancy McKechnie. Not only does she have a flair for decorating, but she also happens to be one of the best real estate agents on Mt. Desert Island in Down East Maine. Click here if you want me to put you in touch with Nancy. (C) Copyright 2017 Tim Carter

It’s important to realize the second piece of metal is bolted to the wall and it has a slight outward bend towards the top of the strip. It only needs to slant out about 1/4 inch. The metal strip on the back of the shelves slides down behind the slanted piece of metal on the wall. The two interlock and it’s impossible for the shelves to slide down from the wall or tip out so long as the metal strip on the wall is securely bolted to the wall studs.

French Cleat Video

In my opinion the best way to bolt this metal strip to the wall is to use through bolts. The easy way out is to use lag bolts that are just giant screws.

The issue with lag bolts is they can lose considerable holding power if the pilot hole is too large and/or if the bolt is overtightened by an aggressive installer.

wine storage

Closeup of the metal wine storage racks. This ingenious method of reusing an auto parts shelving unit was done by Ms. Nancy McKechnie. Not only does she have a flair for decorating, but she also happens to be one of the best real estate agents on Mt. Desert Island in Down East Maine. Click here if you want me to put you in touch with Nancy. (C) Copyright 2017 Tim Carter

Through Bolts Work Well

Through bolts are more work but they hold so much better. These bolts have nuts and washers on the end of the bolt that passes into the finished wall behind the metal wine storage shelves. In the event you were to use this method, the bolts would typically pass through solid blocking that’s been securely installed between the wall studs.

The only issue is you have to have access to the back of the wall to tighten the nuts onto the bolts. This requires lots of planning as the drywall on the other side of the room can’t be finished until the wine rack is installed.

Use Metal Rack Frame

If you can’t to a french cleat, then you might be able to bolt the shelves to the wall through strong metal that’s part of the outer frame of the shelving unit. It’s hard for me to give you expert advice here because I can’t see your shelves.

You’ll have to decide what type of bolt you’re going to use with this method. Lag bolts can work, they just have to be installed with great care and you need to make sure the bolt is passing directly through the center of a wall stud.

CLICK HERE to get FREE & FAST BIDS from local finish carpenters who can hang your wine racks.

Metal Wine Storage on Mt. Desert Island

Recently, I visited a new home where the wife did exactly what you plan to do. The salvaged metal shelving she purchased was a brilliant fire-engine red. She wanted it black.

Her husband got out a few cans of gloss black spray paint and did the front and sides and all he could easily cover. The inside vertical divider walls of the shelves still had some places where you could see some red.

The wife loved this two-tone look and I have to agree it was tastefully done. I mention this only because you may want to experiment with different colors.

Clean Off Oil & Grease Before Painting

Be sure you clean your metal shelving well before painting. I suggest you use mineral spirits to remove any and all oil that could be coating the metal. Be sure to do this outdoors as you never want to work with combustible liquids indoors for any reason.

Don’t throw away any oil-soaked rags or paper towels. I suggest you burn them safely as they can spontaneously combust if you just throw them in the trash.

Pay close attention to all the instructions on the paint can label to get the best results. Multiple thin coats of paint are usually better than a thick coat where you’re trying to save time.

CLICK HERE to get FREE & FAST BIDS from local finish carpenters who can hang your wine racks.

Column 1222

Behr Deck Over Problems

behr deck over

That's my left foot you see in the lower-left corner. See how this thick coating over the wood deck is peeling? What a mess! Once this happens, what do you do? Rip off all the wood? Do you think you can sand this mess? No way. (C) Copyright 2017 Tim Carter

Behr Deck Over Problems

Behr Deck Over is a thick coating you apply to worn-out decks. Dan from CT emailed me back in October 2016 about this very issue.

The coating was designed by the Behr chemists to both fill and bridge over large cracks you see in neglected wood decks.

It's important to realize that all coatings eventually peel. When this thick coating peels off your deck, it's going to be a nightmare.

Related Links:

Pressure Washers and Wood Deck Video

Deck Sealer Test Results

Free & Fast Bids

CLICK HERE to get FREE & FAST BIDS from local deck cleaning and sealing contractors.

Behr Deck Over and Applesauce

I attended the first-ever Behr Editors Conference a few years ago and had the opportunity to apply some of this product to worn-out treated lumber.

Not only was the product as thick as applesauce, but it also took some effort to apply it.

Wood Decks and Water

Wood is hygroscopic. This means that wood expands and shrinks depending on how wet it is. 

Metal is not hygroscopic nor is fiberglass or fiber cement siding. That's why paint has no problem sticking to your car, your boat or the Hardiplank cement siding on your home.

Treated deck lumber gets wet and dries out each time it rains. This back and forth movement of the wood will cause the Behr Deck Over to peel at some point just as you see in the photo above.

CLICK HERE to get FREE & FAST BIDS from local deck cleaning and sealing contractors.

Perfect Preparation Required

Oxygen Bleach

Stain Solver is MADE in the USA with USA ingredients that are food-grade quality. CLICK THE IMAGE to order some NOW.

You must do an excellent job of preparing the treated wood before you apply the Behr Deck Over if you want it to last a long time.

The best cleaner to use is certified organic Stain Solver oxygen bleach. Stain Solver is a simple powder you mix with water and apply to the dry treated lumber.

Best Way to Clean a Deck Video

Watch this short video to see the best way to clean a neglected deck.

Follow Behr Deck Over Instructions

Another key point is to make sure you read and follow all the instructions of the label of the cans. 

In the long run, it's the best way to ensure you get the longest life out of the product should you decide to use it.

CLICK HERE to get FREE & FAST BIDS from local deck cleaning and sealing contractors.


Tough Tested Solar Battery Review

Power Bank Solar Charger

June 2022 Update: Currently, it appears that the Tough Tested BRAND products are currently unavailable.

But CLICK HERE to get other Power Bank Solar Chargers just like it.

I checked out the Tough Tested Solar Battery recently. 

The moment I unpacked it I had a feeling it was going to become a sweetheart tool.

Within moments, I put it in direct sunlight to see how the 280 mA trickle charger worked.

Real Charging Done With USB Input

The first thing to remember is this battery gets charged using a standard USB cable that you'd use to charge your cellphone or any other small electronic device. The solar panel is just a trickle charger meant to top off the battery once you're away from an input power source.

tough tested solar battery

Here's the storage battery minutes after unpacking it. It comes with a handy carabiner so you can attach it to the outside of a backpack. This allows it to charge up as you hike. CLICK THE PHOTO to have one delivered to your home in days. Copyright 2017 Tim Carter

Related Links

Other Interesting Tool Reviews

Low Voltage Lighting Problems

Tough Tested Solar Battery is Durable

It's important to realize loved the durable waterproof rubber case. This will protect the battery if you take it on a rough and tumble outdoor adventure.

tough tested solar battery

The solar battery fits in my hand with no problems. It weighs more than you'd expect, but that because of the trillions of electrons inside waiting to flow into your cell phone or laptop! CLICK THE PHOTO NOW to have this battery delivered to your door. Copyright 2017 Tim Carter

Charge Two Things at Once

Another key point is the ability to charge two things at once. The battery has two standard USB output ports both equipped with Instasense technology. The charger is smart and knows how much power to deliver to each device you're charging.

tough tested solar battery

You can see the two charging ports labeled on the back. The input port is a standard micro-USB port. The four star-shaped things are the ultra-bright flashlight and emergency-beacon LEDS. Copyright 2017 Tim Carter

Tough Tested Solar Battery Lights

The front of the charger has blue LED lights that act as a fuel gauge. When all four are lit, the charger is full or nearly full. The charger can store 16,000 mA of power. This is enough to charge your standard cell phone at least five or six times.

tough test solar battery

The angled blue LED lights on the front are the fuel gauge. When all four are lit, you've got lots of power inside the battery. You can see the flashlight working behind it. CLICK THE PHOTO NOW to buy this amazing storage battery. Copyright 2017 Tim Carter

tough tested solar battery

The LED flashlight is blindingly bright. It's got two settings, plus a flashing emergency beacon. Are you sitting down? If you HOLD IN the power button for a few seconds, the flashlight sends Morse code SOS. I'm an amateur radio operator and this is a life-saving feature if your lost at night! Copyright 2017 Tim Carter

Final Recommendation

I really like the Tough Tested Solar Battery. It's not a bad size and the fact you can charge two things at once makes it a must-have for me.

In the final analysis, if you're outdoors away from normal charging electricity, you're going to LOVE this battery pack. CLICK HERE to have the solar battery pack delivered to your door.

November 2, 2017 AsktheBuilder Newsletter

It's been almost a month since I've reached out to you.

I can't begin to tell you how much has happened. So much I don't know where to start.

Three weeks ago, I went to Mt. Desert Island (MDI) in Down East Maine for six days. It was food for the soul.

Here are two of my best photos from the trip.

deep blue sea
long pond sunset
These look so much better full screen.

The top shot is why you hear writers call the ocean the "deep blue sea". The water was so blue it hurt your eyes to look at it.

The second photo was taken at the south end of Long Pond as the sun was setting.

If you've not been to Acadia National Park on MDI, put it on your list of things to do.

One of the best-kept secrets about MDI are the Rockefeller Carriage Roads. CLICK HERE to get a stunning book about them. I'm about 1/3 the way through mine.

Nutone Knocking

I just had the pleasure to install a technology gadget you may want for sure at your home.

The Nutone Knock.

nutone knock


CLICK HERE to read all about this wonderful thing you should have on your home.

Cordless Blower

I mentioned weeks ago, I'd let you know about a cordless leaf blower I've been testing.

It's the STIHL BGA 56.
cordless leaf blower
This is a fooler tool.

When you first pick it up, your mind screams it's a toy. It's that lightweight.

It's not. It works and works well.

It's become my go-to blower because it comes on within one second instead of me trying to start my gas-powered blower and then putting it on my back.

I love this blower for all sorts of small jobs like:

  • blowing out dust and leaves from my garage
  • blowing anything from my deck or drive
  • bonfire-assist tool - gets fire going faster

But it has its limitations. I'm only able to get about 15 minutes at most from a battery charge.

It's not the tool I'd use to blow leaves in my large yard, but for many, many other jobs, it's superb.

CLICK HERE do discover more about STIHL cordless blowers.

Thread Black Iron Pipe

Did you know I've been a master plumber since my late 20s? One thing I've ALWAYS loved doing was installing black iron gas lines.

Here's a video I just shot showing the magic involved in cutting threads.

I think you're going to like this video. I'll bet you there's some step you never knew about. Especially using that thing that looks like a medieval torture device! OUCH!!!!!

​​​​​​​Wait until you see it.....

CLICK HERE or the image below to watch it now.
black iron pipe threader
That's enough for today.

Next issue I'm going to start sharing some great Christmas gift ideas for you.

Yeah, Santa is coming!

CLICK HERE for one of my favorite scenes from Elf.

If that video clip doesn't bring a smile to your face and flood you with great memories as a kid visiting Santa at the department store, I don't know what to say.

Tim Carter
Founder - www.AsktheBuilder.com

Do It Right, Not Over!

Nutone Knock Review

nutone knock

Here's my Nutone Knock ready and waiting for you to push that green highlighted button. Once you do that, the magic starts! Copyright 2017 Tim Carter

IMPORTANT NOTE FROM AUTHOR:

December 21, 2017 (see December 20, 2017 Newsletter)

The following review was originally published on November 2, 2017. Within two weeks of publishing it, my Knock stopped working. The interior doorbell was the first thing to malfunction.

A week later, the app failed to work if someone pushed the Knock button you see above.

I reached out to the public relations firm representing Nutone. They put me in touch with the product manager. After repeated back and forth email exchanges, over a period of two weeks, Nutone failed to come up with a fix.

I ripped the Knock off the wall on December 19th and it's now in the garbage can in my garage. Within an hour, I installed the Ring Video Doorbell. CLICK HERE to read the Ring® review.

My recommendation now is do NOT purchase the Nutone Knock.

Back to the original review.

I installed the Nutone Knock wireless doorbell a few days ago.

So far so good, but it was a stroke of luck that it actually brought it to life on my new Moto G5 Plus smartphone!

I want to preface this entire review letting you know I LOVE the Knock, even though I was knocking my hand on my head trying to get it to work.

I think you're going to enjoy this story.

Nutone Knock WiFi Enabled Security

The Nutone Knock is a sleek doorbell that has a camera, microphone and infrared light. It also has a speaker built into it allowing you to have a conversation with anyone at your door no matter where you are.

It works just like making a Skype phone call over the Internet.

Related Links:

Doorbell Extenders - Hear Your Doorbell Everywhere

Doorbell Stories and Alternatives

Installation Challenges

I'm an amateur radio operator and have built small radios using tiny electronic parts. This skill came in handy as the instructions require you to install a small diode in the actual interior doorbell in your home.

My guess is most homeowners would not be comfortable doing this step. It's important to note that diodes must be installed one way as they regulate the direction of flow of electricity.

nutone knock

Here's the inside of the actual doorbell up on the wall inside my house. The yellow arrow points to the diode. How many homeowners do you think will be able to do this without messing it up? My money is on most will shy away from this step. Copyright 2017 Tim Carter

I installed the doorbell base plate outdoors with no difficulty. A point often overlooked is the importance of following the instructions.

It's extremely important that you have the above-mentioned diode installed correctly BEFORE you connect the new doorbell to the wires sticking out of the wall at your front door!

It was easy to attach the new doorbell wires to the ones sticking out from my wall with the supplied crimp connectors.

Nutone Knock

Here's what appears on your smartphone screen a second or two after someone pushes the green button on the Knock. Don't ask me how my German Shepherd got up to ring the bell. Smart Lady the dog! Copyright 2017 Tim Carter

Downloading the Knock App

Another key point is to go step-by-step following the easy-to-read instructions. I was able to download and install the free Nutone Knock app on my smartphone in less than a minute.

Just after that is when the trouble started.

I followed all the steps multiple times to get the app to work with my new Nutone Knock doorbell. 

Each time all I saw was a image of the doorbell on my screen with a nasty RED X showing the phone couldn't connect.

I'm fairly tech savvy and got frustrated. Not wanting to give up, I had my very tech savvy son give it a try.

He was unable to get it to work.

I decided to wait until the following day to reach out to the Nutone people to see what I was doing wrong.

The Monster Nor'easter

Hours later, a monster Nor'easter storm lashed central New Hampshire where I live. We lost power and Internet for 16 hours.

I have a standby generator, but the electrical circuit that powers the DC transformer connected to the doorbell is not on it.

The doorbell was dead for 16 hours.

It's (Nutone Knock) Alive!

When the power came back on, my cell phone was on the kitchen counter getting charged up. I left it there overnight.

Little did I know, but the doorbell was now working and the motion detector was sending alerts every few minutes that a leaf fell onto the front porch.

Lot of Settings

When I woke up, I was stunned to see the doorbell was working.

It was working VERY WELL!

The first thing I did was go into the settings and let the motion detector to the lowest possible sensitivity to stop the constant "bong tone" in my phone.

Suggestions to Nutone Knock Engineers

I can't prove that the doorbell needed to be powered down to make it work. But that's the only thing that happened once I had given up trying to make it work.

If that's the case, then it needs to be put in the instructions.

But there's an issue with that.

Most houses there's no indication on the circuit breaker box which circuit controls the low-voltage transformer that operates the doorbell.

Tim's Suggestions:

  • The Nutone engineers need to put an on/off power switch on the Knock
  • The pairing of the Knock needs to be as simple or even more simple than me activating my Arlo wireless security cameras
  • A video needs to be made showing how easy it is to install the diode
  • Update app to allow homeowners to prerecord messages that can play through the speaker when the homeowner is unable to respond to a ringing doorbell
  • Have a person who's fluent in the English language view every warning issued by the Nutone Knock - see below screenshot.
Nutone Grammar

Ouch! An editor needs to check all copy of all hard-coded messages. Plus, how could a brand-new Knock that's not even readily available not have the correct firmware in it? Copyright 2017 Tim Carter

Nutone Knock App Typo Heart

Final Rating of the Nutone Knock

I give the Knock four hammers out of five.

Once it's working it's a very nice tool to have.

But I struggled to get it working and I'm sure I won't be the last.


How to Thread Black Iron Pipe Video

How to Thread Black Iron Pipe Video

To thread black iron, you need to use special tools.

It's dirty work and if it's hot outdoors, you'll break a sweat for sure.

Related Links:

Sealing Black Iron Pipe Joints - The BEST Sealant

Flexible Gas Lines Instead of Stiff Black Iron

Thread Black Iron in Minutes

In this video, Tim Carter demonstrates how to cut threads on black iron pipe using a hand ratchet and cutting dies.

Black Iron Pipe SUCCESS TIPS:

  • Be sure the pipe dies match the pipe size
  • Ream out cut black iron pipe
  • Use plenty of oil while cutting threads
  • Be sure to stop cutting once end of pipe is flush with end of die
Pipe Die

Here's what a pipe cutting die looks like outside the hand ratchet. CLICK THE PHOTO NOW to have this delivered to your home in days.

This column was shared with Tim's readers in his November 2, 2017 Newsletter.